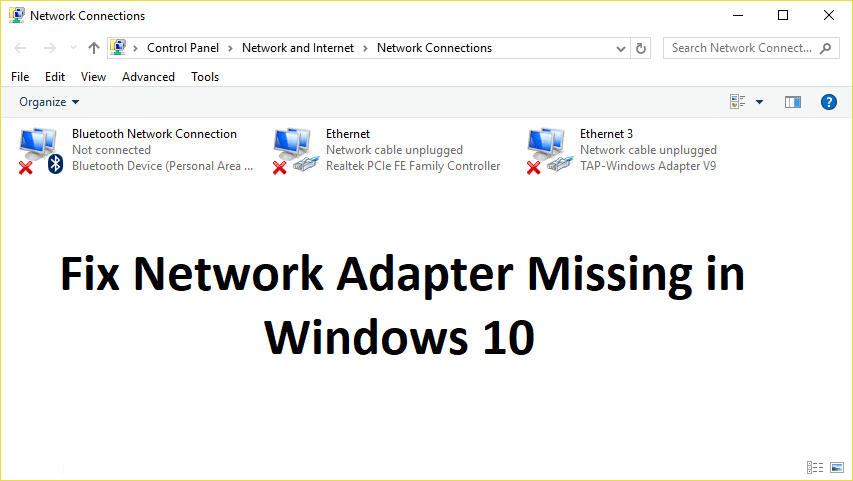
If you don’t see Wireless Adapter under Network Connections neither there is a Network adapter tab under device manager then it seems like your Network Adapter is missing or not detected on your Windows 10 which is a serious issue because you won’t be able to access the Internet until the issue is resolved. In short, when you click on the Wireless icon on the system tray there won’t be any device listed in order to connect to the Internet and if you open Device Manager then you won’t see the Network Adapter tab.
These are the reasons behind the Network Adapter missing issue:
- Network adapter missing in Device manager
- No Network Adapters showing in Device Manager
- Network Adapter Not Detected
- Network Adapter Not Found Windows 10
- No Network Adapter In Device Manager
The main cause of this issue seems to be outdated, incompatible or corrupted Network Adapter drivers. If you have recently upgraded from previous versions of Windows then it’s possible that the old drivers will not work with the new Windows and hence the issue. So without wasting any time let’s see how to actually Fix Network Adapter Missing in Windows 10 issue with the below-listed troubleshooting steps.
Note: Just make sure to uninstall any VPN software on your PC before continuing.
Fix Network Adapter Missing in Windows 10
ตรวจสอบให้แน่ใจว่าได้สร้างจุดคืนค่าในกรณีที่มีสิ่งผิดปกติเกิดขึ้น
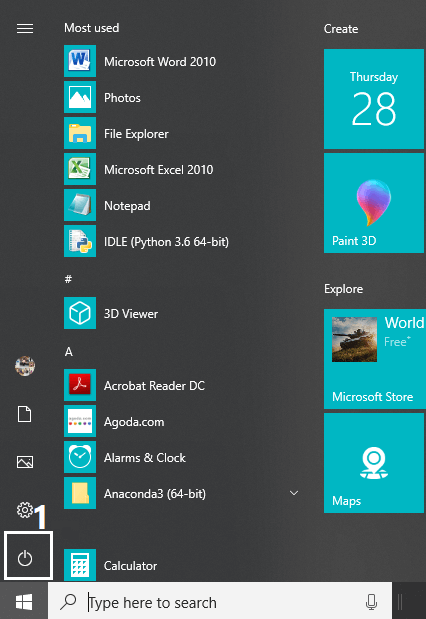
Method 1: Reboot your Computer
Most of us know about this very basic trick. Rebooting your computer can sometimes fix any software conflict by giving it a fresh start. So if you are someone who would rather put their computer on sleep, restarting your computer is a good idea.
ฮิต คลิกที่ เมนูเริ่มต้น แล้วคลิกที่ ปุ่ม Power ได้ที่มุมซ้ายล่าง
2. ถัดไป คลิกที่ เริ่มต้นใหม่ ตัวเลือกและคอมพิวเตอร์ของคุณจะรีสตาร์ทเอง
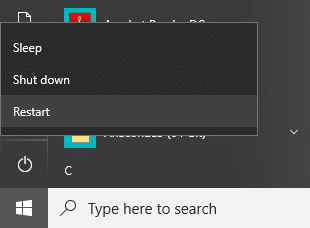
หลังจากที่คอมพิวเตอร์รีสตาร์ทแล้ว ให้ตรวจสอบว่าปัญหาของคุณได้รับการแก้ไขหรือไม่
Method 2: Flush DNS and Reset Winsock Components
1. Open elevated Command Prompt.
2. Now type the following command and press Enter after each one:
ipconfig / ปล่อย
ipconfig / flushdns
ipconfig / renew

3. Again open Command Prompt and type the following command one by one and hit enter after each one:
ipconfig /flushdns
nbtstat –r
netsh int ip reset
netsh winsock reset
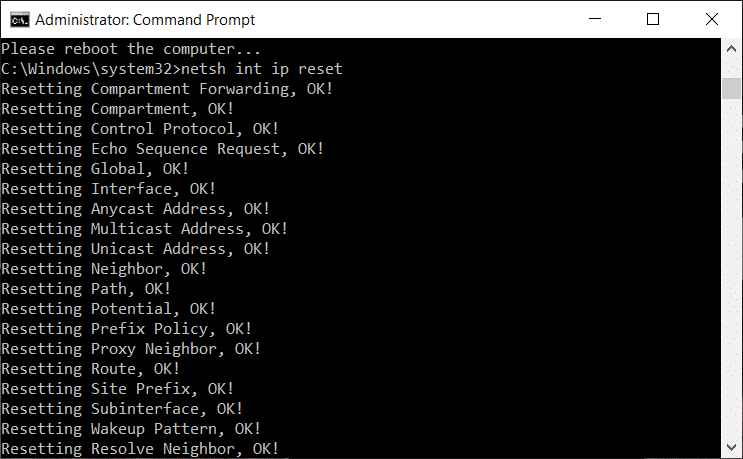
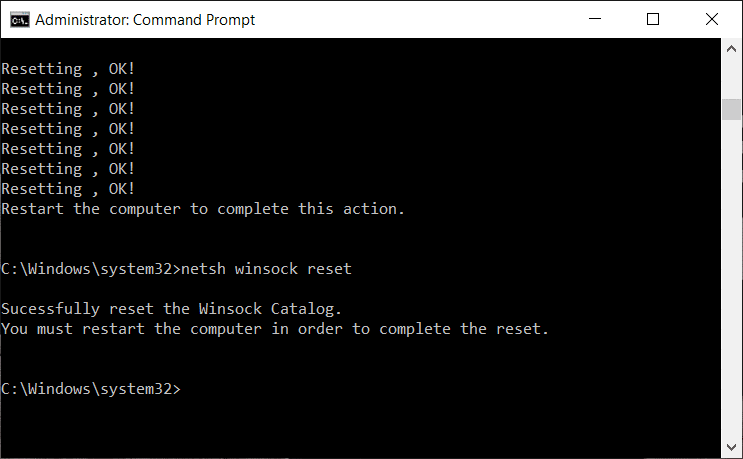
4. Reboot to apply changes. Flushing DNS seems to Fix Network Adapter Driver Issues on Windows 10.
Method 3: Run WWAN AutoConfig Service
1. กด Windows Key + R แล้วพิมพ์ services.msc และกด Enter

2 หา WWAN AutoConfig Service in the list (press W to reach to the end of the list quickly).
3. ดับเบิลคลิกที่ WWAN AutoConfig Service.
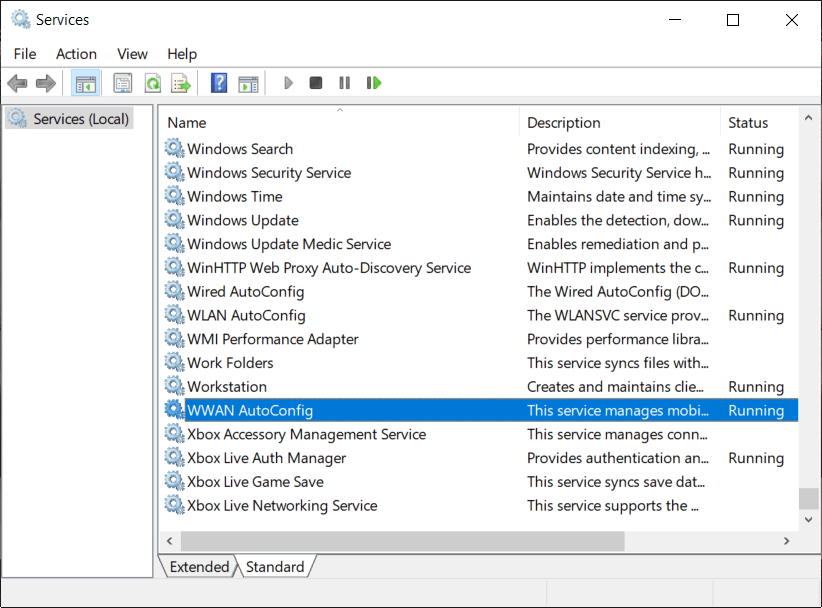
4. If the service is already running then click on Stop, then from the Startup type drop-down select อัตโนมัติ.
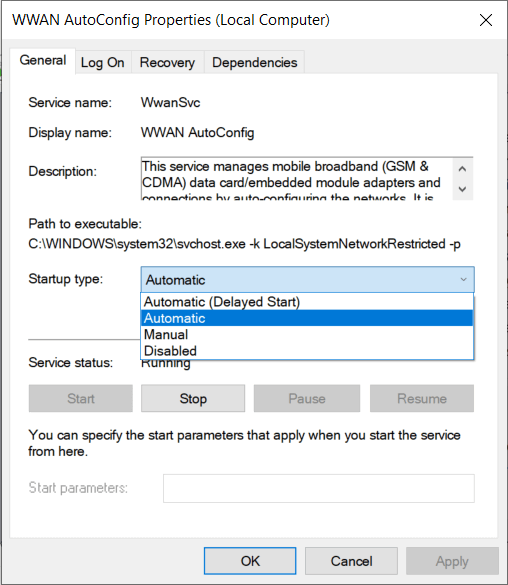
5. Click Apply followed by OK.
6. คลิกขวาที่ WWAN AutoConfig Service และเลือก เริ่มต้น
Method 4: Update Network Adapter Drivers
1. Press Windows key + R and type “devmgmt.msc” in Run dialogue box to open ตัวจัดการอุปกรณ์

2. ขยาย อะแดปเตอร์เครือข่ายจากนั้นคลิกขวาที่ .ของคุณ ตัวควบคุม Wi-Fi (เช่น Broadcom หรือ Intel) แล้วเลือก อัปเดตซอฟต์แวร์ไดรเวอร์

3. ตอนนี้เลือก “Search for automatically for updated driver software"
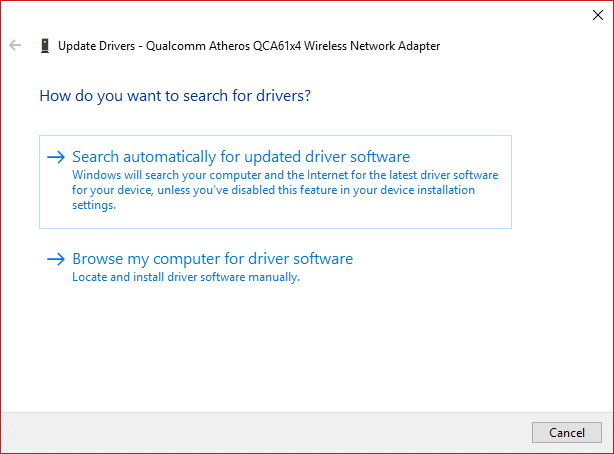
4 ตอนนี้ Windows will automatically search for the Network driver update and if new update is found, it will automatically download and install it.
5. Once finished, close everything and reboot your PC.
6. If you’re still facing the Network Adapter Missing in Windows 10 issue, then again right-click on your WiFi controller and select อัพเดตไดรเวอร์ ในตัวจัดการอุปกรณ์
7. Now, in the Update Driver Software Windows, select “เรียกดูคอมพิวเตอร์ของฉันเพื่อหาซอฟต์แวร์ไดรเวอร์"

8. ตอนนี้เลือก “ให้ฉันเลือกจากรายการไดรเวอร์ที่มีอยู่ในคอมพิวเตอร์ของฉัน"

9. ลอง update drivers from the listed versions (make sure to checkmark compatible hardware).
10. If the above didn’t work then go to เว็บไซต์ผู้ผลิต manufacturer เพื่ออัพเดทไดรเวอร์

11. Download and install the latest driver from the manufacturer’s website then restart your PC.
Method 5: Uninstall Network Adapter Drivers
1. กด Windows Key + R จากนั้นพิมพ์ “devmgmt.msc” และกด Enter เพื่อเปิด Device Manager
2. ขยาย Network Adapters และค้นหา ชื่ออะแดปเตอร์เครือข่ายของคุณ
3. ให้แน่ใจว่าคุณ จดชื่ออะแดปเตอร์ไว้ ในกรณีที่มีบางอย่างผิดพลาด
4. Right-click on your network adapter and uninstall it.

5. It will ask for confirmation เลือกใช่
6. Restart your PC and Windows will automatically install the network adapter drivers again.
7. If the drivers are not installed automatically then again open the Device Manager.
8. From the Device Manager menu, click on การกระทำ จากนั้นคลิกที่ “สแกนหาการเปลี่ยนแปลงฮาร์ดแวร์"

วิธีที่ 6: ตรวจสอบให้แน่ใจว่า Windows เป็นเวอร์ชันล่าสุด
1 กด คีย์ Windows + ฉันเปิดการตั้งค่าจากนั้นคลิกที่ อัปเดตและความปลอดภัย
![]()
2. From the left-hand side, menu click on Windows Update
3. ตอนนี้คลิกที่ “ตรวจหาการปรับปรุง” เพื่อตรวจสอบการอัปเดตที่มีอยู่

4. If any updates are pending then click on ดาวน์โหลดและติดตั้งการอัปเดต

5. Once the updates are downloaded, install them and your Windows will become up-to-date.
6. After the updates are installed reboot your PC to save changes.
วิธีที่ 7: เรียกใช้ตัวแก้ไขปัญหาอะแดปเตอร์เครือข่าย
1. กด Windows Key + I เพื่อเปิด Settings จากนั้นคลิกที่ อัปเดตและความปลอดภัย
![]()
2. From the left-hand menu select การแก้ไขปัญหา
3. Under Troubleshoot click on การเชื่อมต่ออินเทอร์เน็ต แล้วคลิก เรียกใช้ตัวแก้ไขปัญหา

4. ทำตามคำแนะนำบนหน้าจอเพิ่มเติมเพื่อเรียกใช้ตัวแก้ไขปัญหา
5. If the above didn’t fix the issue then from the Troubleshoot window, click on อะแดปเตอร์เครือข่าย จากนั้นคลิกที่ เรียกใช้ตัวแก้ไขปัญหา
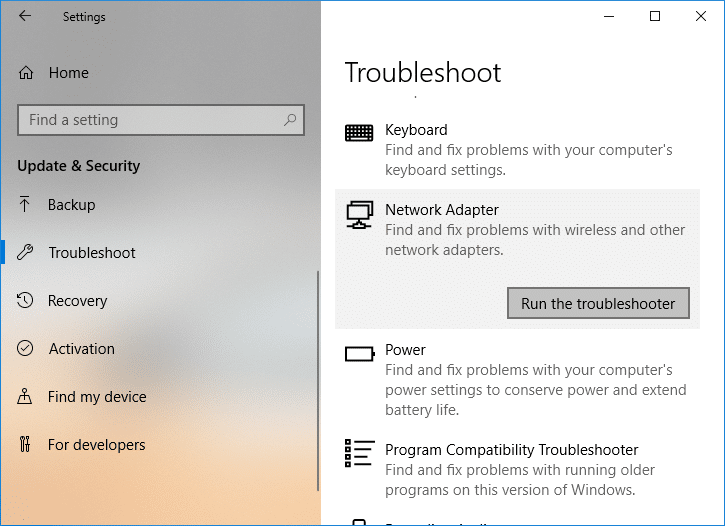
5. รีบูทพีซีของคุณเพื่อบันทึกการเปลี่ยนแปลงและดูว่าคุณสามารถทำได้หรือไม่ fix the Network Adapter Missing issue.
Method 8: Install Intel PROSet/Wireless Software
Sometimes the problem is caused due to outdated Intel PROSet Software, hence updating it seems to fix Network Adapter Missing in Windows 10 issue. ดังนั้น ไปที่นี่ and download the latest version of PROSet/Wireless Software and install it. This is a third party software which manages your WiFi connection instead of Windows and if PROset/Wireless Software is outdated is can cause drivers issue in อะแดปเตอร์เครือข่ายไร้สาย Hence, read How to Update Network Adapter Drivers on Windows 10.
วิธีที่ 9: รีเซ็ตการเชื่อมต่อเครือข่าย
1. กด Windows Key + I เพื่อเปิด Settings จากนั้นคลิกที่ เครือข่ายและอินเทอร์เน็ต

2. From the left-hand menu select สถานะ.
3. Now scroll down and click on รีเซ็ตเครือข่าย ที่ส่วนลึกสุด.

4. คลิกอีกครั้งที่ “รีเซ็ตเลย” under Network reset section.

5. This will successfully reset your network adapter and once it is complete the system will be restarted.
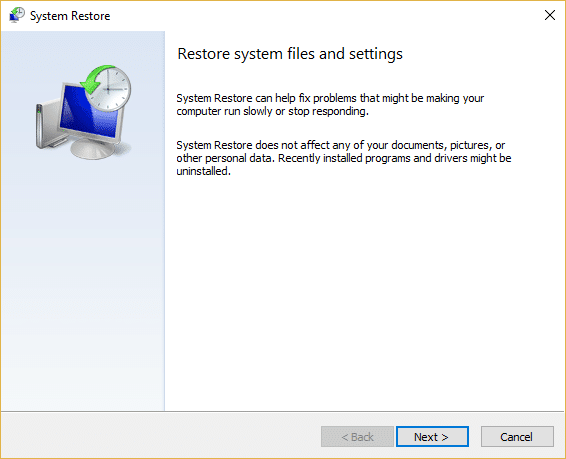
วิธีที่ 10: ดำเนินการคืนค่าระบบ
การคืนค่าระบบจะทำงานเพื่อแก้ไขข้อผิดพลาดเสมอ ดังนั้นการคืนค่าระบบจึงสามารถช่วยคุณแก้ไขข้อผิดพลาดนี้ได้อย่างแน่นอน ดังนั้นโดยไม่ต้องเสียเวลารันระบบคืนค่าเพื่อที่จะ resolve Network Adapter Missing issue.
Method 11: Using elevated Command Prompt
1. กด Windows Key + X จากนั้นเลือก Command Prompt (Admin)

2. พิมพ์คำสั่งต่อไปนี้ลงใน cmd แล้วกด Enter:
netcfg -sn
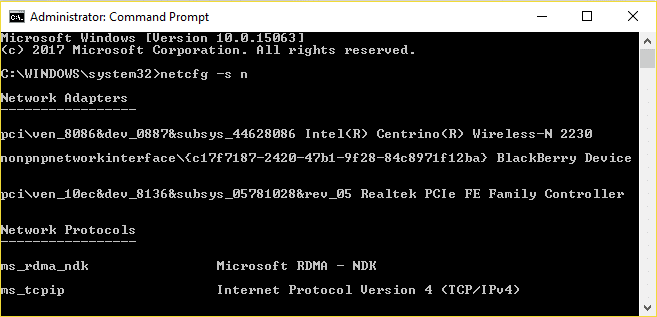
3. This will display a list of networking protocols and in that list find DNI_DNE.
4. If DNI_DNE is listed then type the following command into cmd:
reg ลบ HKCRCLSID {988248f3-a1ad-49bf-9170-676cbbc36ba3} / va / f
netcfg -v -u dni_dne
5. If you don’t see DNI_DNE listed then only run the command netcfg -v -u dni_dne.
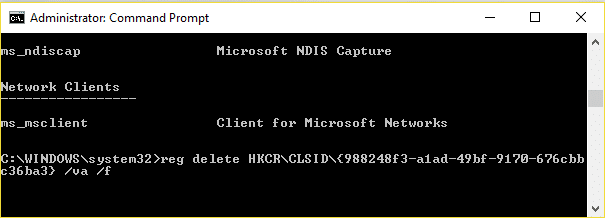
6. Now if you receive the error 0x80004002 after trying to run the above command then you need to delete the above key manually.
7. กด Windows Key + R แล้วพิมพ์ regedit และกด Enter

8. Navigate to the following Registry Key:
HKEY_CLASSES_ROOTCLSID{988248f3-a1ad-49bf-9170-676cbbc36ba3}
9. Delete this key and then again type netcfg -v -u dni_dne command in cmd.
10. รีบูทพีซีของคุณเพื่อบันทึกการเปลี่ยนแปลง
แนะนำสำหรับคุณ:
นั่นคือคุณประสบความสำเร็จ Fix Network Adapter Missing in Windows 10 แต่ถ้าคุณยังมีคำถามใดๆ เกี่ยวกับโพสต์นี้ อย่าลังเลที่จะถามพวกเขาในส่วนความคิดเห็น

