Fix Desktop Icons keep getting rearranged after Windows 10 Creators Update: After installing the latest Windows 10 Creators Update users are complaining about a new strange issue where the desktop icons keep getting rearranged automatically. Every time the user hits refresh the desktop icons arrangement is changed or messed up. In short whatever you do from saving a new file on the desktop, to rearranging icons on the desktop, to renaming files or shortcuts on the desktop affects the icon arrangement in some way or other.
![]()
In some cases, in addition to above issues, users are also complaining about the icon spacing issue as before the update the space between icons was different and after the Creators Update, the icon spacing is also messed up. Below is the official Windows announcement of a new feature being introduced in Creators Update called Desktop Icon Placement Improvements:
Windows now more intelligently rearranges and scales desktop icons when you switch between different monitors and scaling settings, seeking to preserve your custom icon layout rather than scrambling them.
Now the main issue about this feature is you can’t disable it and this time Microsoft has really messed up by introducing this feature which is causing more harm than good. Anyway without wasting any more time let’s see how to actually Fix Desktop Icons keep getting rearranged after Windows 10 Creators Update with the below-listed troubleshooting guide.
Ayusin ang mga Desktop Icon na patuloy na muling inaayos pagkatapos ng Windows 10 Creators Update
Siguraduhin na lumikha ng isang restore point kung sakaling may mali ang isang bagay.
Paraan 1: Baguhin ang Icon View
1.I-right-click sa desktop pagkatapos ay piliin tingnan at baguhin ang view mula sa iyong kasalukuyang napiling view patungo sa anumang iba pa. Halimbawa kung ang "Medium" ay kasalukuyang napili pagkatapos ay mag-click sa "Maliit."

2.Now muli piliin ang parehong view na kung saan ay mas maaga pinili halimbawa ay namin piliin Medium na naman.
3. Susunod, piliin ang “maliit” sa opsyong View at makikita mo kaagad ang mga pagbabago sa icon sa desktop.
![]()
4.Pagkatapos nito, hindi awtomatikong muling ayusin ng icon ang kanilang mga sarili.
Method 2: Enable Align icons to grid
1.Right-click on an empty space on the desktop then select View at alisin ang tsek Align icons to grid.
![]()
2.Now again from the view option enable Align icons to grid and see if you are able to fix the issue.
3.Kung hindi, mula sa opsyong View alisan ng check ang Auto arrange icon at lahat ay gagana.
Paraan 3: Alisan ng check ang Payagan ang mga tema na baguhin ang mga icon sa desktop
1.Press Windows Key + I to open Settings then click Pag-personalize.
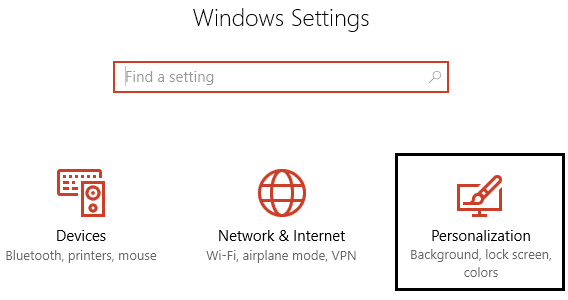
2. Mula sa kaliwang menu piliin Mga Tema at pagkatapos ay mag-click Mga setting ng icon ng desktop.
![]()
3. Ngayon sa window ng Mga Setting ng Desktop Icon, alisan ng tsek ang opsyon na “Payagan ang mga tema na baguhin ang mga icon sa desktop" sa ilalim.
![]()
4. I-click ang Ilapat na sinusundan ng OK.
5. I-reboot ang iyong PC upang i-save ang mga pagbabago at makita kung magagawa mo Fix Desktop Icons keep getting rearranged automatically issue.
Paraan 4: Tanggalin ang Icon Cache
1.Make sure to save all the work which you are currently doing on your PC and close all the present applications or folder windows.
2.Pindutin ang Ctrl + Shift + Esc nang sabay upang buksan Task manager.
3.I-right-click sa Windows Explorer at piliin ang End Task.

4.Click talaksan pagkatapos ay mag-click sa Magpatakbo ng bagong gawain.

5. Uri cmd.exe sa value field at i-click ang OK.

6. Ngayon i-type ang sumusunod na command sa cmd at pindutin ang Enter pagkatapos ng bawat isa:
CD /d %userprofile%AppDataLocal
DEL IconCache.db / a
EXIT
![]()
7. Kapag ang lahat ng mga command ay matagumpay na naisakatuparan malapit na command prompt.
8. Ngayon buksan muli ang Task Manager kung isinara mo pagkatapos ay i-click File > Magpatakbo ng bagong gawain.
9.I-type ang explorer.exe at i-click ang OK. Ire-restart nito ang iyong Windows Explorer at Fix Desktop Icons keep getting rearranged issue.

Method 5: Roll back to the previous Windows 10 build
1.First, go to the Login screen then click on Power button pagkatapos pindutin nang matagal ang Shift at pagkatapos ay mag-click sa I-restart.
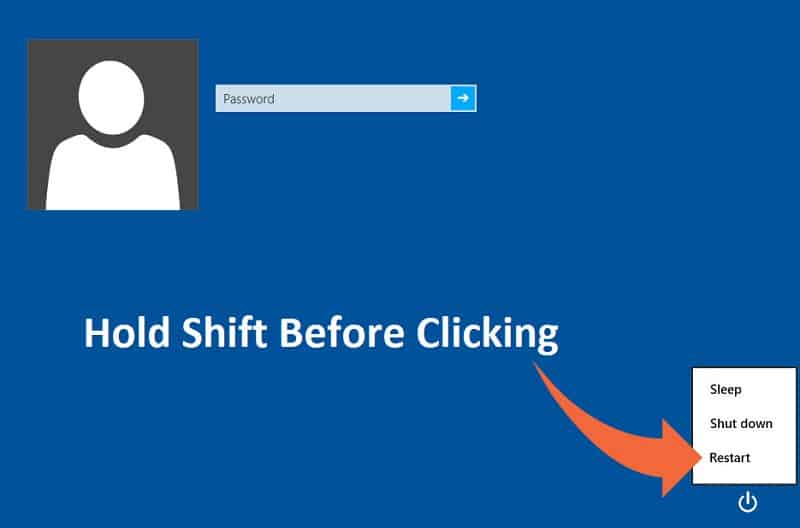
2. Siguraduhing hindi mo bibitawan ang pindutan ng Shift hanggang sa makita mo ang Advanced na menu ng Mga Opsyon sa Pagbawi.

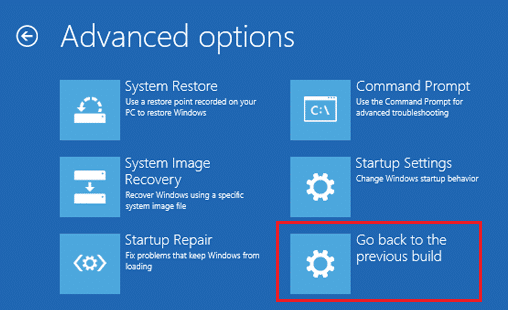
3. Ngayon Mag-navigate sa sumusunod sa menu ng Advanced na Mga Pagpipilian sa Pagbawi:
I-troubleshoot > Mga advanced na opsyon > Bumalik sa nakaraang build.
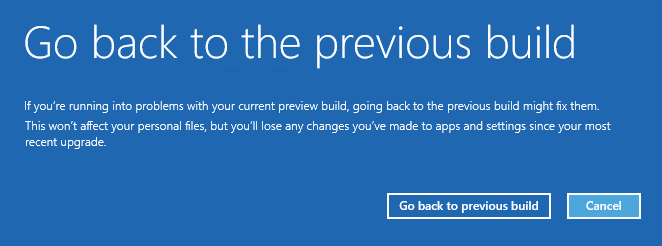
3.After a few seconds, you will be asked to choose your User Account. Click on the User Account, type in your password and click Continue. Once done, choose the option Go Back to the Previous Build again.
Inirerekomenda para sa iyo:
Iyan na ang iyong matagumpay Ayusin ang mga Desktop Icon na patuloy na muling inaayos pagkatapos ng Windows 10 Creators Update ngunit kung mayroon ka pa ring mga katanungan tungkol sa gabay na ito, huwag mag-atubiling tanungin sila sa seksyon ng komento.
![Fix WMI Provider Host High CPU Usage [Windows 10]](https://lbsite.org/wp-content/uploads/2023/02/Fix-WMI-Provider-Host-High-CPU-Usage-on-Windows-10.png "Fix WMI Provider Host High CPU Usage [Windows 10]")
