When you try to log in to Final Fantasy XIV, you’ll run into a few issues. These issues occur when you’re on the character pick screen or waiting in line for the timer to reach zero so you can start playing. FFXIV Error 90002 code (Connection with the server was lost) has been reported in Final Fantasy XIV at random intervals while some players are actively playing the game. According to most afflicted users, the problem does not appear on the first screen or during the character creation menu. Those of you who are seeing FFXIV Error 90002 might be curious as to what’s going on. Here’s all you need to know about FFXIV Error 90002 and how to repair it.
How to Fix FFXIV Error 90002 in Windows 10
You may face errors while playing Final Fantasy XIV due to various reasons. Below are all the possible methods to fix the said error.
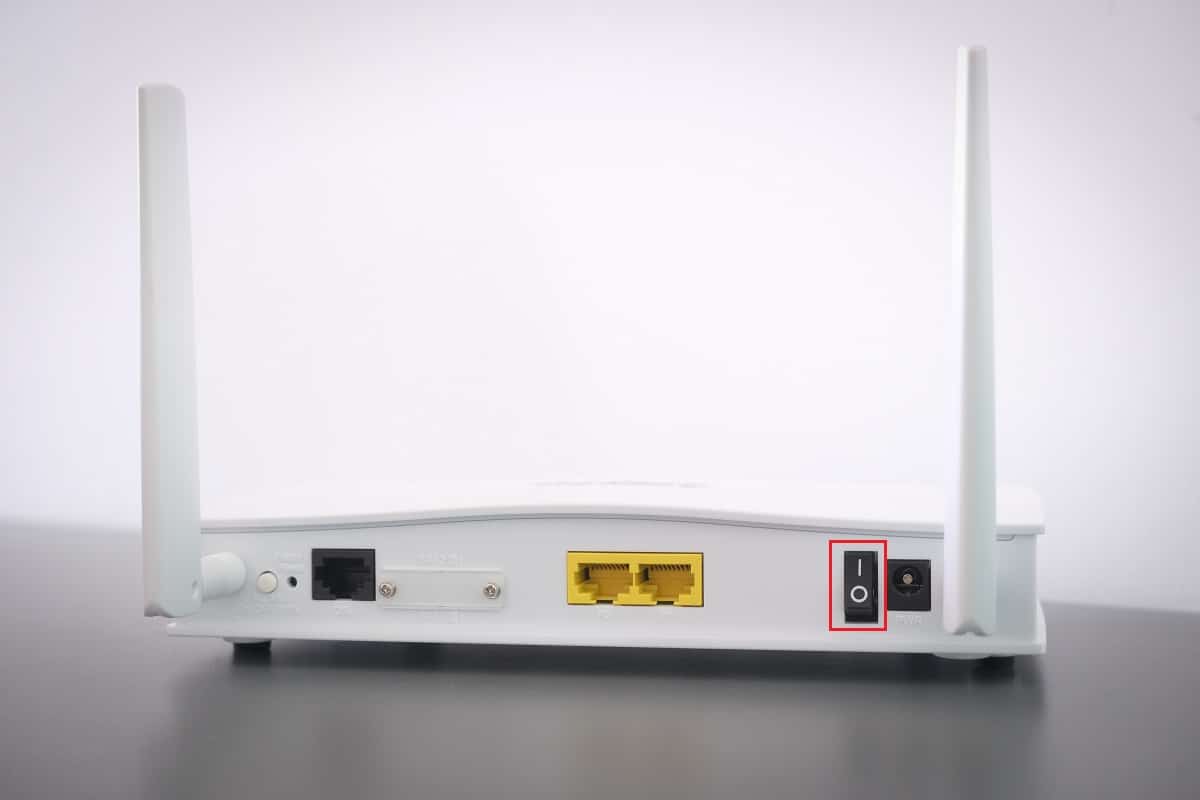
Method 1: Reboot Router
According to several afflicted customers, this problem might also be caused by an IP or TCP discrepancy with your router. If this is the case, you should be able to resolve the problem with a simple router reset. You can start by restarting the computer and reconnecting to the internet. After that, restart your router as well. If this doesn’t work, you may try resetting the router by disconnecting and unplugging the complete connection. The router should then be hooked into the power source.
1. Hanapin ang Power button sa likod ng iyong router.
2. Pindutin ang pindutan nang isang beses upang patayin mo.
3. Ngayon, kalagin iyong Kable ng kapangyarihan ng router at maghintay hanggang ang kapangyarihan ay ganap na maubos mula sa mga capacitor.
4. Pagkatapos, makipagkonek muli ang kapangyarihan cable at i-on ito pagkatapos ng isang minuto.
Your whole connection will be reconfigured after you reset the router. You’ll need to configure the password, privacy, and other options.
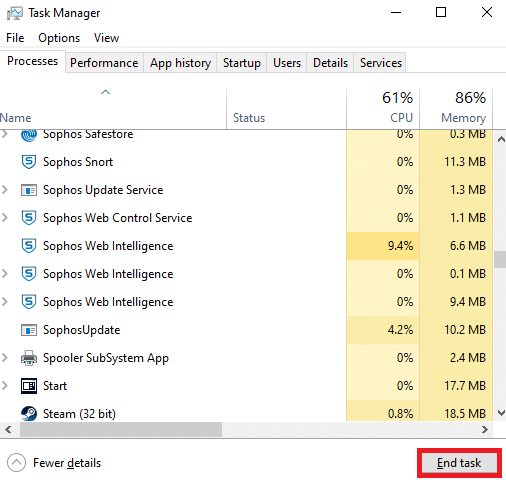
Method 2: Restart Final Fantasy XIV
You may fix FFXIV Error 90002 by restarting FFXIV and re-establishing the Network Connection to Server. Restarting your gaming system would be preferable. This will clear any data or tasks that were interfering with the smooth operation of FFXIV. You can end the game process from Task Manager and relaunch the game again.
Gayundin Basahin: Paano Ayusin ang Final Fantasy XIV Fatal DirectX Error
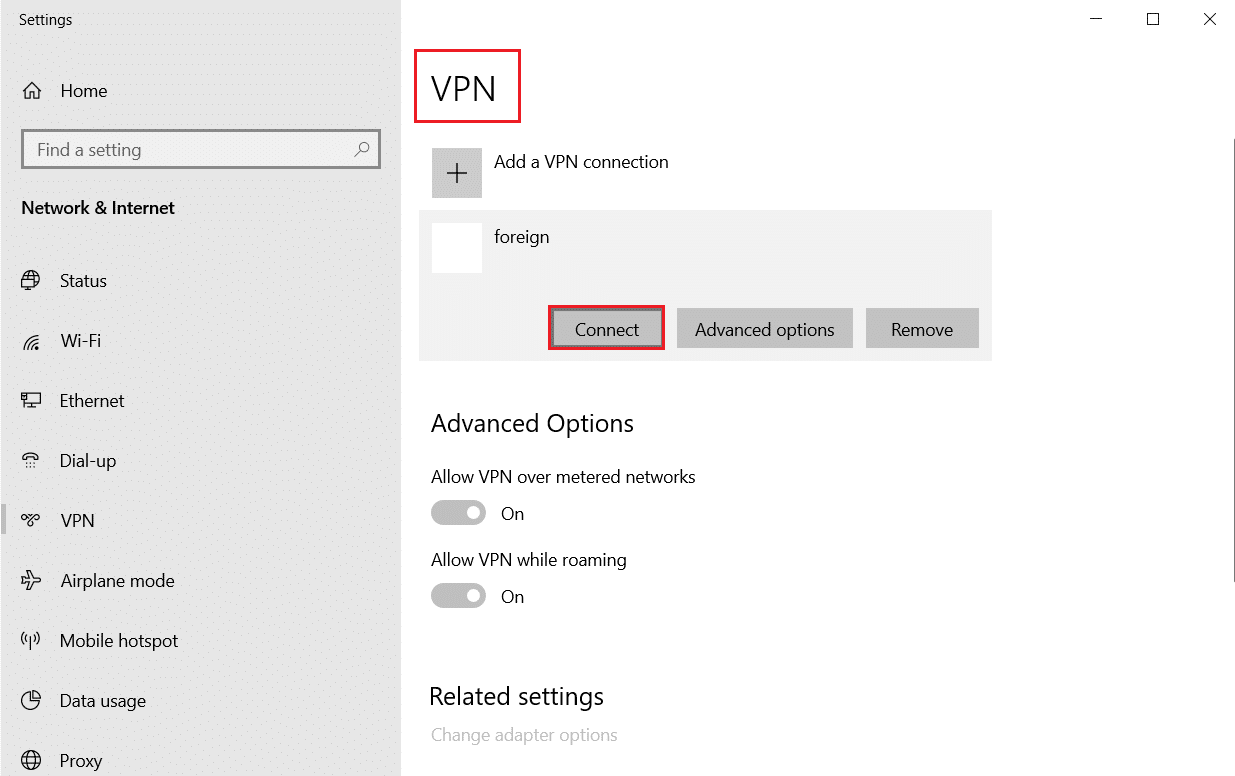
Method 3: Use VPN to Avoid Level3 ISP Node
This problem can happen at any time. Configure and enable your VPN favorite before attempting to connect to the Final Fantasy XIV game server if you already have one. Connectivity may be hampered by the usage of a VPN. Your connection may fail or slow down. If you don’t have access to a premium ISP, you’re likely experiencing drop-in connections with Final Fantasy as a result of considerable latency or packet loss between you and the server. This difficulty might be caused by a Level 3 node or another untrustworthy provider node between you and the game server.
If this scenario applies to you;
- Maaari mo ring makipag-ugnayan sa iyong ISP and request that they rectify the matter.
- O kaya mo utilize a VPN service to bypass the ISP Note.
This is especially true when utilizing a free VPN service. You’ll experience latency and a drop in performance as a result. You may have used up all of your free quotas. You’ll also experience a lot of packet loss.
If you’re not using a VPN, the issue might be with your location. It’s possible that your server connection isn’t working properly. This occurs when the distance between the client and the server is greater.
Read our guide on how to set up a VPN on Windows 10.
Paraan 4: I-update ang Mga Driver
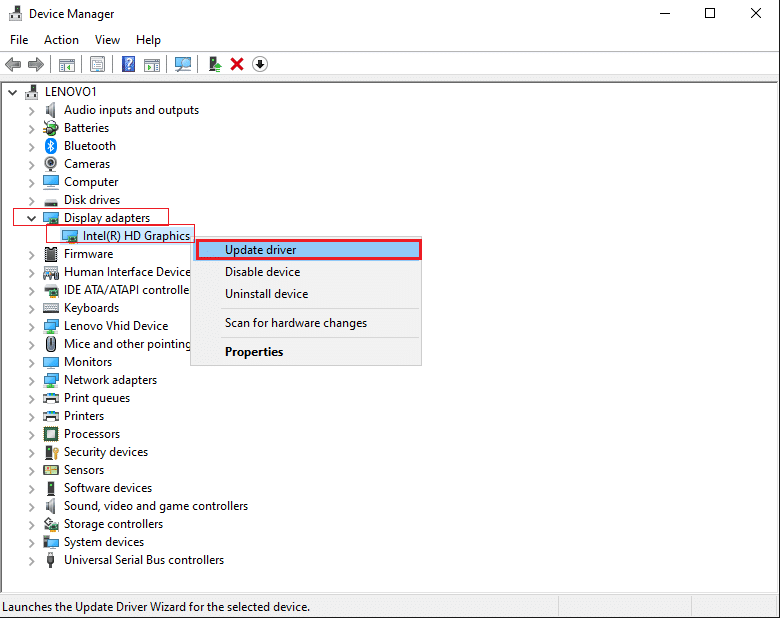
A version incompatibility might also cause the Error Code 90002 to appear in Final Fantasy XIV. Make sure you have the most recent game version. You may also need to update your Graphics Card Drivers if you use a PC. Read our guide on 4 ways to update graphics drivers in Windows 10. Once you have updated the graphics driver, reboot your computer and check if you have fixed the issue.
Gayundin Basahin: Final Fantasy XIV Suporta sa Windows 11
Method 5: Disable Large Send Offload
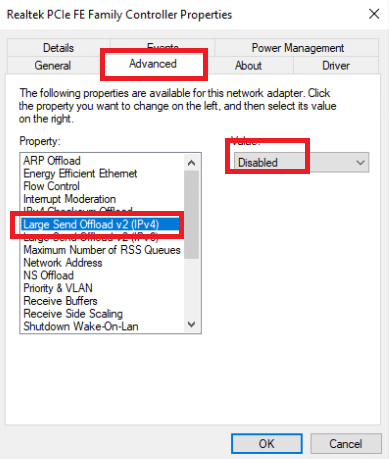
It turns out, because of a Network Adapter option called Large Send Offload. Large Send Offload is a Network Adapter configuration option. It might prohibit upper-level protocols like TCP from splitting huge packets into smaller packets with distinct headers, which is normally beneficial for network speed optimization. While this is typically beneficial to network speed, MMOs such as Final Fantasy XIV tend to cause occasional disconnects when this function is activated. If the option is enabled, however, some games, such as Final Fantasy XIV, may disconnect from the internet. As a result, you can try deactivating Large Send Offload to fix FFXIV Error 90002. The steps are listed below in detail.
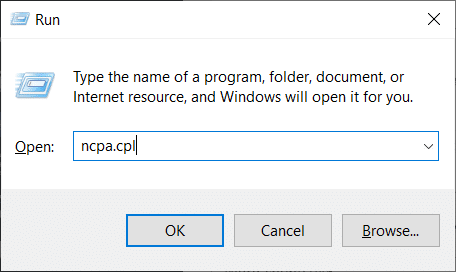
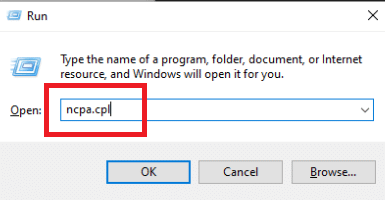
1. Pindutin ang Windows + R mga susi upang buksan ang Tumakbo dialog box.
2. Then, in the text box, write ncpa.cpl at i-click ang Magpasok to bring up the Network Connection option.
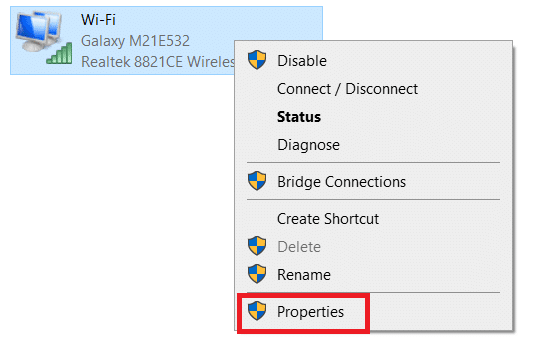
3. Right-click on Wi-Fi and select Mga Katangian mula sa menu ng konteksto.
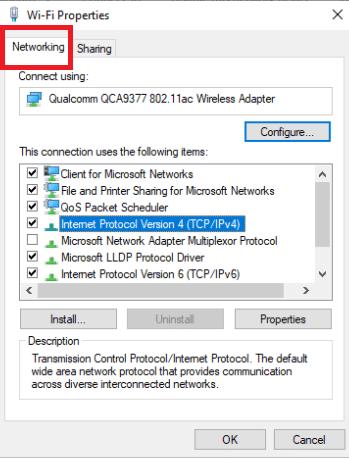
4. Piliin ang Networking tab from the Ethernet Properties menu and click I-configure ang under Connect using.
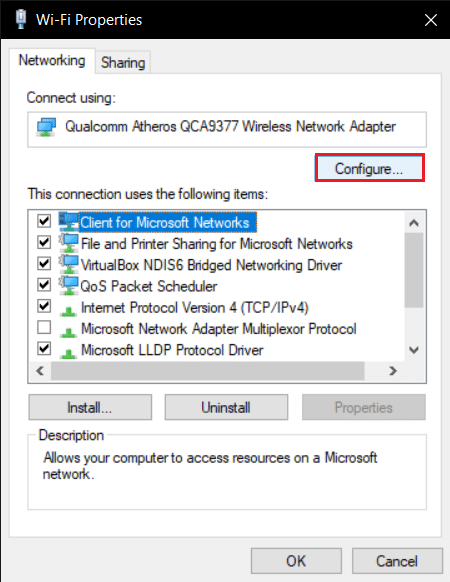
5. Piliin ang Advanced na tab from the horizontal menu and Large Send Offload v2 (IPv4) from the Property menu, and change the value to Hindi pinagana.
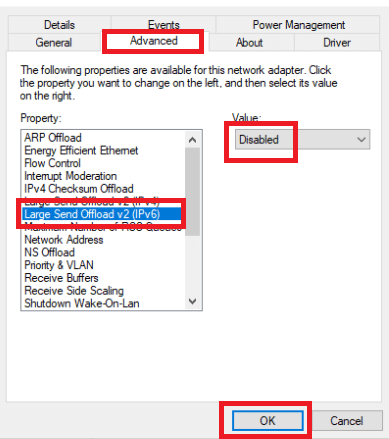
6. Then, under the Large Send Offload v2 (IPv6) property again change the value to disabled, and click Ok upang i-save ang mga pagbabago.
7. I-restart ang iyong computer to see whether the problem has been resolved.
If FFXIV Error 90002 issue remains, go on to the next option on the list below.
Method 6: Run Final Fantasy XIV as Administrator
Administrator-run apps are granted specific permissions that they would not otherwise have. So, anytime you launch Final Fantasy XIV, be sure you right-click and choose Run as Administrator. Its Compatibility Mode can also be changed.
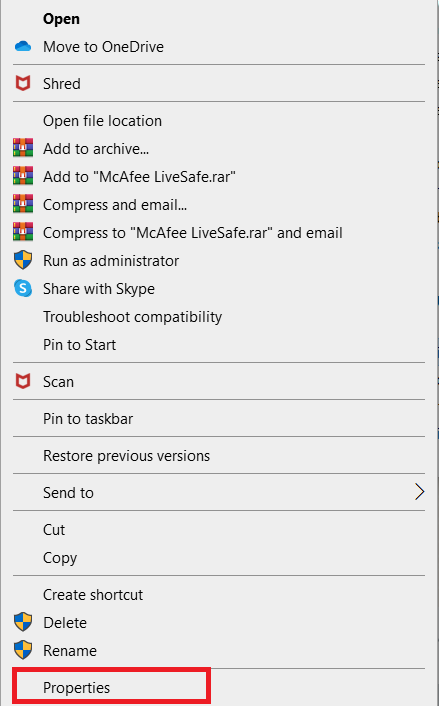
1. If you purchased Final Fantasy XIV sa pamamagitan ng Steam, right-click the game and select Mga Katangian.
2. Mag-click sa Pagkakatugma. Lagyan ng check ang kahon sa tabi Patakbuhin ang program na ito sa mode ng pagiging tugma.
3. Also check Patakbuhin ang program na ito bilang isang tagapangasiwa pagpipilian.
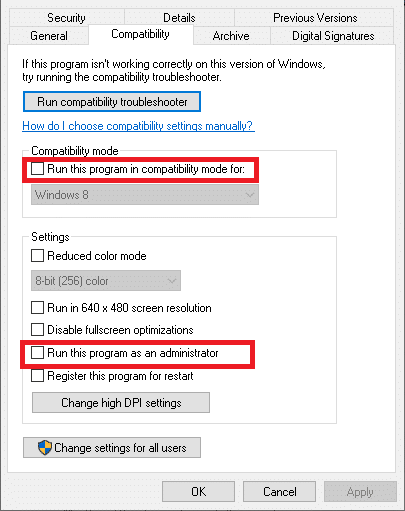
4. Panghuli, mag-click sa Mag-apply> OK at i-restart ang PC.
Gayundin Basahin: Fix Square Enix Error Code i2501
Method 7: Switch to Google DNS
This error number can also be caused by a DNS discrepancy, which prevents your PC from connecting to the FFXIV mega server. A Google DNS is recommended for many gaming connections. It’s useful not just for FFXIV Error 90002, but also for any other game server connectivity issues.
1. pindutin ang Windows + R key sabay buksan ang Tumakbo dialog box.
2. Then, in the text box, write ncpa.cpl at i-click ang Magpasok to bring up the Network Connection option.
3. Right-click on Wi-Fi and select Mga Katangian mula sa menu ng konteksto.

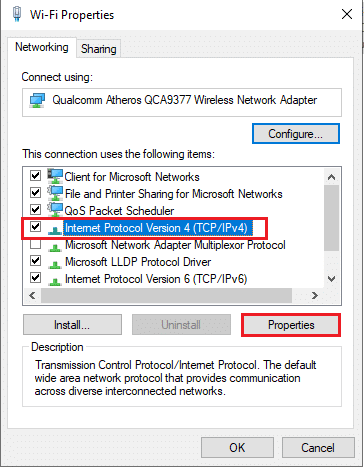
4. When you’re on the Properties page, go to the Networking Tab.
5. Piliin ang Bersyon ng Internet Protocol 4 (TCP / IPv4) at i-click ang Mga Katangian button to configure this connection.
6. Piliin ang Pangkalahatan tab on the following screen.
7. Mag-click sa Gamitin ang mga sumusunod na address ng DNS server: at Palitan Preference DNS Server at Kahaliling DNS Server with the values in the following DNS server address respectively:
8.8.8.8
8.8.4.4

8. Once the settings for TCP / IPV4 have been updated, repeat steps 1 to 4 and select Bersyon ng Internet Protocol 6 (TCP / IPv6) from the list and use the following DNS server addresses
2001: 4860: 4860 :: 8888
2001: 4860: 4860 :: 8844
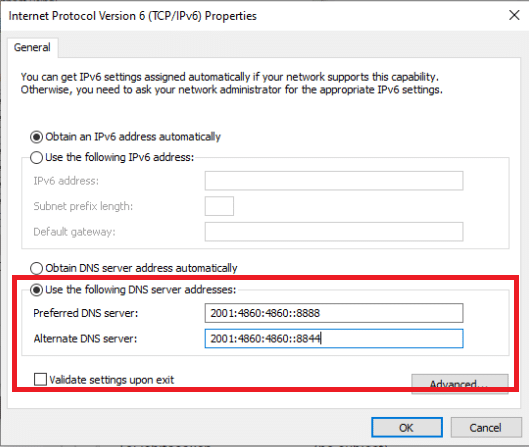
9. Save the changes you’ve just made, then i-reboot ang iyong PC upang suriin kung Final Fantasy XIV error code issue has been solved.
Method 8: Disable Third-party Antivirus Temporarily (If Applicable)
This problem, according to multiple afflicted customers, might also be caused by a gaming clash with Avast Firewall. If the problem persists, you should remove the program. Remember to enable your antivirus or switch to another antivirus application after you’ve fixed the problem. Read our guide on how to disable antivirus temporarily on Windows 10.
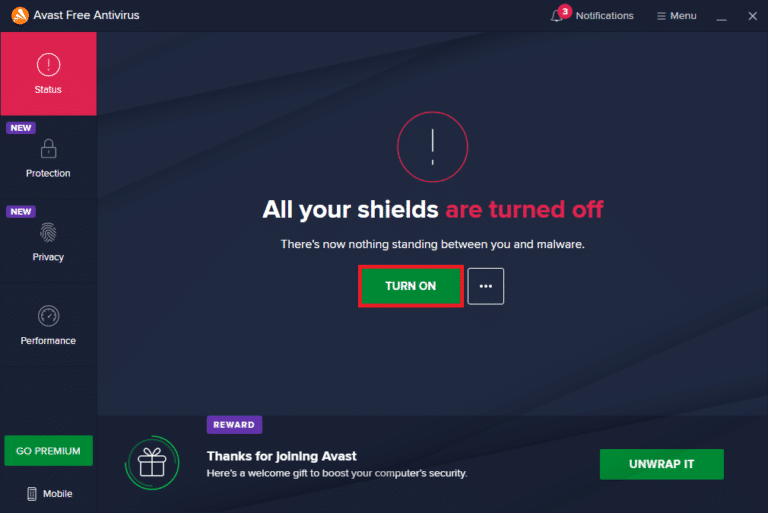
Gayundin Basahin: 5 ways to completely uninstall avast antivirus in Windows 10.
Method 9: Reinstall Final Fantasy XIV
If none of the previous steps worked, FFXIV should be uninstalled and reinstalled. The majority of gamers have reported that after completing this step, FFXIV Unable to Download Patch Files and Error 90002 were resolved. The FFXIV 90002 problem can also be caused by a faulty or corrupt packet being sent out, which breaks the connection with the game server, as some afflicted users have confirmed. It might be a general activity, such as character movement, or something more erratic. Make sure you remove the game properly, as well as any files it may have left on your computer. To do so, follow the guidelines below:
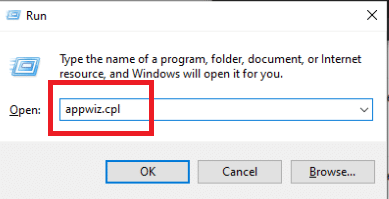
1. buksan ang Tumakbo dialog box.
2. To open the Programs and Features panel, type appwiz.cpl at pindutin Ipasok ang key.
3. Scroll through the list of installed items on the Programs and Features page until you find the Final Fantasy XIV installation. Right-click on it and select I-uninstall mula sa menu ng konteksto na lilitaw.
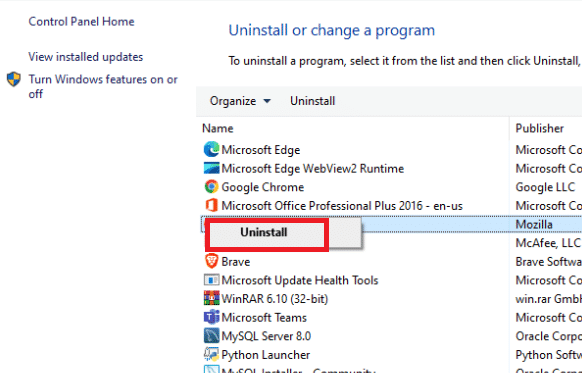
4. To finish the operation, follow the mga direksyon on the uninstalling screen.
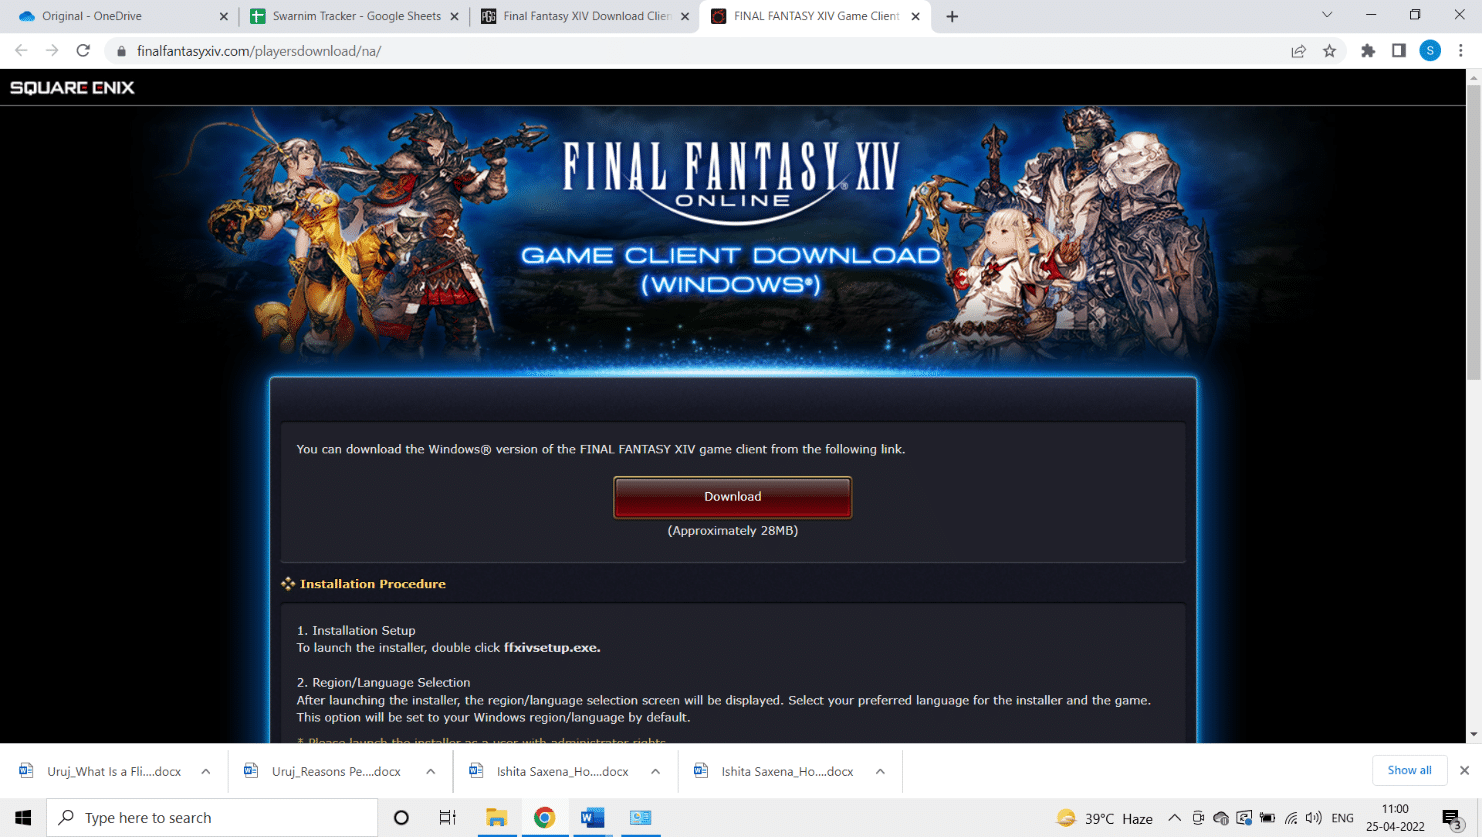
5. I-restart ang iyong computer when the procedure is completed, and then reinstall the Final Fantasy XIV client from the opisyal na site.
6. After the installation is complete, restart the laro to see whether the problem has been repaired.
7. If the problem persists, proceed to the next possible solution listed below.
Gayundin Basahin: Fix Fallout New Vegas Out of Memory error
Method 10: Force FFXIV to Ignore UPnP
If none of the techniques below have worked for you and you’re encountering this error on a PC, you may be able to resolve the issue by modifying the Final Fantasy XIV.cfg file to force the executable to avoid using UPnP. If you wish to try out this workaround, simply follow the steps below to make Final Fantasy ignore UPnP and fix FFXIV Error 90002.
1. bukas file Explorer.
2. Pagkatapos ay pumunta sa Mga dokumento at pagkatapos ay Aking Laro, pagkatapos ay i-double click ang FF14 folder.
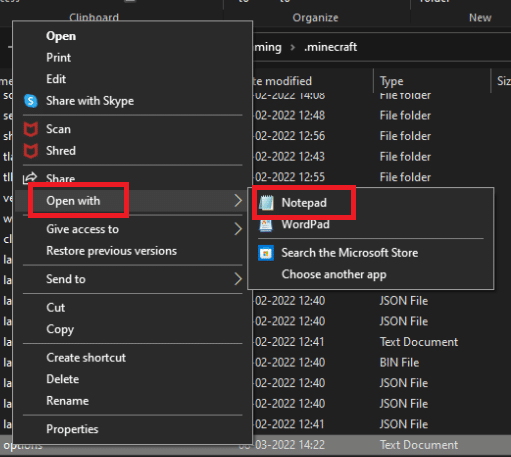
3. When you’re in the FF14 folder, i-right-click FFXIV.cfg at piliin ang Buksan sa at pagkatapos ay Notepad mula sa menu ng konteksto na lilitaw.
4. Gamitin Notepad + + instead of the standard Notepad software if you have a more efficient text editor installed.
5. After you’ve successfully opened the .cfg file in Notepad, scroll down the list of options until you reach the Setting ng network.
6. Change the value of UPnP from 1 sa 0 in the Network Settings, then save the adjustments.
tandaan: Make sure you don’t alter the name of the .cfg file when you save the changes.
Inirerekomenda:
Umaasa kami na nakita mong kapaki-pakinabang ang impormasyong ito at nagawa mong lutasin FFXIV Error 90002 problem. Please let us know which technique was the most beneficial for you and use the form below if you have any queries or comments.

")