Fix The Service Couldn’t Be Started Windows Defender Error 0x80070422: Windows Defender is a malware protection software which is inbuilt into Windows 10. Now it is used widely by Windows users because it’s reliable, but in some cases, users also installed 3rd party Antivirus software such as Norton, Quick Heal etc which is not recommend because they corrupt the files of Windows Defender. Once you completely uninstall 3rd party antivirus you won’t be able to use Windows Defender properly because files required by it have already been corrupted and can no longer be used.
“The service couldn’t be started.
The service cannot be started, either because it is disabled or because it has no enabled devices associated with it.”
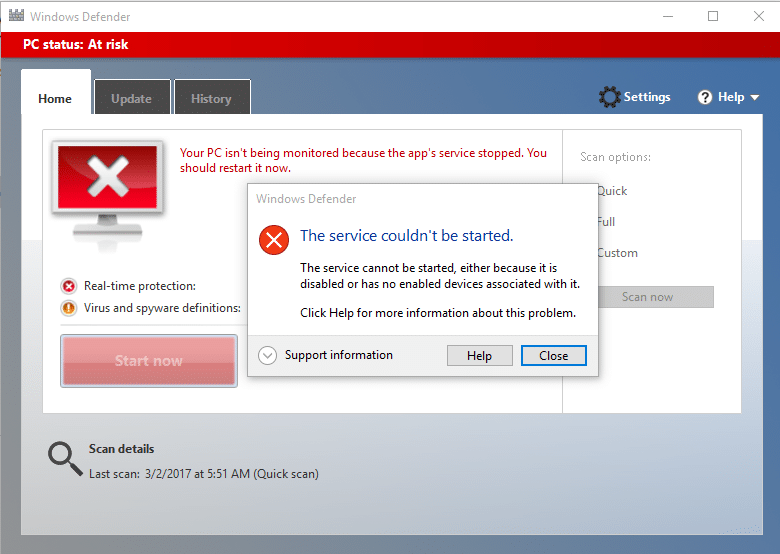
Windows Defender is turned off when you use a 3rd party Antivirus and once you uninstall the Antivirus software you won’t be able to turn ON Windows Defender. If you try to enable Windows Defender you will face the error “The Service Couldn’t Be Started” with error code 0x80070422. So without wasting any time let’s see how to actually Fix The Service Couldn’t Be Started Windows Defender Error 0x80070422 with the help of below-listed troubleshooting guide.
Fix The Service Couldn’t Be Started Windows Defender Error 0x80070422
Tiyaking gumawa ng restore point kung sakaling may magkamali.
Paraan 1: Patakbuhin ang SFC at CHKDSK
1. Pindutin ang Windows Key + X pagkatapos ay mag-click sa Command Prompt (Admin).

2. Ngayon i-type ang sumusunod sa cmd at pindutin ang enter:
Sfc /scannow sfc /scannow /offbootdir=c: /offwindir=c:windows (Kung nabigo ang itaas, subukan ito)

3.Hintaying matapos ang proseso sa itaas at sa sandaling tapos na i-restart ang iyong PC.
4.Susunod, patakbuhin ang CHKDSK mula dito Ayusin ang Mga Error sa File System gamit ang Check Disk Utility (CHKDSK).
5. Hayaang makumpleto ang proseso sa itaas at muling i-reboot ang iyong PC upang i-save ang mga pagbabago.
Method 2: Temporarily Disable 3rd party Antivirus
1.I-right-click sa Icon ng Antivirus Program mula sa system tray at piliin Huwag paganahin.

2.Susunod, piliin ang time frame kung saan ang Mananatiling hindi pinagana ang antivirus.

Tandaan: Piliin ang pinakamaliit na tagal ng oras na posible halimbawa 15 minuto o 30 minuto.
3.Once done, again try to run Windows Defender and check if the error resolves or not.
4. Pindutin ang Windows Key + X pagkatapos ay piliin Control Panel.

5.Susunod, mag-click sa Sistema at Seguridad.
6.Pagkatapos ay mag-click sa Windows Firewall.

7. Ngayon mula sa kaliwang window pane mag-click sa I-on o i-off ang Windows Firewall.

8.Piliin ang I-off ang Windows Firewall at i-restart ang iyong PC. Again try to open Windows Defender and see if you’re able to Fix The Service Couldn’t Be Started Windows Defender Error 0x80070422.
Kung ang paraan sa itaas ay hindi gumana tiyaking sundin ang eksaktong parehong mga hakbang upang i-on muli ang iyong Firewall.
Paraan 3: Tiyaking napapanahon ang Windows
1. Pindutin ang Windows Key + I pagkatapos ay piliin Update at Security.

2.Susunod, muling i-click Suriin ang mga update at tiyaking mag-install ng anumang mga nakabinbing update.

3.Pagkatapos ma-install ang mga update, i-reboot ang iyong PC at tingnan kung magagawa mo Fix The Service Couldn’t Be Started Windows Defender Error 0x80070422.
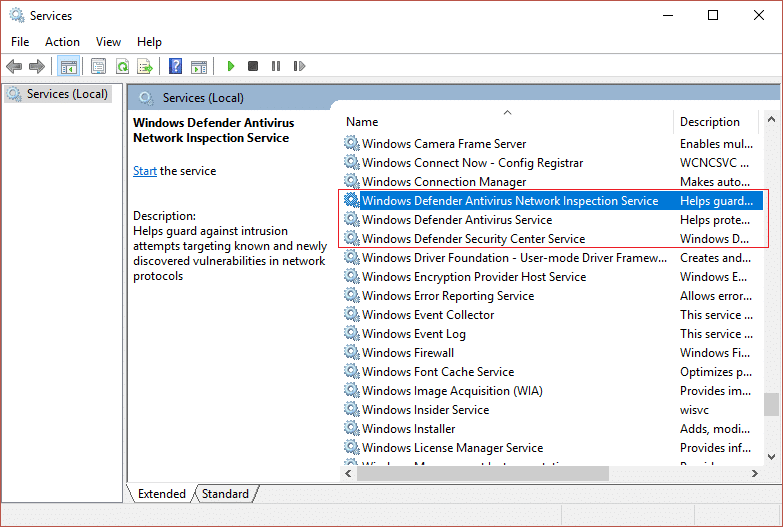
Method 4: Make sure Windows Defender service is set to Automatic
tandaan: If Windows Defender service is grayed out in Services Manager then follow this post.
1. Pindutin ang Windows Key + R pagkatapos ay i-type services.msc at pindutin ang Enter.

2.Find the following services in the Services window:
Windows Defender Antivirus Network Inspection Service
Windows Defender Antivirus Service
Windows Defender Security Center Service
3.Double-click on each of them and make sure their Startup type is set to Awtomatik and click Start if the services are not already running.
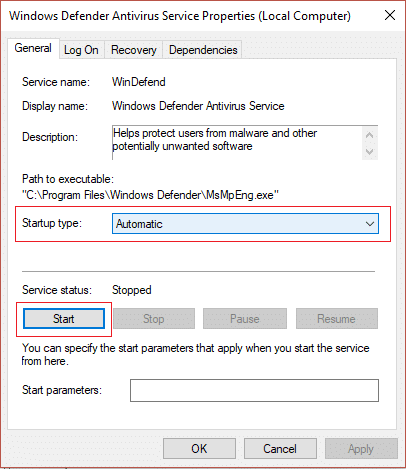
4. I-click ang Ilapat na sinusundan ng OK.
5. I-reboot ang iyong PC upang i-save ang mga pagbabago at tingnan kung magagawa mo Fix The Service Couldn’t Be Started Windows Defender Error 0x80070422.
Method 5: Enable Windows Defender through Registry Editor
1. Pindutin ang Windows Key + R pagkatapos ay i-type regedit at pindutin ang Enter.

2.Mag-navigate sa sumusunod na registry key:
HKEY_LOCAL_MACHINESYSTEMCurrentControlSetServicesWinDefend
3. Ngayon i-right-click sa winddefend at piliin ang Mga Pahintulot.
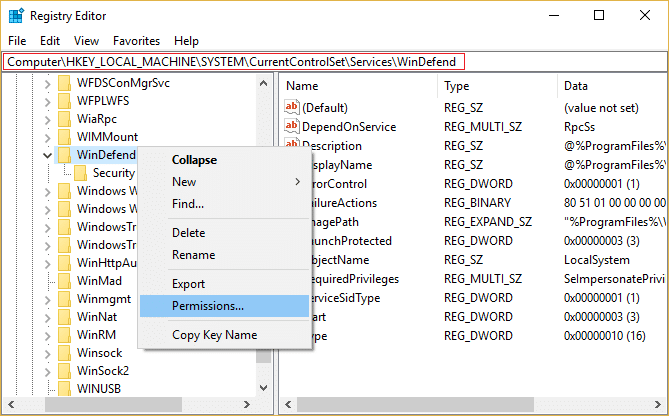
4.Follow this guide in order to take full control or ownership of the above registry key.
5.After that make sure you have selected winddefend then in the right window double-click on Start DWORD.
6.Change the value to 2 in the value data field and click OK.
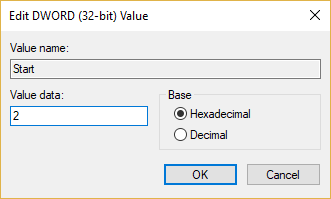
7.Close Registry Editor and reboot your PC.
8.Again try to enable Windows Defender and this time it should work.
Paraan 6: Patakbuhin ang CCleaner at Malwarebytes
1. I-download at i-install CCleaner & Malwarebytes.
2.Patakbuhin ang Malwarebytes at hayaan itong i-scan ang iyong system para sa mga mapaminsalang file.
3. Kung may nakitang malware, awtomatiko itong aalisin ang mga ito.
4. Ngayon tumakbo CCleaner at sa seksyong "Cleaner", sa ilalim ng tab na Windows, iminumungkahi naming suriin ang mga sumusunod na seleksyon na lilinisin:

5. Kapag natiyak mo na ang tamang mga puntos ay nasuri, i-click lang Run Cleaner, at hayaang tumakbo ang CCleaner sa kurso nito.
6. Upang linisin pa ang iyong system, piliin ang tab na Registry at tiyaking naka-check ang mga sumusunod:

7. Piliin ang I-scan para sa Isyu at payagan ang CCleaner na mag-scan, pagkatapos ay i-click Ayusin ang Mga Napiling Isyu.
8. Kapag tinanong ng CCleaner “Gusto mo ba ng mga backup na pagbabago sa registry?” piliin ang Oo.
9. Kapag nakumpleto na ang iyong backup, piliin ang Ayusin ang Lahat ng Napiling Isyu.
10. I-restart ang iyong PC upang i-save ang mga pagbabago at makita kung magagawa mo Fix The Service Couldn’t Be Started Windows Defender Error 0x80070422.
Method 7: Refresh or Reset your PC
1. Pindutin ang Windows Key + I para buksan ang Mga Setting pagkatapos ay piliin Update at Security.
2.From left-hand menu select Pagbawi at mag-click sa "Magsimula” under Reset this PC.

3.Select the option to Panatilihin ang aking mga file.

4.Follow the instructions on the screen to complete the process.
5.This will take some time and your computer will restart.
Paraan 8: Ayusin ang Pag-install ng Windows 10
Ang pamamaraang ito ay ang huling paraan dahil kung walang gumagana, tiyak na aayusin ng pamamaraang ito ang lahat ng mga problema sa iyong PC. Repair Install gamit lang ang in-place upgrade para ayusin ang mga isyu sa system nang hindi tinatanggal ang data ng user na nasa system. Kaya sundin ang artikulong ito para makita kung Paano Madaling Ayusin ang Pag-install ng Windows 10.
Inirerekomenda para sa iyo:
Iyon lang, matagumpay ka na Fix The Service Couldn’t Be Started Windows Defender Error 0x80070422 ngunit kung mayroon ka pa ring mga katanungan tungkol sa gabay na ito, huwag mag-atubiling tanungin sila sa seksyon ng komento.

