Process and Compressed Memory is a Windows 10 feature responsible for memory compression (also referred to as RAM compression and memory compression). This feature basically utilizes data compression to reduce the size or number of paging request to and from the auxiliary storage. In short, this feature is designed to take less amount of disk space and memory but in this case the System and Compressed Memory process start using 100% Disk and Memory, causing the affected PC to become slow.

In Windows 10, a compressions store is added to the concept of Memory Manager, which is an in-memory collection of compressed pages. So whenever the memory starts to fill up, the System and Compressed Memory process will compress the unused pages instead of writing them to the disk. The benefit of this is the amount of memory used per process is reduced, which allows Windows 10 to maintain more programs or apps in physical memory.
The problem appears to be incorrect Virtual Memory settings. Someone changed the paging file size from automatic to a particular value, virus or malware, Google Chrome or Skype, corrupt system files etc. So without wasting any time let’s see how to actually Fix 100% Disk Usage by System and Compressed Memory with the help of below-listed troubleshooting guide.
[SOLVED] 100% Disk Usage by System and Compressed Memory
Tiyaking gumawa ng restore point, kung sakaling may magkamali.
Method 1: Repair Corrupt System Files
1. Buksan ang Command Prompt. Maaaring gawin ng user ang hakbang na ito sa pamamagitan ng paghahanap 'cmd' at pagkatapos ay pindutin ang Enter.

2. Ngayon i-type ang sumusunod sa cmd at pindutin ang enter:
Sfc /scannow sfc /scannow /offbootdir=c: /offwindir=c:windows (Kung nabigo ang itaas, subukan ito)
![SFC scan now command prompt | [SOLVED] 100% Disk Usage by System and Compressed Memory](https://lbsite.org/wp-content/uploads/2023/01/SFC-scan-now-command-prompt.png)
3. Hintaying matapos ang proseso sa itaas at kapag tapos na, i-restart ang iyong PC.
4. Again open cmd and type the following command and hit enter after each one:
Dism /Online /Cleanup-Image /CheckHealth Dism /Online /Cleanup-Image /ScanHealth Dism /Online /Cleanup-Image /RestoreHealth

5. Hayaang tumakbo ang DISM command at hintayin itong matapos.
6. Kung ang utos sa itaas ay hindi gumana pagkatapos ay subukan sa ibaba:
Dism /Image:C:offline /Cleanup-Image /RestoreHealth /Source:c:testmountwindows Dism /Online /Cleanup-Image /RestoreHealth /Source:c:testmountwindows /LimitAccess
tandaan: Palitan ang C:RepairSourceWindows ng iyong pinagmumulan ng pagkumpuni (Pag-install ng Windows o Recovery Disc).
7. I-reboot ang iyong PC upang i-save ang mga pagbabago at tingnan kung magagawa mo Fix 100% Disk Usage by System and Compressed Memory Issue.
Method 2: Set Correct Paging File Size
1. Pindutin ang Windows Key + R pagkatapos ay i-type sysdm.cpl at pindutin ang Enter upang buksan Ang mga katangian ng sistema.

2. Lumipat sa Advanced na tab at pagkatapos ay mag-click sa Mga setting sa ilalim ng Performance.

3. Again switch to the Advanced tab and click Change under Virtual Memory.

4. Checkmark “Awtomatikong pamahalaan ang laki ng paging file para sa lahat ng mga drive."
![Checkmark Automatically manage paging file size for all drives | [SOLVED] 100% Disk Usage by System and Compressed Memory](https://lbsite.org/wp-content/uploads/2023/02/Checkmark-Automatically-manage-paging-file-size-for-all-drives.png)
5. Click OK, then click Apply followed by OK.
6. Select Yes to Restart your PC to save changes.
Paraan 3: I-disable ang Mabilis na Startup
1. Pindutin ang Windows Key + R pagkatapos ay i-type ang control at pindutin ang Enter para buksan Control Panel.

2. Mag-click sa Hardware at Sound pagkatapos ay mag-click sa Mga Pagpipilian sa Power.

3. Pagkatapos, mula sa kaliwang window pane piliin "Piliin kung ano ang gagawin ng mga pindutan ng kuryente."

4. Ngayon mag-click sa "Baguhin ang mga setting na kasalukuyang hindi magagamit."

5. Alisan ng tsek ang “I-on ang mabilis na startup”At mag-click sa I-save ang mga pagbabago.
![Uncheck Turn on fast startup | [SOLVED] 100% Disk Usage by System and Compressed Memory](https://lbsite.org/wp-content/uploads/2023/01/Uncheck-Turn-on-fast-startup.png)
6. Restart your PC and see if you’re able to Fix 100% Disk Usage by System and Compressed Memory Issue.
Method 4: Disable Superfetch Service
1. Pindutin ang Windows Key + R pagkatapos ay i-type services.msc at pindutin ang Enter.

2. Hanapin Super fetch service from the list then right-click on it and select Properties.

3. Under Service status, if the service is running, click on Itigil.
4. Now, from the Startup type drop-down select Hindi pinaganang.

5. I-click ang Ilapat, na sinusundan ng OK.
6. I-reboot ang iyong PC upang i-save ang mga pagbabago.
If the above method doesn’t disable Superfetch services then you can follow disable Superfetch using Registry:
1. Pindutin ang Windows Key + R pagkatapos ay i-type regedit at pindutin ang Enter upang buksan ang Registry Editor.

2. Mag-navigate sa sumusunod na key ng pagpapatala:
HKEY_LOCAL_MACHINESYSTEMCurrentControlSetControlSession ManagerMemory ManagementPrefetchParameters
3. Make sure you have selected PrefetchParameter pagkatapos ay sa kanang window i-double click sa PaganahinSuperfetch susi at change it’s value to 0 in the Value data field.

4. Click OK and close the Registry Editor.
5. Restart your PC to save changes and see if you’re able to Fix 100% Disk Usage by System and Compressed Memory Issue.
Method 5: Adjust your PC for Best Performance
1. Pindutin ang Windows Key + R pagkatapos ay i-type sysdm.cpl at pindutin ang Enter upang buksan Ang mga katangian ng sistema.
2. Lumipat sa Advanced tab at pagkatapos ay mag-click sa Setting sa ilalim Pagganap.
3. Under Visual Effects checkmark “Ayusin para sa pinakamahusay na pagganap".

4. I-click ang Ilapat, na sinusundan ng OK.
5. I-reboot ang iyong PC at tingnan kung magagawa mo Fix 100% Disk Usage by System and Compressed Memory Issue.
Method 6: Kill the Speech Runtime Executable Process
1. Pindutin ang Ctrl + Shift + Esc upang ilunsad ang Task Manager.
2. Nasa Tab na proseso, hanapin Speech Runtime Executable.
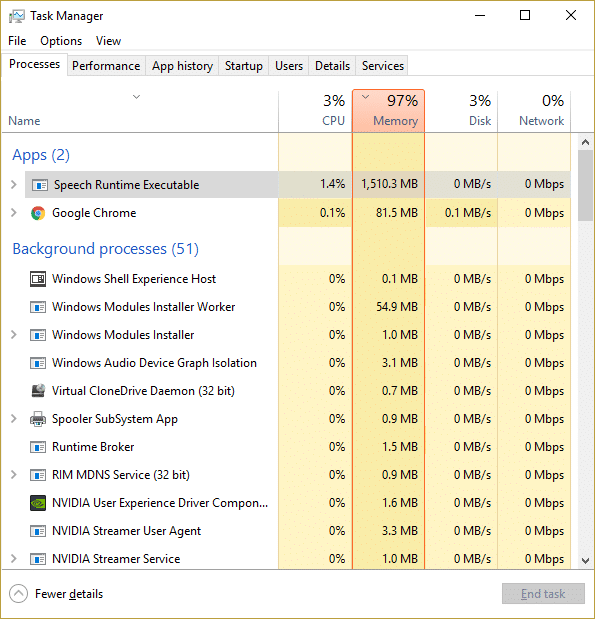
3. I-right-click ito at piliin End Task.
Paraan 7: Patakbuhin ang CCleaner at Malwarebytes
1. I-download at i-install CCleaner at Malwarebytes.
2. Patakbuhin ang Malwarebytes at hayaan itong i-scan ang iyong system para sa mga mapaminsalang file. Kung may nakitang malware, awtomatiko nitong aalisin ang mga ito.

3. Ngayon patakbuhin ang CCleaner at piliin Pasadyang Malinis.
4. Sa ilalim ng Custom Clean, piliin ang tab ng Windows at mga default na checkmark at i-click Suriin.
![Select Custom Clean then checkmark default in Windows tab | [SOLVED] 100% Disk Usage by System and Compressed Memory](https://lbsite.org/wp-content/uploads/2023/01/Select-Custom-Clean-then-checkmark-default-in-Windows-tab.png)
5. Kapag kumpleto na ang Pagsusuri, tiyaking tiyak mong aalisin ang mga file na tatanggalin.

6. Panghuli, mag-click sa Patakbuhin ang Mas Malinis button at hayaang tumakbo ang CCleaner sa kurso nito.
7. Para mas malinis ang iyong system, piliin ang tab na Registry, at tiyaking nasusuri ang mga sumusunod:

8. Mag-click sa I-scan para sa mga isyu at payagan ang CCleaner na mag-scan, pagkatapos ay mag-click sa Ayusin ang Mga Napiling Isyu button.
![Once scan for issues is completed click on Fix selected Issues | [SOLVED] 100% Disk Usage by System and Compressed Memory](https://lbsite.org/wp-content/uploads/2023/01/Once-scan-for-issues-is-completed-click-on-Fix-selected-Issues.png)
9. Kapag tinanong ng CCleaner “Gusto mo ba ng mga backup na pagbabago sa registry?" piliin ang Oo.
10. Kapag nakumpleto na ang iyong backup, mag-click sa Ayusin ang Lahat ng Napiling Isyu button.
11. I-restart ang iyong PC upang i-save ang mga pagbabago.
Method 8: Change configuration of Google Chrome and Skype
Para sa Google Chrome: Navigate to the following under Chrome: Settings > Show Advanced Settings > Privacy > Use a prediction service to load pages more quickly. Disable the toggle next to “Use a prediction service to load pages.”

Change configuration For Skype
1. Make sure you have exited Skype, if not end task from Task Manager for Skype.
2. Press Windows Key + R then type the following and click OK:
C:Program Files (x86)SkypePhone
3. Mag-right click sa skype.exe at piliin ang Properties.

4. Lumipat sa Tab ng seguridad at i-click ang I-edit.

5. Piliin ang LAHAT NG MGA APPLICATION PACKAGES under Group or user names then checkmark Write sa ilalim Payagan.

6. Click Apply, followed by OK and see if you’re able to Fix 100% Disk Usage by System and Compressed Memory Issue.
Method 9: Set Correct Permission for System and Compressed Memory Process
1. Pindutin ang Windows Key + R pagkatapos ay i-type taskschd.msc and hit Enter to open Task Scheduler.

2. Mag-navigate sa sumusunod na landas:
Task Scheduler Library > Microsoft > Windows > MemoryDiagnostic
![Double click on ProcessMemoryDiagnostic Events | [SOLVED] 100% Disk Usage by System and Compressed Memory](https://lbsite.org/wp-content/uploads/2023/02/Double-click-on-ProcessMemoryDiagnostic-Events.png)
3. I-double click sa ProcessMemoryDiagnostic Events at pagkatapos ay mag-click Baguhin ang Gumagamit o Grupo under Security Options.

4. click Advanced at pagkatapos ay mag-click Find Now.

5. Piliin ang iyong Account ng administrator from the list then click OK.

6. Muli i-click ang OK to add your administrator account.
7. Checkmark Patakbuhin nang may pinakamataas na pribilehiyo at pagkatapos ay mag-click OK.

8. Follow the same steps for RunFullMemoryDiagnostic and close everything.
9. I-reboot ang iyong PC upang i-save ang mga pagbabago.
Method 10: Disable System and Compressed Memory Process
1. Pindutin ang Windows Key + R pagkatapos ay i-type taskschd.msc at pindutin ang Enter upang buksan Tagapag-iskedyul ng Gawain.
2. Mag-navigate sa sumusunod na landas:
Task Scheduler Library > Microsoft > Windows > MemoryDiagnostic
3. Mag-right click sa RunFullMemoryDiagnostic at piliin ang Huwag paganahin.
![Right-click on RunFullMemoryDiagnostic and select Disable | [SOLVED] 100% Disk Usage by System and Compressed Memory](https://lbsite.org/wp-content/uploads/2023/02/Right-click-on-RunFullMemoryDiagnostic-and-select-Disable.png)
4. Close Task Scheduler and restart your PC.
Inirerekomenda:
Iyan na ang iyong matagumpay Fix 100% Disk Usage by System and Compressed Memory ngunit kung mayroon ka pa ring mga katanungan tungkol sa post na ito, huwag mag-atubiling tanungin sila sa seksyon ng komento.

