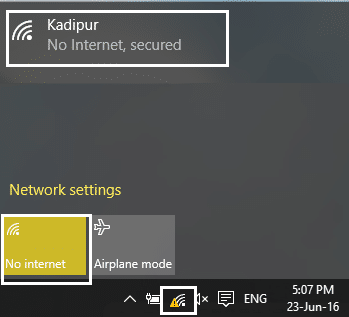
If a WiFi network has the ‘limited connectivity’ sign next to it, it means that you’re connected to the network but do not have access to the internet. The main reason for this issue is that the DHCP server is not responding. And when the DHCP server doesn’t respond the computer automatically assigns an IP address to itself because the DHCP server was unable to assign the IP address. Hence the ‘Limited or No connectivity’ error.
Fix limited access or no connectivity WiFi issues
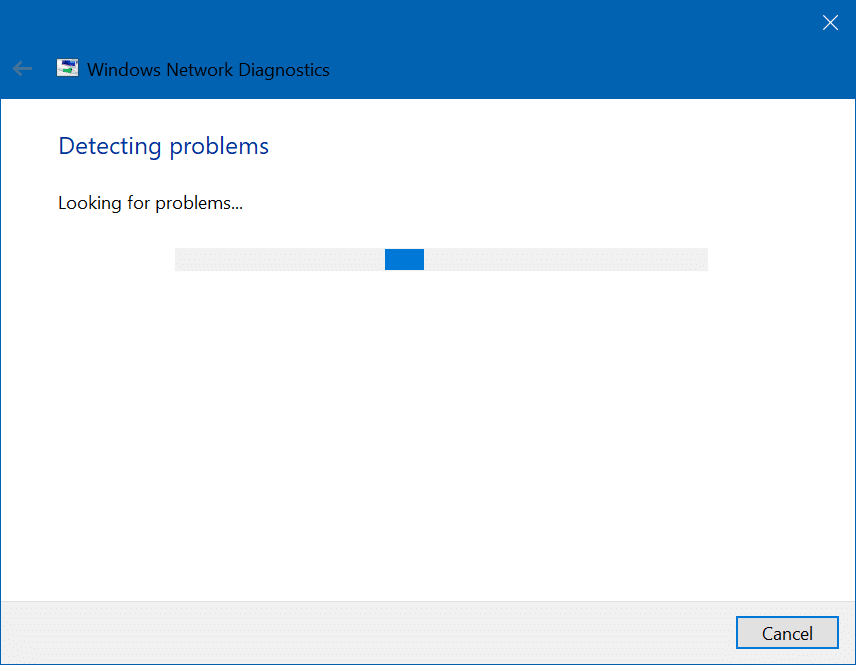
Method 1: Run Network troubleshooter
1. Клацніть правою кнопкою миші на значок мережі at the taskbar and click on Усунення несправностей.
![]()
2. The Network Diagnostics window will open. Follow the on-screen instructions to run the Troubleshooter.
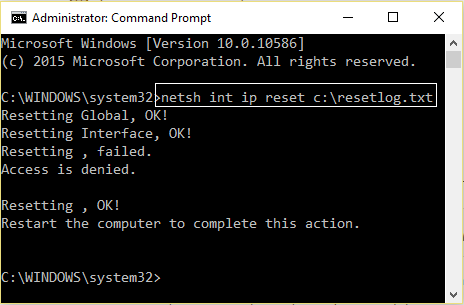
Спосіб 2: Скиньте TCP / IP
1. Right-click on the Windows button and select “Command Prompt(Admin).”

2. Введіть таку команду: netsh int ip reset c:resetlog.txt
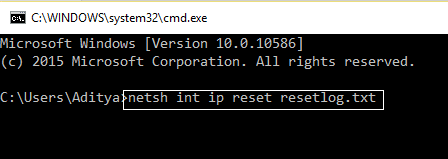
3. If you don’t want to specify the directory path then use this command: netsh int ip скинути resetlog.txt
4. Перезавантажте ПК.
Method 3: Change Bitdefender firewall settings (Or your Antivirus Firewall)
1. Open Settings of Bitdefender Internet Security and choose Брандмауер.
2. Клацніть наAdvanced Settings"Кнопку.
3. Make sure that “Увімкніть спільний доступ до підключення до Інтернету” перевірено.
ПРИМІТКА: If you don’t have the above setting then disable “Block Internet Connection Sharing” instead of above.
4. Click the OK button to save changes.
5. And if it doesn’t work try disabling your Antivirus Firewall and enabling Windows Firewall.
For maximum people changing firewall settings fixes the limited access or no connectivity WiFi problem, but if it didn’t work for you don’t lose hope we still have a long way to go, so follow the next method.
Method 4: Change adapter settings
1. Open the Bitdefender, then select Protection module і натисніть Firewall feature.
2. Make sure the Firewall is turned ON and then go to the Adapters tab and perform the following changes:
Set Network type to "Home/Office"
Set Stealth Mode to "Off"
Set Generic to "On"
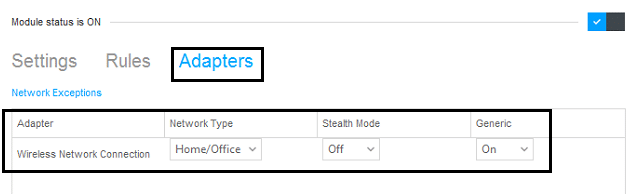
3. Restart your PC to apply these changes.
Method 5: Wake up your Wi-Fi Adapter
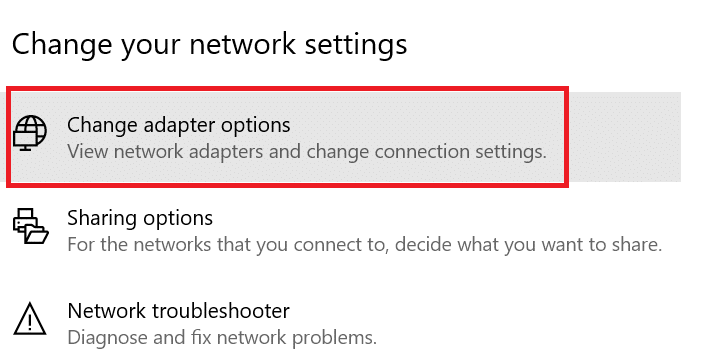
1. Клацніть правою кнопкою миші on the network icon in the notification area and select відкритий Network & Internet Settings.

2 Під Змініть налаштування мережі, натисніть на Змінити параметри адаптера.
3. Натисніть на свій Мережа WiFi і виберіть Властивості.
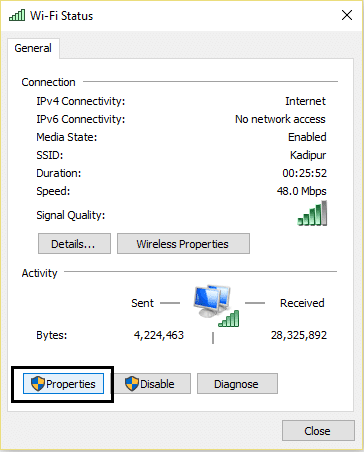
4. Зараз в Властивості WiFi натисніть Налаштувати
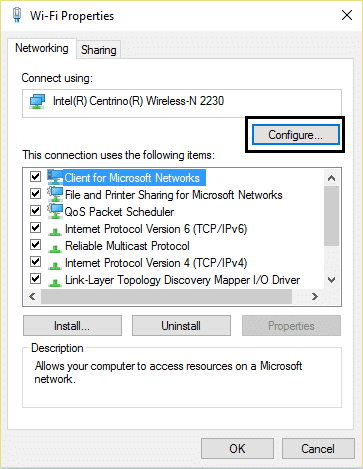
5. Go to the Power Management tab and uncheck “Дозвольте комп’ютеру вимкнути цей пристрій, щоб заощадити енергію."
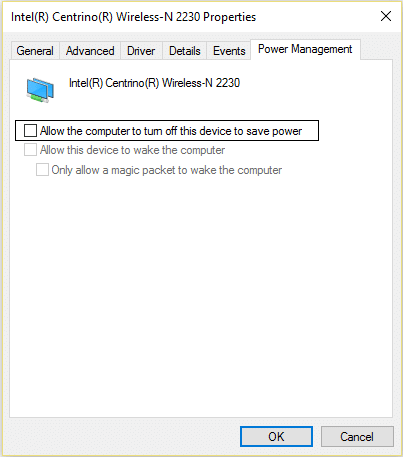
6. Перезавантажте комп'ютер.
Спосіб 6: Використовуйте Google DNS
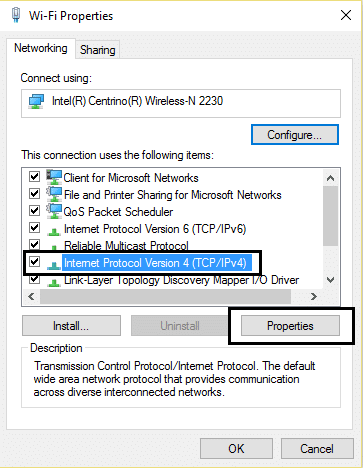
1. Again go to your Wi-Fi properties.
2. Тепер виберіть Версія 4 Протокол Інтернету (TCP / IPv4) і натисніть кнопку Властивості.
3. Check the box saying “Використовувати наступний сервер DNS адреси” and enter the following:
Переважний DNS-сервер: 8.8.8.8
Альтернативний DNS-сервер: 8.8.4.4
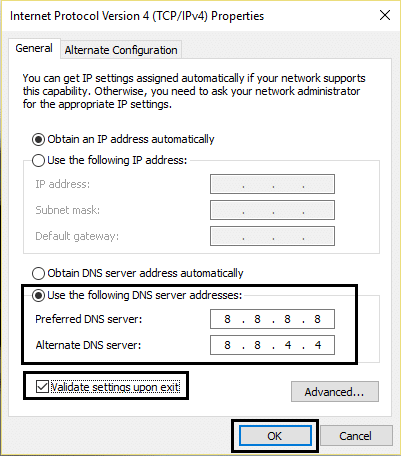
4. Click OK to save, then click close and перезапуск ваш ПК.
Method 7: Reset TCP/IP Auto-tuning
1. Right-click on the Windows key and select “Командний рядок (адміністратор)."
2. Type the following commands:
netsh int tcp set heuristics disabled
netsh int tcp set global autotuninglevel=disabled
netsh int tcp set global rss=enabled
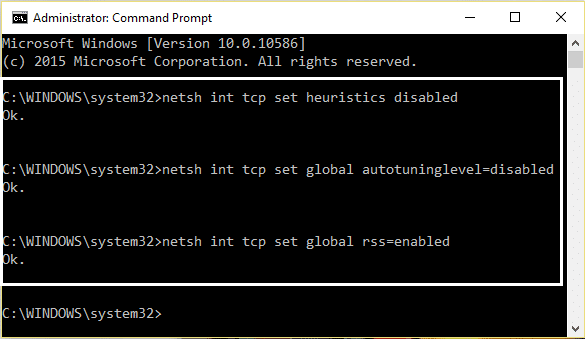
3. Перезавантажте комп'ютер.
Method 8: Enable Download over metered connections
1 Натисніть на ключ для Windows і виберіть Налаштування.
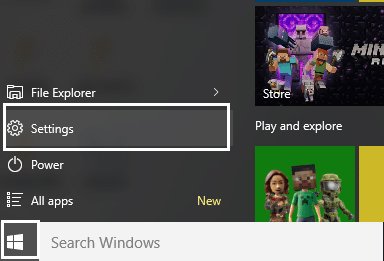
2. Now in settings click on Мережа та Інтернет.

3. Here you will see Додаткові параметри, натисніть на нього.
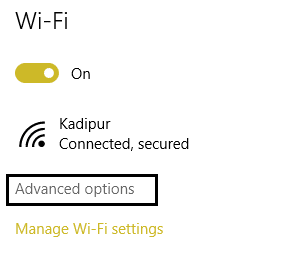
4. Переконайтеся, що ваш Metered connection is set to ВКЛ.
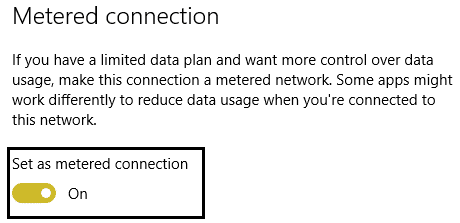
5. Перезавантажувати застосувати зміни.
Yeah, I admit, this is a stupid step but hey for some people it worked out so why not try it and who knows your limited access or no connectivity WiFi issues may be fixed.
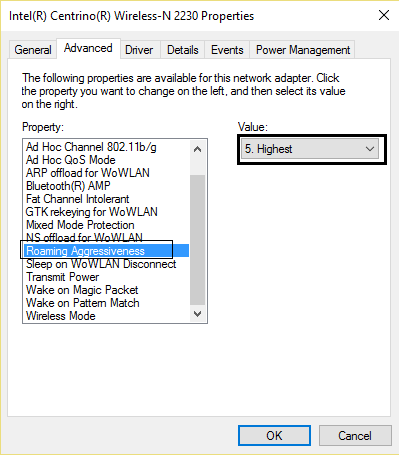
Method 9: Set Roaming Aggressiveness to Maximum
1. Клацніть правою кнопкою миші on the network icon in the notification area and select відкритий Network & Internet Settings.
2 Під Змініть налаштування мережі, натисніть на Змінити параметри адаптера.
3. Тепер виберіть свій Wi-Fi Internet, і натисніть на Властивості.
4. Inside Wi-Fi properties click on Налаштувати
5 Перейдіть до the Advanced tab і знайти Агресивність роумінгу установка.
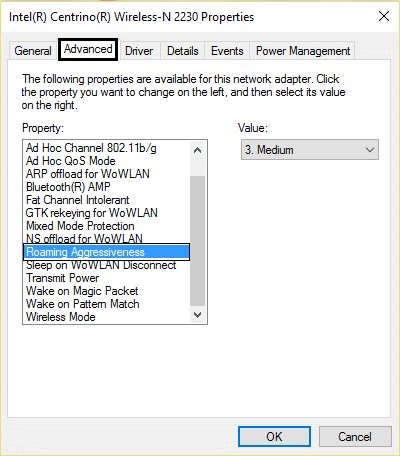
6. Change the value from Medium to Highest і натисніть кнопку ОК.
7. Перезавантажувати застосувати зміни.
Спосіб 10: Оновіть драйвери
1. Press Windows key + R and type “devmgmt.msc” in Run dialogue box to open the диспетчер пристроїв.

2. Розгорнути Мережеві адаптери, а потім клацніть правою кнопкою миші на вашому Wi-Fi контролер(наприклад, Broadcom або Intel) і виберіть Оновлення драйверів.

3. In the Update Driver Software Windows, select “Перегляньте комп'ютер на драйвері."

4. Тепер виберіть «Дозвольте вибрати зі списку драйверів пристроїв на своєму комп’ютері."

5. Спробуйте оновити драйвери з перерахованих версій.
6. If the above didn’t work then go to the веб-сайт виробника to update drivers: https://downloadcenter.intel.com/
7. Перезавантажувати застосувати зміни.
Вам також може сподобатися:
I hope by now any one of the methods must have worked for you to fix limited access or no connectivity WiFi issues. If you still have any queries regarding this guide please feel free to ask them in the comments.
![[SOLVED] keyboard has stopped working on Windows 10](https://lbsite.org/wp-content/uploads/2023/01/Solved-keyboard-has-stopped-working-on-Windows-10.png "[SOLVED] keyboard has stopped working on Windows 10")
