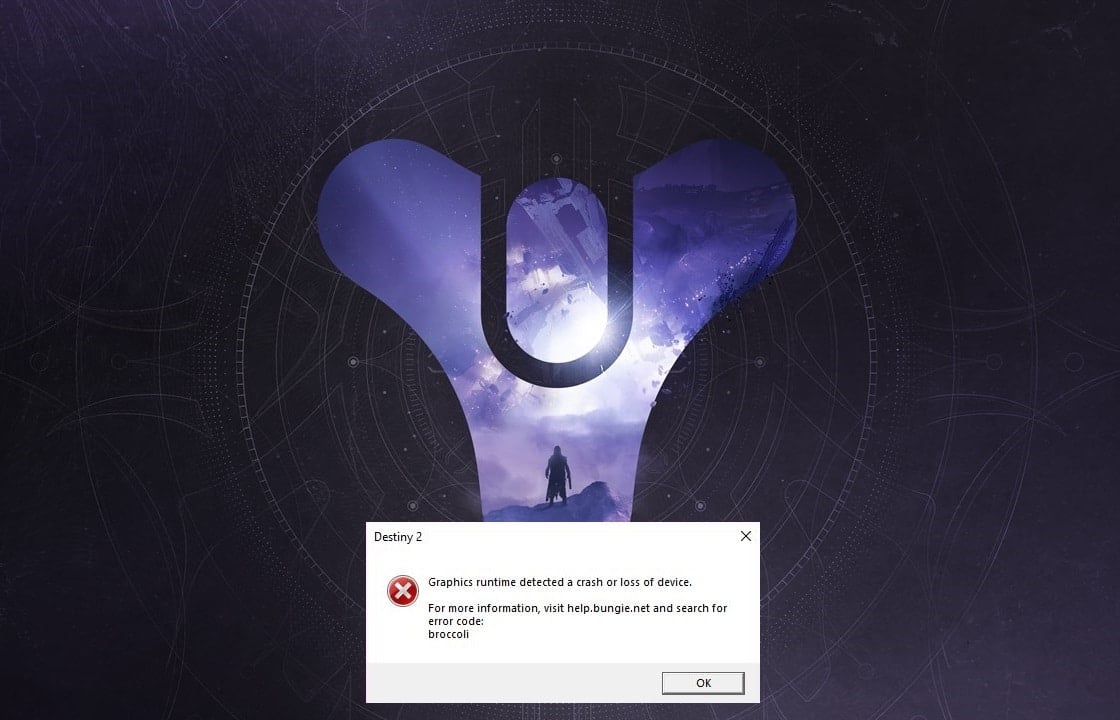
Destiny 2 is a multiplayer shooting game that is hugely popular amongst gamers today. Bungie Inc developed this game and released it in 2017. It is now available on Windows computers along with PlayStation 4/5 and Xbox models – One/X/S. Since it is an online-only game, you would require a stable and high-speed internet connection on your device to play it. Many users reported some issues while playing this game on their Windows systems, majorly: error code بروکولی and error code میرین بیری. Keep reading to learn more about Destiny 2 Error Code Broccoli and the methods to fix it.
درست کریں قسمت 2 Error Code Broccoli on Windows 10
Here are the general reasons why this error occurs while playing Destiny 2:
- Overclocked GPU: All Graphics Processing Units are set to run at a particular speed called the بنیادی رفتار which is set by the device manufacturer. On some GPUs, users can boost their performance by increasing the GPU speed to a level higher than the base speed. However, overclocking the GPU may cause the Broccoli error.
- Full-screen glitch: You are more likely to face Destiny 2 error code Broccoli if you are using NVIDIA GeForce GPU.
- Outdated Windows version: If the Windows operating system is working on an outdated version, then the system will not update the GPU drivers on the PC. You need to ensure that you have the latest version of Windows installed.
- Corrupted/Outdated Graphics card drivers: The Destiny 2 error code Broccoli can occur if the graphic drivers on your PC are outdated or corrupt. Destiny 2 requires compatible graphics card and updated graphics card drivers so that your gaming experience is smooth and error-free.
To fix Destiny 2 error code Broccoli, try the methods written below, one-by-one, to find a possible solution for your Windows 10 system.
Method 1: Run Game in Windowed Mode (NVIDIA)
This method is applicable only if you use NVIDIA GeForce تجربہ to play Destiny 2. Since GeForce Experience might force the game into Full-screen mode, leading to error code Broccoli learn How to Manually Add Game to GeForce Experience learn How to Manually Add Game to GeForce Experience. Follow the steps below to force the game to run in Windowed Mode instead:
1. شروع کریں NVIDIA کے GeForce تجربہ درخواست.
2. پر جانے کے ہوم پیج (-) ٹیب اور منتخب کریں قسمت 2 from the list of games displayed on the screen.
3. نیچے سکرول کریں اور پر کلک کریں۔ ٹول آئیکن ترتیبات کو شروع کرنے کے لئے.
4. پر کلک کریں ڈسپلے موڈ کے تحت کسٹم سیٹنگز اور منتخب کریں ہوا ہوا ڈراپ ڈاؤن مینو سے.
Last. آخر میں ، پر کلک کریں کا اطلاق کریں تبدیلیوں کو بچانے کے لئے.
6. لانچ قسمت 2 اور فعال کریں فل سکرین موڈ from here instead. Refer highlighted section in the pic below.
طریقہ 2: ونڈوز کو اپ ڈیٹ کریں۔
The developers named the error code Broccoli to indicate the inconsistencies with the Graphics card drivers and Windows OS. If the graphics card driver updates are handled by the Windows Update service on your PC, it is necessary to ensure that no Windows updates are pending. Follow the given steps to update Windows:
1. ٹائپ کریں تازہ ترین معلومات in ونڈوز کی تلاش box. Launch the ونڈوز اپ ڈیٹ کی ترتیبات۔ from the search result, as shown.
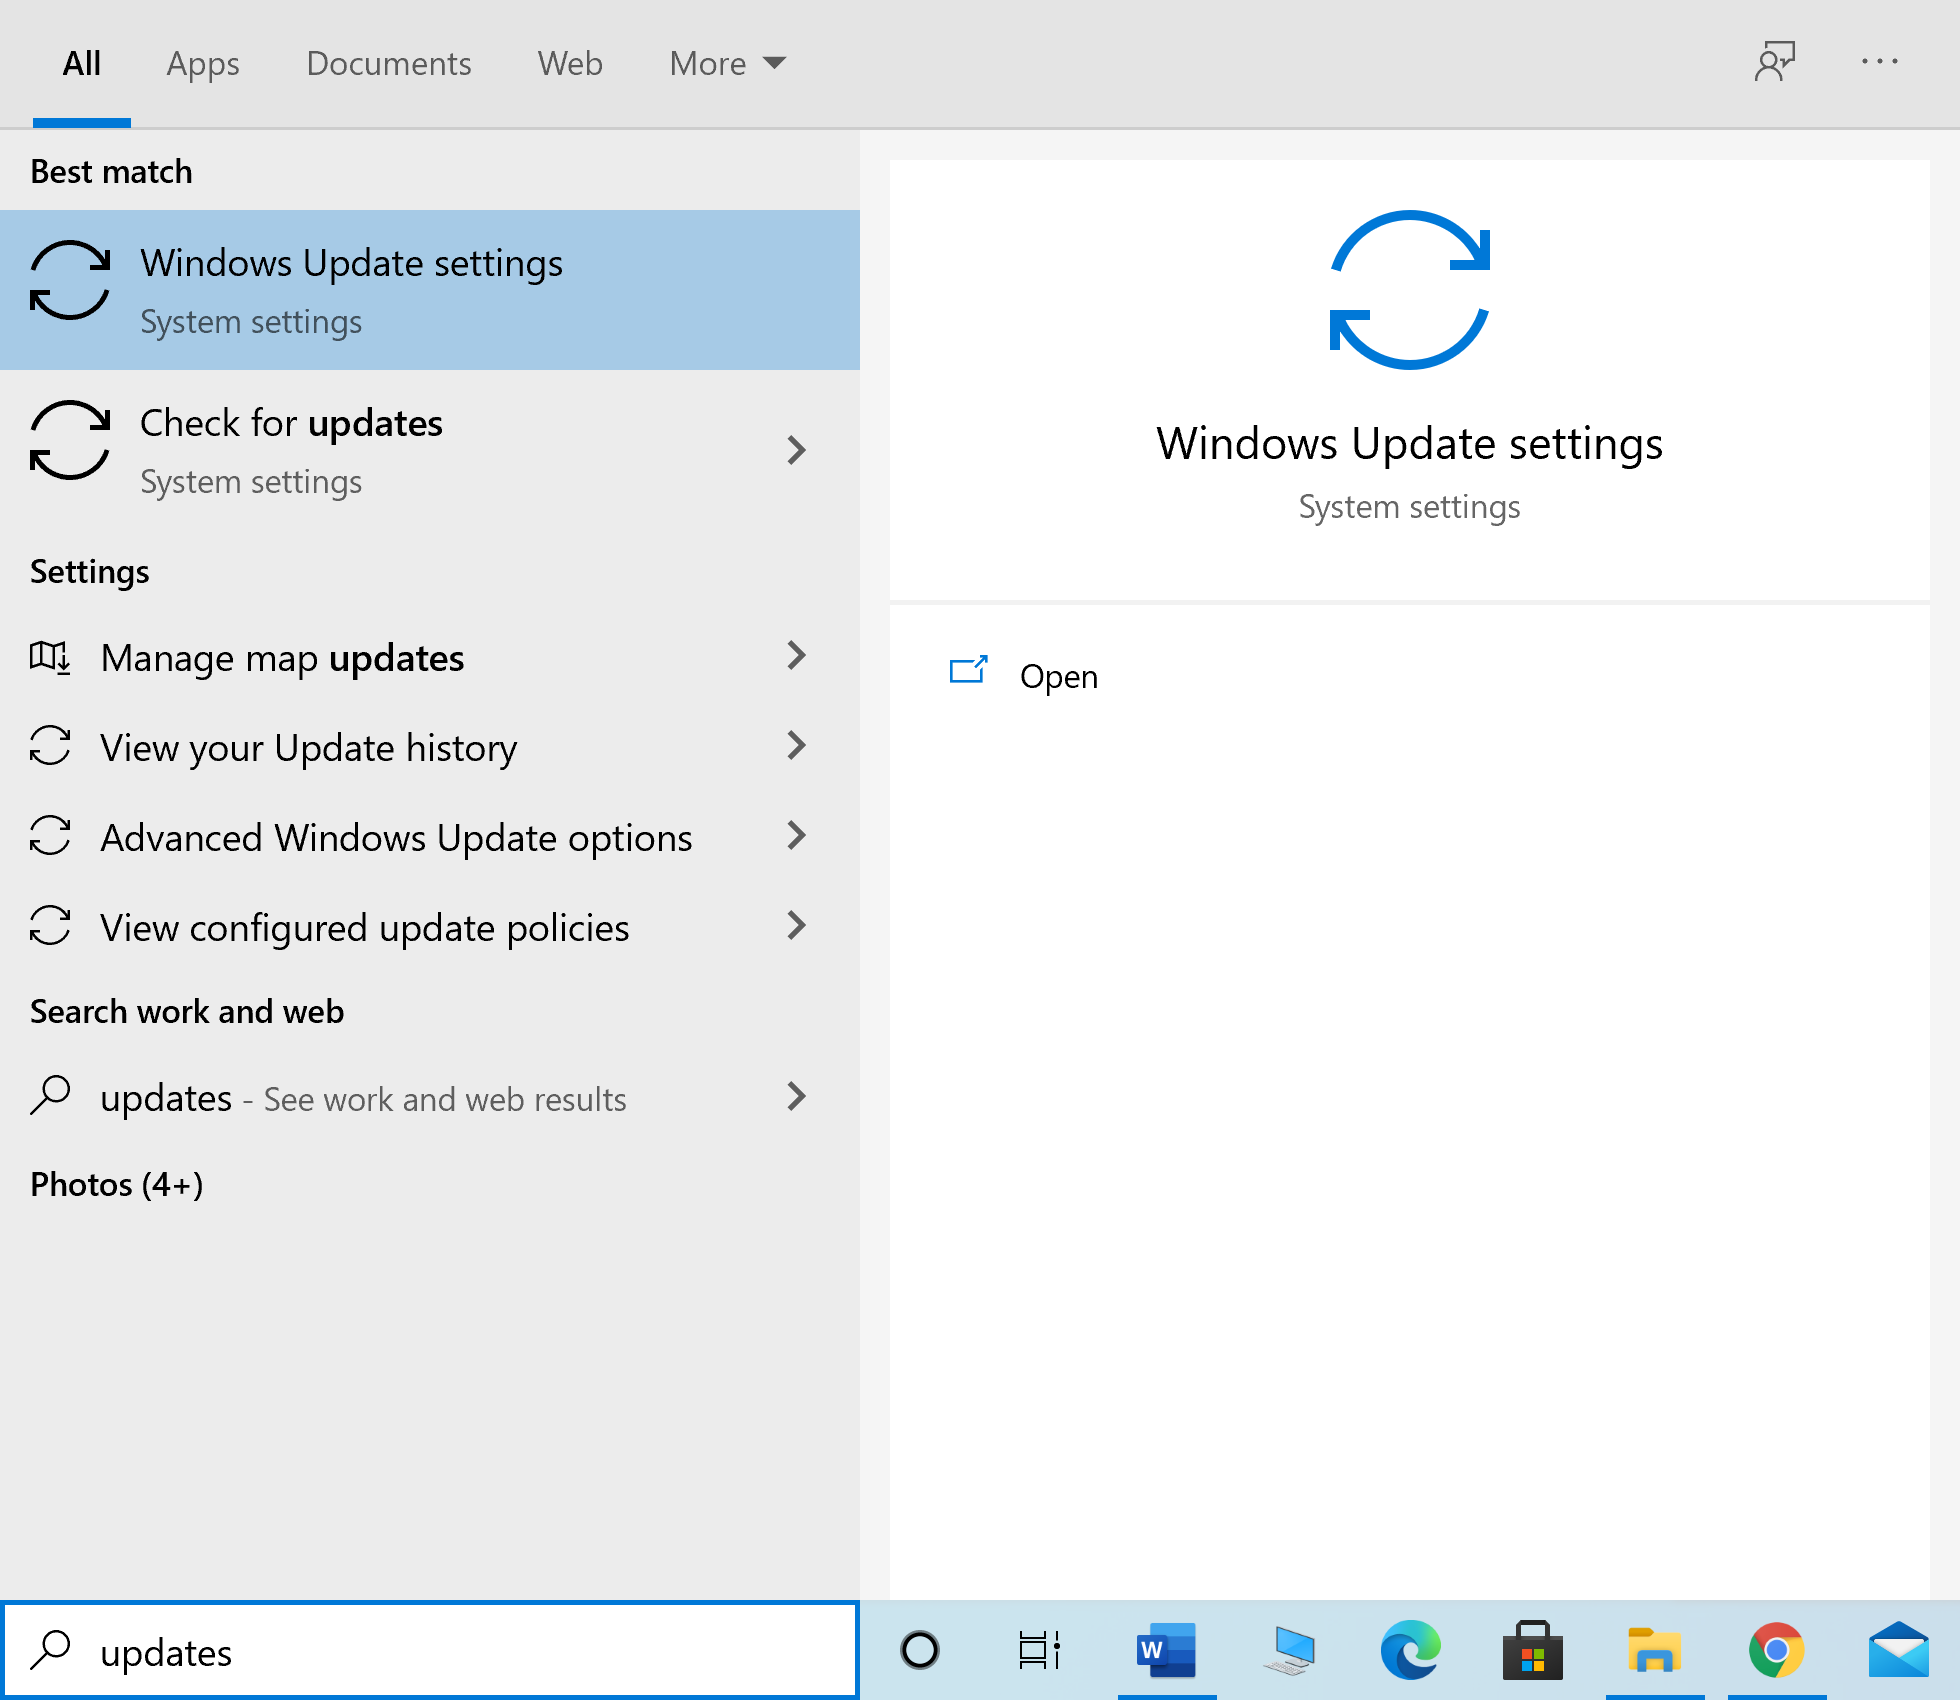
2. پر کلک کریں اپ ڈیٹس کی جانچ پڑتال کریں from the right pane, as depicted.
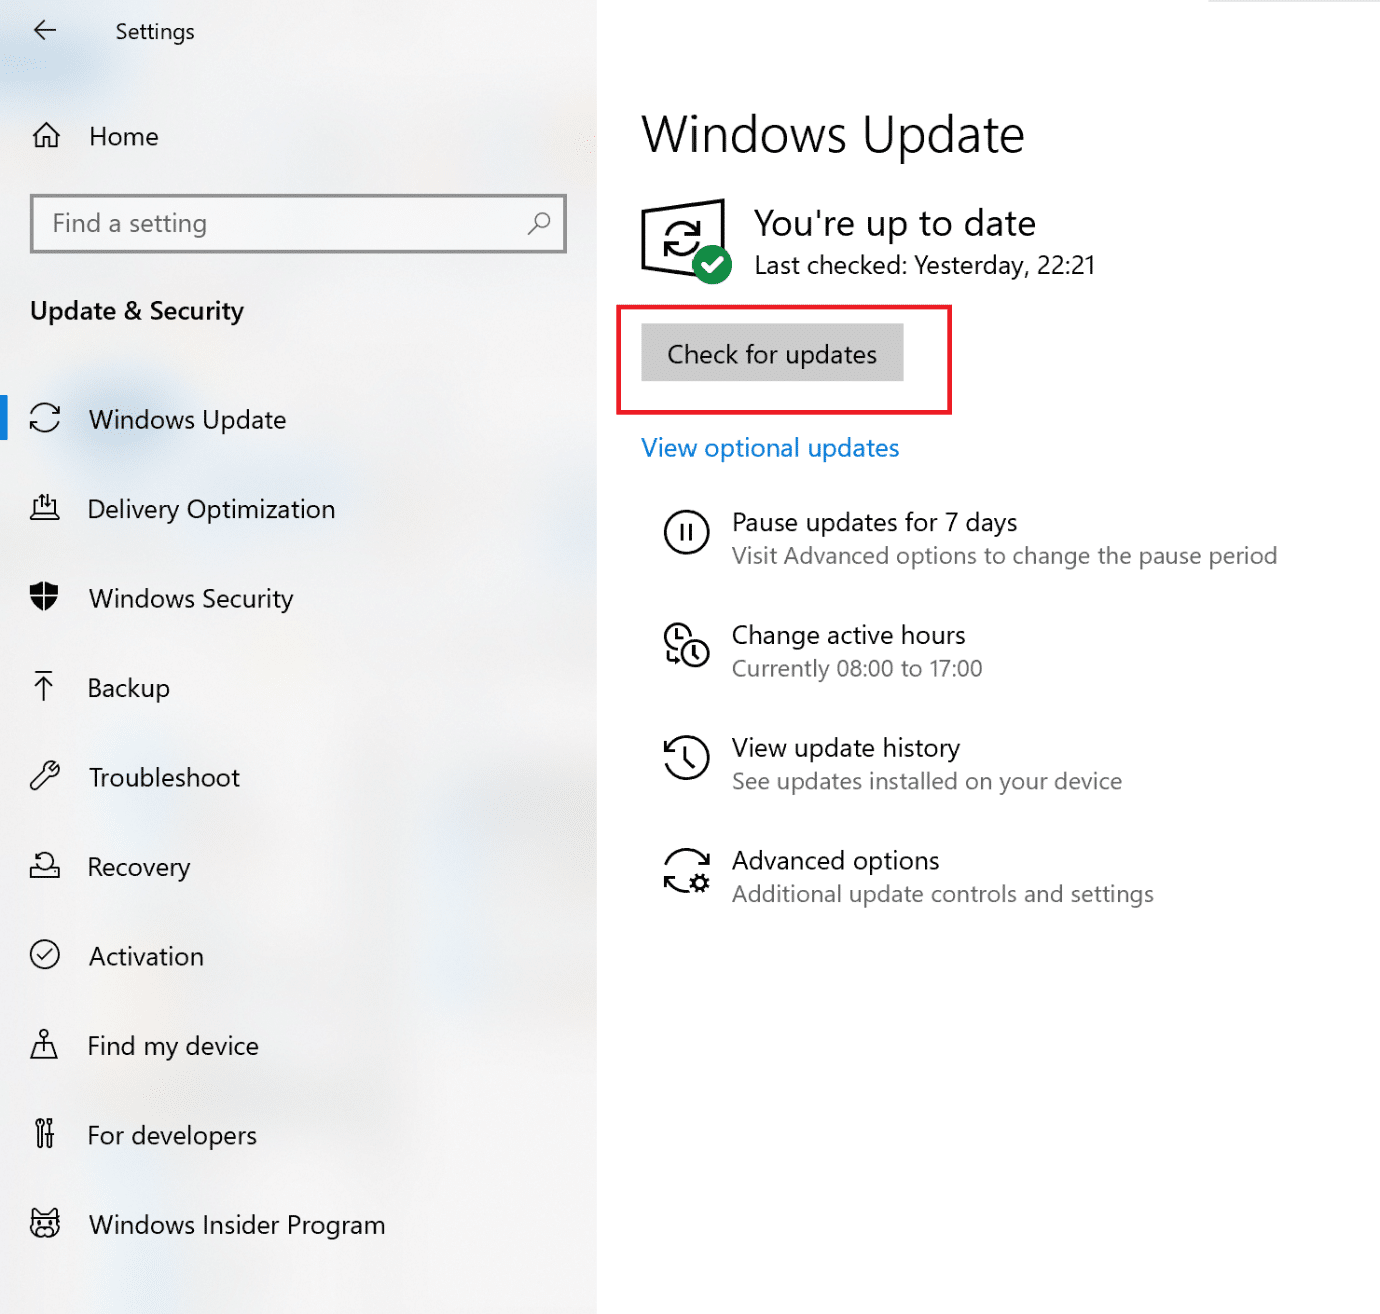
3 انتظار کریں for Windows to search for and install any pending updates.
نوٹ: Your PC may need to restart several times during the update process. Return to Windows Update settings to install all available updates, after every restart.
After the process is complete, launch Destiny 2 and see if the game launches without Broccoli error. If not, there may be issues with Graphics card drivers which will be dealt with in succeeding methods.
بھی پڑھیں: Windows Updates Stuck? Here are a few things you could try!
Method 3: Reinstall Graphics Card Drivers
If the above methods did not work for you, you need to update Graphics card drivers on your PC to eliminate the issue of corrupt and/or outdated drivers. This can possibly resolve Destiny 2 error code Broccoli.
Given below are two options:
- update graphics card drivers using Device Manager.
- update the drivers by reinstalling them manually.
Option 1: Automatically Update Graphics Card Drivers
1. ٹائپ کریں آلہ منتظم میں ونڈوز کی تلاش box and launch the app from there.
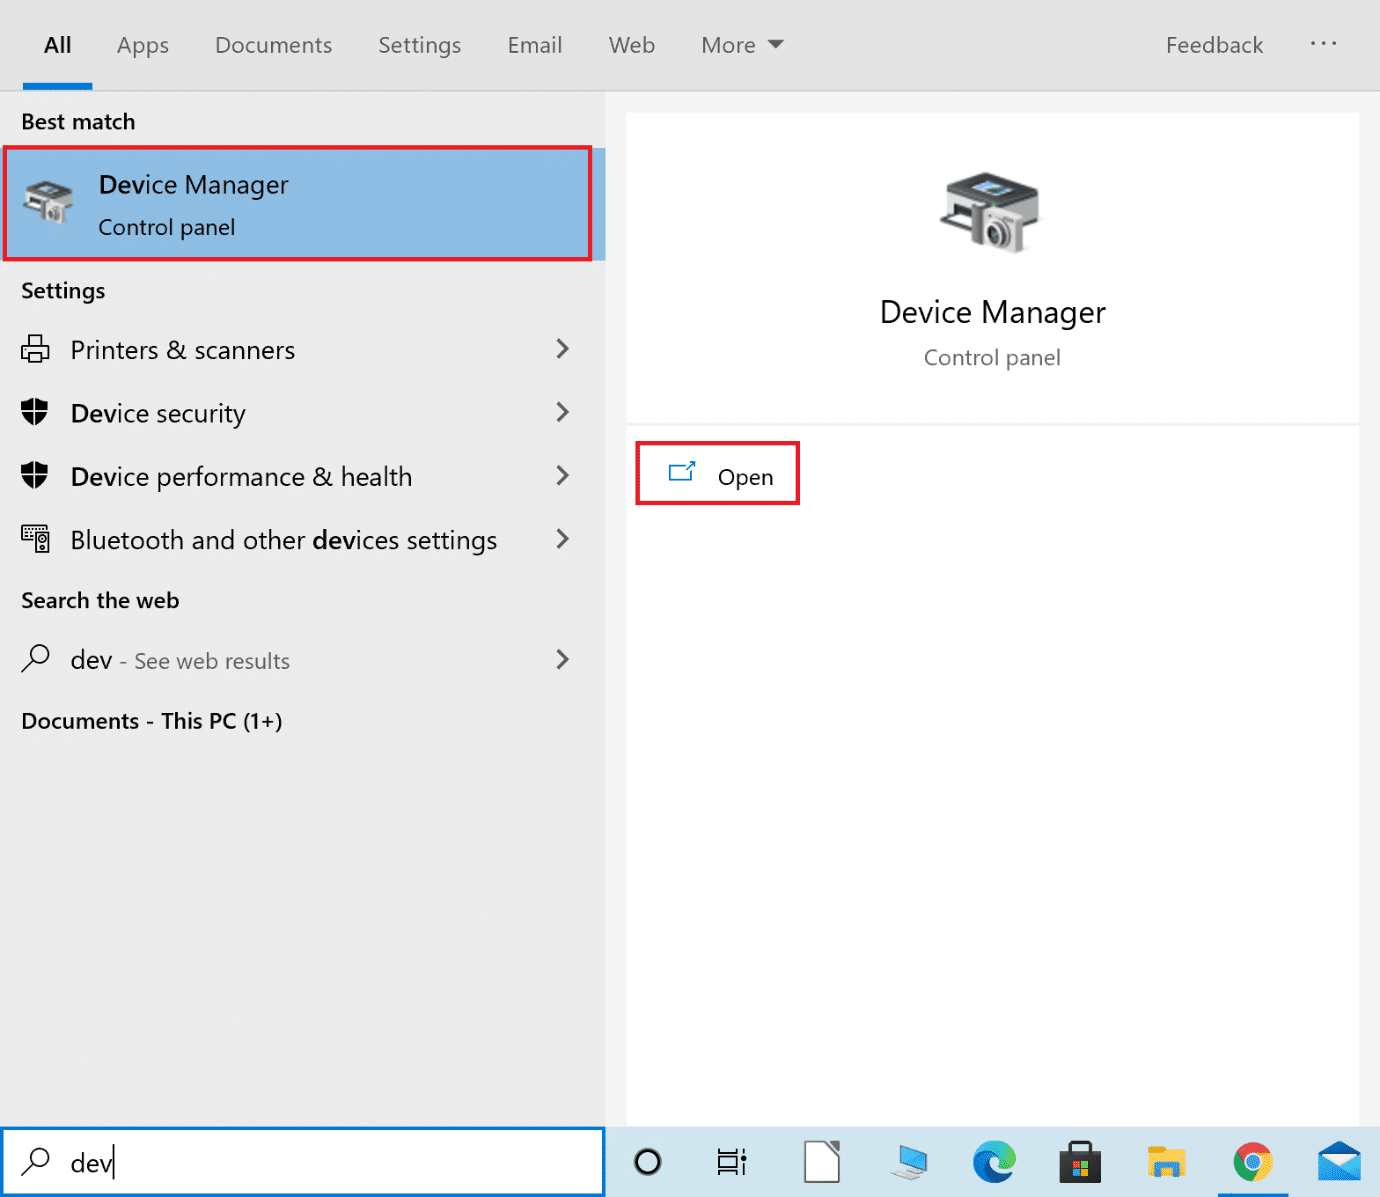
2. پر کلک کریں نیچے کی طرف تیر کرنے کے لئے اگلے ڈسپلے اڈاپٹر اس کو بڑھانا
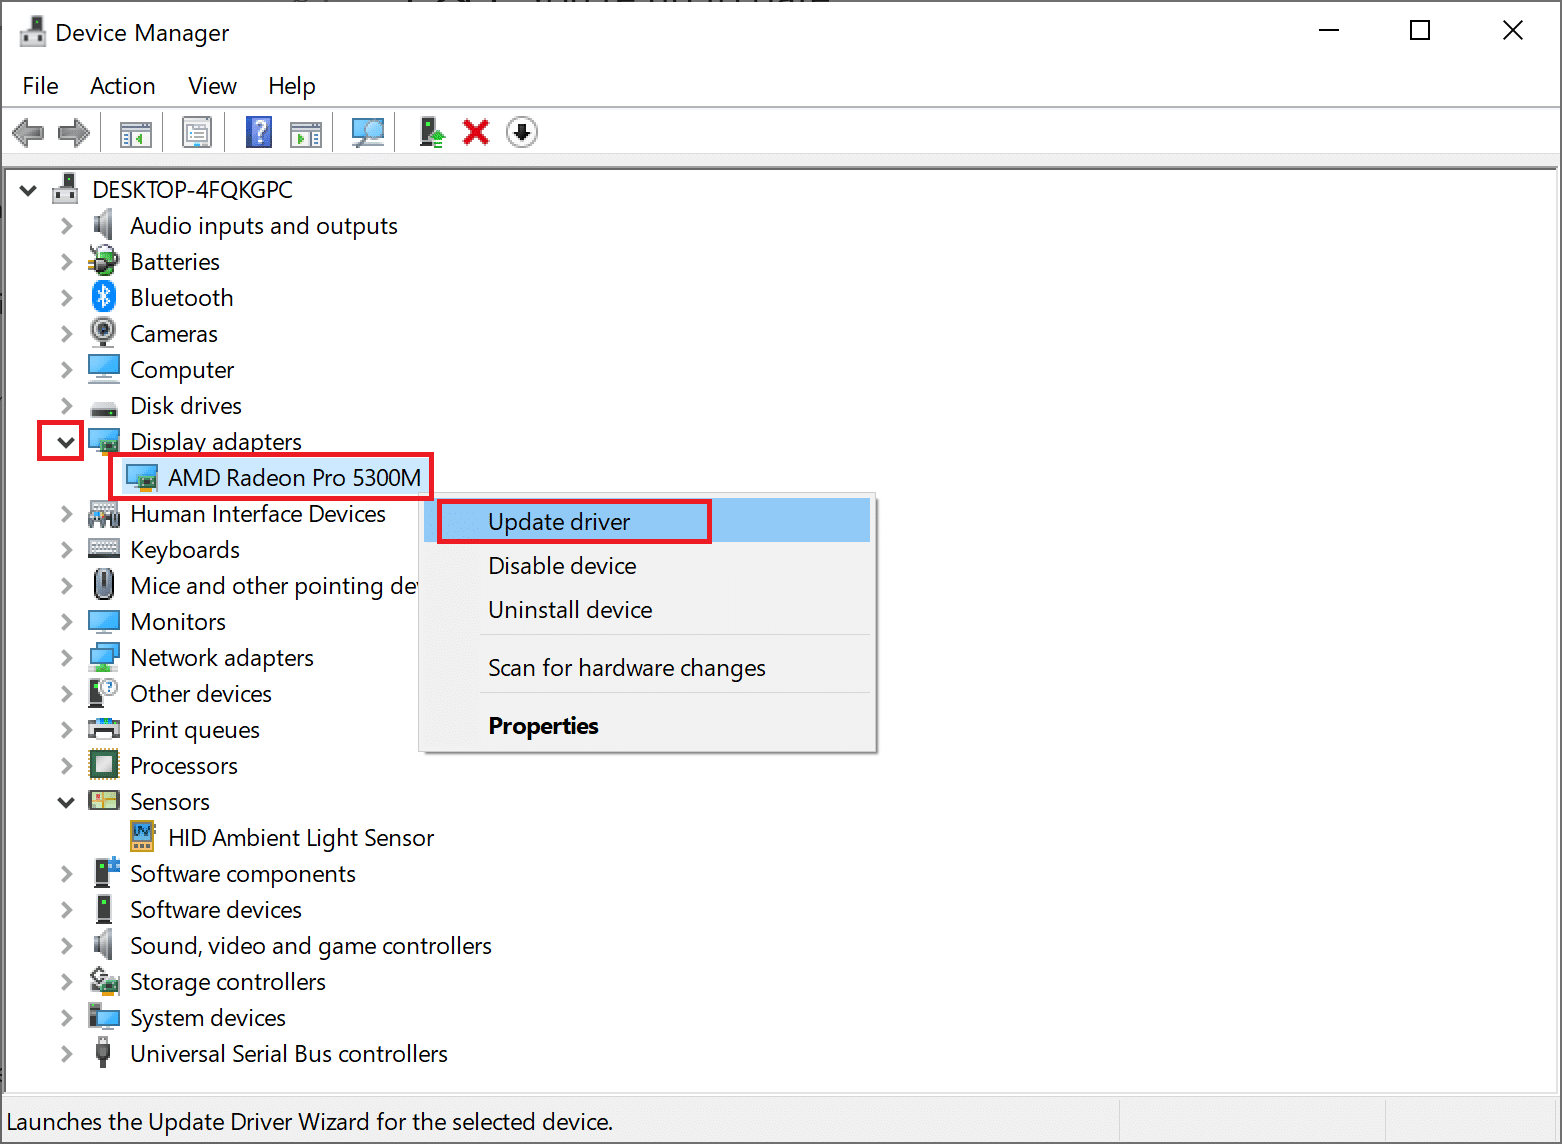
3. Right-click on your Graphics card driver and select ڈرائیور کو اپ ڈیٹ کریں from the drop-down menu, as depicted below.
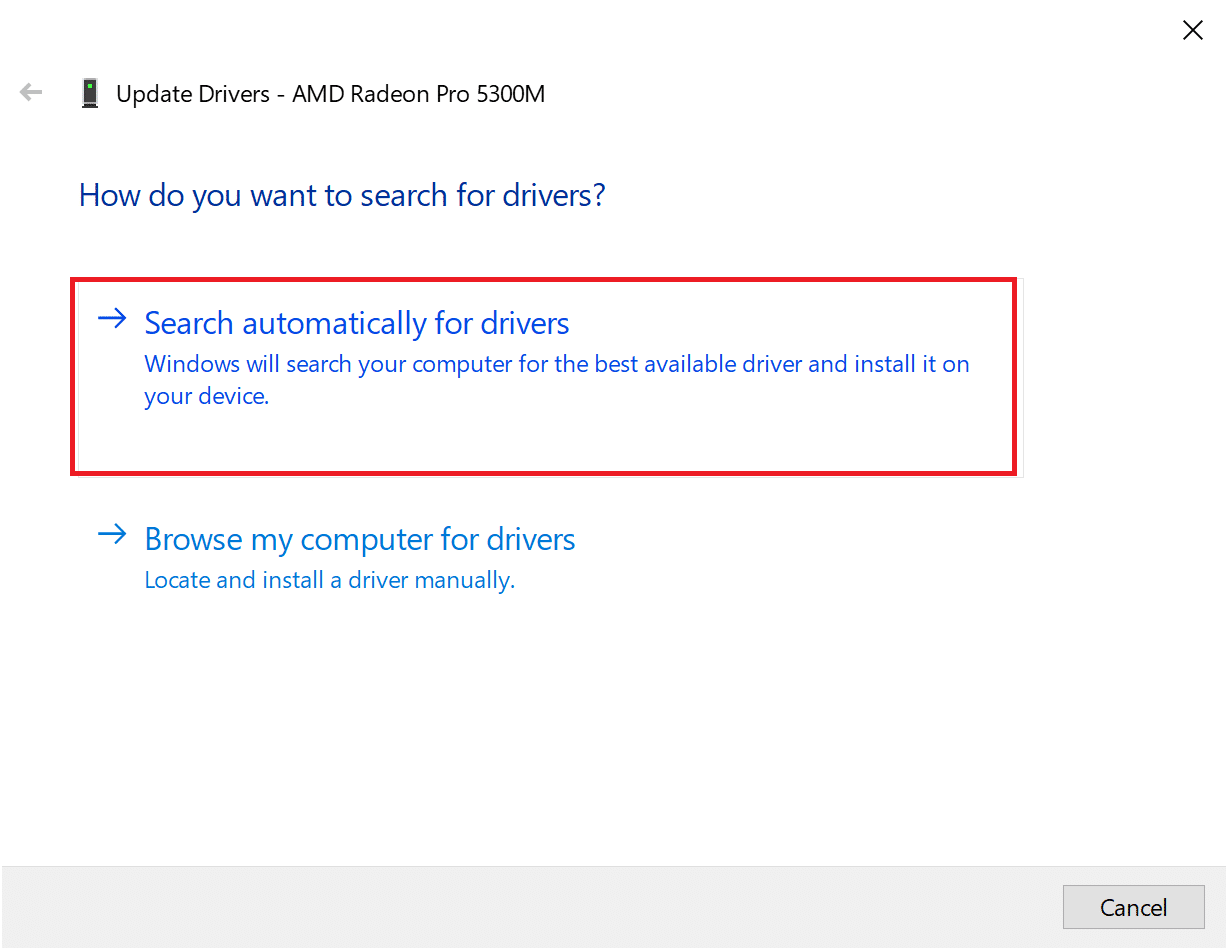
4. In the pop-up box that follows, click on the option titled ڈرائیوروں کے لئے خود بخود تلاش کریں، جیسا کہ ذیل میں روشنی ڈالی گئی ہے۔
5. انتظار کریں for your PC to install updated drivers if any are found.
6. Restart the computer and launch the game.
If the above option did not work, you need to manually update the graphics card drivers by reinstalling them on your computer. Read below to do so.
Option 2: Manually Update Drivers by Reinstallation
This process has been explained for users of AMD graphic cards and NVIDIA graphics cards. If you use any other graphics card, ensure to follow the correct steps to reinstall those.
Reinstall AMD Graphic Drivers
1. Download AMD Cleanup Utility یہاں سے.
2. Once the file is downloaded, right-click on it and select انتظامیہ کے طورپر چلانا.
3. پر کلک کریں جی ہاں پر AMD کلین اپ یوٹیلٹی pop-up box to enter ونڈوز ریکوری ماحولیات.
4. Once in محفوظ طریقہ, follow the instructions on the screen to complete the uninstallation process.
5. The AMD Cleanup Utility will completely remove AMD drivers without leaving leftover files on your system. Of course, if there are any corrupt AMD files, those will be removed too. After the process is complete, your machine will دوبارہ شروع کریں خود بخود. یہاں کلک کریں مزید پڑھنے کے لئے.
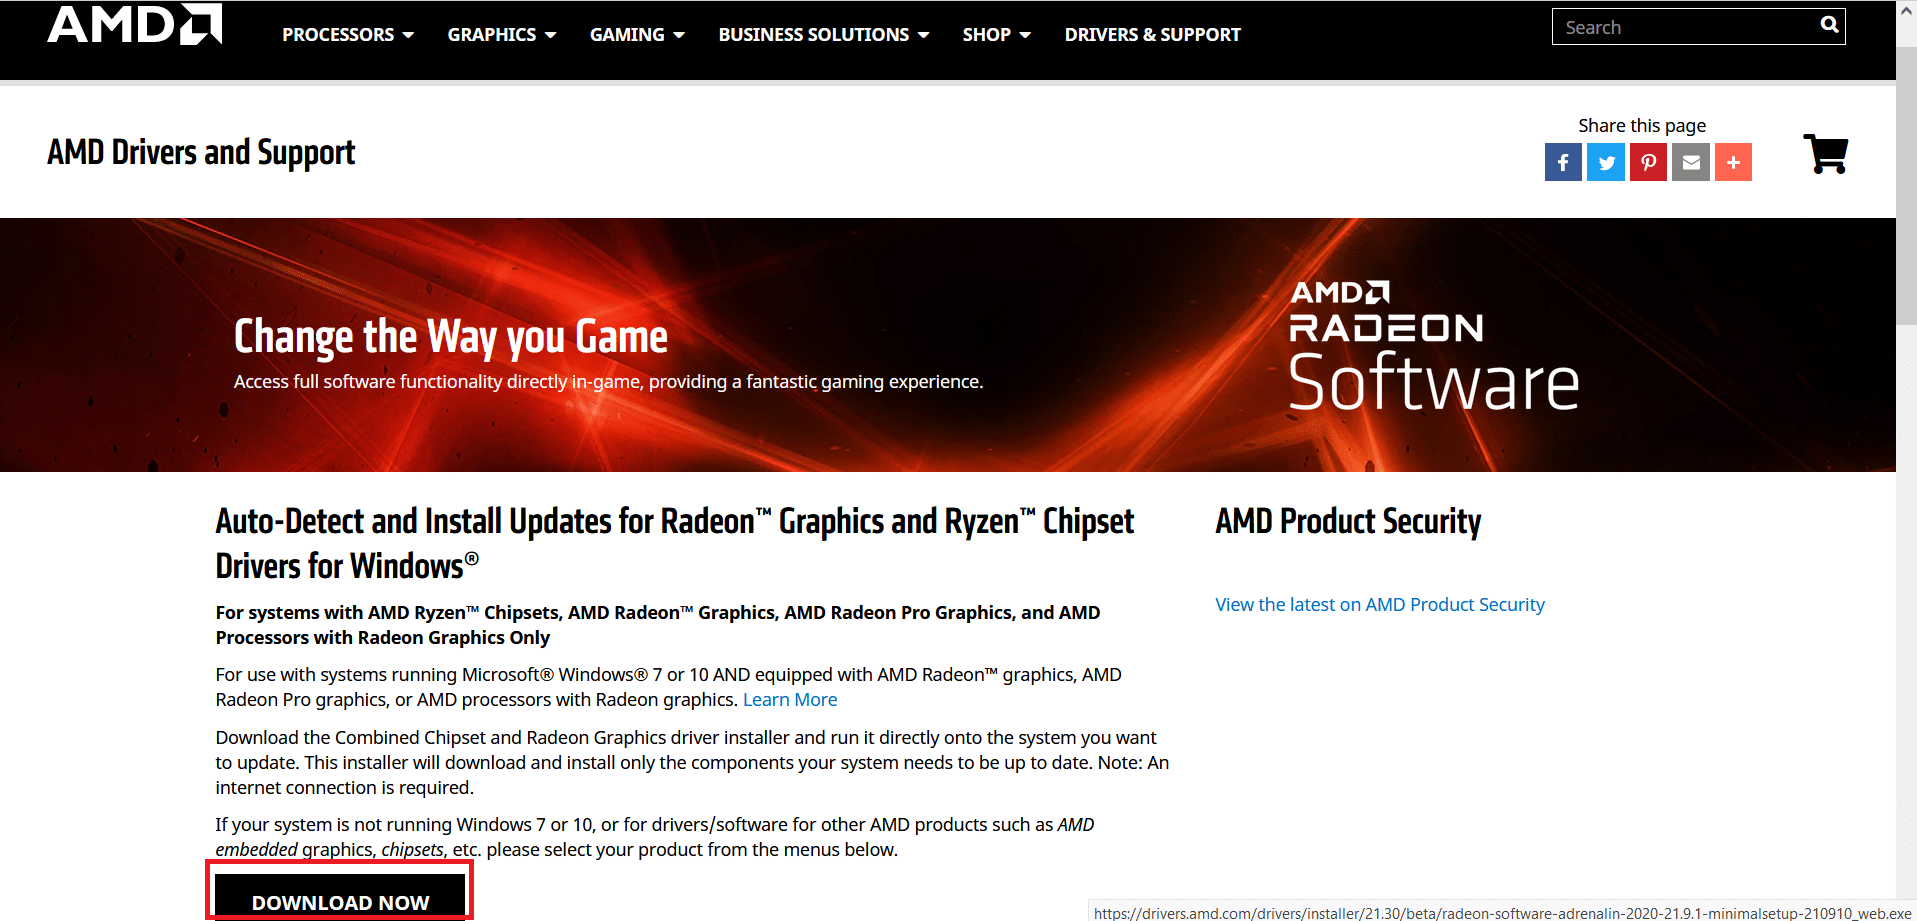
6. ملاحظہ کریں AMD کی سرکاری ویب سائٹ اور پر کلک کریں اب ڈاؤن لوڈ option displayed at the bottom of the screen, to download the latest drivers for your PC.
7. On the AMD Radeon Software Installer, click on تجویز کردہ ورژن to determine the most suitable drivers for the AMD hardware on your PC. انسٹال ان.
8. Follow the instruction on-screen to finish the installation. Once done, کمپیوٹر کو دوبارہ شروع کریں and enjoy playing Destiny 2.
Reinstall NVIDIA Graphics Cards
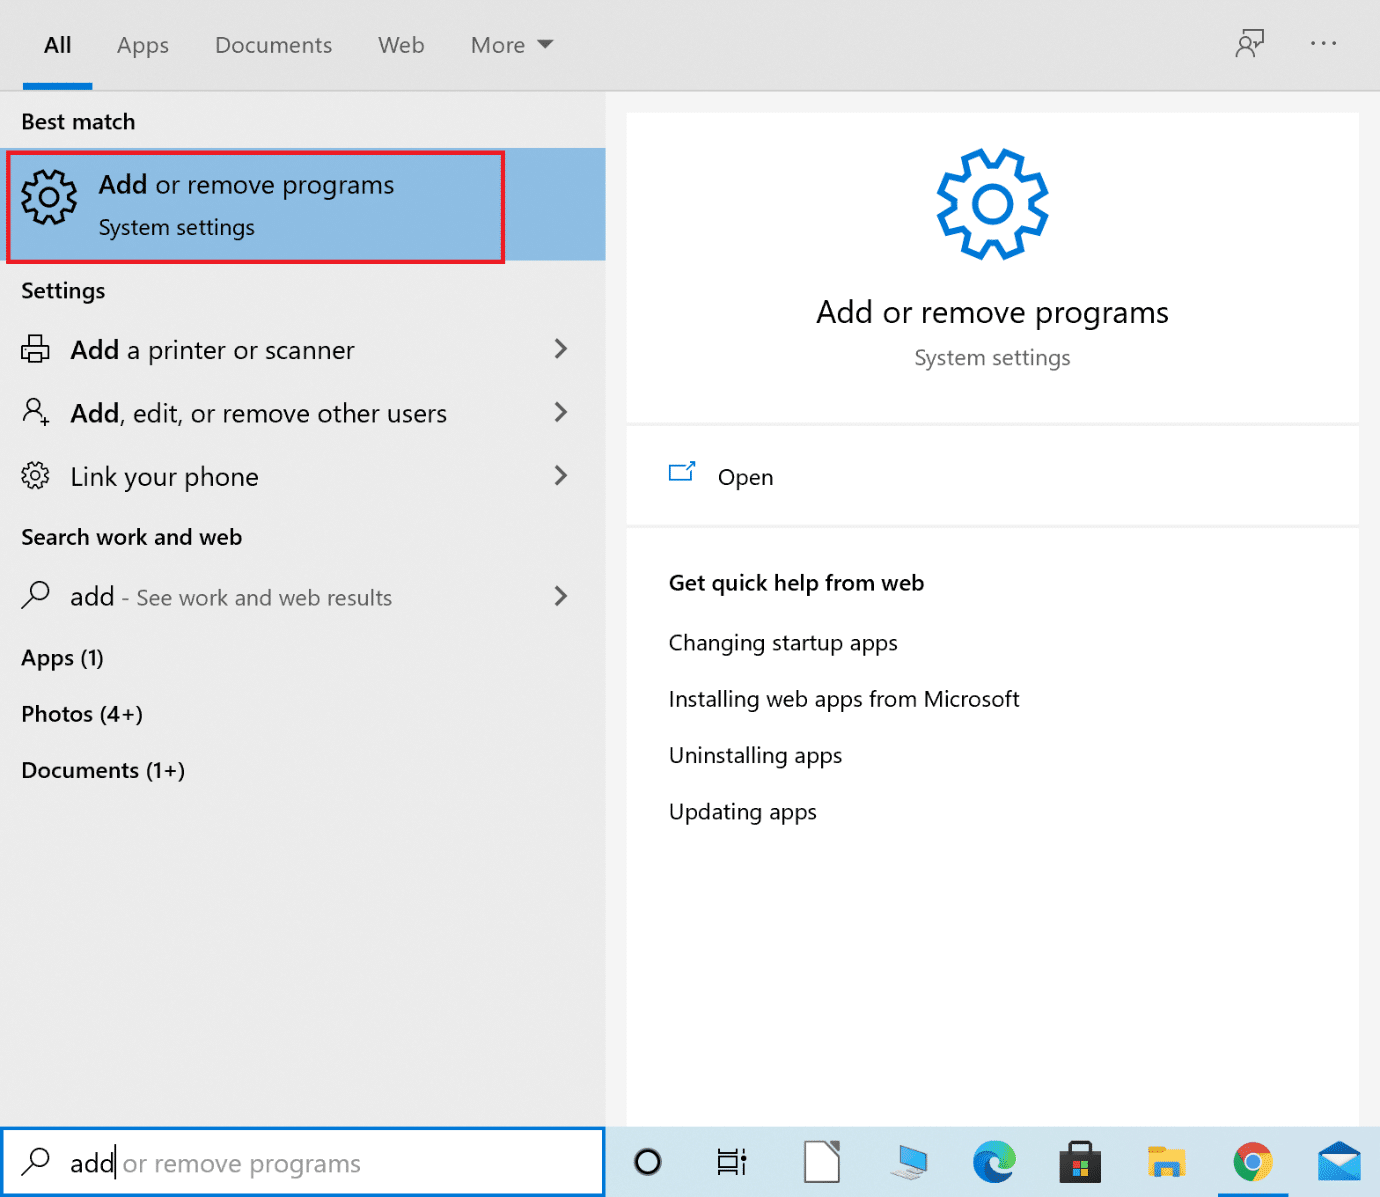
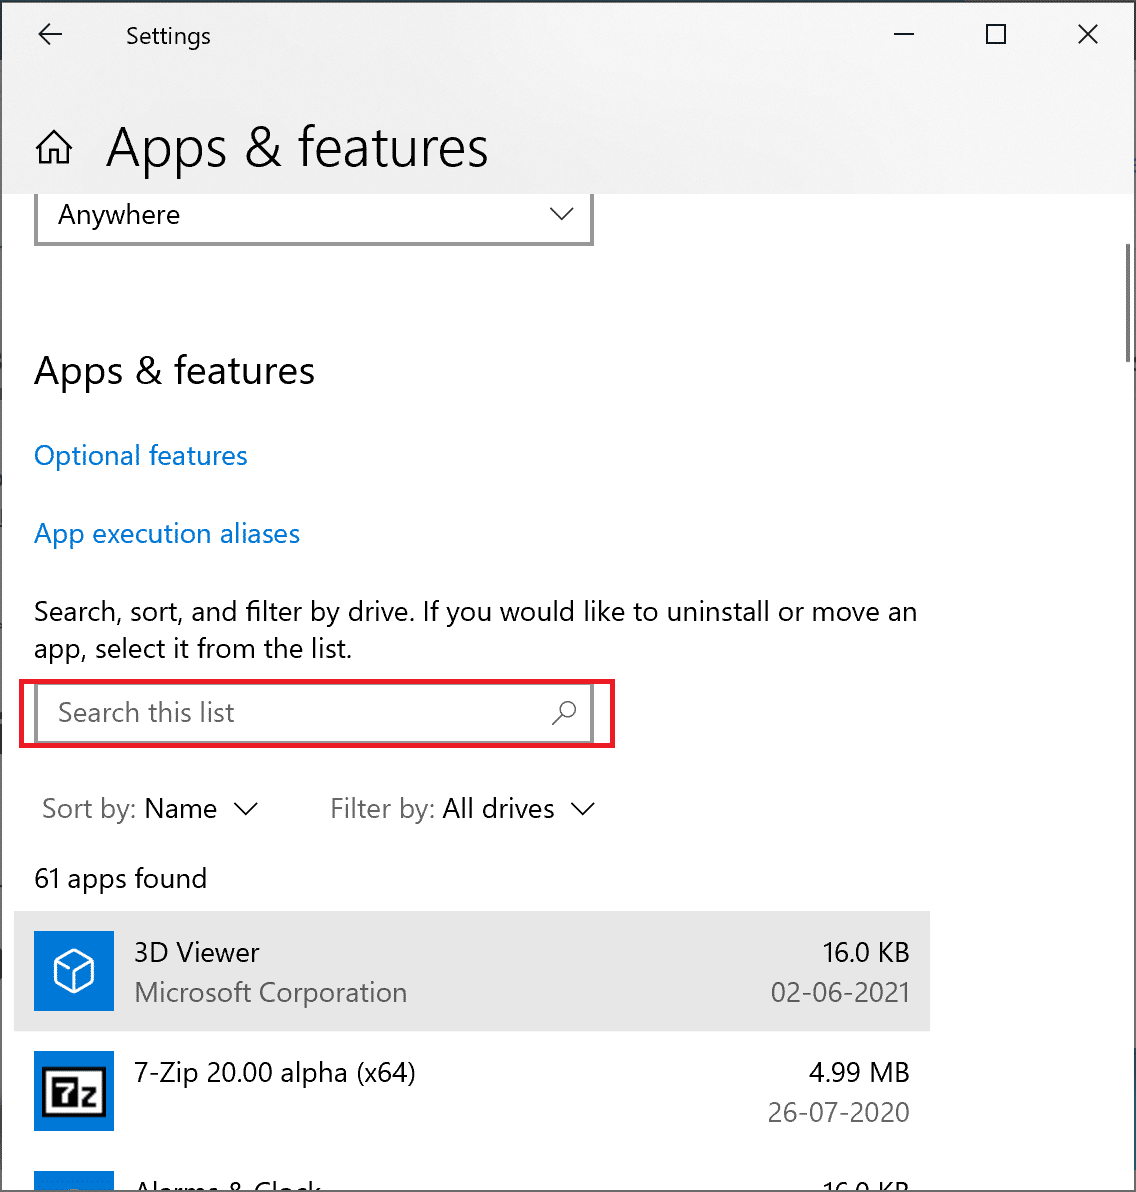
1. ٹائپ کریں پروگرام شامل کریں یا ختم کریں میں ونڈوز کی تلاش box and launch it from the search result, as shown.
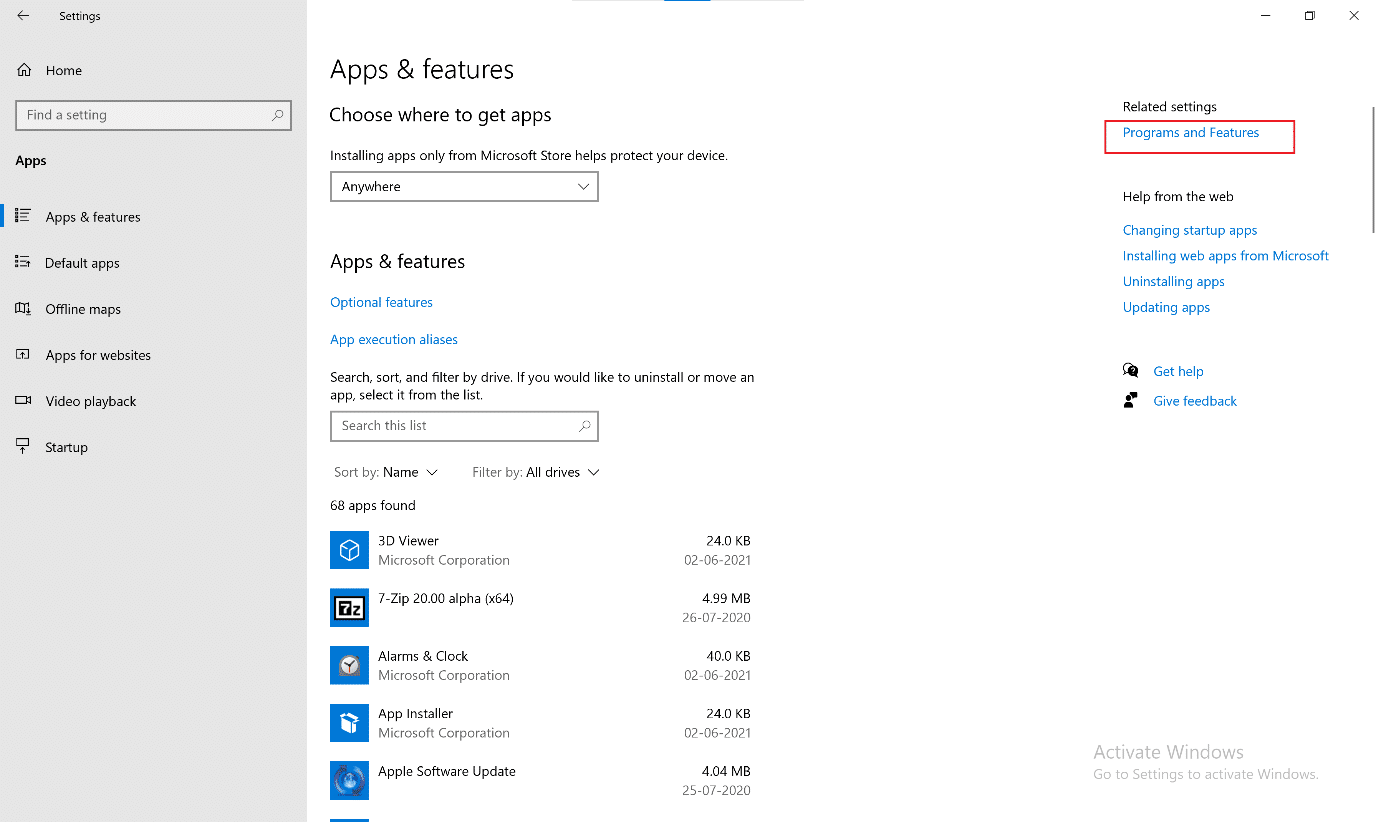
2. پر کلک کریں پروگرام اور خاکے کے تحت متعلقہ ترتیبات اسکرین کے دائیں جانب سے۔
3. پر کلک کریں نیچے کی طرف تیر کرنے کے لئے اگلے Change your view آئیکن جیسا کہ دکھایا گیا ہے۔
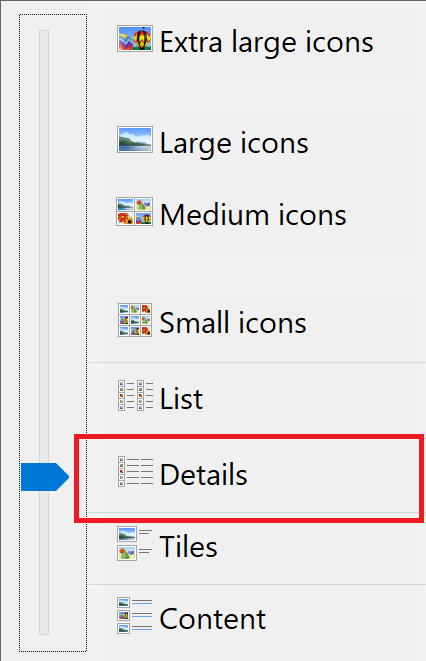
4. منتخب کریں تفصیلات دیکھیں from the list to view apps along with the name of the publisher, date of installation, and the version installed.
![]()
5. Select all instances of apps and programs published by NVIDIA. Right-click on each and select انسٹال کریں.
نوٹ: متبادل طور پر، آپ استعمال کر سکتے ہیں ڈرائیور انسٹال انسٹالر to uninstall NVIDIA GeForce as well.
6. دوبارہ شروع کریں کمپیوٹر ایک بار
7. پھر، ملاحظہ کریں Nvidia official website اور پر کلک کریں لوڈ to download the latest GeForce Experience.

8. Click on the downloaded file to رن the set-up utility.
9 اگلے، میں لاگ ان کریں to your Nvidia account and click on the ڈرائیور tab. Install all the recommended drivers.
بھی پڑھیں: ونڈوز 10 پر گرافکس کارڈ کا پتہ نہیں چل سکا
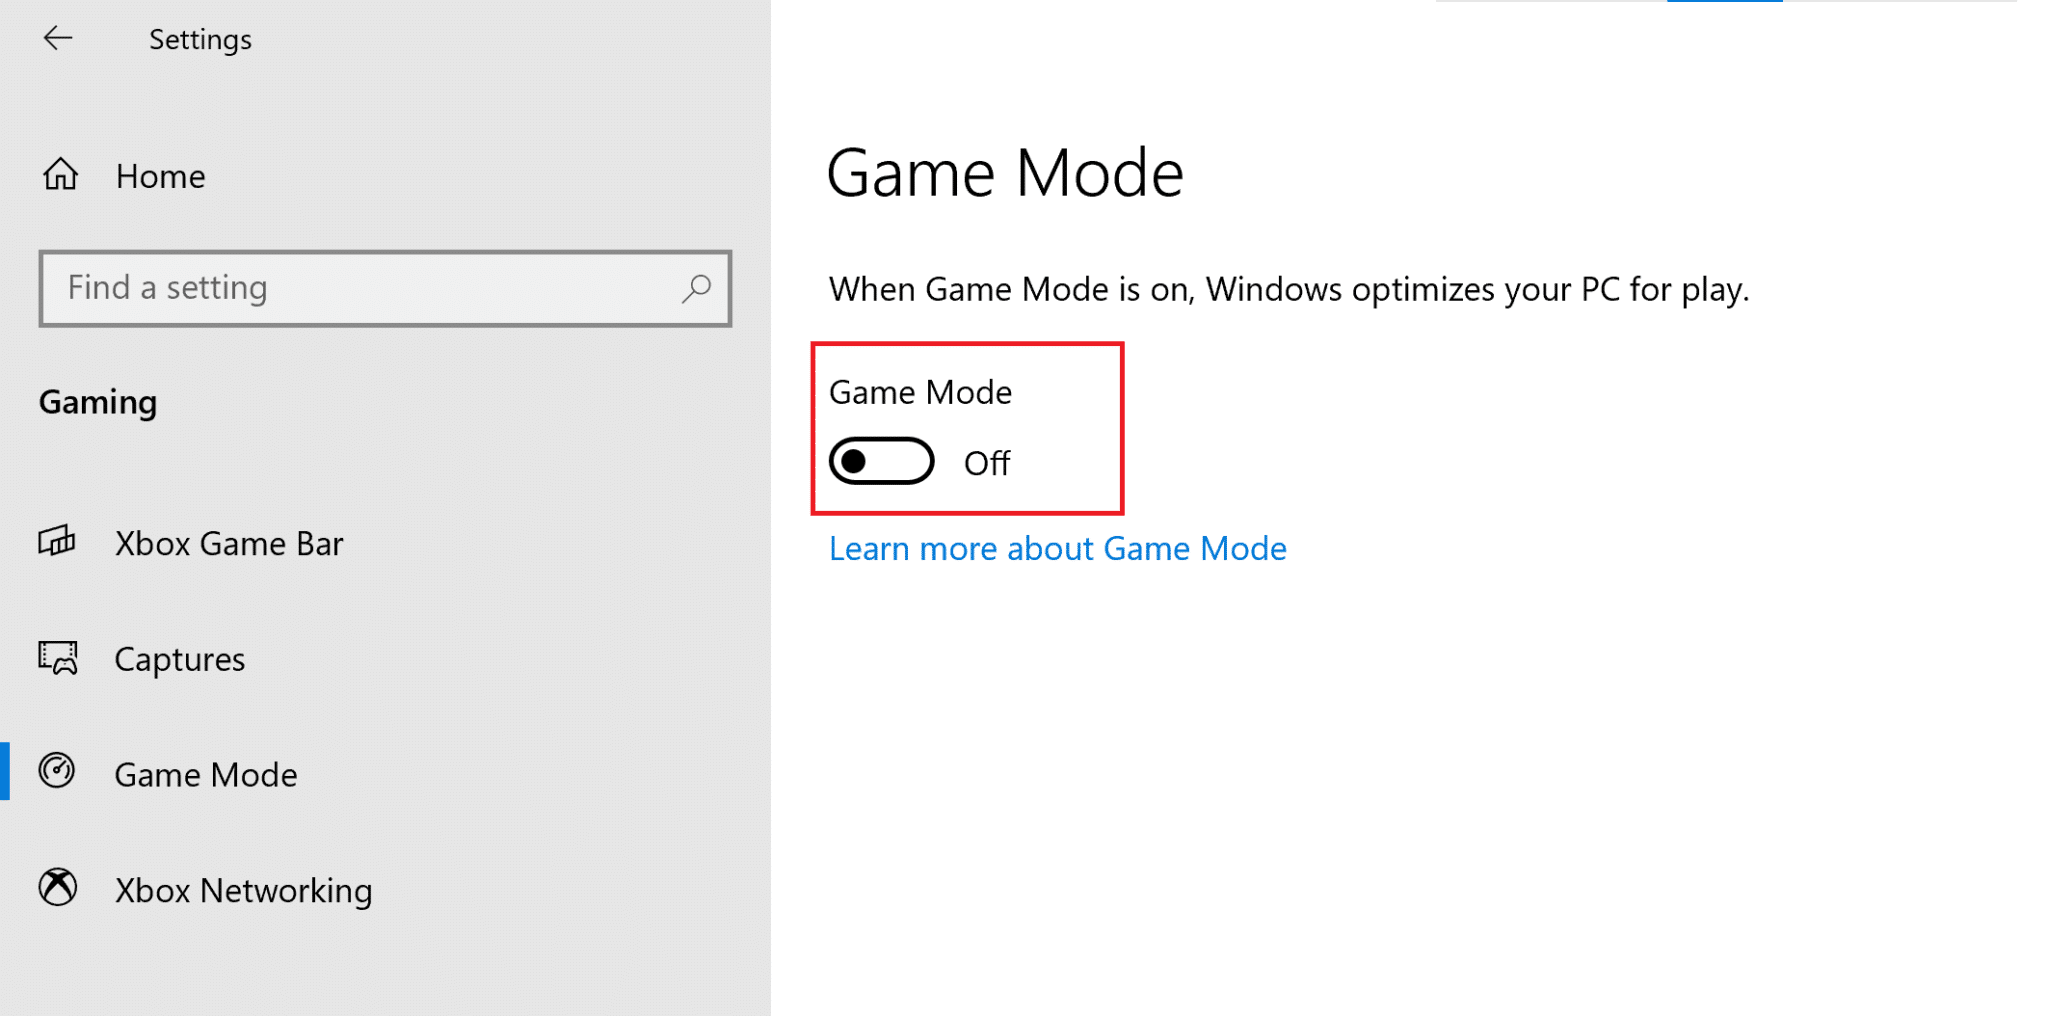
Method 4: Toggle off Game Mode
The Windows 10 feature of Game Mode can boost the gaming experience and performance of your PC. Nevertheless, many users have reported that disabling this feature is a potential Destiny 2 error code Broccoli fix. Here’s how you can turn off Game Mode in Windows 10 systems:
1. ٹائپ کریں Game mode settings میں ونڈوز کی تلاش box. Click on Open from the right window.
2. ٹوگل کریں کھیل موڈ آف جیسا کہ ذیل میں دکھایا گیا.
Method 5: Check Integrity of Destiny 2 Files (For Steam)
If you use Steam to play Destiny 2, you need to verify the integrity of game files so that the installed version of the game matches the latest version available on Steam servers. Read our guide on How to Verify the Integrity of Game Files on Steam here.
Method 6: Enable Multi-GPU settings (If applicable)
This method is applicable if you use two graphic cards and are facing the Destiny 2 Broccoli error. These settings allow the PC to combine multiple graphic cards and use combined graphics processing power. Follow the listed steps to enable the said settings for NVIDIA and AMD, as the case may be.
NVIDIA کے لئے
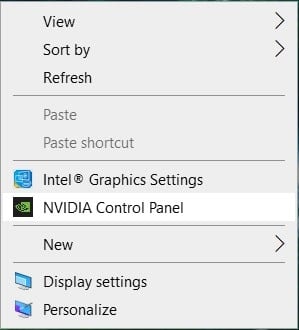
1. پر دائیں کلک کریں ڈیسک ٹاپ اور منتخب کریں NVIDIA کنٹرول پینل.
2. پر کلک کریں SLI، Surround، PhysX کو ترتیب دیں۔, from the left pane of the NVIDIA Control Panel.
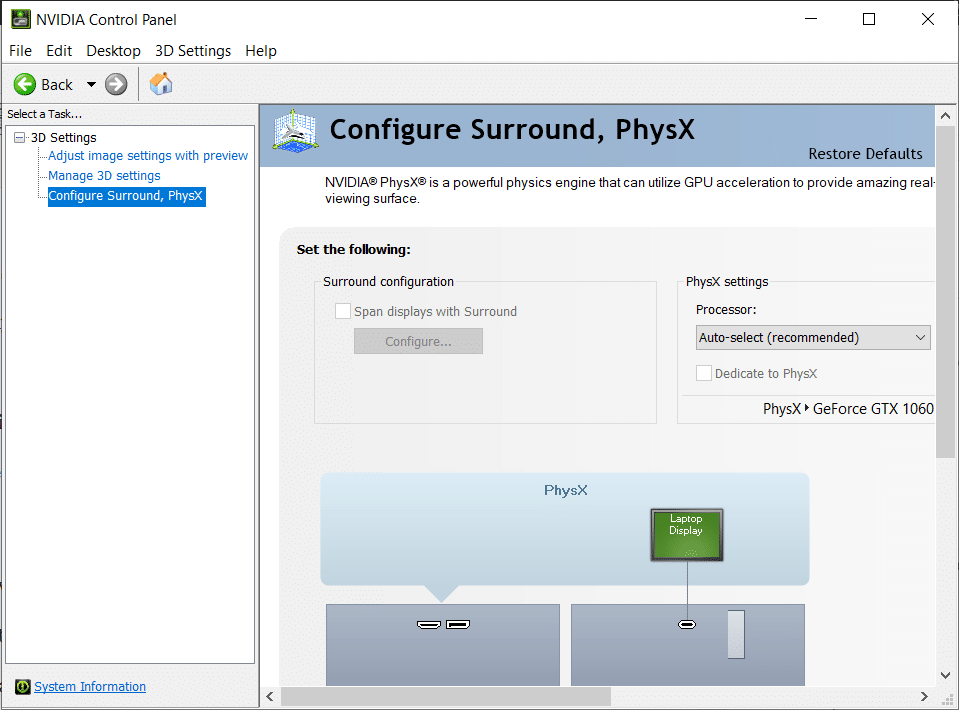
3. پر کلک کریں 3D کارکردگی کو زیادہ سے زیادہ کریں۔ کے تحت SLI ترتیب. محفوظ کریں تبدیلیاں.
نوٹ: The Scalable Link Interface (SLI) is the brand name for the NVIDIA multi-GPU setting.
4. دوبارہ شروع کریں آپ کا سسٹم and launch the game to check if the issue is resolved.
AMD کے لئے
1. اپنے پر دائیں کلک کریں۔ ڈیسک ٹاپ اور پر کلک کریں AMD Radeon Software.
2. پر کلک کریں ترتیبات کا آئکن from the top right corner of the AMD Software window.
3. اگلا، پر جائیں گرافکس ٹیب.
4. نیچے سکرال اعلی درجے کی سیکشن اور ٹوگل آن کریں۔ AMD کراس فائر to enable multi-GPU settings.
نوٹ: CrossFire is the brand name for the AMD multi-GPU setting.
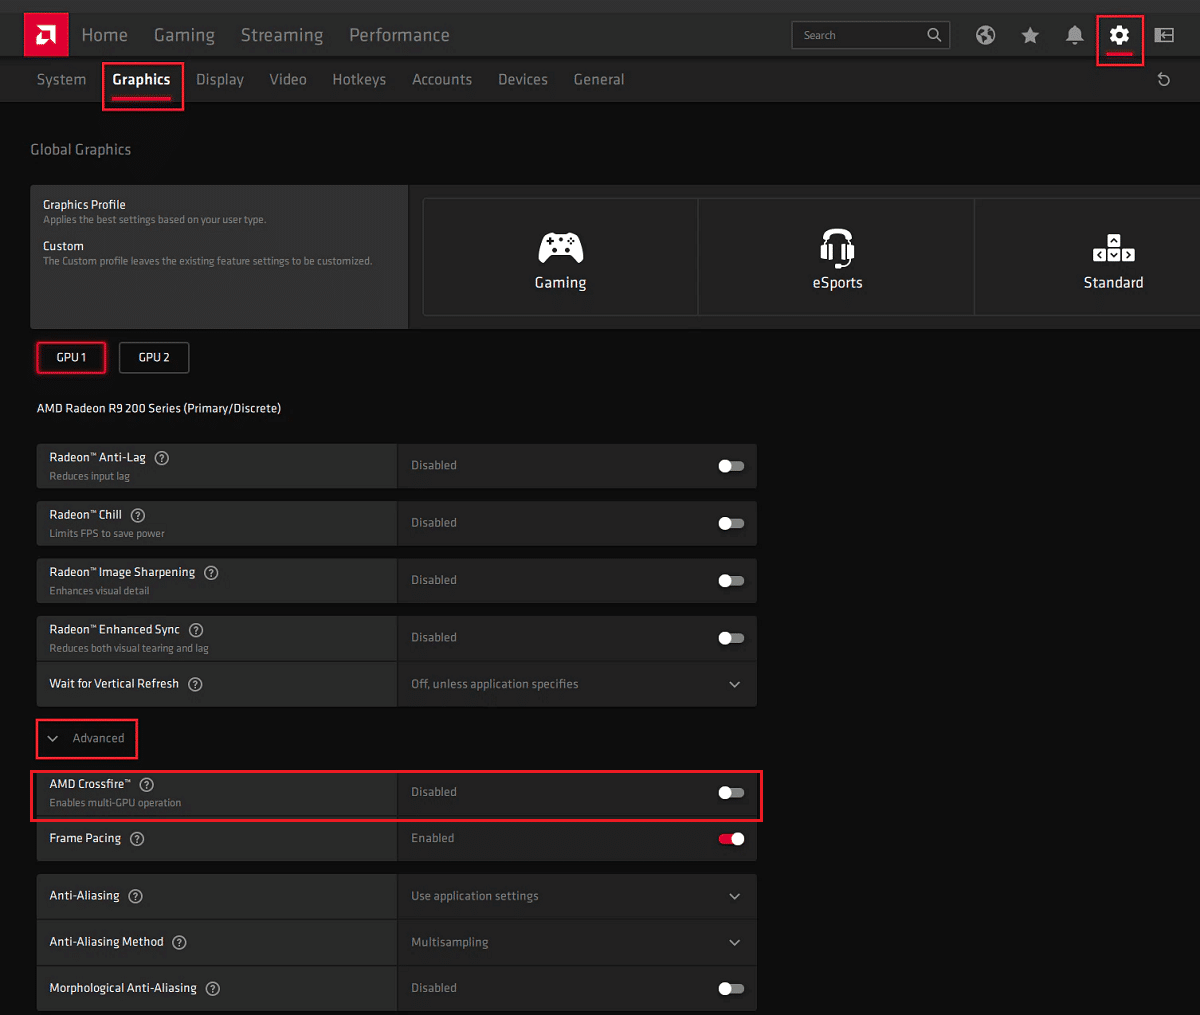
5. دوبارہ شروع کریں the PC, and launch Destiny 2. Check if you’re able to fix Destiny 2 Error Code Broccoli.
Method 7: Change Graphic Settings on Destiny 2
In addition to modifying graphics settings associated with GPU, you can do similar modifications in the game itself. This will help avoid issues arising out of graphics inconsistency like Destiny 2 error code Broccoli. Here’s how to alter graphics settings in Destiny 2:
1. لانچ قسمت 2 کی طرح اس عمل کو کر سکتے ہیں۔
2. پر کلک کریں کھولیں ترتیبات to view the available settings.
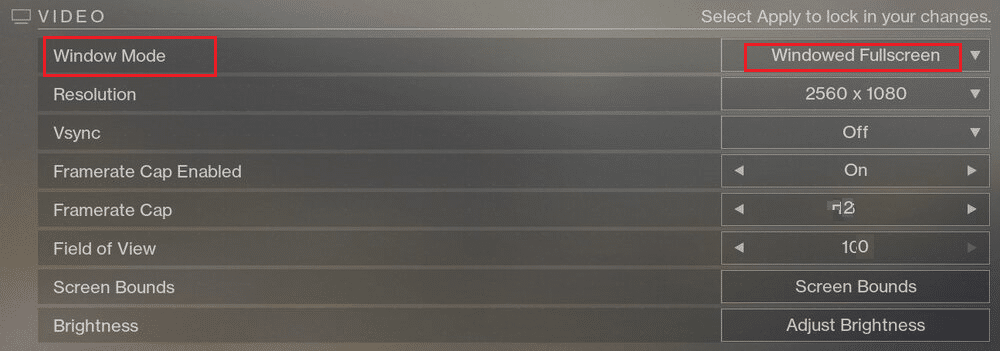
3. اگلا، پر کلک کریں ویڈیو بائیں پین سے ٹیب.
4. اگلا ، منتخب کریں Vsync from Off to وہ.
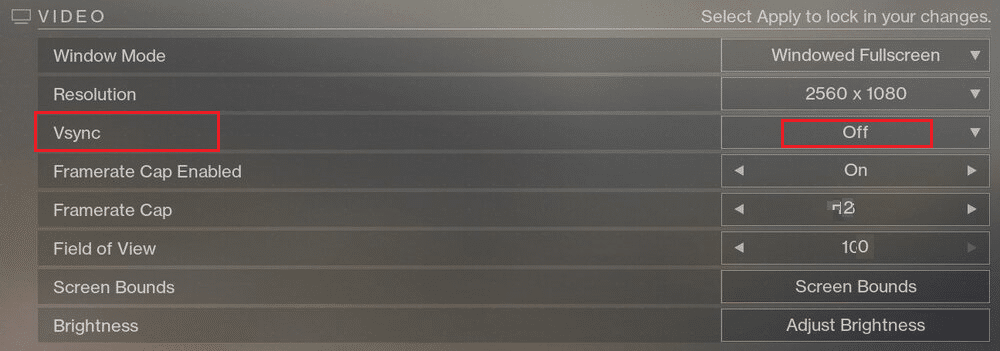
5. پھر ، Enable Framerate Cap اور اسے سیٹ کریں 72 from the drop-down, as illustrated below.
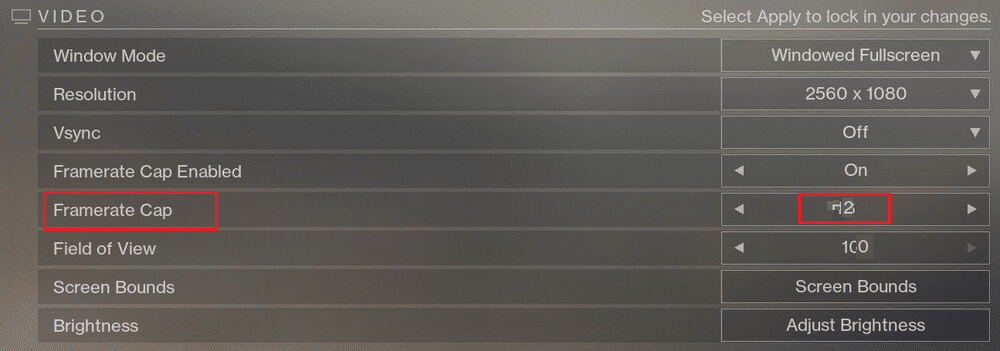
6. محفوظ کریں the settings and launch the game.
بھی پڑھیں: Fix Unreal Engine Exiting Due To D3D Device Being Lost
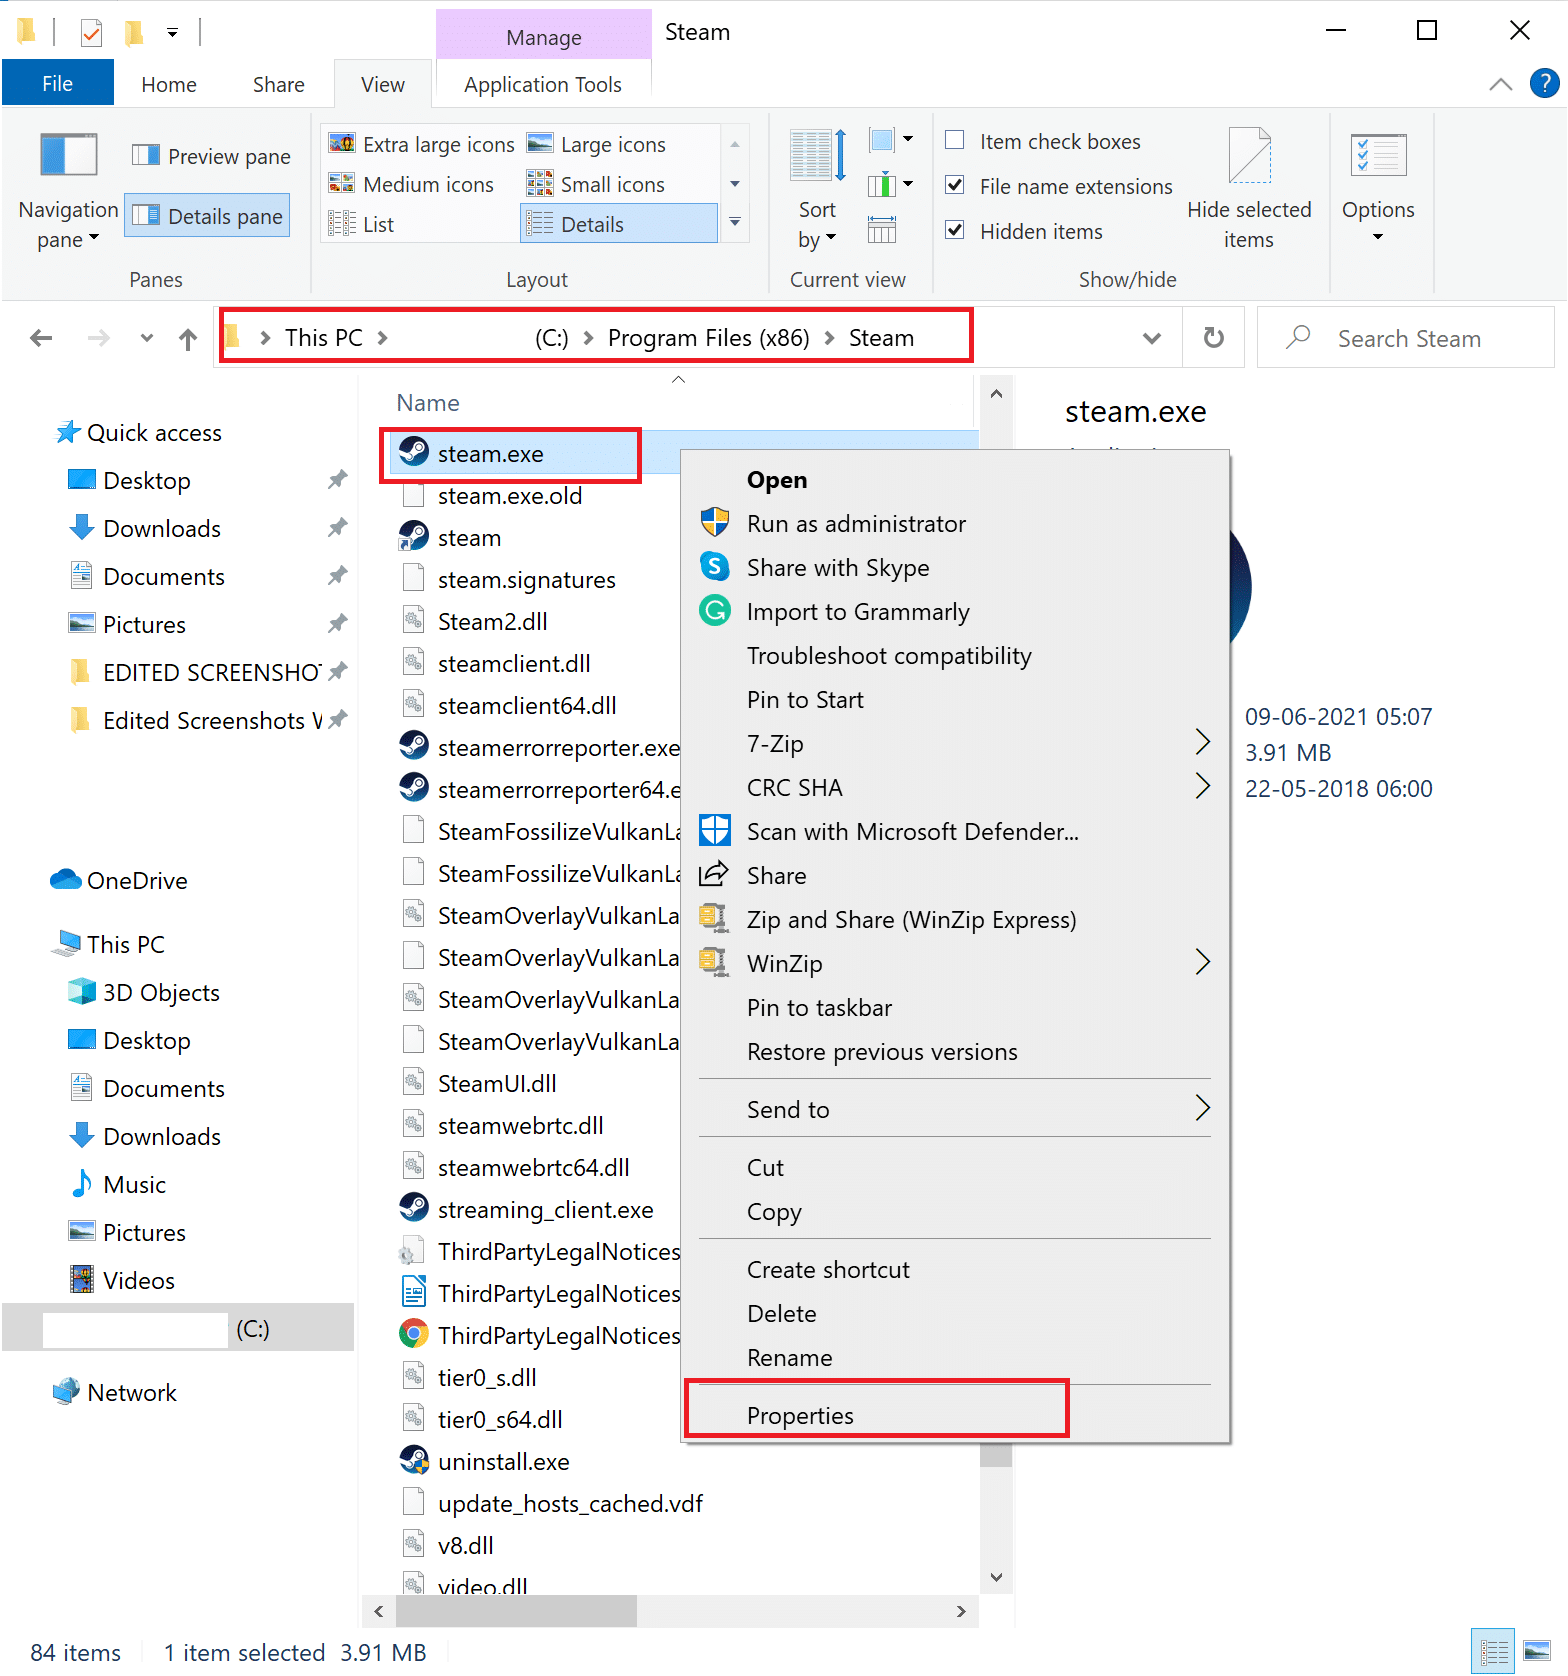
Method 8: Change Game Properties
You can change settings for the executable file of the game to potentially fix the Broccoli error code. Follow the given steps to do the same.
1. Launch File Explorer and go to C: > Program files (x86).
نوٹ: If you have installed the game elsewhere, navigate to the appropriate directory.
2. کھولیں Destiny 2 folder. پر دائیں کلک کریں .exe فائل of the game and select پراپرٹیز.
نوٹ: Below is an example shown using بھاپ.
3. اگلا، پر جائیں سلامتی میں ٹیب پراپرٹیز window. Click on the option titled ترمیم کریں.
4. اس بات کو یقینی بنائیں مکمل کنٹرول is enabled for all users, as depicted below.
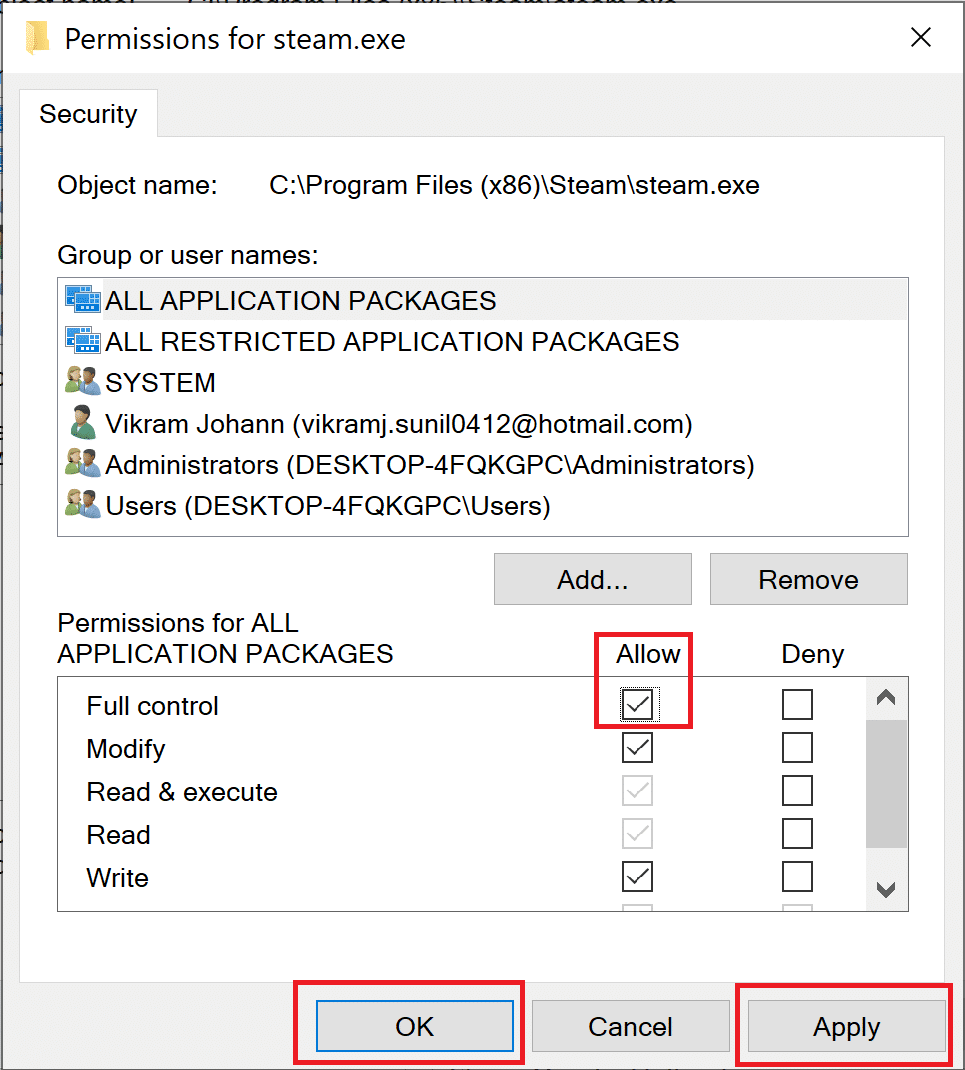
5. پر کلک کریں لگائیں> ٹھیک ہے to save changes as highlighted above.
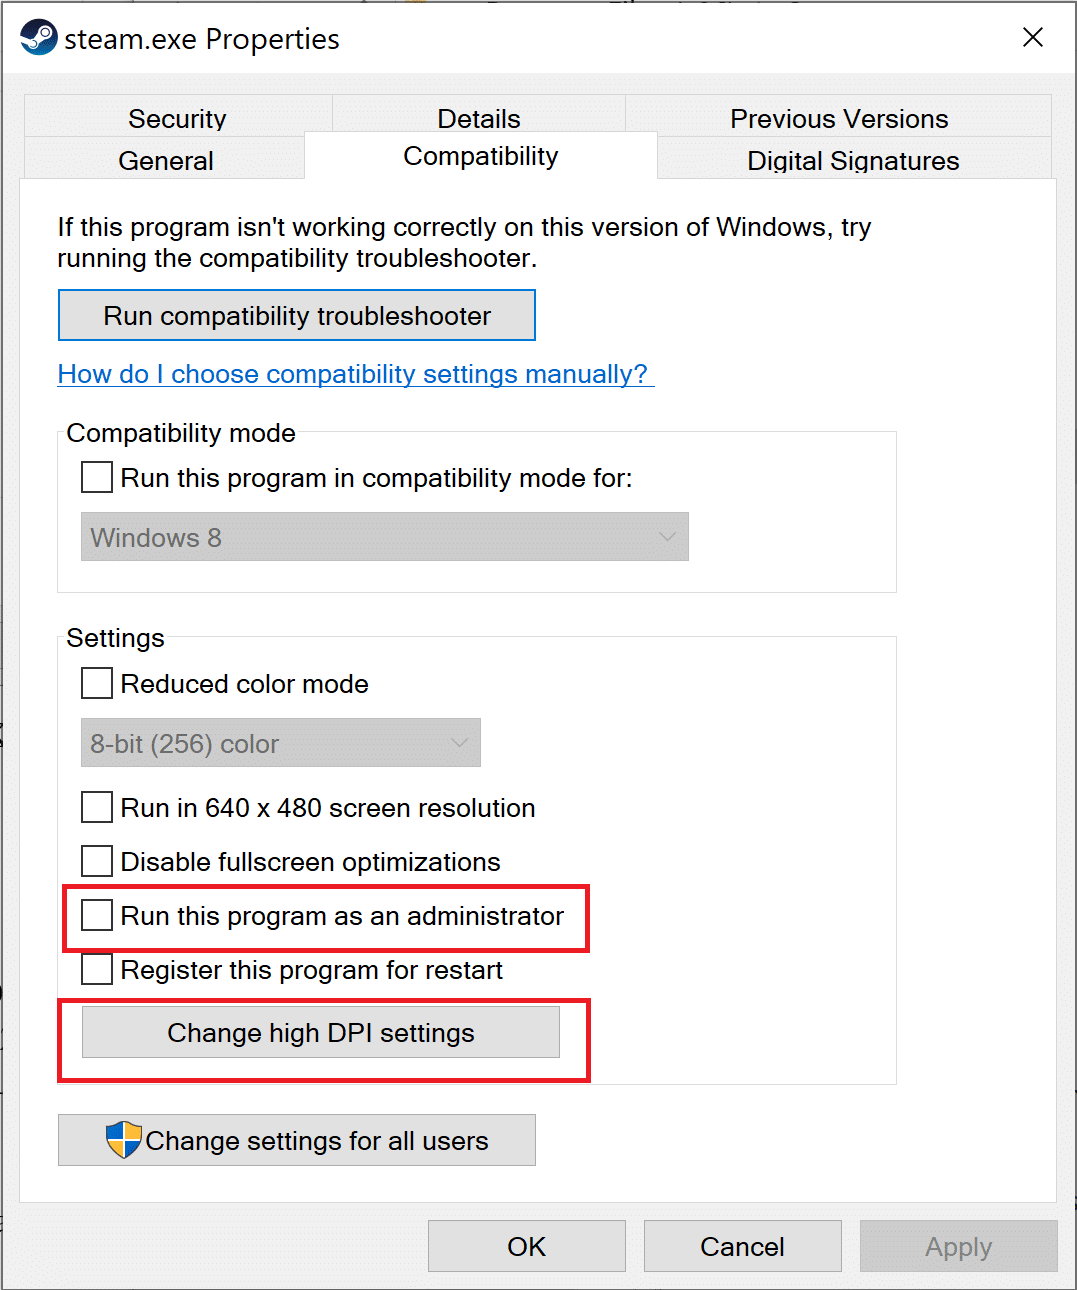
6. اگلا، پر سوئچ کریں۔ مطابقت tab and check the box next to the option titled اس پروگرام کو بطور ایڈمنسٹریٹر چلائیں.
7. پھر، پر کلک کریں۔ اعلی DPI سیٹنگز کو تبدیل کریں۔ جیسا کہ دکھایا گیا ہے.
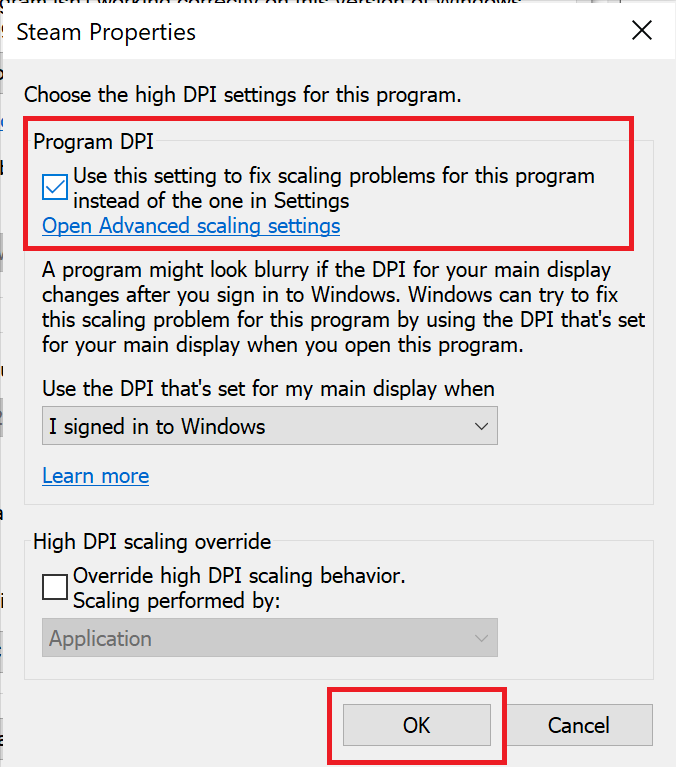
8. Here check the box under Program DPIہے. پر کلک کریں OK ترتیبات کو بچانے کے لئے.
Method 9: Set Destiny 2 as High Priority
To ensure that the CPU resources are reserved for Destiny 2 gameplay, you need to set it as a high-priority task in Task Manager. When your PC prefers to utilize the CPU for Destiny 2, there are lesser chances that the game will crash. Follow these steps to prioritize Destiny 2 and in turn, fix Destiny 2 Error Code Broccoli on Windows 10:
1. ٹائپ کریں ٹاسک مینیجر in ونڈوز کی تلاش box. Launch it from the search result by clicking اوپن.

2. پر جانے کے تفصیلات دیکھیں میں ٹیب ٹاسک مینیجر کھڑکی.
3. پر دائیں کلک کریں قسمت 2 اور پر کلک کریں Set priority > High, as explained in the given pic.
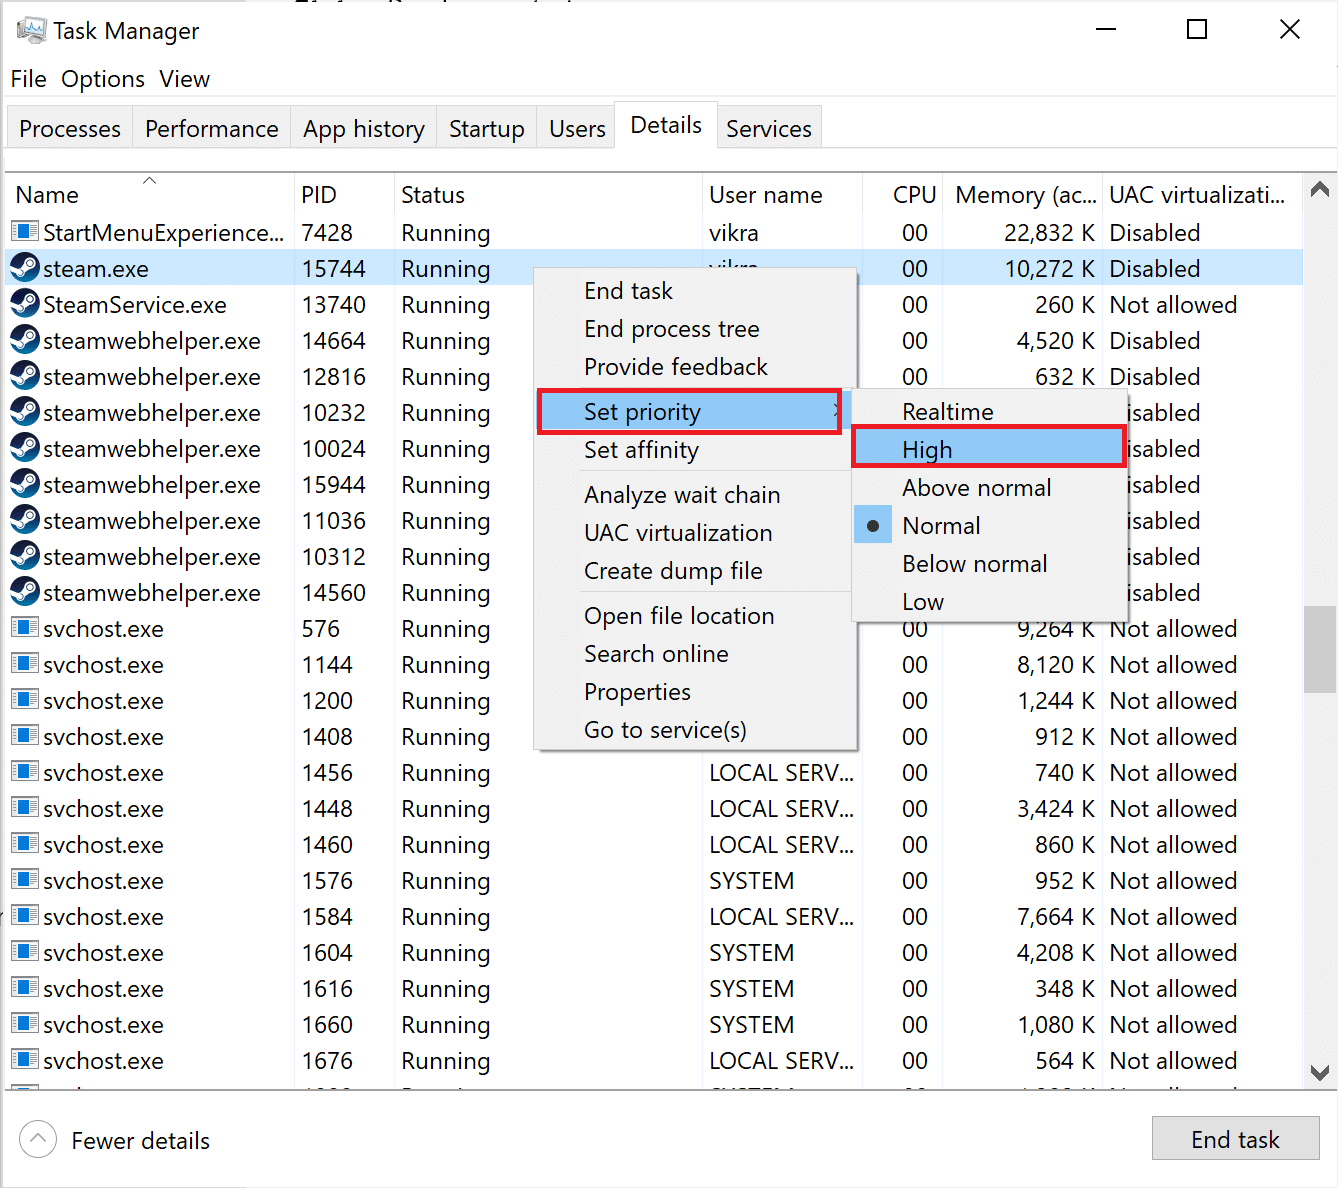
4. Repeat the same process for Battle.net, بھاپ, or any application that you use to launch Destiny 2.
بھی پڑھیں: ونڈوز 10 میں سی پی یو عمل کی ترجیح کو کیسے تبدیل کیا جائے۔
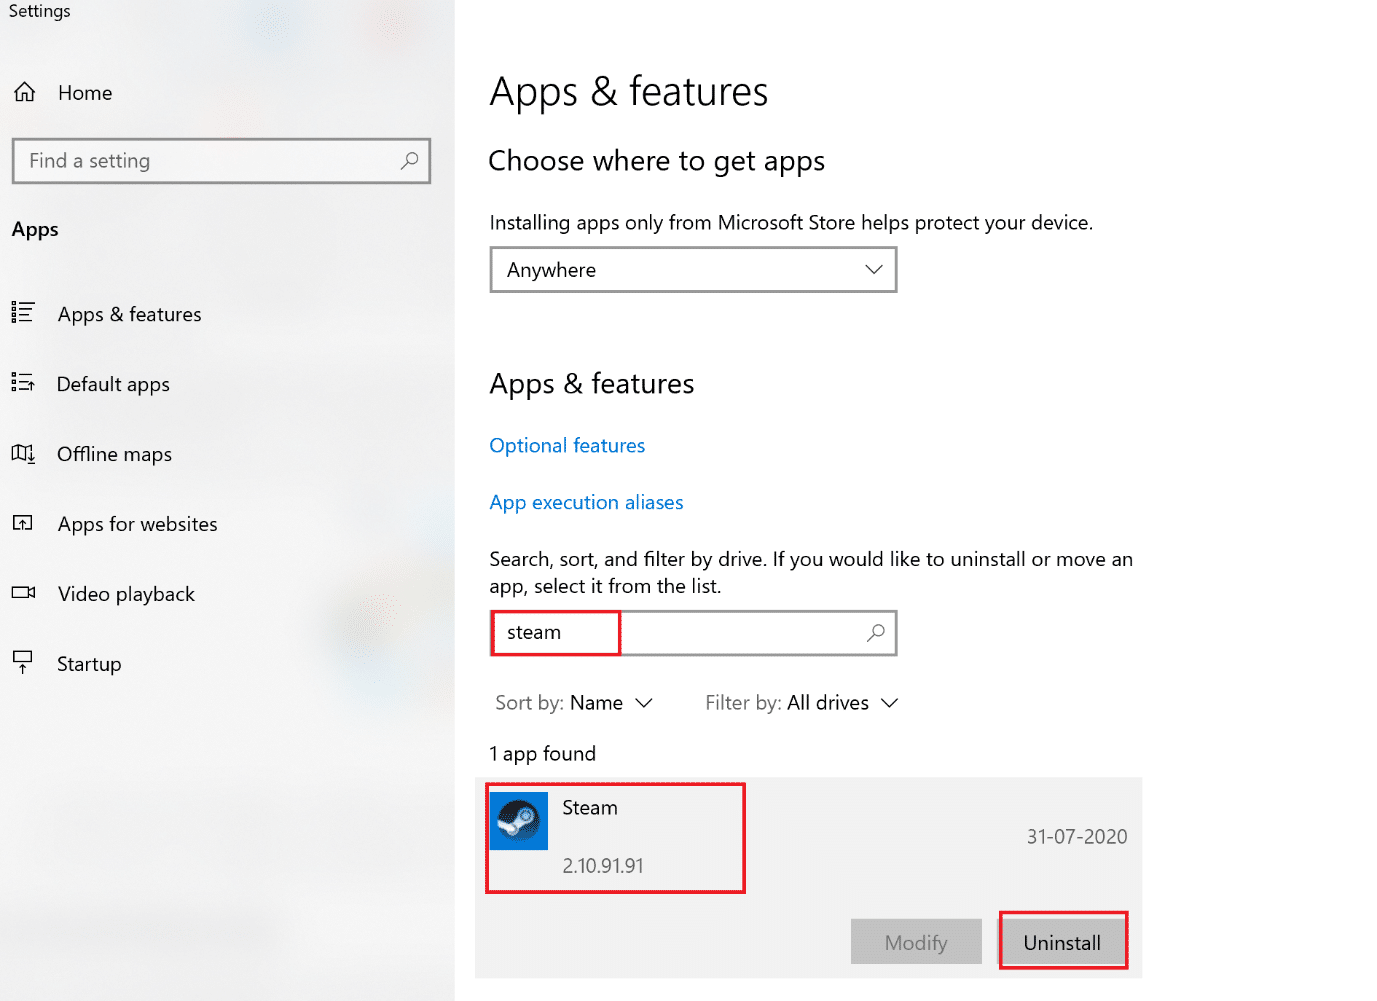
Method 10: Reinstall Destiny 2
There might be corrupt installation files or game files. To clean your system of corrupt game files, you need to reinstall the game, as follows:
1. لانچ پروگرام شامل کریں یا ختم کریں window as explained in طریقہ 3 during Reinstallation of Graphics drivers.
2. ٹائپ کریں قسمت 2 میں اس فہرست کو تلاش کریں۔ text box, as shown.
3. پر کلک کریں قسمت 2 in the search result and select انسٹال کریں.
نوٹ: Below is an example is given using بھاپ.
4. انتظار کریں for the game to be uninstalled.
5. بھاپ لانچ کریں۔ or the application that you use to play games and reinstall Destiny 2.
Corrupt game files on your PC, if any, are now deleted and the Destiny 2 Broccoli error code rectified.
طریقہ 11: ونڈوز میموری کی تشخیص چلائیں
In case, the said error still persists, there is a probability of hardware problems with your computer. To diagnose these problems, implement this method. The Windows Memory Diagnostic app will scan the hardware components of your computer to search for problems. For example, if the RAM on your PC is malfunctioning, the diagnostic app will give information about it so that you can get the RAM checked or replaced. Similarly, we shall run this tool to have problems diagnosed with system hardware that is affecting gameplay.
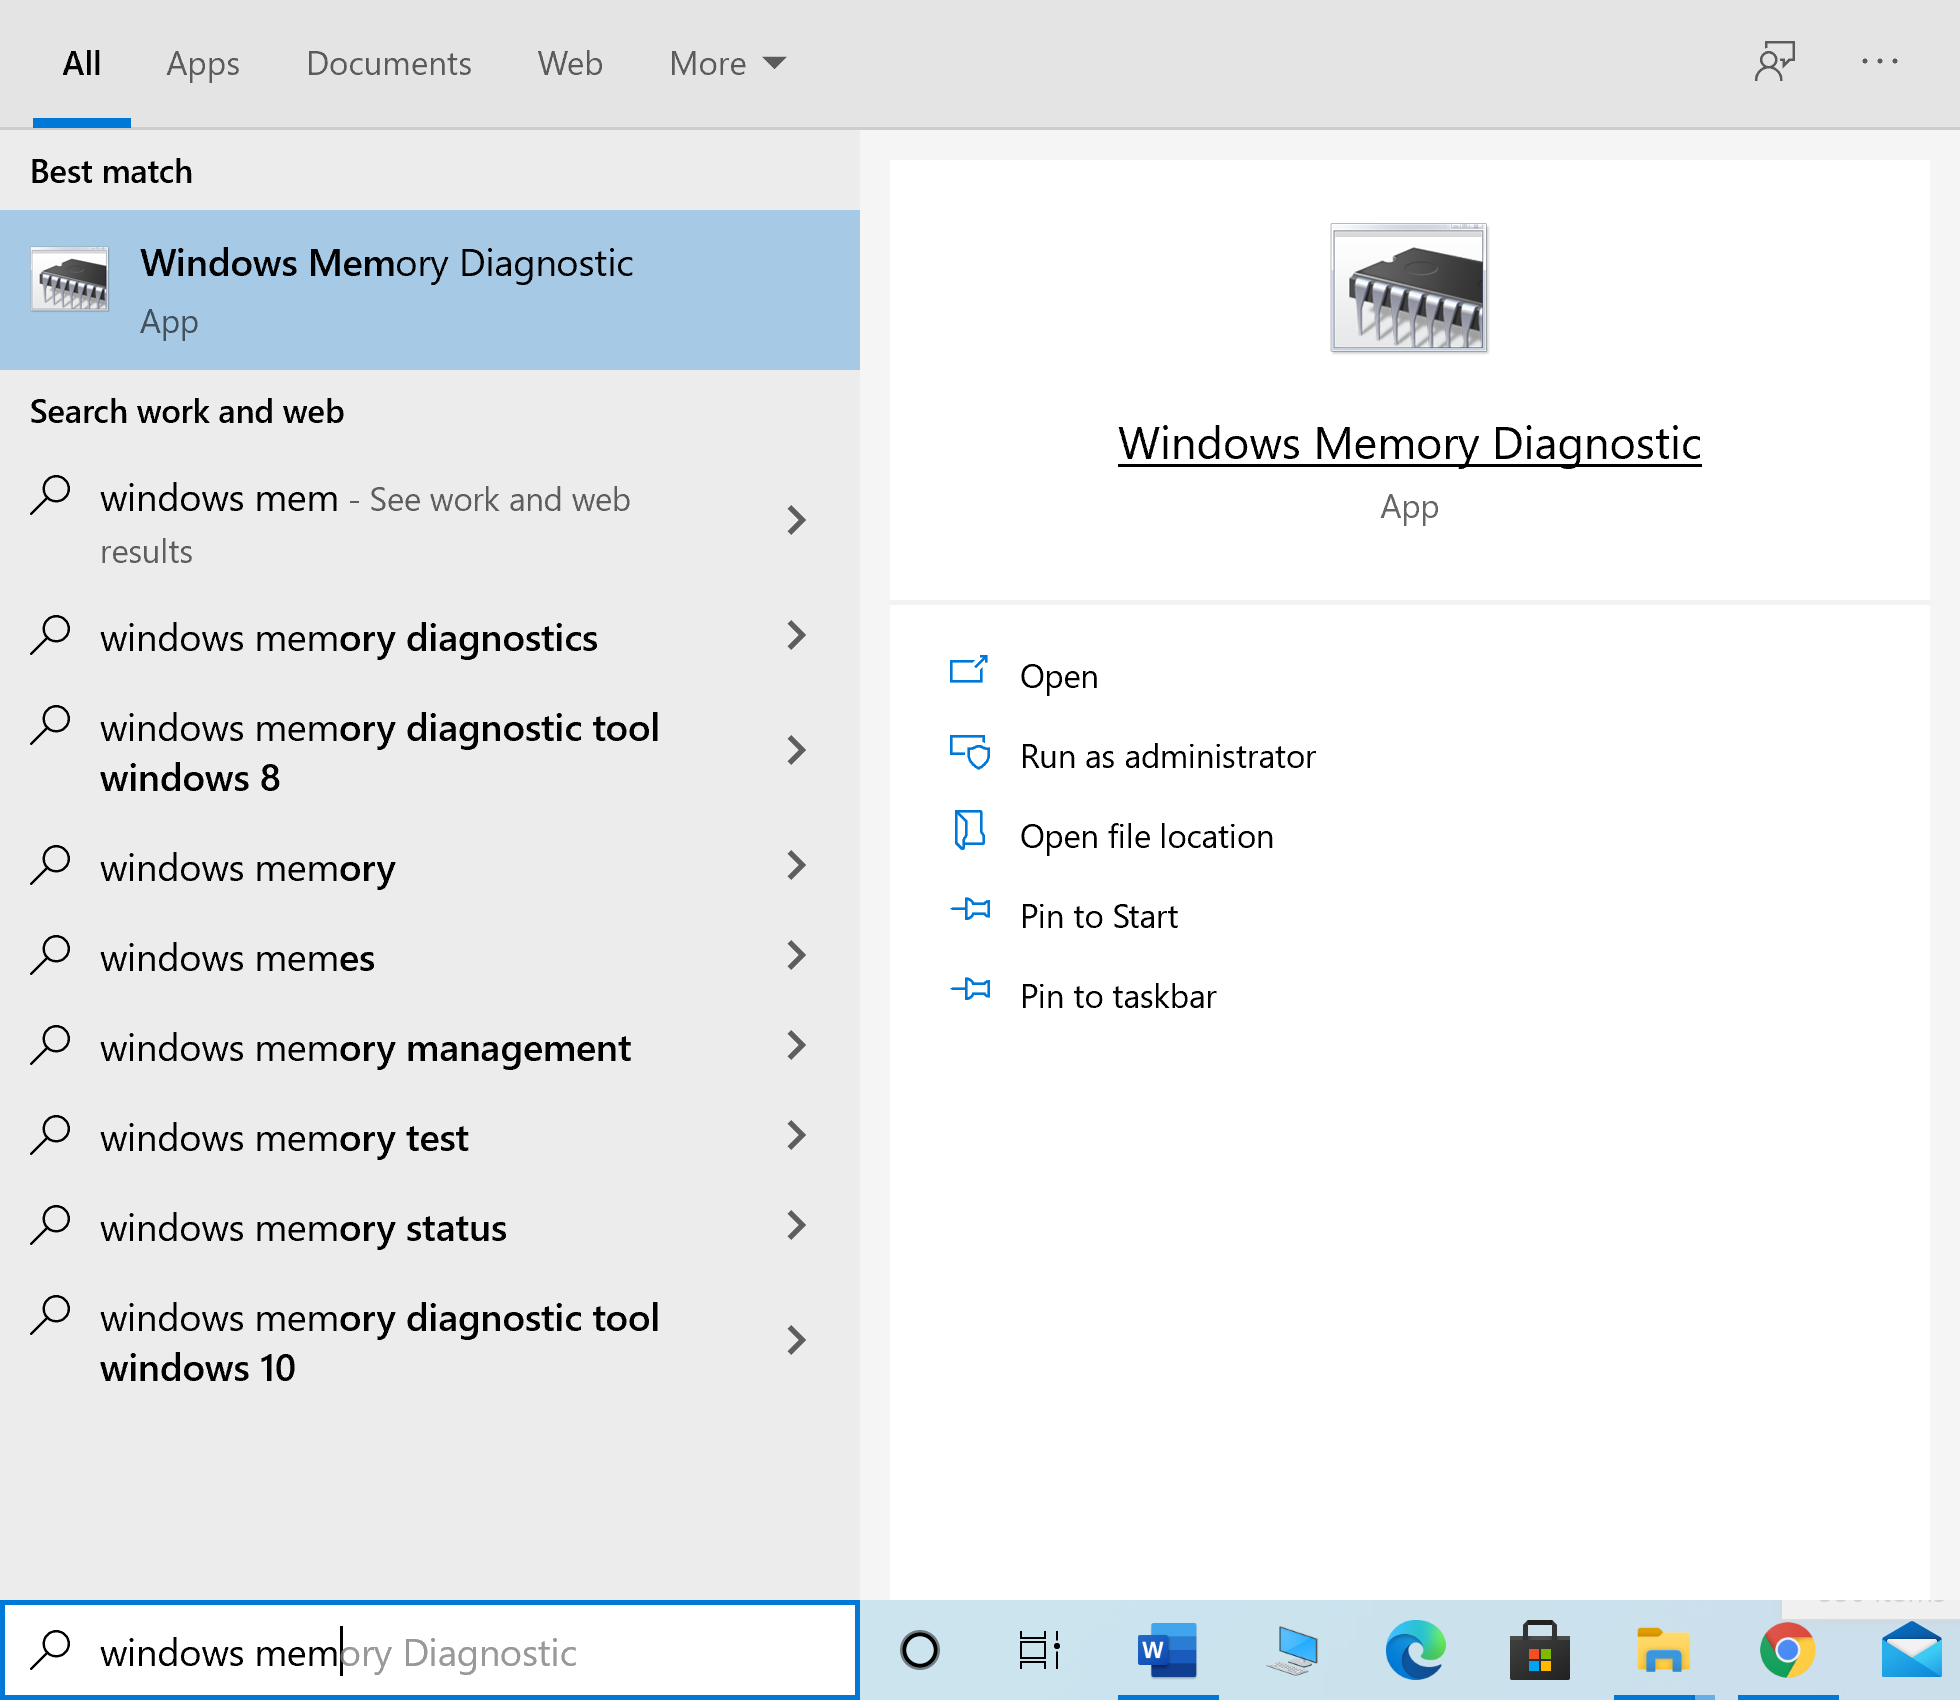
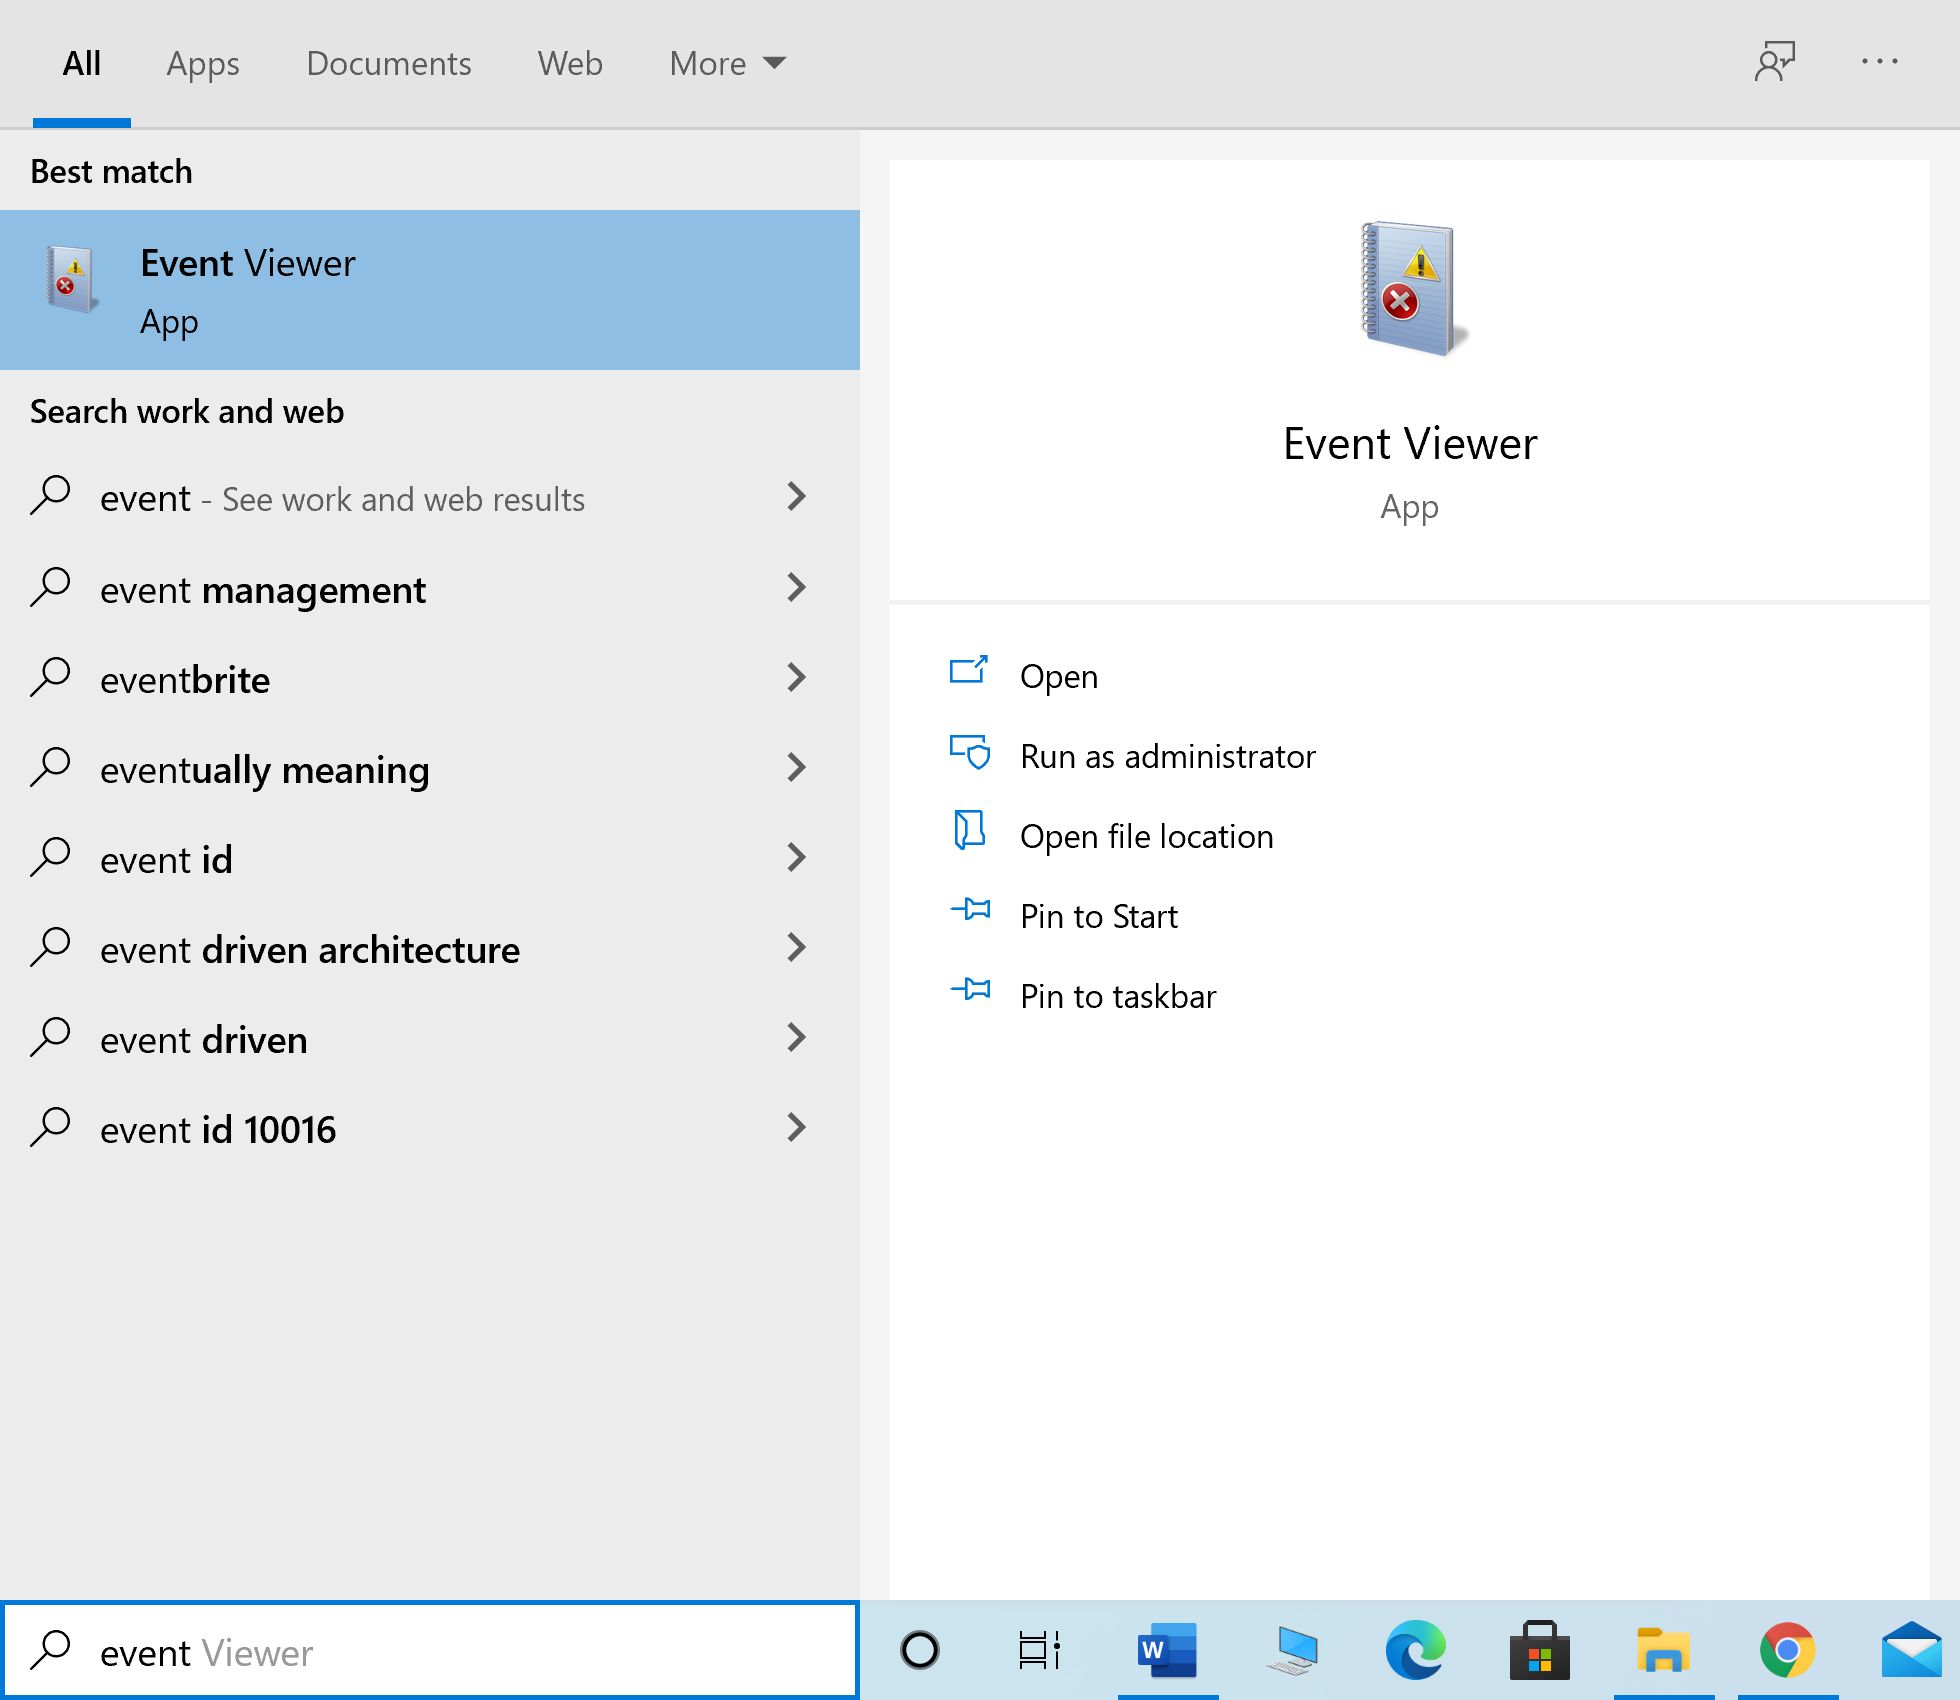
1. ٹائپ کریں ونڈوز میموری تشخیصی۔ میں ونڈوز کی تلاش box. Open it from here.
2. پر کلک کریں ابھی دوبارہ شروع کریں اور مسائل کی جانچ کریں (تجویز کردہ) پاپ اپ ونڈو میں.
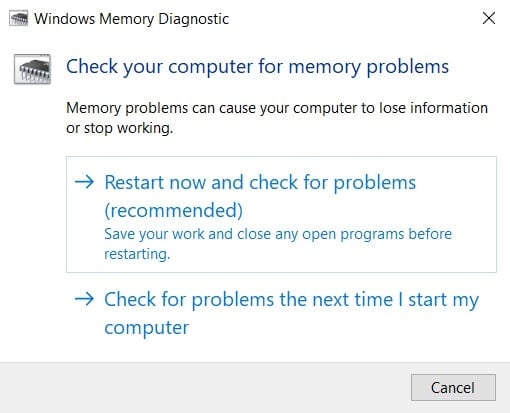
3. The computer will دوبارہ شروع کریں and begin the diagnostics.
نوٹ: The process may take a while. Do not switch off the machine during the process.
4. The computer will ربوٹ جب عمل مکمل ہوجاتا ہے.
5. To view the diagnostic information, go to وقوعہ کا شاہد، جیسے دکھایا گیا ہے.
6. نیویگیشن ونڈوز لاگ> سسٹم from the left pane of the Event Viewer window.
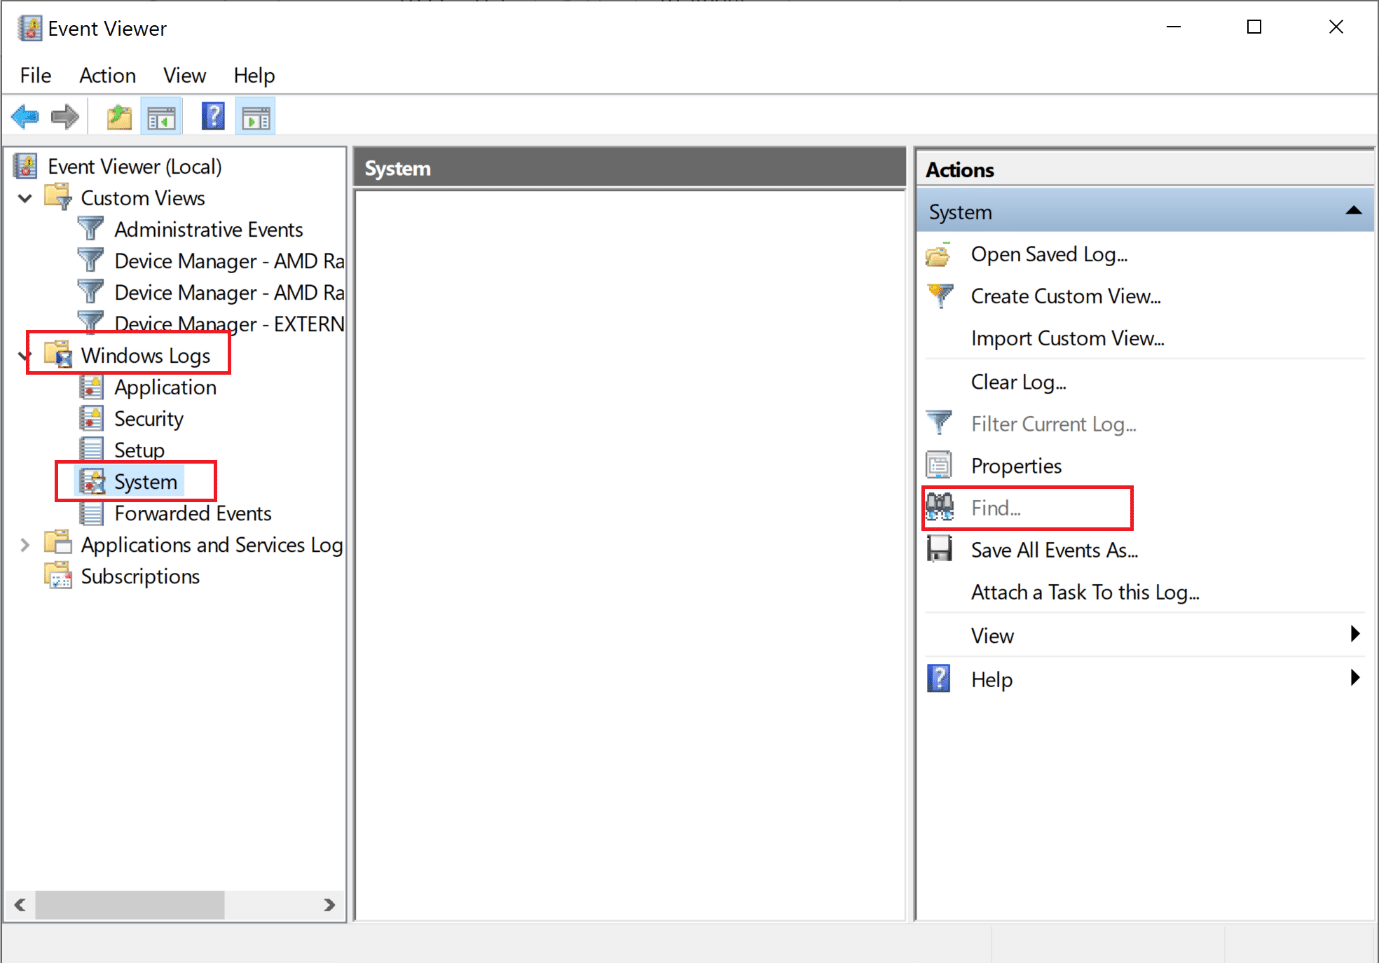
7. پر کلک کریں مل سے عوامل pane on the right-hand side.
8. ٹائپ کریں میموری ڈایگنوسٹک اور منتخب کریں اگلا تالاش کریں.
9. Check the Event Viewer window for information displayed about ناقص ہارڈ ویئر، اگر کوئی.
10. If the hardware is found to be defective, get it checked or replaced by a technician.
سفارش کی جاتی ہے:
ہمیں امید ہے کہ یہ گائیڈ مددگار تھا اور آپ کر سکتے تھے۔ fix Destiny 2 error code Broccoli on your Windows 10 laptop/desktop. Do let us know which method worked the best for you. Also, if you have any questions or suggestions regarding this article, feel free to drop them in the comments section below.

