WmiPrvSE is the acronym for Windows Management Instrumentation Provider Service. Windows Management Instrumentation (WMI) is a component of the Microsoft Windows operating system that provides management information and control in an enterprise environment. Many people believe it’s a virus as sometimes WmiPrvSE.exe causes high CPU usage, but it’s not a virus or malware instead WmiPrvSE.exe is manufactured by Microsoft itself.
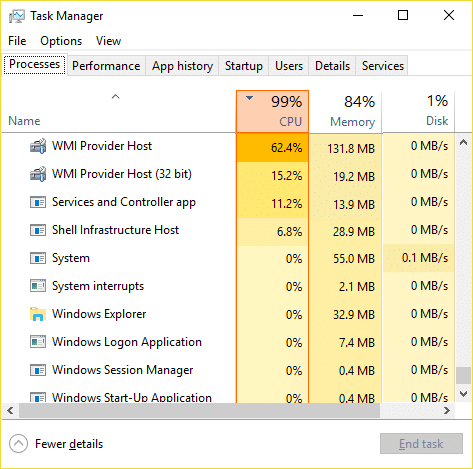
The main problem is that the Windows freezes or stuck when WmiPrvSE.exe is taking many system resources, and all the other apps or programs are left with a little or no resources at all. This will cause your PC to become sluggish, and you won’t be able to use it all, at last, you will have to reboot your PC. Even after a reboot, sometimes this issue will not be resolved, and you will again face the same problem. So without wasting any time let’s see how to actually Fix High CPU Usage by WmiPrvSE.exe with the below-listed troubleshooting guide.
Fix High CPU Usage by WmiPrvSE.exe
کچھ غلط ہونے کی صورت میں بحالی پوائنٹ بنانا یقینی بنائیں۔
Method 1: Restart Windows Management Instrumentation Service
1. Windows Key + R دبائیں پھر ٹائپ کریں۔ services.msc اور داخل کریں.

2. تلاش کریں Windows Management Instrumentation Service in the list then right-click on it and select دوبارہ شروع کریں.
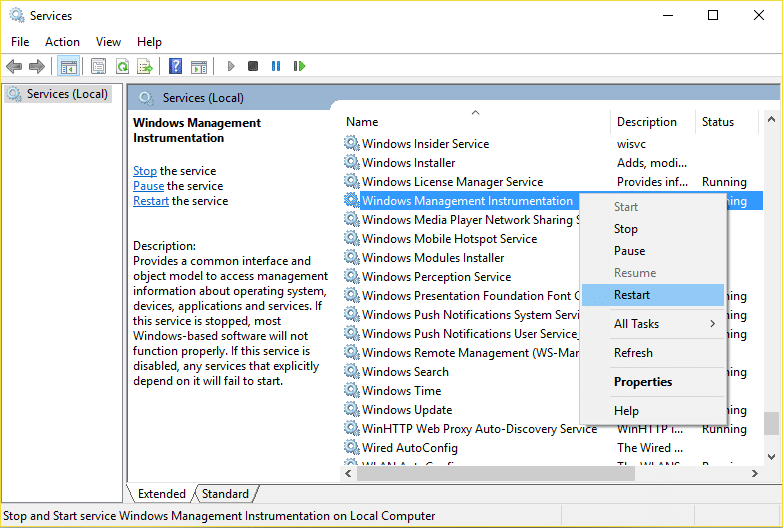
3. This will restart all the service associated with WMI services and Fix High CPU Usage by WmiPrvSE.exe.
Method 2: Restart Other Services associated with WMI
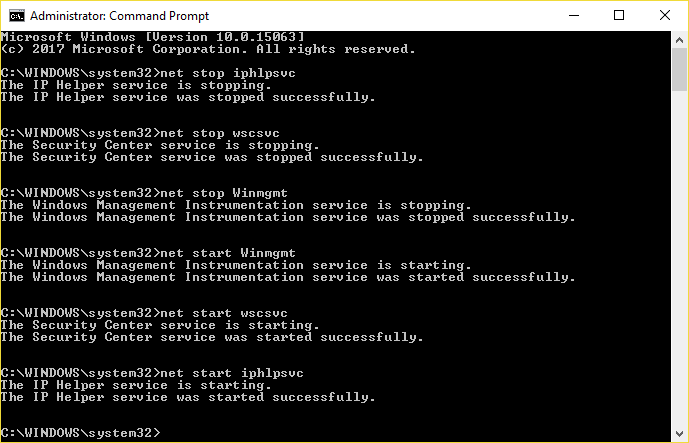
1. Press Windows Key + X then select کمانڈ پرپیٹ (ایڈمن).

2. Type the following into cmd and hit Enter after each one:
نیٹ اسٹاپ iphlpsvc
نیٹ اسٹاپ wscsvc
نیٹ سٹاپ winmgmt
نیٹ شروع winmgmt
نیٹ اسٹارٹ Wscsvc
نیٹ آغاز iphlpsvc
3. تبدیلیاں محفوظ کرنے کے لیے اپنے پی سی کو ریبوٹ کریں۔
طریقہ 3: CCleaner اور Malwarebytes چلائیں۔
1. ڈاؤن لوڈ اور انسٹال کریں CCleaner & Malwarebytes.
2. Malwarebytes چلائیں۔ اور اسے آپ کے سسٹم کو نقصان دہ فائلوں کے لیے اسکین کرنے دیں۔ اگر میلویئر پایا جاتا ہے، تو یہ انہیں خود بخود ہٹا دے گا۔

3. اب CCleaner چلائیں اور منتخب کریں۔ کسٹم کلین.
4. کسٹم کلین کے تحت، منتخب کریں۔ ونڈوز ٹیب then make sure to checkmark defaults and click تجزیہ.

5. تجزیہ مکمل ہونے کے بعد، اس بات کو یقینی بنائیں کہ آپ حذف ہونے والی فائلوں کو ہٹانے کے لیے یقینی ہیں۔

6. آخر میں ، پر کلک کریں کلینر چلائیں۔ بٹن اور CCleaner کو اپنا کورس چلانے دیں۔
7. اپنے سسٹم کو مزید صاف کرنے کے لیے، رجسٹری ٹیب کو منتخب کریں۔، اور یقینی بنائیں کہ درج ذیل چیک کیے گئے ہیں:

8. پر کلک کریں مسائل کے لیے اسکین کریں۔ بٹن دبائیں اور CCleaner کو اسکین کرنے کی اجازت دیں، پھر کلک کریں۔ منتخب کردہ مسائل کو درست کریں۔ بٹن پر کلک کرنا ہے۔

9. جب CCleaner پوچھتا ہے "کیا آپ رجسٹری میں بیک اپ تبدیلیاں چاہتے ہیں؟" ہاں منتخب کریں.
10. آپ کا بیک اپ مکمل ہونے کے بعد، پر کلک کریں۔ تمام منتخب مسائل کو ٹھیک کریں۔ بٹن پر کلک کرنا ہے۔
11. تبدیلیاں محفوظ کرنے کے لیے اپنے کمپیوٹر کو دوبارہ شروع کریں۔
Method 4: Run System Maintenance Troubleshooter
1. Windows Key + X دبائیں اور پر کلک کریں۔ کنٹرول پینل.

2. Search Troubleshoot and click on خرابیوں کا سراغ لگانا.

3. Next, click on view all in the left pane.
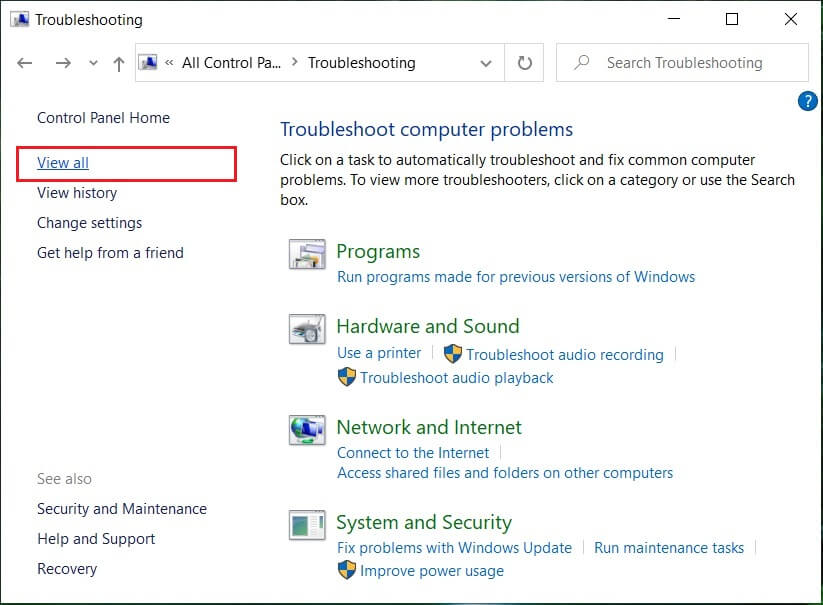
4. Click and run the Troubleshooter for System Maintenance.

5. The Troubleshooter may be able to Fix High CPU Usage by WmiPrvSE.exe.
Method 5: Locate the process manually using Event Viewer
1. Windows Key + R دبائیں پھر ٹائپ کریں۔ واقعہ wwr.msc اور کھولنے کے لئے درج کریں پر دبائیں وقوعہ کا شاہد.

2. From the top menu, click on لنک اور پھر منتخب کریں Show Analytic and Debug Logs option.
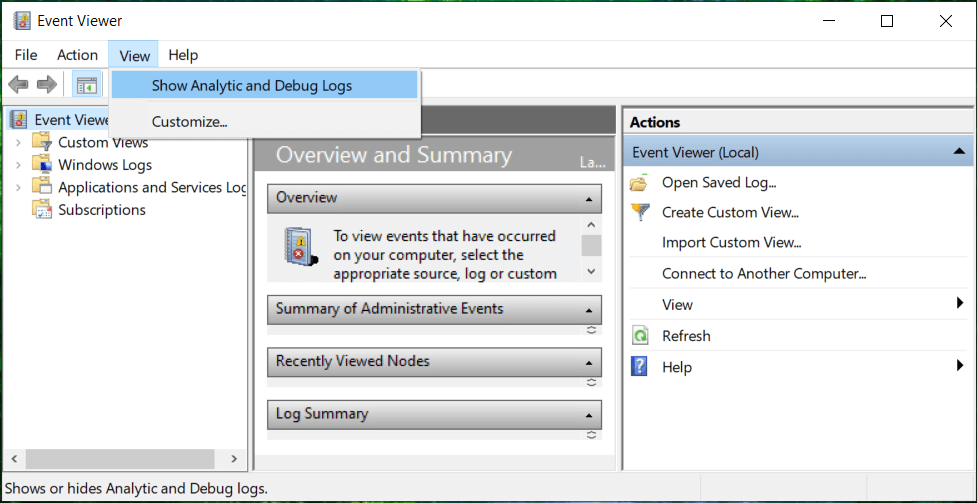
3. Now, from the left pane navigate to the following by double-clicking on each of them:
Applications and Services Logs > Microsoft > Windows > WMI-Activity
4. Once you are under WMI سرگرمی folder (make sure you have expanded it by double-clicking on it) select Operationally.
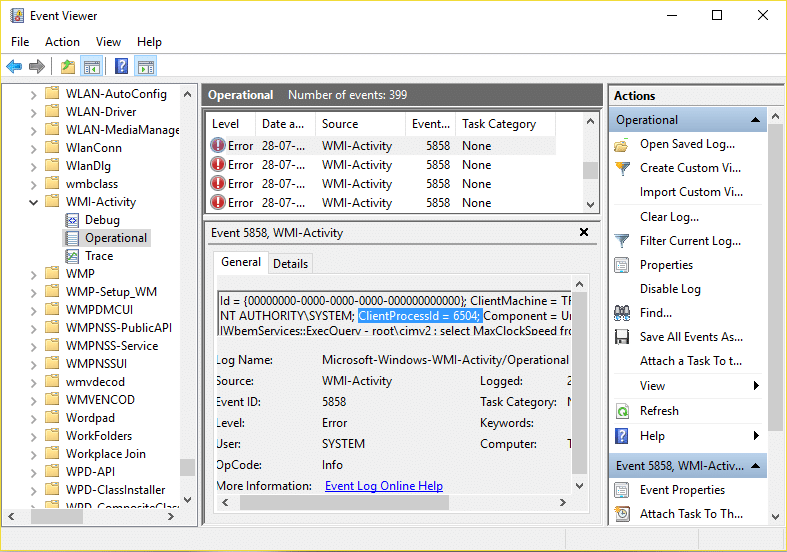
5. In the right window pane select خرابی under Operational and General tab look for the ClientProcessId for that particular service.
6. Now we have the Process Id of the particular service causing High CPU usage, we need to disable this particular service اس مسئلے کو حل کرنے کے ل.
7. دبائیں Ctrl + Shift + Esc together to open Task Manager.

8. پر جائیں سروس ٹیب اور کے لئے دیکھو Process Id which you noted above.
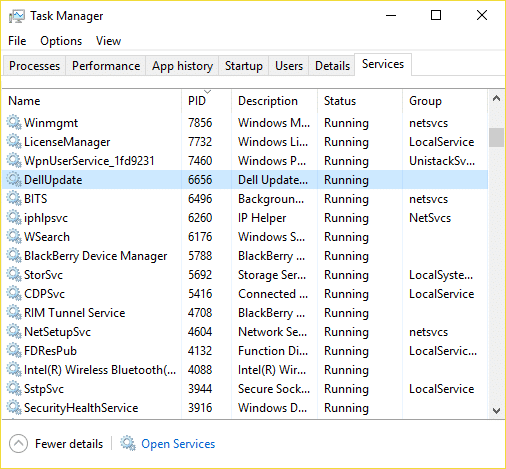
9. The service with the corresponding Process ID is the culprit, so once you find it go to Control Panel > Uninstall a Program.
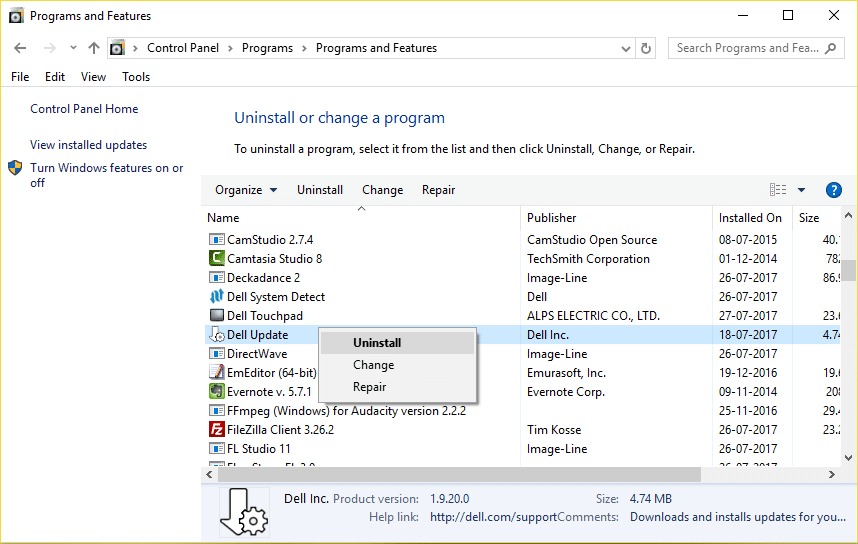
10. Uninstall the particular program or service associated with above Process ID then reboot your PC.
سفارش کی جاتی ہے:
یہ آپ نے کامیابی سے حاصل کی ہے۔ Fix High CPU Usage by WmiPrvSE.exe لیکن اگر آپ کے پاس اب بھی اس پوسٹ کے حوالے سے کوئی سوالات ہیں تو بلا جھجھک ان سے تبصرے کے سیکشن میں پوچھیں۔

