The autofill feature is an important part of the Outlook program. AutoComplete allows you to enter an entire email while composing a message with just one email initial. This feature helps you save time and gives you quick access to emails. However, sometimes users may experience Outlook AutoComplete not working issue; this issue can be caused for various reasons, such as an outdated Office version or bugs with the Outlook program. In this guide, we will discuss methods to resolve Outlook Address AutoComplete not working issue on your Outlook.
How to Fix Outlook AutoComplete Not Working Correctly
There can be various reasons for Outlook Autofill email address not working on your Outlook account; some of the most common reasons are mentioned here.
- If you have disabled AutoComplete in Outlook, you won’t be able to use this feature.
- Bugs and glitches with the Outlook program can also cause this issue.
- Issues with a user profile can also cause AutoComplete feature not working issue.
- Corrupt Outlook Add-ins can also cause this issue.
- Corrupt Outlook data PST files can also cause this issue with Outlook.
- Outdated or corrupt Microsoft Office updates can also cause this issue.
- A corrupt RoamCache folder can also cause this issue with Outlook.
Following are the troubleshooting methods to solve this problem.
Method 1: Enable AutoComplete in Outlook
If you have not enabled the AutoComplete feature in Outlook, you will not be able to use this feature. You will have to manually enable AutoComplete to resolve this Outlook address AutoComplete not working issue. You can follow these simple steps to enable AutoComplete in Outlook.
1. کھولو آؤٹ لک ، اور پر جائیں فائل from the top-left side of the window.
2. Here, from the left-side panel, click on آپشنز کے بھی.

3. نیویگیشن میل ٹیب.
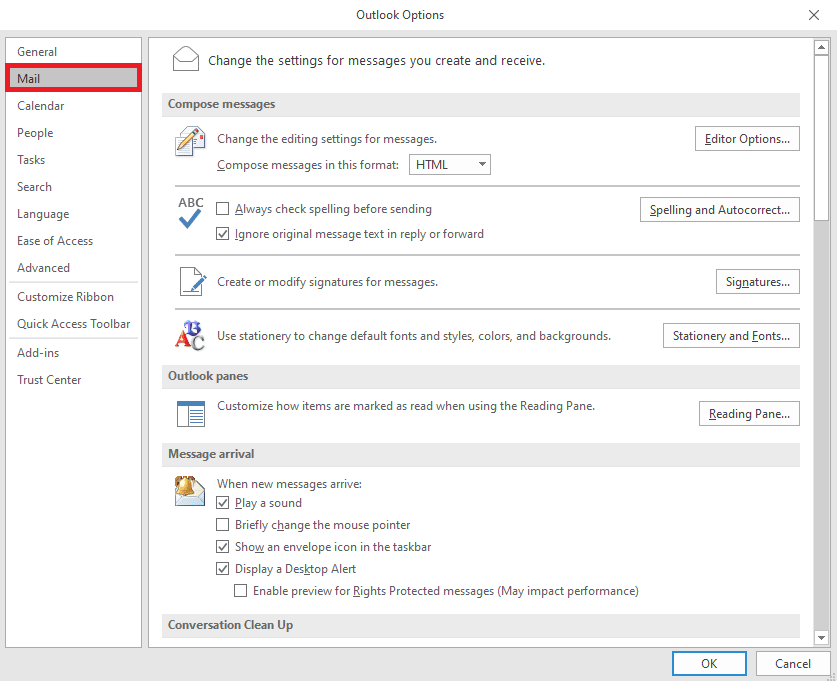
4. Scroll down here, and locate پیغامات بھیجیں اختیارات.
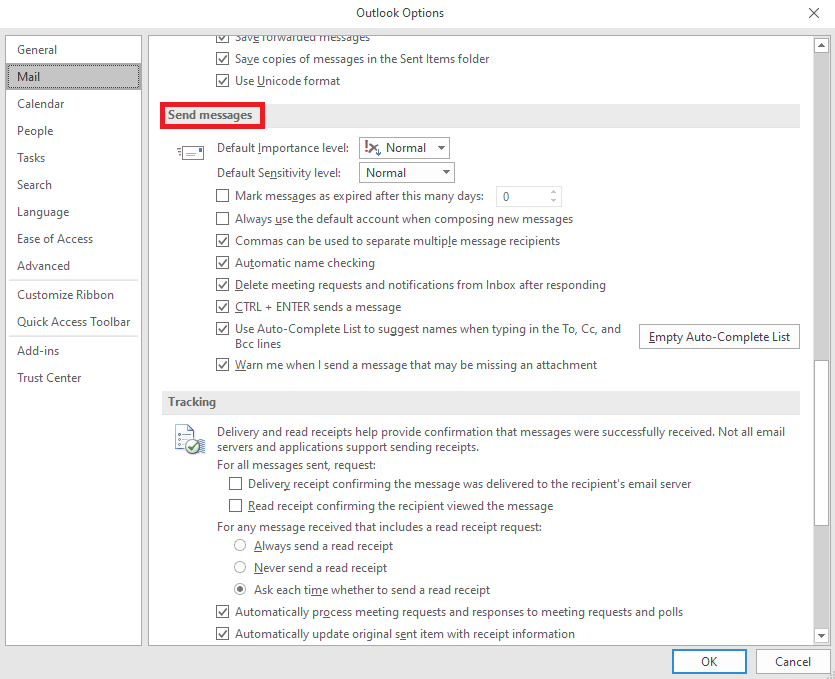
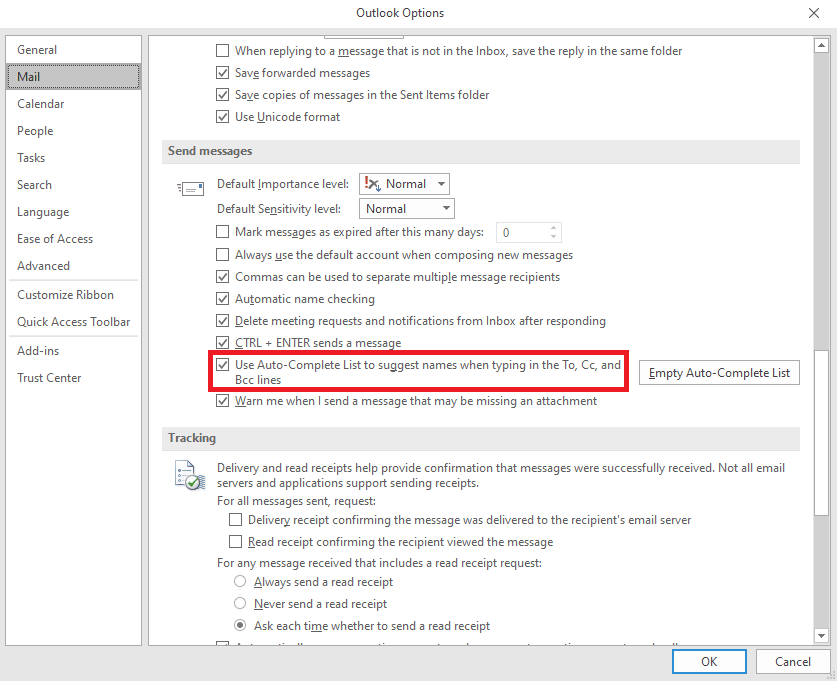
5. Here, check the Use Auto-Complete List to suggest names when typing in the To, Cc, and Bcc lines.
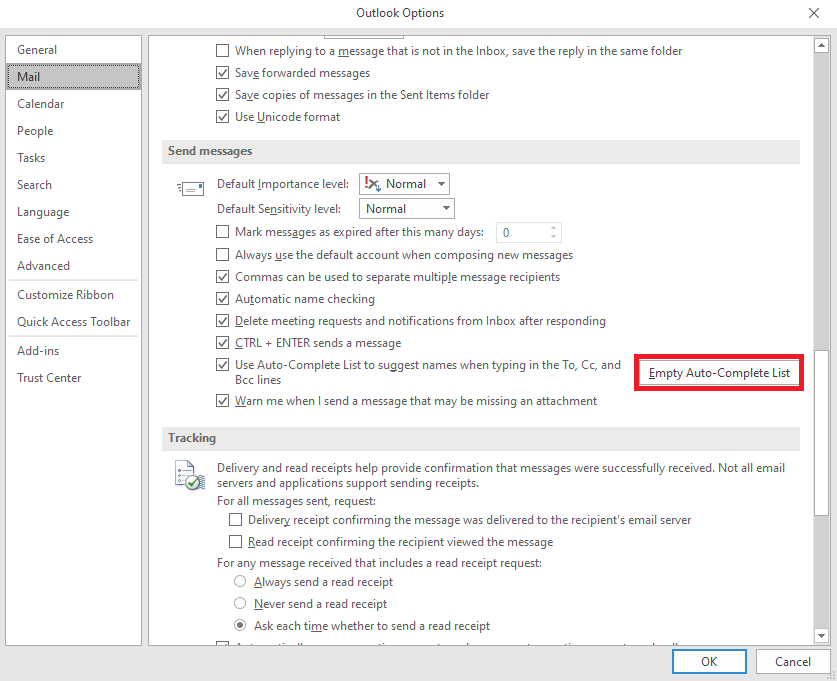
6. If you find this option already checked, click on the خالی خودکار مکمل فہرست.
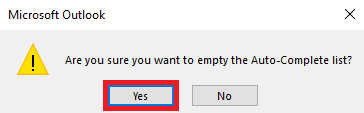
7. کلک کریں جی ہاں کارروائی کی تصدیق کرنے کے لئے.
طریقہ 2: آؤٹ لک کو سیف موڈ میں چلائیں۔
Running programs in safe mode can help you avoid various issues. You can use safe mode to make the troubleshooting process easier and avoid hardware issues. You can follow these simple steps to run Outlook in safe mode to resolve Outlook autocomplete not working issue.
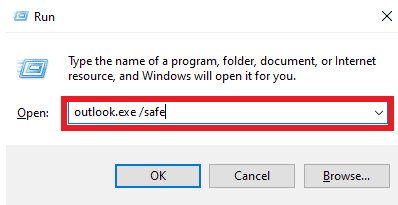
1. دبائیں ونڈوز + آر کیز کھولنے کے لئے Run dialog box.
2. In the Run dialog box, type Outlook.exe/safe اور دبائیں کلید درج کریں۔.
بھی پڑھیں: ونڈوز 10 پر سرور سے جڑنے کی کوشش کر رہے آؤٹ لک کو درست کریں۔
Method 3: Run Outlook with Different Profile
Make sure the Outlook issue is happening only in your Outlook program and not on the entire system. You can try to log in to Outlook with a different profile. You can also add a different account on Outlook.
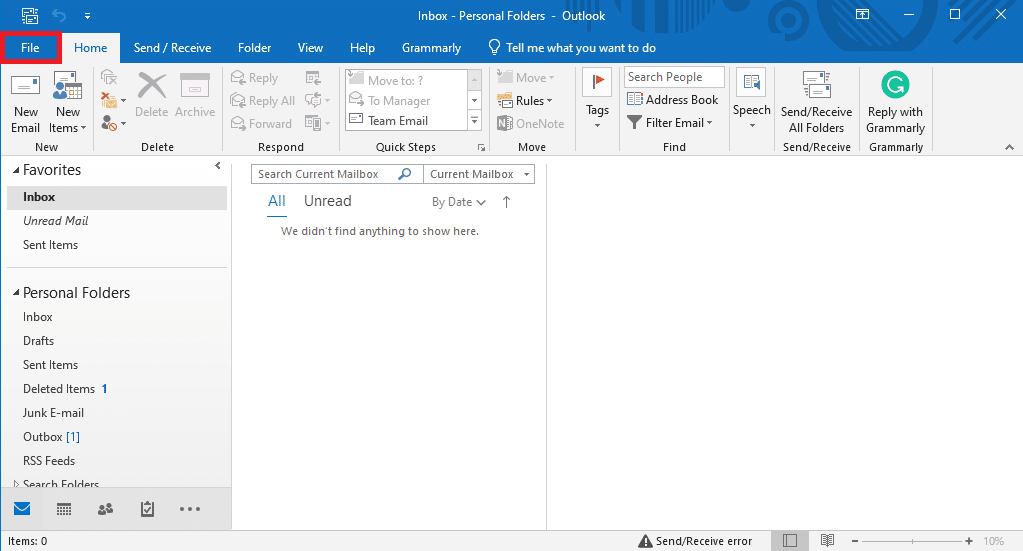
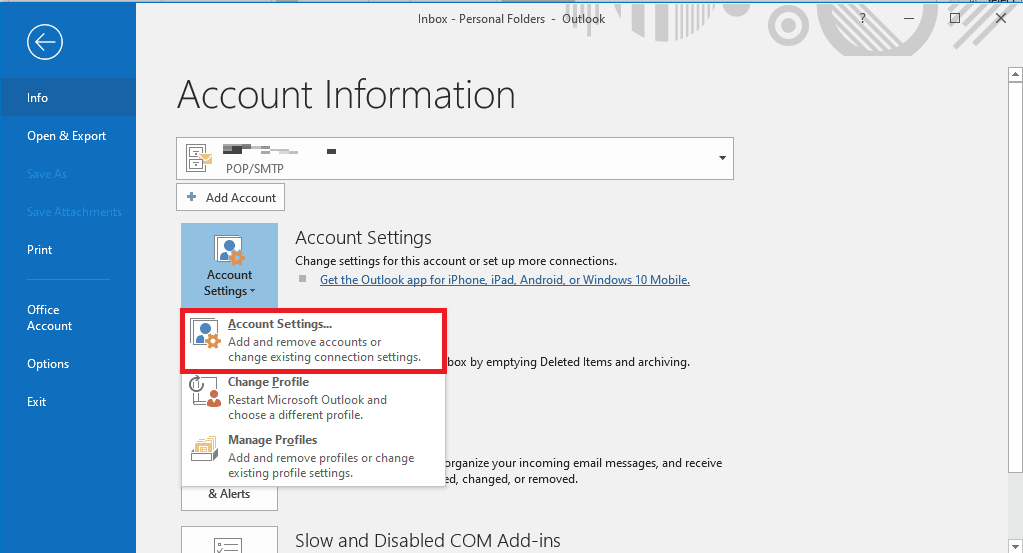
1. کھولو آؤٹ لک on your computer, and click on فائل.
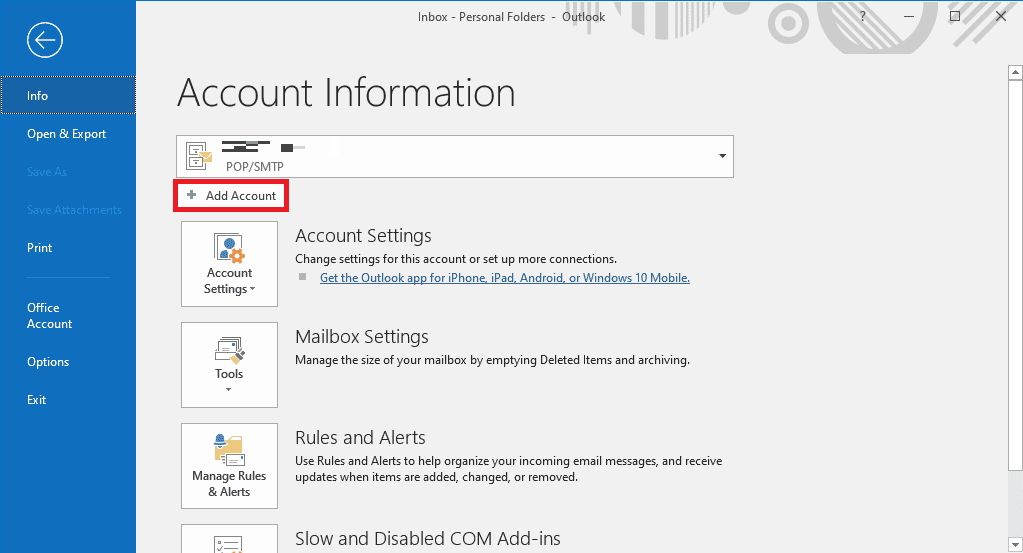
2. میں اکاؤنٹ کی معلومات page, locate and click on اکاؤنٹ کا اضافہ.
3. درج کریں لاگ ان کی تصدیق for a different account.
طریقہ 4: آؤٹ لک ایڈ ان کو غیر فعال کریں۔
Sometimes, the issue can be caused by an Outlook Add-in. Ad-ins can be very useful and help you organize your Outlook application. However, if Outlook Add-ins get corrupt for some reason, you may experience various issues, such as AutoComplete not working on Outlook. To resolve these issues, you can try to disable Outlook Add-ins. You can follow these simple steps to disable Outlook Add-ins.
1. کھولو آؤٹ لک on your computer and navigate to فائل.

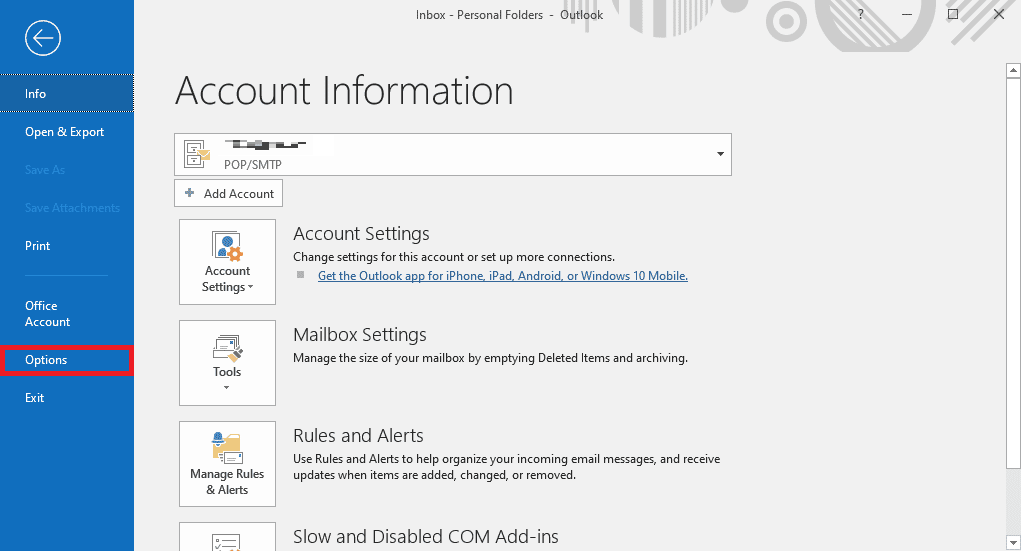
2. Here, from the left-side panel, click on آپشنز کے بھی.
3. Now, locate and navigate to شامل کریں.

4. Here, locate the انتظام کریں ڈراپ ڈاؤن اور منتخب کریں COM ایڈس.
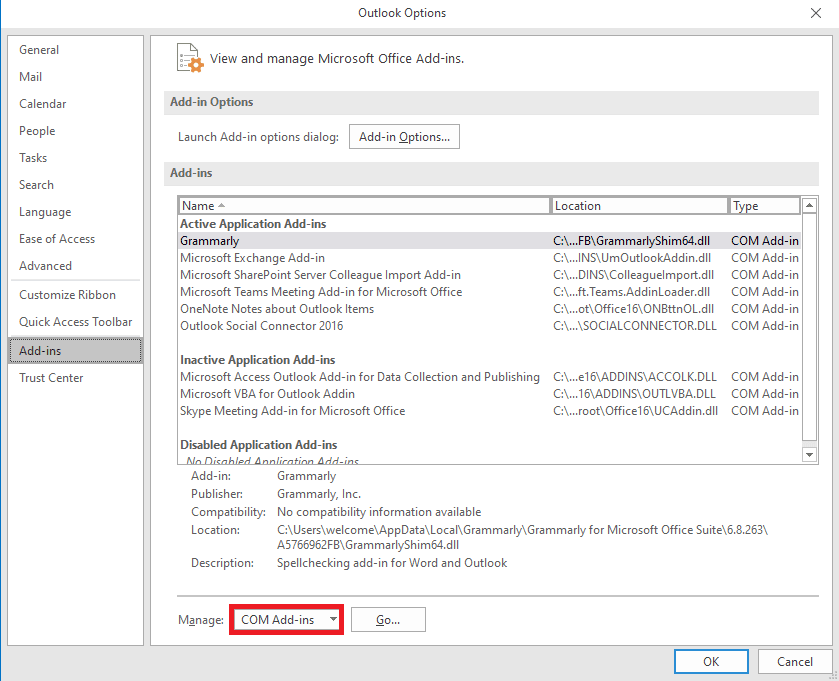
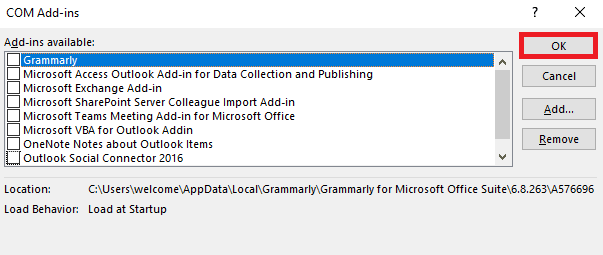
5. اب، کلک کریں۔ Go.
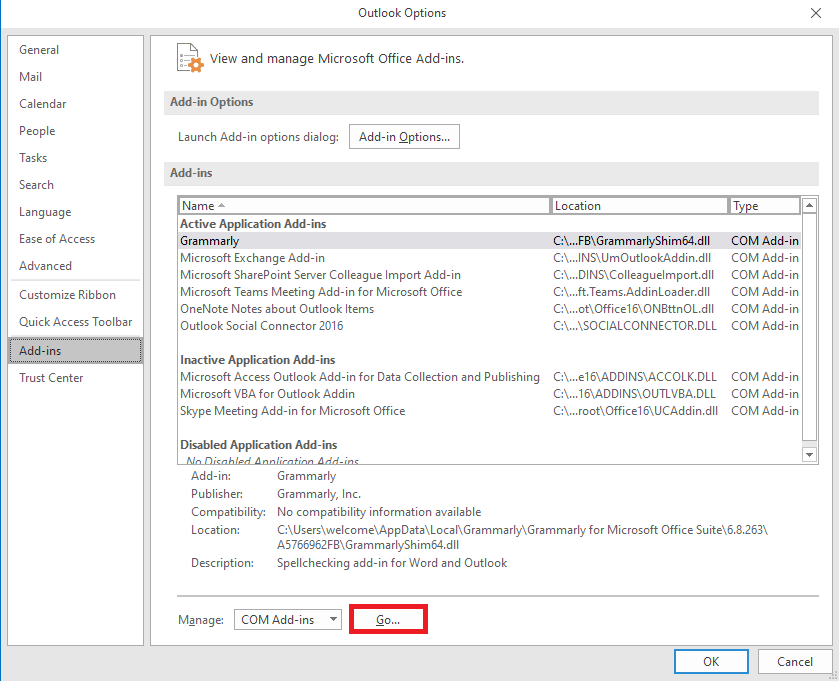
6. یہاں، نشان زد کریں all the Add-ins and then click OK.
Method 5: Repair Outlook Data PST File
PST, or Personal Table Storage, files store Outlook emails; if this file is corrupt or causing issues, you may experience Outlook address AutoComplete not working error. You can use the Inbox repair tool to help you figure out a solution for this issue. Follow these simple steps to execute this method.
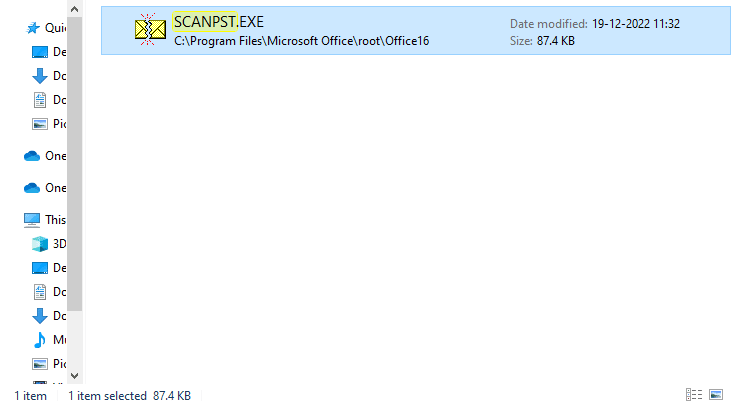
1. کھولیں آؤٹ لک فولڈر آن فائل ایکسپلورر.
C: پروگرام فائلیںمیںروسافٹ آفیسٹوٹوآفس ایکس این ایم ایم ایکس
2. پر کلک کریں سکینپسٹ. EXE فائل.
3. اب، منتخب کریں۔ براؤز کریں option to locate the file you wish to scan.
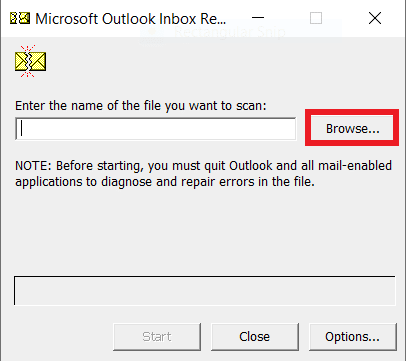
4. In the new dialog box, click on آغاز.
5. آخر میں ، کلک کریں مرمت to fix all the PST file issues.
If this method does not fix Outlook autocomplete not working issue, move on to the next method.
بھی پڑھیں: آؤٹ لک 365 میں حذف شدہ ڈرافٹ کو کیسے بازیافت کریں۔
Method 6: Update Microsoft Office
If the Microsoft Office program is experiencing bugs and glitches, updating it can help you fix the issues. An outdated Microsoft Office can make your Outlook vulnerable to bugs and other application issues. Therefore, manually updating Office is a great way to fix not just the AutoComplete issues but also other underlying issues with the Microsoft Office package. You can follow these simple steps to update Microsoft Office from the Microsoft Outlook program.
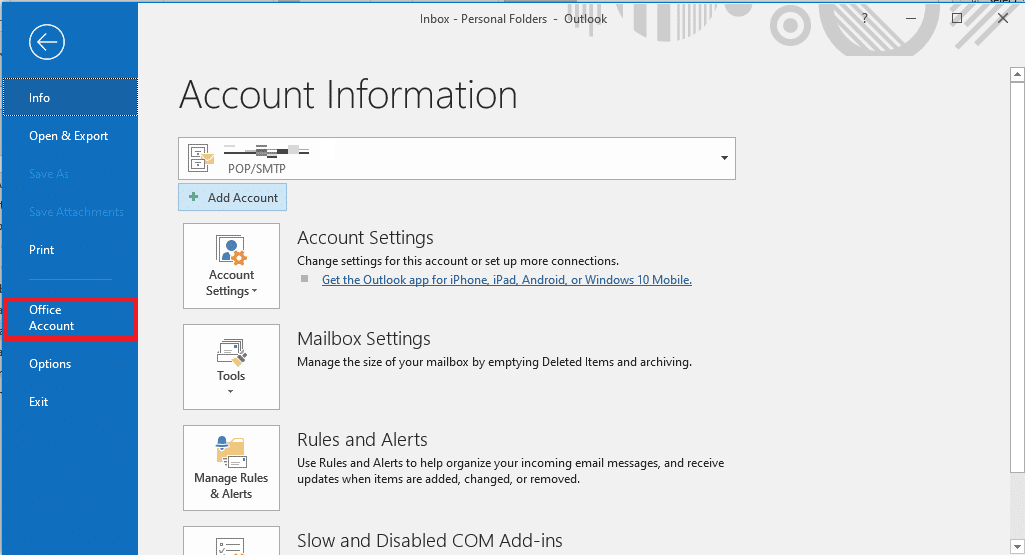
1. کھولو آؤٹ لک on your computer and navigate to فائلوں.

2. From the left-side panel, click on the آفس اکاؤنٹ.
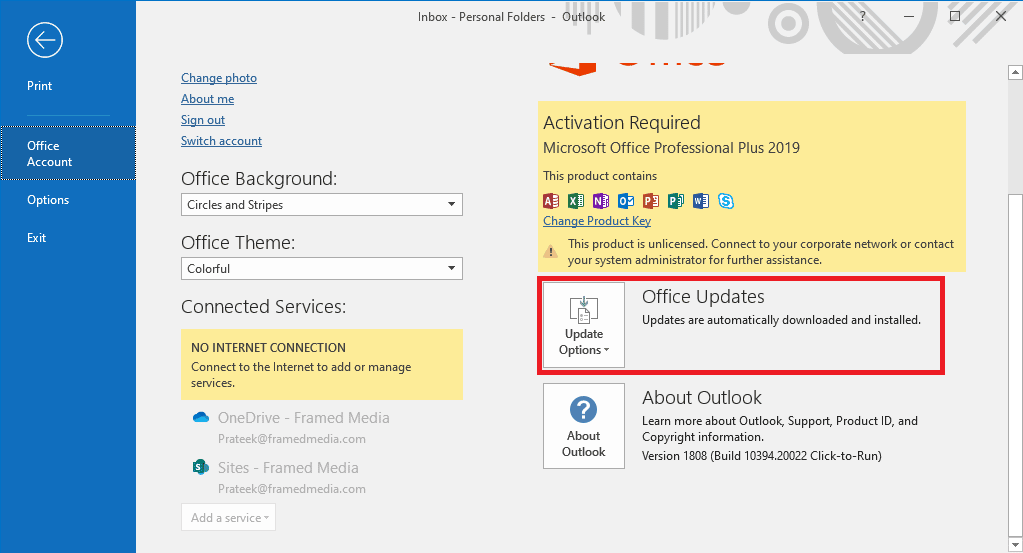
3. Here, locate دفتر تازہ ترین معلومات .
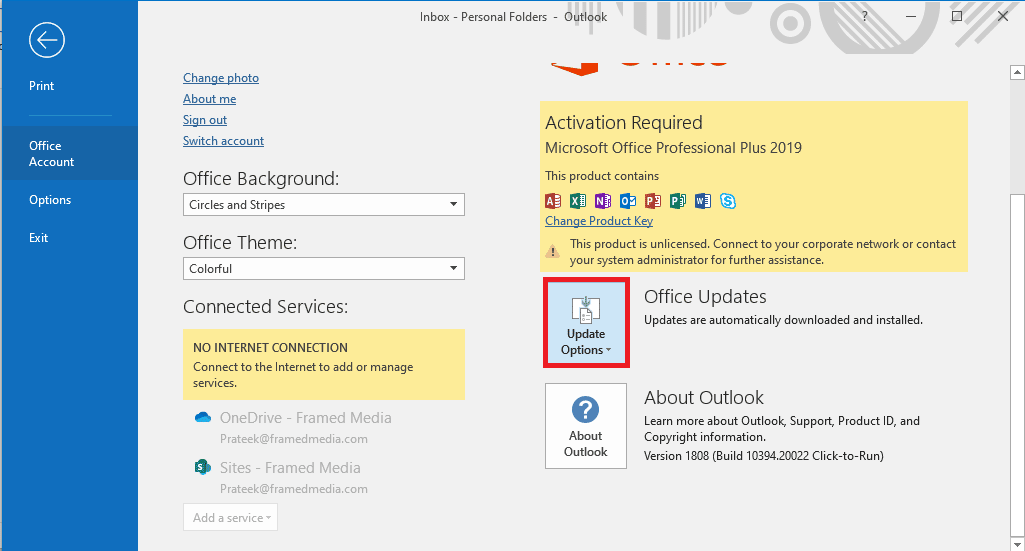
4. اب، پر کلک کریں۔ اختیارات کو اپ ڈیٹ کریں۔ نیچے گرجانا.
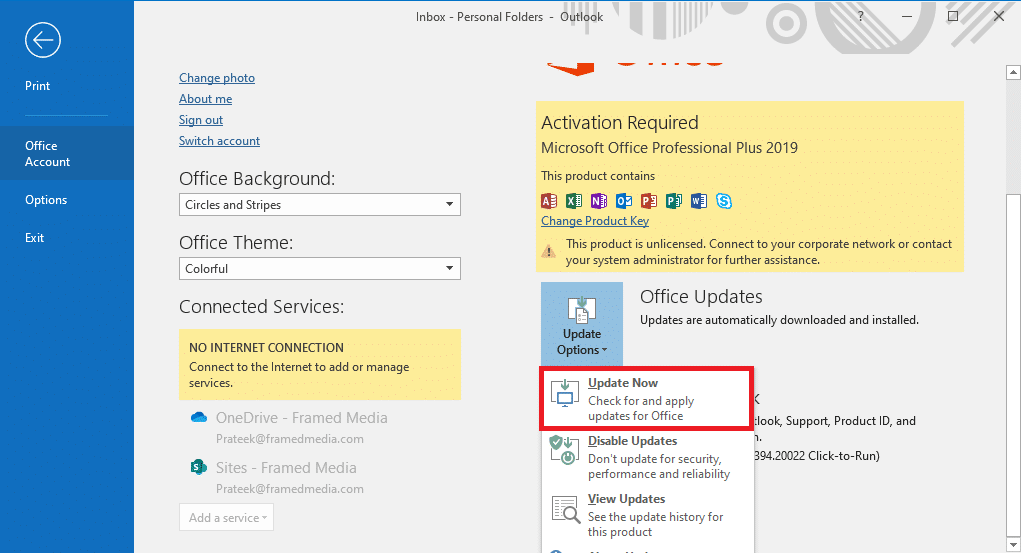
5. آخر میں، پر کلک کریں۔ تازہ ترین کریں. جدید بنایں.
If this method does not fix Outlook Autofill email address not working issue, move on to the next method.
Method 7: Rename RoamCache Folder
If you have enabled the AutoComplete feature but still have the issue, it can be due to a corrupt RoamCache folder. You can fix this issue by resetting the AutoComplete folder. You will only need to rename the RoamCache folder in the directory. You can rename the RoamCache folder for both, a home email account and a Microsoft Exchange server account.
Option I: Rename RoamCache Folder for Home Email Account
You can follow these simple steps to rename the RoamCache folder in a home email account.
1. کھولو آؤٹ لک on your computer and navigate to فائل.

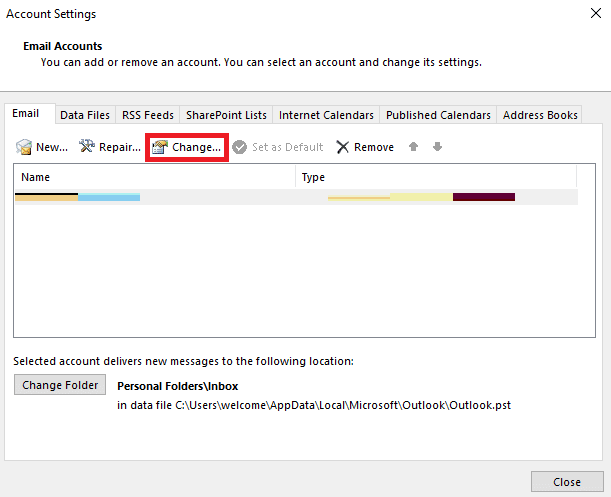
2. اب، پر کلک کریں۔ اکاؤنٹ کی ترتیبات drop-down and then select اکاؤنٹ کی ترتیبات.

3. Here, select your Home Email Account.
4. کلوز the Outlook program.
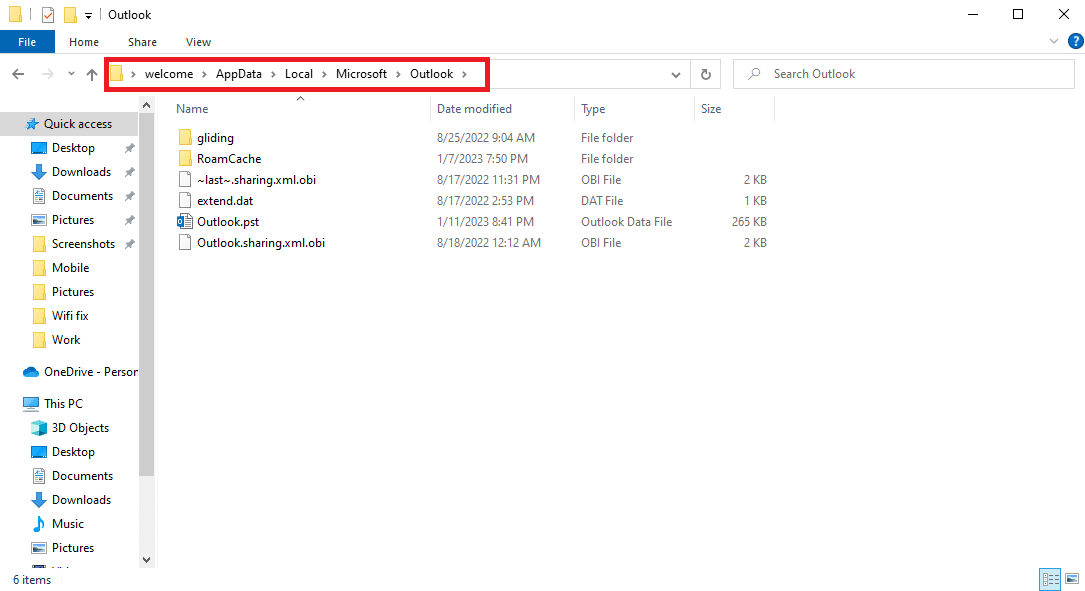
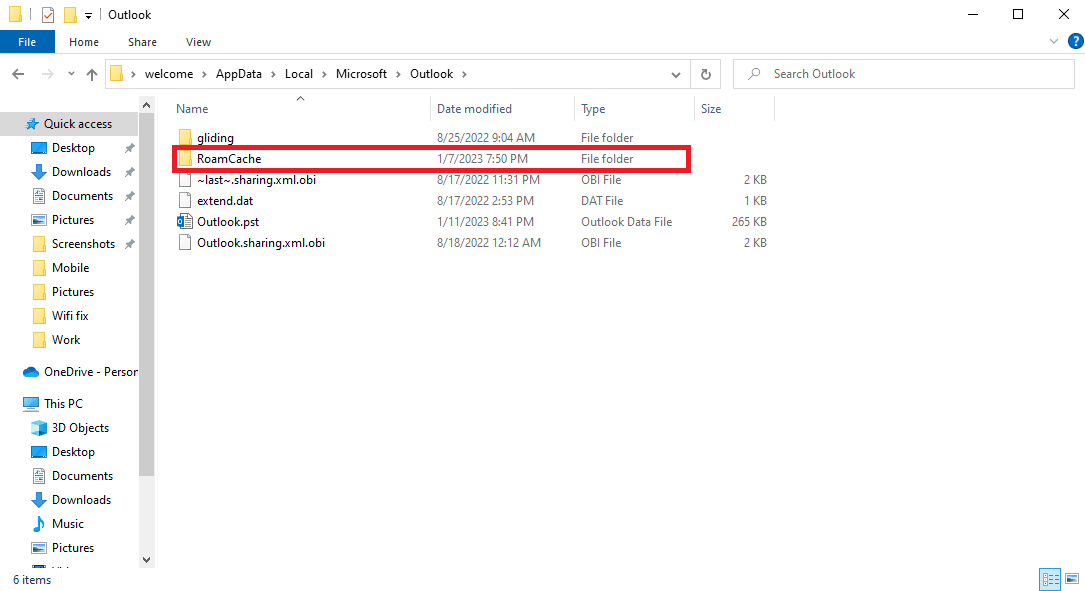
5. دبائیں Windows + E keys کھولنے کی فائل ایکسپلورر.
6. Navigate to the following location راستہ.
%LOCALAPPDATA%MicrosoftOutlook

7. Here, locate the RoamCache فولڈر.

8. Rename this folder with a new name.
بھی پڑھیں: اپنے مائیکروسافٹ ایکسچینج ایڈمنسٹریٹر کو درست کریں آؤٹ لک کے اس ورژن کو بلاک کر دیا ہے۔
Option II: Rename RoamCache Folder for Microsoft Exchange Server Account
You can follow these simple steps to rename the RoamCache folder in a مائیکروسافٹ ایکسچینج server account to solve Outlook address AutoComplete not working issue.
1. کھولو آؤٹ لک on your computer and navigate to فائل.

2. اب، پر کلک کریں۔ اکاؤنٹ کی ترتیبات drop-down and then select اکاؤنٹ کی ترتیبات.
3. Here, select your Microsoft Exchange Server Account.
4. اب، پر کلک کریں تبدیل کریں
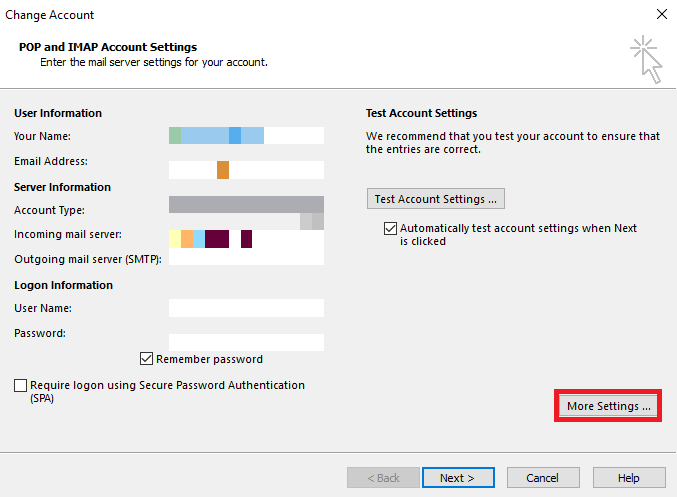
5. یہاں پر کلک کریں۔ مزید ترتیبات.
6. نیویگیشن اعلی درجے کی ٹیب.
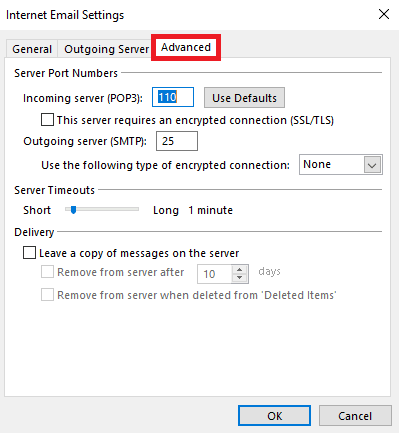
7. Unselect the کیچڈ ایکسچینج وضع استعمال کریں باکس اور منتخب کریں اگلے.
8. آخر میں ، کلک کریں ختم.
9. بند کریں۔ آؤٹ لک پروگرام.
10. دبائیں Windows + E keys ایک ہی وقت میں کھولنے کے لئے فائل ایکسپلورر.
11. میں فائل ایکسپلورر, navigate to the following location راستہ.
%LOCALAPPDATA%MicrosoftOutlook
12. Here, locate the RoamCache فولڈر.
13. Rename this folder to old_RoamCache.
14. اب ، کھولیں آؤٹ لک program and follow the steps mentioned above to navigate to the کیچڈ ایکسچینج وضع استعمال کریں آپشن.
15. چیک کریں Use Cached Exchange Mode.
16. آخر میں، آؤٹ لک ایپ کو دوبارہ شروع کریں۔.
سفارش کی جاتی ہے:
ہمیں امید ہے کہ یہ گائیڈ آپ کے لیے کارآمد تھا اور آپ اسے ٹھیک کرنے میں کامیاب ہو گئے تھے۔ Outlook AutoComplete not working مسئلہ. ہمیں بتائیں کہ آپ کے لیے کون سا طریقہ کارگر ہے۔ اگر آپ کے پاس ہمارے لیے کوئی مشورے یا سوالات ہیں تو براہ کرم ہمیں تبصرے کے سیکشن میں بتائیں۔

