How to Fix Automatic Repair couldn’t repair your PC: Windows 10 is the latest operating system offered by Microsoft and with each Windows upgrade Microsoft is trying their best to overcome the limitation and shortcomings of various issues found in earlier versions of Windows. But there are some errors that are common to all versions of Windows including boot failure being the major one. Boot failure can happen with any version of Windows including Windows 10.
Automatic repair is generally able to fix the boot failure error, this is a built-in option that comes along with Windows itself. When Windows 10 running system fails to boot, the Automatic Repair option tries to repair Windows automatically. In most cases, automatic repair fixes various issues related to boot failures but like any other program, it also has its limitations, and sometimes Automatic Repair fails to work.
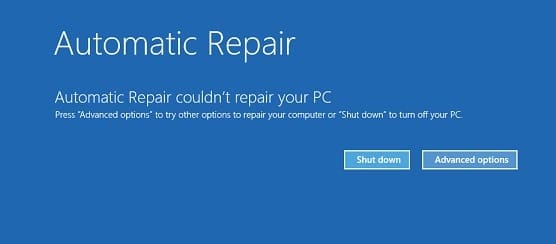
Automatic Repair fails because there are some errors or corrupted or missing files in your operating system installation that prevent Windows from starting correctly and if Automatic Repair fails then you won’t be able to get into Safe Mode. Often a failed automatic repair option will show you some kind of error message like this one:
Automatic Repair couldn't repair your PC.
Press "Advanced options" to try other options to repair your PC or "Shut down" to turn off your PC.
Log file: C:WINDOWSSystem32LogfilesSrtSrtTrail.txt
In a situation when Automatic Repair couldn’t repair your PC, Bootable installation media or Recovery Drive/System Repair Disc are helpful in such cases. Let’s get started and see step by step how you can fix Automatic Repair couldn’t repair your PC error.
نوٹ: For each and every step below you need to have Bootable installation media or Recovery Drive/System Repair Disc and if you don’t have one then create one. If you don’t want to download the entire OS from the website then you use your friend’s PC to create the disc using this لنک or you need to download official Windows 10 ISO but for that, you need to have a working internet connection and PC.
IMPORTANT: Never convert a Basic disk that contains your operating system to a Dynamic disk, as it could make your system unbootable.
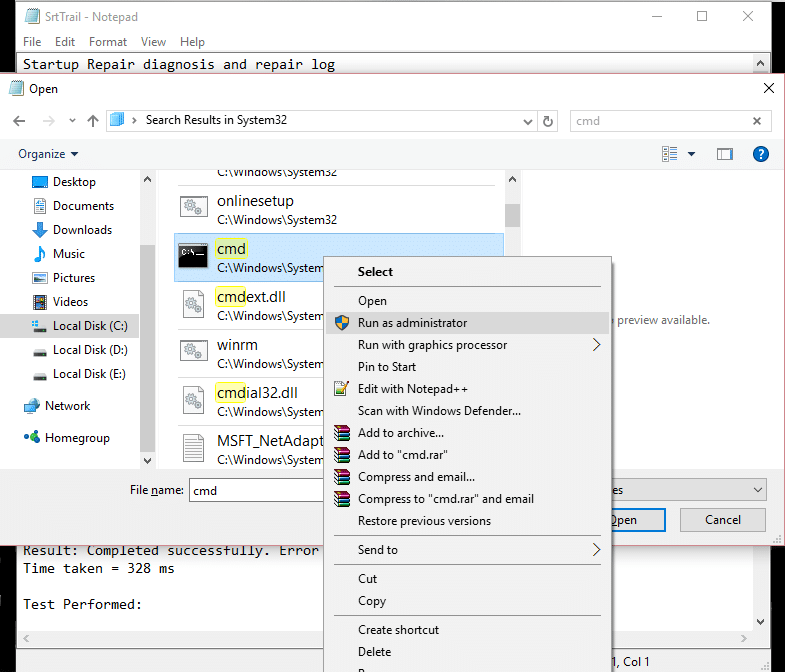
How to open Command Prompt at Boot in Windows 10
نوٹ: You need to open Command Prompt at Boot a lot in order to fix various issues.
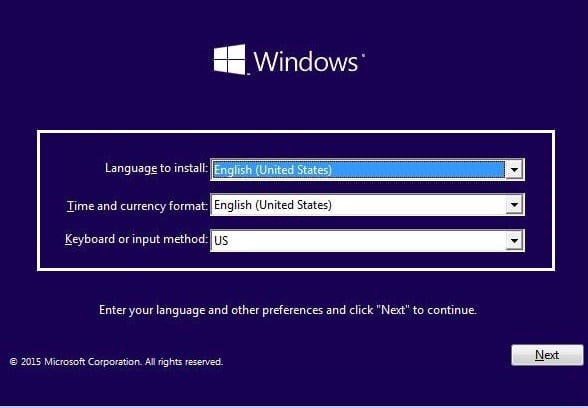
a) Put in the Windows installation media or Recovery Drive/System Repair Disc and select your زبان کی ترجیحات، اور اگلا پر کلک کریں۔
ب) کلک کریں مرمت آپ کا کمپیوٹر نیچے ہے۔

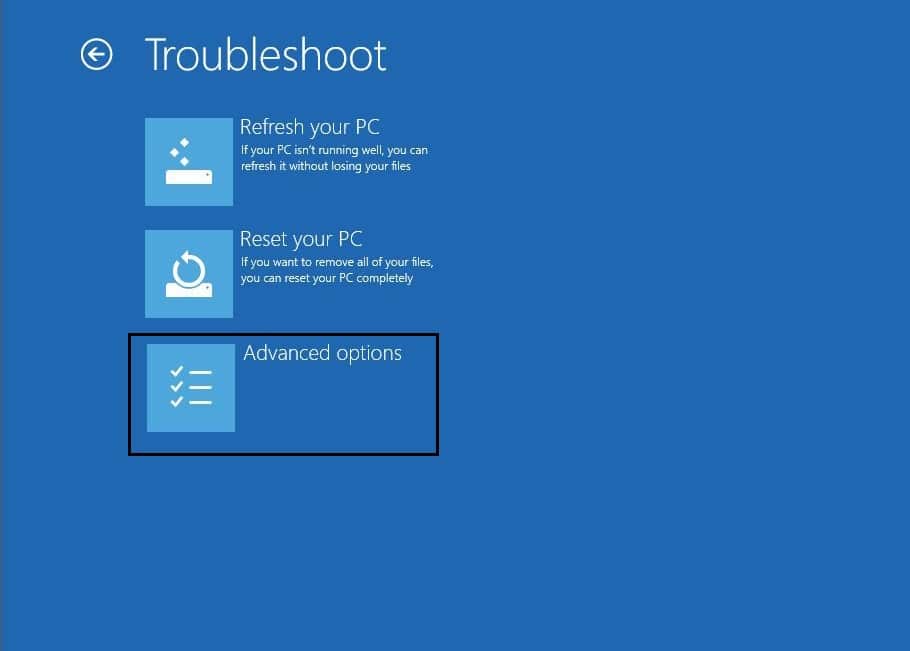
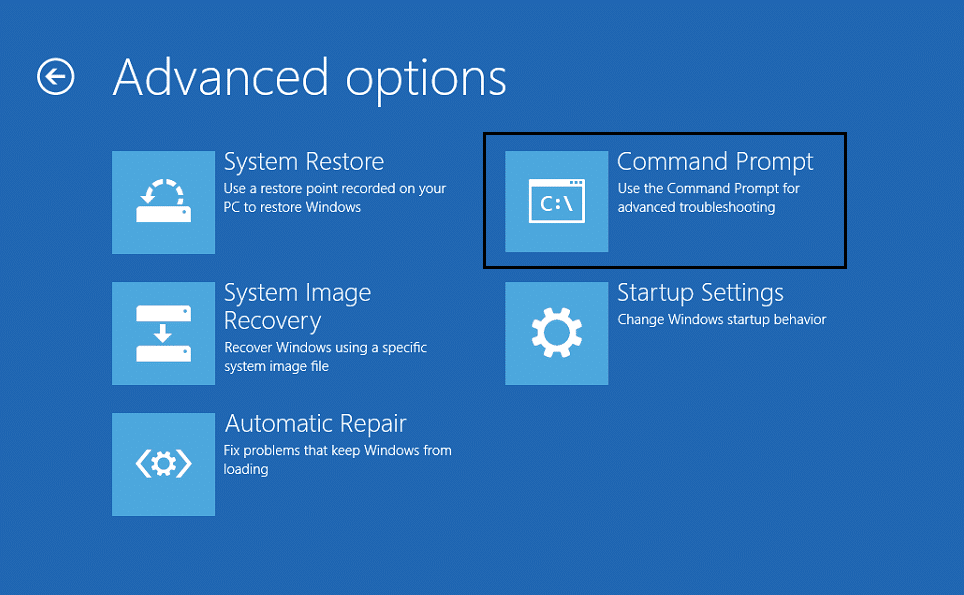
c) Now choose دشواری حل کریں اور پھر اعلی درجے کی اختیارات
d) منتخب کریں۔ کمانڈ پرامپٹ (نیٹ ورکنگ کے ساتھ) اختیارات کی فہرست سے۔
Fix Automatic Repair couldn’t repair your PC
اہم اعلان دستبرداری:
These are very advanced tutorial, if you don’t know what you’re doing then you may accidentally harm your PC or perform some steps incorrectly that will ultimately make your PC unable to boot to Windows. So if you don’t know what you’re doing, please take help from any technician or expert supervision is recommended.
Method 1: Fix boot and rebuild BCD
1. Open the Command prompt and type the following commands one by one & hit enter:
bootrec.exe / rebuildbcd
bootrec.exe / fixmbr
bootrec.exe / fixboot
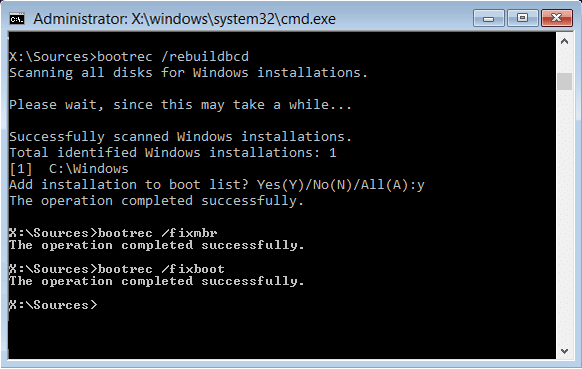
2. After completing each command successfully type باہر نکلیں.
3. Restart your PC to see if you boot to windows.
4. If you get an error in the above method then try this:
bootsect /ntfs60 C: (replace the drive letter with your boot drive letter)
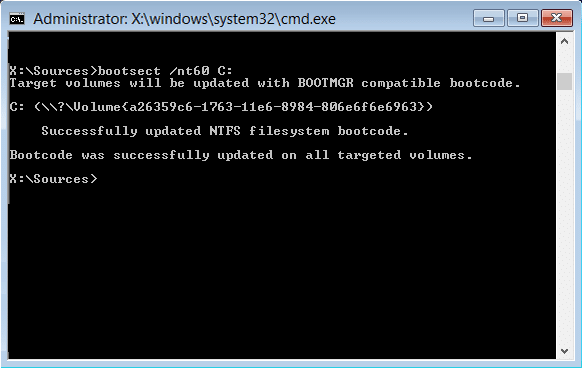
5. And again try the above commands which failed earlier.
Method 2: Use Diskpart to fix corrupted file system
1. Again go to کمانڈ پرامپٹ اور قسم: diskpart
2. Now type these commands in Diskpart: (don’t type DISKPART)
DISKPART> ڈسک منتخب کریں 1
ڈسکپارٹ> تقسیم 1 منتخب کریں
ڈسکپارٹ> فعال
ڈسکپارٹ> فائل سسٹم میں توسیع کریں
ڈسکپارٹ> باہر نکلیں
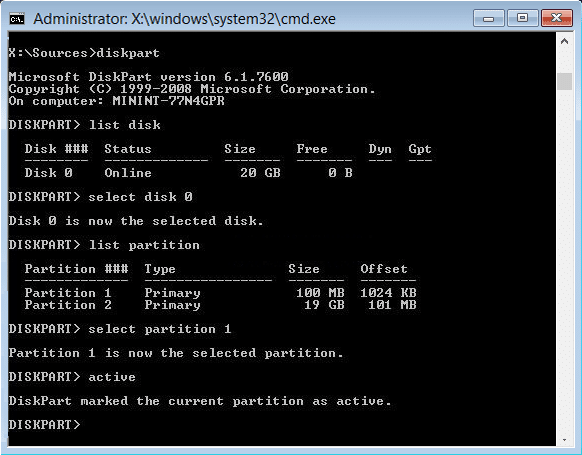
3. Now type the following command:
 bootrec.exe / rebuildbcd
 bootrec.exe / fixmbr
 bootrec.exe / fixboot
4. Restart to apply changes and see if you’re able to fix Automatic Repair couldn’t repair your PC error.
Method 3: Use Check Disk Utility
1. Go to command prompt and type the following: chkdsk/f/r C:
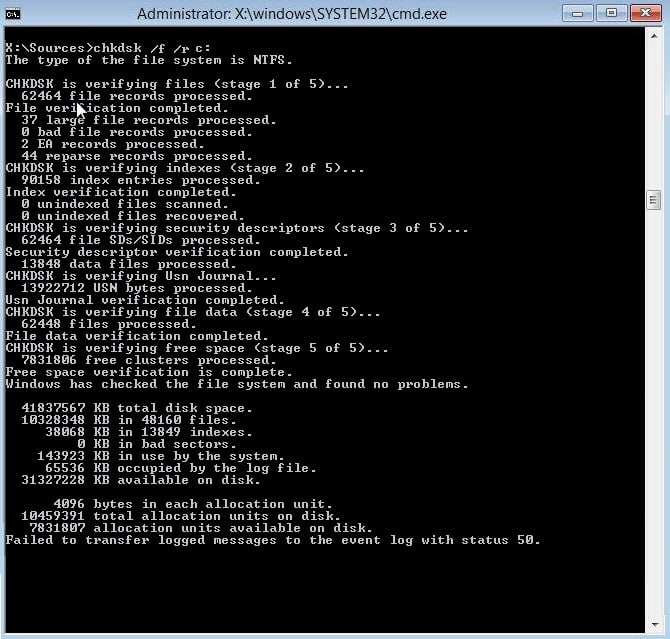
2. اب اپنے کمپیوٹر کو دوبارہ شروع کریں to see if the problem is fixed or not.
Method 4: Recover Windows registry
1. درج کریں انسٹالیشن یا ریکوری میڈیا اور اس سے بوٹ.
2. اپنے منتخب کریں زبان کی ترجیحات اور اگلا پر کلک کریں۔
3. After selecting language press شفٹ + F10 کمانڈ پرامپٹ پر۔
4. Type the following command in the Command Prompt:
cd C: windowssystem32logfilessrt (اس کے مطابق اپنے ڈرائیو لیٹر کو تبدیل کریں)

5. Now type this to open the file in notepad: SrtTrail.txt
6. دبائیں CTRL + O پھر فائل کی قسم سے منتخب کریں "تمام فائلیںاور تشریف لے جائیں۔ سی: ونڈوز سسٹم 32 then right-click صدر اور انتظام ڈائریکٹر اور Run as کو منتخب کریں۔ منتظم
7. Type the following command in cmd: cd C: windowssystem32config
8. Rename Default, Software, SAM, System, and Security files to .bak to back up those files.
9. To do so type the following command:
DEFAULT DEFAULT.bak کا نام تبدیل کریں۔
SAM SAM.bak کا نام تبدیل کریں۔
SECURITY SECURITY.bak کا نام تبدیل کریں۔
SOFTWARE SOFTWARE.bak کا نام تبدیل کریں۔
SYSTEM SYSTEM.bak کا نام تبدیل کریں۔
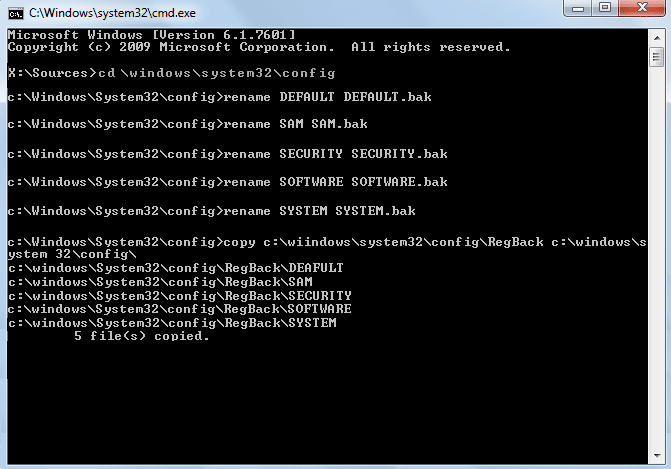
10. Now type the following command in cmd:
کاپی c:windowssystem32configRegBack c:windowssystem32config
11. Restart your PC to see if you can boot to Windows.
Method 5: Repair Windows Image
1. Open Command Prompt and enter the following command:
ڈس ایم / آن لائن / صافی - تصویری / بحال ہاؤس

2. Press enter to run the above command and wait for the process to complete, usually, it takes 15-20 minutes.
نوٹ: If the above command doesn’t work then try this: Dism/Image:C:offline/Cleanup-Image/RestoreHealth/Source:c:testmountwindows or Dism/Online/Cleanup-Image/RestoreHealth/Source:c:testmountwindows/LimitAccess
3. After the process is completed restart your PC.
4. Reinstall all the windows drivers and fix Automatic Repair couldn’t repair your PC error.
طریقہ 6: پریشانی والی فائل کو حذف کریں۔
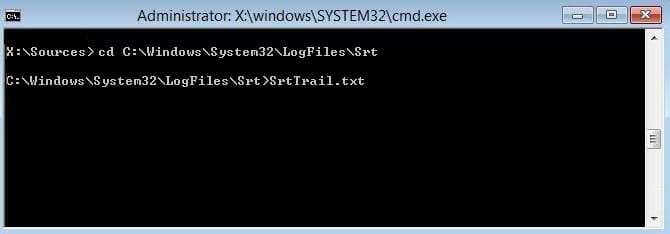
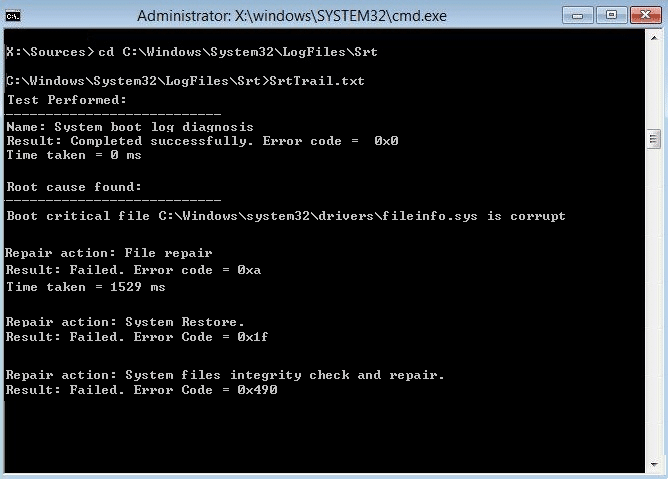
1. Access Command Prompt again and enter the following command:
cd C:WindowsSystem32LogFilesSrt
SrtTrail.txt
2. When the file opens you should see something like this:
بوٹ کریٹیکل فائل c:windowssystem32driverstmel.sys کرپٹ ہے۔
3. Delete the problematic file by entering the following command in cmd:
سی ڈی سی: ونڈو سسٹم 32 ڈرایورز
کی tmel.sys
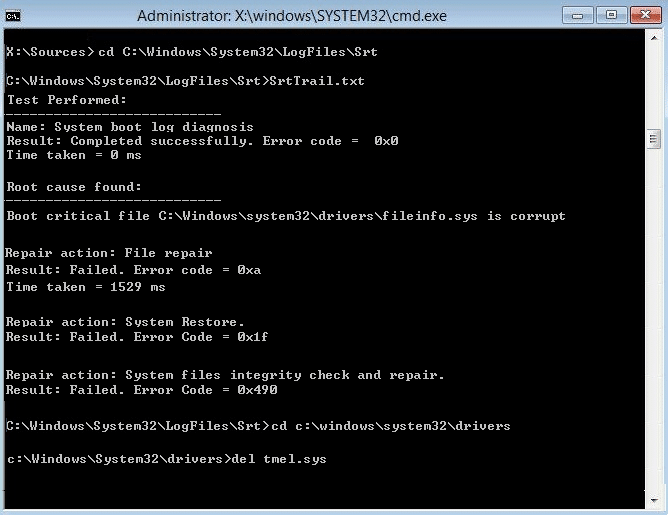
نوٹ: ایسے ڈرائیورز کو ڈیلیٹ نہ کریں جو آپریٹنگ سسٹم کو لوڈ کرنے کے لیے ونڈوز کے لیے ضروری ہیں۔
4. Restart to see if the issue is fixed if not continue to the next method.
Method 7: Disable Automatic Startup Repair Loop
1. Open Command Prompt and enter the following command:
نوٹ: Only disable if you are in Automatic Startup Repair Loop
bcdedit / سیٹ {پہلے سے طے شدہ} بازیافت نمبر
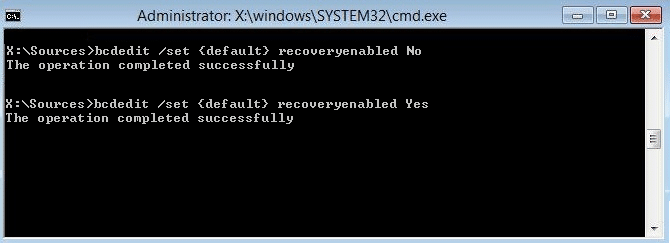
2. Restart and Automatic Startup Repair should be disabled.
3. If you need to again enable it, enter the following command in cmd:
bcdedit /set {default} recovery enabled ہاں
4. تبدیلیاں لاگو کرنے کے لیے ریبوٹ کریں۔
طریقہ 8: ڈیوائس پارٹیشن اور osdevice پارٹیشن کی صحیح قدریں سیٹ کریں۔
1. In Command Prompt type the following and press enter: bcdedit
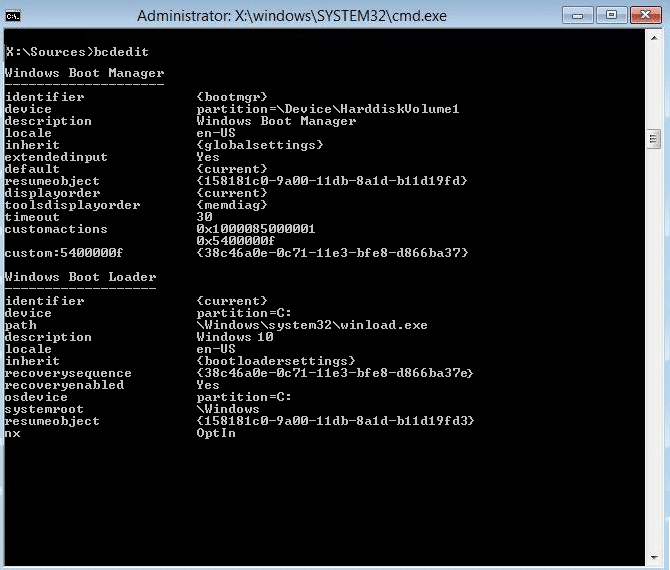
2. Now find the values of ڈیوائس پارٹیشن اور osdevice پارٹیشن اور یقینی بنائیں کہ ان کی اقدار درست ہیں یا تقسیم کو درست کرنے پر سیٹ ہیں۔
3. By default value is C: because Windows comes pre-installed on this partition only.
4. If by any reason it is changed to any other drive then enter the following commands and press Enter after each one:
bcdedit / set {default} device split = c:
bcdedit / set {default} osdevice split = c:
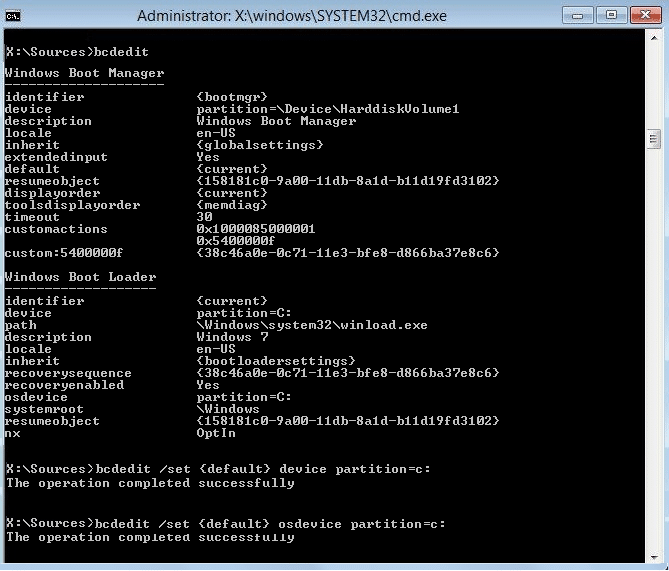
نوٹ: اگر آپ نے اپنی ونڈوز کو کسی دوسری ڈرائیو پر انسٹال کیا ہے تو یقینی بنائیں کہ آپ اسے C کے بجائے استعمال کرتے ہیں:
5. Reboot your PC to save changes and fix Automatic Repair couldn’t repair your PC error.
Method 9: Disable driver signature enforcement
1. Put in the Windows installation media or Recovery Drive/System Repair Disc and select your زبان کی ترجیحات، اور اگلا پر کلک کریں۔
2. کلک کریں مرمت آپ کا کمپیوٹر نیچے ہے۔
3. Now choose دشواری حل کریں اور پھر اعلی درجے کی اختیارات
4. منتخب کریں شروع کی ترتیبات.
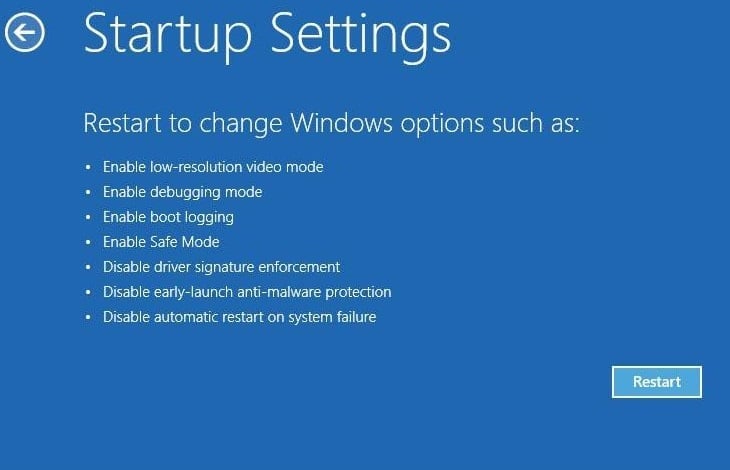
5. Restart your PC and نمبر 7 دبائیں (If 7 isn’t working then relaunch the process and try different numbers).

Method 10: Last option is to perform Refresh or Reset
Again insert Windows 10 ISO then select your language preferences and click اپنے کمپیوٹر کی مرمت کریں کے نیچے دیے گئے.
1. منتخب کریں خرابیوں کا سراغ لگانا جب بنیادی فہرست ظاہر ہوتا ہے.

2. Now choose between the option Refresh or Reset.
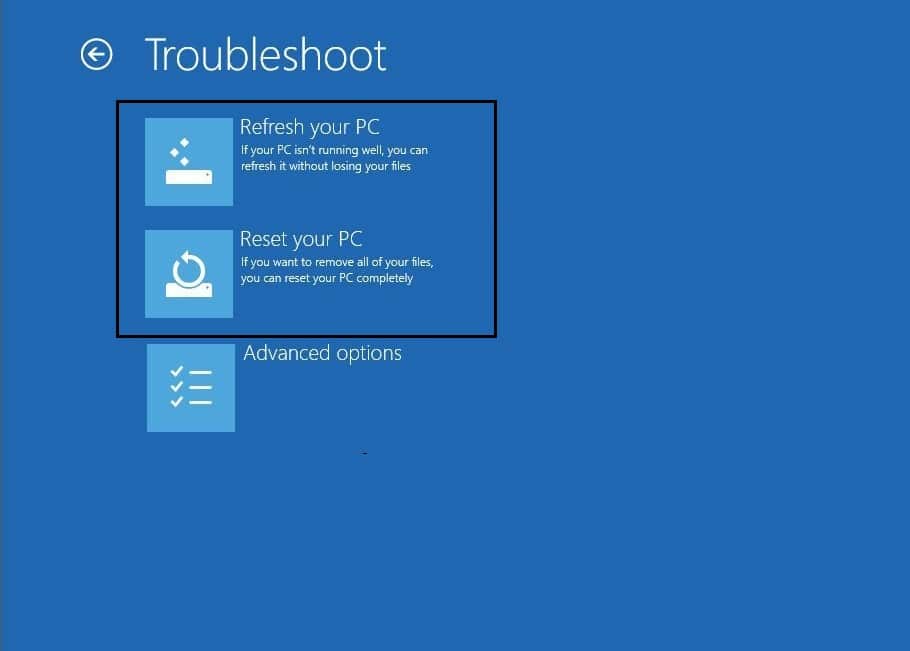
3. Follow the on-screen instructions to complete the Reset or Refresh.
4. Make sure you have the latest OS disc (ترجیحا ونڈوز 10) in order to complete this process.
آپ کیلئے تجویز کردہ:
By now you must have successfully درست Automatic Repair couldn’t repair your PC but if you still have any questions regarding this guide please feel free to ask them in the comment section.

