Install Software Without Admin Rights
Trying to install new software, driver, or program, and you are unable to do so? Did your operating system ask for the Administrator’s permission and make you pause your installation? If the questions state your exact position, let go of your worry. You might be just a normal PC user, and the installation might require administrative privileges. This article will help you on how to install software or program without admin rights in Windows 10.

How to Install Software Without Admin Rights in Windows 10
Before getting to know the methods that can be adopted to solve the issue of installation without admin rights in Windows 10, it is important to have a clear understanding of the terms: drivers, programs, and software. This section attempts to give you an understanding of the same.
- In simple words, a program is a set of instructions written for the PC.
- Software is the compilation of programs.
- A driver is a program that communicates between software and the PC.
So, all three are interlinked with each other.
Below are listed methods of how to install software without admin rights. It is advisable to implement these methods only if you trust the source of the installation file.
نوٹ: Moreover, in order to do so, you will need to make changes for future installations using administrator account access only.
Method 1: Use Installation File and Command in Notepad
In this method, we will copy the installation file and command the PC to bypass the Run as Administrator command. The User Account Control or UAC prompt is skipped, making the installation process simple.
نوٹ: For explanatory purposes, وی ایل سی میڈیا پلیئر software is considered, and the files are placed in a نیا فولڈر میں ڈیسک ٹاپ folder. Also, this method may or may work on your system.
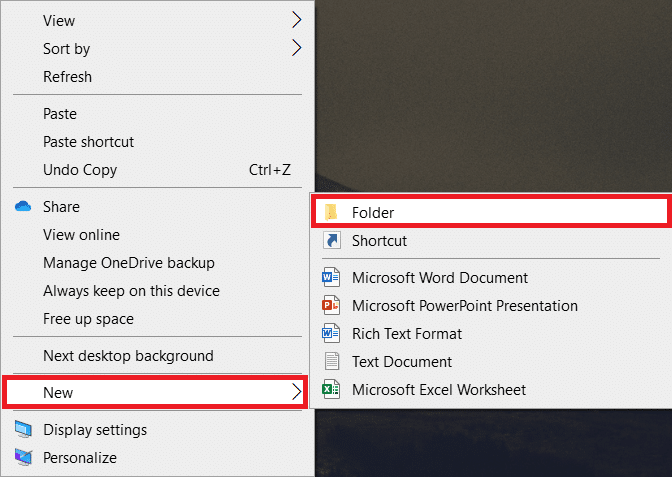
1. پر دائیں کلک کریں ڈیسک ٹاپ اور منتخب کریں نئی. پھر کلک کریں فولڈر.
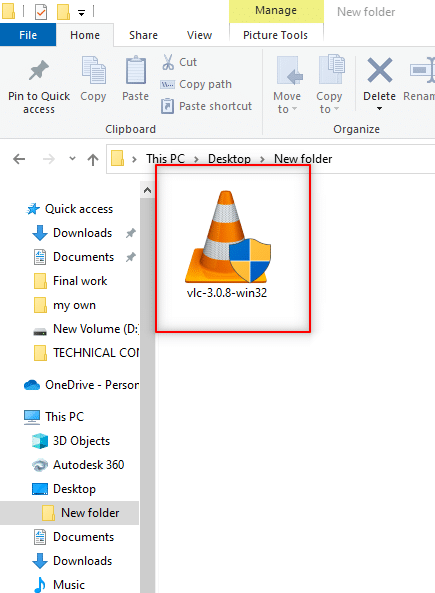
2. Copy the installation file of وی ایل سی میڈیا پلیئر کرنے کے لئے نیا فولڈر آپ کے ڈیسک ٹاپ.
نوٹ: The file with the گیا. exe extension is the file that is used to install the software.
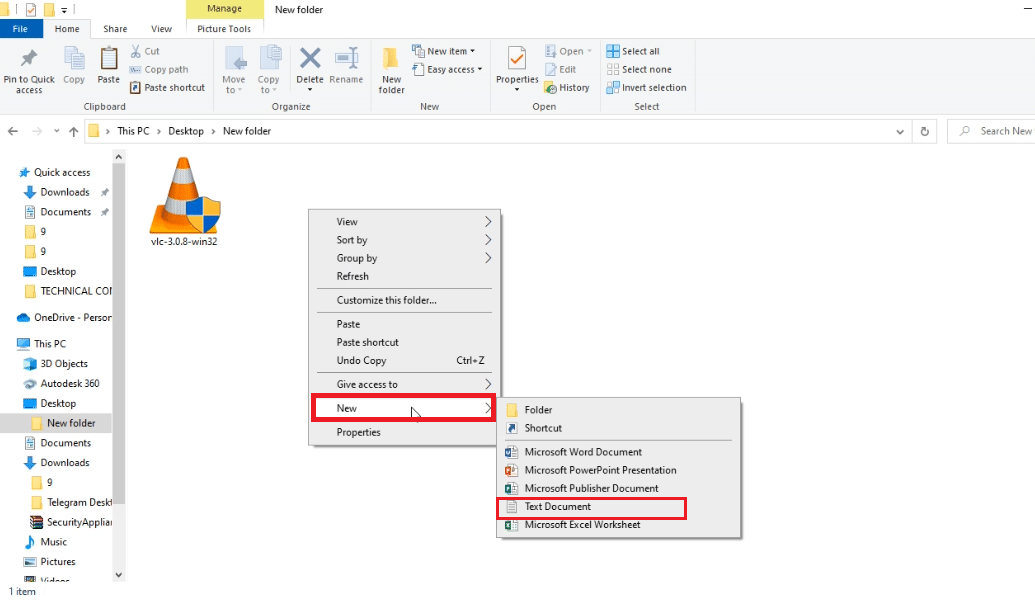
3. میں نیا فولڈرپر دائیں کلک کریں۔ خالی جگہ، اور منتخب کریں نئی ڈراپ ڈاؤن فہرست میں۔
4. In the following menu, select متنی دستاویز.
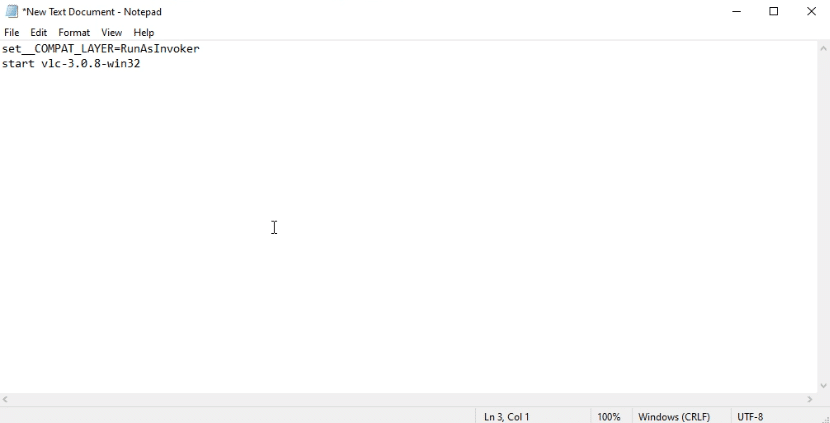
5. Open that نوٹ پیڈ file, and enter the following command.
_COMPAT_LAYER = RunAsInvoker سیٹ کریں
Start vlc-3.0.8-win32
نوٹ: Here, you have to replace vlc-3.0.8-win32۔ with the name of the software installer.
6. دبائیں Ctrl + Shift + S keys ایک ہی وقت میں کھولنے کے لئے ڈائیلاگ باکس کے طور پر محفوظ کریں۔.
7. Save the file in the format software_installer_name.bat file extension, that is, vlc-3.0.8-win32.bat.
8. منتخب کریں تمام فائلیں in the drop-down menu of دستاویز کی قسم the file. Click on the محفوظ کریں فائل کو محفوظ کرنے کے لیے بٹن۔
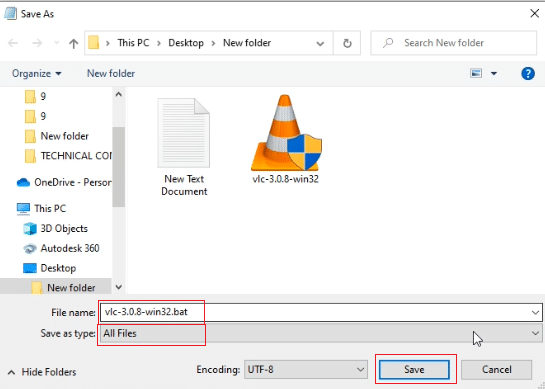
9. پر ڈبل کلک کریں vlc-3.0.8-win32.bat file to install the software.
Why Does Installation Require Admin Rights?
اگرچہ یوزر اکاؤنٹ کنٹرول or UAC prompts at every step of installation are frustrating, the reasons for requiring admin rights for installation could be:
- Security purposes: If there is no admin right for a software installation, anyone can install the malware on your PC. To prevent this action, it requires admin rights.
- Decision time: As the UAC prompts keeps appearing, the admin has the time required to decide on the installation of the particular software. He can reconsider his decision in installation.
- Safety for PC: Sometimes, the programs can disrupt your PC. To stop this, admin rights are required to ensure that the software installed doesn’t disrupt the PC.
How to Use Admin Account to Install Software
The process of how to install software without admin rights without bypassing the Administrator permissions can be tedious. We recommend to convert your own account as admin account or use current admin account to disable such restrictions. The same is explained in subsequent sections.
Method 1: Bypass UAC Prompts and Install Software
In this case, you can alter the UAC prompts and then install the software on your User account.
Step I: Set Password for Administrator Account
This method allows you to exclusively set a password for the Administrator so that you can bypass the UAC prompts and work as an Administrator.
نوٹ: This method may lead to loss of data in the PC, so it is advisable to use it after backing up all the PC data.
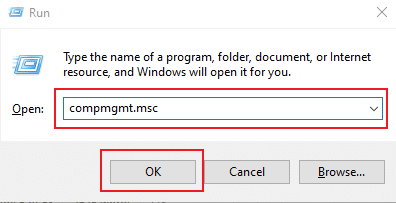
1. کھولیں رن دبانے سے ڈائیلاگ باکس ونڈوز + آر کیز ایک ہی وقت میں.
2. ٹائپ کریں compmgmt.msc in the bar and click OK کھولنے کے لئے کمپیوٹر کے انتظام کھڑکی.
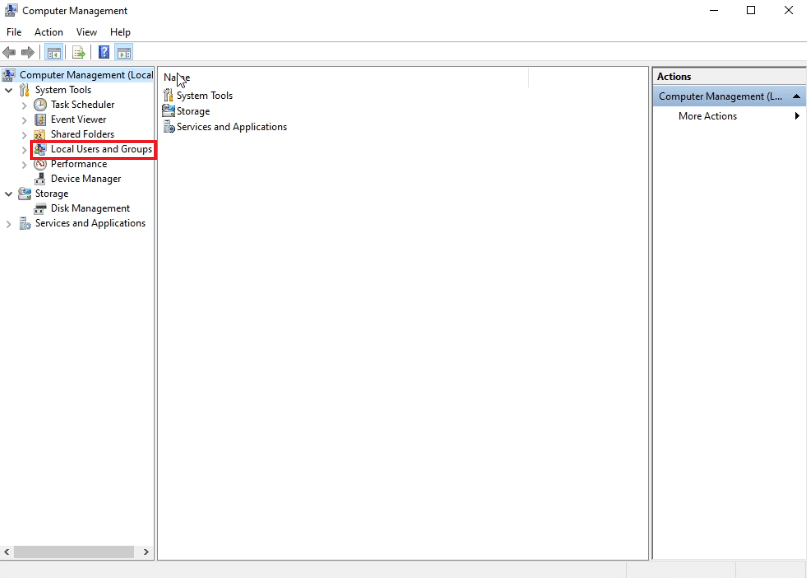
3. پھیلائیں۔ مقامی صارفین اور گروپ فولڈر.
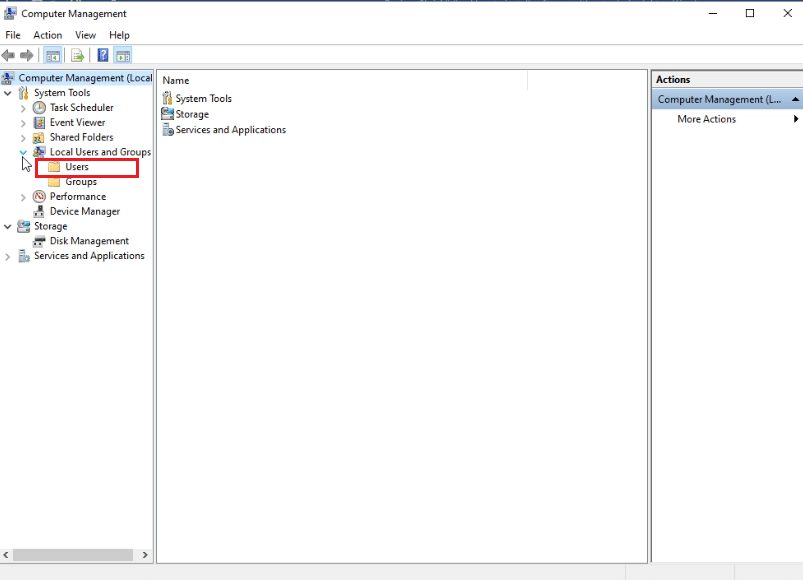
4. پر کلک کریں صارفین فولڈر.
5. پر دائیں کلک کریں ایڈمنسٹریٹر اور منتخب کریں Set Password… آپشن.
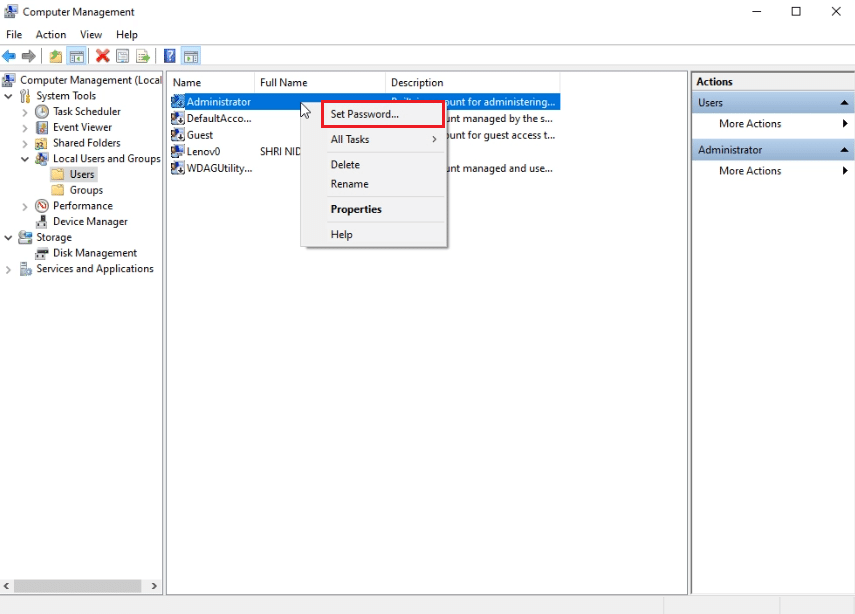
6. پر کلک کریں آگے بڑھو and follow the instructions on the Windows wizard.

بھی پڑھیں: C:windowssystem32configsystemprofileDesktop is Unavailable: Fixed
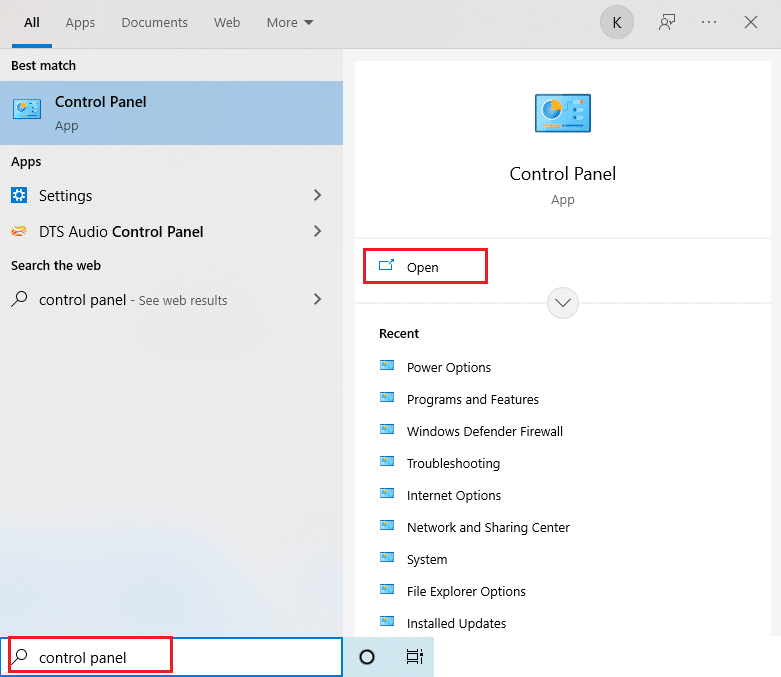
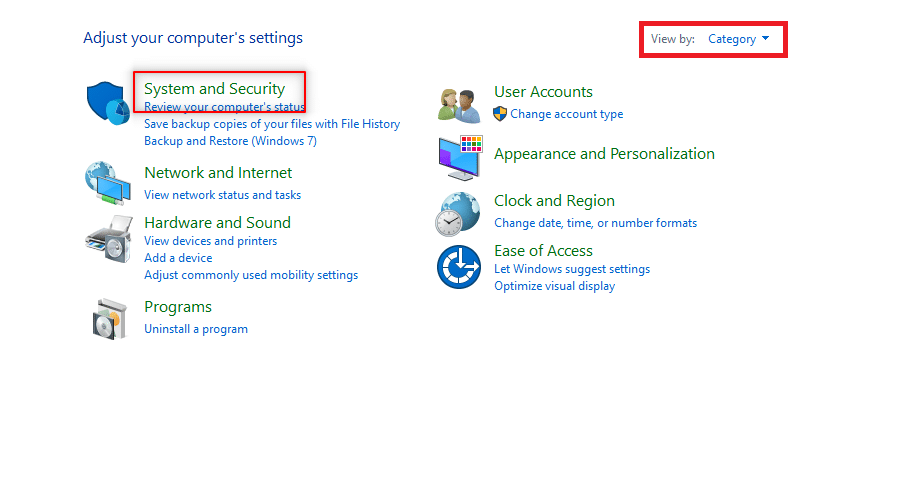
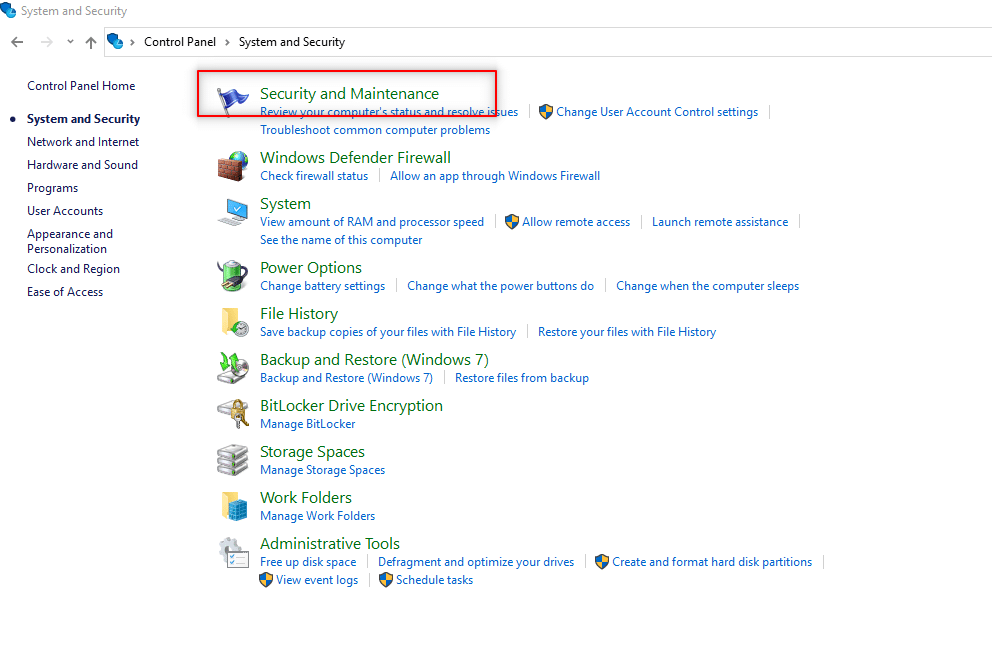
Step II: Turn Off Download Restrictions Set by Administrator
In this method, you will be able to disable all the UAC prompts of the PC. In other words, you will not receive any UAC prompt for any activity on the PC. This allows you to install any application without responding to the download restrictions set by the Administrator.
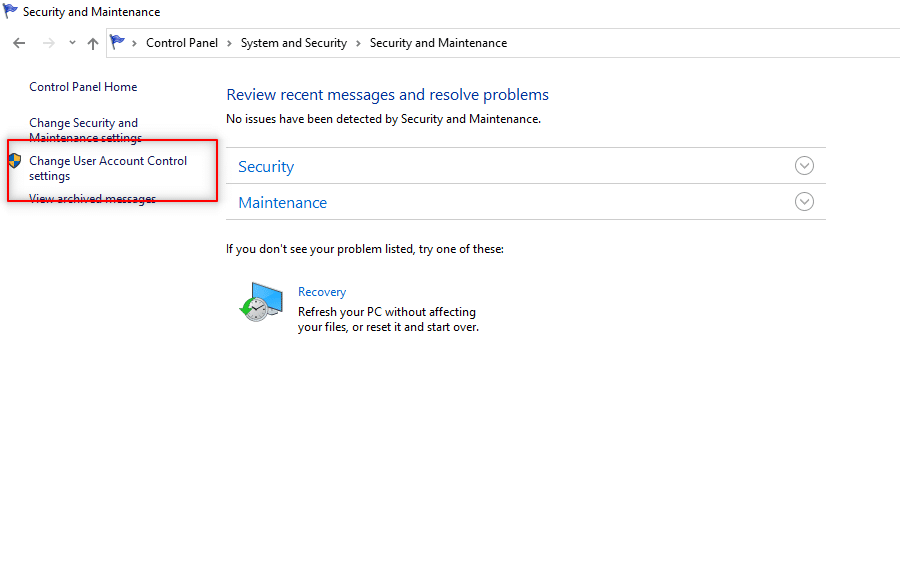
1. مارو ونڈوز کلیدی اور ٹائپ کریں کنٹرول پینل in the search bar. Open the best results.
2. سیٹ کریں کی طرف سے دیکھیں as قسم. منتخب کریں نظام اور حفاظت مینو میں آپشن دستیاب ہے۔
3. کلک کریں سیکورٹی اور بحالی.
4. پر کلک کریں صارف اکاؤنٹ کنٹرول کی ترتیبات کو تبدیل کریں.
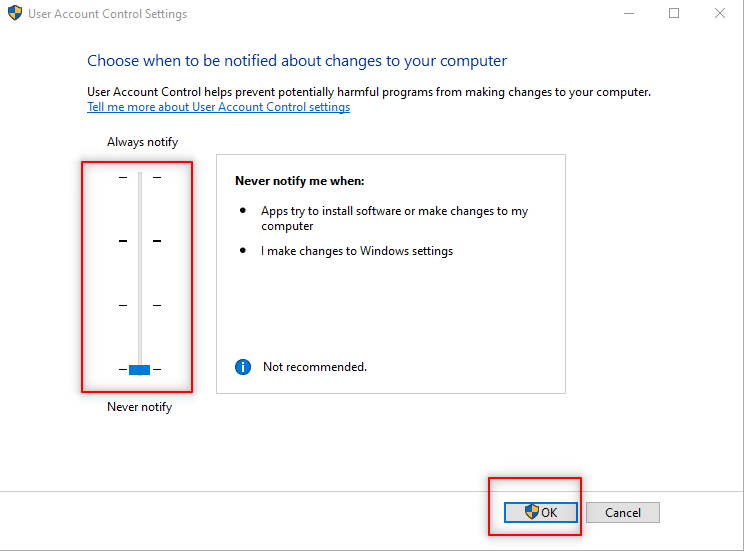
5. Drag the selector in the screen to the bottom to the کبھی مطلع نہ کریں اختیار کریں اور کلک کریں OK.
نوٹ: This setting will modify the PC and will never ask for Admin permission until you reset the preference using the selector.
Method 2: Make Your User Account An Admin Account
As you cannot skip the UAC prompt commands, you can make your user account as an Admin account and then install the software on the account. You will learn the method of making your existing User account an Administrator account so that you wouldn’t have to skip the UAC prompts. This will allow you to install the program, and this method answers how to install a program without admin rights Windows 10.
Option I: Using Command Prompt
This method in how to install software without admin rights allows you to make an Admin account for yourself so that you can have a different account that is completely under your control.
نوٹ: The software you are trying to install has to be installed in this Administrator account and not in your existing User account.
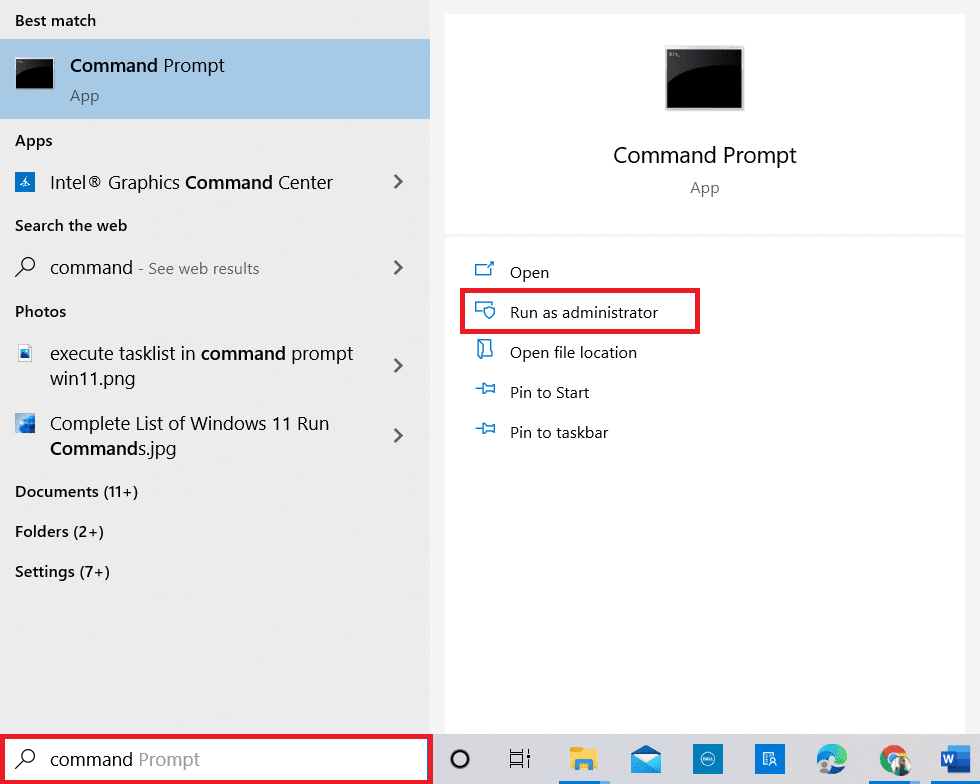
1. ٹائپ کریں کمان فوری طور پر میں ونڈوز سرچ بار اور پر کلک کریں انتظامیہ کے طورپر چلانا.

2. کلک کریں جی ہاں پرامپٹ میں
3. کمانڈ ٹائپ کریں۔ نیٹ یوزر ایڈمنسٹریٹر/فعال: ہاں اور مارا درج کریں.
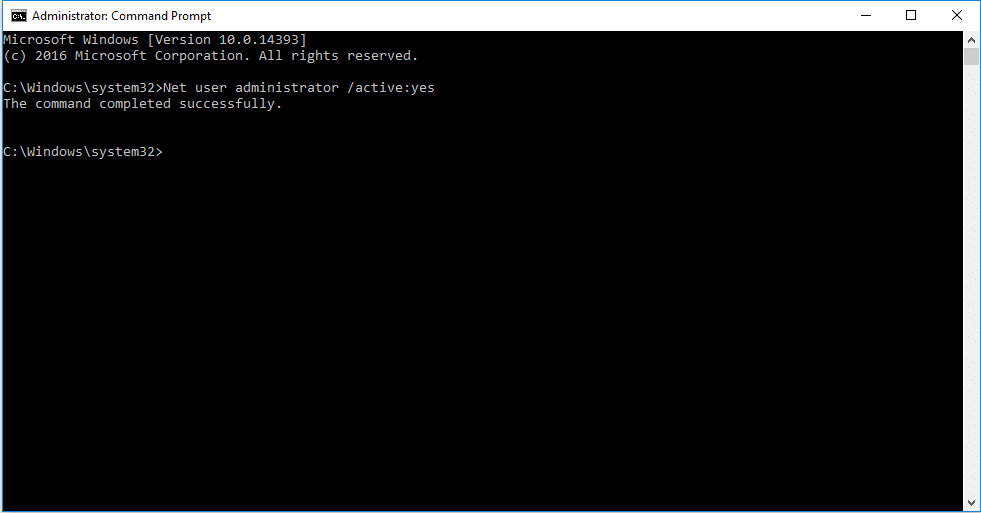
4. اپنے کمپیوٹر کو دوبارہ شروع کریں, and you will see an Administrator account.
Now, you can install a program in Windows 10
بھی پڑھیں: ونڈوز 10 میں ڈیفالٹ پروگراموں کو کیسے تبدیل کریں۔
Option II: Using Group Membership Properties
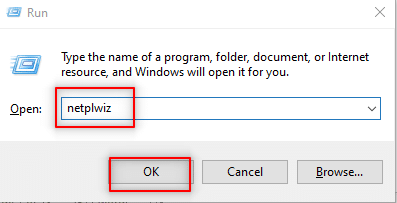
1. دبائیں ونڈوز + آر کیز ایک ہی وقت میں کھولنے کے لئے رن ڈائلاگ باکس.
2. ٹائپ کریں netplwiz اور پر کلک کریں OK.
نوٹ: netplwiz ایک کمانڈ لائن ہے جو PC کے لیے سیٹ سیکورٹی پاس ورڈ کو ہٹاتی ہے۔
3. میں صارفین tab, select your account.
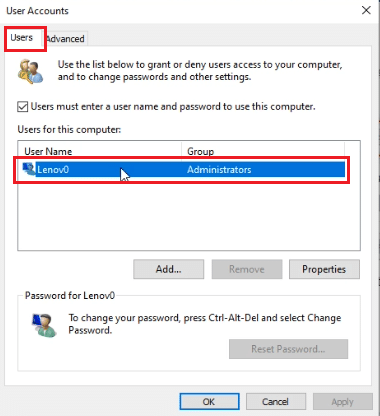
4. پر کلک کریں پراپرٹیز.
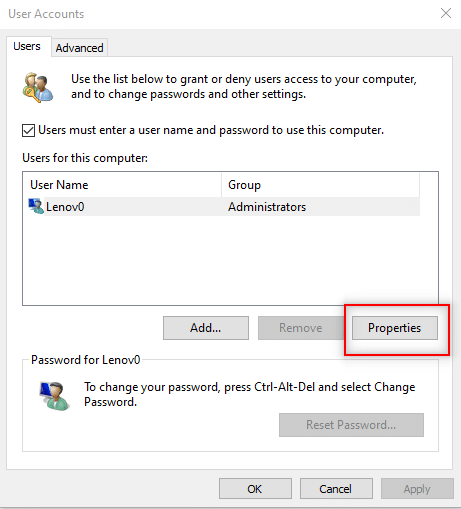
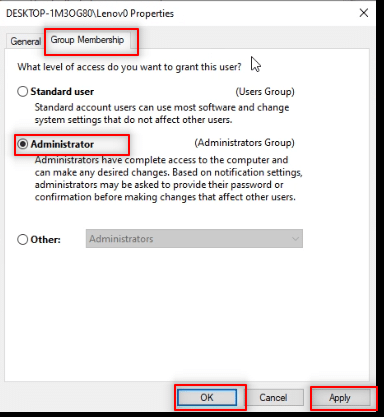
5. پر جانے کے گروپ ممبرشپ ٹیب اور منتخب کریں ایڈمنسٹریٹر اسے ایڈمن اکاؤنٹ بنانے کے لیے۔
6. کلک کریں کا اطلاق کریں اور پھر OK.
Option III: Using Control Panel
This method allows you to make your User account an Administrator account to install any application without having to ask the admin.
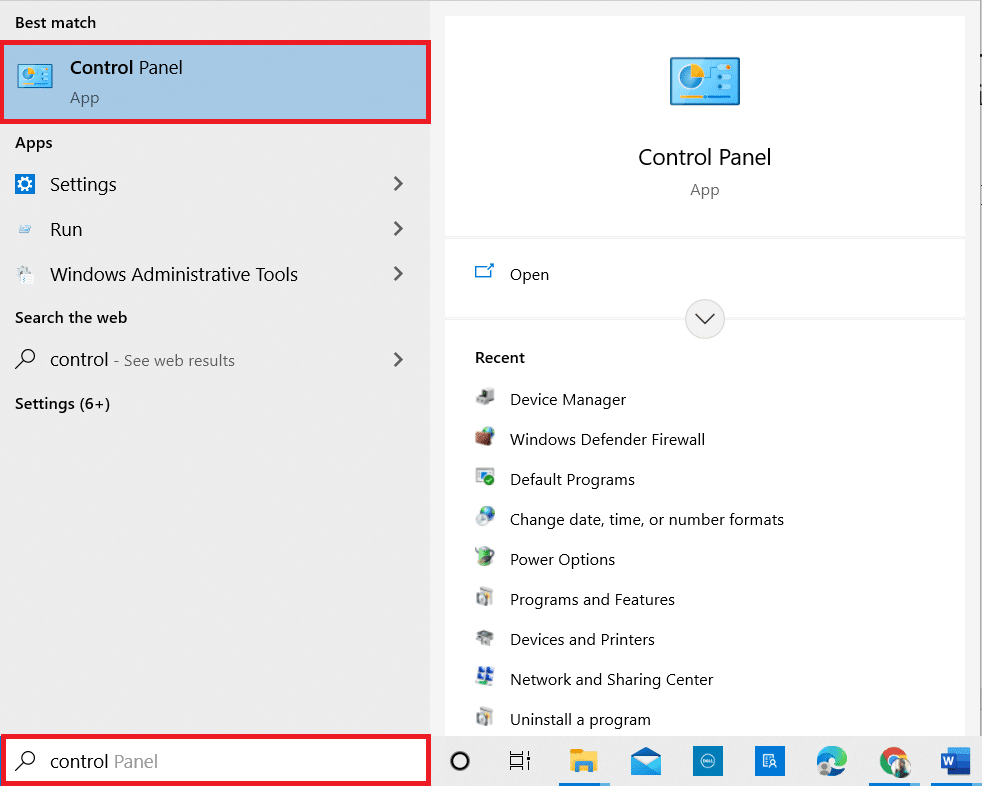
1. ٹائپ کریں کنٹرول پینل میں ونڈوز سرچ بار and launch it on your PC.
2. سیٹ کریں کی طرف سے دیکھیں as قسمہے. پر کلک کریں صارف اکاؤنٹس.
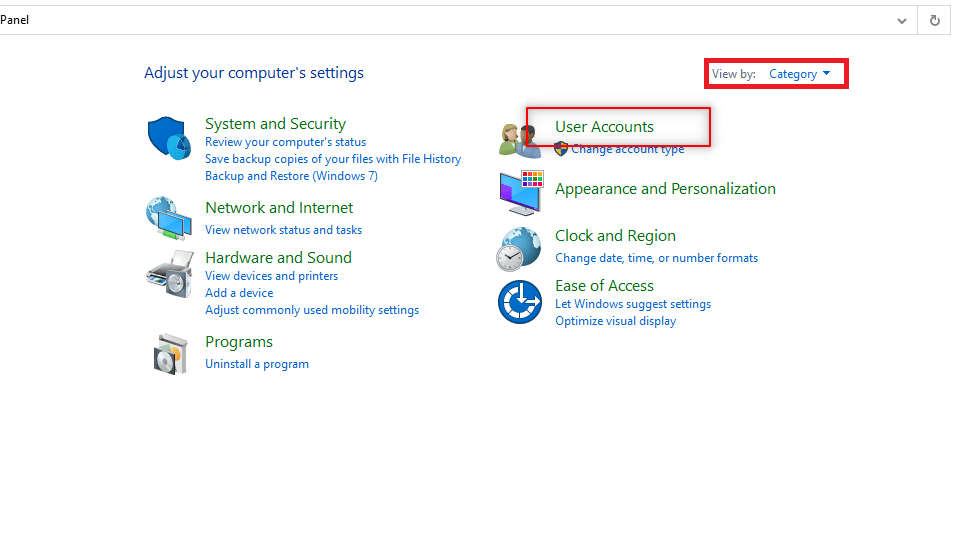
3. منتخب کریں صارف اکاؤنٹس سب سے اوپر.
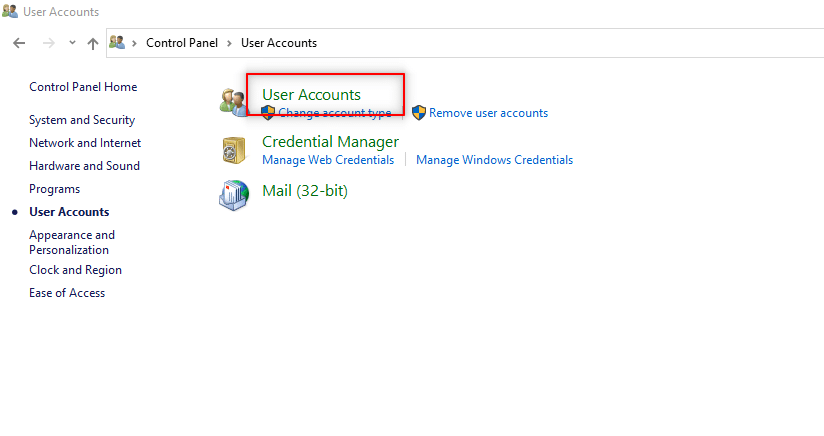
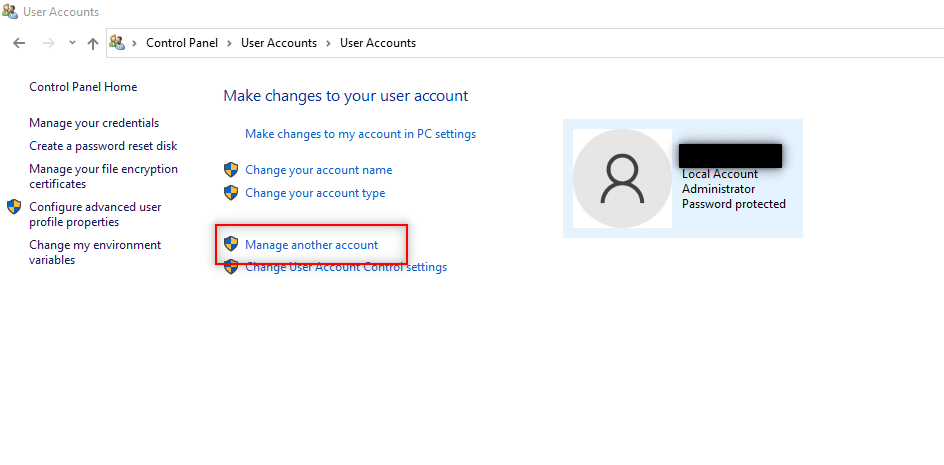
4. منتخب کریں دوسرا اکاؤنٹ کا نظم کریں.
5. منتخب کریں standard user on the PC by clicking on it.
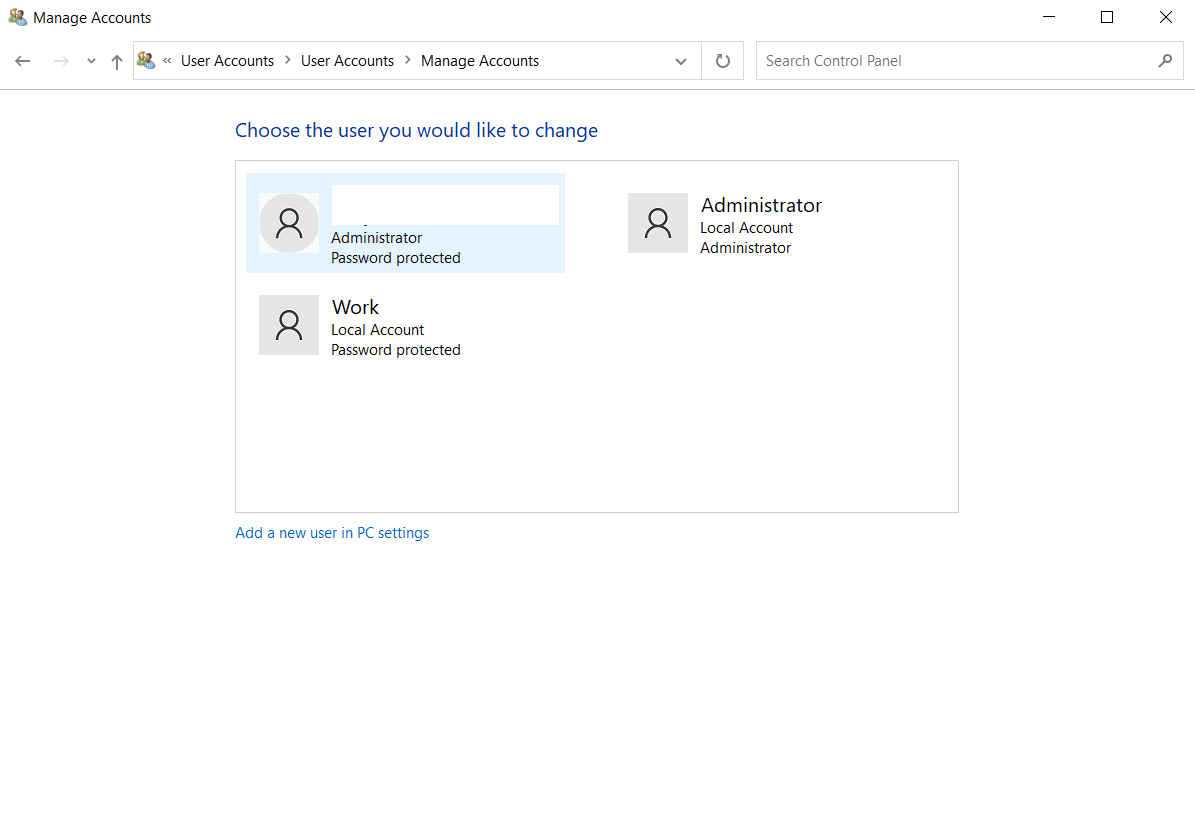
6. منتخب کریں change the account type بائیں پینل میں
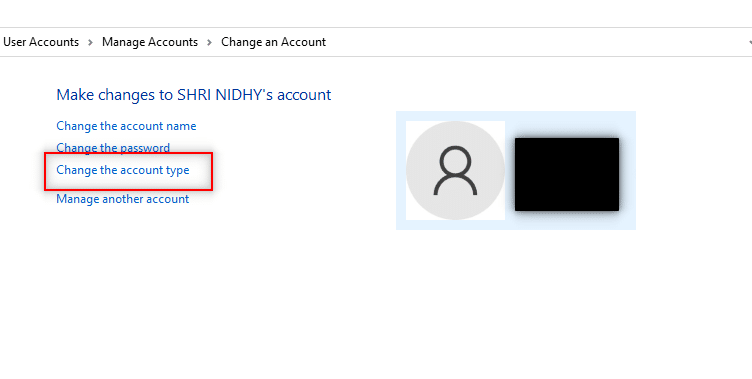
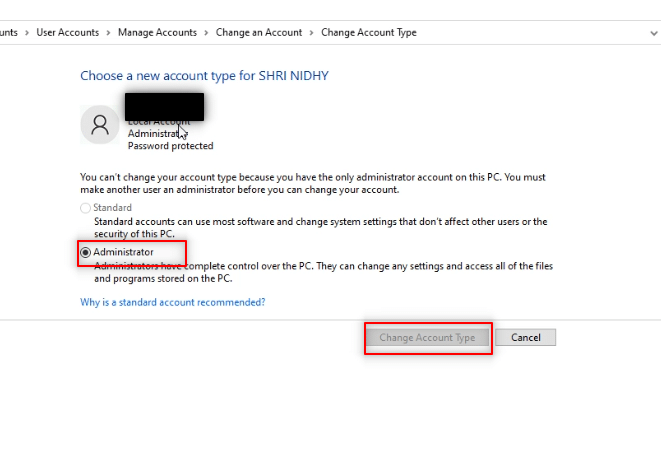
7. منتخب کریں ایڈمنسٹریٹر اور پر کلک کریں اکاؤنٹ کی قسم تبدیل کریں۔.
8. پھر بوٹ کریں the PC and install a program without admin rights Windows 10.
بھی پڑھیں: ونڈوز 10 میں اسٹارٹ اپ پروگراموں کو کیسے تبدیل کریں۔
طریقہ 3: Modify User Account Settings
This method allows you to update the settings of your PC and makes it easy for you to install drivers on your PC at ease. To do this, we will use Group Policy Editor. The steps in the method are divided into three phases for your better understanding. This method is mainly focused on explaining how to install drivers without admin rights Windows 10.
نوٹ: You can access Group Policy Editor only if you use Windows 10 Pro, Enterprise، اور تعلیم ایڈیشنز
Step I: Modify Local Users and Groups
The steps mentioned below allow you to permit the non-administrator to install printer drivers. Hence, it is advisable to install only trusted printer drivers.
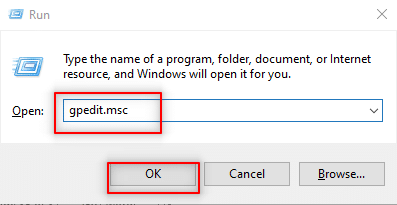
1. کھولیں ڈائیلاگ باکس چلائیں۔ دبانے سے ونڈوز + آر کیز ایک ہی وقت میں.
2. ٹائپ کریں gpedit.msc اور پر کلک کریں OK کھولنے کے لئے گروپ پالیسی ایڈیٹر.
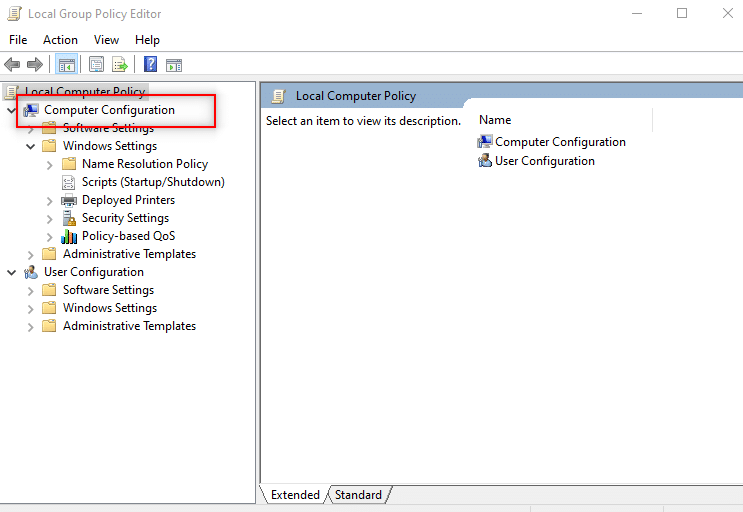
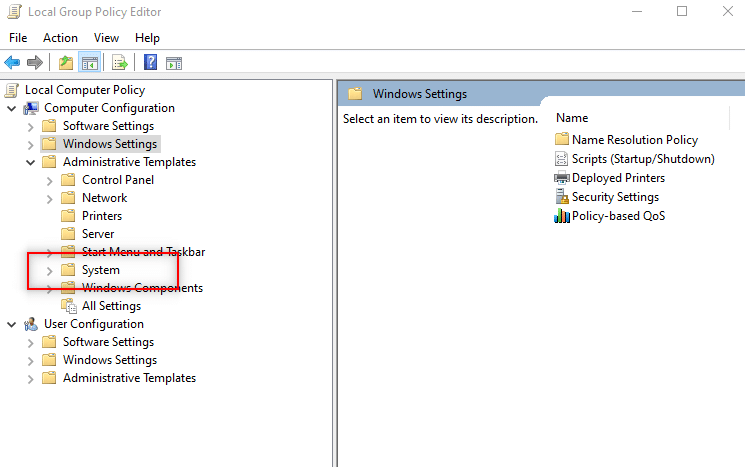
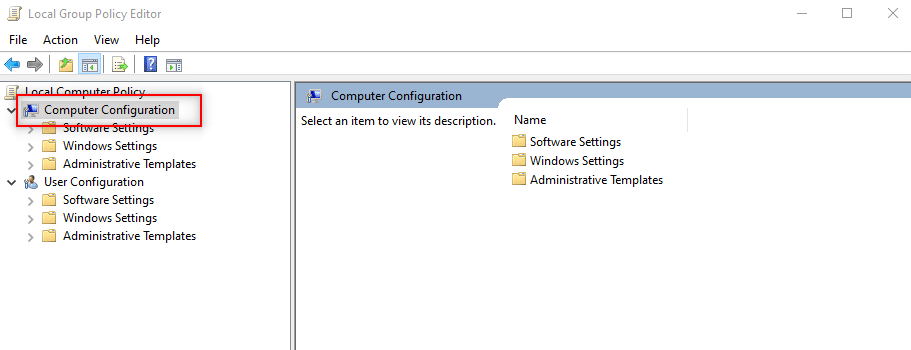
3. In the left pane, expand the کمپیوٹر کی ترتیب آپشن.
4. پر کلک کریں ونڈوز ترتیبات اور اسے بڑھاؤ۔
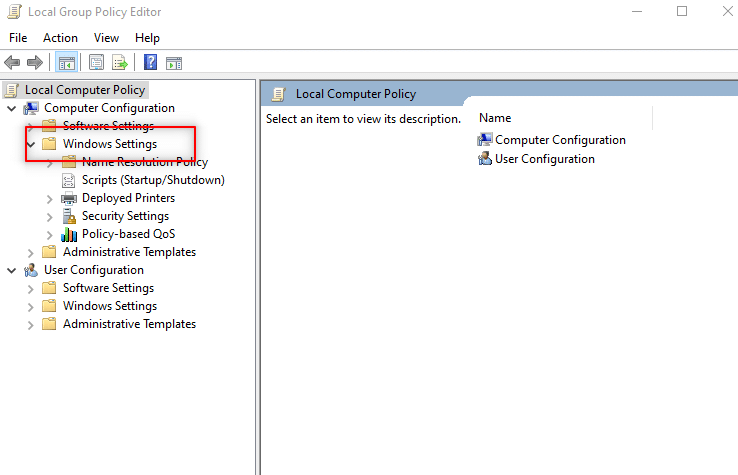
5. پھیلائیں۔ سیکورٹی کی ترتیبات فہرست میں
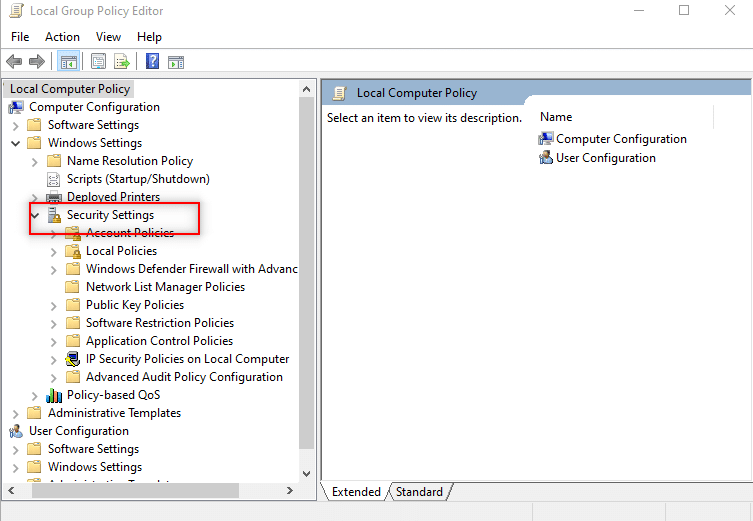
6. منتخب کریں مقامی پالیسیاں اور اسے بڑھاؤ۔
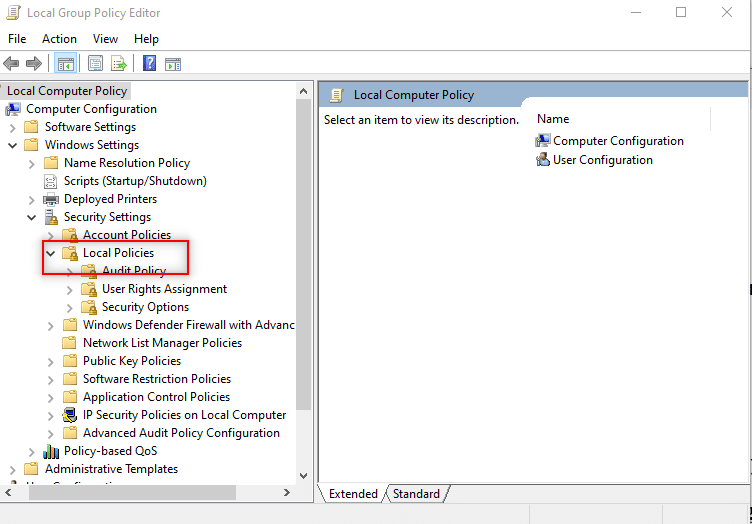
7. Select and expand سیکیورٹی کے اختیارات in the list available.
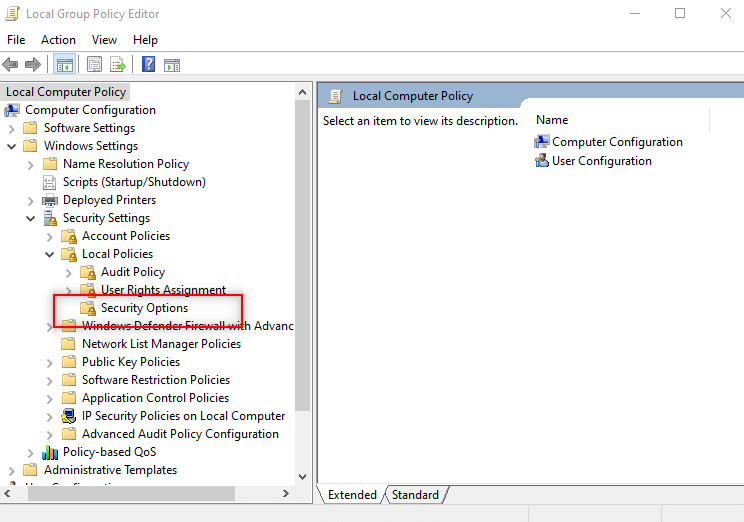
8. منتخب کریں Devices: Prevent users from installing printer drivers دائیں پین میں۔
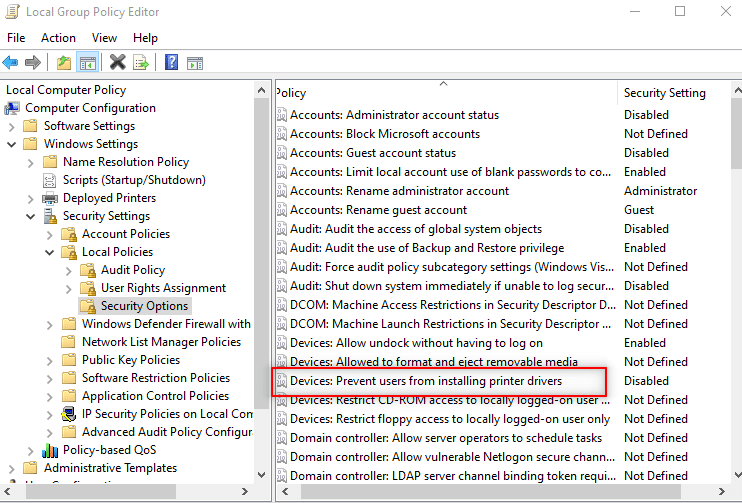
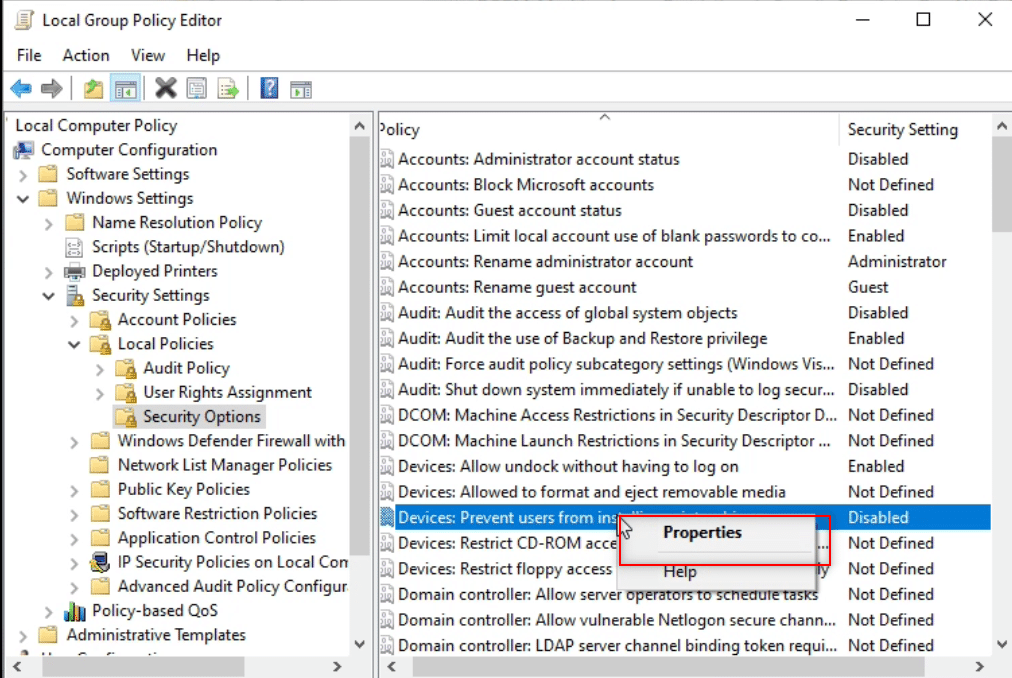
9. Right-click on the option and choose پراپرٹیز فہرست میں
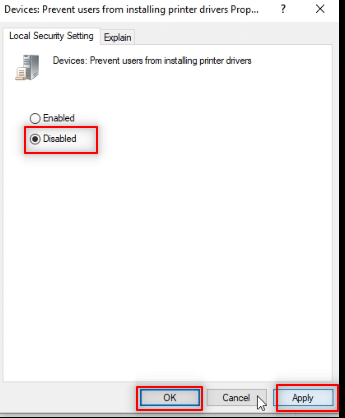
10 منتخب کیجئیے غیر فعال کر دیا آپشن اور پر کلک کریں کا اطلاق کریں اور پھر OK.
بھی پڑھیں: Install Group Policy Editor (gpedit.msc) on Windows 10 Home
Step II: Install Printer Driver
As an answer to the question of how to install software without admin rights, you can install the Printer Driver. The following steps will help you install the printer driver on your PC.
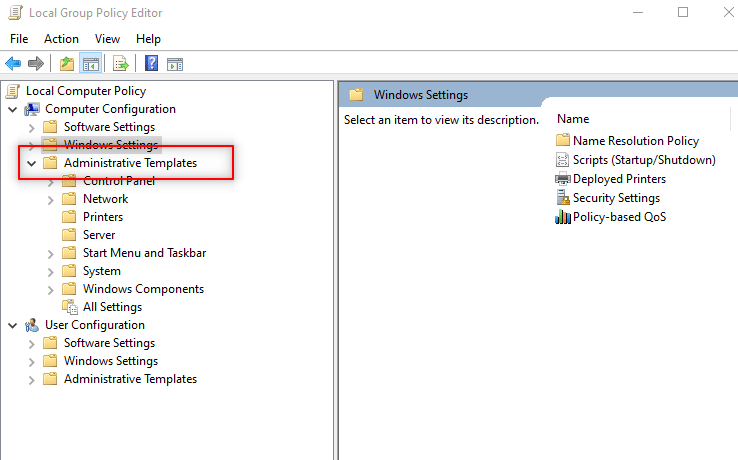
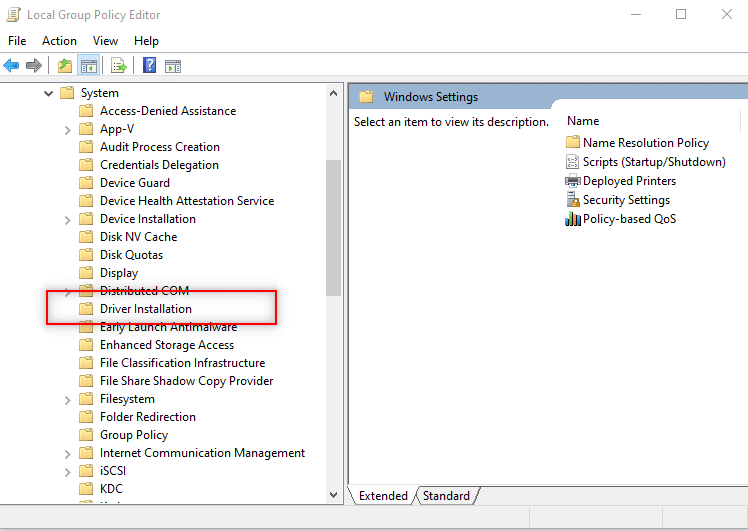
1. In the same گروپ پالیسی ایڈیٹر window, expand کمپیوٹر کی ترتیب.

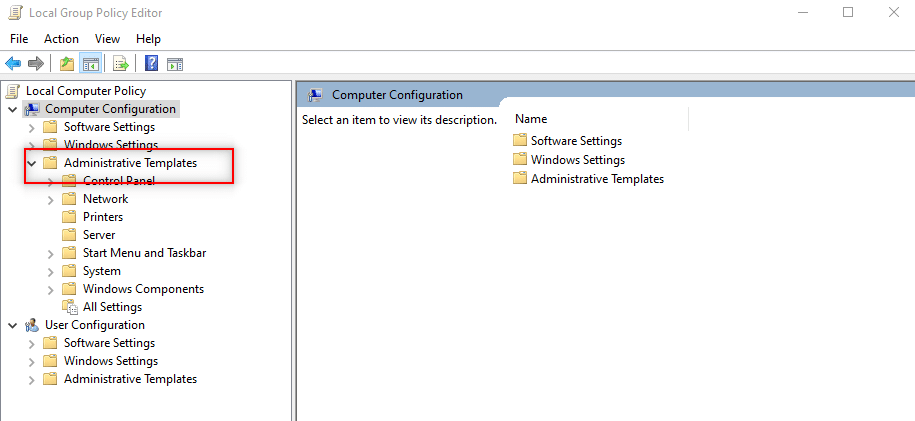
2. منتخب کریں انتظامی سانچے اور اسے بڑھاؤ۔
3. From the list available, select نظام and expand the folder.
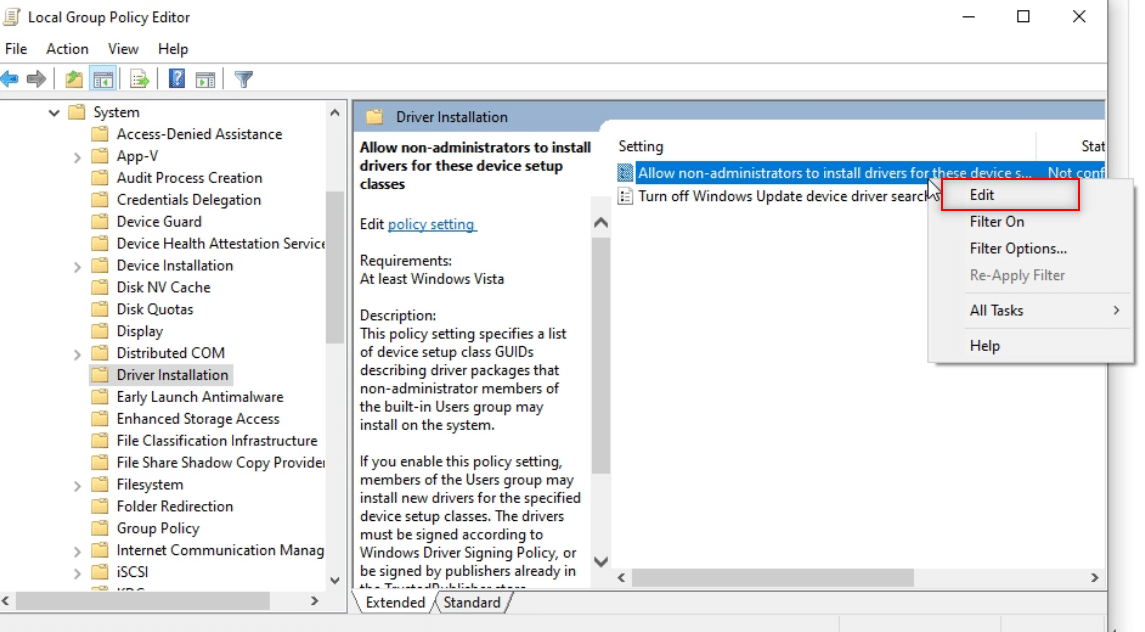
4. پر کلک کریں ڈرائیور کی تنصیب ونڈو کے بائیں پین میں۔
5. Next, right-click Allow non-administrators to install drivers for these device setup classes اور منتخب کریں ترمیم کریں آپشن.
6. آپشن منتخب کریں۔ فعال کردہ اور اس کے بعد پر کلک کریں دکھائیں… بٹن پر کلک کرنا ہے۔
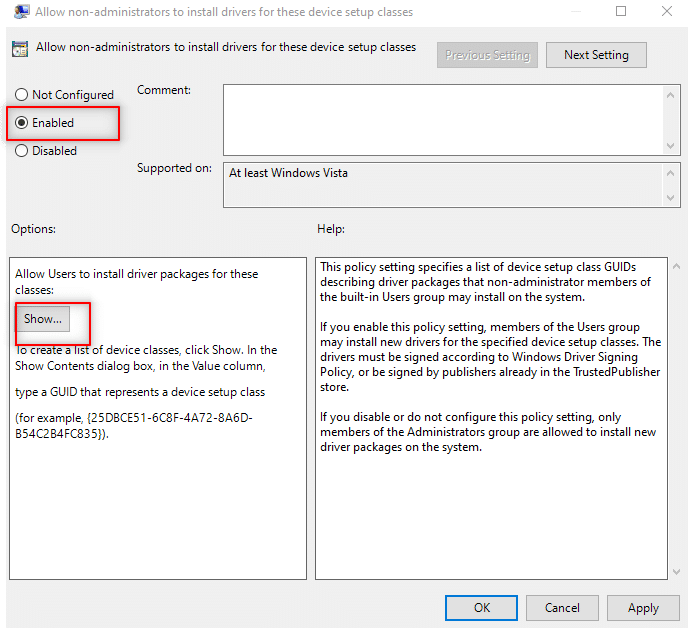
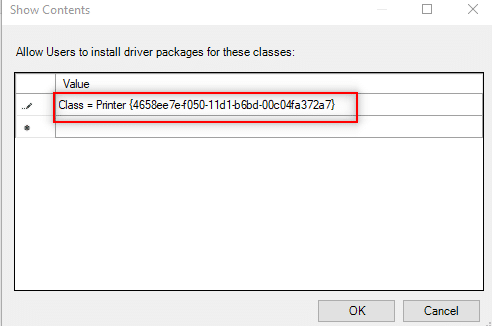
7. میں مواد دکھائیں window, type in the following GUID.
Class = Printer {4658ee7e-f050-11d1-b6bd-00c04fa372a7}
نوٹ: GUID is a Globally Unique Identifier used to provide unique reference numbers to software applications.
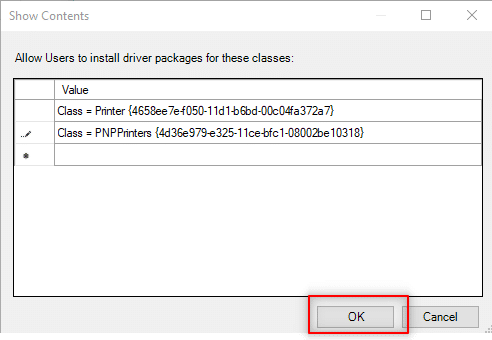
8. اب، پر کلک کریں۔ next entry and type in the given GUID
Class = PNPPrinters {4d36e979-e325-11ce-bfc1-08002be10318}

9. پر کلک کریں OK to apply the changes to your PC.
Step III: Give Windows Access to Driver
The following steps are done to give Windows access to the driver you wish to install on your PC.
1. شروع کریں گروپ پالیسی ایڈیٹر window on your PC.
2. Expand the folder کمپیوٹر کی ترتیب.
3. پھیلائیں۔ انتظامی سانچے فولڈر.
4. منتخب کریں پرنٹرز in the list available.
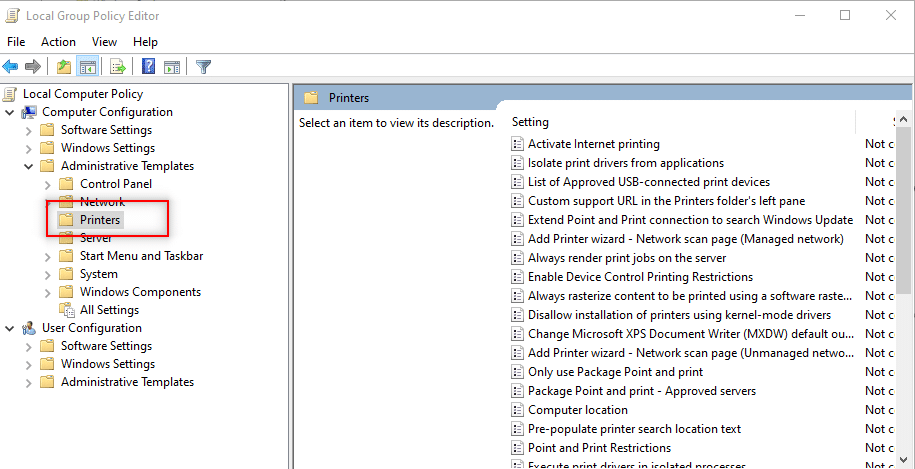
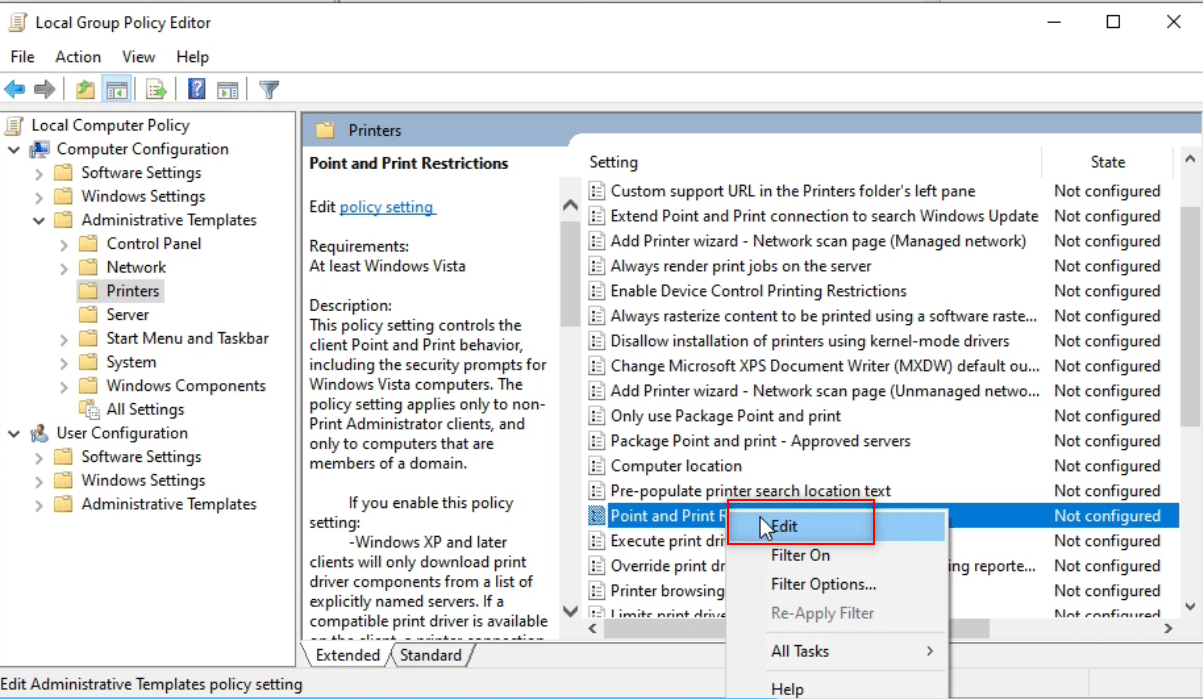
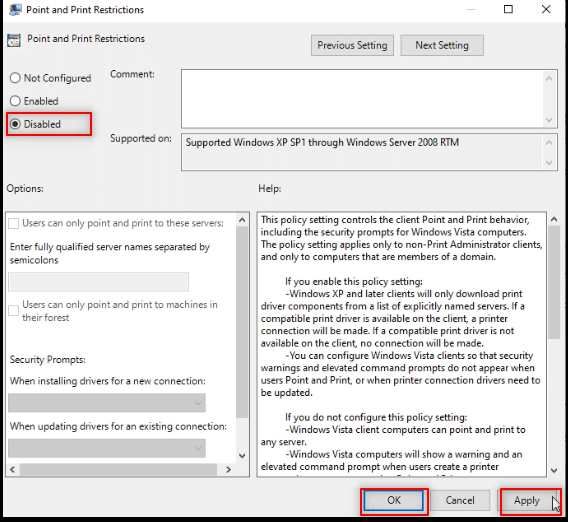
5. Next, right-click پوائنٹ اور پرنٹ کی پابندیاں اور منتخب کریں ترمیم کریں.
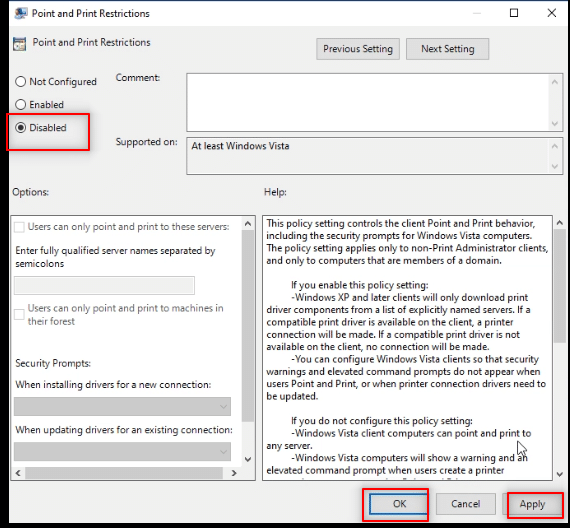
6. منتخب کریں غیر فعال کر دیا in the window and click کا اطلاق کریں اور پھر OK.
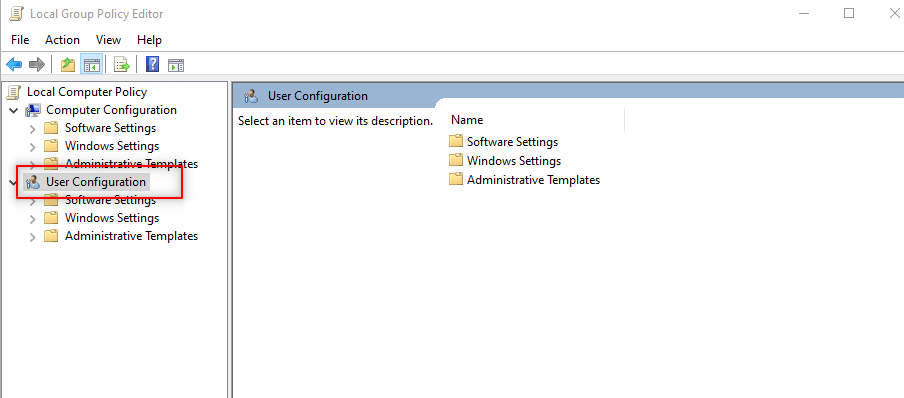
7. Now, in the same گروپ پالیسی ایڈیٹر window, expand the folder صارف ترتیب.
8. پر کلک کریں انتظامی سانچے اور اسے بڑھاؤ۔
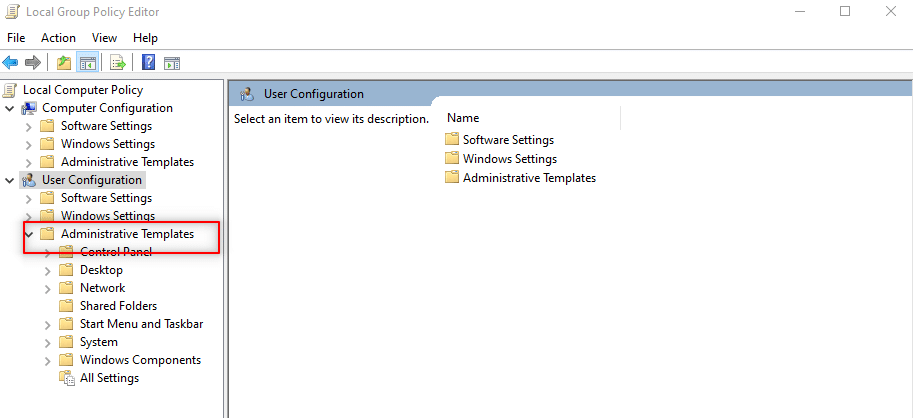
9. منتخب کریں کنٹرول پینل in the list and expand it.
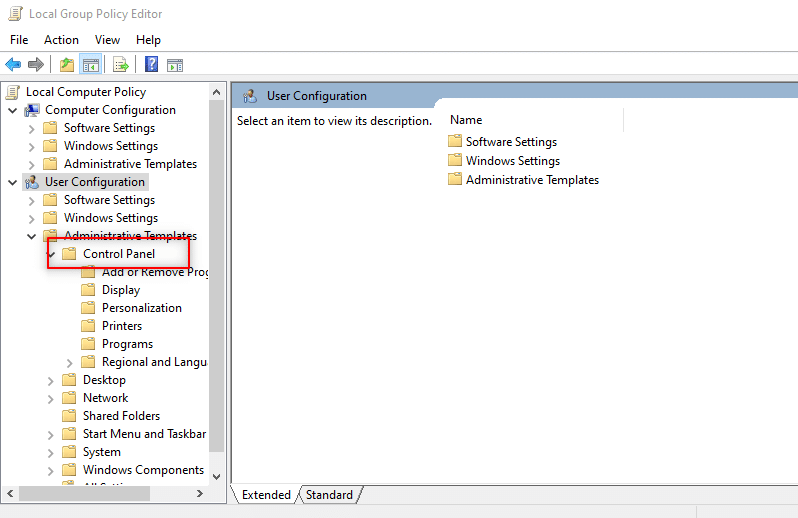
10. منتخب کریں پرنٹرز in the list displayed.
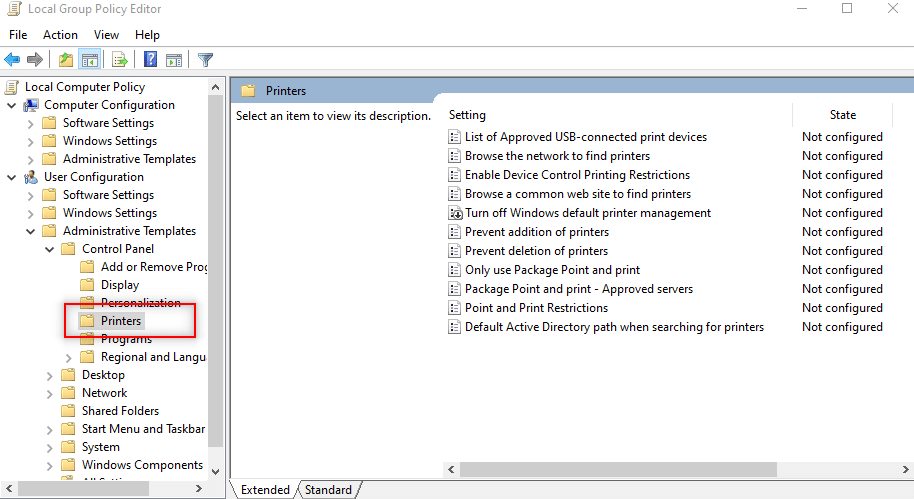
11. دائیں کلک کریں Point and Printer restrictions. منتخب کیجئیے ترمیم کریں ڈراپ ڈاؤن مینو میں آپشن۔
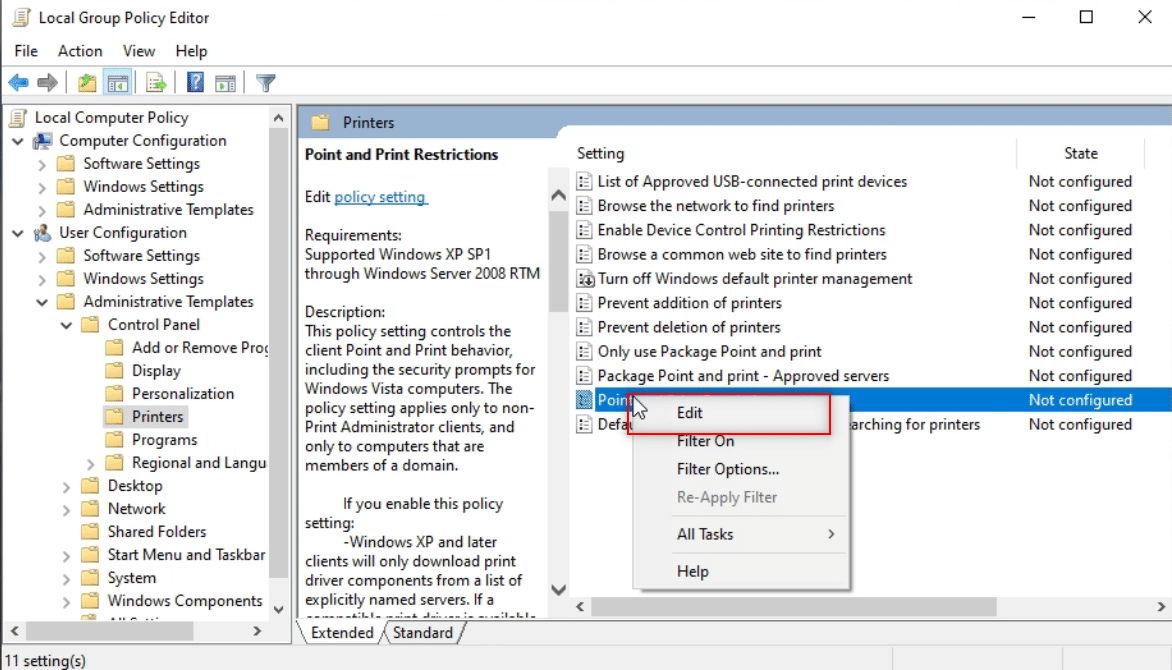
12. Set it as غیر فعال کر دیا، پر کلک کریں درخواست دیں، اور پھر OK.
13. بند کریں۔ گروپ پالیسی ایڈیٹر window to end the process.
14. دوبارہ شروع کریں پی سی اور اپنے کمپیوٹر پر ڈرائیور انسٹال کریں۔
بھی پڑھیں: ونڈوز کو تیار کرنے پر پھنسے ہوئے Windows 10 کو درست کریں۔
Method 4: Add An Administrator Account
You can do so in two ways as explained below, in detail.
Option I: Using Command Prompt
In this method, you can add another Administrator account in addition to the existing Administrator account. This will allow you to install the software on your other account.
1. مارو ونڈوز کلیدی، قسم کمان فوری طور پر میں تلاش بار اور پر کلک کریں انتظامیہ کے طورپر چلانا جیسے دکھایا گیا ہے.
2. کلک کریں جی ہاں میں یوزر اکاؤنٹ کنٹرول فوری طور پر.
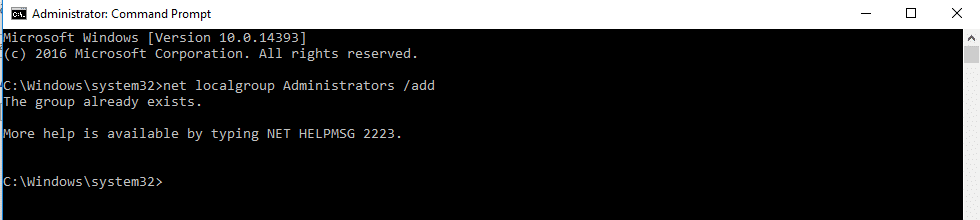
3. ٹائپ کریں۔ نیٹ لوکل گروپ ایڈمنسٹریٹرز / ایڈ کمانڈ اور مارو کلید درج کریں.
نوٹ: Space should be left between Administrators and slash.
Option II: Choose Built-In Administrator in Safe Mode
This method allows you to open your PC in safe mode and configure your settings on the PC to install the application at ease.
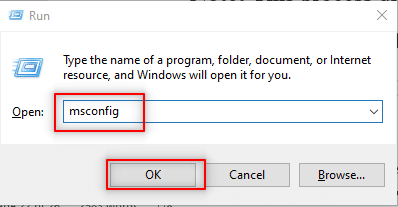
1. کھولیں رن ڈائیلاگ باکس دبائیں ونڈوز + آر کیز ایک ہی وقت میں.
2. ٹائپ کریں msconfig اور پر کلک کریں OK کھولنے کے لئے سسٹم کی ترتیب کھڑکی.
3. پر جانے کے بوٹ کریں ٹیب اور چیک کریں سیف بوٹ آپشن.
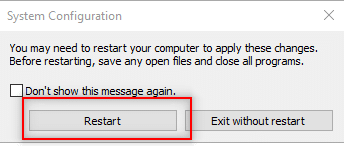
4. پر کلک کریں کا اطلاق کریں اور پھر OK عمل کو ختم کرنے کے لیے۔
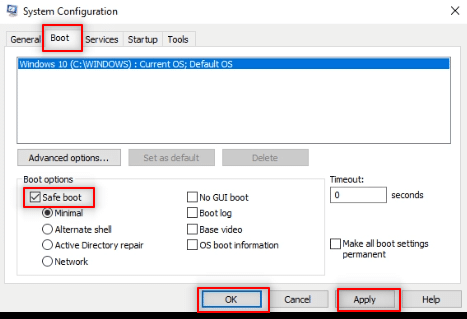
5. پر کلک کریں دوبارہ شروع کریں to end the process on the next screen.
6. After the PC starts in محفوظ طریقہ, choose a built-in ایڈمنسٹریٹر account and enter without password to install the software.
Additional Method: Reset PC (Not Recommended)
To answer your question about how to install software without administrator rights, you can reset your PC. This method will treat your PC as a new PC. You can use this method to set a user account to your PC and set a password. This way, you can gain access by making yourself the Administrator.
نوٹ: This method will lead to the deletion of all data in the PC. This method will reset all the data and settings on your PC. You may have to re-install Windows on your PC.
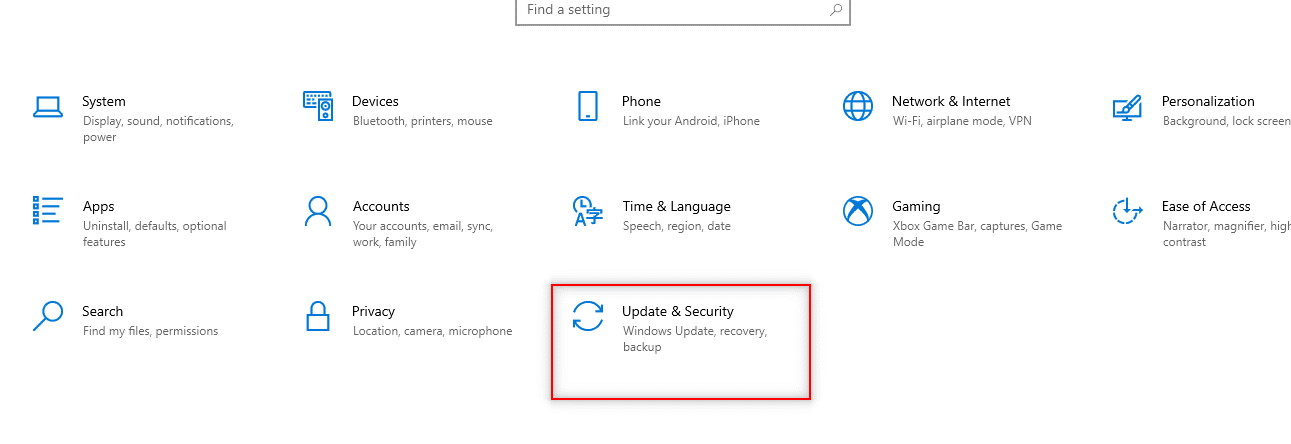
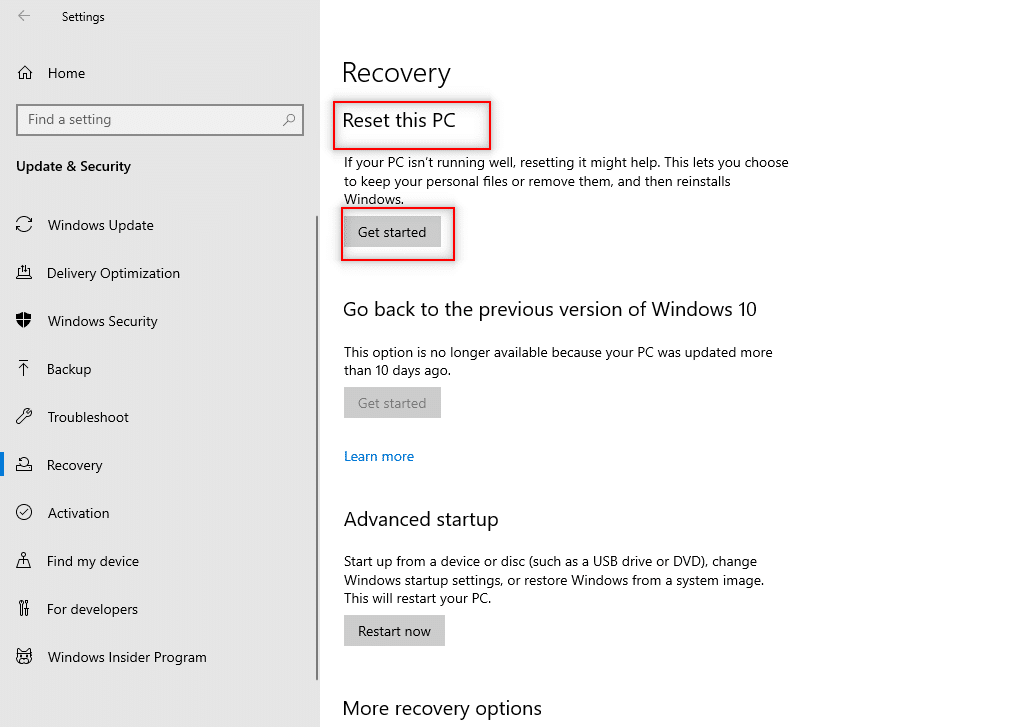
1. دبائیں ونڈوز + آئی کیز۔ ایک ساتھ کھولنے کے لئے ترتیبات اپلی کیشن.
2. منتخب کریں تازہ کاری اور سیکیورٹی مینو میں آپشن دستیاب ہے۔
3. منتخب کریں شفایابی ونڈو کے بائیں پین میں۔
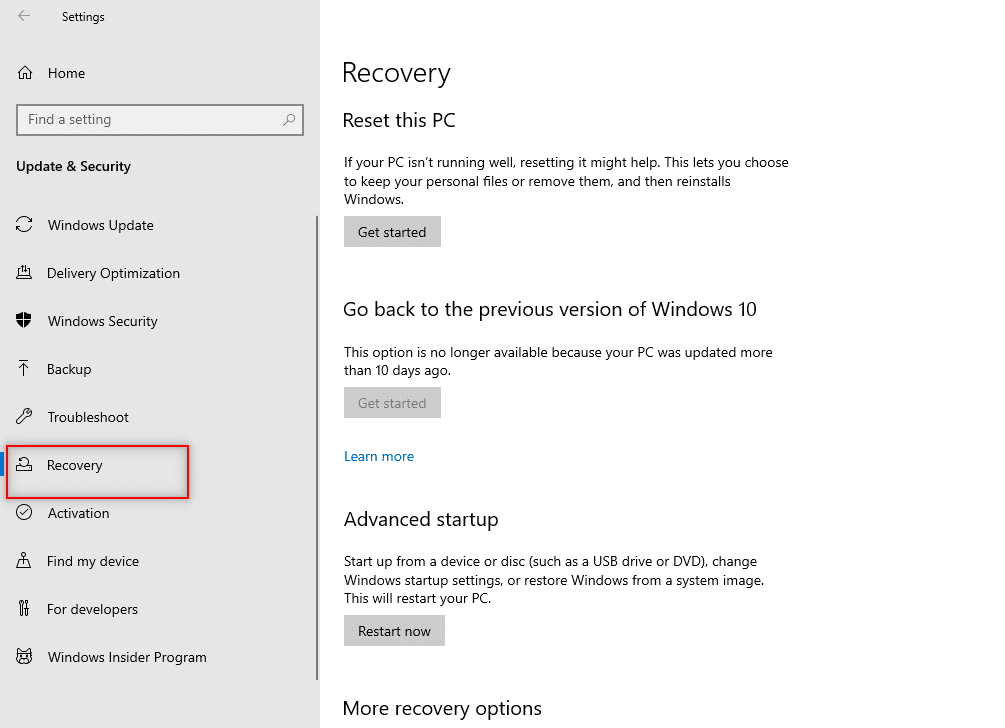
4. کے نیچے اس پی سی کو دوبارہ ترتیب دیں آپشن ، پر کلک کریں شروع کریں بٹن پر کلک کرنا ہے۔
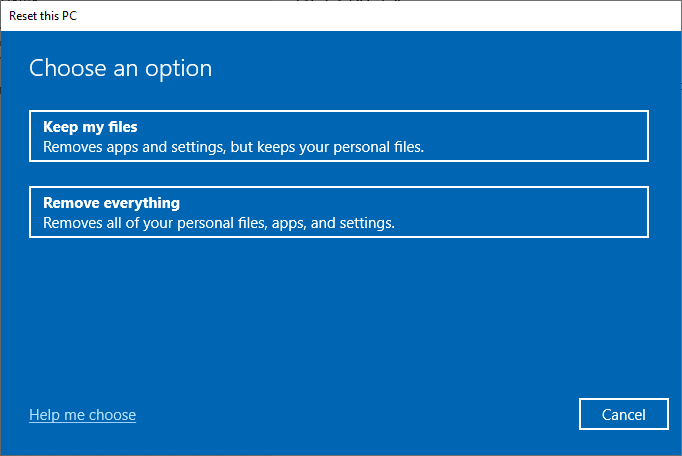
5A. If you want to remove apps and settings but keep your personal files, select the میری فائلیں رکھیں آپشن.
5B. If you want to remove all your personal files, apps, and settings, select the سب کچھ ہٹا دیں آپشن.
6. Finally, follow the on-screen instructions to complete the reset process.
7. دوبارہ شروع کریں پی سی and install a program without admin rights Windows 10.
سفارش کی جاتی ہے:
We hope that this article was helpful and you have learned the answer to how to install software without admin rights. The article has aimed to give information about the methods that can be used to install software on your PC by bypassing admin rights on your PC. Please drop your valuable suggestions and queries in the comments section.

