Fix The Service Couldn’t Be Started Windows Defender Error 0x80070422: Windows Defender is a malware protection software which is inbuilt into Windows 10. Now it is used widely by Windows users because it’s reliable, but in some cases, users also installed 3rd party Antivirus software such as Norton, Quick Heal etc which is not recommend because they corrupt the files of Windows Defender. Once you completely uninstall 3rd party antivirus you won’t be able to use Windows Defender properly because files required by it have already been corrupted and can no longer be used.
“The service couldn’t be started.
The service cannot be started, either because it is disabled or because it has no enabled devices associated with it.”
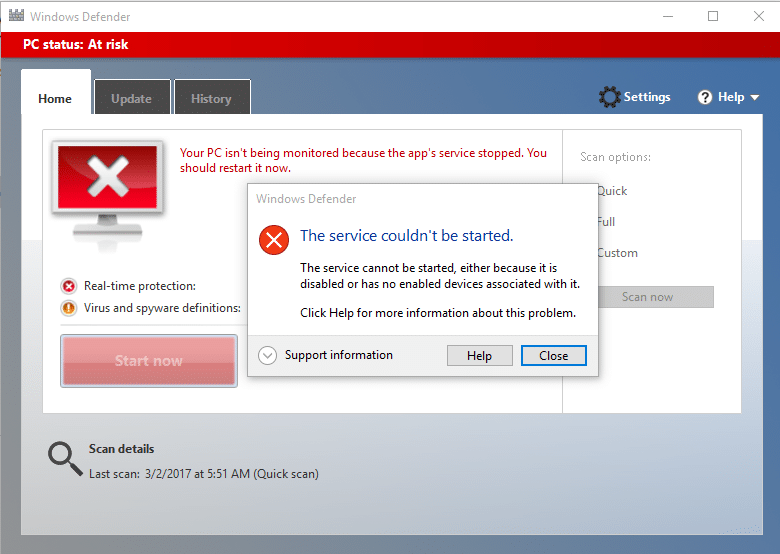
Windows Defender is turned off when you use a 3rd party Antivirus and once you uninstall the Antivirus software you won’t be able to turn ON Windows Defender. If you try to enable Windows Defender you will face the error “The Service Couldn’t Be Started” with error code 0x80070422. So without wasting any time let’s see how to actually Fix The Service Couldn’t Be Started Windows Defender Error 0x80070422 with the help of below-listed troubleshooting guide.
Fix The Service Couldn’t Be Started Windows Defender Error 0x80070422
Agar biror narsa noto'g'ri bo'lsa, tiklash nuqtasini yaratganingizga ishonch hosil qiling.
1-usul: SFC va CHKDSK-ni ishga tushiring
1.Windows Key + X tugmalarini bosing va keyin bosing Buyruqning xohishi (Admin).

2. Endi cmd-ga quyidagilarni kiriting va Enter tugmasini bosing:
Sfc /scannow sfc /scannow /offbootdir=c: /offwindir=c:windows (Agar yuqorida bajarilmasa, buni sinab ko'ring)

3.Yuqoridagi jarayon tugashini kuting va tugallangach, kompyuteringizni qayta ishga tushiring.
4.Keyin, bu yerdan CHKDSK ni ishga tushiring Diskni tekshirish yordam dasturi (CHKDSK) yordamida fayl tizimi xatolarini tuzating.
5.Yuqoridagi jarayonni tugallang va o'zgarishlarni saqlash uchun kompyuteringizni qayta ishga tushiring.
Method 2: Temporarily Disable 3rd party Antivirus
1. Sichqonchaning o'ng tugmasi bilan bosing Antivirus dasturi belgisi tizim tepsisidan tanlang va tanlang O'chirish.

2.Keyin, qaysi vaqt oralig'ini tanlang Antivirus o'chirilgan bo'lib qoladi.

Eslatma: mumkin bo'lgan eng kichik vaqtni tanlang, masalan, 15 daqiqa yoki 30 daqiqa.
3.Once done, again try to run Windows Defender and check if the error resolves or not.
4.Windows Key + X tugmalarini bosing va keyin tanlang Boshqaruv uskunasi.

5.Keyingi, ustiga bosing Tizim va xavfsizlik.
6. Keyin ustiga bosing Windows xavfsizlik devori.

7.Endi chap oyna panelidan Windows xavfsizlik devorini yoqish yoki o'chirish-ni bosing.

8.Windows xavfsizlik devorini o'chirish-ni tanlang va kompyuteringizni qayta yoqing. Again try to open Windows Defender and see if you’re able to Fix The Service Couldn’t Be Started Windows Defender Error 0x80070422.
Yuqoridagi usul ishlamasa, xavfsizlik devorini qayta yoqish uchun xuddi shu amallarni bajarganingizga ishonch hosil qiling.
3-usul: Windows-ning yangilanganligiga ishonch hosil qiling
1.Windows + I tugmalarini bosing, keyin tanlang Yangilash va xavfsizlik.

2.Keyingi, yana bosing Yangilanishlarni tekshiring va kutilayotgan yangilanishlarni o'rnatganingizga ishonch hosil qiling.

3.Yangilanishlar o'rnatilgandan so'ng, kompyuteringizni qayta ishga tushiring va imkoningiz borligini tekshiring Fix The Service Couldn’t Be Started Windows Defender Error 0x80070422.
Method 4: Make sure Windows Defender service is set to Automatic
Eslatma: If Windows Defender service is grayed out in Services Manager then follow this post.
1.Windows + R tugmalarini bosing va keyin yozing services.msc va Enter tugmasini bosing.

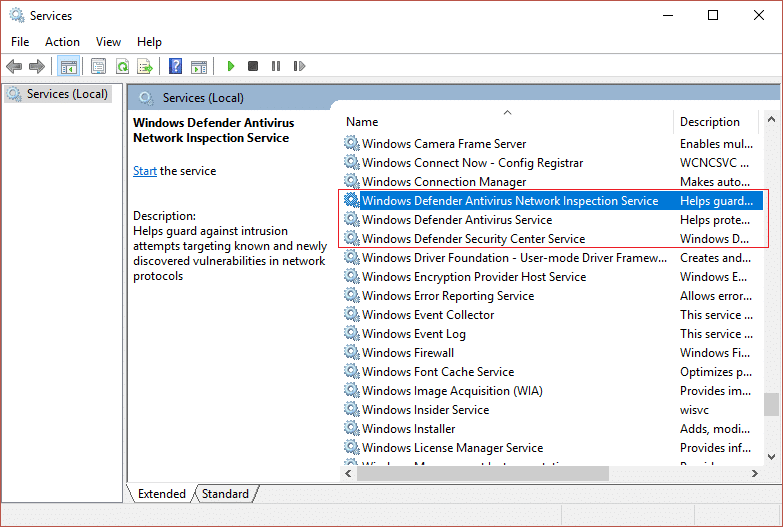
2.Find the following services in the Services window:
Windows Defender Antivirus Network Inspection Service
Windows Defender Antivirus Service
Windows Defender Security Center Service
3.Double-click on each of them and make sure their Startup type is set to avtomatik and click Start if the services are not already running.
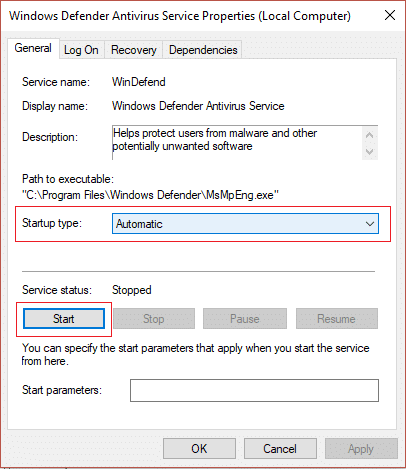
4.Ilova ni, keyin esa OK ni bosing.
5.O'zgarishlarni saqlash uchun kompyuteringizni qayta ishga tushiring va imkoningiz borligini tekshiring Fix The Service Couldn’t Be Started Windows Defender Error 0x80070422.
Method 5: Enable Windows Defender through Registry Editor
1.Windows + R tugmalarini bosing va keyin yozing regedit va Enter tugmasini bosing.

2. Quyidagi ro'yxatga olish kitobi kalitiga o'ting:
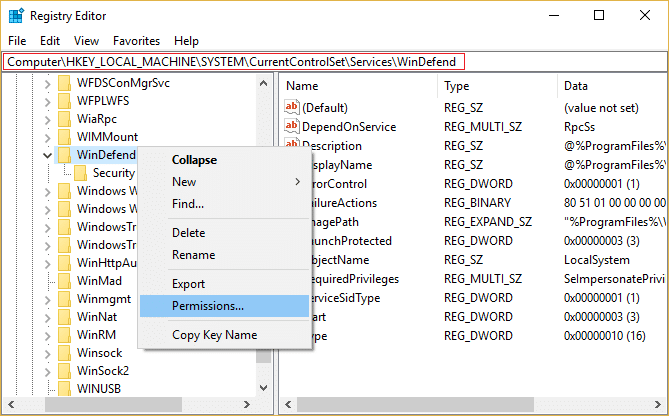
HKEY_LOCAL_MACHINESYSTEMCurrent ControlSetServicesWinDefend
3. Endi sichqonchaning o'ng tugmachasini bosing WinDefend va tanlash Ruxsatlar.
4.Follow this guide in order to take full control or ownership of the above registry key.
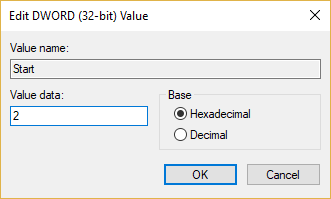
5.After that make sure you have selected WinDefend then in the right window double-click on Start DWORD.
6.Change the value to 2 in the value data field and click OK.
7.Ro‘yxatga olish kitobi muharririni yoping va shaxsiy kompyuteringizni qayta yoqing.
8.Again try to enable Windows Defender and this time it should work.
6-usul: CCleaner va Malwarebytes-ni ishga tushiring
1. Yuklab oling va o'rnating CCleaner & Zararli dasturlar.
2.Malwarebytes-ni ishga tushiring va tizimingizni zararli fayllar uchun skanerlashiga ruxsat bering.
3. Zararli dastur topilsa, u ularni avtomatik ravishda o'chiradi.
4. Endi yugur CCleaner va Windows yorlig'i ostidagi "Tozalash" bo'limida biz tozalash uchun quyidagi tanlovlarni tekshirishni taklif qilamiz:

5.To'g'ri nuqtalar tekshirilganiga ishonch hosil qilganingizdan so'ng, shunchaki bosing Run Cleaner, va CCleaner o'z yo'nalishini boshqarishiga ruxsat bering.
6.Tizimingizni keyingi tozalash uchun Ro'yxatga olish kitobi yorlig'ini tanlang va quyidagilar tekshirilganligiga ishonch hosil qiling:

7.Scan for Issue-ni tanlang va CCleaner-ga skanerlashiga ruxsat bering, so'ngra bosing Tanlangan muammolarni tuzatish.
8. CCleaner so'ragandaRo'yxatga olish kitobiga zaxira o'zgarishlar kiritilishini xohlaysizmi?” Ha ni tanlang.
9. Zaxira nusxasi tugallangach, Barcha tanlangan muammolarni tuzatish ni tanlang.
10. O'zgarishlarni saqlash va imkoningiz borligini bilish uchun kompyuteringizni qayta ishga tushiring Fix The Service Couldn’t Be Started Windows Defender Error 0x80070422.
Method 7: Refresh or Reset your PC
1.Press Windows Key + I to open Settings then select Yangilash va xavfsizlik.
2.From left-hand menu select qayta tiklash va "tugmasini bosingIshni boshlang” under Reset this PC.

3. uchun variantni tanlang Fayllarimni saqlang.

4.Follow the instructions on the screen to complete the process.
5.This will take some time and your computer will restart.
8-usul: Windows 10-ni o'rnating
This method is the last resort because if nothing works out then this method will surely repair all problems with your PC. Repair Install just using an in-place upgrade to repair issues with the system without deleting user data present on the system. So follow this article to see How to Repair Install Windows 10 Easily.
Siz uchun tavsiya etiladi:
Mana, siz muvaffaqiyatga erishdingiz Fix The Service Couldn’t Be Started Windows Defender Error 0x80070422 ammo agar sizda ushbu qo'llanma bo'yicha savollaringiz bo'lsa, ularni sharhlar bo'limida so'rashingiz mumkin.

