Change Critical Battery Levels on Windows 10: Users are unable to change the critical & low battery levels below a specific point and if you got a big battery then you are not able to utilize your battery to the optimum levels. You won’t be able to change the critical battery levels below 5% on Windows 10 and 5% means close to 15 minutes of battery time. So in order to utilize that 5 %, users want to change the critical battery levels to 1%, because once the critical battery levels are met the system is automatically put into hibernation which just takes close to 30 seconds to complete.
By default the following battery levels are set by Windows:
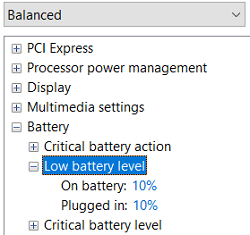
Low Battery Level: 10%
Reserve Power: 7%
Critical Level: 5%
Once the battery is below 10% you will get a notification saying low battery levels accompanied by a beep sound. After that, once the battery is below 7% the Windows will flash a warning message to save your work and turn off your PC or plug in the charger. Now once the battery levels are at 5% then Windows will automatically get into hibernation. So without wasting any time let’s see How to Change Critical Battery Levels on Windows 10 with the help of the below-listed guide.
Change Critical Battery Levels on Windows 10
Đảm bảo tạo điểm khôi phục đề phòng trường hợp xảy ra sự cố.
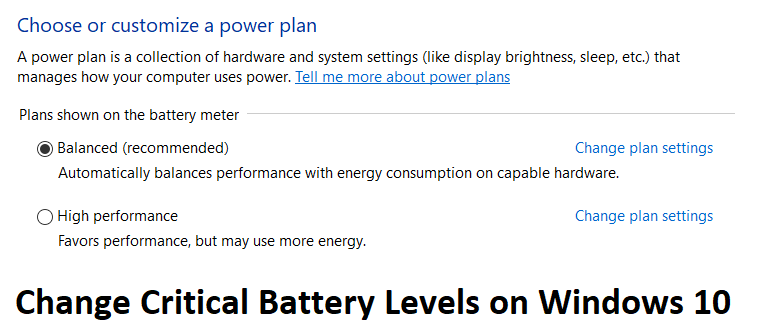
Method 1: Change Critical & Low Level Battery Levels
Lưu ý: This method doesn’t seem to work on all computers, but it’s worth a try.
1.Turn off your PC then remove battery from your laptop.
2.Plug in the power source and start your PC.
3.Log into Windows then right-click on Power icon và chọn Tùy chọn năng lượng.
4.Sau đó bấm vào Thay đổi cài đặt kế hoạch next to your currently active plan.
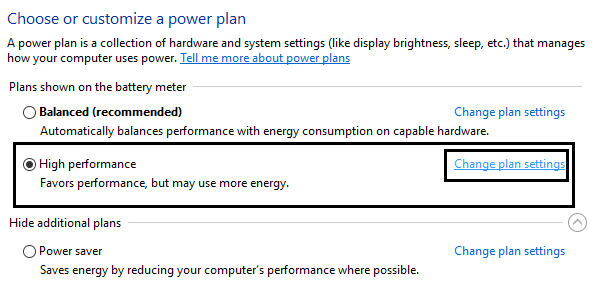
5.Tiếp theo, nhấp vào Thay đổi cài đặt nguồn nâng cao.
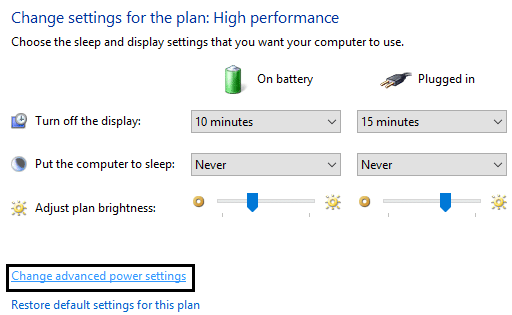
6.Cuộn xuống cho đến khi bạn tìm thấy Pin, click the plus icon to expand it.
7.Now if you want to then you can change the actions which computer takes on reaching a specific battery level by expanding Critical battery actions.
8.Next, expand Mức độ pin quan trọng và thay đổi settings to 1% for both Plugged in and On battery.
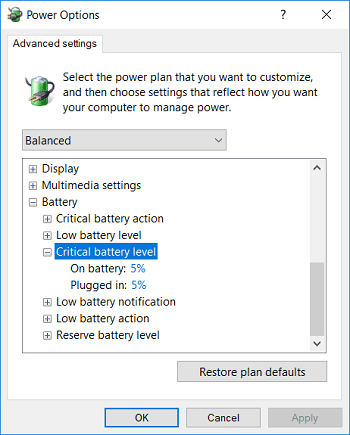
10.If you want then do the same for Mức pin thấp just make sure to set it to 5%, not below it.
11.Nhấp vào Áp dụng theo sau là OK.
12. Khởi động lại PC của bạn để lưu các thay đổi.
Method 2: Use Powercfg.exe to change battery levels
1. Nhấn phím Windows + X rồi chọn Dấu nhắc lệnh (Quản trị viên).

2.Nhập lệnh sau vào cmd và nhấn Enter:
powercfg -setdcvalueindex SCHEME_CURRENT SUB_BATTERY BATLEVELCRIT <percentage>
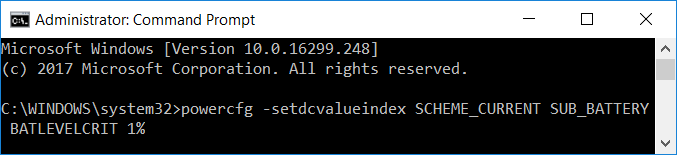
Lưu ý: If you want to set the critical battery level to 1% then the above command will be:
powercfg -setdcvalueindex SCHEME_CURRENT SUB_BATTERY BATLEVELCRIT 1%
3.Now if you want to set the critical battery level for plugged into 1% then the command will be:
powercfg -setacvalueindex SCHEME_CURRENT SUB_BATTERY BATLEVELCRIT 1%

4. Khởi động lại PC của bạn để lưu các thay đổi.
In addition to above, you could learn more about troubleshooting power plans from tại đây.
Đề nghị:
Thế là bạn đã thành công Change Critical Battery Levels on Windows 10 nhưng nếu bạn vẫn có bất kỳ thắc mắc nào liên quan đến hướng dẫn này thì vui lòng hỏi họ trong phần bình luận.

