One of the many ways IT professionals solve their client’s tech conundrums is by using the ‘Remote Desktop’ feature built into Windows 10. As the name suggests, the feature allows users to remotely connect and control a computer via the internet. For example, Users can access their work computer from their home system and vice versa. Apart from the native remote desktop feature, there are a plethora of third-party developed applications such as Teamviewer and Anydesk available to Windows as well as Mac users. Much like everything Windows-related, the remote desktop feature isn’t completely flawless and can cause a headache if you are getting your computer remotely diagnosed.
Being an internet-dependent feature, usually an unstable or slow internet connection can cause issues with a remote desktop. Some users may have the remote connections and remote assistance disabled altogether. Interference from existing remote desktop credentials, the Windows Firewall, an antivirus program, the network settings may also disrupt the remote connection. Nevertheless, in this article, we have listed down several solutions for you to try and resolve issues with the remote desktop feature.
Fix Remote Desktop Won’t Connect in Windows 10
Firstly, make sure your internet connection is working fine. Try running a speed test (Speedtest bởi Ookla) to verify the same. If you have an extremely slow connection, some issues are bound to happen. Contact your internet service provider and check out our article on 10 Ways to Speed up your Internet.
Moving on, if the internet connection isn’t the culprit, let’s ensure that remote connections are allowed and the Firewall/antivirus program isn’t blocking the connection. If issues continue to persist, you may need to modify the registry editor or make the switch to a third-party application.
8 Ways to Fix Remote Desktop Won’t Connect on Windows 10
Method 1: Allow Remote Connections to your Computer
By default, remote connections are disabled and therefore, if you are trying to set up a connection for the first time, you need to manually enable the feature. Allowing remote connections is as simple as toggling on a single switch in the settings.
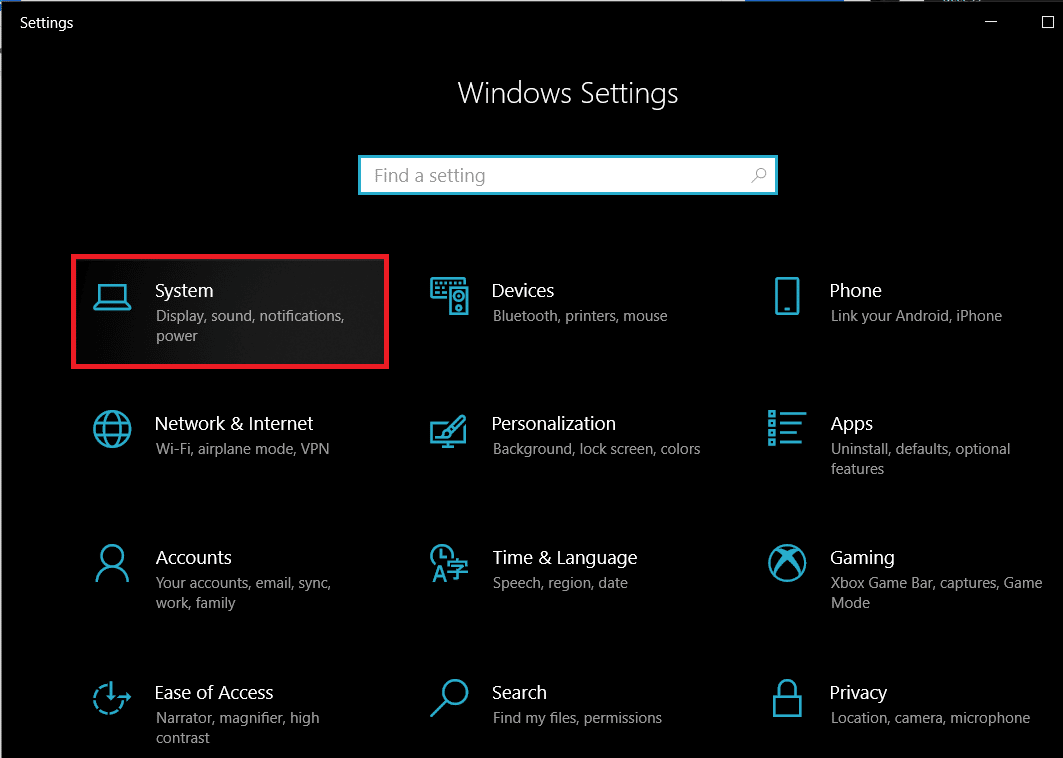
1. Open Windows Settings bằng cách nhấn Khóa Windows + Tôi đồng thời. Nhấp vào WELFARE.
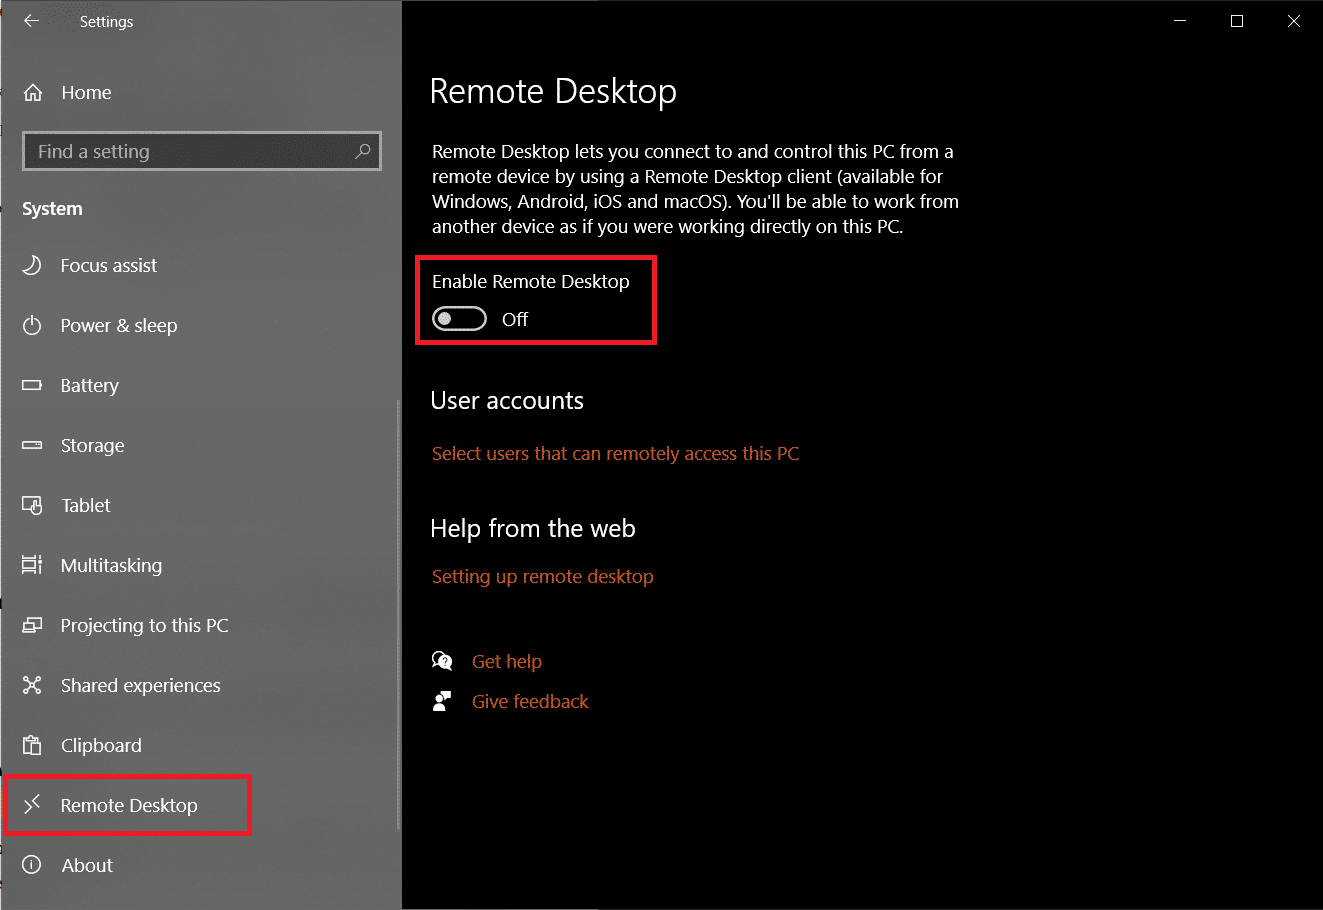
2. Di chuyển đến Remote Desktop tab (second last) from the left-hand pane and toggle on the switch for Remote Desktop.
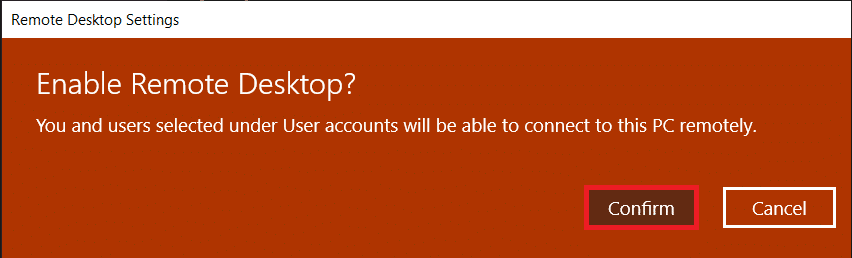
3. If you receive a pop-up requesting affirmation on your action, simply click on Xác nhận.
Cũng đọc: Fix The L2TP Connection Attempt Failed Error on Windows 10
Method 2: Modify Firewall Settings
Remote Desktop while being an extremely handy feature can also act as a doorway for hackers and allow them unrestricted access to your personal computer. To keep a check on your computer’s security, a remote desktop connection isn’t allowed through the Windows Firewall. You will need to manually allow Remote Desktop through the defender firewall.
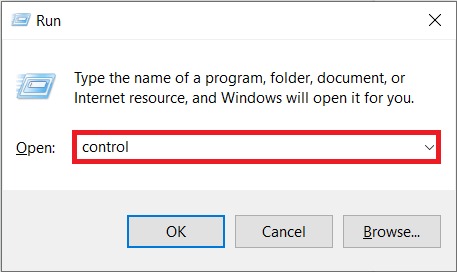
1. Kiểu Bảng điều khiển trong một trong hai Chạy hộp lệnh or the start search bar and press nhập để mở ứng dụng.
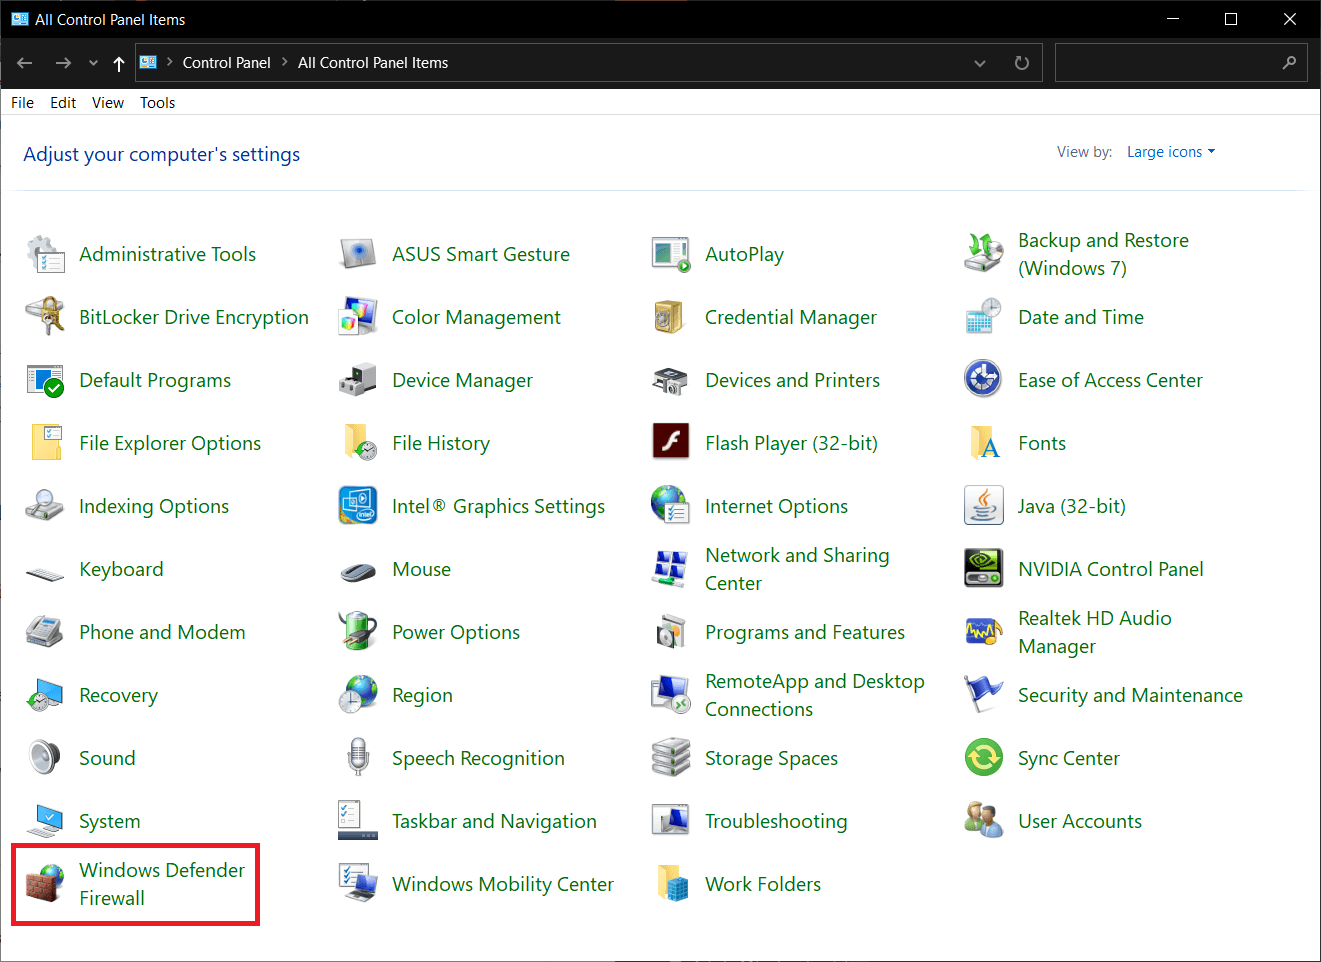
2. Bây giờ, bấm vào Windows Defender Firewall.
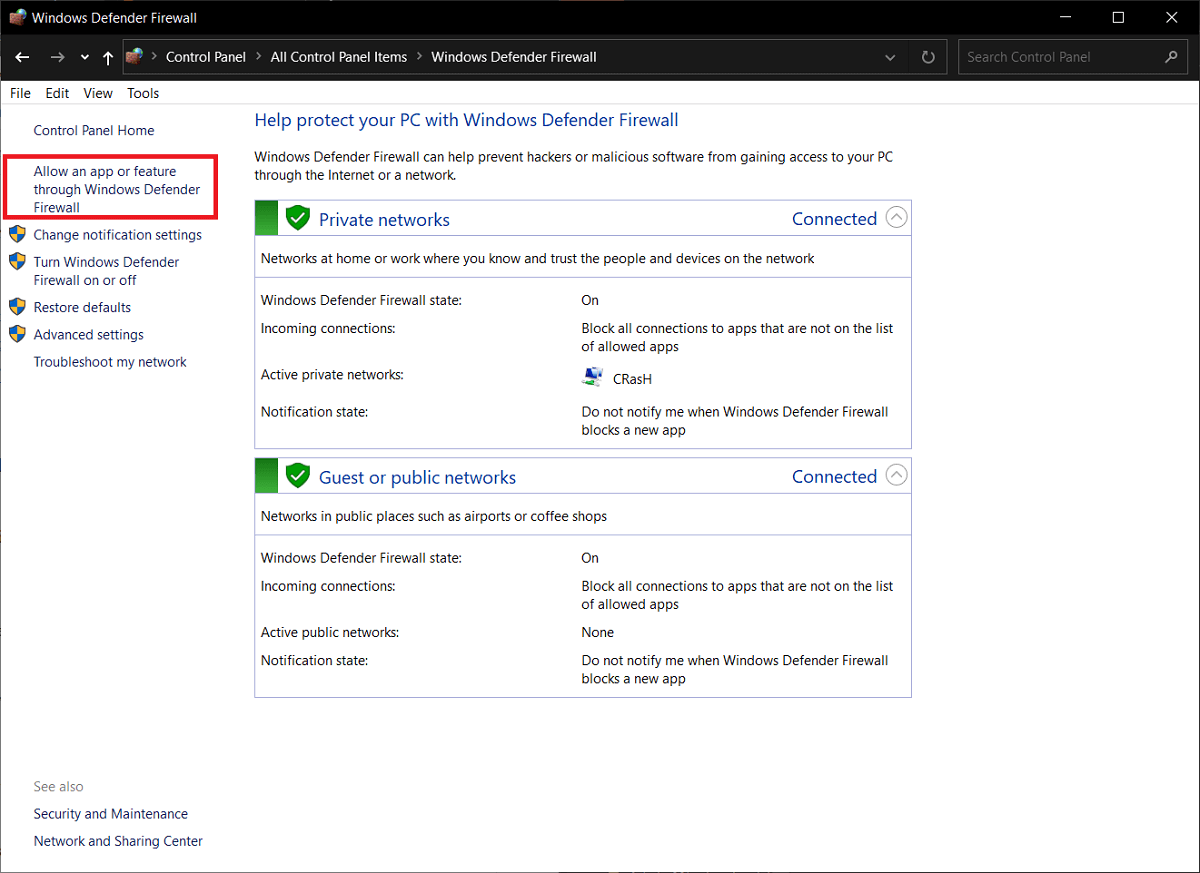
3. In the following window, click on the Cho phép một ứng dụng hoặc tính năng thông qua Tường lửa của Bộ bảo vệ Windows siêu liên kết.
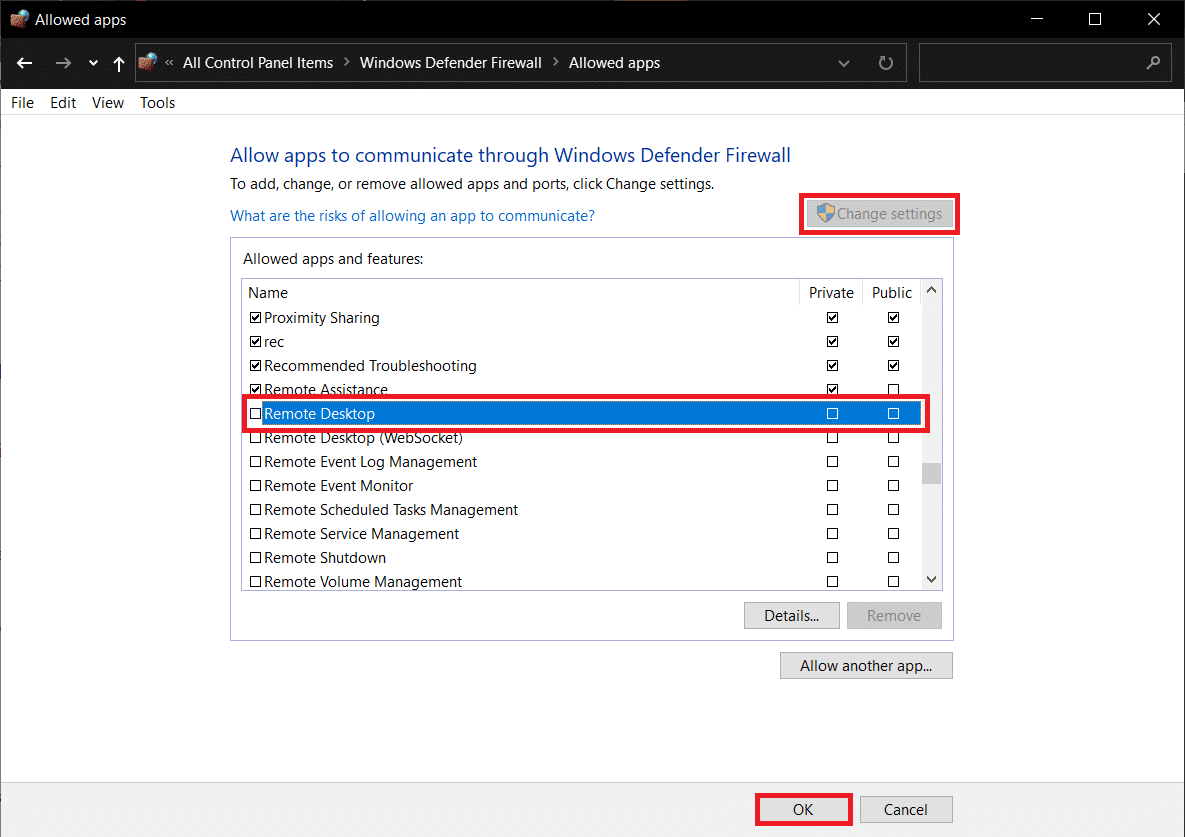
4. Bấm vào Change Settings .
5. Scroll down the Allow apps and features list and check the box next to Remote Desktop.
6. Nhấp vào OK to save the modification and exit.
Along with the Defender Firewall, an antivirus program you have installed on your computer may be blocking a remote connection from being set up. Temporarily disable the antivirus or uninstall it and check if you are able to create a connection.
Cũng đọc: Truy cập máy tính của bạn từ xa bằng Chrome Remote Desktop
Method 3: Enable Remote Assistance
Similar to Remote Desktop, Windows has another feature called Remote Assistance. Both of these may sound the same but have some key differences. For example, a remote desktop connection grants complete control over the system to a remote user while Remote Assistance allows users to only grant partial control. Furthermore, to establish a remote connection, one needs to know the exact credentials while an invitation is required for providing remote assistance. Also, in a remote connection, the host computer screen remains blank and contents are only displayed on the remotely connected system. In a remote assistance connection, the same desktop is shown on both the connected computers.
If you are having trouble setting up a remote connection, try enabling remote assistance and then sending an invitation to the other user.
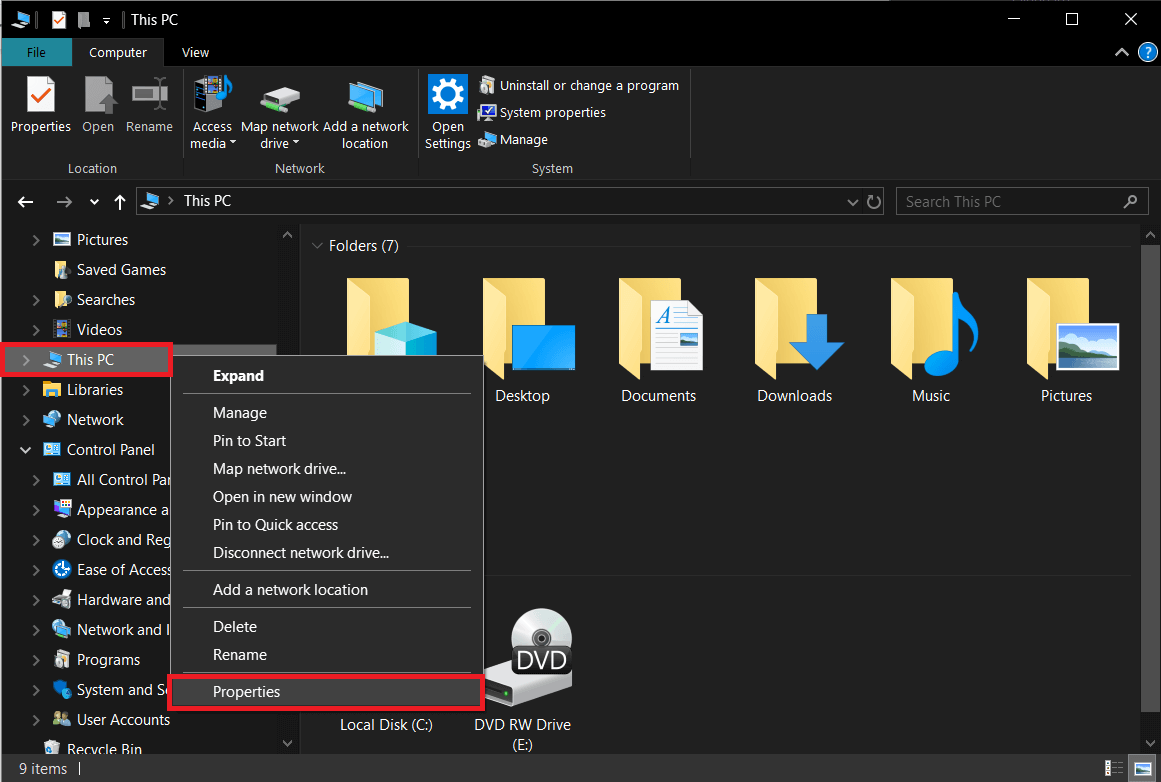
1. Double-click on the Windows File Explorer shortcut icon on your desktop to launch the application and nhấp chuột phải on Máy tính này.
2. Nhấp vào Bất động sản in the ensuing context menu.
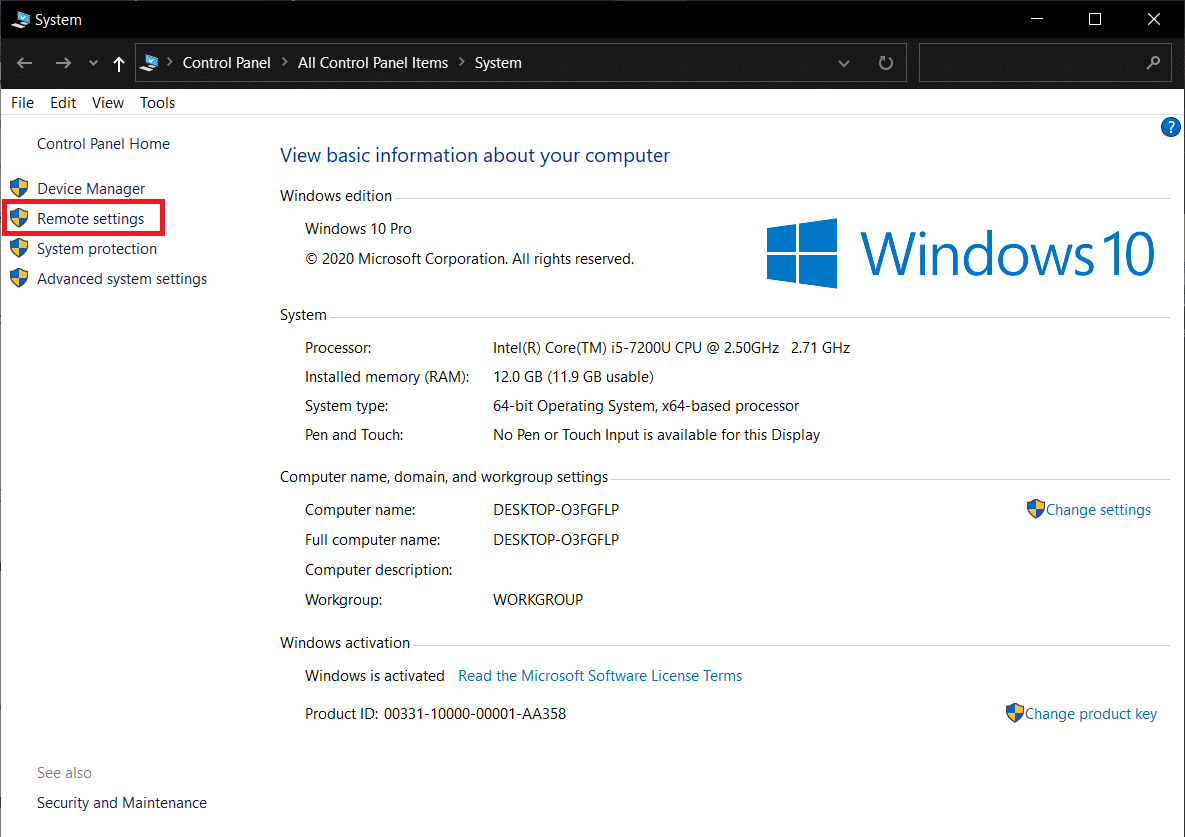
3. Công khai Thiết lập từ xa.
4. Đánh dấu vào ô bên cạnh ‘Allow Remote Assistance connections to this computer’.
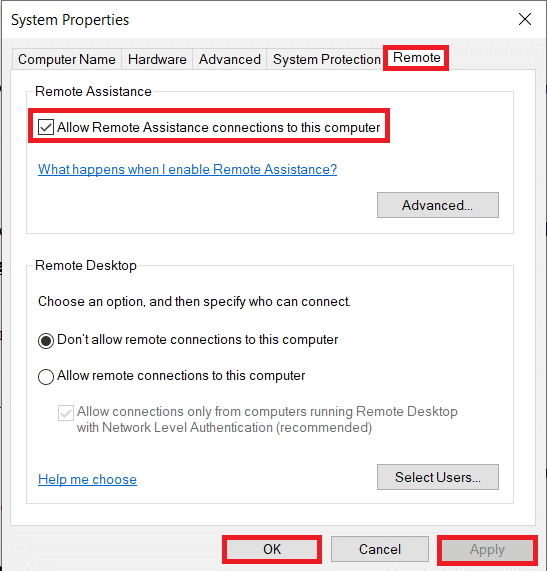
5. Remote Assistance also needs to be manually allowed through the firewall. So follow steps 1 through 4 of the previous method and tick the box next to Remote Assistance.
To Send an Assistance Invitation:
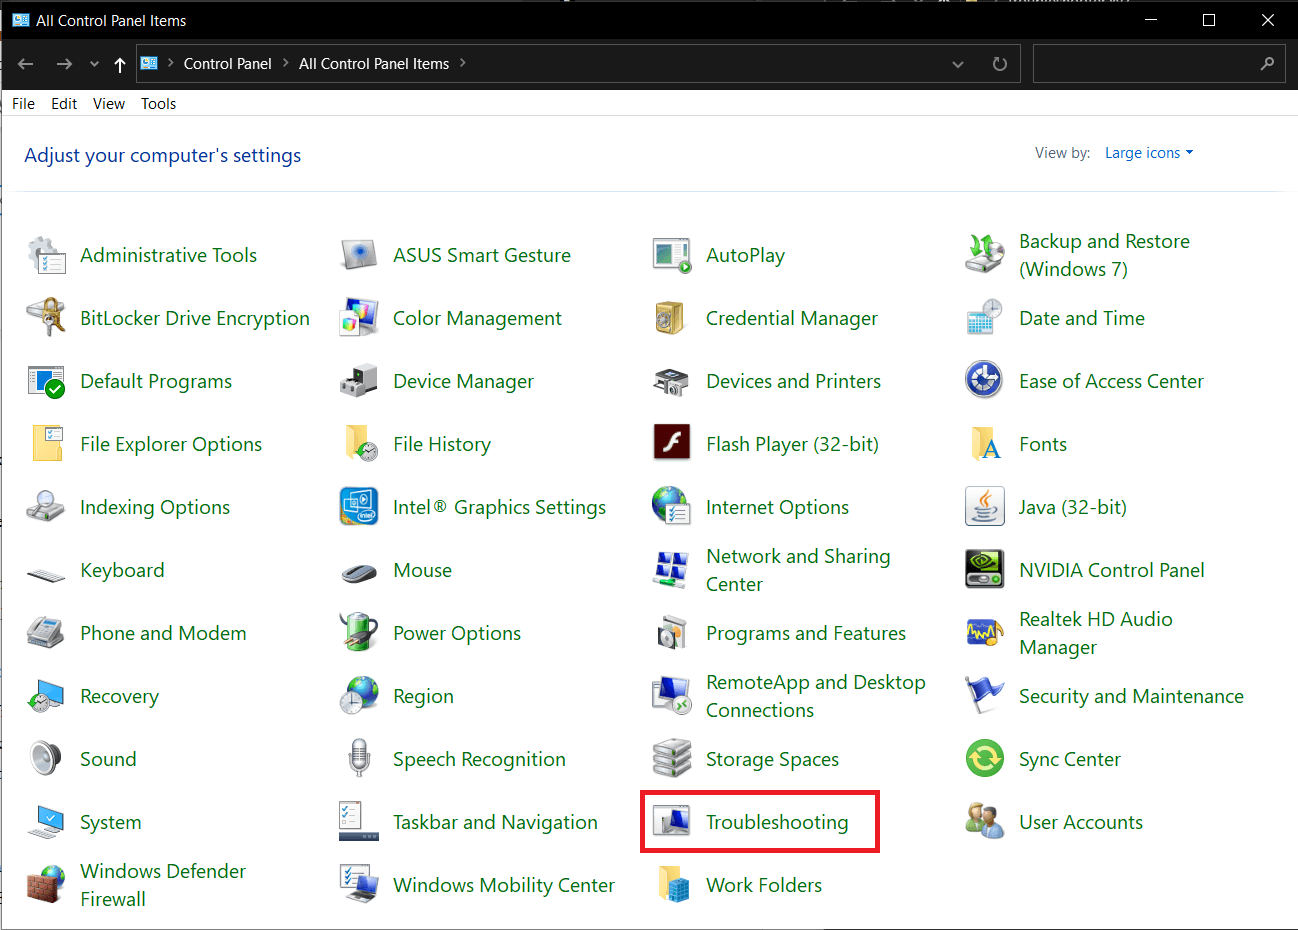
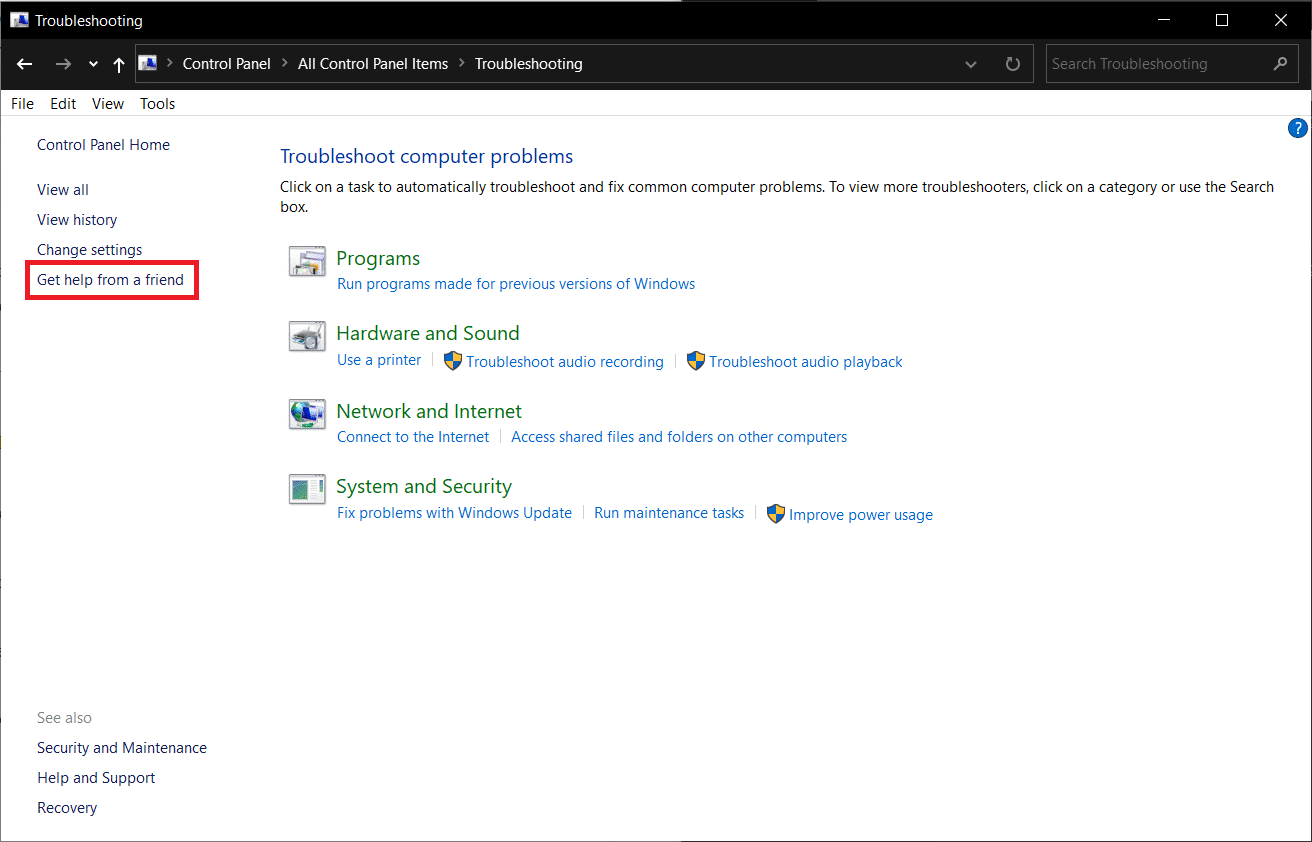
1. Mở Bảng điều khiển và bấm vào Xử lý sự cố mục.
2. Trên ngăn bên trái, nhấp vào Get help from a friend.
3. Nhấp vào Invite someone to help you. in the following window.
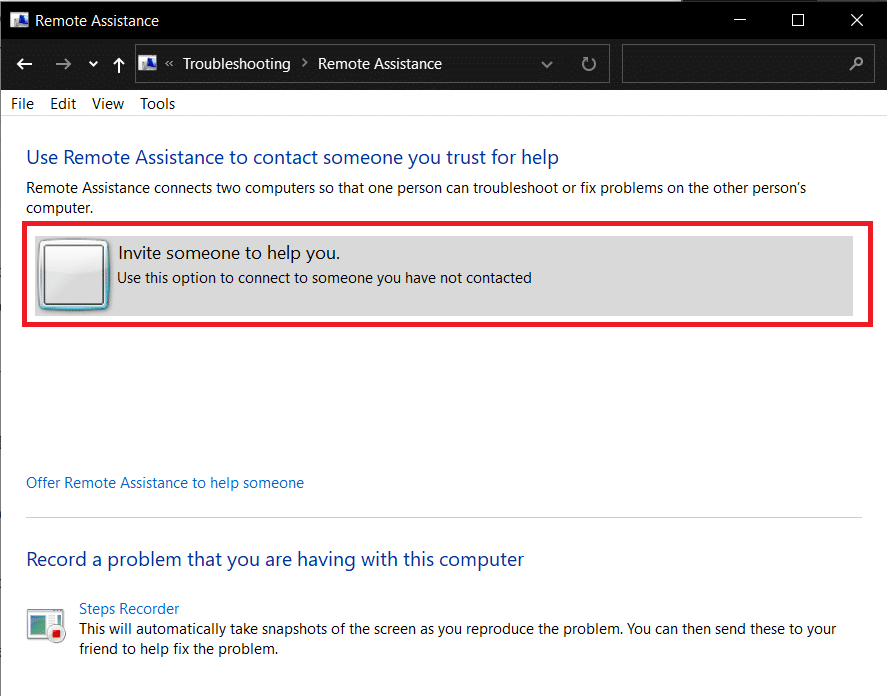
4. Choose any of the three methods to invite your friend over. For the purpose of this tutorial, we will continue with the first option, i.e, Save this invitation as a file. You can also directly mail the invitation.

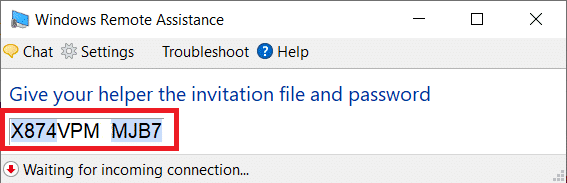
5. Save the invitation file in your preferred location.
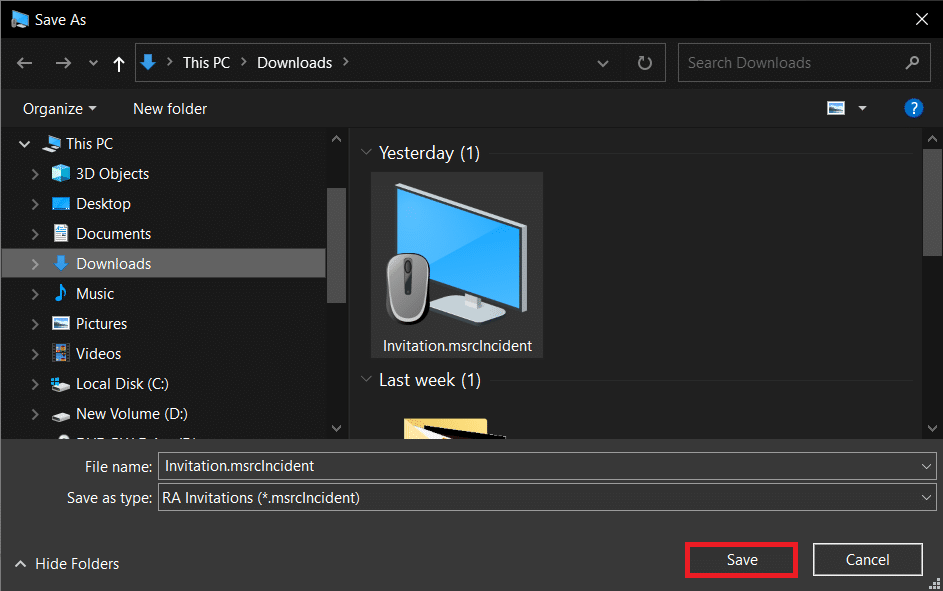
6. Once the file is saved, another window displaying the file password will open up. Carefully copy the password and send that to your friend. Do not close the Remote Assistance window until the connection is established, otherwise, you will need to create and send a new invitation.
Cũng đọc: Fix Remote Desktop Cannot Connect to the Remote Computer
Method 4: Disable Custom Scaling
An important setting that often gets overlooked when setting up a remote connection is custom scaling. To those unaware, Windows allows users to set a custom size for their text, apps, etc. using the Custom Scaling feature. However, if the feature (custom scale) isn’t compatible with the other device, issues will arise in remotely controlling the computer.
1. Phóng Windows Settings một lần nữa và nhấp vào WELFARE.
2. On the Display settings page, click on Tắt chia tỷ lệ tùy chỉnh và đăng xuất.
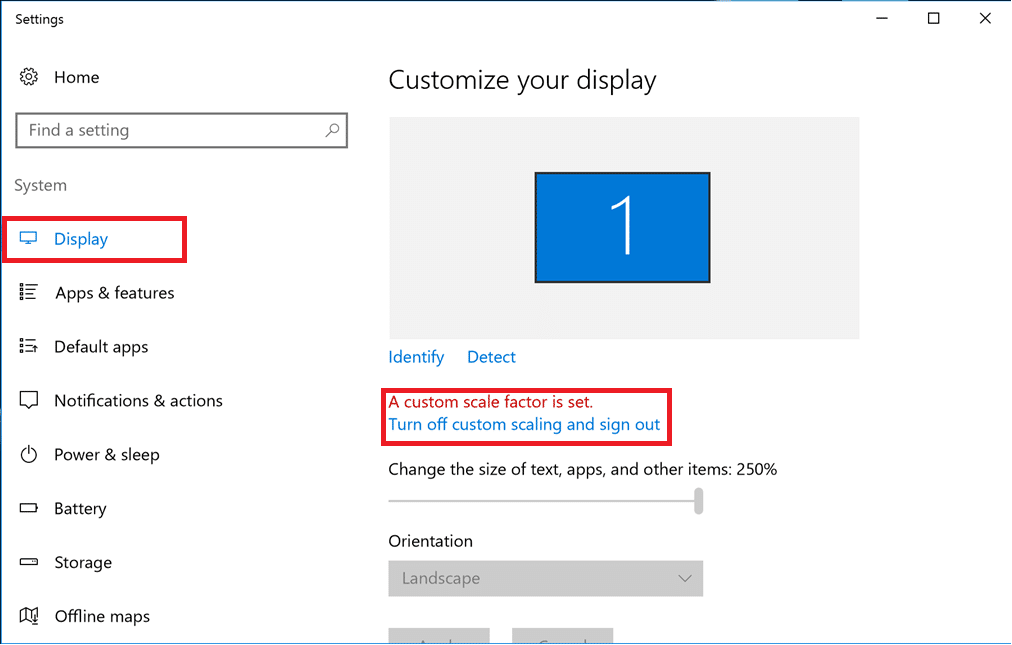
3. Sign back into your account and check if you are able to connect now.
Cũng đọc: How to Enable Remote Desktop on Windows 10
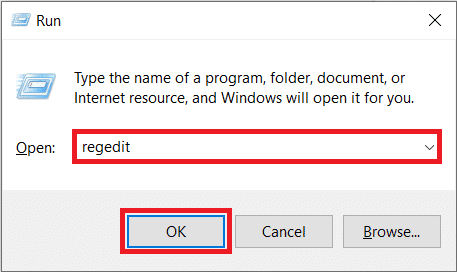
Method 5: Modify the Registry Editor
Some users have been able to solve the remote desktop won’t connect problem by modifying the Terminal Server Client folder in the Registry editor. Be extremely careful in following the below steps and making changes to the registry as any accidental mistake can prompt additional issues.
1. Press Windows key + R to launch the Run command box, type Regedit, and hit the enter key to mở Trình chỉnh sửa sổ đăng ký.
2. Using the navigation menu on the left panel, head down to the following location:
HKEY_CURRENT_USERSoftwareMicrosoftTerminal Server Client
3. Nhấp chuột phải anywhere on the right panel and select Mới tiếp theo Giá trị DWORD (32-bit).
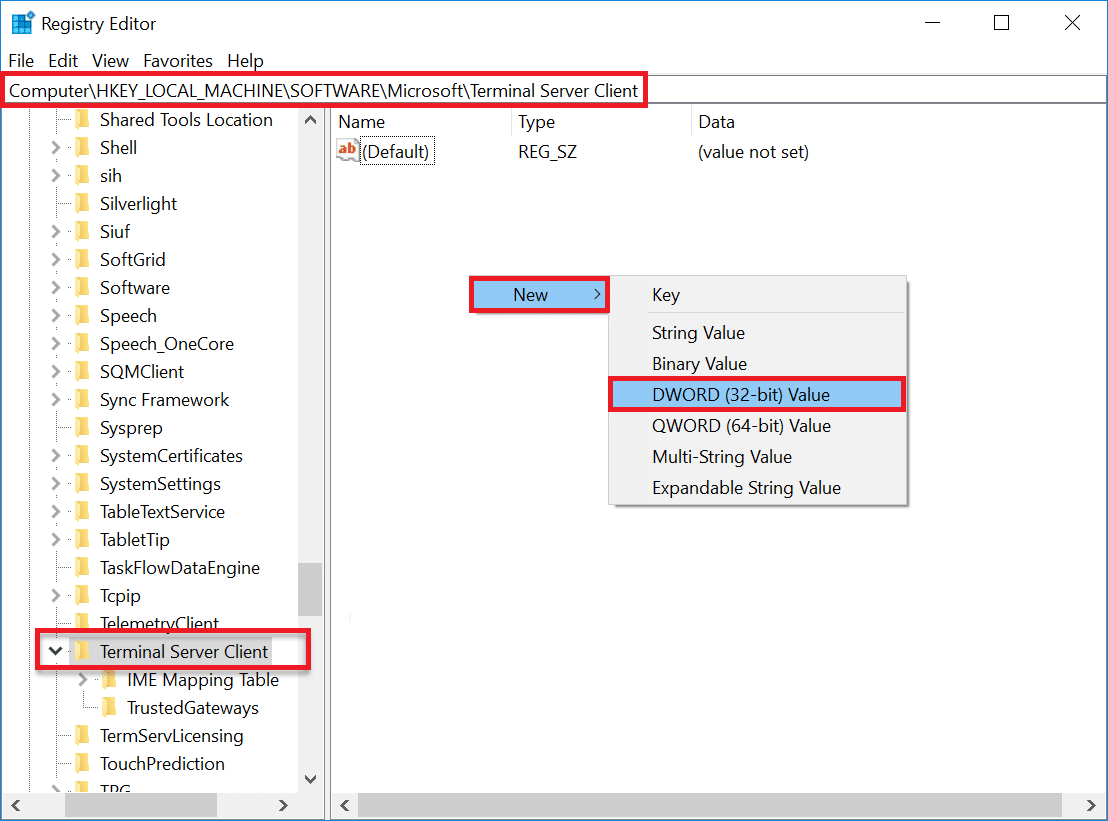
4. Rename the value to RDGClientTransport.
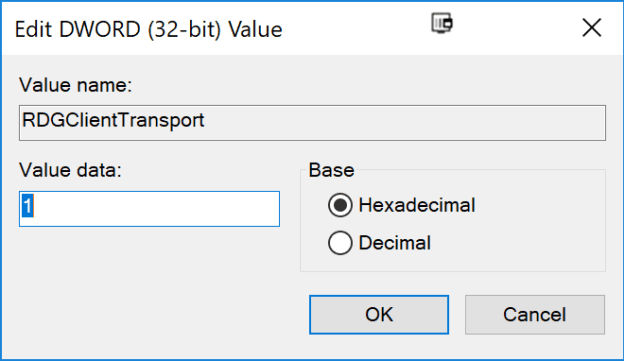
5. Double-click on the newly created DWORD Value to open its Properties and set Value Data as 1.
Method 6: Delete existing Remote Desktop Credentials
If you had previously connected to a computer but are now facing issues in connecting again, try deleting the saved credentials and starting all over again. It is quite possible that some of the details were changed and thus, the computers fail to connect.
1. Perform a search for Remote Desktop Connection using the Cortana search bar and hit enter when the results arrive.
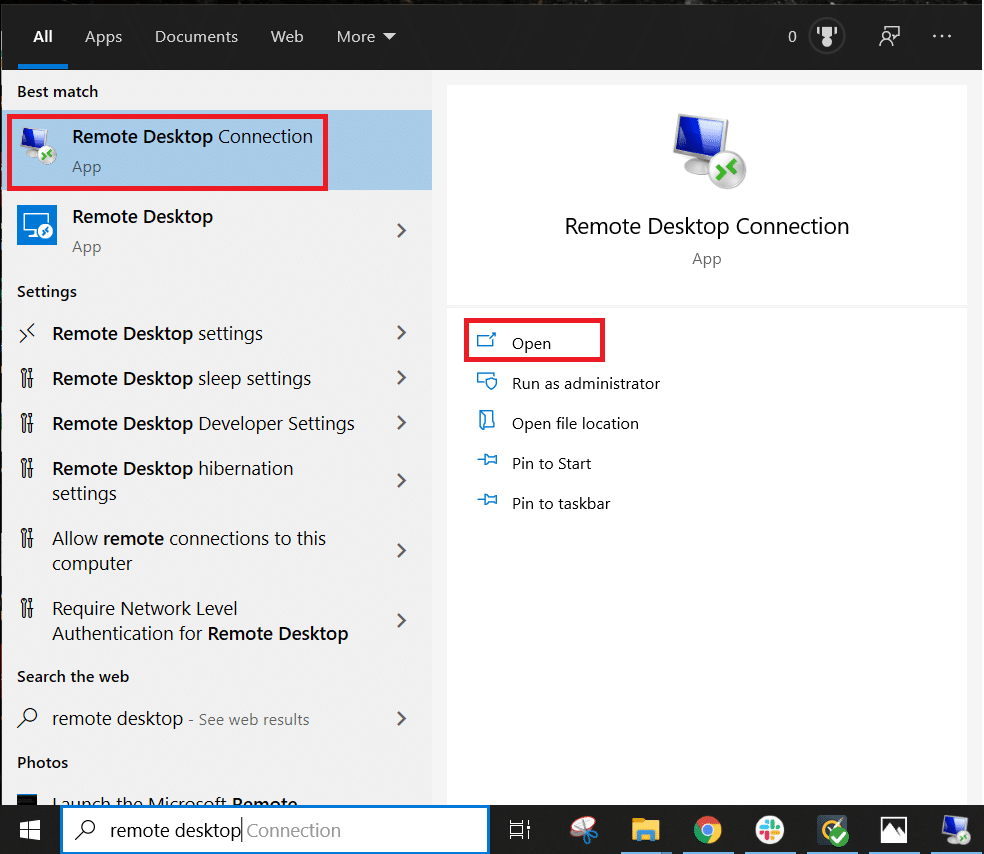
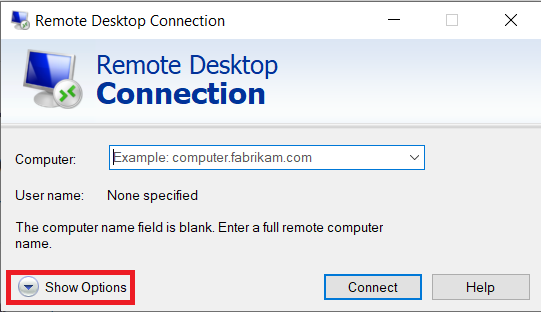
2. Bấm vào Hiển thị các tùy chọn arrow to reveal all tabs.
3. Di chuyển đến Nâng cao và nhấp vào tab ‘Settings…’ button under Connect from anywhere.
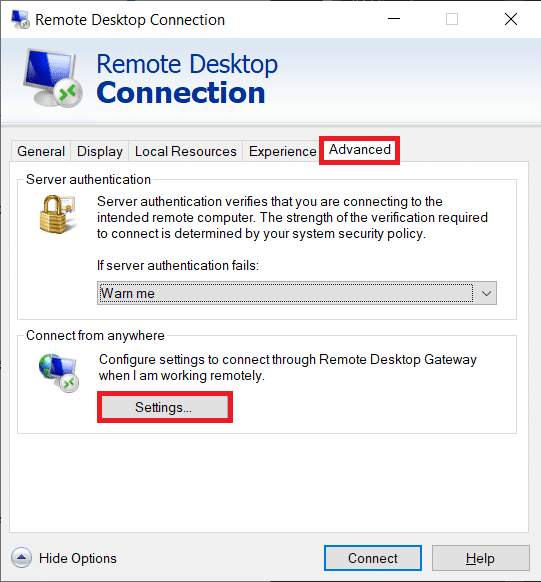
4. Delete the existing credentials for the computer you are having a hard time connecting to.
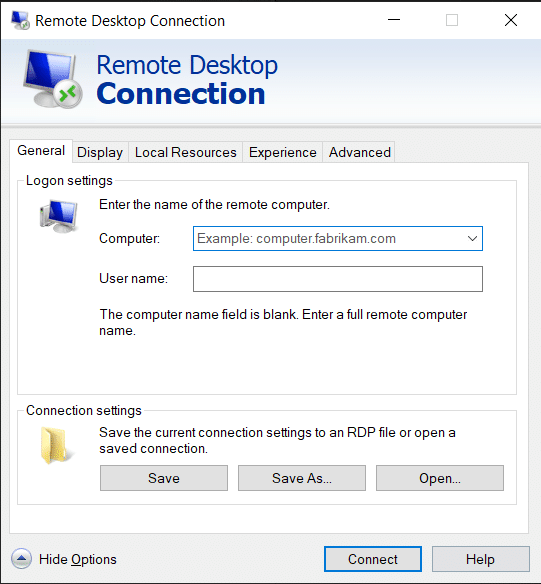
You can also manually enter the IP address of a remote computer and edit or delete the credentials from the General tab itself.
Cũng đọc: Cách thiết lập kết nối máy tính từ xa trên Windows 10
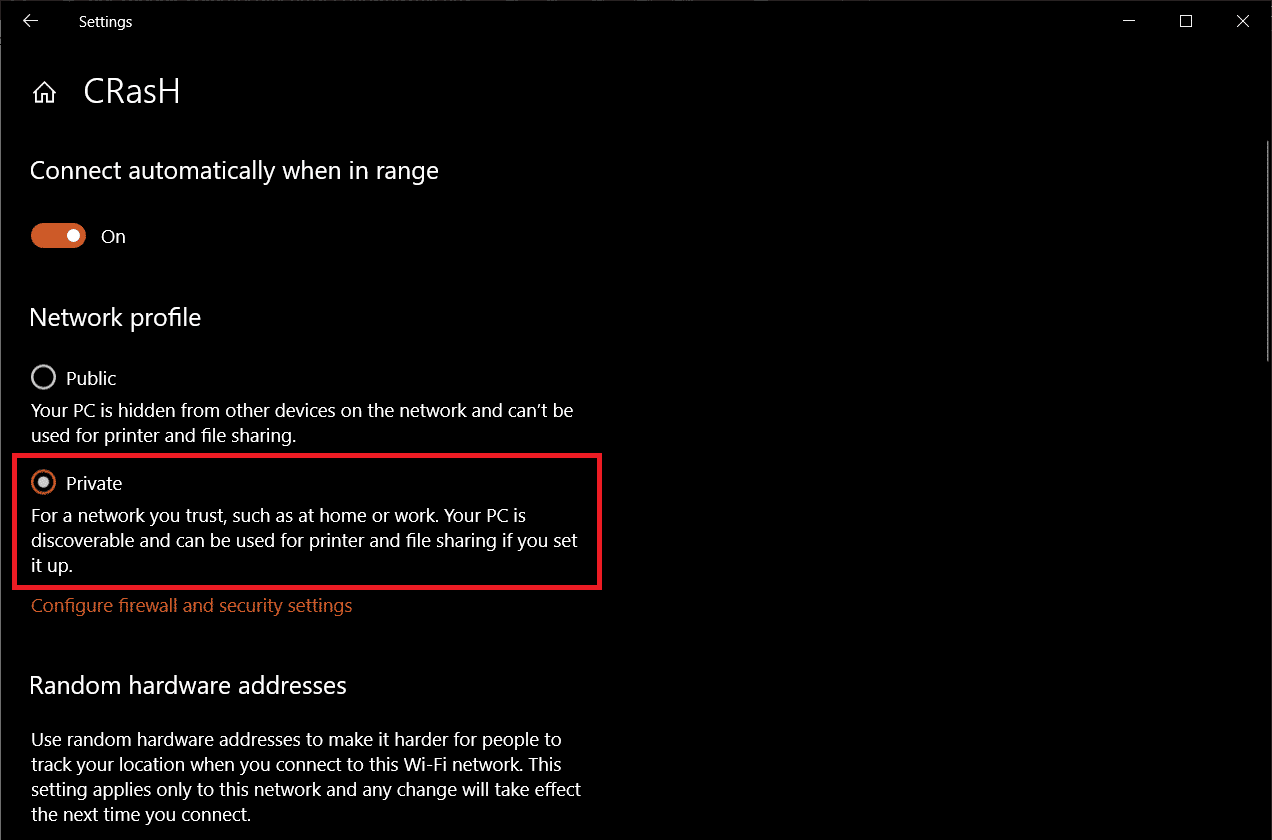
Method 7: Change Network Settings
For the sake of our digital security, remote desktop connections are only allowed on private networks. So if you are connected to a public network, switch to a more secure private one or manually set the connection as private.
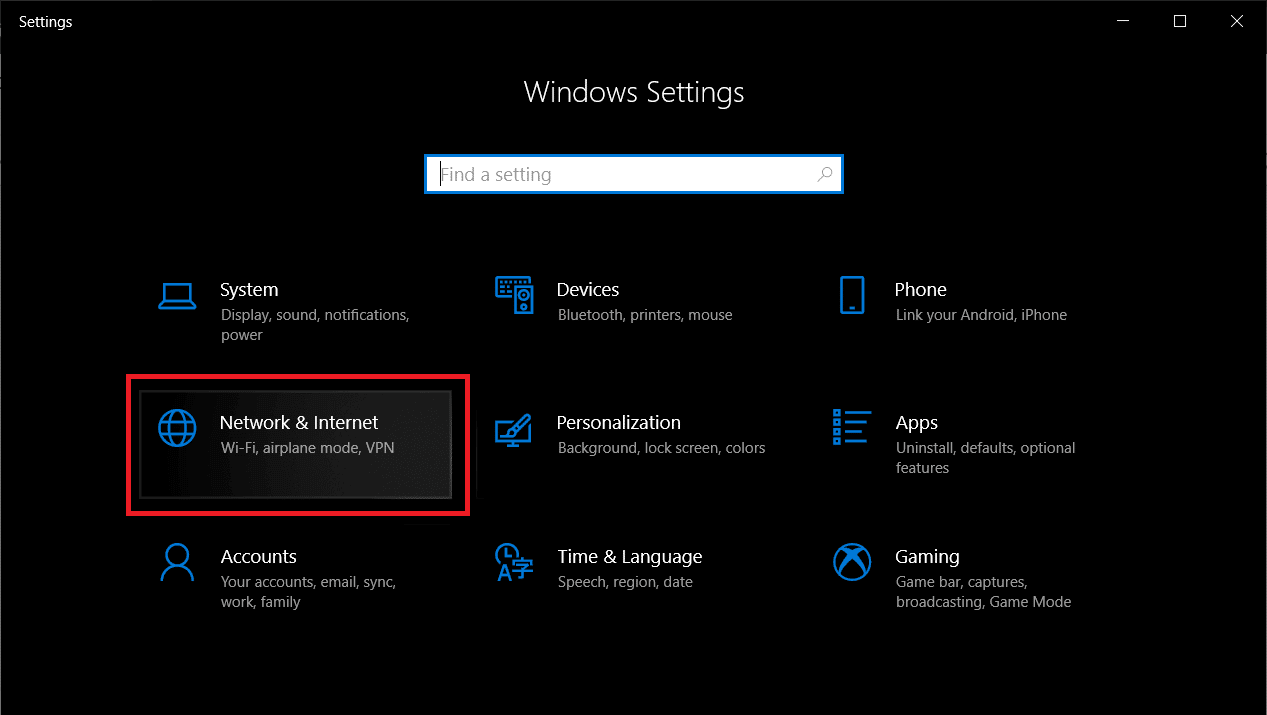
1. Công khai Windows Settings một lần nữa và nhấp vào Mạng & Internet.
2. On the Status page, click on the Bất động sản button under your current network.
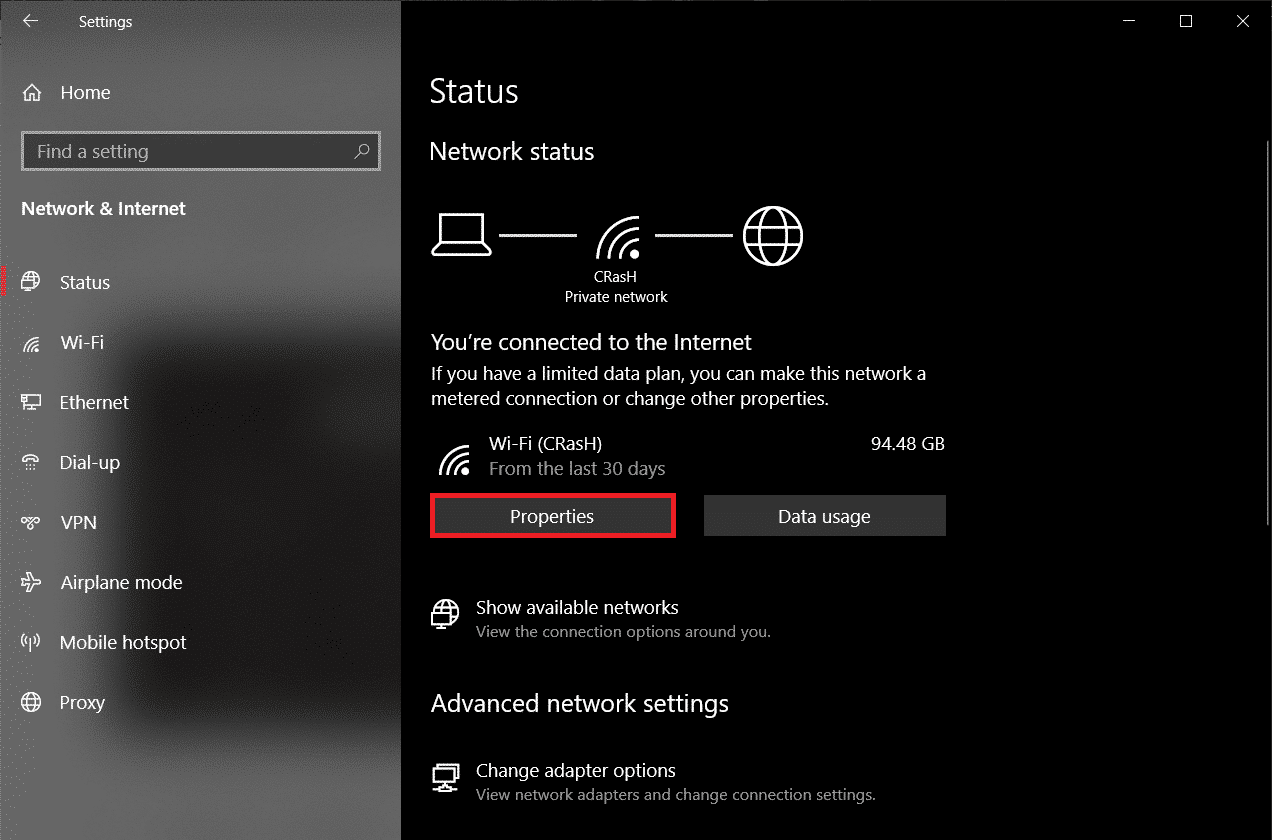
3. Set the Network Profile as Riêng.
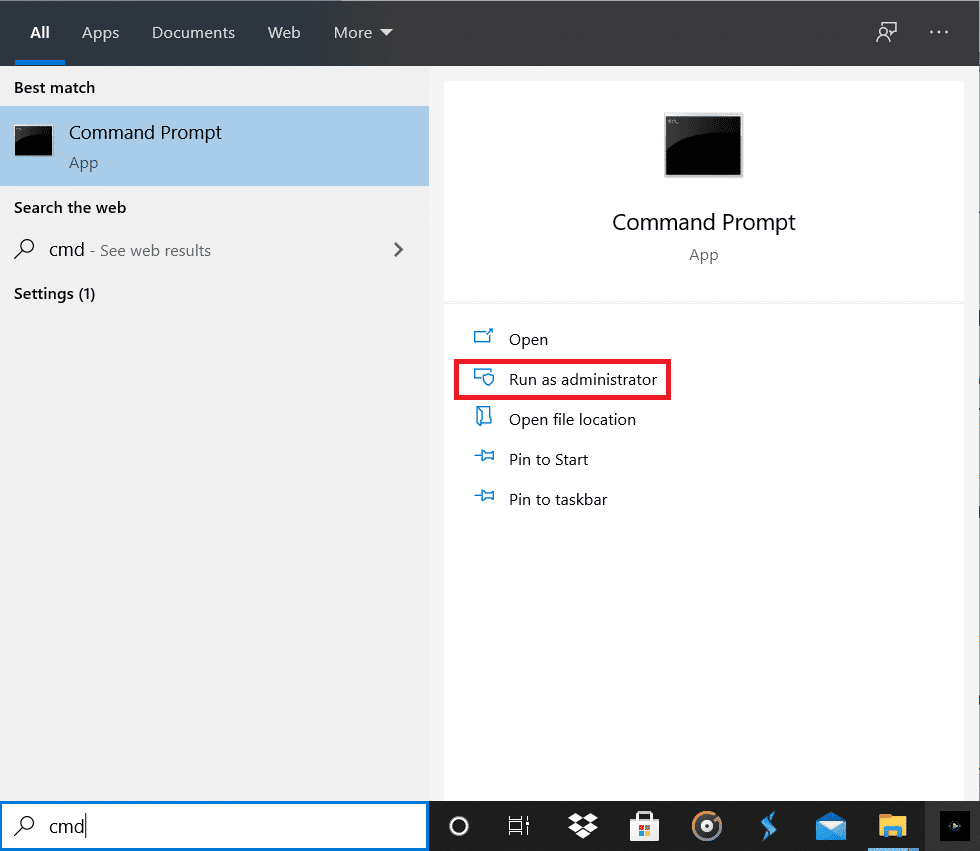
Method 8: Add the IP Address to the Host’s file
Another manual solution to the remote desktop won’t connect issue is adding the remote computer’s IP address to the host’s file. To know a Computer’s IP address, open Settings > Network & Internet > Properties of the currently connected network, scroll down to the end of the page, and check the IPv4 value.
1. Tìm kiếm Command Prompt in the Start Search bar and select Run as Administrator.
2. Type the following command and press enter
cd C: / Windows / System32 / Drivers / etc
3. Next, execute notepad hosts to open the host’s file in the notepad application.
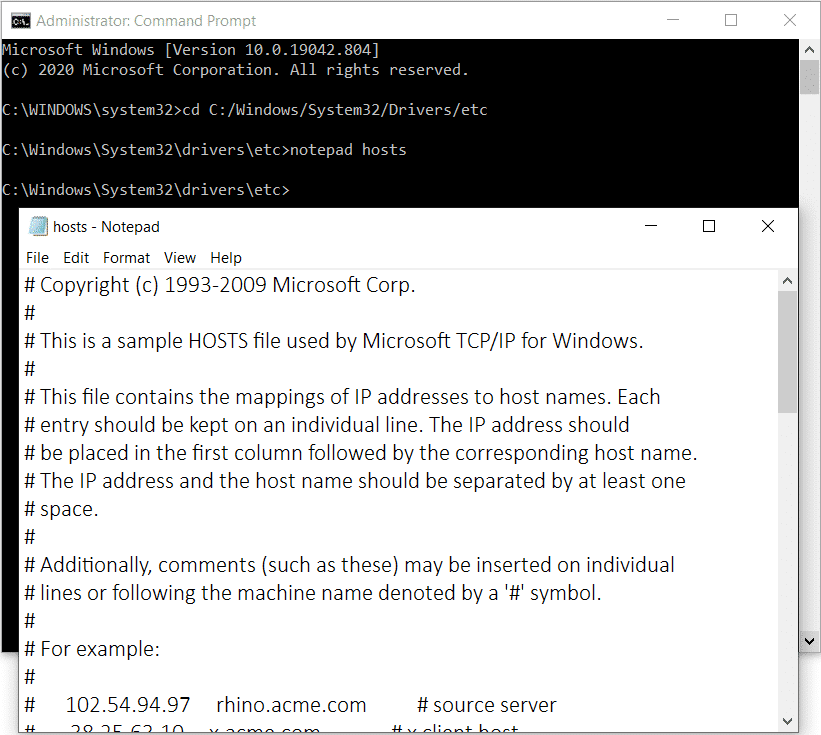
4. Add the remote computer’s IP address and press Ctrl + S to save the changes.
If issues with the remote desktop feature only started after performing the most recent Windows Update, uninstall the update or wait for another one to arrive with the bug hopefully fixed. Meanwhile, you can use one of the several third-party remote desktop programs available for Windows. As mentioned earlier, TeamViewer và Anydesk are crowd favorites, free, and very easy to use. Máy tính từ xa, ZoHo Assistvà LogMeIn are a few great paid alternatives.
Đề nghị:
Chúng tôi hy vọng hướng dẫn này hữu ích và bạn có thể fix Remote Desktop Won’t Connect in Windows 10. Still, if you have any doubts then feel free to ask in the comment section below.

