Fix External Hard Drive Not Showing Up or Recognized: External hard drives are very useful when you want to increase storage space. They enable you to store data at a place other than your computer’s primary storage and that too at a relatively lower cost. They are easy to use. But, sometimes it may occur that even after connecting your external hard drive to your computer, it doesn’t show up or get recognized. There can be various reasons for your external hard drive not showing up like dead USB ports or driver issues. If your computer fails to detect your external hard drive, here’s what you need to do.
Before you move on to the following methods, you must first ensure that your drive’s power switch is on (if it exists). The lights on the device will indicate that. While most of the external drives are powered over USB itself, some may have a separate power cable. In such a case, you must ensure that the power cable is working fine. If it isn’t working, the power cable or your power outlet may be damaged. If you have checked all of this and your drive doesn’t show up, continue following the given steps.
Fix External Hard Drive Not Showing Up or Recognized
Rii daju pe o ṣẹda aaye imupadabọ kan ti nkan kan ba jẹ aṣiṣe.
Method 1 – Try Using a Different USB Port Or Computer
Try inserting your hard drive in some other USB port to check if there’s an issue with the USB port itself. If your external hard drive shows up on inserting it in another USB port, then your previous USB port may be dead.
Also, try inserting your hard drive on some other computer. If it doesn’t show up on the other computer as well, there may be a problem with the hard drive. It may even be completely dead and you might need to replace it. This way you will know where exactly the problem lies.
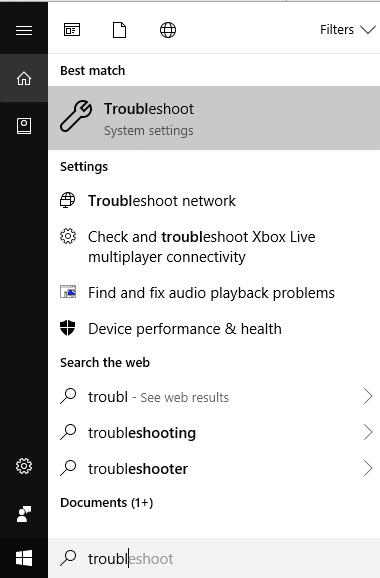
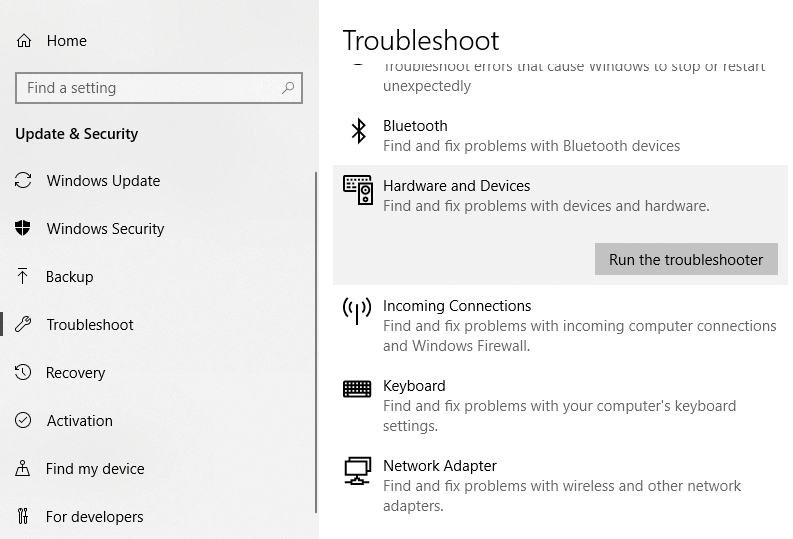
Method 2 – Run Hardware and Devices Troubleshooter
The Windows inbuilt troubleshooter may handle this for you by checking and fixing any hardware or USB related issues, so this one is the foremost step. To let Windows troubleshoot this problem,
1.Wa fun Laasigbotitusita in the Windows search field and then click on it. Alternatively, you can access it in the Settings.
2.Scroll down to ‘Hardware ati awọn ẹrọ’ and click on it.
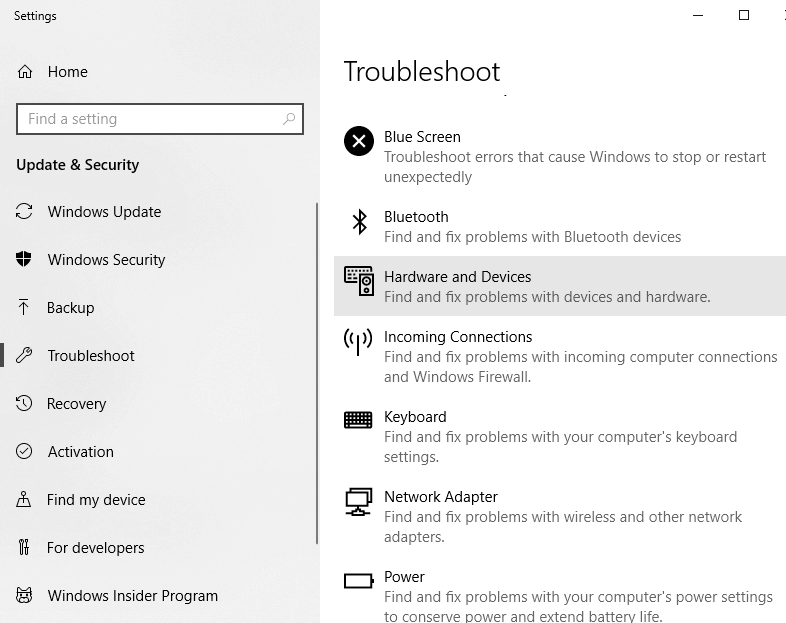
3. Tẹ lori 'Ṣiṣe awọn oluṣakoso naa’ under Hardware and Devices.
Method 3 – Enable the External Drive If It Isn’t Already
If your external hard drive like WD My Passport Ultra is not showing up or recognized then it may be caused because it is disabled on your computer. You should ensure that your hard drive is enabled by:
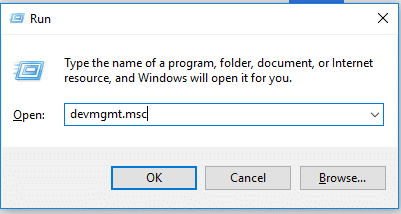
1. Tẹ Bọtini Windows + R lati ṣii Ṣiṣe.
2.Type ‘devmgmt.msc’ and click on OK.
3.In the device management window, double click on the type of your external hard drive. It may be located under ‘Awọn iwakọ Disk'Tabi'Universal ni tẹlentẹle akero olutona'.
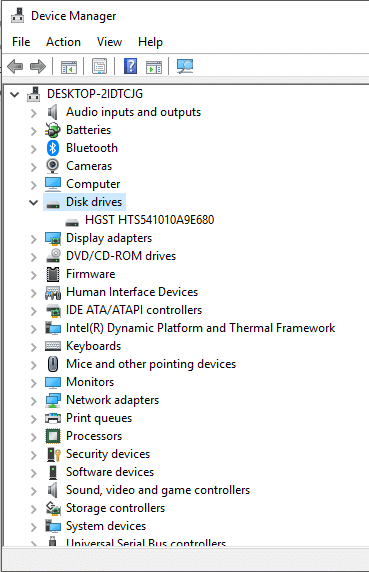
4.Double-click on your external hard drive to open its Awọn ohun-ini.
5.Now, if you see the ‘Mu ẹrọ ṣiṣẹ’ button, then it means the hard disk is already enabled.
6.But if you see ‘Mu ẹrọ ṣiṣẹ’ button, then make sure to click on it in order to enable the external hard drive.
Method 4 – Update External Hard Drive Drivers
ti o ba ti drivers for hard drives are outdated or missing, it can lead to the external hard drive not showing up or recognized. Therefore, you must make sure that the drivers are updated. You can update the drivers manually by searching for the latest version online and downloading them to your computer. For this, you need to gather the required knowledge.
1. Tẹ Bọtini Windows + R ki o si tẹ devmgmt.msc ati Tẹ sii lati ṣii Oluṣakoso ẹrọ.

2.Fagun Awọn awakọ Disk or Universal Serial Bus olutona.
3.Now right-click on your External hard drive and select Imudojuiwọn iwakọ.
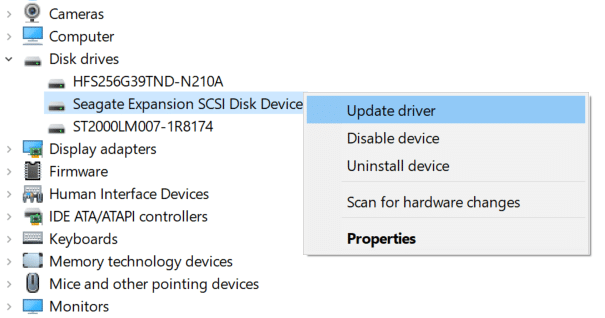
4.Choose the option “Ṣawari laifọwọyi fun software imudojuiwọn iwakọ".
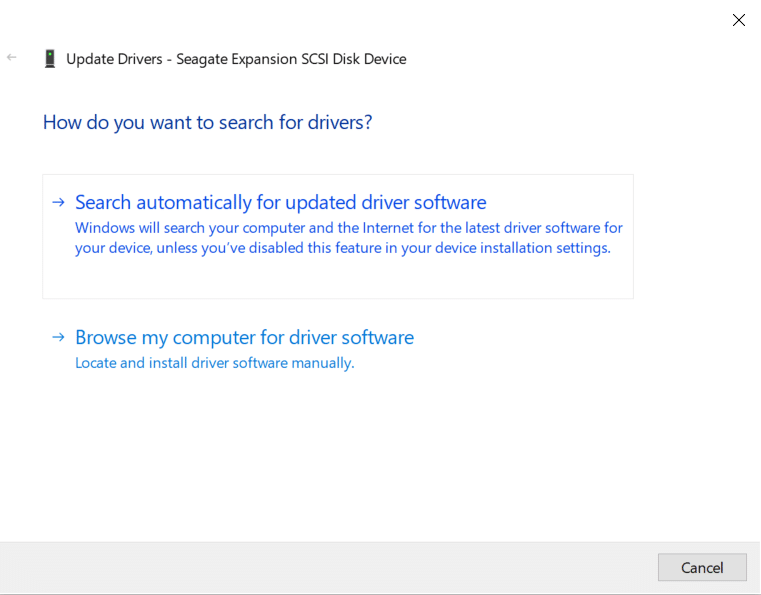
5.This will automatically look for and install the updated driver of the hardware from the internet.
6.If the above steps were helpful in fixing the issue then very good, if not then continue.
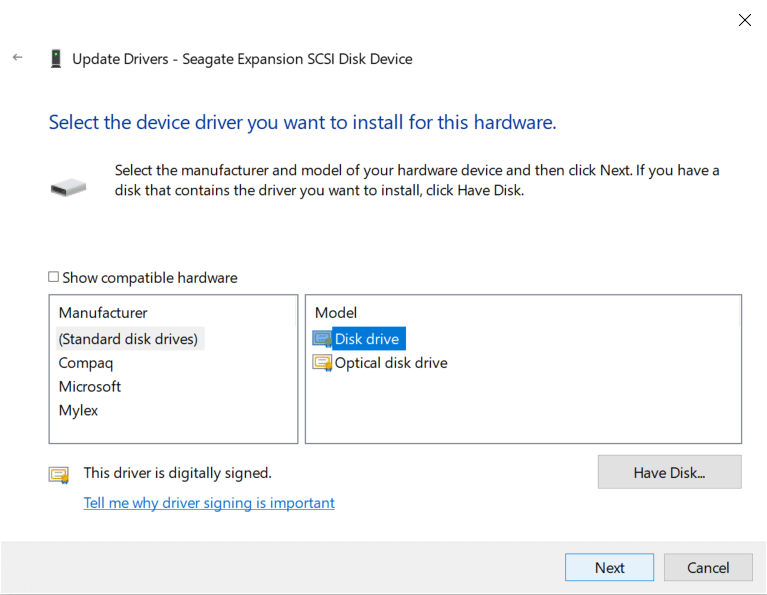
7.Again right-click on your external hard drive and select “Iwakọ Imudojuiwọn"ṣugbọn ni akoko yii lori iboju atẹle yan"Lọ kiri lori kọmputa mi fun software iwakọ."

8. Bayi yan "Jẹ ki n mu ninu atokọ ti awọn awakọ to wa lori kọnputa mi. "

9. Níkẹyìn, select the latest driver lati akojọ ki o tẹ Itele.
10.Let the above process finish and restart your PC to save changes.
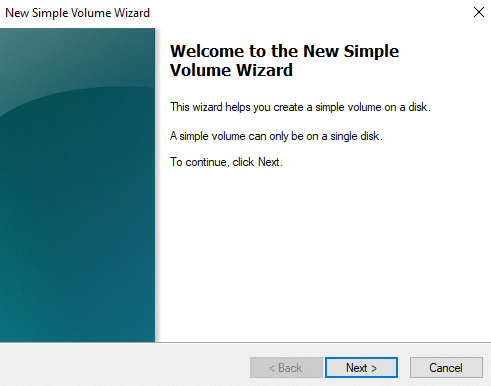
Method 5 – Create Partitions for your External Drive
If you are connecting your hard drive for the first time, then it is possible that it does not show up because it doesn’t have any partitions. For a previously used hard drive too, partition issues may cause it to not be detected. To partition your drive,
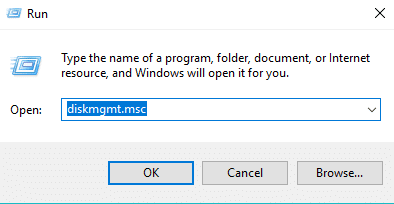
1. Tẹ Bọtini Windows + R lati ṣii Run.
2.Type ‘diskmgmt.msc’ and click on OK.
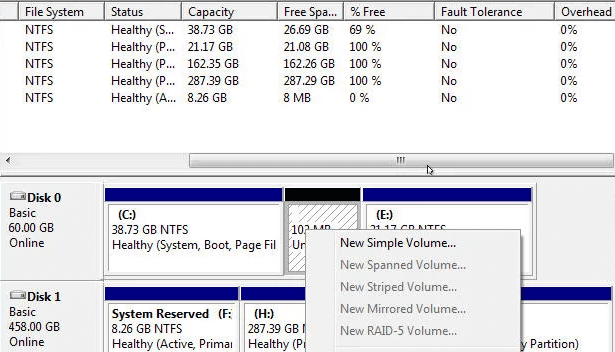
3.In the disk management window, right-click on the hard drive and select ‘New simple volume'.
4.To complete the process follow this guide.
5.Restart your computer and check if you’re able to fix external hard drive not showing up or recognized issue.
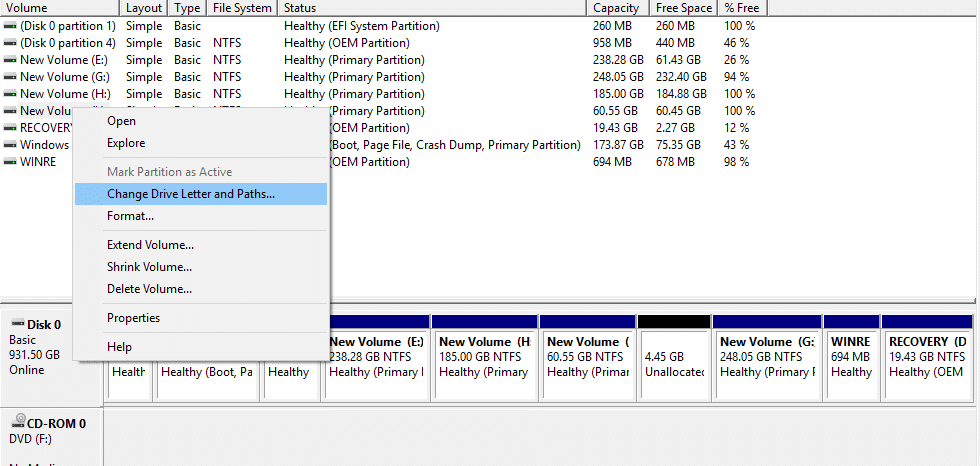
Method 6 – Set Or Change the Drive Letter
Once your drive is correctly partitioned, you must assign a drive letter in order to detect your external hard drive. For this,
1. Tẹ Bọtini Windows + R lati ṣii Run.
2.Type ‘diskmgmt.msc’ and click on OK.
3.In the Disk Management window, titẹ-ọtun on the drive that you want to assign a drive letter.
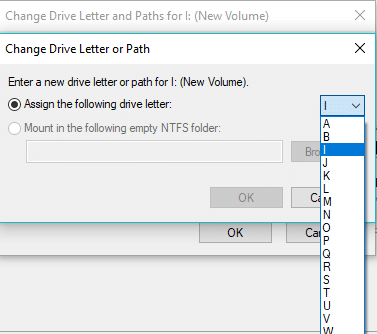
4. Tẹ lori 'Change drive letters and paths'.
5.If your drive doesn’t have a drive letter already, click on ‘fi’. Otherwise, click on ‘ayipada’ to change the drive letter.
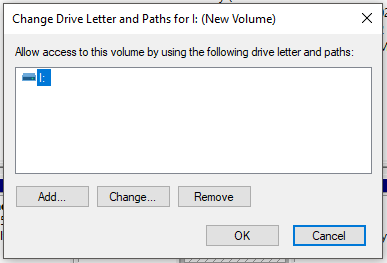
6.Select ‘Fi lẹta iwakọ wọnyi si’ radio button.
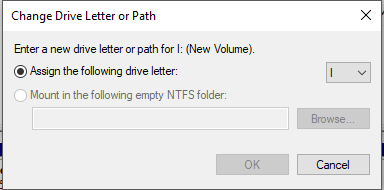
7.Choose a new letter you want to assign from the drop-down menu and click on Ok.
8.Disconnect and re-insert your external hard drive and check if your external hard drive is now recognized or not.
Method 7 – Format the External Hard Drive
If your drive is partitioned and still does not show up, it may be because it was partitioned or formatted earlier using a different file system or OS and the Windows can’t understand it. To format the drive,
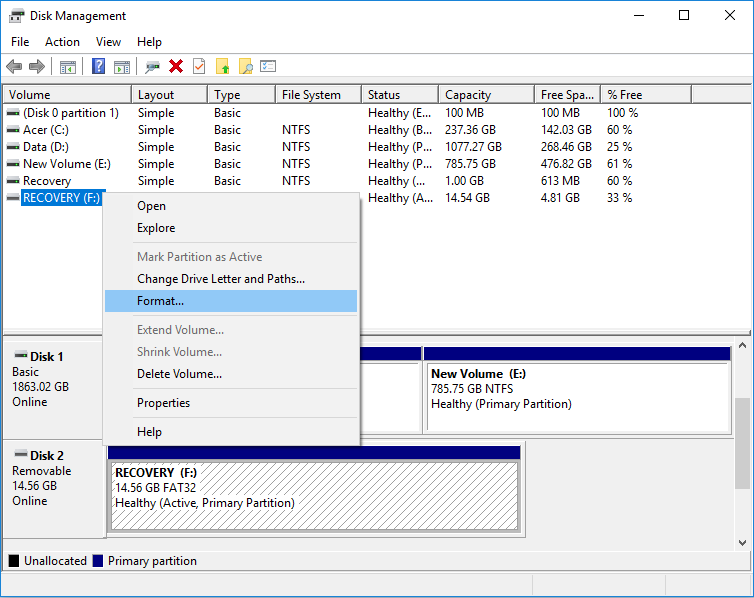
1.Press Windows key + R to open Run then type 'diskmgmt.msc’ ki o si tẹ Tẹ.
2.In the disk management window, right-click on the hard drive and select ‘kika'.
akiyesi: This will erase all the contents of the drive. You may need to back up your files using the system which the drive was partitioned in.
3.Type any name which you want to give your drive under Volume label field.
4.Select the file systems from FAT, FAT32, exFAT, NTFS, or ReFS, according to your use.
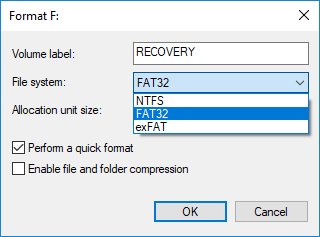
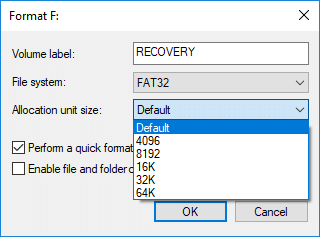
5.Bayi lati Iwọn ipin ipin (Cluster size) drop-down make sure to select Default.
6.Check or uncheck “Ṣe ọna kika kiakia” options depending on whether you want to do a quick format or full format.
7.Next, check or uncheck “Enable file and folder compression” option according to your preference.
8.Finally, review all your choices and then click OK ati lẹẹkansi tẹ lori OK lati jẹrisi awọn iṣe rẹ.
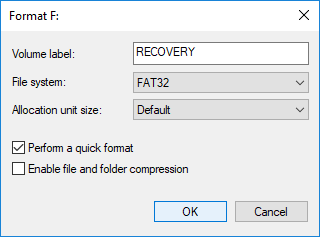
9.Once the Format is complete, you can close Disk Management.
This should definitely fix external hard drive not showing up issue, but if for some reason you’re stuck then follow the next method.
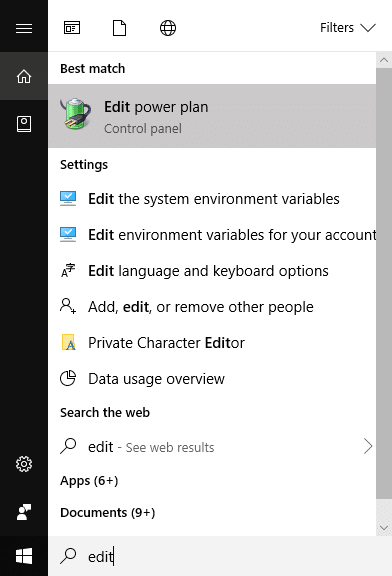
Method 8 – Disable USB Selective Suspend Setting
1.Search for ‘Satunkọ eto agbara’ in the search field located on your taskbar and open it.
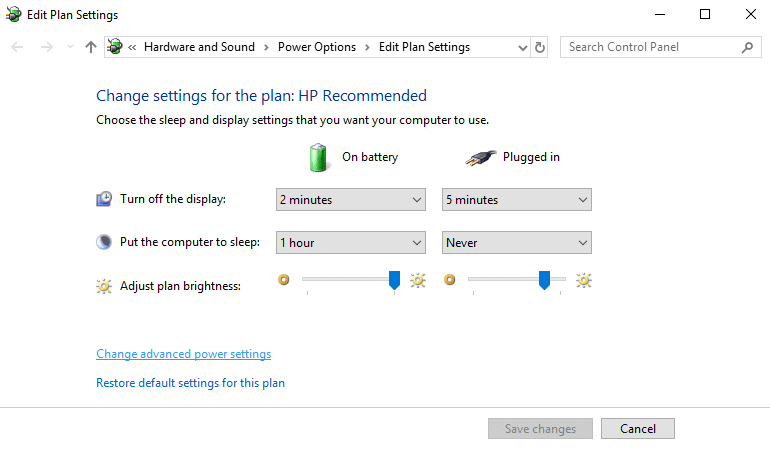
2. Tẹ lori 'Yi eto agbara to ti ni ilọsiwaju pada'.
3.Under USB settings, disable ‘Eto idadoro USB yiyan'.
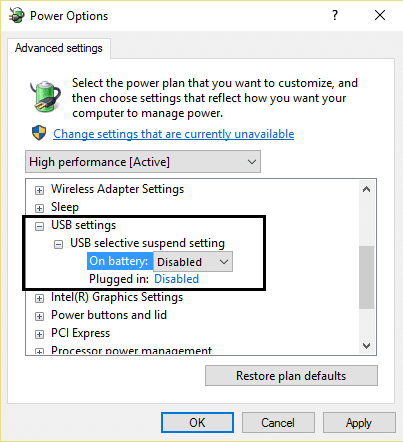
4.Click OK followed by Apply to save changes.
5.Reinsert your hard drive and this time it will show up without any issue.
niyanju:
Mo nireti pe nkan yii ṣe iranlọwọ ati pe o le ni irọrun ni bayi Fix External Hard Drive Not Showing Up or Recognized, but if you still have any questions regarding this tutorial then feel free to ask them in the comment’s section.
![Ṣe atunṣe MSVCR120.dll ti nsọnu ni Windows 10 [O DARA]](https://lbsite.org/wp-content/uploads/2023/02/Fix-MSVCR120.dll-is-missing-in-Windows-10.png "Ṣe atunṣe MSVCR120.dll ti nsọnu ni Windows 10 [O DARA]")
![Koodu Aṣiṣe Ile itaja Windows 0x8000ffff [O yanju]](https://lbsite.org/wp-content/uploads/2023/01/1675194729_Fix-Windows-Store-Error-Code-0x8000ffff.png "Koodu Aṣiṣe Ile itaja Windows 0x8000ffff [O yanju]")