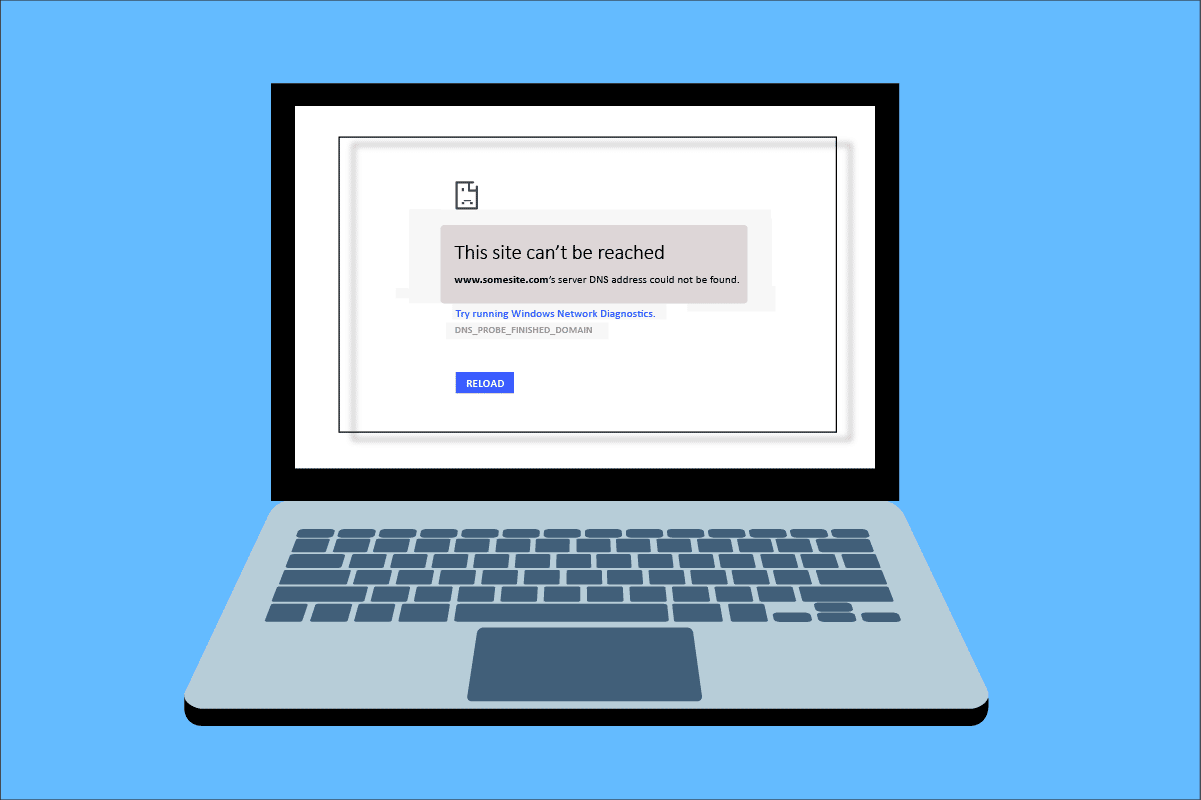
While surfing internet in your browser, you may face Server IP address could not be found error. This is a common issue for the Google Chrome users. We bring to you a helpful guide that will fix server IP address could not be found error on Windows 10. So, continue reading!
How to Fix Server IP Address Could Not be Found on Windows 10
One of the most popular web browser is Google Chrome. However if you are facing the error while browsing in the Chrome browser, then do not worry! This issue may be caused due to various reasons like;
- Aiduro Asopọ Ayelujara
- Corrupt Browser Cache and Cookies
- Incorrect IP Address
- Corrupt DNS Cache
- Outdated Network Drivers
Here, we have listed all possible methods to fix the said issue on Windows 10.
Method 1: Troubleshoot Network Adapter
The said issue may occur due to your network error. You can run the network adapter troubleshooter to fix any errors with your network adapter. Read our guide to troubleshoot network connectivity on Windows 10.

Ọna 2: Ko kaṣe ẹrọ aṣawakiri kuro
The cache files in your web browser may get corrupt. You can try to clear the cache and cookies of your browser and try to check if the error still persists or not. Follow these steps to clear browser cache.
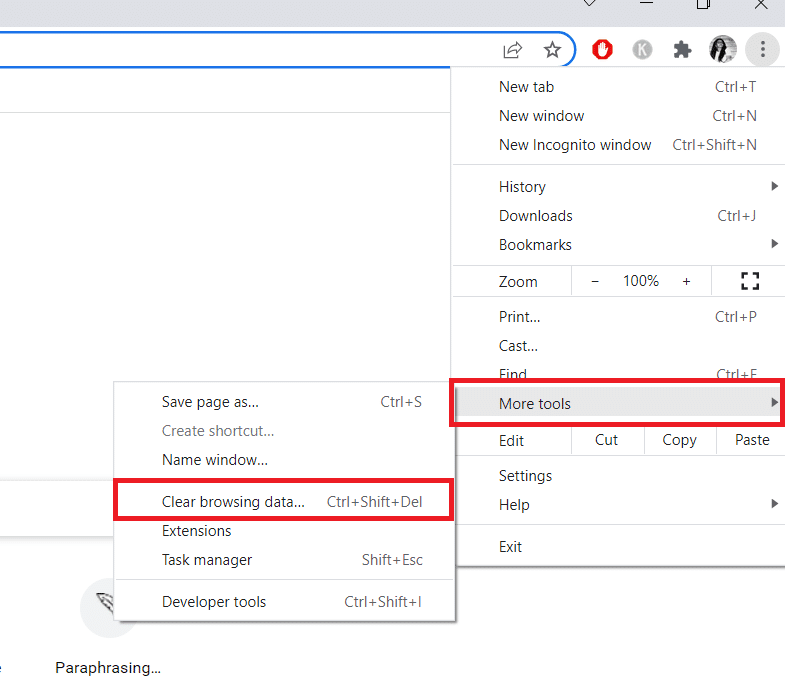
1. Lọlẹ awọn Chrome browser from Windows search bar as shown.

2. Bayi, tẹ lori awọn aami aami mẹta ni igun apa ọtun.
3. Nibi, tẹ lori awọn Awọn irinṣẹ diẹ sii aṣayan.
4. Next, tẹ lori awọn Ko lilọ kiri ayelujara kuro data… aṣayan.
akiyesi: O le tẹ Chrome: // eto / clearBrowserData in the search bar to launch the browser history page directly.
5. Nibi, yan awọn Akoko ibiti in the next window. Check the boxes marked:
- Awọn kuki ati data Aaye miiran ati
- Awọn aworan ti o fipamọ ati awọn faili.
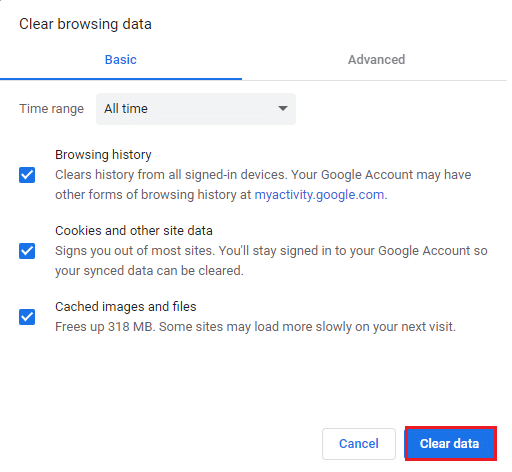
6. Níkẹyìn, tẹ lori Nu data kuro.
Tun Ka: Fix This Plugin is Not Supported error in Chrome
Method 3: Clear DNS Cache
You can try to clear the DNS cache to fix server IP address could not be found error. Follow our guide to flush and reset the DNS cache in Windows 10.
Method 4: Release and Renew IP Address
Here are the steps to release and renew the IP address.
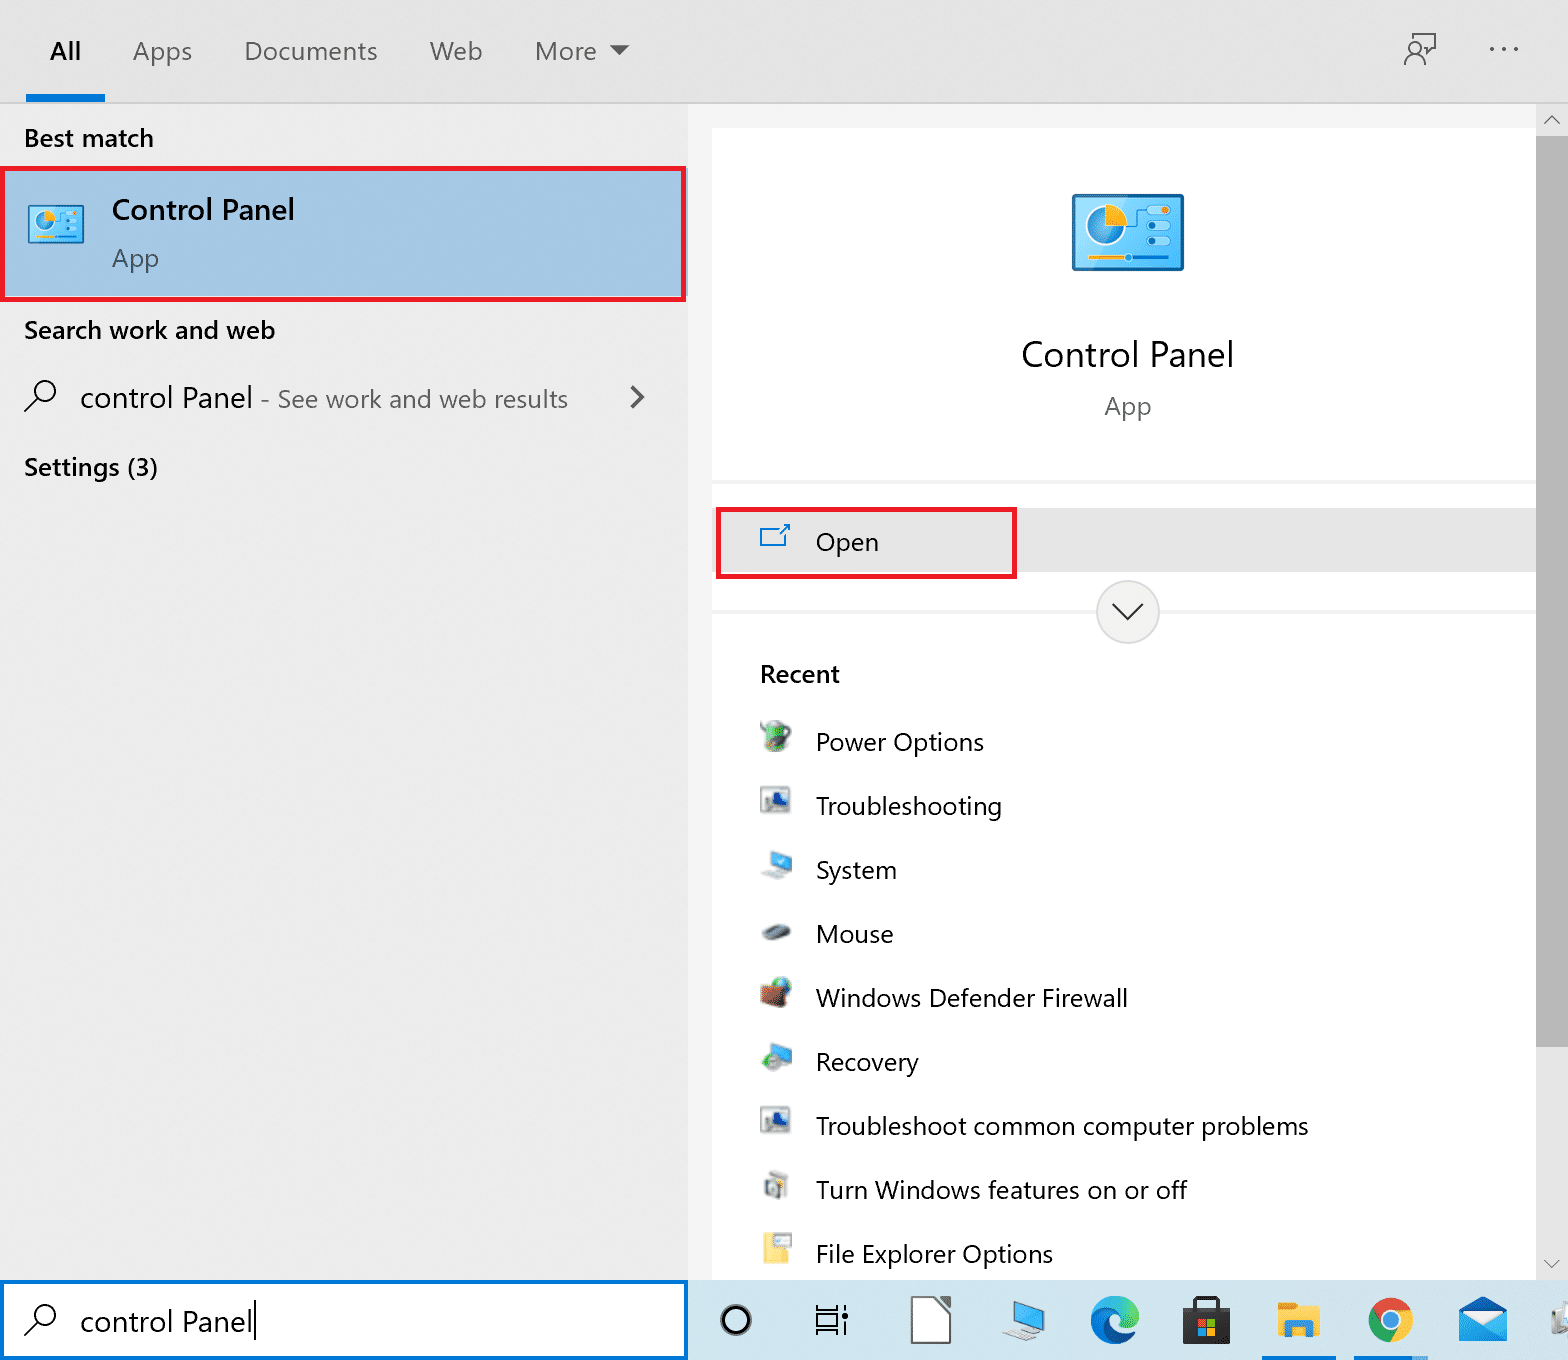
1. Lu awọn Bọtini Windows, tẹ Òfin Tọ, ki o tẹ lori Ṣiṣe bi olutọju.

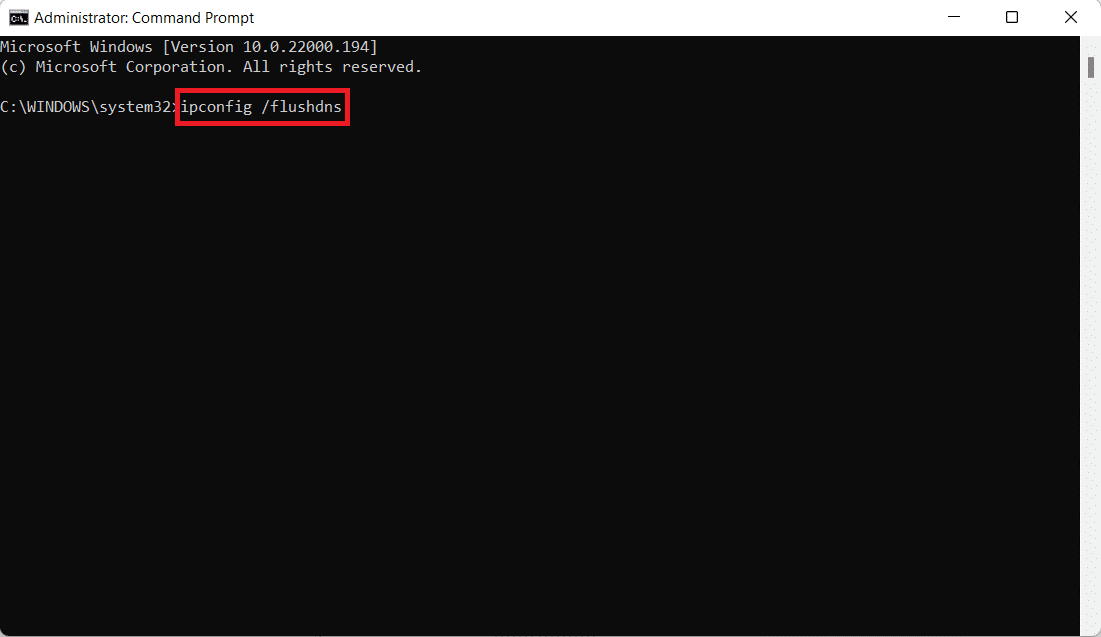
2. Firstly you should flush the DNS cache as shown in ọna 2.
3. Once the above process is complete, type ipconfig / tu silẹ ki o tẹ bọtini naa Tẹ bọtini.

4. Lẹhinna, tẹ ipconfig / tunse ati ki o lu Tẹ to renew your IP.

Tun Ka: Fix No WiFi Networks Found in Windows 10
Method 5: Change DNS Address
Incorrect DNS address also cause this said Chrome error. You can change your DNS address to fix the error. Follow the given steps to change DNS address.
1. Tẹ awọn Bọtini Windows, tẹ Ibi iwaju alabujuto o si tẹ lori Open.
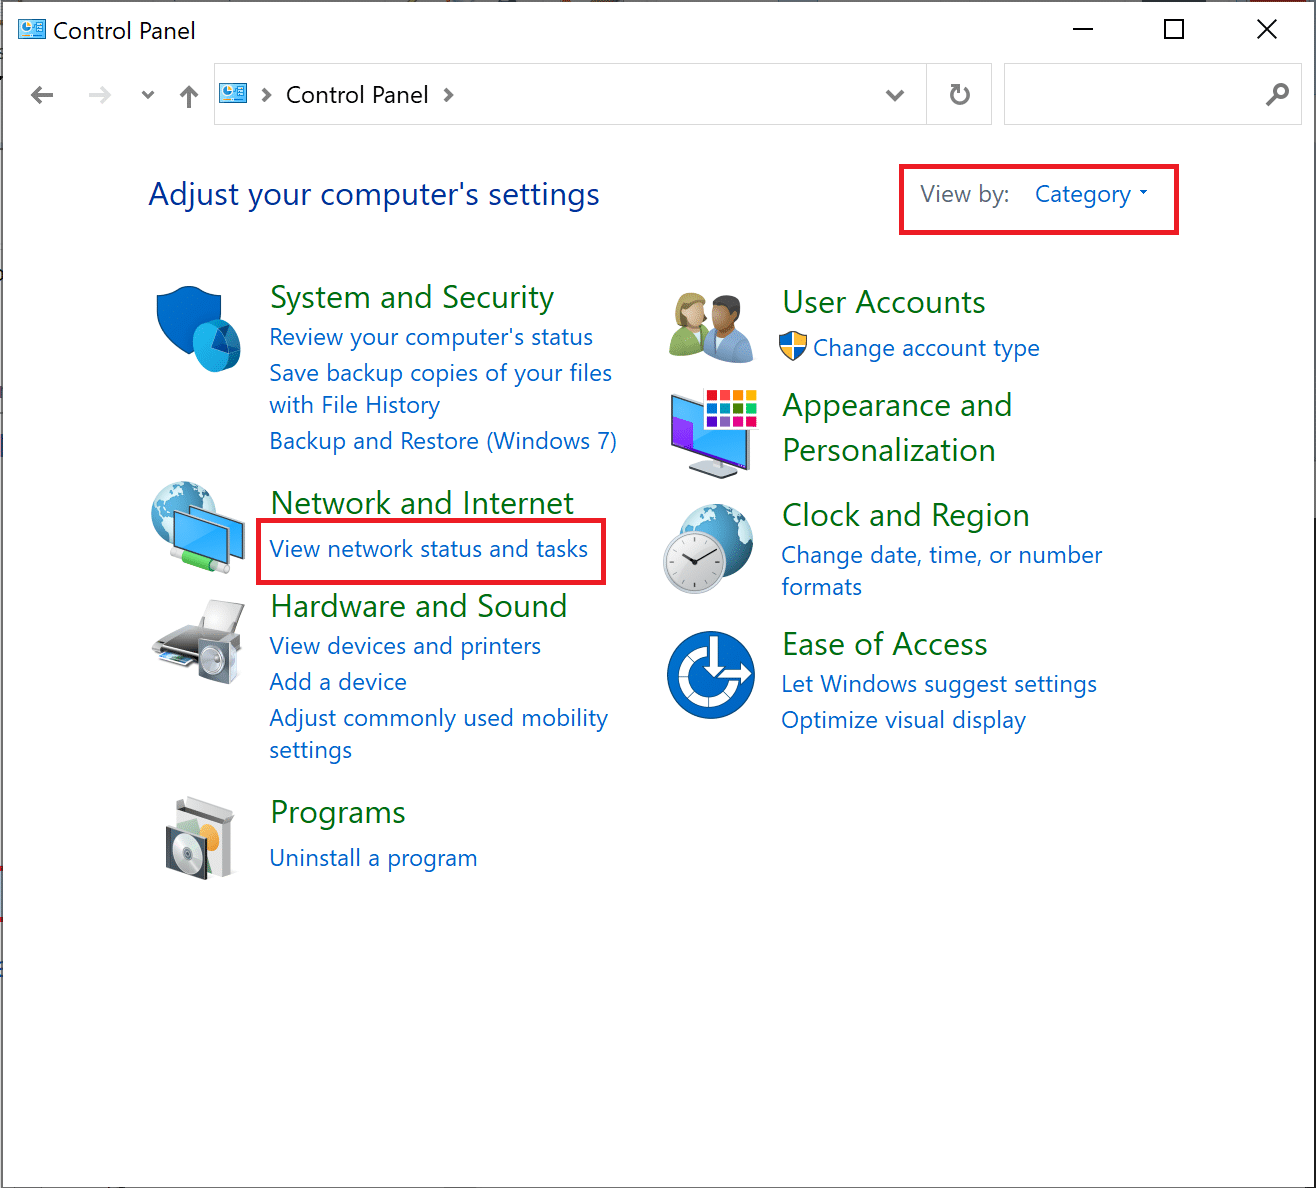
2. Ṣeto Wo nipasẹ > Ẹka o si tẹ lori Wo ipo nẹtiwọọki ati awọn iṣẹ ṣiṣe.
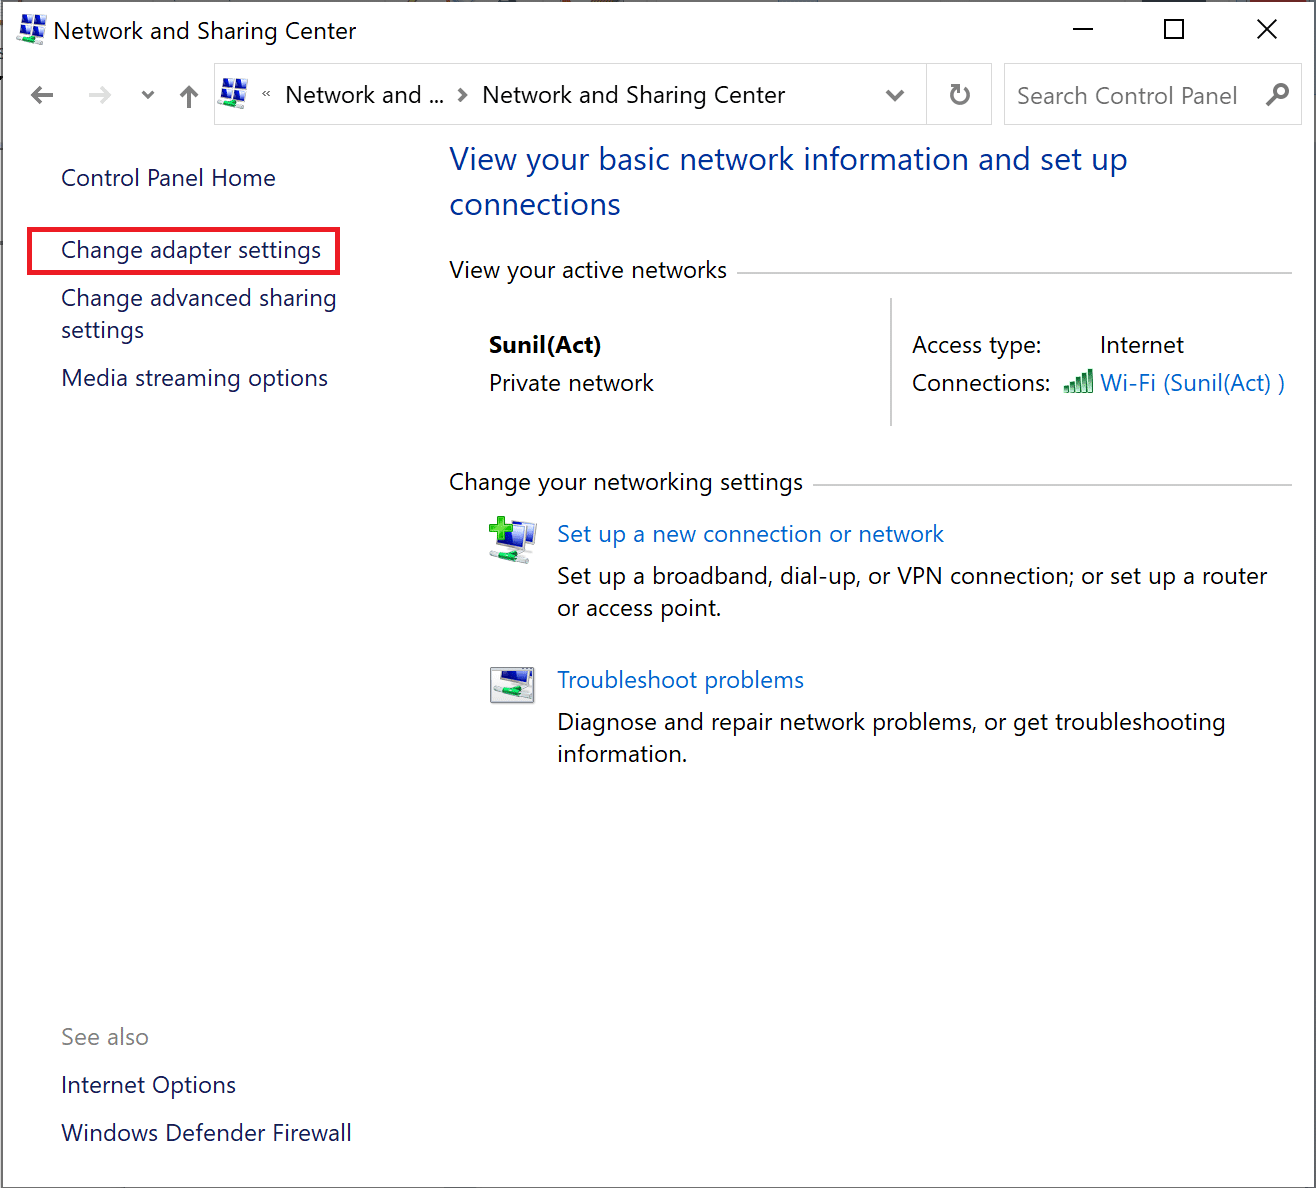
3. Bayi, tẹ lori awọn Yi eto iṣeto pada option at the left sidebar.
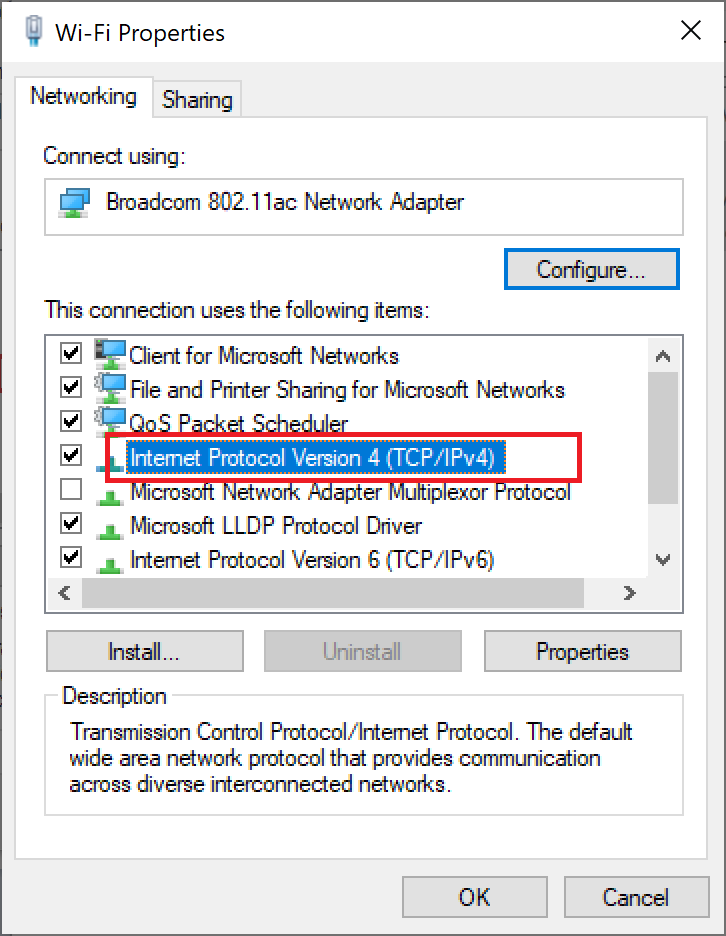
4. Next, right-click on your currently active internet connection and select Properties, bi afihan.
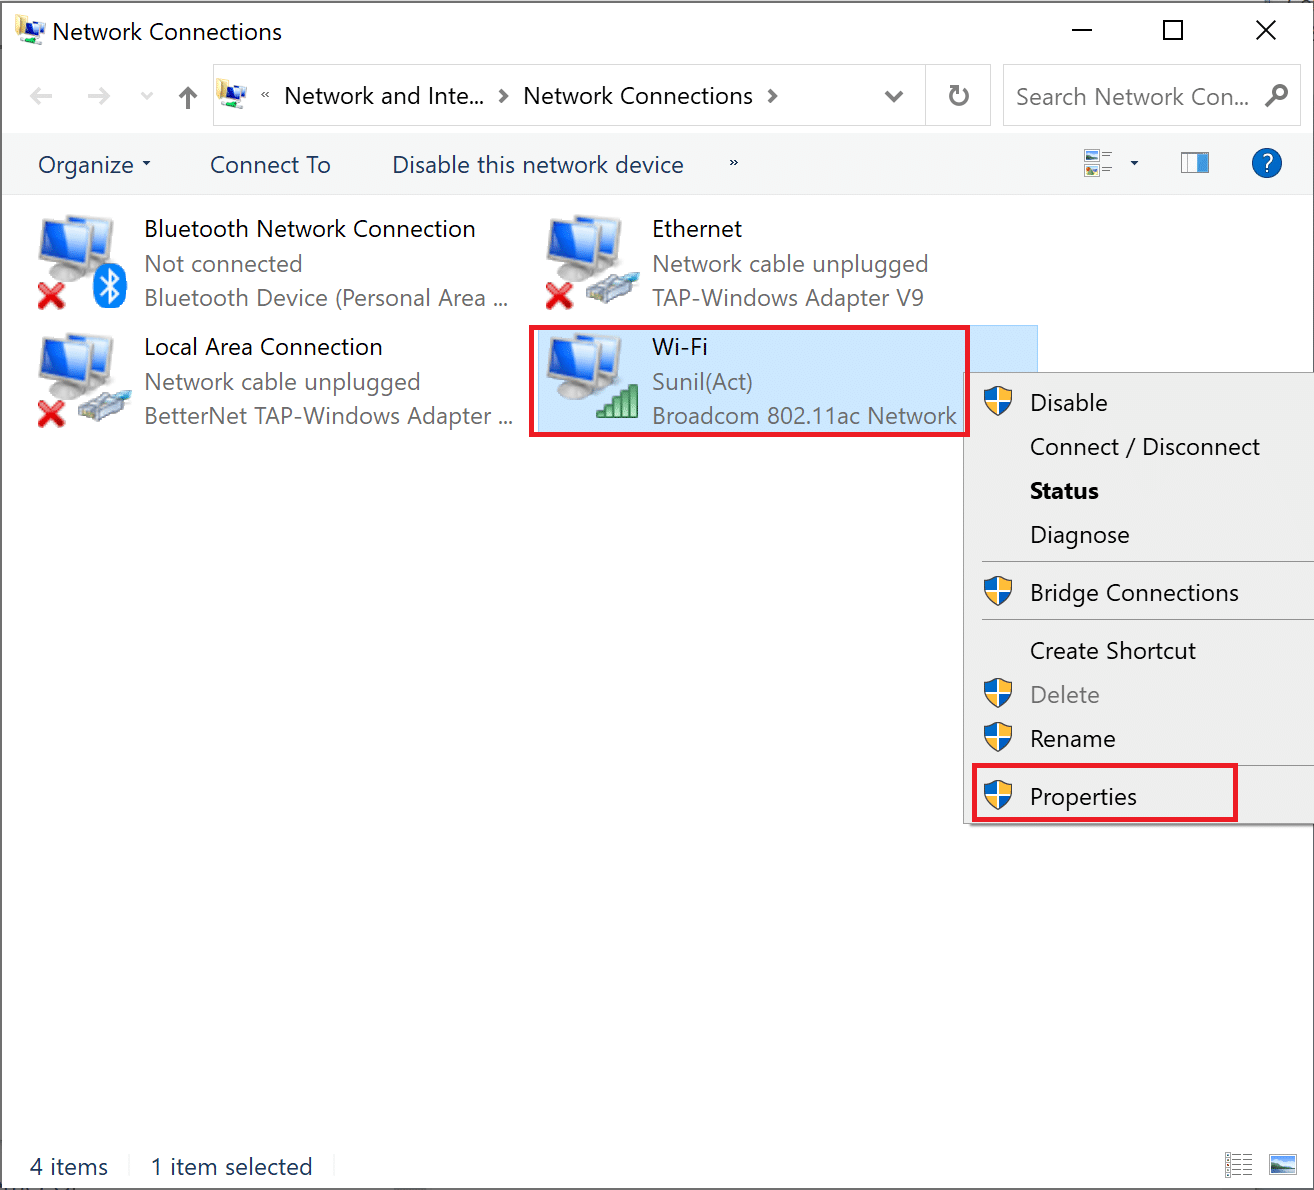
5. In the Properties window, double-click on Atilẹyin Ilana Ayelujara ti 4 (TCP / IPv4).
6. Next, check the options titled Gba adiresi IP kan laifọwọyi ati Lo awọn adirẹsi olupin DNS wọnyi, bi afihan.
6a. For the Preferred DNS server, enter the Google Public DNS address as: 8.8.8.8
6b. And, In the Omiiran olupin DNS, enter the other Google Public DNS as: 8.8.4.4
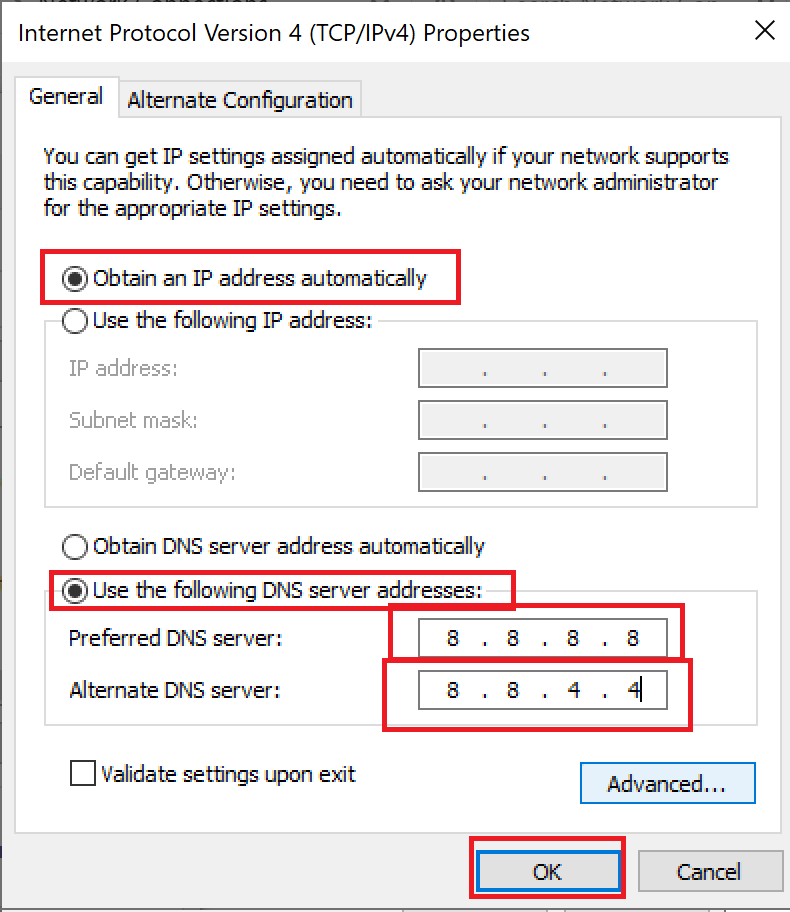
7. Ni ikẹhin, tẹ lori OK to save the changes and atunbere PC.
Method 6: Restart DNS Cache
You can follow these steps to restart DNS cache.
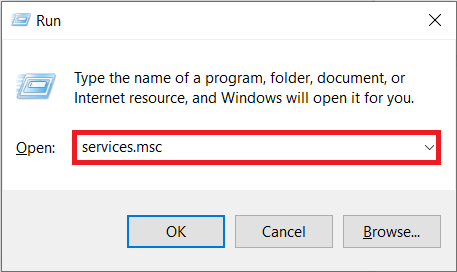
1. Tẹ awọn Awọn bọtini Windows + R papo lati ṣii Run apoti ibanisọrọ.
2. Then type services.msc ki o tẹ bọtini naa Tẹ bọtini lati ṣii awọn iṣẹ window.
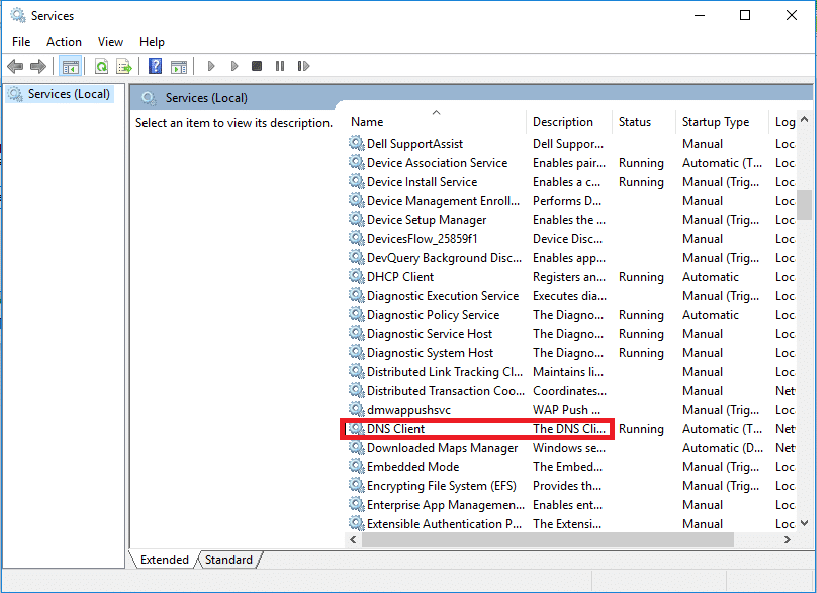
3. Right-click on Onibara DNS ki o si yan Tun bẹrẹ.
akiyesi: If you find no restart option and unable to restart it from this method, you do not need to worry. You just need to open an elevated Command Prompt on your system.
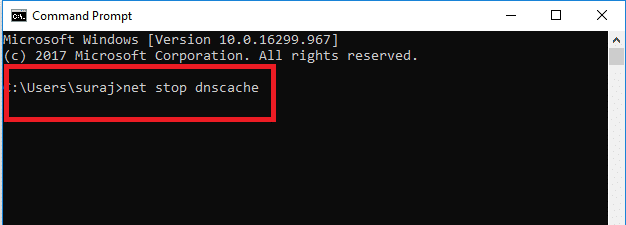
4. Tẹ awọn wọnyi pipaṣẹ ki o tẹ bọtini naa Tẹ bọtini.
apapọ Duro dnscache
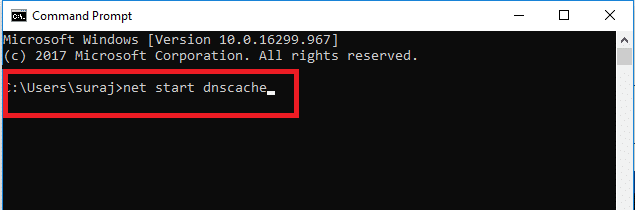
5. To start it again, type the given pipaṣẹ ki o si lu Tẹ bọtini.
net ibere dnscache
Tun Ka: Bii o ṣe le tun awọn eto Nẹtiwọọki pada lori Windows 10
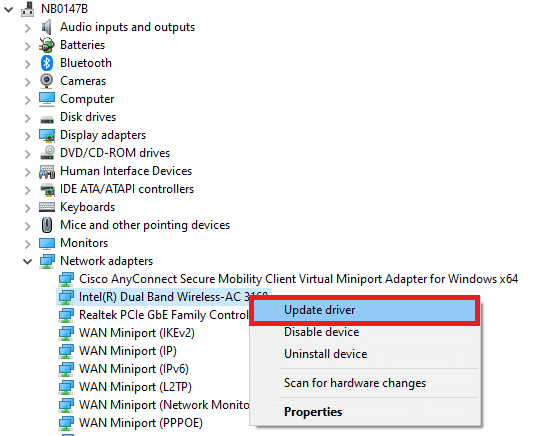
Method 7: Update Network Driver
Outdated network drive also can cause server IP address could not be found error. If you do not have the latest driver versions installed, then this may create bugs and can result in the unstable network connection. So, updating your network driver is necessary for a good network connection. Read our guide to update network drivers on Windows 10.
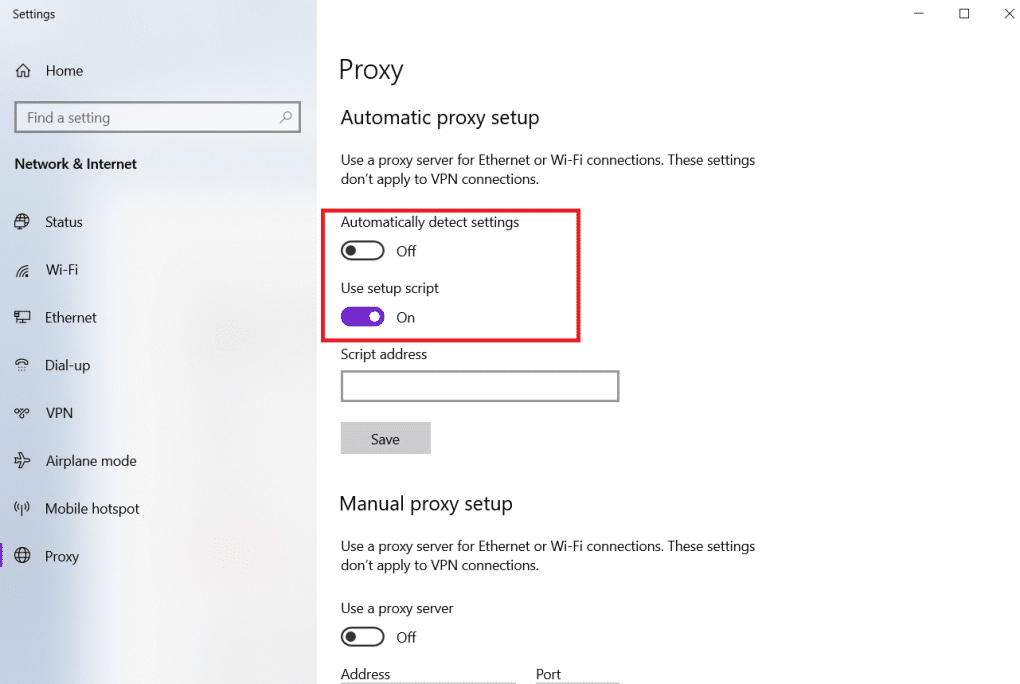
Method 8: Verify Proxy Settings
If you are using a proxy server, then using a particular proxy can create issues with your internet. You can change your proxy server to solve this problem. Follow the steps listed below to verify proxy settings.
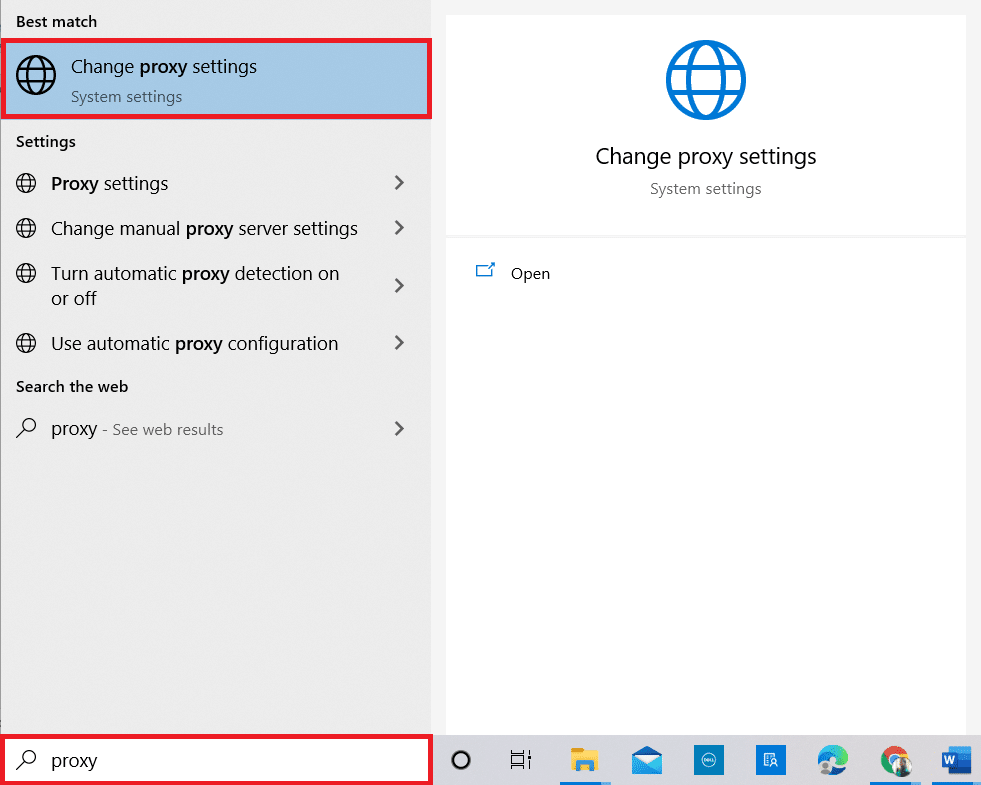
1. Lu awọn Windows key ati tẹ aṣoju o si tẹ lori Yi awọn eto aṣoju pada lati awọn abajade wiwa.
2. Here, switch on the toggle for Ṣawari laifọwọyi ri awọn eto.
niyanju:
We hope that you learned how to fix server IP address could not be found on Windows 10. Feel free to reach out to us with your queries and suggestions via the comments section below. Let us know what you want to learn about next.

