Process and Compressed Memory is a Windows 10 feature responsible for memory compression (also referred to as RAM compression and memory compression). This feature basically utilizes data compression to reduce the size or number of paging request to and from the auxiliary storage. In short, this feature is designed to take less amount of disk space and memory but in this case the System and Compressed Memory process start using 100% Disk and Memory, causing the affected PC to become slow.

In Windows 10, a compressions store is added to the concept of Memory Manager, which is an in-memory collection of compressed pages. So whenever the memory starts to fill up, the System and Compressed Memory process will compress the unused pages instead of writing them to the disk. The benefit of this is the amount of memory used per process is reduced, which allows Windows 10 to maintain more programs or apps in physical memory.
The problem appears to be incorrect Virtual Memory settings. Someone changed the paging file size from automatic to a particular value, virus or malware, Google Chrome or Skype, corrupt system files etc. So without wasting any time let’s see how to actually Fix 100% Disk Usage by System and Compressed Memory with the help of below-listed troubleshooting guide.
[SOLVED] 100% Disk Usage by System and Compressed Memory
Rii daju lati ṣẹda aaye imupadabọ, o kan ni ọran ti nkan kan ba jẹ aṣiṣe.
Ọna 1: Tunṣe Awọn faili eto ibajẹ
1. Open Command Tọ. Olumulo le ṣe igbesẹ yii nipa wiwa fun 'cmd' ati ki o tẹ Tẹ.

2. Bayi tẹ awọn wọnyi ni cmd ki o si tẹ tẹ:
Sfc / scannow sfc / scannow /offbootdir=c: /offwindir=c:windows (Ti oke ba kuna lẹhinna gbiyanju eyi)
![SFC scan now command prompt | [SOLVED] 100% Disk Usage by System and Compressed Memory](https://lbsite.org/wp-content/uploads/2023/01/SFC-scan-now-command-prompt.png)
3. Duro fun awọn loke ilana lati pari ati ni kete ti ṣe, tun rẹ PC.
4. Tun ṣii cmd ki o tẹ aṣẹ wọnyi ki o tẹ tẹ lẹhin ọkọọkan:
Dism / Online / Aworan-fọọmu / CheckHealth Dism / Online / Aworan-fọọmu / ScanHealth Dism / Online / Aworan-fọto / Mu padaHealth

5. Jẹ ki aṣẹ DISM ṣiṣẹ ati duro fun o lati pari.
6. Ti aṣẹ ti o wa loke ko ba ṣiṣẹ lẹhinna gbiyanju lori isalẹ:
Dism / Aworan: C: offline / Cleanup-Image / Mu padaHealth / Orisun: c: testmountwindows Dism / Online / Cleanup-Image / RestoreHealth / Orisun: c: testmountwindows /LimitAccess
akiyesi: Rọpo C:RepairSourceWindows pẹlu orisun atunṣe rẹ (Fifi sori ẹrọ Windows tabi Disiki Imularada).
7. Atunbere rẹ PC lati fi awọn ayipada ati ki o wo ti o ba ti o ba ni anfani lati Fix 100% Disk Usage by System and Compressed Memory Issue.
Method 2: Set Correct Paging File Size
1. Tẹ Windows Key + R lẹhinna tẹ sysdm.cpl ki o lu Tẹ lati ṣii System Properties.

2. Yipada si awọn Ti ni ilọsiwaju taabu ati ki o si tẹ lori Eto labẹ Performance.

3. Again switch to the Advanced tab and click Change under Virtual Memory.

4. Checkmark “Laifọwọyi ṣakoso faili faili paging fun gbogbo awọn awakọ."
![Checkmark Automatically manage paging file size for all drives | [SOLVED] 100% Disk Usage by System and Compressed Memory](https://lbsite.org/wp-content/uploads/2023/02/Checkmark-Automatically-manage-paging-file-size-for-all-drives.png)
5. Click OK, then click Apply followed by OK.
6. Select Yes to Restart your PC to save changes.
Ọna 3: Mu Ibẹrẹ Yara ṣiṣẹ
1. Tẹ Windows Key + R lẹhinna tẹ iṣakoso ki o tẹ Tẹ lati ṣii Ibi iwaju alabujuto.

2. Tẹ lori Ohun elo ati Ohun ki o si tẹ lori Awọn aṣayan Agbara.

3. Nigbana ni, lati osi window PAN yan "Yan ohun ti awọn bọtini agbara ṣe."

4. Bayi tẹ lori "Yi awọn eto pada ti o wa ni bayi ko si."

5. Yọ kuro "Ṣiṣe ibẹrẹ ni kiakia”Ki o tẹ Fipamọ awọn ayipada.
![Uncheck Turn on fast startup | [SOLVED] 100% Disk Usage by System and Compressed Memory](https://lbsite.org/wp-content/uploads/2023/01/Uncheck-Turn-on-fast-startup.png)
6. Restart your PC and see if you’re able to Fix 100% Disk Usage by System and Compressed Memory Issue.
Method 4: Disable Superfetch Service
1. Tẹ Windows Key + R lẹhinna tẹ services.msc ki o si tẹ Tẹ.

2. Wa Super gba service from the list then right-click on it and select Awọn ohun-ini.

3. Under Service status, if the service is running, click on Duro.
4. Now, from the Ibẹrẹ type drop-down select Alaabo.

5. Tẹ Waye, atẹle nipa O dara.
6. Atunbere PC rẹ lati fi awọn ayipada pamọ.
If the above method doesn’t disable Superfetch services then you can follow disable Superfetch using Registry:
1. Tẹ Windows Key + R lẹhinna tẹ regedit ki o si tẹ Tẹ lati ṣii Olootu Iforukọsilẹ.

2. Lilö kiri si bọtini iforukọsilẹ atẹle:
HKEY_LOCAL_MACHINESYSTEMCurrentControlSetControlSession ManagerMemory ManagementPrefetchParameters
3. Make sure you have selected Awọn ipele tẹlẹ lẹhinna ni ọtun window tẹ lẹmeji lori Mu ṣiṣẹSuperfetch bọtini ati change it’s value to 0 in the Value data field.

4. Click OK and close the Registry Editor.
5. Tun rẹ PC lati fi awọn ayipada ati ki o wo ti o ba ti o ba ni anfani lati Fix 100% Disk Usage by System and Compressed Memory Issue.
Method 5: Adjust your PC for Best Performance
1. Tẹ Windows Key + R lẹhinna tẹ sysdm.cpl ki o lu Tẹ lati ṣii System Properties.
2. Yipada si awọn To ti ni ilọsiwaju taabu ati lẹhinna tẹ lori Eto labẹ Išẹ.
3. Under Visual Effects checkmark “Satunṣe fun iṣẹ ti o dara julọ".

4. Tẹ Waye, atẹle nipa O dara.
5. Reboot your PC and see if you’re able to Fix 100% Disk Usage by System and Compressed Memory Issue.
Method 6: Kill the Speech Runtime Executable Process
1. Tẹ Konturolu + yi lọ yi bọ + Esc lati ṣe ifilọlẹ Oluṣakoso Iṣẹ-ṣiṣe.
2. Nínú Awọn ilana taabu, ri Speech Runtime Executable.
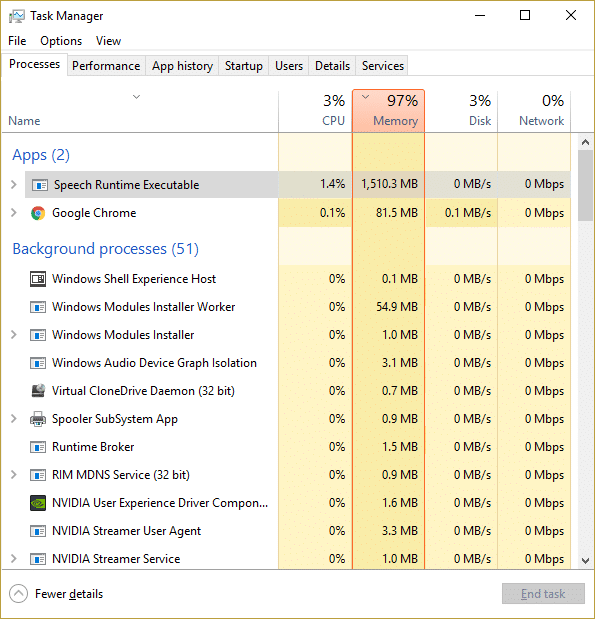
3. Tẹ-ọtun lori rẹ ki o yan Muu ṣiṣe.
Ọna 7: Ṣiṣe CCleaner ati Malwarebytes
1. Gbaa lati ayelujara ati fi sori ẹrọ CCleaner & Malwarebytes.
2. Ṣiṣe Malwarebytes ki o jẹ ki o ṣayẹwo ẹrọ rẹ fun awọn faili ipalara. Ti a ba rii malware, yoo yọ wọn kuro laifọwọyi.

3. Bayi ṣiṣe CCleaner ati ki o yan Aṣa mimọ.
4. Labẹ Aṣa Mọ, yan awọn Windows taabu ati ki o ṣayẹwo awọn aiyipada ki o tẹ itupalẹ.
![Select Custom Clean then checkmark default in Windows tab | [SOLVED] 100% Disk Usage by System and Compressed Memory](https://lbsite.org/wp-content/uploads/2023/01/Select-Custom-Clean-then-checkmark-default-in-Windows-tab.png)
5. Ni kete ti Itupalẹ ti pari, rii daju pe o ni idaniloju lati yọ awọn faili kuro lati paarẹ.

6. Lakotan, tẹ lori Ṣiṣe Isenkanjade bọtini ati ki o jẹ ki CCleaner ṣiṣe awọn oniwe-papa.
7. Lati siwaju nu eto rẹ, yan taabu iforukọsilẹ, ati rii daju pe a ṣayẹwo atẹle naa:

8. Tẹ lori Ṣayẹwo fun Awọn ọrọ bọtini ati ki o gba CCleaner lati ọlọjẹ, ki o si tẹ lori awọn Ṣe atunṣe Awọn ọran ti a yan Bọtini.
![Once scan for issues is completed click on Fix selected Issues | [SOLVED] 100% Disk Usage by System and Compressed Memory](https://lbsite.org/wp-content/uploads/2023/01/Once-scan-for-issues-is-completed-click-on-Fix-selected-Issues.png)
9. Nigbati CCleaner beere “Ṣe o fẹ awọn iyipada afẹyinti si iforukọsilẹ?" yan Bẹẹni.
10. Lọgan ti rẹ afẹyinti ti pari, tẹ lori awọn Ṣe atunṣe Gbogbo Awọn ọran ti a yan Bọtini.
11. Tun PC rẹ bẹrẹ lati fi awọn ayipada pamọ.
Method 8: Change configuration of Google Chrome and Skype
Fun Google Chrome: Navigate to the following under Chrome: Settings > Show Advanced Settings > Privacy > Use a prediction service to load pages more quickly. Disable the toggle next to “Use a prediction service to load pages.”

Change configuration For Skype
1. Make sure you have exited Skype, if not end task from Task Manager for Skype.
2. Press Windows Key + R then type the following and click OK:
C:Program Files (x86)SkypePhone
3. Tẹ-ọtun lori skype.exe ki o si yan Awọn ohun-ini.

4. Yipada si Aabo taabu ki o si tẹ Ṣatunkọ.

5. Yan ALL APPLICATION PACKAGES under Group or user names then checkmark Write labẹ Gba laaye.

6. Click Apply, followed by OK and see if you’re able to Fix 100% Disk Usage by System and Compressed Memory Issue.
Method 9: Set Correct Permission for System and Compressed Memory Process
1. Tẹ Windows Key + R lẹhinna tẹ Taskschd.msc and hit Enter to open Task Scheduler.

2. Lilö kiri si ọna atẹle:
Task Scheduler Library > Microsoft > Windows > MemoryDiagnostic
![Double click on ProcessMemoryDiagnostic Events | [SOLVED] 100% Disk Usage by System and Compressed Memory](https://lbsite.org/wp-content/uploads/2023/02/Double-click-on-ProcessMemoryDiagnostic-Events.png)
3. Double tẹ lori ProcessMemoryDiagnostic Events ati ki o si tẹ Yipada Olumulo tabi Ẹgbẹ under Security Options.

4. Tẹ To ti ni ilọsiwaju ati ki o si tẹ Find Now.

5. Yan tirẹ Oluṣakoso IT from the list then click OK.

6. Lẹẹkansi tẹ Dara to add your administrator account.
7. Checkmark Ṣiṣe pẹlu awọn anfani to ga julọ ati lẹhinna tẹ O DARA.

8. Follow the same steps for RunFullMemoryDiagnostic and close everything.
9. Atunbere PC rẹ lati fi awọn ayipada pamọ.
Method 10: Disable System and Compressed Memory Process
1. Tẹ Windows Key + R lẹhinna tẹ Taskschd.msc ki o lu Tẹ lati ṣii Oluṣeto Iṣẹ.
2. Lilö kiri si ọna atẹle:
Task Scheduler Library > Microsoft > Windows > MemoryDiagnostic
3. Tẹ-ọtun lori RunFullMemoryDiagnostics ki o si yan Muu ṣiṣẹ.
![Right-click on RunFullMemoryDiagnostic and select Disable | [SOLVED] 100% Disk Usage by System and Compressed Memory](https://lbsite.org/wp-content/uploads/2023/02/Right-click-on-RunFullMemoryDiagnostic-and-select-Disable.png)
4. Close Task Scheduler and restart your PC.
niyanju:
Iyẹn ni o ni aṣeyọri Fix 100% Disk Usage by System and Compressed Memory ṣugbọn ti o ba tun ni awọn ibeere eyikeyi nipa ifiweranṣẹ yii lẹhinna lero ọfẹ lati beere lọwọ wọn ni apakan asọye.

