Process and Compressed Memory is a Windows 10 feature responsible for memory compression (also referred to as RAM compression and memory compression). This feature basically utilizes data compression to reduce the size or number of paging request to and from the auxiliary storage. In short, this feature is designed to take less amount of disk space and memory but in this case the System and Compressed Memory process start using 100% Disk and Memory, causing the affected PC to become slow.

In Windows 10, a compressions store is added to the concept of Memory Manager, which is an in-memory collection of compressed pages. So whenever the memory starts to fill up, the System and Compressed Memory process will compress the unused pages instead of writing them to the disk. The benefit of this is the amount of memory used per process is reduced, which allows Windows 10 to maintain more programs or apps in physical memory.
The problem appears to be incorrect Virtual Memory settings. Someone changed the paging file size from automatic to a particular value, virus or malware, Google Chrome or Skype, corrupt system files etc. So without wasting any time let’s see how to actually Fix 100% Disk Usage by System and Compressed Memory with the help of below-listed troubleshooting guide.
[SOLVED] 100% Disk Usage by System and Compressed Memory
确保创建一个还原点,以防出现问题。
方法1:修复损坏的系统文件
1. 打开命令提示符。用户可以通过搜索来执行此步骤 'Cmd的' 然后按Enter键。

2. 现在在 cmd 中输入以下内容并按 Enter 键:
Sfc /scannow sfc /scannow /offbootdir=c: /offwindir=c:windows (如果上述失败,请尝试这个)
![SFC scan now command prompt | [SOLVED] 100% Disk Usage by System and Compressed Memory](https://lbsite.org/wp-content/uploads/2023/01/SFC-scan-now-command-prompt.png)
3. 等待上述过程完成,完成后重新启动电脑。
4. 再次打开 cmd 并键入以下命令,并在每条命令后按 Enter 键:
Dism /Online /Cleanup-Image /CheckHealth Dism /Online /Cleanup-Image /ScanHealth Dism /Online /Cleanup-Image /RestoreHealth

5. 运行 DISM 命令并等待其完成。
6. 如果上述命令不起作用,请尝试以下命令:
Dism /Image:C:offline /Cleanup-Image /RestoreHealth /Source:c:testmountwindows Dism /Online /Cleanup-Image /RestoreHealth /Source:c:testmountwindows /LimitAccess
请注意: 将 C:RepairSourceWindows 替换为您的修复源(Windows 安装或恢复光盘)。
7. 重新启动您的电脑以保存更改并查看是否能够 Fix 100% Disk Usage by System and Compressed Memory Issue.
Method 2: Set Correct Paging File Size
1. 按 Windows 键 + R,然后输入 SYSDM.CPL 然后按Enter打开 系统属性。

2。 切换到 高级选项卡 然后点击 性能下的设置。

3. Again switch to the Advanced tab and click Change under Virtual Memory.

4. Checkmark “自动管理所有驱动器的页面文件大小。=
![Checkmark Automatically manage paging file size for all drives | [SOLVED] 100% Disk Usage by System and Compressed Memory](https://lbsite.org/wp-content/uploads/2023/02/Checkmark-Automatically-manage-paging-file-size-for-all-drives.png)
5. Click OK, then click Apply followed by OK.
6. Select Yes to Restart your PC to save changes.
方法3:禁用快速启动
1. 按 Windows 键 + R,然后输入 control 并按 Enter 键打开 控制面板。

2。 点击 硬件和声音 然后点击 电源选项.

3. 然后,从左侧窗格中选择 “选择电源按钮的功能。“

4。 现在点击 “更改当前不可用的设置。“

5. 取消选中“打开快速启动”,然后点击 保存更改。
![Uncheck Turn on fast startup | [SOLVED] 100% Disk Usage by System and Compressed Memory](https://lbsite.org/wp-content/uploads/2023/01/Uncheck-Turn-on-fast-startup.png)
6. Restart your PC and see if you’re able to Fix 100% Disk Usage by System and Compressed Memory Issue.
Method 4: Disable Superfetch Service
1. 按 Windows 键 + R,然后输入 SERVICES.MSC 并按Enter键。

2。 找 SuperFetch的 service from the list then right-click on it and select 属性。

3. Under Service status, if the service is running, click on 停止。
4. 现在,从 创业公司 type drop-down select 禁用。

5. 单击应用,然后单击 确定。
6. 重新启动电脑以保存更改。
If the above method doesn’t disable Superfetch services then you can follow disable Superfetch using Registry:
1. 按 Windows 键 + R,然后输入 注册表编辑器 并按 Enter 打开注册表编辑器。

2. 导航到以下注册表项:
HKEY_LOCAL_MACHINESYSTEMCurrentControlSetControlSession Manager内存管理PrefetchParameters
3. Make sure you have selected 预取参数 然后在右侧窗口中双击 启用超级提取 关键和 change it’s value to 0 in the Value data field.

4. Click OK and close the Registry Editor.
5. 重新启动电脑以保存更改并查看是否能够 Fix 100% Disk Usage by System and Compressed Memory Issue.
Method 5: Adjust your PC for Best Performance
1. 按 Windows 键 + R,然后输入 SYSDM.CPL 然后按Enter打开 系统属性。
2。 切换到 高级 标签,然后单击 个人设置 下 性能。
3. Under Visual Effects checkmark “调整为最佳性能“。

4. 单击应用,然后单击 确定。
5. Reboot your PC and see if you’re able to Fix 100% Disk Usage by System and Compressed Memory Issue.
Method 6: Kill the Speech Runtime Executable Process
1。 按 按Ctrl + Shift + Esc键 启动任务管理器。
2.在 进程选项卡, 找 Speech Runtime Executable.
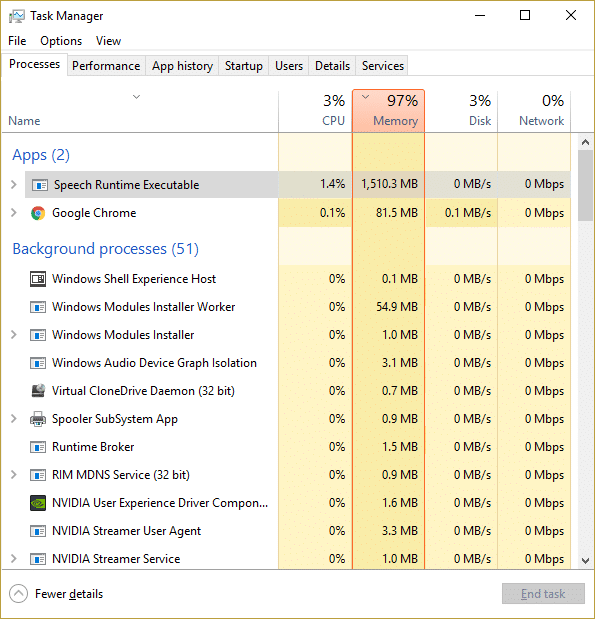
3. 右键单击它并选择 结束任务。
方法 7:运行 CCleaner 和 Malwarebytes
1。 下载并安装 CCleaner的 &恶意软件字节。
2. 运行恶意软件字节 并让它扫描您的系统是否有有害文件。如果发现恶意软件,它会自动删除它们。

3. 现在运行 CCleaner 并选择 定制清洁.
4. 在自定义清洁下,选择 窗口选项卡 并选中默认值并单击 分析.
![Select Custom Clean then checkmark default in Windows tab | [SOLVED] 100% Disk Usage by System and Compressed Memory](https://lbsite.org/wp-content/uploads/2023/01/Select-Custom-Clean-then-checkmark-default-in-Windows-tab.png)
5. 分析完成后,请确保您确定删除要删除的文件。

6.最后,点击 运行清洁器 按钮,让 CCleaner 继续运行。
7. 要进一步清理您的系统, 选择注册表选项卡,并确保检查以下内容:

8。 点击 检查问题 按钮并允许 CCleaner 扫描,然后单击 修复选定的问题 按钮。
![Once scan for issues is completed click on Fix selected Issues | [SOLVED] 100% Disk Usage by System and Compressed Memory](https://lbsite.org/wp-content/uploads/2023/01/Once-scan-for-issues-is-completed-click-on-Fix-selected-Issues.png)
9. 当CCleaner询问“您想要备份对注册表的更改吗?= 选择是.
10. 备份完成后,单击 修复所有选定的问题 按钮。
11. 重新启动电脑以保存更改。
Method 8: Change configuration of Google Chrome and Skype
对于Google Chrome: Navigate to the following under Chrome: Settings > Show Advanced Settings > Privacy > Use a prediction service to load pages more quickly. Disable the toggle next to “Use a prediction service to load pages.”

Change configuration For Skype
1. Make sure you have exited Skype, if not end task from Task Manager for Skype.
2. Press Windows Key + R then type the following and click OK:
C:Program Files (x86)SkypePhone
3。 右键单击 Skype.exe的 并选择 属性。

4.切换到 安全选项卡 并点击 编辑。

5。 选择 所有应用程序包 under Group or user names then checkmark Write 下 允许。

6. Click Apply, followed by OK and see if you’re able to Fix 100% Disk Usage by System and Compressed Memory Issue.
Method 9: Set Correct Permission for System and Compressed Memory Process
1. 按 Windows 键 + R,然后输入 Taskschd.msc and hit Enter to open Task Scheduler.

2. 导航到以下路径:
Task Scheduler Library > Microsoft > Windows > MemoryDiagnostic
![Double click on ProcessMemoryDiagnostic Events | [SOLVED] 100% Disk Usage by System and Compressed Memory](https://lbsite.org/wp-content/uploads/2023/02/Double-click-on-ProcessMemoryDiagnostic-Events.png)
3.双击 ProcessMemoryDiagnostic Events 依次 更改用户或组 under Security Options.

4。 点击 高级 依次 Find Now.

5.选择您的 管理员帐户 from the list then click OK.

6. 再来一次 单击确定 to add your administrator account.
7. Checkmark 用最高权限运行 然后单击确定。

8. Follow the same steps for RunFullMemoryDiagnostic and close everything.
9. 重新启动电脑以保存更改。
Method 10: Disable System and Compressed Memory Process
1. 按 Windows 键 + R,然后输入 Taskschd.msc 然后按Enter打开 任务调度程序。
2. 导航到以下路径:
Task Scheduler Library > Microsoft > Windows > MemoryDiagnostic
3。 右键单击 运行完整内存诊断 并选择 禁用。
![Right-click on RunFullMemoryDiagnostic and select Disable | [SOLVED] 100% Disk Usage by System and Compressed Memory](https://lbsite.org/wp-content/uploads/2023/02/Right-click-on-RunFullMemoryDiagnostic-and-select-Disable.png)
4. Close Task Scheduler and restart your PC.
推荐:
这样你就成功了 Fix 100% Disk Usage by System and Compressed Memory 但如果您对这篇文章仍有任何疑问,请随时在评论部分提问。

