አስተካክል የጀምር ሜኑ በዊንዶውስ 10 ላይ አይሰራም

If you have recently updated or upgraded to Windows 10, then chances are your Start Menu may not work properly, making it impossible for users to navigate around Windows 10. Users are experiencing various issues with Start Menu such as Start Menu does not open, Start Button is not working, or Start Menu freezes etc. If your Start Menu isn’t working then don’t worry as today we will see a way to fix this issue.
This exact cause is different for different users because each user has a different system configuration and environment. But the problem can be related to anything like corrupted user account or drivers, damaged system files, etc. So without wasting any time, let’s see How to Fix Start Menu Not Working in Windows 10 with the help of the below-listed tutorial.
የሆነ ችግር ከተፈጠረ ልክ የመልሶ ማግኛ ነጥብ መፍጠርዎን ያረጋግጡ።
To run Command Prompt as an administrator, press Ctrl + Shift + Esc to open Task Manager. Then click on ፋይል ከዚያ ይምረጡ አዲስ ተግባር ያከናውኑ. ይተይቡ Cmd.exe እና ምልክት አድርግ"ይህንን ተግባር በአስተዳደራዊ ልዩ መብቶች መፍጠር” then click OK. Similarly, to open PowerShell, type powershell.exe and again checkmark the above field then hit Enter.

ዘዴ 1: ዊንዶውስ ኤክስፕሎረር እንደገና ያስጀምሩ
1. ይጫኑ Ctrl + Shift + Esc ለማስጀመር ቁልፎች አንድ ላይ ሆነው የስራ አስተዳዳሪ.
2. አግኝ explorer.exe በዝርዝሩ ውስጥ ከዚያ በቀኝ-ጠቅ ያድርጉ እና ተግባርን ጨርስ የሚለውን ይምረጡ።

3. አሁን ይህ ኤክስፕሎረርን ይዘጋዋል እና እንደገና ለማስጀመር። ፋይል> አዲስ ተግባርን አሂድ የሚለውን ጠቅ ያድርጉ።
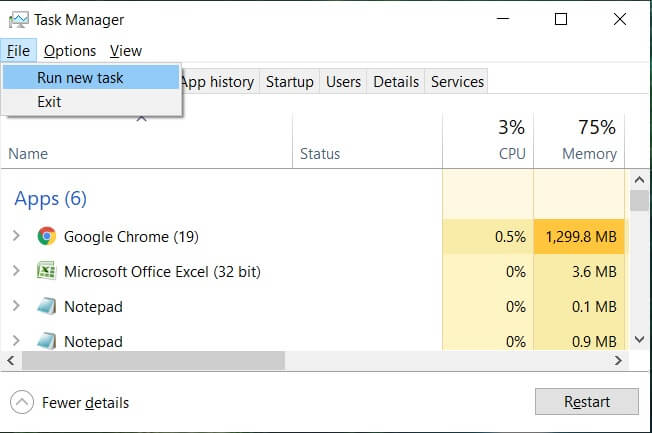
4. ይተይቡ explorer.exe እና ኤክስፕሎረርን እንደገና ለማስጀመር እሺን ይጫኑ።

5. Exit Task Manager and see if you’re able to Fix Start Menu Not Working in Windows 10.
6. If you’re still facing the issue, then log out from your account and re-login.
7. ይጫኑ Ctrl+Shift+Del key at the same time and click on Signout.
8. Type in your password to login to Windows and see if you’re able to fix the issue.
Method 2: Create a new local administrator account
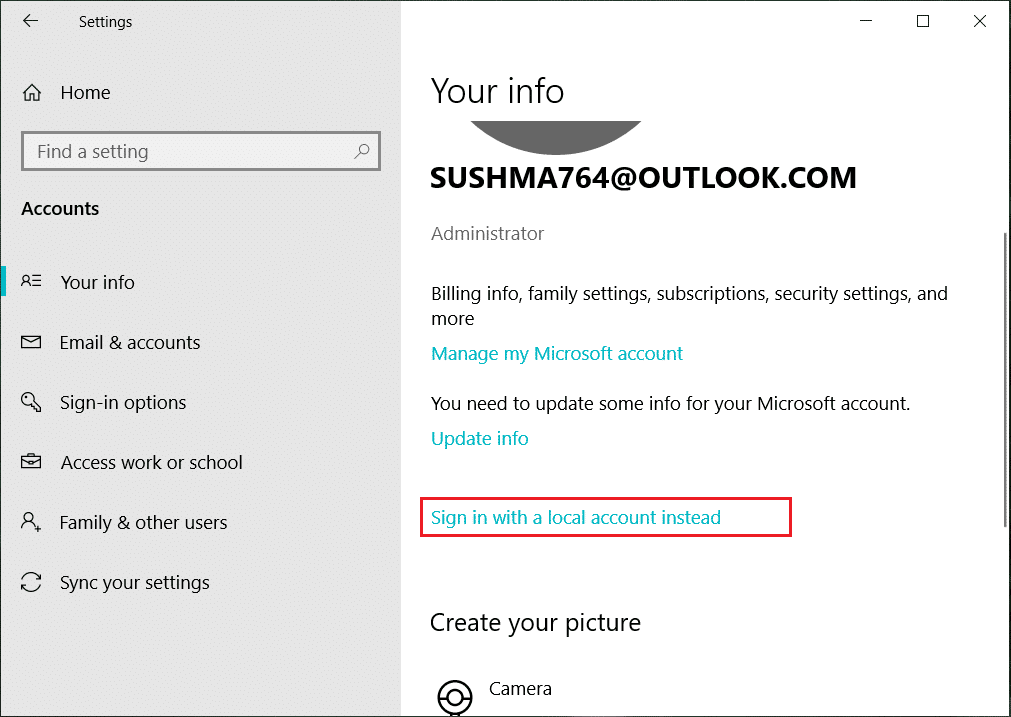
If you’re signed with your Microsoft account, then first remove the link to that account by:
1. ዊንዶውስ ቁልፍ + R ን ይጫኑ ከዚያም "" ብለው ይተይቡ.ms-settings:” (ያለ ጥቅሶች) እና አስገባን ይምቱ።
2. ይምረጡ Account > Sign in with a local account instead.
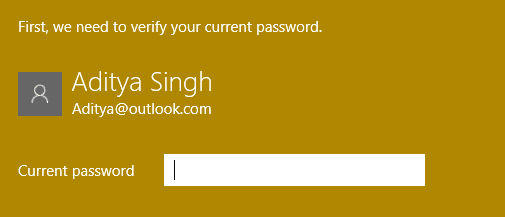
3. ይተይቡ በእርስዎ የ Microsoft መለያ ይለፍ ቃል እና ጠቅ ያድርጉ ቀጣይ.
4. አንድ ይምረጡ new account name and password, and then select Finish and sign out.
#1. Create the new administrator account:
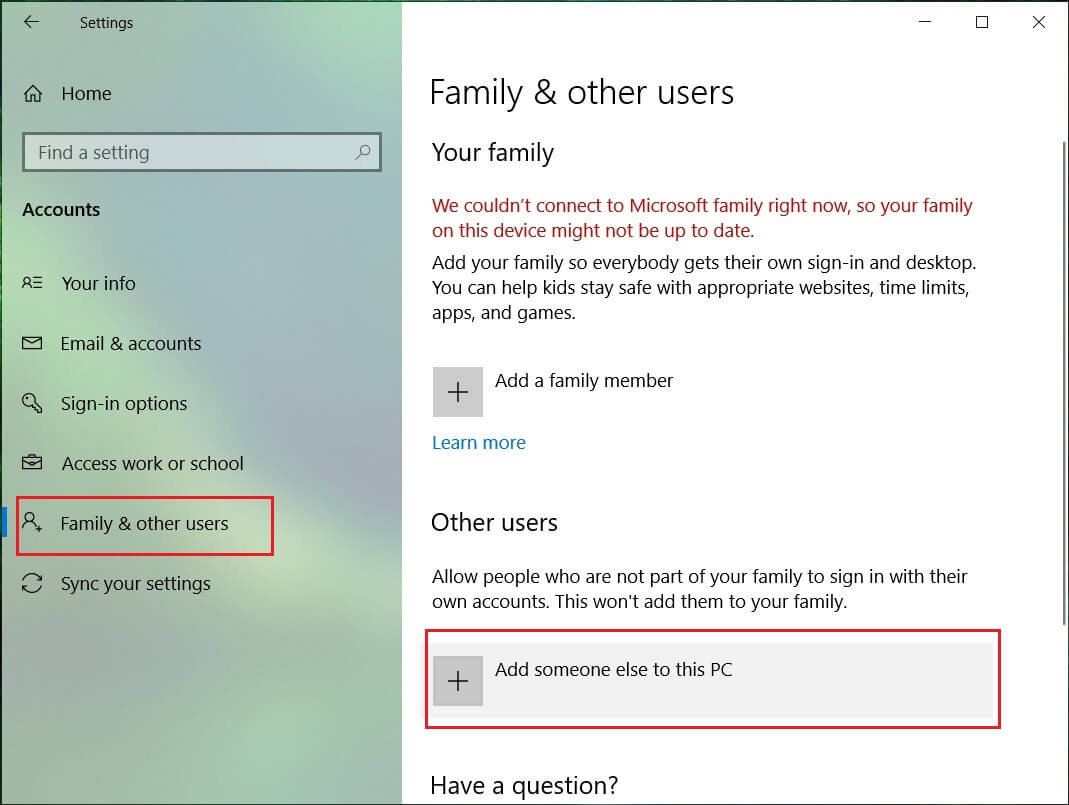
1. ቅንብሮችን ለመክፈት ዊንዶውስ ቁልፍ + Iን ይጫኑ እና ከዚያ ይንኩ። መለያዎች
2. ከዚያ ወደ ይሂዱ ቤተሰብ እና ሌሎች ሰዎች።
3. Under Other people click on “Add someone else to this PC."
4. Next, provide a name for the user and a password then select Next.
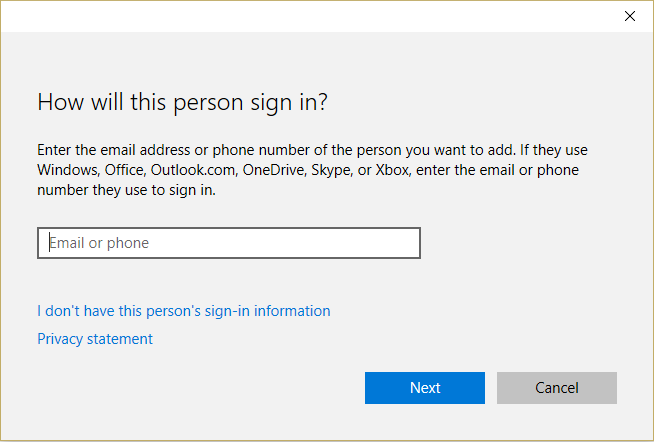
5. ያዋቅሩ የተጠቃሚ ስም እና የይለፍ ቃል, ከዚያ ይምረጡ ቀጣይ> ጨርስ
#2. Next, make the new account an administrator account:
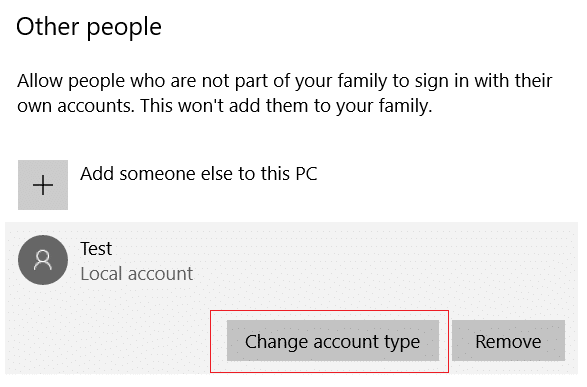
1. Again open የ Windows ቅንብሮች እና ጠቅ ያድርጉ መለያ.

2. ወደ ሂድ ቤተሰብ እና ሌሎች ሰዎች ትር.
3. Other people choose the account you just created and then selected a Change account type.
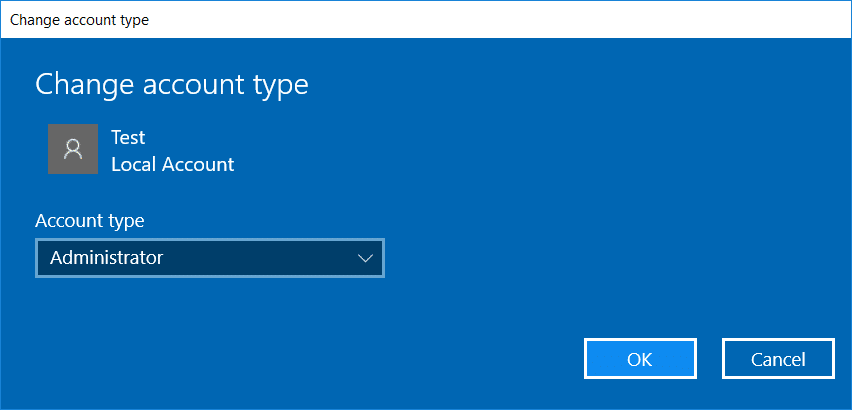
4. Under Account type, select አስተዳዳሪ ከዚያም የሚለውን ጠቅ ያድርጉ እሺ.
#3. If the issue persists try deleting the old administrator account:
1. Again go to Windows Settings then Account > Family & other people.
2. Under Other users, select the old administrator account, click አስወግድ፣ እና ይምረጡ Delete account and data.

3. If you were using a Microsoft account to sign in before, you can associate it with the new administrator by following the next step.
4. ውስጥ Windows Settings > Accounts, select Sign in with a Microsoft account instead and enter your account info.
Finally, you should be able to አስተካክል የጀምር ሜኑ በዊንዶውስ 10 ላይ አይሰራም as this step seems to fix the issue in most cases.
If you continue to experience Start Menu’s issue, it’s recommended to download and run Start Menu Troubleshooter.
1. Download and run Start Menu Troubleshooter.
2. በ ላይ ሁለቴ ጠቅ ያድርጉ የወረደ ፋይል ከዚያም ይህንን ይጫኑ ቀጣይ.
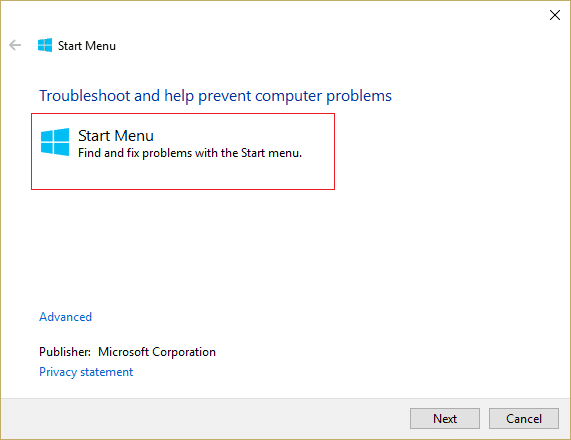
3. Let it finds and automatically Fixes Start Menu Not Working in Windows 10.
Method 4: Run System File Checker (SFC) and Check Disk
1. የትእዛዝ ጥያቄን ይክፈቱ። ተጠቃሚው በመፈለግ ይህንን እርምጃ ማከናወን ይችላል። 'cmd' እና ከዚያ Enter ን ይጫኑ.

2. አሁን የሚከተለውን በ cmd ውስጥ ያስገቡ እና አስገባን ይምቱ።
Sfc/scannow sfc /scannow /offbootdir=c፡ /offwindir=c:windows

3. ከላይ ያለው ሂደት እስኪጠናቀቅ ድረስ ይጠብቁ እና አንዴ ከጨረሱ በኋላ ፒሲዎን እንደገና ያስጀምሩ.
4. በመቀጠል CHKDSK ከ የፋይል ስርዓት ስህተቶችን በCheck Disk Utility(CHKDSK) ያስተካክሉ።
5. ከላይ ያለው ሂደት ይጠናቀቅ እና ለውጦቹን ለማስቀመጥ ፒሲዎን እንደገና ያስነሱት።
Method 5: Force Cortana to Rebuild Settings
Open Command Prompt with administrative rights then type the following one by one and hit Enter after each command:
CD /d "%LOCALAPPDATA%PackagesMicrosoft.Windows.Cortana_cw5n1h2txyewy"
Taskkill /F /IM SearchUI.exe
RD /S /Q Settings
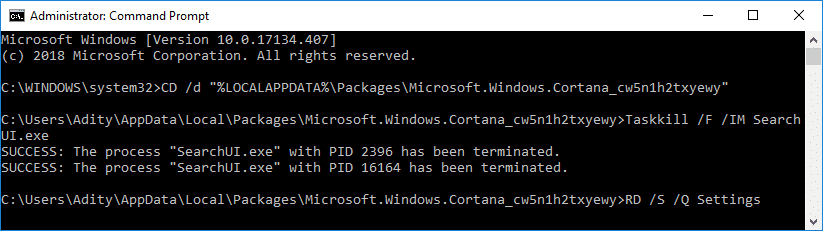
This will force Cortana to rebuild the settings and will Fix Start Menu and Cortana Not Working in Windows 10.
If the issue is still not resolved, follow this guide to fix any issues related to Cortana.
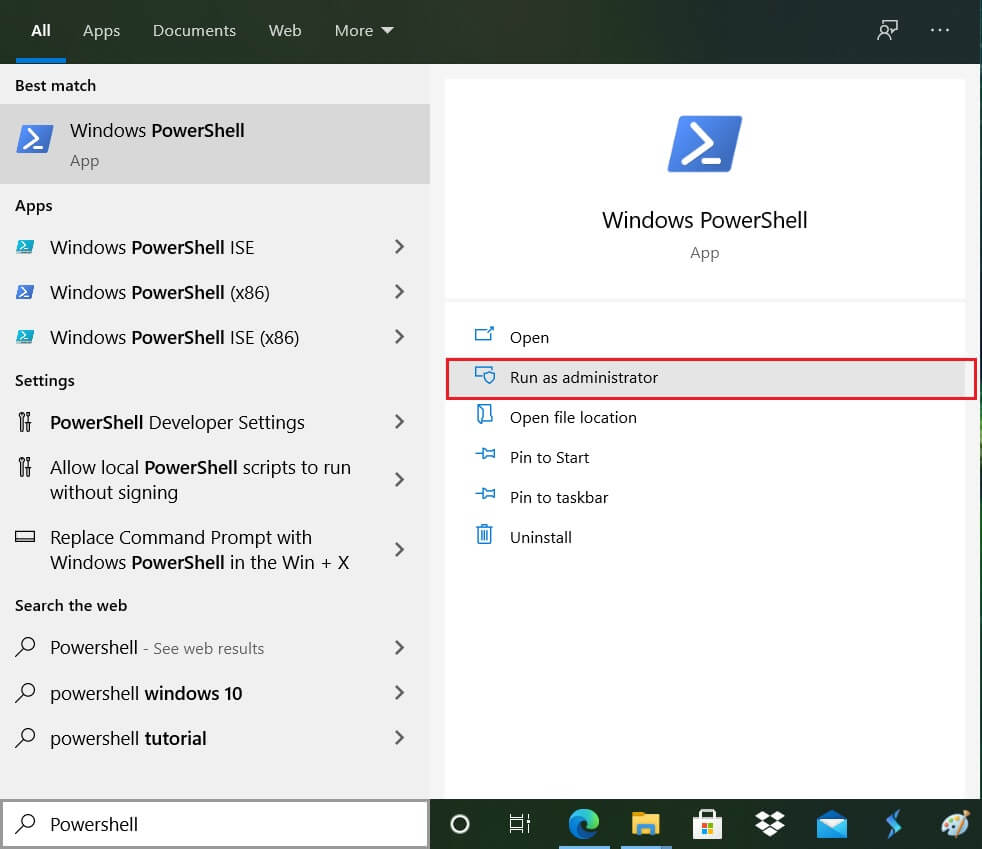
Method 6: Re-Register Windows App
1. ይተይቡ PowerShell በዊንዶውስ ፍለጋ ከዚያም በ PowerShell ላይ ቀኝ-ጠቅ ያድርጉ እና ይምረጡ እንደ አስተዳዳሪ አስኪድ.
2. አሁን የሚከተለውን ትዕዛዝ በPowerShell መስኮት ውስጥ ያስገቡ።
Get-AppX Packack-AllUsers Forward {Add-Appx Packack-DisableDevelopmentMode -Register "$ ($ _. InstallLocation) AppXManifest.xml"}

3. Powershell ከላይ ያለውን ትዕዛዝ እስኪፈጽም ድረስ ይጠብቁ እና ሊመጡ የሚችሉትን ጥቂት ስህተቶች ችላ ይበሉ.
4. ለውጦችን ለማስቀመጥ ፒሲዎን እንደገና ያስነሱ።
ዘዴ 7: Registry Fix
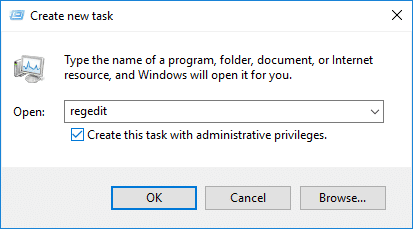
1. Press Ctrl + Shift + Esc to open Task Manager then click on ፋይል እና ይምረጡ አዲስ ተግባር ያሂዱ።
2. ይተይቡ ሒደት እና ምልክት አድርግ"ይህንን ተግባር በአስተዳደራዊ ልዩ መብቶች መፍጠር” ከዚያ እሺን ጠቅ ያድርጉ።
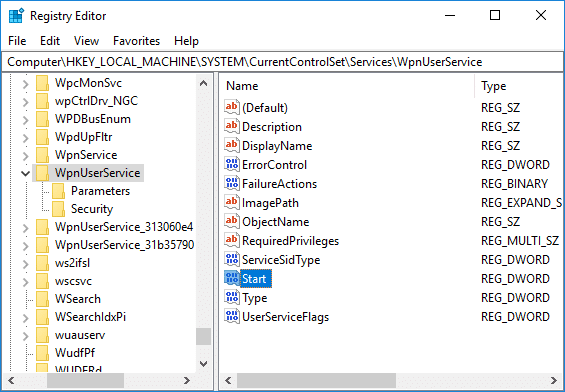
3. Now navigate to the following registry key in the Registry Editor:
ComputerHKEY_LOCAL_MACHINESYSTEMCurrentControlSetServicesWpnUserService
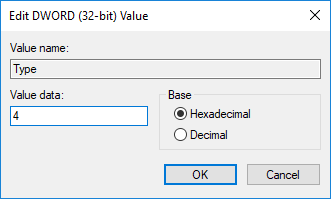
4. መምረጥዎን ያረጋግጡ WpnUserService then in the right window double-click on the DWORD ጀምር።
5. Change its value to 4 then click እሺ.
6. ለውጦችን ለማስቀመጥ ፒሲዎን እንደገና ያስነሱ።
ዘዴ 8: ዊንዶውስ 10ን ያድሱ ወይም እንደገና ያስጀምሩ
ማስታወሻ: If you can’t access your PC, restart your PC a few times until you start ራስ -ሰር ጥገና። ከዚያ ወደ ይሂዱ መላ መፈለግ > ይህን ፒሲ ዳግም አስጀምር > ሁሉንም ነገር አስወግድ።
1. መቼት ለመክፈት ዊንዶውስ ቁልፍ + Iን ይጫኑ እና ከዚያ ን ይጫኑ የዝማኔ እና የደህንነት አዶ።
![]()
2. በግራ በኩል ባለው ምናሌ ውስጥ ይምረጡ መልሶ ማግኘት.
3. በታች ይህን ፒሲ ዳግም አስጀምር, " ላይ ጠቅ ያድርጉአጅማመር"አዝራር.

4. ምርጫውን ይምረጡ የእኔን ፋይሎች ጠብቅ.

5. For the next step, you might be asked to insert Windows 10 installation media, so ensure you have it ready.
6. Now, select your Windows version and click ዊንዶውስ በተጫነበት ድራይቭ ላይ ብቻ > remove my files.

5. ላይ ጠቅ ያድርጉ ዳግም አስጀምር ቁልፍ
6. ዳግም ማስጀመርን ለማጠናቀቅ በማያ ገጹ ላይ ያሉትን መመሪያዎች ይከተሉ።
የሚመከር:
ያ ነው በተሳካ ሁኔታ ያለህ አስተካክል የጀምር ሜኑ በዊንዶውስ 10 ላይ አይሰራም ግን ይህንን ትምህርት በተመለከተ አሁንም ጥያቄዎች ካሉዎት በአስተያየቱ ክፍል ውስጥ ለመጠየቅ ነፃነት ይሰማዎ።