Fix Windows Modules Installer Worker High CPU Usage
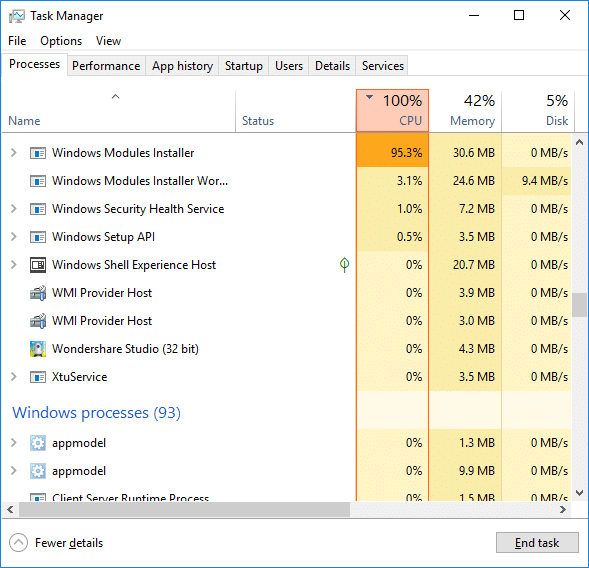
If you are facing the High CPU Usage by Windows Modules Installer Worker, then don’t worry as thousands of other users are also facing the similar problem and therefore, there are many working fixes which we will be discussing today in this article. To verify if you are facing this issue open Task Manager (Ctrl + Shift + Esc) and you will find that the Windows Modules Installer Worker is consuming High CPU or Disk Usage.

برو تلميح: You may leave your PC overnight or for a few hours to see the issue rectify itself once the Windows is finished downloading and installing updates.
What is Windows Modules Installer worker (WMIW)?
Windows Modules Installer worker (WMIW) is a service which takes cares of automatically installing Windows Update. According to its service description, WMIW is a system process that enables automatic installation, modification, and removal of Windows updates and optional components.
This process is responsible for finding new Windows Update automatically and installing them. As you might be aware that Windows 10 automatically install newer builds (i.e. 1803 etc.) via Windows Updates, so this process is responsible for installing these updates in the background.
Although this process is called Windows Modules Installer worker (WMIW) and you will see the same name in the Processes tab in the Task Manager, but if you switch to Details tab, then you will find the name of the file as TiWorker.exe.
Why Is Windows Modules Installer worker Using So Much CPU?
As Windows Modules Installer worker (TiWorker.exe) runs continuously in the background, sometimes it might utilize high CPU or disk usage when installing or uninstalling Windows Updates. But if its constantly using high CPU then the Windows Modules Installer worker may have become unresponsive while checking new updates. As a result, you may be experiencing lags, or your system might hang or freeze completely.
The first thing users do when they experience freezing, or lagging issues on their system is to restart their PC, but I assure you that this strategy won’t work in this case. This is because the issue will not resolve by itself until and unless you fix the underlying cause.
Fix Windows Modules Installer Worker High CPU Usage
تأكد من إنشاء نقطة استعادة في حالة حدوث خطأ ما.
Windows Modules Installer Worker (WMIW) is an important service, and it should not be disabled. WMIW or TiWorker.exe is not a virus or malware, and you cannot just delete this service from your PC. So without wasting any time let’s see How to Fix Windows Modules Installer Worker High CPU Usage بمساعدة دليل استكشاف الأخطاء وإصلاحها المدرج أدناه.
الطريقة الرابعة: تشغيل مستكشف أخطاء Windows Update ومصلحها
1. اضغط على مفتاح Windows + I لفتحه الإعدادات ثم انقر فوق أيقونة التحديث والأمان.
![]()
2. من القائمة اليمنى ، حدد استكشاف تحت "الحصول على ما يصل وتشغيلها"انقر فوق تحديث ويندوز.
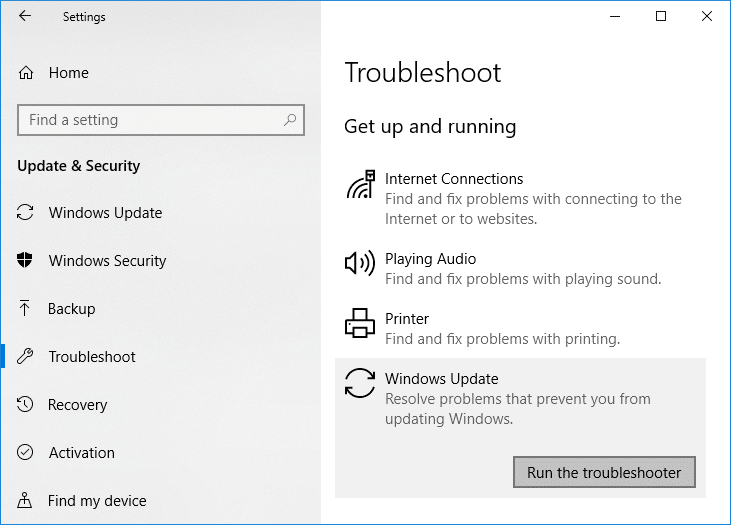
3. انقر الآن على "قم بتشغيل مستكشف الأخطاء ومصلحها"ضمن Windows Update.
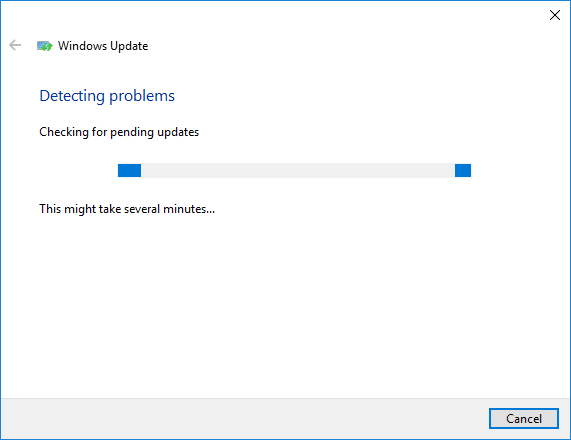
4. Let the troubleshooter run, and it will automatically fix any issues found with Windows Update taking forever.
Method 2: Manually Check for Windows Updates
1. اضغط على مفتاح Windows + I ثم حدد التحديث والأمان.
2. من الجانب الأيسر ، انقر فوق القائمة تحديث ويندوز.
3. الآن انقر فوق "التحقق من وجود تحديثات"للتحقق من وجود أي تحديثات متوفرة.

4. إذا كانت هناك أية تحديثات معلقة ، فانقر فوق قم بتنزيل وتثبيت التحديثات.

5. بمجرد تنزيل التحديثات ، قم بتثبيتها ، وسيصبح Windows الخاص بك محدثًا.
Method 3: Configure Windows Update to Manual
تنبيه: This method will switch Windows Update from automatically installing the new updates to the manual. This means you have to manually check for Windows Update (weekly or monthly) to keep your PC secure. But follow this method, and you can again set the Updates to Automatic once the issue is resolved.
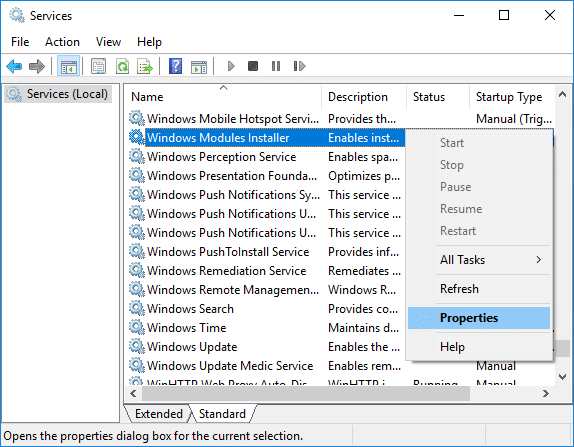
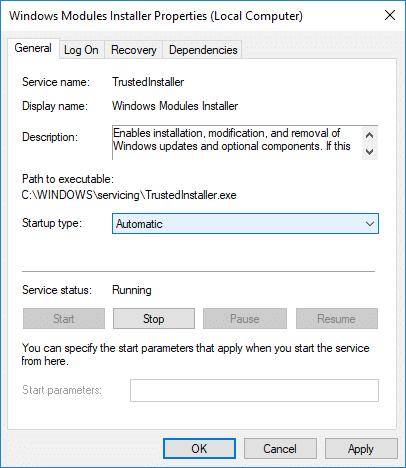
1.اضغط على مفتاح Windows + R ثم اكتب services.msc ثم اضغط على Enter.

2. Scroll down and find نوافذ مثبت الوحدات النمطية الخدمة في القائمة.
3. انقر بزر الماوس الأيمن ويندوز المثبت وحدات الخدمة وحدد خصائص.
4. الآن اضغط على قلة النوم then from the نوع بدء التشغيل حدد القائمة المنسدلة دليل.
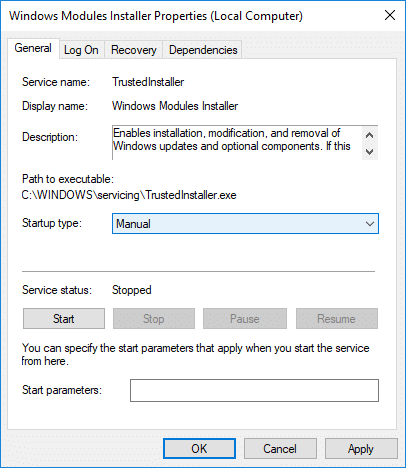
5. انقر فوق "تطبيق"، متبوعًا بـ حسنا.
6. Similarly, follow the same step for the خدمة Windows Update.
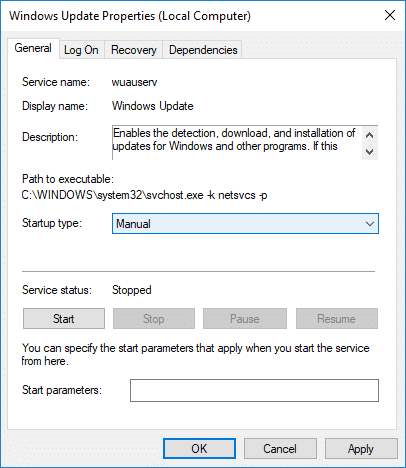
7. أعد تشغيل الكمبيوتر لحفظ التغييرات.
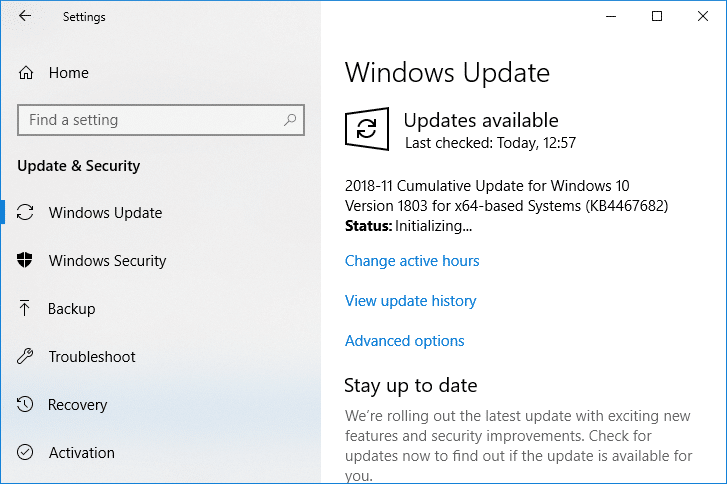
8. مرة أخرى تحقق من وجود Windows Updates Manually وتثبيت أي تحديثات معلقة.
9. Once is done, again go back to services.msc window and open the Windows Modules Installer & Windows Update Properties نافذة.
10. تعيين نوع بدء التشغيل إلى أوتوماتيك ثم انقر آبدأ. Then click Apply followed by OK.
11. أعد تشغيل الكمبيوتر لحفظ التغييرات.
الطريقة الرابعة: تشغيل مستكشف أخطاء صيانة النظام ومصلحها
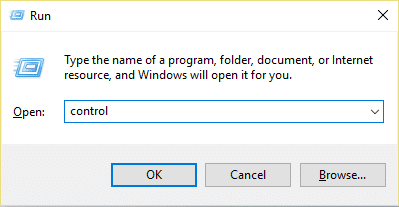
1. اضغط على مفتاح Windows + R ثم اكتب control واضغط على Enter للفتح لوحة التحكم.
2. ابحث عن استكشاف الأخطاء وإصلاحها وانقر فوق استكشاف الأخطاء وإصلاحها.

3. المقبل ، انقر فوق المزيد في الجزء الأيمن.
4. انقر على “System Maintenance” لتشغيل System Maintenance Troubleshooter.

5. قد يتمكن مستكشف الأخطاء ومصلحها من القيام بذلك Fix Windows Modules Installer Worker High CPU Usage, but if it didn’t, then you need to run System Performance Troubleshooter.
6. افتح موجه الأوامر. يمكن للمستخدم تنفيذ هذه الخطوة من خلال البحث عن "كمد" ثم اضغط على إنتر.

7. اكتب الأمر التالي في cmd واضغط على Enter:
msdt.exe / id PerformanceDiagnostic
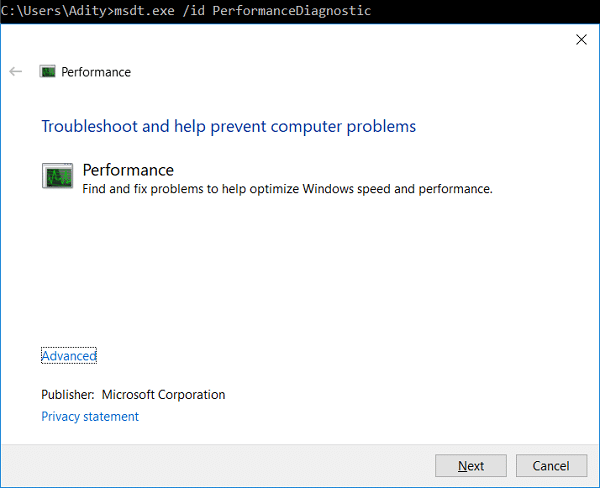
8. Follow the on-screen instruction to run the troubleshooter and fix any issues find the System.
9. Finally, exit the cmd and reboot your PC.
Method 5: Disable Automatic Maintenance
Sometimes Automatic Maintenance can conflict with the Windows Modules Installer Worker service, so try to disable Automatic Maintenance using this guide and see if this fixes your issue.
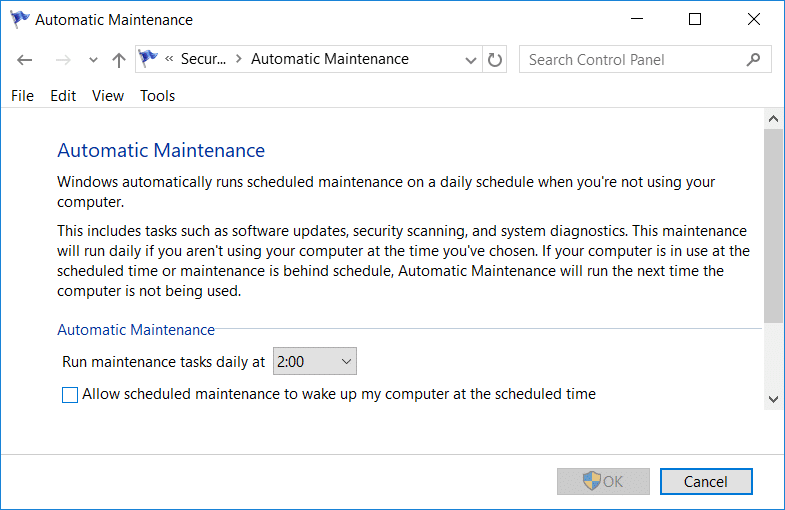
Although disabling Automatic Maintenance is not a good idea, but there might be some case where you need to actually disable it, for example, if your PC freezes during automatic maintenance or Windows Modules Installer Worker High CPU Usage issue then you should disable maintenance to troubleshoot the issue.
الطريقة الثالثة: تشغيل مدقق ملفات النظام و DISM
1. افتح موجه الأوامر. يمكن للمستخدم تنفيذ هذه الخطوة من خلال البحث عن "كمد" ثم اضغط على إنتر.
2- الآن اكتب ما يلي في cmd واضغط على Enter:
Sfc / scannow sfc / scannow / offbootdir = c: / offwindir = c: windows (إذا فشل أعلاه ، فجرب هذا)

3. انتظر حتى تنتهي العملية المذكورة أعلاه وبمجرد الانتهاء ، أعد تشغيل الكمبيوتر.
4. افتح cmd مرة أخرى واكتب الأمر التالي ثم اضغط على زر الإدخال بعد كل أمر:
التخلص / عبر الإنترنت / تنظيف الصورة / CheckHealth Dism / عبر الإنترنت / Cleanup-Image / ScanHealth Dism / Online / Cleanup-Image / RestoreHealth

5. دع الأمر DISM يعمل وانتظر حتى ينتهي.
6. إذا لم يعمل الأمر أعلاه ، فجرّب ما يلي:
Dism / Image: C: Offline / Cleanup-Image / RestoreHealth / المصدر: c: testmountwindows Dism / Online / Cleanup-Image / RestoreHealth / المصدر: c: testmountwindows / LimitAccess
ملحوظة: استبدل C: RepairSourceWindows بمصدر الإصلاح (تثبيت Windows أو قرص الاسترداد).
7. أعد تشغيل جهاز الكمبيوتر الخاص بك لحفظ التغييرات ومعرفة ما إذا كان بإمكانك القيام بذلك Fix Windows Modules Installer Worker High CPU Usage.
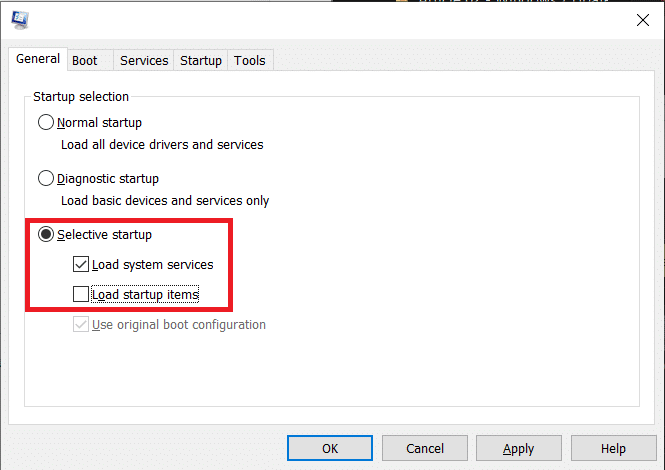
الطريقة الأولى: قم بإجراء تمهيد نظيف
Sometimes 3rd party software can conflict with Windows and can cause the issue. To Fix Windows Modules Installer Worker High CPU Usage issue، فأنت بحاجة إلى إجراء تمهيد نظيف على جهاز الكمبيوتر الخاص بك وتشخيص المشكلة خطوة بخطوة.
Method 8: Set your WiFi as Metered Connection
ملحوظة: This will stop Windows Automatic Update, and you will need to manually check for Updates.
1. اضغط على مفتاح Windows + I لفتحه الإعدادات ثم انقر فوق الشبكة والإنترنت.

2. من القائمة اليمنى ، حدد واي فاي.
3. Under Wi-Fi, انقر on your currently connected network (WiFi).
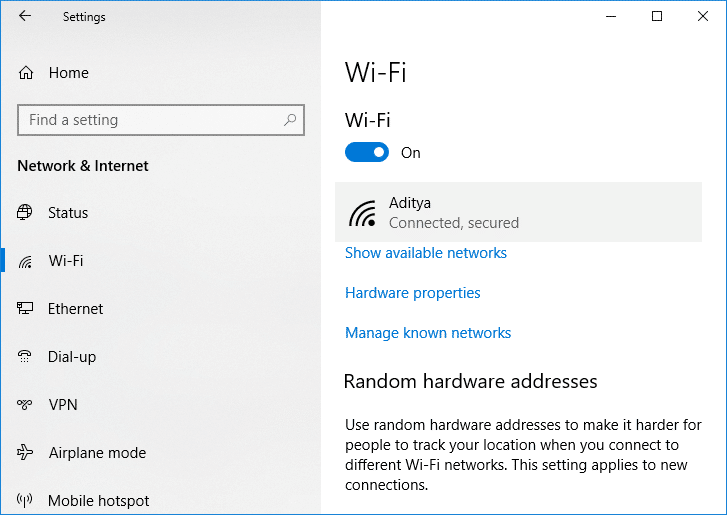
4. Scroll down to Metered connection and تمكين التبديل تحت "على النحو اتصال بعدادات".
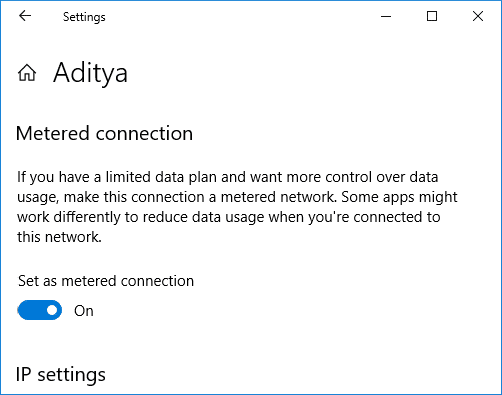
5. Close Settings and reboot your PC to save changes.
أوصى:
هذا كل شيء، لقد نجحت Fix Windows Modules Installer Worker High CPU Usage ولكن إذا كان لا يزال لديك أي استفسارات بخصوص هذا البرنامج التعليمي فلا تتردد في طرحها في قسم التعليقات.
