Windows 10 Saatını İnternet Saat Serveri ilə sinxronlaşdırın

Synchronize Windows 10 Clock with an Internet Time Server: If you have set the Clock in Windows 10 to automatically set time then you may be aware that the current time is synchronized with an Internet Time Server in order to update time. This means that the clock on your PC’s Taskbar or Windows Settings is updated at regular intervals to match the time on the time server which ensures that your clock has accurate time. You need to be connected to the internet for time to automatically synchronize with an Internet time server without which the time won’t be updated.
Now Windows 10 uses the Network Time Protocol (NTP) to connect with the Internet time servers in order to synchronize Windows Clock. If the time in Windows Clock is not accurate then you could face network issues, corrupted files, and incorrect timestamps in documents & important files. With Windows 10 you could easily change the time servers or can even add a custom time server when necessary.
So now you know it’s important for your Windows to display the correct time in order to ensure proper functioning of your PC. Without which certain applications and Windows services will start experiencing issues. So without wasting any time let’s see How to Synchronize Windows 10 Clock with an Internet Time Server with the help of the below-listed tutorial.
How to Synchronize Windows 10 Clock with an Internet Time Server
Bir şey səhv olarsa, bərpa nöqtəsi yaratdığınızdan əmin olun.
Method 1: Synchronize Windows 10 Clock with an Internet Time Server in Internet Time Settings
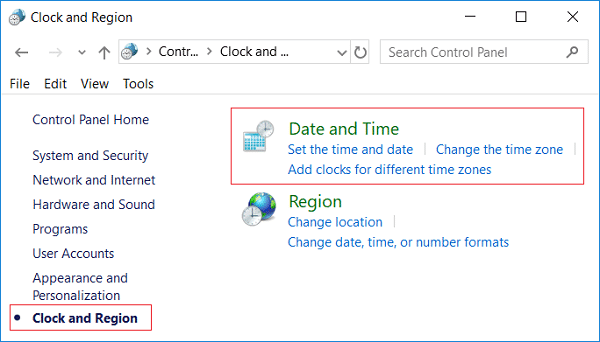
1.Növ nəzarət in Windows 10 Search then click on İdarəetmə Paneli axtarış nəticəsindən.

2. İndi " üzərinə klikləyinSaat, Dil və Bölgə” sonra “ klikləyinTarix və Saat".
3.Under Date and Time window click “Tarixi və saatı dəyişdirin".
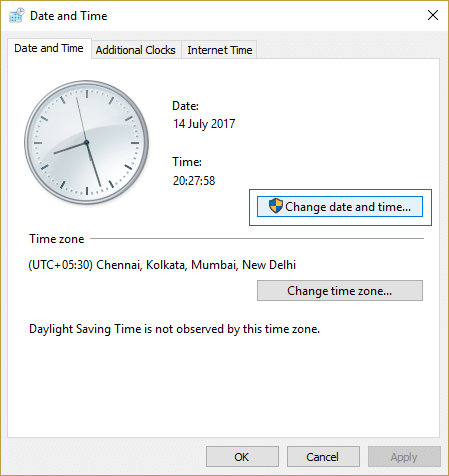
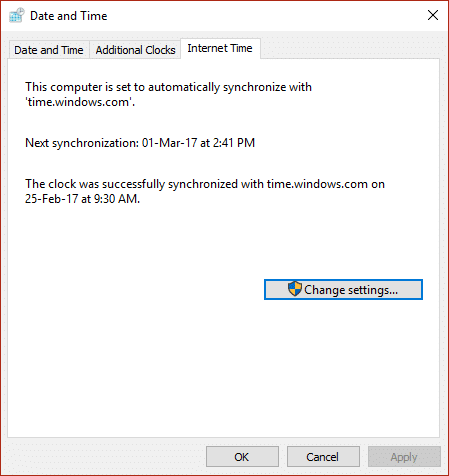
4.Switch to Internet Time then click on “Ayarları dəyişdirin".
5." işarəsini qoymağınızdan əmin olun.İnternet vaxt serveri ilə sinxronizasiya edin” box, then select a time server from the Server drop-down and click Update Now.
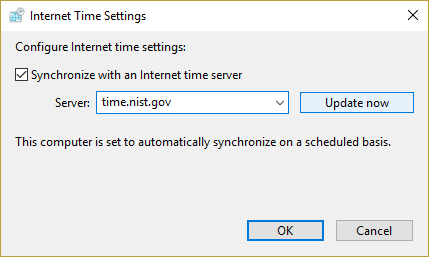
6.Click Ok then click Apply followed by OK again.
7.If the time is not updated then choose a different Internet time server and again click Update now.

8. Dəyişiklikləri saxlamaq üçün kompüterinizi yenidən başladın.
Method 2: Synchronize Windows 10 Clock with an Internet Time Server in Command Prompt
1.Windows Key + X düyməsini basın, sonra seçin Komanda İstemi (Admin).

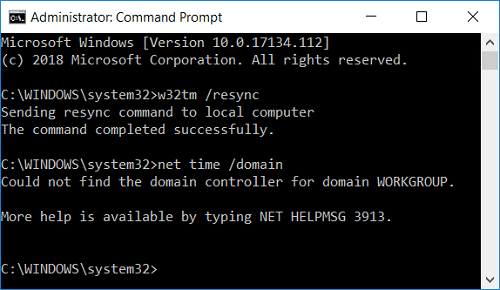
2. Aşağıdakı əmri cmd-ə yazın və Enter düyməsini basın:
w32tm /yenidən sinxronizasiya edin
net time /domain
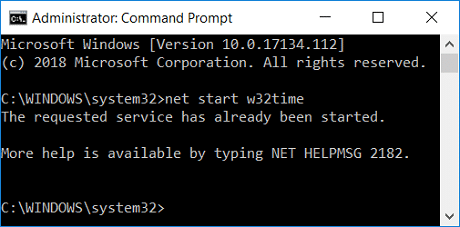
3. Əgər a The service has not been started. (0x80070426) error, onda lazımdır start Windows Time service.
4.Type the following command to start Windows Time service then again try to synchronize Windows Clock:
net başlanğıc w32time
5.Close Command Prompt and restart your PC.
Method 3: Change the Internet Time Synchronization Update Interval
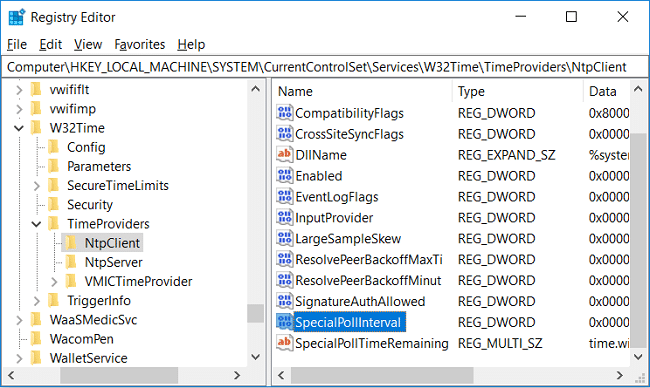
1.Windows Key + R düymələrini basın, sonra yazın regedit və Qeydiyyat Redaktorunu açmaq üçün Enter düyməsini basın.

2. Aşağıdakı qeyd defteri açarına keçin:
ComputerHKEY_LOCAL_MACHINESYSTEMCurrentControlSetServicesW32TimeTimeProvidersNtpClient
3. seçin NtpcClient then in right window pane double-click on Xüsusi Sorğu Interval dəyərini dəyişdirmək üçün.
4. İndi seçin Decimal from the Base then in the Value date change the value to 86400.
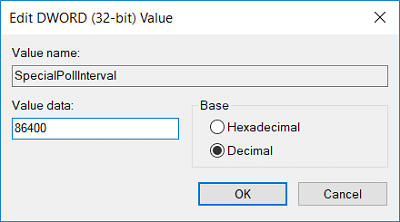
Qeyd: 86400 seconds (60 seconds X 60 minutes X 24 hours X 1 day) which means that the time will be updated every day. The default time is every 604800 seconds (7 days). Just make sure not use the time interval less than 14400 seconds (4 hours) as your computer’s IP will get banned from the time server.
5.Click Ok then close Registry Editor.
6. Dəyişiklikləri saxlamaq üçün kompüterinizi yenidən başladın.
Method 4: Add a new Internet time server on Windows 10
1.Type control in Windows 10 Search then click on İdarəetmə Paneli axtarış nəticəsindən.
2. İndi " üzərinə klikləyinSaat, Dil və Bölgə” sonra “ klikləyinTarix və Saat".
3.Under Date and Time window click “Tarixi və saatı dəyişdirin".
4.Buraya keçin İnternet vaxtı sonra " üzərinə klikləyinAyarları dəyişdirin".
5. " işarəsini qoyunİnternet vaxt serveri ilə sinxronizasiya edin” box then under Server type the address of the time server and click İndi Yeniləyin.
Qeyd: Buraya baxın for a list of the Simple Network Time Protocol (SNTP) time servers that are available on the Internet.
6.Click Ok then click Apply followed by OK again.
7. Dəyişiklikləri saxlamaq üçün kompüterinizi yenidən başladın.
Method 5: Add a new Internet time server on Windows 10 using Registry
1.Windows Key + R düymələrini basın, sonra yazın regedit və açmaq üçün Enter düyməsini basın Qeydlər redaktoru.
2. Aşağıdakı qeyd defteri açarına keçin:
HKEY_LOCAL_MACHINESOFTWAREMicrosoftWindowsCurrentVersionDateTimeServers
3. Üzərinə sağ klikləyin Serverlər sonra seçin Yeni > Sətir dəyəri.
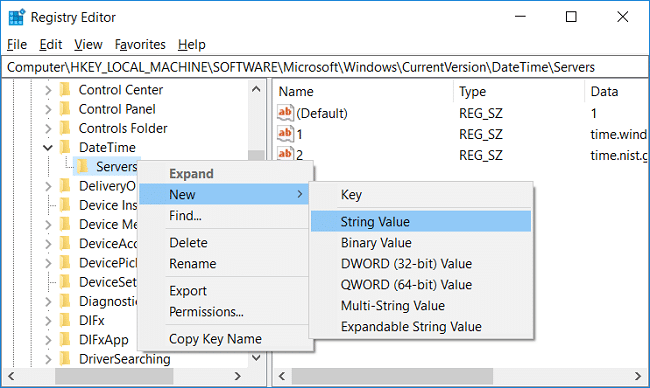
4.Type a number according to the position of the new server, for example, if there are already 2 entries then you have to name this new string as 3.
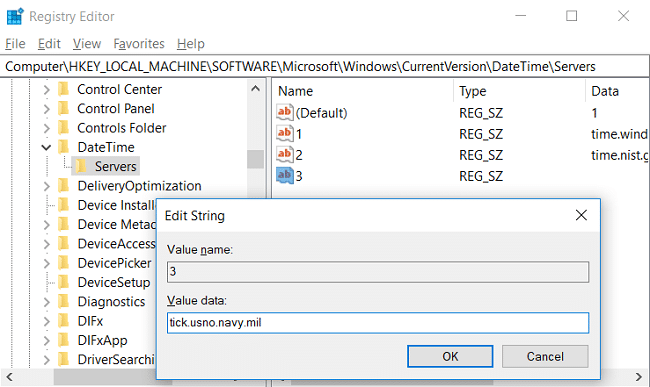
5.Now double-click on this newly created String Value to change its value.
6.Sonrakı, type the address of the time server then click OK. For example, if you want to use Google Public NTP server then enter time.google.com.
Qeyd: Buraya baxın for a list of the Simple Network Time Protocol (SNTP) time servers that are available on the Internet.
7.Dəyişiklikləri saxlamaq üçün kompüterinizi yenidən başladın.
If you’re still facing in synchronizing Windows 10 Clock then fix them using the below-listed steps:
Qeyd: This will remove all your custom servers from Registry.
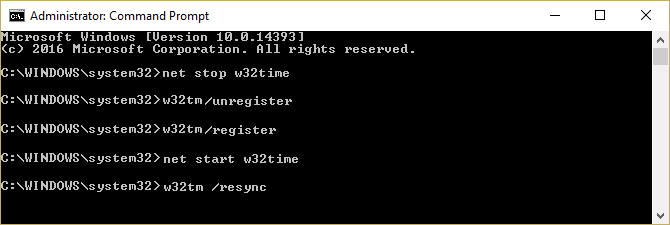
1.Windows Key + X düyməsini basın, sonra seçin Command Prompt (Admin).

2. Aşağıdakı əmri cmd-ə yazın və Enter düyməsini basın:
netstop w32time
w32tm /qeydiyyatdan keçmə
w32tm /qeydiyyat
net başlanğıc w32time
w32tm /resync /nowait
3.Dəyişiklikləri saxlamaq üçün kompüterinizi yenidən başladın.
Tövsiyə edilir:
Budur, siz uğurla öyrəndiniz How to Synchronize Windows 10 Clock with an Internet Time Server but if you still have any queries regarding this tutorial then feel free to ask them in the comment’s section.