Fix Windows 10 install Fails With Error C1900101-4000D

Fix Windows 10 install Fails With Error C1900101-4000D: If you’re trying to upgrade to Windows 10 but the install fails with error code C1900101-4000D then don’t worry as it occurs because the Windows installer cannot access important files required for installation. Sometimes this error is also caused because of a conflict during installation but you can’t be sure as there is no error message accompanying this error.
0xC1900101-0x4000D
The installation failed in the SECOND_BOOT phase with an error during MIGRATE_DATA operation
While there is no definite fix for this issue but users seem to be recommending a clean installation of Windows 10 which should only be used as a last resort. So without wasting any time let’s see How to Fix Windows 10 install Fails With Error C1900101-4000D with the help of below-listed troubleshooting guide.
Fix Windows 10 install Fails With Error C1900101-4000D
Preduvjeti
a)Make sure to Update all drivers, including graphic, sound, BIOS, USB devices, printers, etc before the installing Windows 10.
b)Remove all external USB devices such as pen drive, external hard disk, USB keyboard & mouse, USB printer and all peripherals.
c)Use an ethernet cable instead of WiFi and disable WiFi until the update is complete.
Method 1: Temporarily Disable Antivirus and Firewall before attempting Upgrade
1. Desni klik na Ikona antivirusnog programa sa sistemske palete i izaberite Onemogući.

2.Sljedeće, odaberite vremenski okvir za koji se Antivirus će ostati onemogućen.

Bilješka: Odaberite najmanju moguću količinu vremena, na primjer 15 minuta ili 30 minuta.
3.Once done, again try to upgrade your PC and check if the error resolves or not.
4.Type control in the Windows Search then click on Kontrolna tabla iz rezultata pretraživanja.

5.Dalje, kliknite na Sistem i sigurnost.
6. Zatim kliknite na Windows zaštitni zid.

7. Sada iz lijevog okna prozora kliknite na Uključite ili isključite Windows zaštitni zid.

8.Odaberite Isključi Windows zaštitni zid i ponovo pokrenite računar. Again try to upgrade your PC and see if you’re able to Fix Windows 10 install Fails With Error C1900101-4000D.
Ako gornja metoda ne radi, obavezno slijedite iste korake da ponovo uključite svoj zaštitni zid.
Method 2: Remove any hyphens from your computer or machine name
1. Pritisnite tipku Windows + R, a zatim otkucajte sysdm.cpl i pritisnite Enter da otvorite Svojstva sistema.

2.Make sure you’re under Kartica Ime računara zatim kliknite na promjena dugme na dnu.
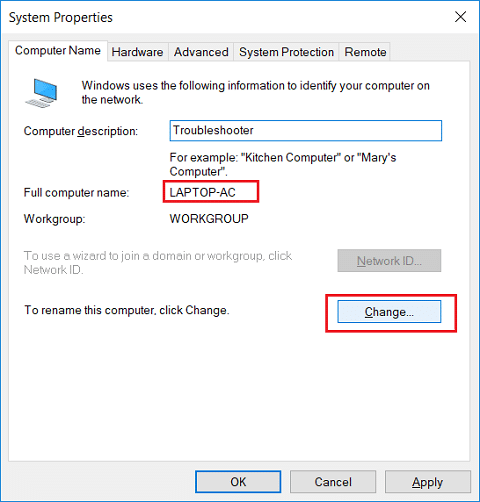
3.Make sure your machine name is simple no periods or hyphens or dashes.
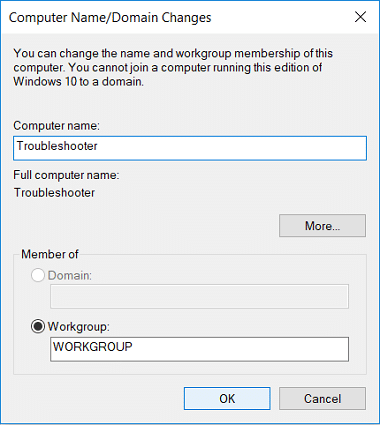
4.Click OK then Apply followed by OK.
5. Ponovo pokrenite računar da biste sačuvali promene.
Metod 3: Provjerite je li Windows ažuriran
1. Pritisnite tipku Windows + I, a zatim odaberite Ažuriranje i sigurnost.

2.Dalje, ponovo kliknite Proverite ažuriranja i obavezno instalirajte sva ažuriranja na čekanju.

3. Nakon što se ažuriranja instaliraju, ponovo pokrenite računar i vidite da li možete Fix Windows 10 install Fails With Error C1900101-4000D.
Metoda 4: Izvršite čisto pokretanje
This would make sure that if any 3rd party application is conflicting with Windows update then you will be able to successfully install Windows Updates inside Clean Boot. Sometimes 3rd party software can conflict with Windows Update and therefore cause Windows Update to be Stuck. In order, Fix Windows 10 install Fails With Error C1900101-4000D, potrebno je da izvršite čisto pokretanje računara i da dijagnostikujete problem korak po korak.

Method 5: Upgrade using Windows 10 Media Creation Tool
1.Download Media Creation Tool here.
2.Backup your data from system partition and save your license key.
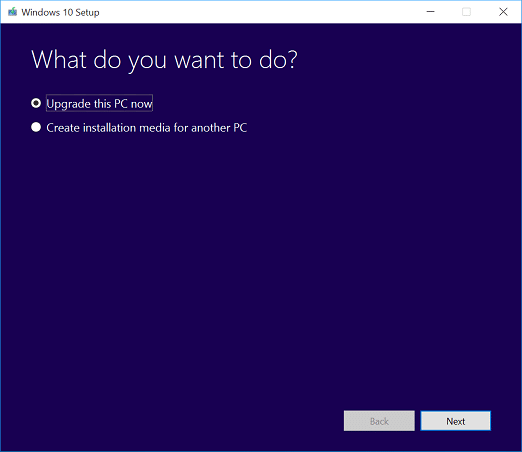
3.Start the tool and choose to Upgrade this PC now.
4.Accept the license terms.
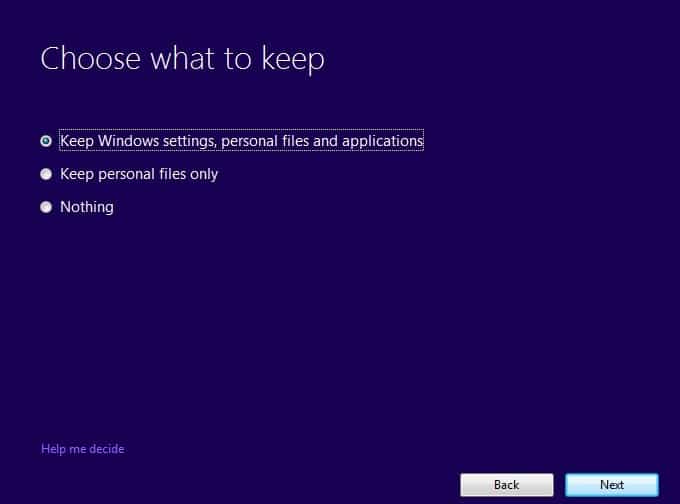
5.After the installer is ready, choose to Keep personal files and apps.
6.The PC will restart few times and your PC would be successfully upgraded.
Metoda 6: Pokrenite SFC i DISM
1. Pritisnite tipku Windows + X, a zatim kliknite na Komandni redak (Admin).

2. Sada upišite sljedeće u cmd i pritisnite enter:
Sfc /scannow sfc /scannow /offbootdir=c: /offwindir=c:windows (Ako gore ne uspije, pokušajte s ovim)

3. Sačekajte da se gornji proces završi i kada završite ponovo pokrenite računar.
4. Ponovo otvorite cmd i upišite sljedeću naredbu i pritisnite enter nakon svake:
a) Dism /Online /Cleanup-Image /CheckHealth b) Dism /Online /Cleanup-Image /ScanHealth c) Dism /Online /Cleanup-Image /RestoreHealth

5. Pustite da se DISM naredba pokrene i pričekajte da se završi.
6. Ako gornja naredba ne radi, pokušajte sa sljedećim:
Dism /Image:C:offline /Cleanup-Image /RestoreHealth /Izvor:c:testmountwindows Dism /Online /Cleanup-Image /RestoreHealth /Izvor:c:testmountwindows /LimitAccess
Bilješka: Zamijenite C:RepairSourceWindows lokacijom vašeg izvora popravke (Windows instalacijski disk ili disk za oporavak).
7. Ponovo pokrenite računar da sačuvate promene i vidite da li ste u mogućnosti Fix Windows 10 install Fails With Error C1900101-4000D.
Method 7: Reset Windows Updates Components
1. Pritisnite tipku Windows + X, a zatim odaberite Komandni red (Admin).
2. Sada upišite sljedeće naredbe da zaustavite Windows Update Services, a zatim pritisnite Enter nakon svake:
net stop wuauserv
net stop cryptSvc
net stop bitova
net stop msiserver

3. Dalje, upišite sljedeću naredbu da preimenujete SoftwareDistribution Folder i zatim pritisnite Enter:
ren C: WindowsSoftwareDistribution SoftwareDistribution.old
Ren C: WindowsSystem32catroot2 catroot2.old

4. Konačno, otkucajte sljedeću naredbu da pokrenete Windows Update Services i pritisnite Enter nakon svake:
net start wuauserv
net start cryptSvc
net start bita
net start msiserver

5. Ponovo pokrenite računar da sačuvate promene i proverite da li ste u mogućnosti Fix Windows 10 install Fails With Error C1900101-4000D.
Method 8: Delete Registry for Mounted Images
1. Pritisnite tipku Windows + R, a zatim otkucajte regedit i pritisnite Enter da otvorite Registry Editor.

2. Idite do sljedećeg ključa registratora:
HKEY_LOCAL_MACHINESOFTWAREMicrosoftWIMMountMounted Images
3.Odaberite Mounted Images then in the right window pane right-click on (Default) and select Delete.
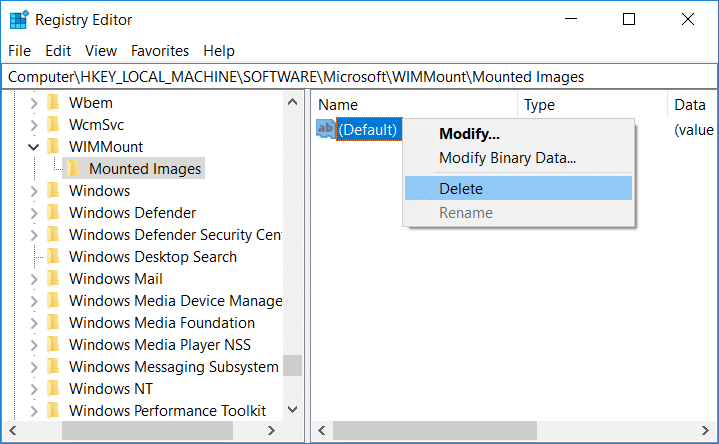
4.Izađite iz uređivača registra i ponovo pokrenite računar da biste sačuvali promene.
Method 9: Disable Wi-Fi Adapter and CD/DVD Drive
1. Pritisnite tipku Windows + R, a zatim otkucajte devmgmt.msc i pritisnite Enter da otvorite Upravitelj uređaja.

2.Expand DVD/CD-ROM drives, a zatim kliknite desnim tasterom miša na vaš CD / DVD pogon i izaberite Onemogućite uređaj.

3.Similarly, expand Network adapters then right-click on your WiFi adapter i odaberite Onemogućite uređaj.
4.Again try to run Windows 10 setup and see if you’re able to Fix Windows 10 install Fails With Error C1900101-4000D.
Method 10: Run Malwarebytes and AdwCleaner
Malwarebytes is a powerful on-demand scanner which should remove browser hijackers, adware and other types of malware from your PC. It is important to note that Malwarebytes will run alongside antivirus software without conflicts. To install and run Malwarebytes Anti-Malware, go to this article and follow each and every step.
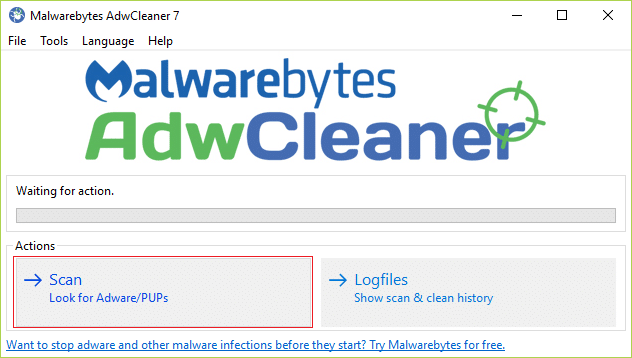
1.Download AdwCleaner from this link.
2.Once the download is complete, double-click on the adwcleaner.exe file da pokrenete program.
3.Kliknite na “slažem se”Dugme za accept the license agreement.
4.On the next screen, click the Dugme za skeniranje under Actions.
5.Now, wait for the AdwCleaner to search for PUPs and other malicious programs.
6.Once the scan is complete, click čist in order to clean your system of such files.
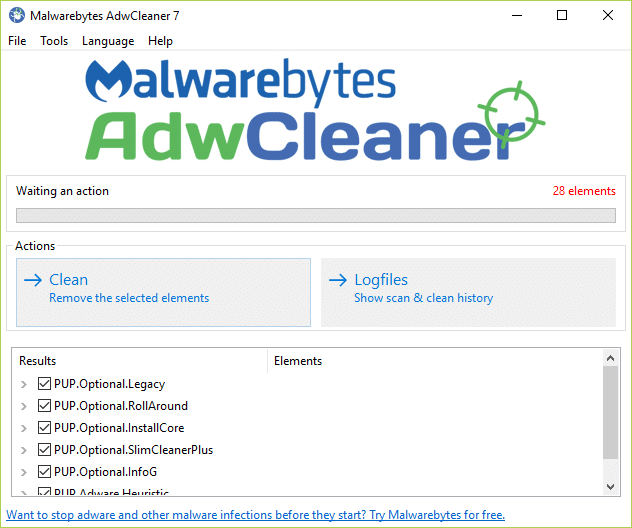
7.Save any work you might be doing as your PC will need to reboot, click OK to reboot your PC.
8.Once the computer reboots, a log file will open which will list all of the files, folders, registry keys, etc that were removed in the previous step.
Preporučena:
To je to što ste uspjeli Fix Windows 10 install Fails With Error C1900101-4000D ali ako i dalje imate bilo kakvih pitanja u vezi sa ovim vodičem, slobodno ih postavite u odjeljku za komentare.