Giunsa paghimo ang usa ka Gmail Account nga wala’y Pag-verify sa Numero sa Telepono

Over the past few decades, technology has progressed at an exponential pace, redefining aspects of our life that had previously remained unchanged for centuries. With its increasing popularity, people have begun to trust internet-based services blindly, providing them with personal information that was once confidential. One such internet service that collects a ton of personal information is Gmail. From your date of birth and phone number to your monthly expenditure, Gmail knows you better than your parents. Therefore, it is understandable when users are apprehensive about providing Gmail with personal info like their phone number. If you wish to safeguard your privacy, read below to learn how to create a Gmail account without phone number verification.
Why Does Gmail Ask for Your Phone Number?
Huge websites like Google encounter tons of people logging in every day, with a majority of them being bots or fake accounts. Hence, such companies are forced to add multiple layers of verification to ensure that genuine users get to use their service.
Moreover, as people have started to own multiple technological devices, keeping track of them has become extremely difficult. Therefore, along with the traditional email and password login, Google has introduced an additional layer of security through phone numbers. If the company believes that a log-in from a certain device isn’t right, they can verify it through the user’s phone number.
Giunsa paghimo ang usa ka Gmail Account nga wala’y Pag-verify sa Numero sa Telepono
With all that being said, if you wish to keep your phone number to yourself, and yet, wish to create a Gmail account, the following methods should suit you just fine.
Pamaagi 1: Use a Fake Phone Number
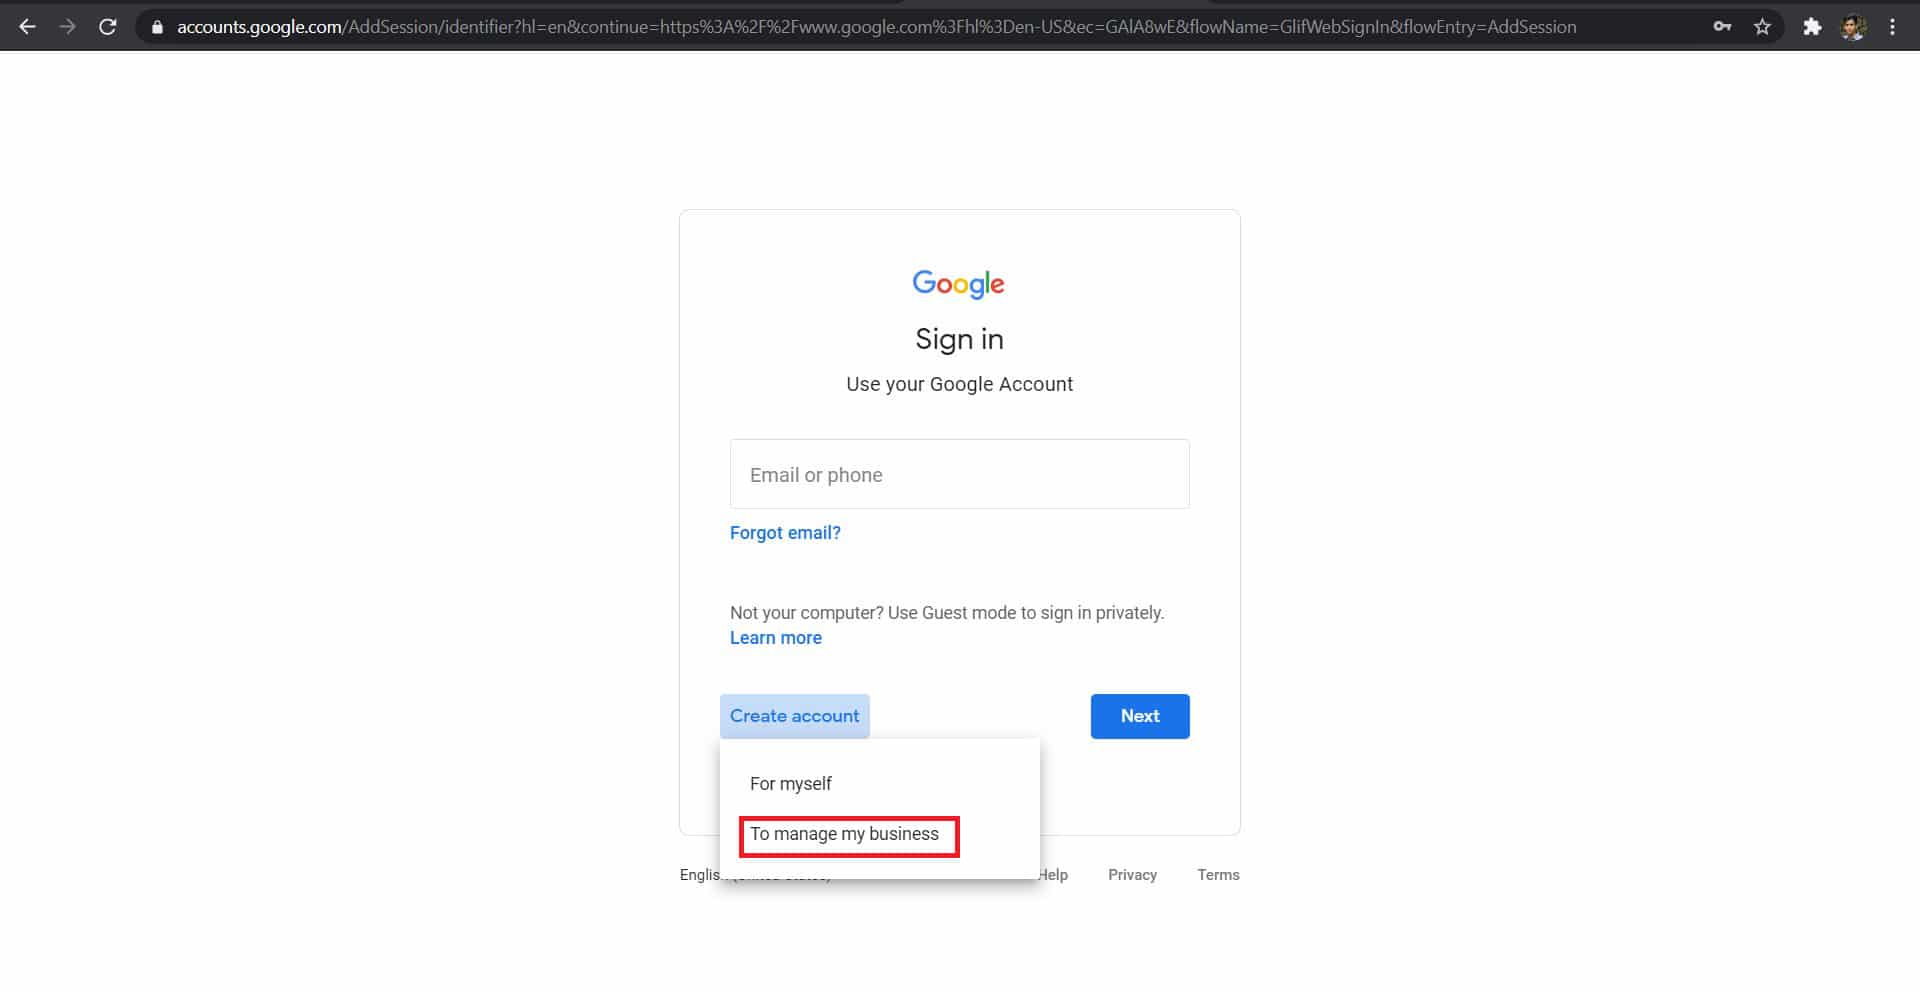
While creating a new account on Google, there are three types of options available: Para sa akong kaugalingon, For my child ug To manage my business. Accounts that are created to handle businesses need phone numbers for verification and criteria like age are not considered at all. In situations like these, creating a fake phone number is a smart workaround. Here’s how you can use a fake phone number to get past Google verification:
1. Pangadto sa Google Sign-in page, ug i-klik sa Paghimo og usa ka asoy.
2. I-klik ang To manage my business from the given options, as depicted below.
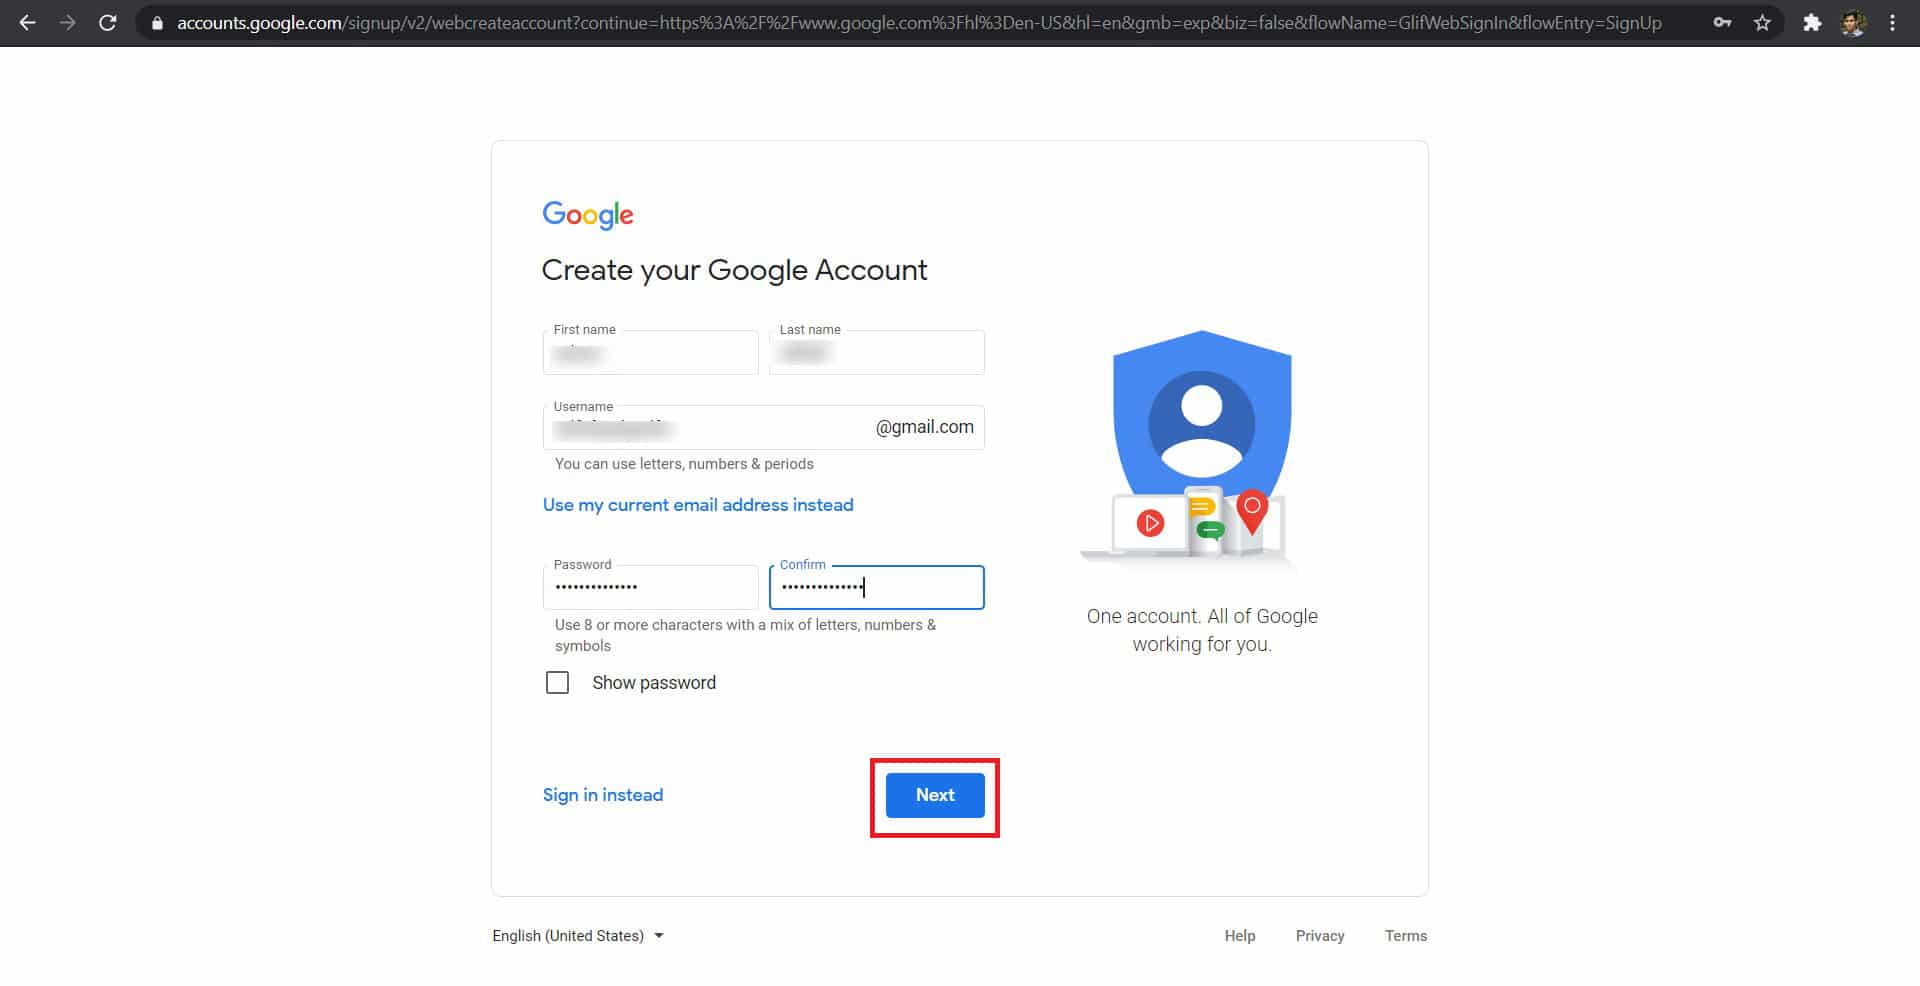
3. Enter your First and Last name, Username of your email, and your password to proceed further.
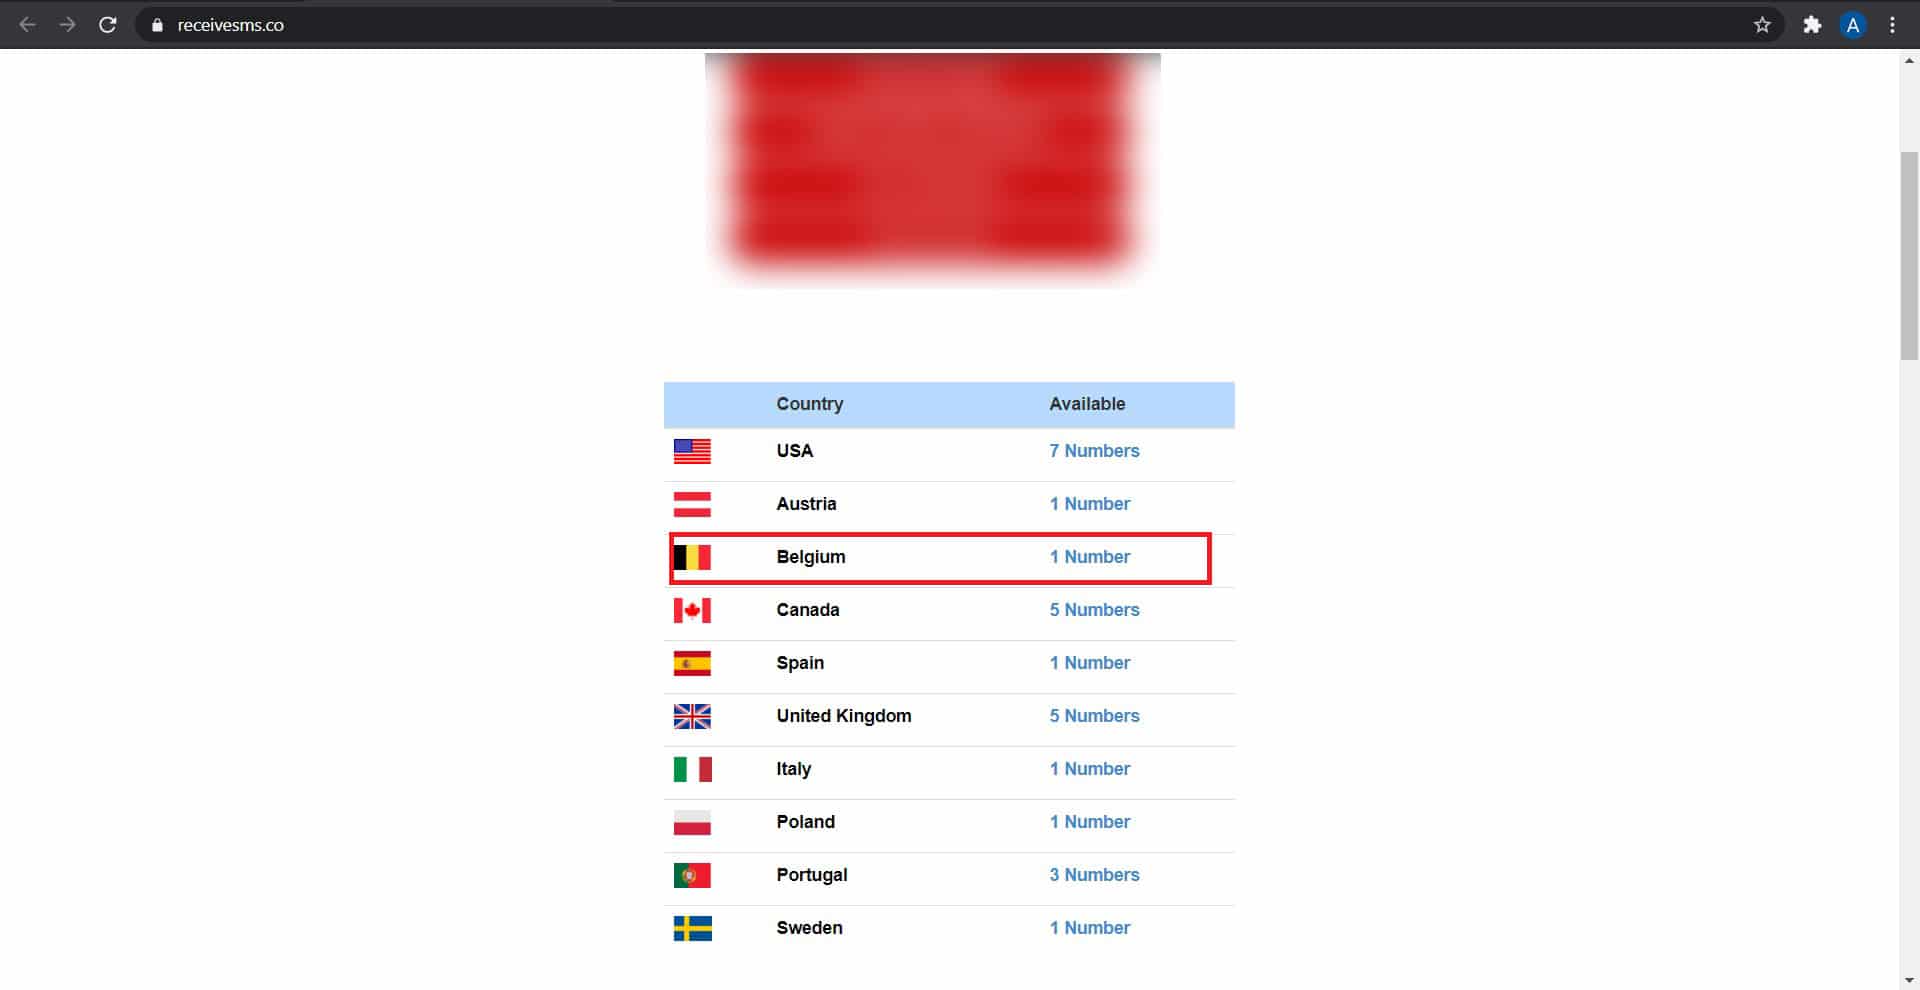
4. Open a new tab and head onto Pagdawat og SMS. From the list of available countries and phone numbers, select one based on your preference.
5. The next page will reflect a bunch of fake phone numbers. Click on Read received SMS for any one of these, as shown.

6. Click on it to kopya ang gidaghanon sa imong clipboard
7. Balik sa Google sign-in page, Ug paste the phone number you had copied.
Mubo nga sulat: Make sure you change the Code sa Nasud sa ingon.
8. Balik sa Receive SMS website to obtain the OTP required for logging in. Click on Update Messages sa pagtan-aw sa OTP.

This is how to create a Gmail account without phone number verification of your real phone number.
Basaha usab: Pagtangtang sa Gmail Account Permanente (Uban sa mga Hulagway)
Pamaagi 2: Enter your Age as 15 Years
Another way to trick Google and to avoid phone number verification is by entering your age as 15. Google tends to assume that young children do not possess mobile numbers and gives you a thumbs up to proceed forward. This method might work but only for accounts, you create opting Para sa akong kaugalingon or For my child options. But, for this to work you will need to clear all cookies and cache stored in your web browser.
1. Read our guide on How to reset Google Chrome.
2. Then, launch Chrome in Incognito mode pinaagi sa dinalian Ctrl + Shift + N nga mga yawe sa tingub.
3. Pagdala ngadto Google Sign-in page, and fill in all details as explained in the previous method.
Mubo nga sulat: Make sure to fill petsa sa pagkatawo as it would be for a 15-year old kid.
4. You will be allowed to skip Phone number verification and thus, you should be able to create a Gmail account without phone number verification.
Pamaagi 3: Buy a Burner Phone Service
Using a free number to try and log into Google does not always work. Most of the time, Google recognizes fake numbers. On other occasions, the number has already been associated with the maximum amount of Gmail accounts possible. The ideal way to bypass this problem is to buy a burner phone service. These services are reasonably priced and create unique phone numbers as and when requested. Burner App ug DoNotPay are two such services that create virtual phone numbers and will help you create a Gmail account without phone number verification.
Pamaagi 4: Enter Legitimate Information
While entering your personal information, if Google feels that the information is legitimate, it will let you skip phone number verification. So if Google keeps asking you for phone number verification, the ideal thing to do would be to wait for 12 hours and then try again by entering believable personal information.
Method 5: Use Bluestacks to create a Gmail account without phone number verification
Bluestacks is an Android emulator software that enables apps on Android to run on computers. It supports both Windows and macOS systems. In this method, we shall use this app to create a Gmail account without phone number verification.
1. I-download ang Bluestacks pinaagi sa pagklik dinhi. Install the app on your PC by running the .exe nga file.

2. Launch Bluestacks and go to setting.
3. Sunod, i-klik ang Icon sa Google ug pagkahuman, pag-klik Pagdugang og Google account.
4. You will be given two options: Anaa na ug Bag-o nga. I-klik ang Bag-o nga.
5. Enter all mga detalye ingon sa giaghat.
6. Sa katapusan, i-klik sa Paghimo og usa ka asoy to create a Gmail account without phone number verification.
Mubo nga sulat: Remember to put a Recovery email address in case you forget login credentials for this newly set-up account.
girekomendar:
We hope the guide was helpful, and you were able to create a Gmail account without phone number verification. If you still have any queries regarding this article, then feel free to ask them in the comments section.