- in okna by administrátor
Fix Windows Modules Installer Worker High CPU Usage
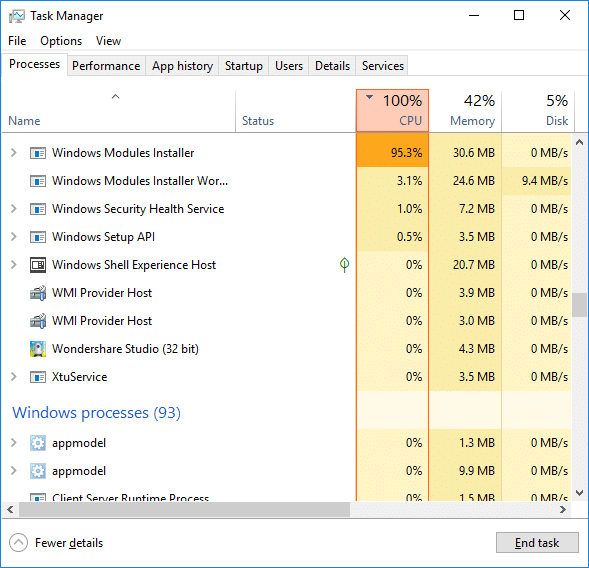
If you are facing the High CPU Usage by Windows Modules Installer Worker, then don’t worry as thousands of other users are also facing the similar problem and therefore, there are many working fixes which we will be discussing today in this article. To verify if you are facing this issue open Task Manager (Ctrl + Shift + Esc) and you will find that the Windows Modules Installer Worker is consuming High CPU or Disk Usage.

Pro Tip: You may leave your PC overnight or for a few hours to see the issue rectify itself once the Windows is finished downloading and installing updates.
What is Windows Modules Installer worker (WMIW)?
Windows Modules Installer worker (WMIW) is a service which takes cares of automatically installing Windows Update. According to its service description, WMIW is a system process that enables automatic installation, modification, and removal of Windows updates and optional components.
This process is responsible for finding new Windows Update automatically and installing them. As you might be aware that Windows 10 automatically install newer builds (i.e. 1803 etc.) via Windows Updates, so this process is responsible for installing these updates in the background.
Although this process is called Windows Modules Installer worker (WMIW) and you will see the same name in the Processes tab in the Task Manager, but if you switch to Details tab, then you will find the name of the file as TiWorker.exe.
Why Is Windows Modules Installer worker Using So Much CPU?
As Windows Modules Installer worker (TiWorker.exe) runs continuously in the background, sometimes it might utilize high CPU or disk usage when installing or uninstalling Windows Updates. But if its constantly using high CPU then the Windows Modules Installer worker may have become unresponsive while checking new updates. As a result, you may be experiencing lags, or your system might hang or freeze completely.
The first thing users do when they experience freezing, or lagging issues on their system is to restart their PC, but I assure you that this strategy won’t work in this case. This is because the issue will not resolve by itself until and unless you fix the underlying cause.
Fix Windows Modules Installer Worker High CPU Usage
Nezapomeňte vytvořit bod obnovení pro případ, že by se něco pokazilo.
Windows Modules Installer Worker (WMIW) is an important service, and it should not be disabled. WMIW or TiWorker.exe is not a virus or malware, and you cannot just delete this service from your PC. So without wasting any time let’s see How to Fix Windows Modules Installer Worker High CPU Usage s pomocí níže uvedeného průvodce odstraňováním problémů.
Metoda 1: Spusťte Poradce při potížích se službou Windows Update
1. Stisknutím klávesy Windows + I otevřete Nastavení pak klikněte na Ikona aktualizace a zabezpečení.
![]()
2. V nabídce na levé straně vyberte Poradce při potížích pod „Vstaňte a běžte" klikněte na Windows Update.
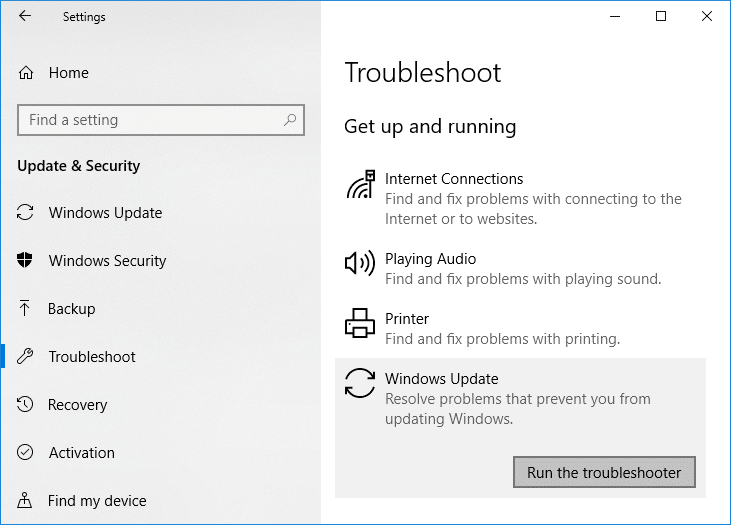
3. Nyní klikněte na „Spusťte nástroj pro odstraňování problémů“ pod Windows Update.
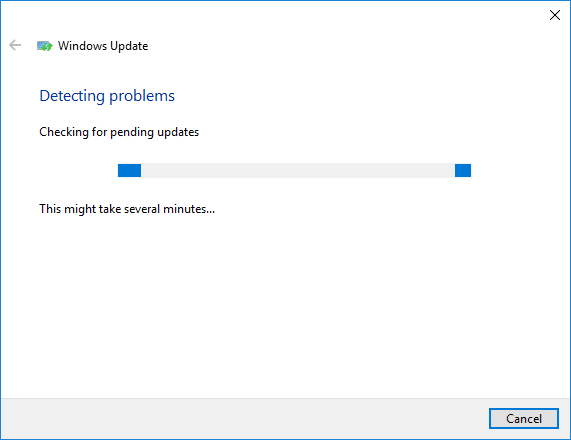
4. Let the troubleshooter run, and it will automatically fix any issues found with Windows Update taking forever.
Method 2: Manually Check for Windows Updates
1. Stiskněte klávesu Windows + I a poté vyberte Aktualizace a zabezpečení.
2. Na levé straně klikněte v nabídce na Windows Update.
3. Nyní klikněte na „Zkontrolovat aktualizace” pro kontrolu dostupných aktualizací.

4. Pokud nějaké aktualizace čekají na vyřízení, klepněte na Stáhnout a nainstalovat aktualizace.

5. Jakmile budou aktualizace staženy, nainstalujte je a váš systém Windows bude aktuální.
Method 3: Configure Windows Update to Manual
Upozornění: This method will switch Windows Update from automatically installing the new updates to the manual. This means you have to manually check for Windows Update (weekly or monthly) to keep your PC secure. But follow this method, and you can again set the Updates to Automatic once the issue is resolved.
1. Stiskněte klávesu Windows + R a zadejte services.msc a stiskněte klávesu Enter.

2. Scroll down and find Windows Installer moduly služby v seznamu.
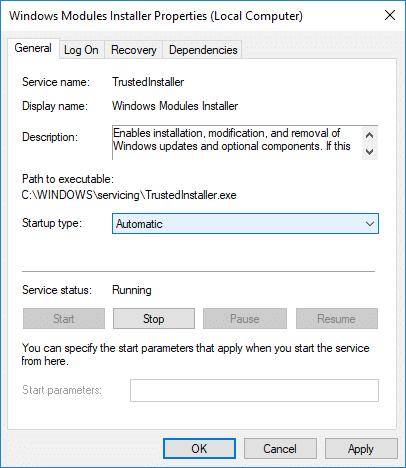
3. Klikněte pravým tlačítkem na Služba Windows Modules Installer a zvolte Vlastnosti.
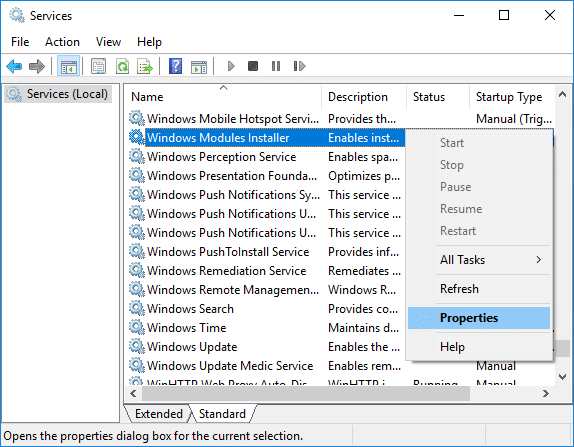
4. Nyní klikněte na Stop then from the Typ spouštění vyberte rozevírací seznam Manuální.
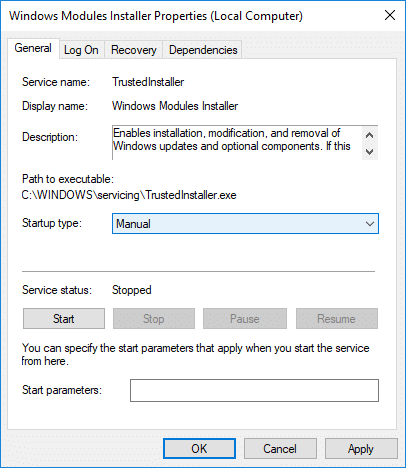
5. Klepněte na tlačítko Použít a poté OK.
6. Similarly, follow the same step for the Služba Windows Update.
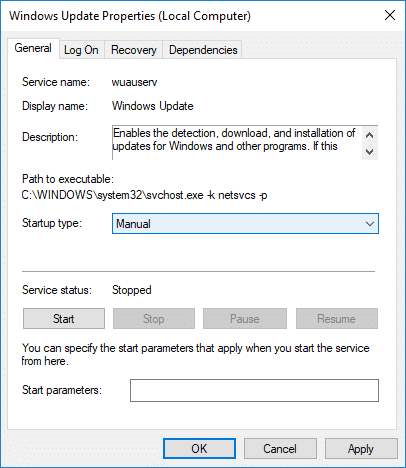
7. Pro uložení změn restartujte počítač.
8. Znovu ověřit Windows Updates Manually a nainstalovat všechny čekající aktualizace.
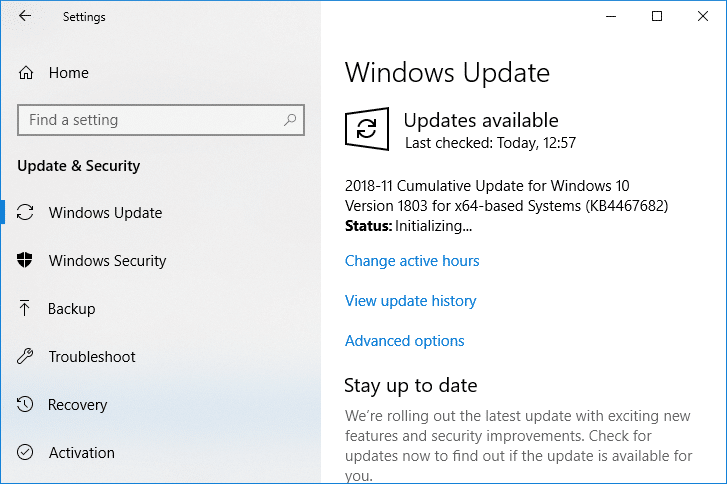
9. Once is done, again go back to services.msc window and open the Windows Modules Installer & Windows Update Properties okno.
10. Nastav Typ spouštění na Automatický a klepněte na tlačítko Home. Then click Apply followed by OK.
11. Pro uložení změn restartujte počítač.
Metoda 4: Spusťte Poradce při potížích s údržbou systému
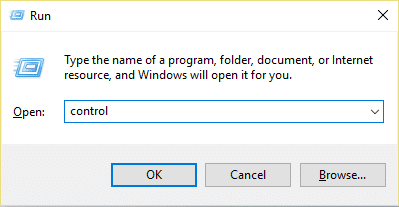
1. Stiskněte klávesu Windows + R, zadejte control a stisknutím klávesy Enter otevřete Kontrolní panel.
2. Vyhledejte Poradce při potížích a klikněte na Odstraňování problémů.

3. Dále klikněte na tlačítko Zobrazit všechny v levém podokně.
4. Klikněte na “System Maintenance” spustit System Maintenance Troubleshooter.

5. Poradce při potížích může být schopen Fix Windows Modules Installer Worker High CPU Usage, but if it didn’t, then you need to run System Performance Troubleshooter.
6. Otevřete Příkazový řádek. Uživatel může tento krok provést vyhledáním 'cmd' A potom stiskněte klávesu Enter.

7. Zadejte následující příkaz do cmd a stiskněte Enter:
msdt.exe / id Výkonnostní diagnostika
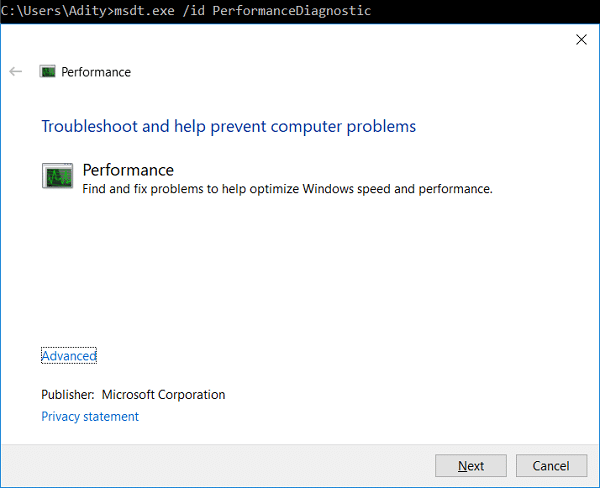
8. Follow the on-screen instruction to run the troubleshooter and fix any issues find the System.
9. Finally, exit the cmd and reboot your PC.
Method 5: Disable Automatic Maintenance
Sometimes Automatic Maintenance can conflict with the Windows Modules Installer Worker service, so try to disable Automatic Maintenance using this guide and see if this fixes your issue.
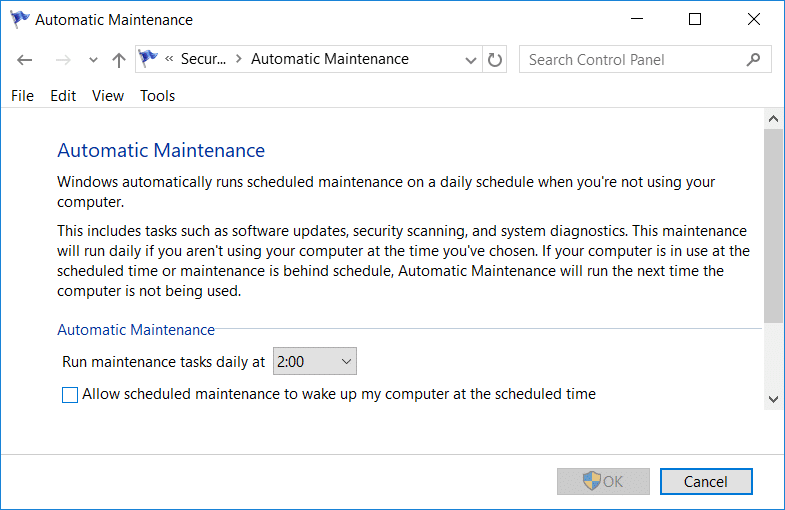
Although disabling Automatic Maintenance is not a good idea, but there might be some case where you need to actually disable it, for example, if your PC freezes during automatic maintenance or Windows Modules Installer Worker High CPU Usage issue then you should disable maintenance to troubleshoot the issue.
Method 6: Run System File Checker and DISM
1. Otevřete Příkazový řádek. Uživatel může tento krok provést vyhledáním 'cmd' A potom stiskněte klávesu Enter.
2. Nyní do cmd zadejte následující a stiskněte Enter:
Sfc /scannow sfc /scannow /offbootdir=c: /offwindir=c:windows (Pokud výše uvedené selže, zkuste toto)

3. Počkejte na dokončení výše uvedeného procesu a po dokončení restartujte počítač.
4. Znovu otevřete cmd a zadejte následující příkaz a po každém stiskněte klávesu Enter:
Dism /Online /Cleanup-Image /CheckHealth Dism /Online /Cleanup-Image /ScanHealth Dism /Online /Cleanup-Image /RestoreHealth

5. Nechte spustit příkaz DISM a počkejte na jeho dokončení.
6. Pokud výše uvedený příkaz nefunguje, zkuste následující:
Dism /Image:C:offline /Cleanup-Image /RestoreHealth /Zdroj:c:testmountwindows Dism /Online /Cleanup-Image /RestoreHealth /Zdroj:c:testmountwindows /LimitAccess
Poznámka: Nahraďte C:RepairSourceWindows svým zdrojem opravy (instalační nebo obnovovací disk systému Windows).
7. Restartujte počítač, abyste uložili změny a zjistěte, zda je to možné Fix Windows Modules Installer Worker High CPU Usage.
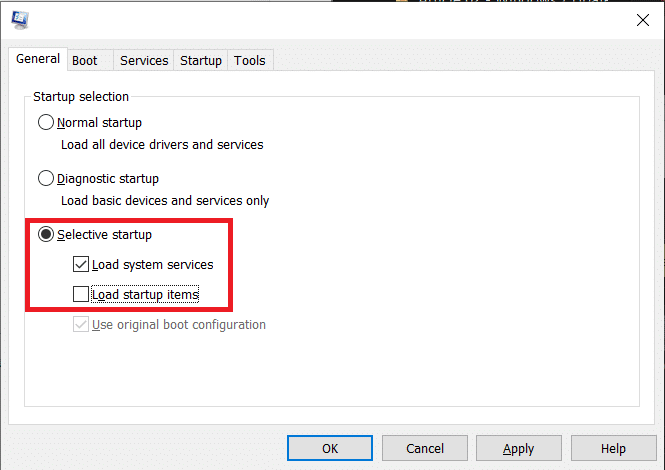
Metoda 7: Proveďte čisté spuštění
Sometimes 3rd party software can conflict with Windows and can cause the issue. To Fix Windows Modules Installer Worker High CPU Usage issue, musíte provést čisté spuštění počítače a diagnostikovat problém krok za krokem.
Method 8: Set your WiFi as Metered Connection
Poznámka: This will stop Windows Automatic Update, and you will need to manually check for Updates.
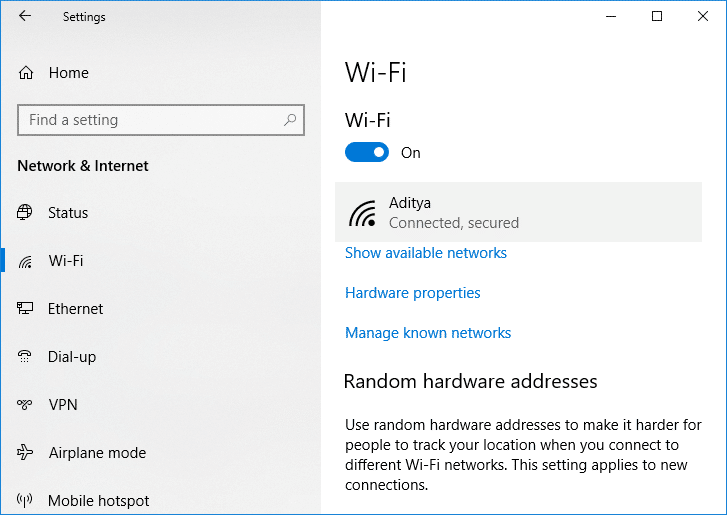
1. Stisknutím klávesy Windows + I otevřete Nastavení pak klikněte na Síť a internet.

2. V nabídce na levé straně vyberte Wi-Fi.
3. Under Wi-Fi, cvaknutí on your currently connected network (WiFi).
4. Scroll down to Metered connection and povolit přepínač pod „Nastavte jako odměřené připojení".
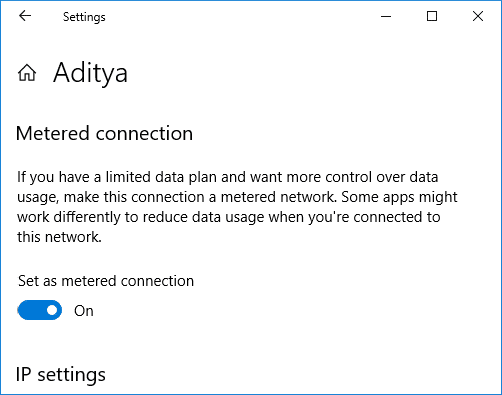
5. Close Settings and reboot your PC to save changes.
Doporučená:
To je vše, úspěšně jste Fix Windows Modules Installer Worker High CPU Usage ale pokud máte stále nějaké dotazy týkající se tohoto tutoriálu, neváhejte se jich zeptat v sekci komentářů.
