Fix Windows Modules Installer Worker High CPU Usage
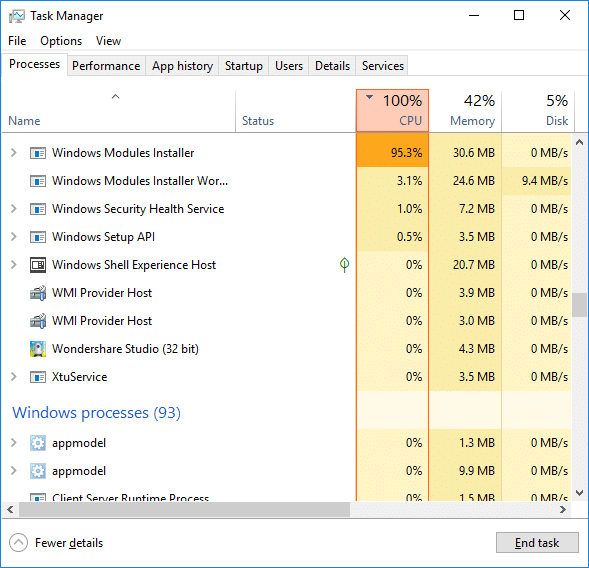
If you are facing the High CPU Usage by Windows Modules Installer Worker, then don’t worry as thousands of other users are also facing the similar problem and therefore, there are many working fixes which we will be discussing today in this article. To verify if you are facing this issue open Task Manager (Ctrl + Shift + Esc) and you will find that the Windows Modules Installer Worker is consuming High CPU or Disk Usage.

Pro Tip: You may leave your PC overnight or for a few hours to see the issue rectify itself once the Windows is finished downloading and installing updates.
What is Windows Modules Installer worker (WMIW)?
Windows Modules Installer worker (WMIW) is a service which takes cares of automatically installing Windows Update. According to its service description, WMIW is a system process that enables automatic installation, modification, and removal of Windows updates and optional components.
This process is responsible for finding new Windows Update automatically and installing them. As you might be aware that Windows 10 automatically install newer builds (i.e. 1803 etc.) via Windows Updates, so this process is responsible for installing these updates in the background.
Although this process is called Windows Modules Installer worker (WMIW) and you will see the same name in the Processes tab in the Task Manager, but if you switch to Details tab, then you will find the name of the file as TiWorker.exe.
Why Is Windows Modules Installer worker Using So Much CPU?
As Windows Modules Installer worker (TiWorker.exe) runs continuously in the background, sometimes it might utilize high CPU or disk usage when installing or uninstalling Windows Updates. But if its constantly using high CPU then the Windows Modules Installer worker may have become unresponsive while checking new updates. As a result, you may be experiencing lags, or your system might hang or freeze completely.
The first thing users do when they experience freezing, or lagging issues on their system is to restart their PC, but I assure you that this strategy won’t work in this case. This is because the issue will not resolve by itself until and unless you fix the underlying cause.
Fix Windows Modules Installer Worker High CPU Usage
Sørg for at oprette et gendannelsespunkt, hvis noget går galt.
Windows Modules Installer Worker (WMIW) is an important service, and it should not be disabled. WMIW or TiWorker.exe is not a virus or malware, and you cannot just delete this service from your PC. So without wasting any time let’s see How to Fix Windows Modules Installer Worker High CPU Usage ved hjælp af nedenstående fejlfindingsvejledning.
Metode 1: Kør Windows Update-fejlfinding
1. Tryk på Windows-tast + I for at åbne Indstillinger Klik derefter på Ikon for opdatering og sikkerhed.
![]()
2. Vælg fra menuen til venstre Fejlfinding under "Kom i gang" Klik på Windows Update.
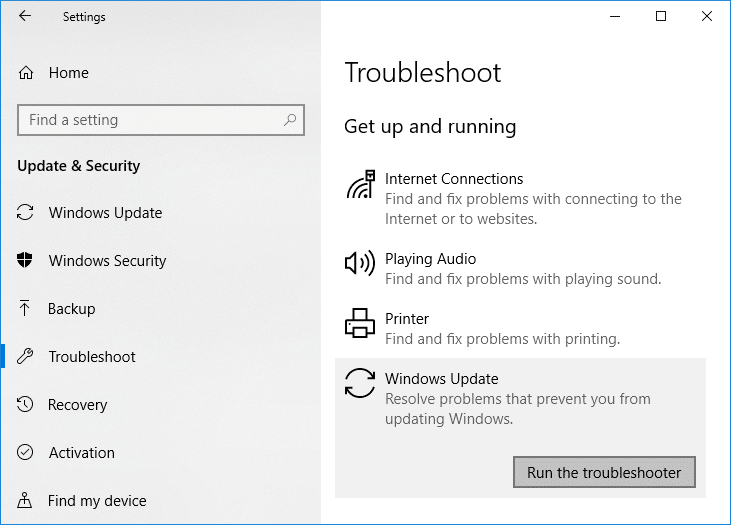
3. Klik nu på “Kør fejlfindingsprogrammet” under Windows Update.
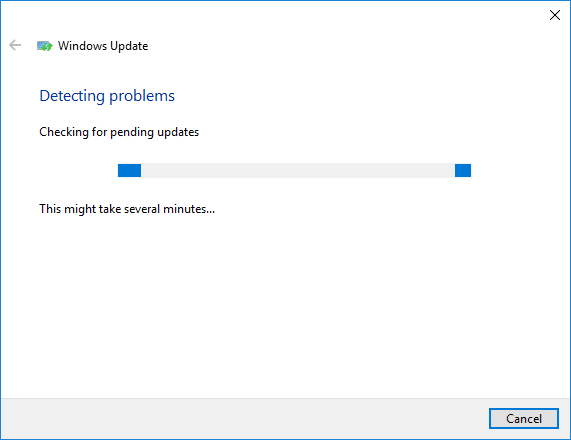
4. Let the troubleshooter run, and it will automatically fix any issues found with Windows Update taking forever.
Method 2: Manually Check for Windows Updates
1. Tryk på Windows-tasten + I og vælg derefter Opdatering og sikkerhed.
2. Fra venstre side klikker menuen på Windows Update.
3. Klik nu på "Søg efter opdateringer”-knappen for at se efter tilgængelige opdateringer.

4. Hvis der afventer nogen opdateringer, så klik på Download og installer opdateringer.

5. Når opdateringerne er downloadet, skal du installere dem, og din Windows vil blive opdateret.
Method 3: Configure Windows Update to Manual
Forsigtig: This method will switch Windows Update from automatically installing the new updates to the manual. This means you have to manually check for Windows Update (weekly or monthly) to keep your PC secure. But follow this method, and you can again set the Updates to Automatic once the issue is resolved.
1. Tryk på Windows-tasten + R og skriv derefter services.msc og tryk på Enter.

2. Rul ned og find Windows Modül Yükleyicisi,en service på listen.
3. Højreklik på Windows moduler Installer service og vælg Egenskaber.
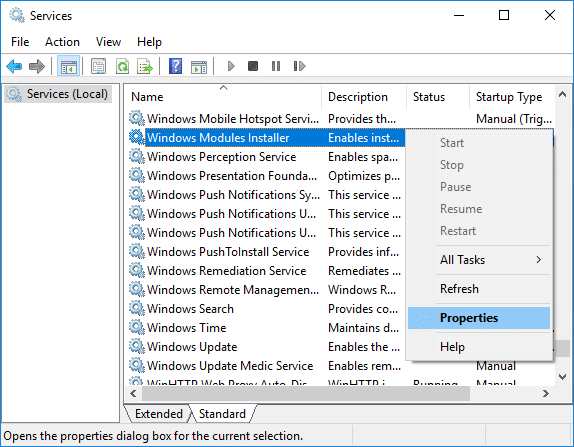
4. Klik nu på Stands derefter fra Starttype drop-down select Manuel.
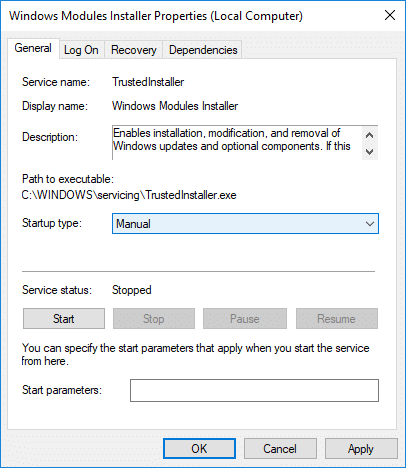
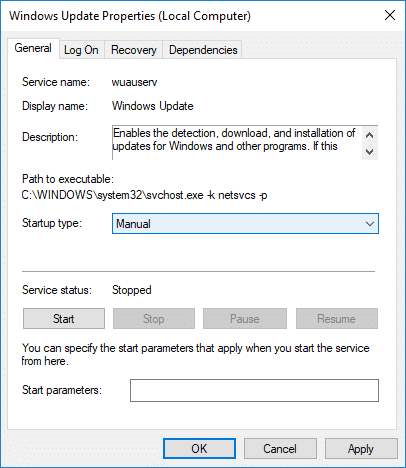
5. Klik på Anvend efterfulgt af OK.
6. Similarly, follow the same step for the Windows Update service.
7. Genstart din pc for at gemme ændringer.
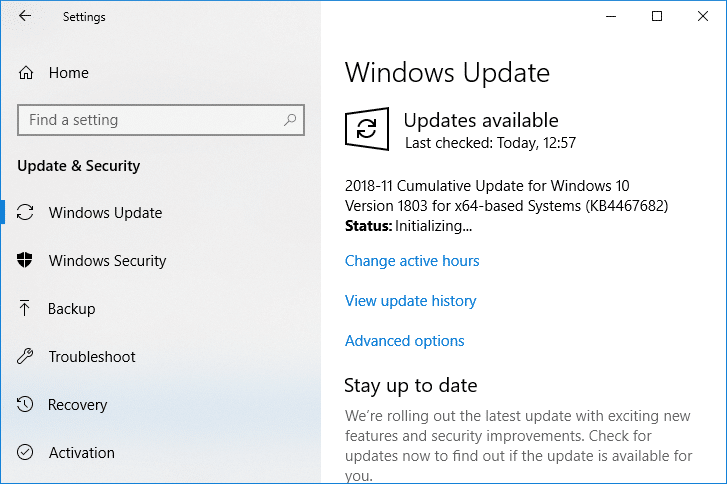
8. Igen se efter Windows Updates Manually og installer eventuelle afventende opdateringer.
9. Once is done, again go back to services.msc window and open the Windows Modules Installer & Windows Update Properties vindue.
10. Indstil Starttype til Automatisk Ur og klik Starten. Then click Apply followed by OK.
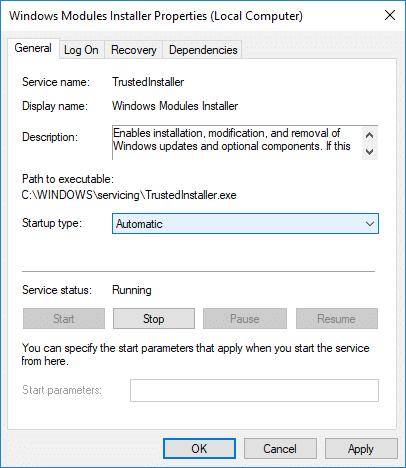
11. Genstart din pc for at gemme ændringer.
Metode 4: Kør systemvedligeholdelsesfejlfinding
1. Tryk på Windows-tasten + R, skriv derefter kontrol og tryk på Enter for at åbne Kontrolpanel.
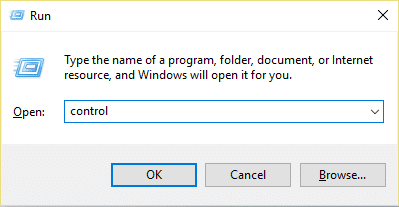
2. Søg Fejlfinding og klik på Fejlfinding.

3. Klik derefter på Se alt i venstre rude.
4. Klik på “System Maintenance” at køre System Maintenance Troubleshooter.

5. Fejlfinderen kan muligvis Fix Windows Modules Installer Worker High CPU Usage, but if it didn’t, then you need to run System Performance Troubleshooter.
6. Åbn Kommandoprompt. Brugeren kan udføre dette trin ved at søge efter 'cmd' Og tryk derefter på Enter.

7. Indtast følgende kommando i cmd og tryk på Enter:
msdt.exe / id PerformanceDiagnostic
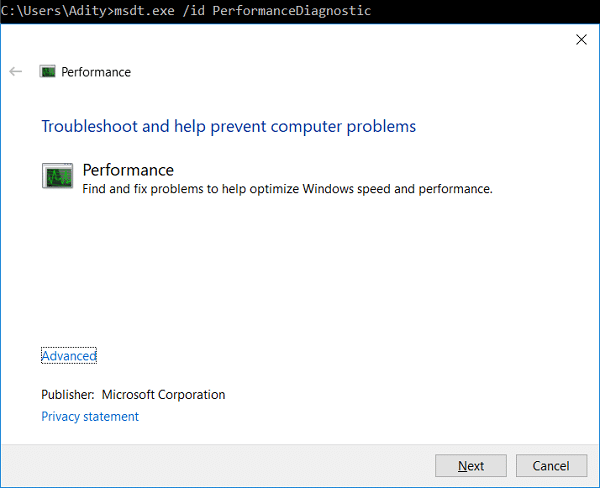
8. Follow the on-screen instruction to run the troubleshooter and fix any issues find the System.
9. Finally, exit the cmd and reboot your PC.
Method 5: Disable Automatic Maintenance
Sometimes Automatic Maintenance can conflict with the Windows Modules Installer Worker service, so try to disable Automatic Maintenance using this guide and see if this fixes your issue.
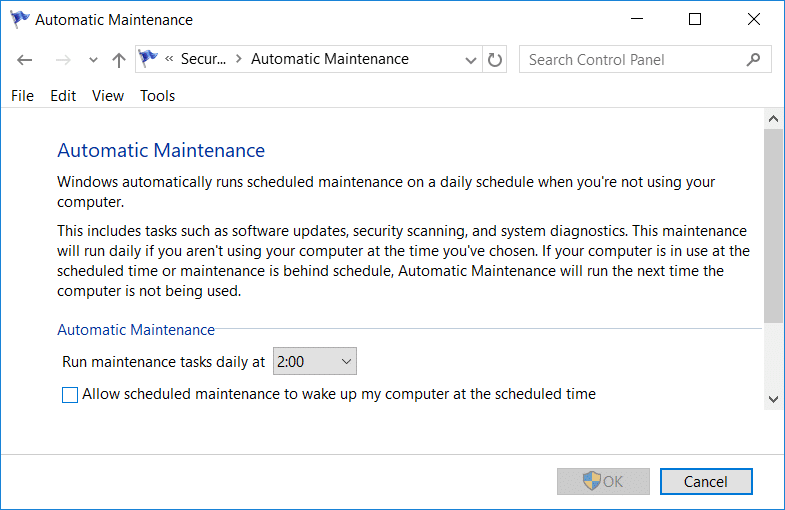
Although disabling Automatic Maintenance is not a good idea, but there might be some case where you need to actually disable it, for example, if your PC freezes during automatic maintenance or Windows Modules Installer Worker High CPU Usage issue then you should disable maintenance to troubleshoot the issue.
Metode 6: Kør System File Checker og DISM
1. Åbn Kommandoprompt. Brugeren kan udføre dette trin ved at søge efter 'cmd' Og tryk derefter på Enter.
2.Skriv nu følgende i cmd og tryk enter:
Sfc /scannow sfc /scannow /offbootdir=c: /offwindir=c:windows (hvis ovenstående mislykkes, så prøv denne)

3. Vent på, at ovenstående proces er færdig, og når du er færdig, genstart din pc.
4. Åbn cmd igen og skriv følgende kommando og tryk enter efter hver enkelt:
Dism /Online /Cleanup-Image /CheckHealth Dism /Online /Cleanup-Image /ScanHealth Dism /Online /Cleanup-Image /RestoreHealth

5. Lad DISM-kommandoen køre, og vent på, at den er færdig.
6. Hvis ovenstående kommando ikke virker, så prøv nedenstående:
Dism /Image:C:offline /Cleanup-Image /RestoreHealth /Source:c:testmountwindows Dism /Online /Cleanup-Image /RestoreHealth /Source:c:testmountwindows /LimitAccess
Bemærk: Udskift C:RepairSourceWindows med din reparationskilde (Windows Installations- eller Recovery Disc).
7. Genstart din pc for at gemme ændringer og se, om du er i stand til det Fix Windows Modules Installer Worker High CPU Usage.
Metode 7: Udfør en ren opstart
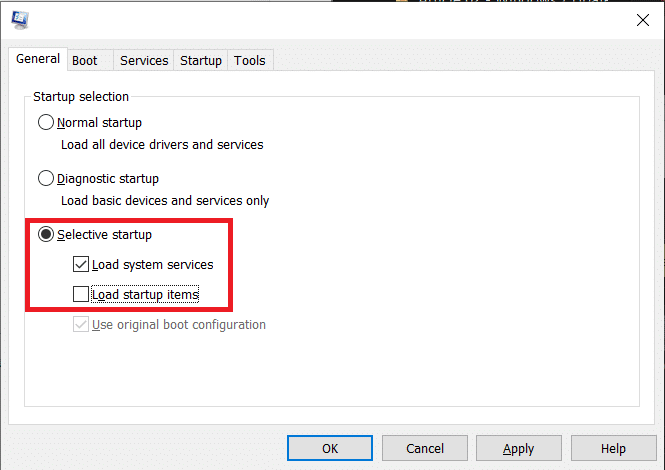
Sometimes 3rd party software can conflict with Windows and can cause the issue. To Fix Windows Modules Installer Worker High CPU Usage issue, skal du udføre en ren opstart på din pc og diagnosticere problemet trin for trin.
Method 8: Set your WiFi as Metered Connection
Bemærk: This will stop Windows Automatic Update, and you will need to manually check for Updates.
1. Tryk på Windows-tast + I for at åbne Indstillinger Klik derefter på Netværk og internet.

2. Vælg fra menuen til venstre Wi-Fi.
3. Under Wi-Fi, klik på din pt connected network (WiFi).
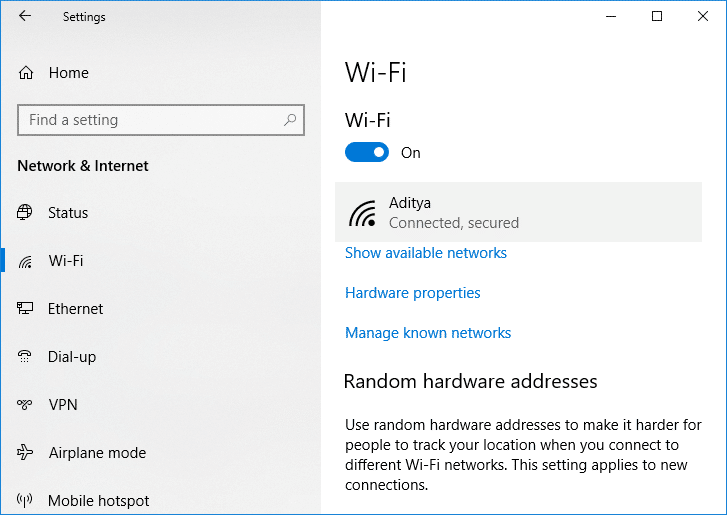
4. Scroll down to Metered connection and aktivere skiften under "Indstil som målrettet tilslutning".
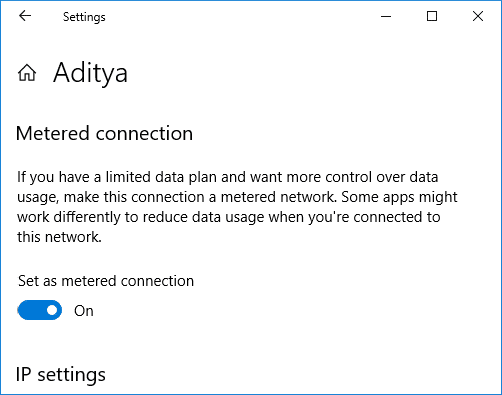
5. Close Settings and reboot your PC to save changes.
Anbefalet:
Det er det, du har med succes Fix Windows Modules Installer Worker High CPU Usage men hvis du stadig har spørgsmål vedrørende denne tutorial, er du velkommen til at spørge dem i kommentarens sektion.
