Are you facing Android Wi-Fi Connection Problems? Does it seem like the end of the world? Don’t worry in this guide we will talk about various tips & tricks which can help you resolve the Wi-Fi connectivity issue on Android devices.
Wi-Fi Connection creating a problem can really be disastrous. These invisible radio waves have become an integral part of our lives and even follow us to our offices, schools, and homes. It seems like “Wi-Fi is in the air” more than LOVE (Or, it’s probably Coronavirus). Smartphones can be really fragile and cannot be relied upon in case of a WiFi Hardware. Especially, if we talk about Android 10, users are facing a lot of issues regarding the Wi-Fi connection.
The problem can be either with passwords or even disruptive distribution of radio waves. Along with that, the software and firmware updates can have a glitch and be the cause of the problem. At times, even if the Wi-Fi is connected to the phone, it cannot load the web pages and sites which can be quite annoying, to be honest.
Fix Android Wi-Fi Connection Problems
But hey, we’re in this together. We have listed down a few amazing hacks than can solve these Wi-Fi issues, just like that.
Method 1: Forget the Network and try connecting again
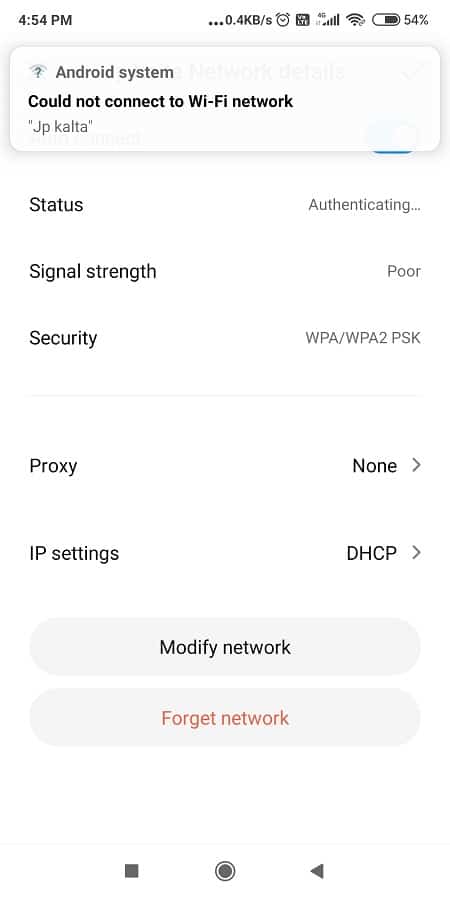
If you’re not able to connect to the WiFi network on your phone then forgetting that network and connecting again can help. This kind of problem is caused when there is a conflict with the IP. Along with that, try to reboot your device and router. This will definitely solve your problem.
Siehe auch:
So stellen Sie gelöschte Textnachrichten auf Android wieder her
Beheben Sie den Android-Fehler „Kein Befehl“.
Die 7 besten Lösungen für den Spotify-Fehler „Irgendwas ist schief gelaufen“ auf Android
Beheben Sie den Netflix-Fehler 5.7 auf Android
Behebung des Kommunikationsfehlercodes von Animal Crossing Pocket Camp
Here are a few steps to forget and reconnect to your Wireless Network:
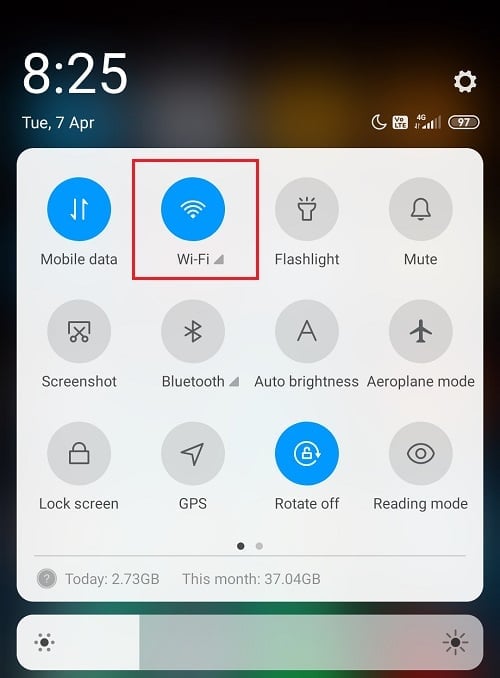
1. Schalten Sie ein your Wi-Fi from the Quick Access bar.
2. Jetzt geh zu Einstellungen und tippe auf Wi-Fi Einstellungen.
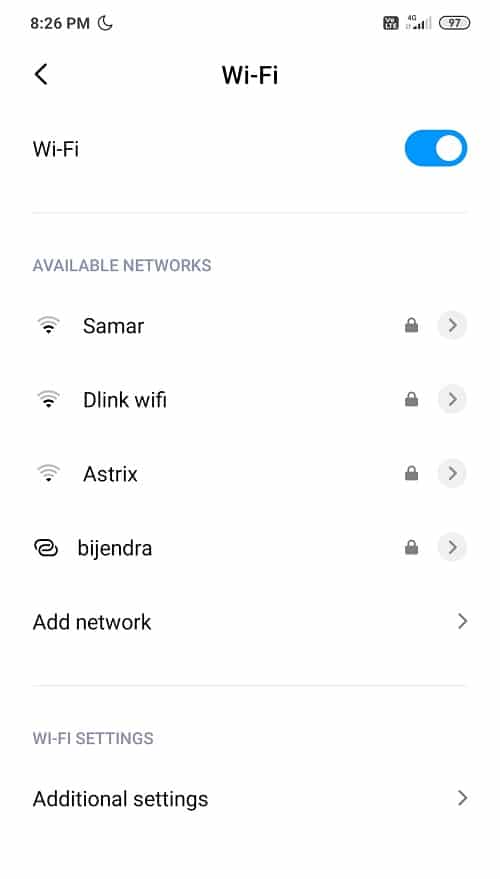
3. Navigieren Sie zu Wi-Fi and then click on the SSID with an issue.
4. Klicke auf Vergessen Sie Netzwerk machen Wiederaufnahme Ihr Gerät.
5. Try connecting to the SSID again and enter your password.
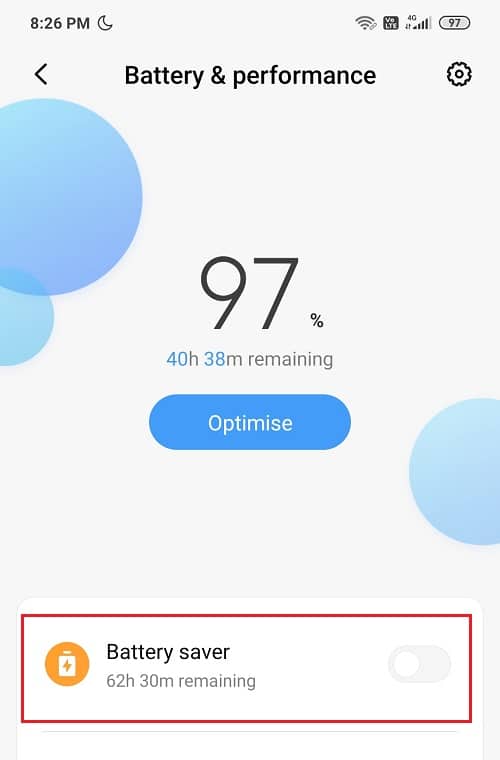
Method 2: Switch Off the Power Saving Mode
Just as the name suggests, power-saving mode reduces battery consumption by turning off Bluetooth, Wi-Fi, NFC, etc to minimize power consumption. Now as you see when the power saving mode is ON, the Wi-Fi is not accessible, so you need to make sure power saving mode is disabled if you’re facing the Android Wi-Fi connection problems.
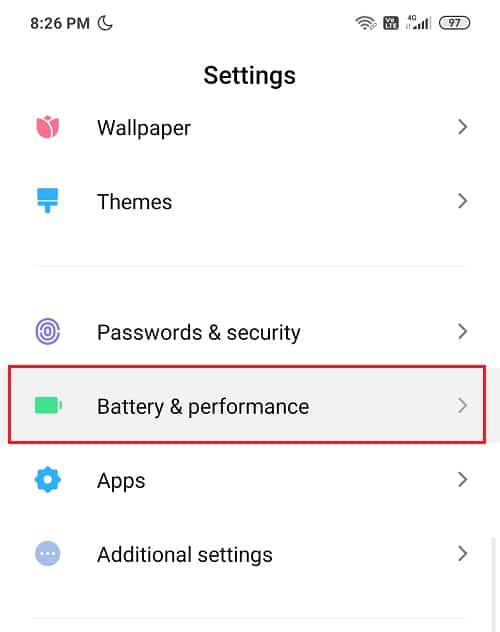
Steps to Turn Off Power Saving Mode:
1 Gehe zu Einstellungen und tippen Sie dann auf 'Batterie & Leistung'.
2. Turn off the toggle next to Battery Saver.
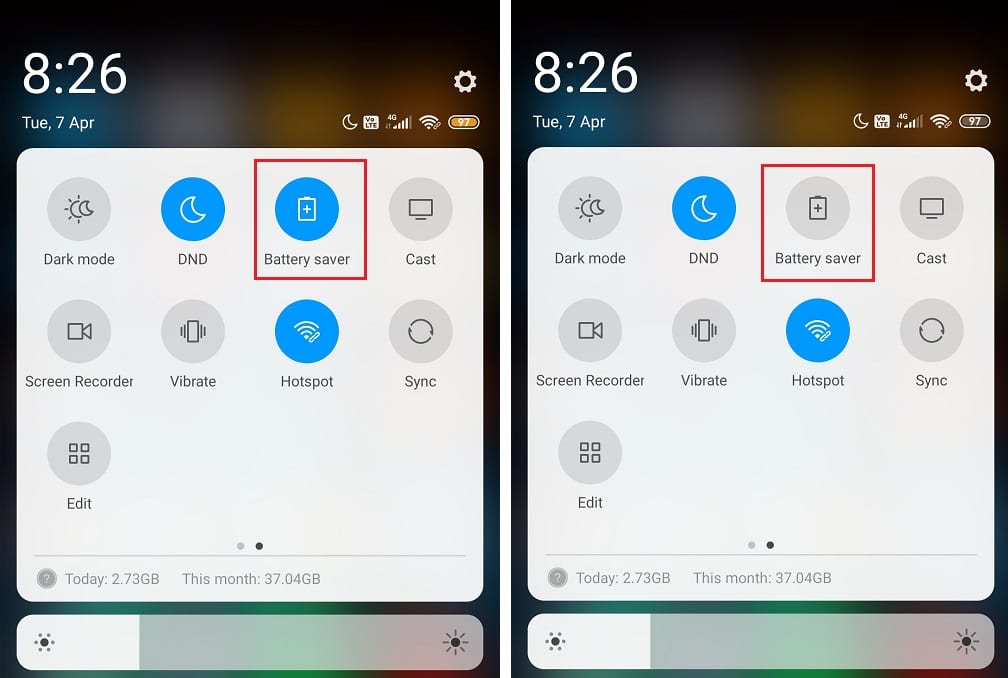
3. Or you can locate the Power Saving Mode Symbol in Ihrer Schnellzugriffsleiste und drehen Sie es Aus.
Method 3: Restart your Router
If you’re not able to connect your device to the router then, in that case, it is advisable to restart your router. And once the router restart, only connect your device instead of all the other devices. Restarting the modem seems to fix various issues with Wi-Fi connection on Android phones but if this step didn’t help then move to the next method.
Also, instead of using WPA + WPA2-Sicherheit, just stick with WPA security. Similarly, you can also try to disable the passwords entirely for your SSID just to give it a try. But it is not recommended to use your router without a password because of security reasons.
Lesen Sie auch: So finden Sie Ihre Telefonnummer auf Android und iOS
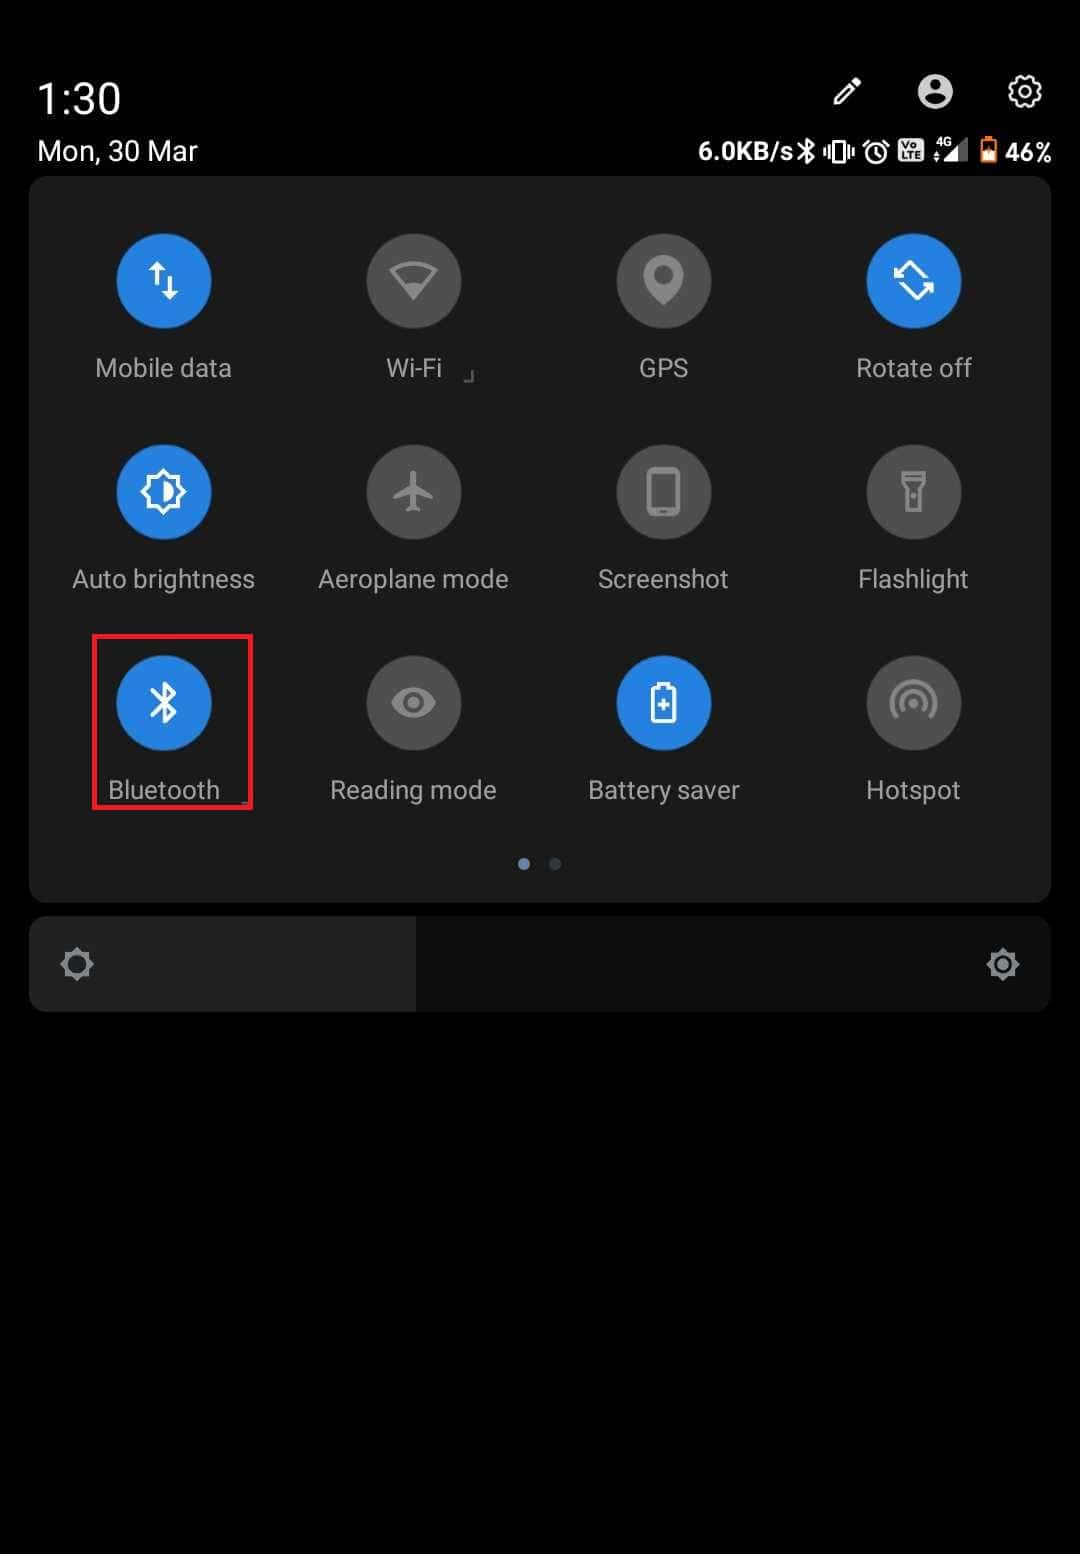
Method 4: Disable Bluetooth Temporarily
This might sound a little off but trust me this method does work. Sometimes, certain bugs on Android can conflict with Wi-Fi causing the connection problem. Now to verify this is not the case here, simply disable the Bluetooth and try connecting your network. If your device supports NFC, then it is recommended to disable it too.
Navigate your Quick Access Bar and turn OFF Bluetooth. This weird hack can work wonders.
Method 5: Make sure your Wi-Fi Password is Correct
If you’re facing Android WiFi Connection Problems then the first thing you should do is check if you’re using the correct password to connect to the WiFi. Passwords are imminent features of Wi-Fi because it’s the only way you can secure your WiFi from unauthorized access.
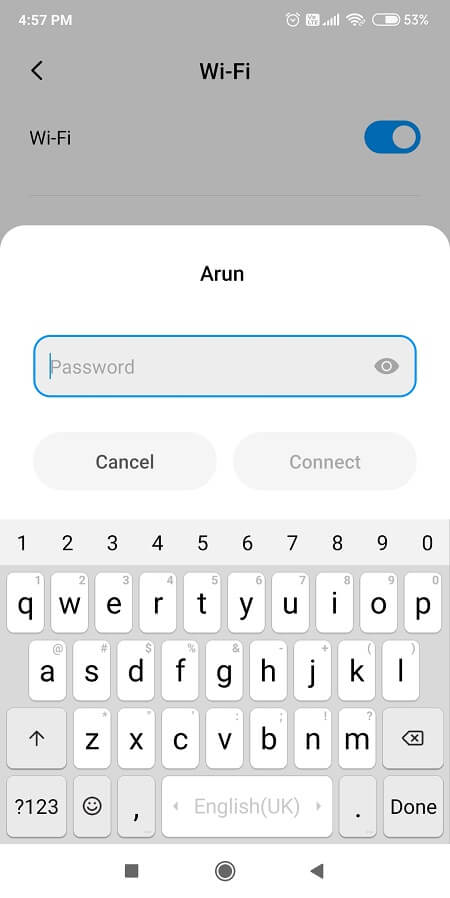
And if you are accidentally using the wrong password then you won’t be able to connect to Wi-Fi. So first, you need to forget your WiFi network using the above method and then again connect using the correct password. One more thing that you should do is to avoid mistakes that can lead to using incorrect passwords. Try to use numbers and alphabets in sequence with proper capitalization. Also, while connecting to the WiFi make sure you are entering the numbers or letters correctly and whether the Caps lock is On or Off.
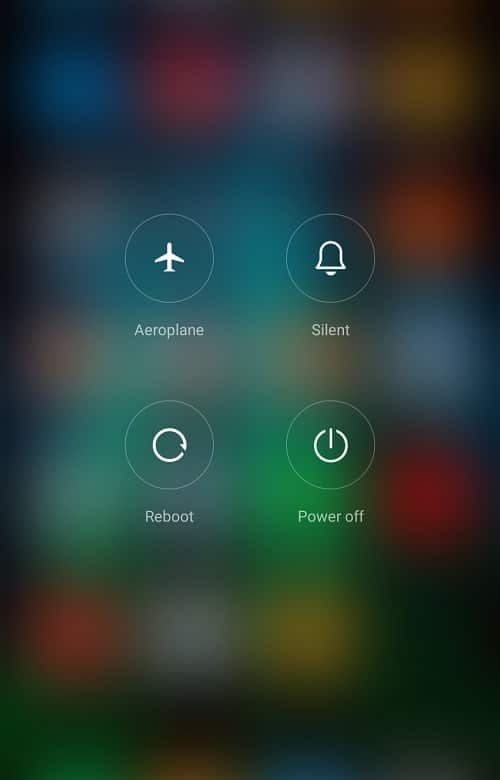
Method 6: Disable Airplane Mode
Diese einfache Lösung hat bei vielen Benutzern funktioniert. Sehen wir uns also ohne Zeitverlust an, wie Sie den Flugzeugmodus auf Ihrem Android-Gerät deaktivieren können:
1. Bring down your Quick Access Bar and tap on Flugzeug-Modus zu ermöglichen es.
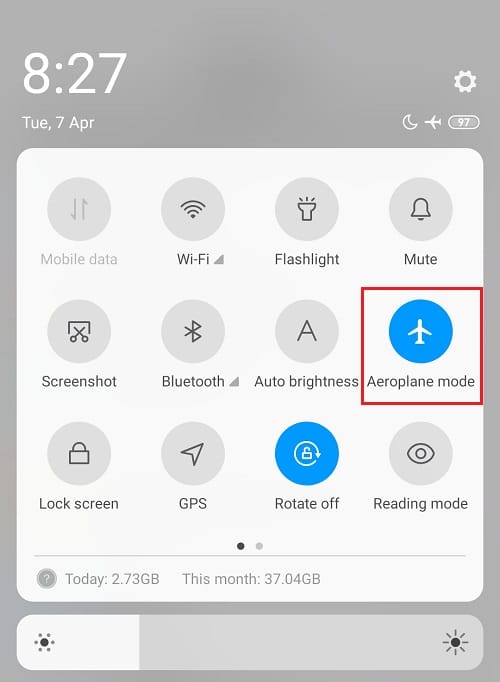
2. Once you enable the Airplane mode, it will disconnect your Mobile network, Wi-Fi Connections, Bluetooth, etc.
3. Wait for few seconds then again tap on it to turn off the Airplane mode. This may be able to resolve WiFi connection problems you are facing.

Method 7: Reset Network Settings to Default
If all the above methods were not able to help you in fixing Android WiFi connection problems then probably resetting the Network Settings to default will. But remember that resetting network settings to default will delete all your saved WiFi networks (SSID’s), passwords, paired devices, etc. This will reset the network settings to factory default.
Follow the steps below to reset your Network Settings to Default:
1. Öffnen Einstellungen auf Ihrem Android-Gerät.
2. Now tap on the search bar and type Zurücksetzen.
3. From the search result click on Reset Wi-Fi, mobile & Bluetooth.
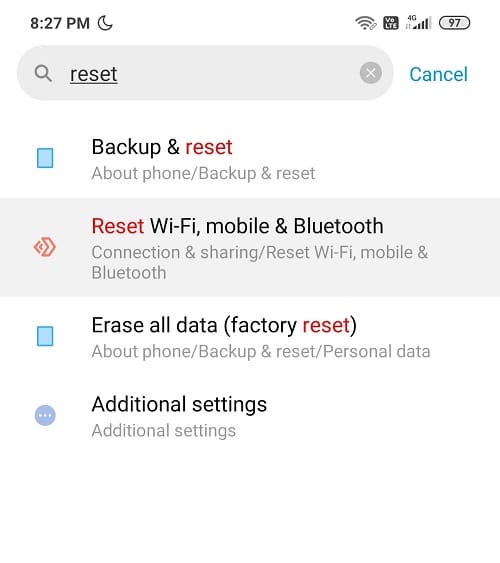
4. Klicken Sie anschließend auf „Einstellungen zurücksetzen" unten.
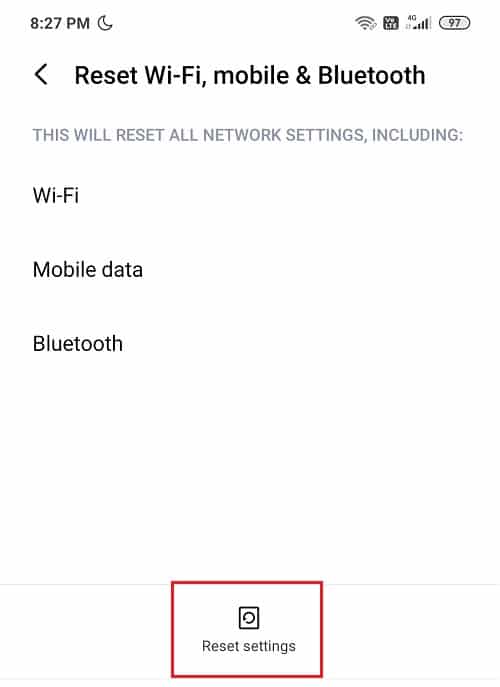
Your network settings will now be set to Default.
Method 8: Switch to 2.4GHz frequency from 5GHz
A bug in the latest version of Android OS seems to cause conflict with Wi-Fi connections and until the users switch to their router to 2.4GHz frequency instead of the 5GHz, they won’t be able to resolve the issue.
Also, make sure to connect to correct SSID while connecting as sometimes other Wi-Fi networks can have the same name as your Wi-Fi connection. Sometimes people simply get confused between several networks having the same names.
Lesen Sie auch: Behebung, dass das Telefon unter Android keine SMS empfängt
Method 9: Turn Off Smart Network Switch
When the Wi-Fi signal is weak or if there are some issues with the current Wi-Fi connection then the Smart Network Switch feature will enable the phone to automatically switch to the mobile data instead of the Wi-Fi network. While this makes things easy for you, but if you don’t want to utilize your mobile data then you need to turn off the Smart Network Switch feature.
Steps to turn off the Smart Network Switch feature are:
1. Go to the Quick Access Bar and long press on the Wi-Fi klicken.
2. Under Wi-Fi, tap on Weitere Einstellungen.
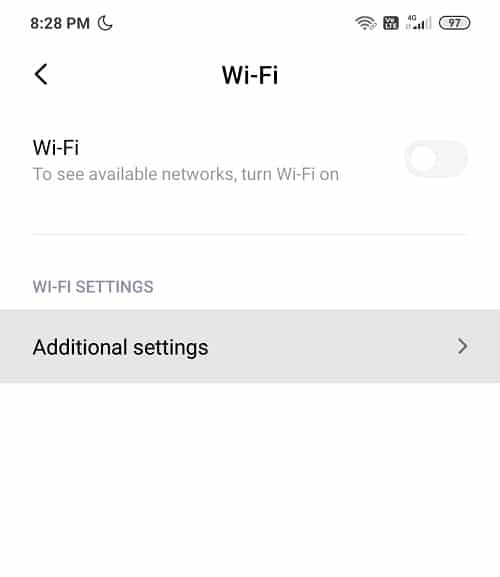
3. Hier finden Sie Intelligenter Netzwerk-Switch oder in diesem Fall a Wi-Fi assistant.
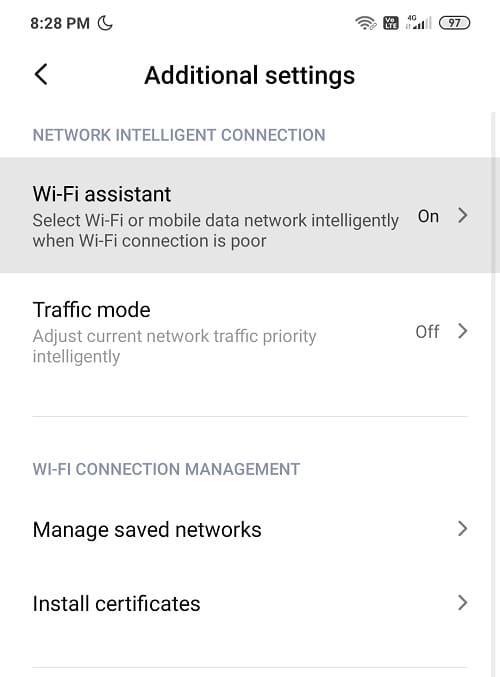
4. Make sure to turn off the toggle next to the Wi-Fi assistant or Smart Network Switch.
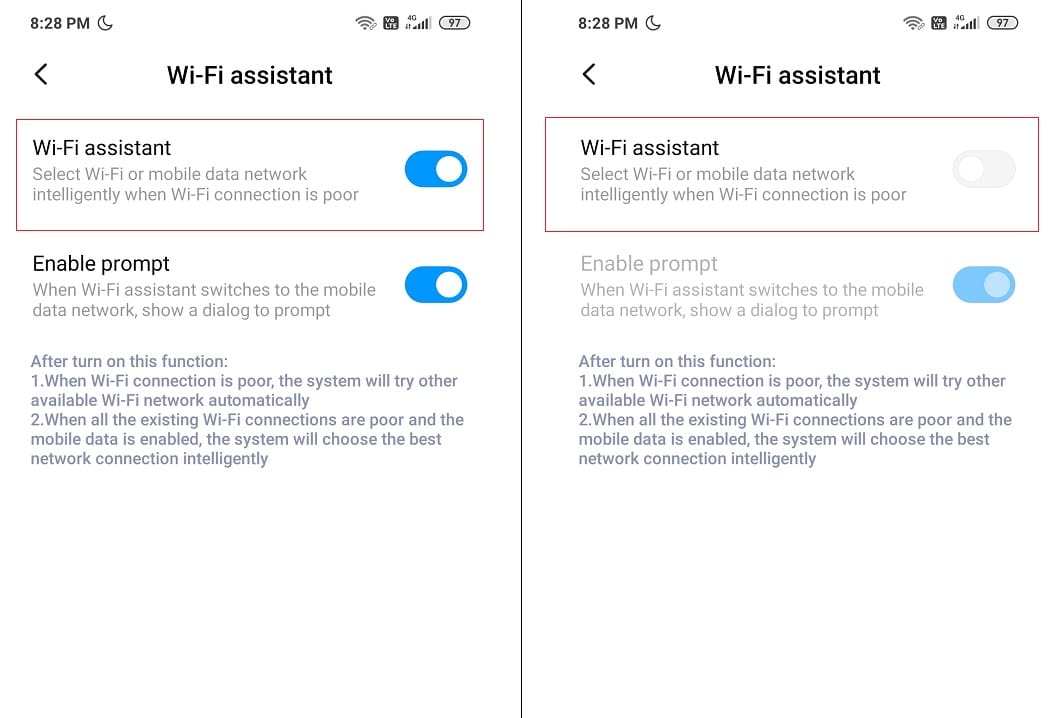
5. Once done, you are good to go!
Methode 10: Android-Betriebssystem aktualisieren
If your operating system is not up to date then it might the cause of the Android WiFi Connection Problems. Your phone will work properly if it is updated in a timely manner. Sometimes a bug can cause conflict with the Wi-Fi and in order to fix the issue, you need to check for the latest update on your Android phone.
At times, your phone is connected to the Wi-Fi but still shows the ‘No Internet’ sign. This is a very common problem among Android users. There is a possibility that your Wi-Fi is not working because of a reported bug in the software. When this bug catches the eye of the company, it releases an update to fix the underlying problem. So updating the device has worked wonders for most users, why don’t you give it a try?
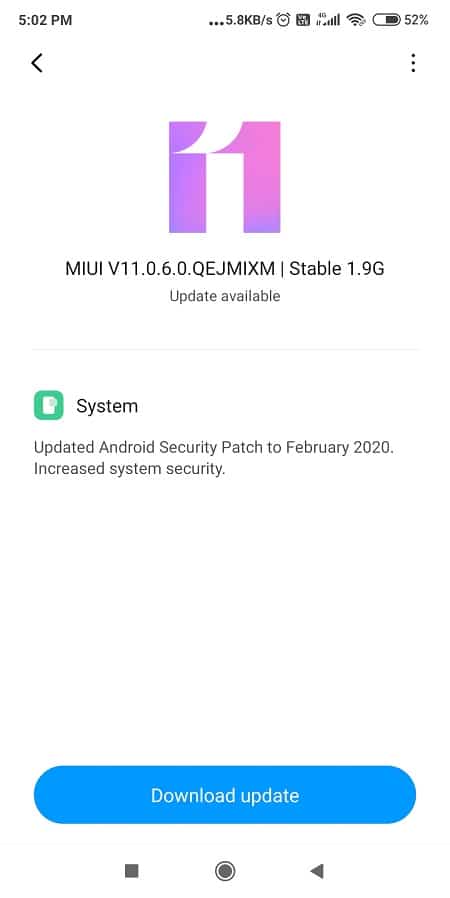
To check whether your phone has the updated version of the software, follow these steps:
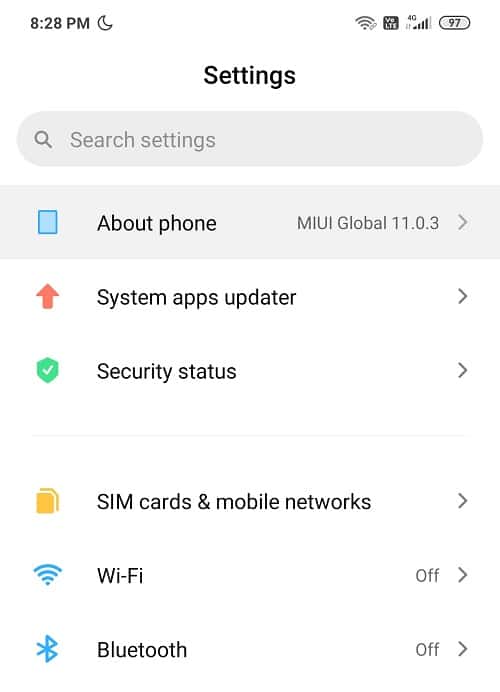
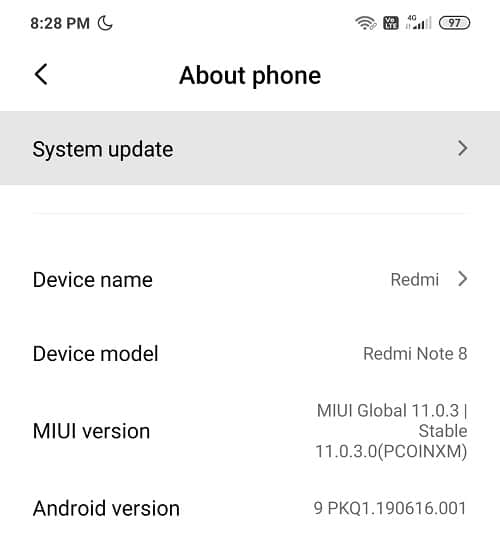
1. Öffnen Einstellungen on your phone and then tap on Über das Gerät.
2. Tippen Sie auf Systemupdate unter Über Telefon.
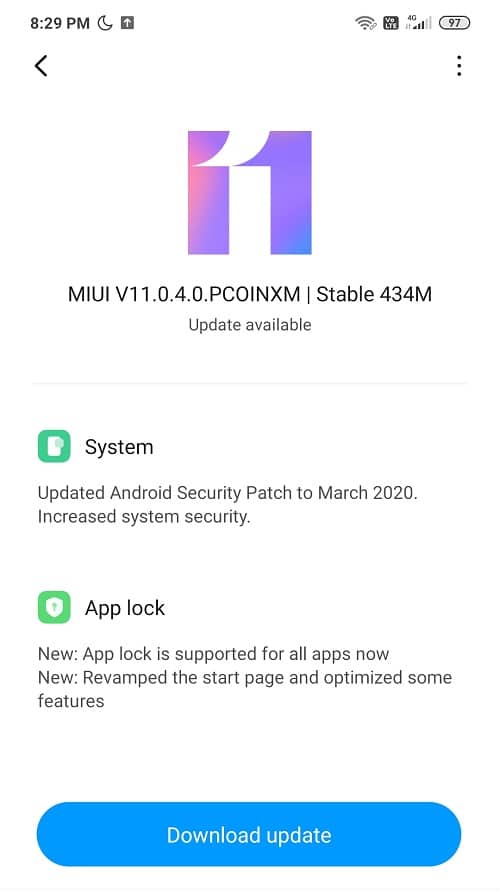
3. Next, tap on ‘Check for Updates’ oder 'Download Updates’ .
4. When the updates are being downloaded make sure you are connected to the Internet either using some other Wi-Fi network or Mobile Data.
5. Warten Sie, bis die Installation abgeschlossen ist, und starten Sie Ihr Gerät neu.
Method 11: Keep Wi-Fi On During Sleep
If your Wi-Fi is still causing a problem, the next best thing you can do is, navigate to your Wi-Fi settings and disable the ‘keep Wi-Fi ON during sleep’ option.
1. Pull down the Quick Access Bar and tap on the Einstellungen klicken.
2. Under Settings tap on the Wi-Fi .
3. On the extreme top right you will see drei Punkte or ‘MErz' option, it may differ from phone to phone.
4. Tippen Sie nun auf das 'Fortgeschritten' aus dem Menü.
5. Als nächstes scrollen Sie nach unten zum Erweiterte Einstellungen and you will find the ‘keep Wi-Fi on During Sleep’ .
6. You will find the three options Always, Only when plugged in, machen Nie.
7 Wählen Immer from the list of options and restart your Phone.
Lesen Sie auch: Senden Sie Textnachrichten vom PC mit einem Android-Telefon
Method 12: Third-Party App causing Interruption
Sometimes third-party apps can cause a conflict with the Wi-Fi connection. And in order to resolve problems with Wi-Fi connection, you can uninstall recently installed apps or any unwanted third-party apps. But before you go uninstalling every third-party app on your phone, you need to verify if this problem is actually caused by third-party apps. The best way to do so is to boot your phone in Safe Mode and see if the problem resolves. If the problem resolves then the issue is caused by third-party apps and you can troubleshoot it. If not, then continue to the next method.
To boot your phone in Safe Mode, follow the below steps:
1. Press & hold the Power-Taste Ihres Androids.
2. Next, tap and hold Ausschalten.
3. A screen asking you if you want to Starten Sie den abgesicherten Modus neu will pop up, tap on OK.
4. Your phone will now boot into the Safe Mode.

5. You should see the words ‘Sicherheitsmodus' written on your home screen at the extreme bottom left.
Method 13: Check Date & Time on your Phone
Sometimes, the date & time of your phone is incorrect and it doesn’t match with the date & time on the Router which will cause a conflict and you won’t be able to connect to the Wi-Fi. So, you need to make sure your phone’s date and time is correct. You can adjust the date & time of your Phone by following the below steps:
1. Öffnen Einstellungen on your phone and search for ‘Terminzeit' aus der oberen Suchleiste.
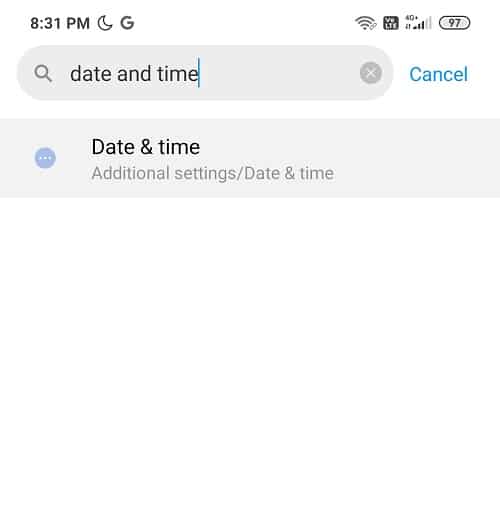
2. From the search result tap on Terminzeit.
3. Jetzt anmachen der Schalter neben dem Automatic date & time and Automatic time zone.

4. Wenn es bereits aktiviert ist, schalten Sie es aus und wieder ein.
5. Du wirst es tun müssen rebooten Ihr Telefon, um die Änderungen zu speichern.
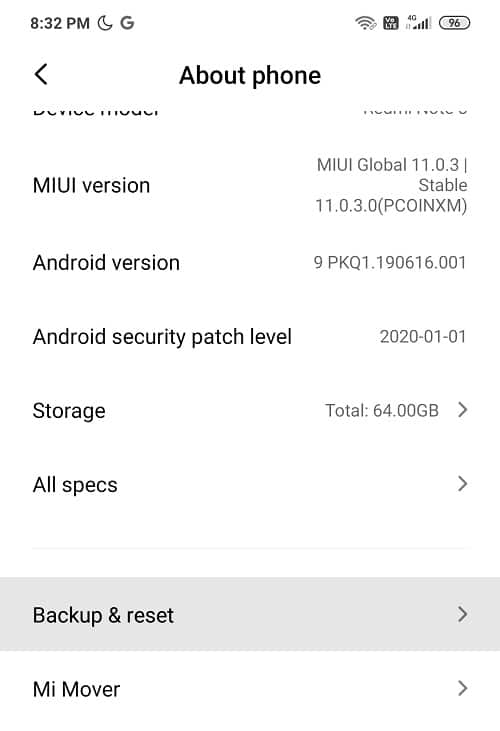
Method 14: Reset your Device to Factory Settings
This step should only be used as a last resort in order to fix the Android Wi-Fi connection problems. Although we are discussing this method at last but it is one of the most effective ones. But remember that you will lose all the data on your phone if you reset the device to factory settings. So before moving forward, it is recommended that you create a backup of your device.
Wenn Sie sich diesbezüglich wirklich entschieden haben, führen Sie die folgenden Schritte aus, um Ihr Gerät auf die Werkseinstellungen zurückzusetzen:
1. Sichern Sie Ihre Daten vom internen Speicher auf einem externen Speicher wie einem PC oder einem externen Laufwerk. Sie können Fotos mit Google Fotos oder Mi Cloud synchronisieren.
2. Öffnen Sie die Einstellungen und tippen Sie dann auf Über Telefon Tippen Sie dann auf Backup-Reset.
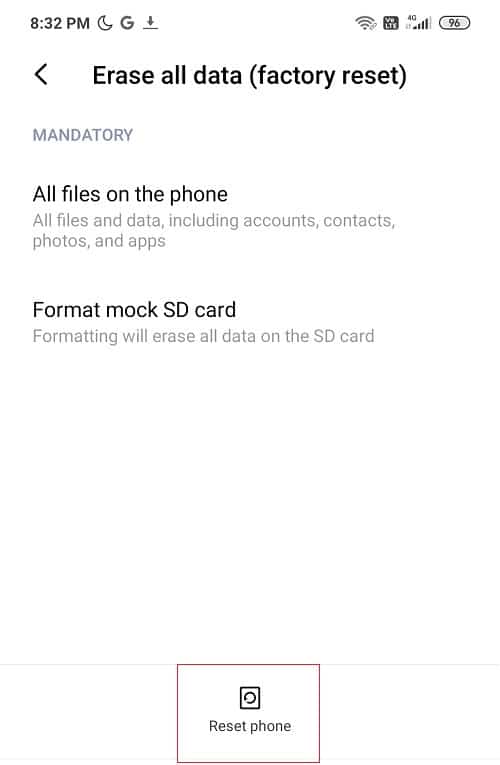
3. Unter „Zurücksetzen“ finden Sie das „Alle Daten löschen (Werksreset)' Möglichkeit.
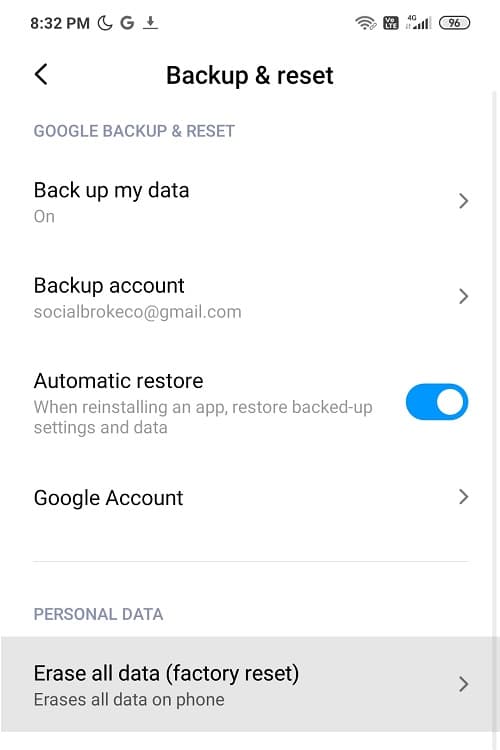
Hinweis: Sie können auch direkt in der Suchleiste nach „Werksreset“ suchen.

4. Tippen Sie anschließend auf „Telefon zurücksetzen" unten.
5. Befolgen Sie die Anweisungen auf dem Bildschirm, um Ihr Gerät auf die Werkseinstellungen zurückzusetzen.
Empfohlen: So löschen Sie den Browserverlauf auf einem Android-Gerät
I hope the above steps were able to Beheben Sie Probleme mit der Android-WLAN-Verbindung and you were able to resolve any issues regarding the Wi-Fi connectivity problems. Let us know what you think about our tips and tricks. Now, off you go!

