- in παράθυρα by διαχειριστής
Fix Windows Modules Installer Worker High CPU Usage
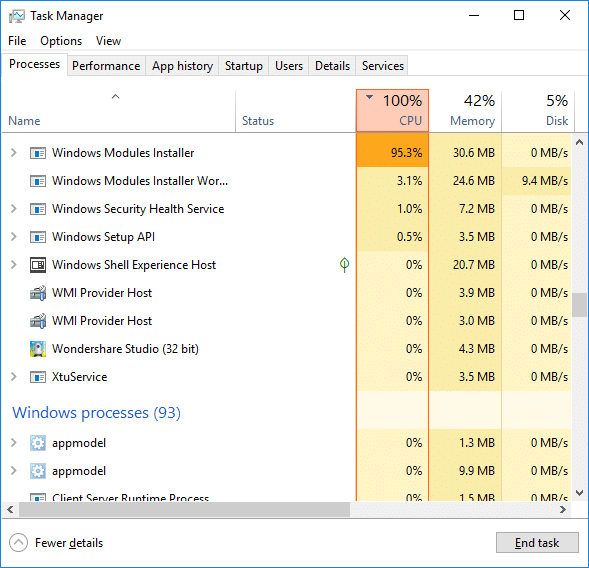
If you are facing the High CPU Usage by Windows Modules Installer Worker, then don’t worry as thousands of other users are also facing the similar problem and therefore, there are many working fixes which we will be discussing today in this article. To verify if you are facing this issue open Task Manager (Ctrl + Shift + Esc) and you will find that the Windows Modules Installer Worker is consuming High CPU or Disk Usage.

Pro Συμβουλή: You may leave your PC overnight or for a few hours to see the issue rectify itself once the Windows is finished downloading and installing updates.
What is Windows Modules Installer worker (WMIW)?
Windows Modules Installer worker (WMIW) is a service which takes cares of automatically installing Windows Update. According to its service description, WMIW is a system process that enables automatic installation, modification, and removal of Windows updates and optional components.
This process is responsible for finding new Windows Update automatically and installing them. As you might be aware that Windows 10 automatically install newer builds (i.e. 1803 etc.) via Windows Updates, so this process is responsible for installing these updates in the background.
Although this process is called Windows Modules Installer worker (WMIW) and you will see the same name in the Processes tab in the Task Manager, but if you switch to Details tab, then you will find the name of the file as TiWorker.exe.
Why Is Windows Modules Installer worker Using So Much CPU?
As Windows Modules Installer worker (TiWorker.exe) runs continuously in the background, sometimes it might utilize high CPU or disk usage when installing or uninstalling Windows Updates. But if its constantly using high CPU then the Windows Modules Installer worker may have become unresponsive while checking new updates. As a result, you may be experiencing lags, or your system might hang or freeze completely.
The first thing users do when they experience freezing, or lagging issues on their system is to restart their PC, but I assure you that this strategy won’t work in this case. This is because the issue will not resolve by itself until and unless you fix the underlying cause.
Fix Windows Modules Installer Worker High CPU Usage
Φροντίστε να δημιουργήσετε ένα σημείο επαναφοράς σε περίπτωση που κάτι πάει στραβά.
Windows Modules Installer Worker (WMIW) is an important service, and it should not be disabled. WMIW or TiWorker.exe is not a virus or malware, and you cannot just delete this service from your PC. So without wasting any time let’s see How to Fix Windows Modules Installer Worker High CPU Usage με τη βοήθεια του παρακάτω οδηγού αντιμετώπισης προβλημάτων.
Μέθοδος 1: Εκτελέστε το Windows Update Troubleshooter
1. Πατήστε Windows Key + I για να ανοίξετε ρυθμίσεις στη συνέχεια, κάντε κλικ στο Εικονίδιο ενημέρωσης και ασφάλειας.
![]()
2. Από το αριστερό μενού, επιλέξτε Αντιμετώπιση προβλημάτων υπό "Εκκίνηση" κάντε κλικ στο Το Windows Update.
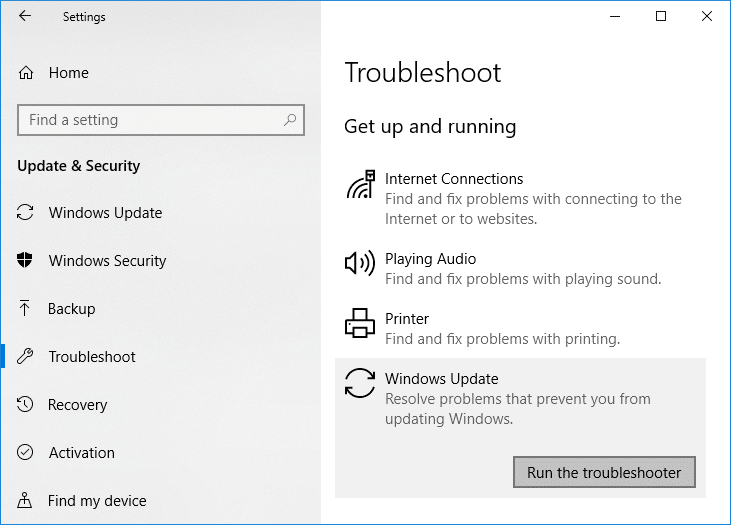
3. Τώρα κάντε κλικ στο «Εκτελέστε το εργαλείο αντιμετώπισης προβλημάτων" κάτω από το Windows Update.
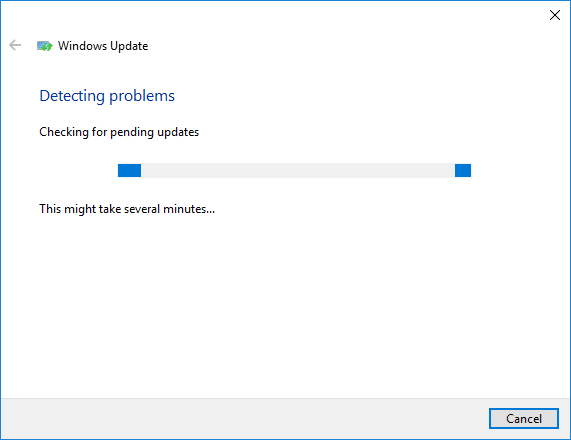
4. Let the troubleshooter run, and it will automatically fix any issues found with Windows Update taking forever.
Method 2: Manually Check for Windows Updates
1. Πατήστε Windows Key + I και μετά επιλέξτε Ενημέρωση και ασφάλεια.
2. Από την αριστερή πλευρά, το μενού κάνει κλικ στο Το Windows Update.
3. Τώρα κάντε κλικ στο «Έλεγχος για ενημερώσειςκουμπί ” για να ελέγξετε για τυχόν διαθέσιμες ενημερώσεις.

4. Εάν εκκρεμούν ενημερώσεις, κάντε κλικ στο Λήψη και εγκατάσταση ενημερώσεων.

5. Μόλις ληφθούν οι ενημερώσεις, εγκαταστήστε τις και τα Windows σας θα ενημερωθούν.
Method 3: Configure Windows Update to Manual
Προσοχή: This method will switch Windows Update from automatically installing the new updates to the manual. This means you have to manually check for Windows Update (weekly or monthly) to keep your PC secure. But follow this method, and you can again set the Updates to Automatic once the issue is resolved.
1.Πατήστε Windows Key + R και μετά πληκτρολογήστε services.msc και πατήστε Enter.

2. Scroll down and find Windows Installer Modules service in the list.
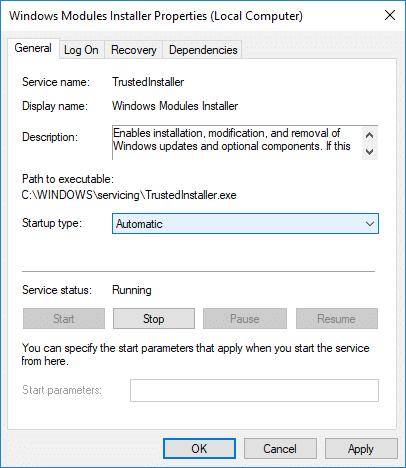
3. Κάντε δεξί κλικ στο Υπηρεσία Windows Modules Installer και επιλέξτε Ιδιότητες.
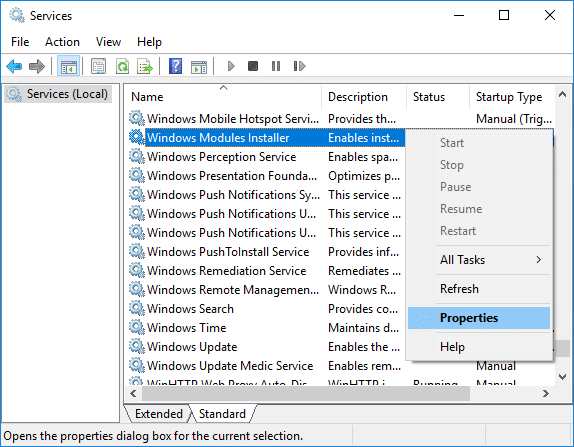
4. Τώρα κάντε κλικ στο στάση then from the τύπος εκκίνησης drop-down select Εγχειρίδιο.
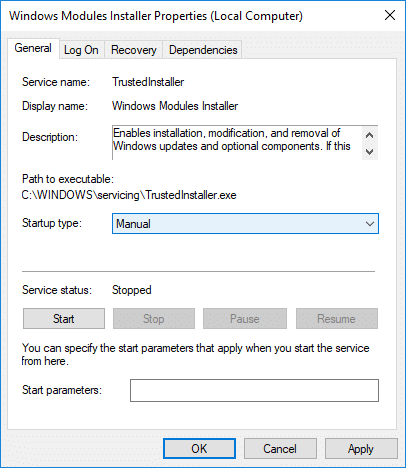
5. Κάντε κλικ στο Apply (Εφαρμογή) και στη συνέχεια Εντάξει.
6. Similarly, follow the same step for the Υπηρεσία Windows Update.
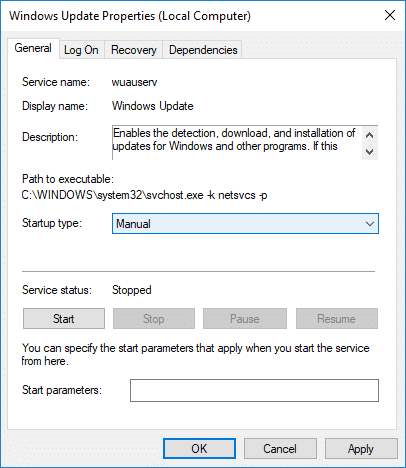
7. Επανεκκινήστε τον υπολογιστή σας για να αποθηκεύσετε τις αλλαγές.
8. Και πάλι έλεγξε για Windows Updates Manually και εγκαταστήστε τυχόν ενημερώσεις που εκκρεμούν.
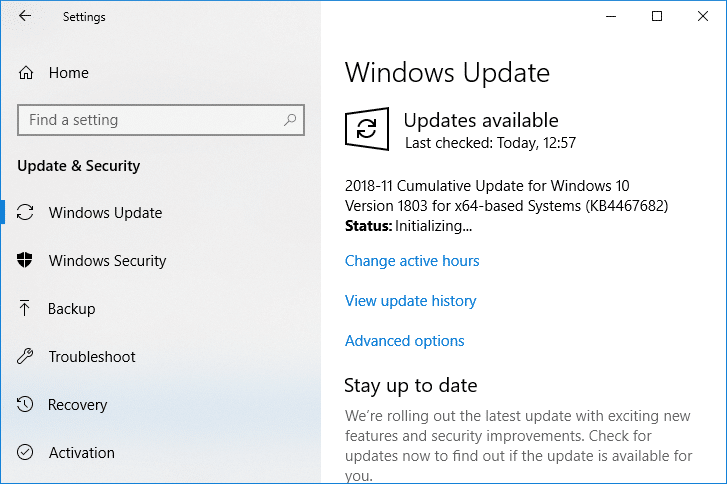
9. Once is done, again go back to services.msc window and open the Windows Modules Installer & Windows Update Properties παράθυρο.
10. Ρυθμίστε το τύπος εκκίνησης προς την Αυτόματο και κάντε κλικ στο κουμπί Αρχική. Then click Apply followed by OK.
11. Επανεκκινήστε τον υπολογιστή σας για να αποθηκεύσετε τις αλλαγές.
Μέθοδος 4: Εκτελέστε το πρόγραμμα αντιμετώπισης προβλημάτων συντήρησης συστήματος
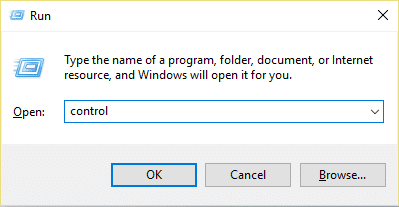
1. Πατήστε Windows Key + R και, στη συνέχεια, πληκτρολογήστε control και πατήστε Enter για να ανοίξει Πίνακας Ελέγχου.
2. Αναζητήστε Αντιμετώπιση προβλημάτων και κάντε κλικ στο Αντιμετώπιση προβλημάτων.

3. Στη συνέχεια, κάντε κλικ στο Προβολή όλων στο αριστερό παράθυρο.
4. Κάντε κλικ στο “System Maintenance” για να εκτελέσετε το System Maintenance Troubleshooter.

5. Το Εργαλείο αντιμετώπισης προβλημάτων μπορεί να το κάνει Fix Windows Modules Installer Worker High CPU Usage, but if it didn’t, then you need to run System Performance Troubleshooter.
6. Ανοίξτε τη γραμμή εντολών. Ο χρήστης μπορεί να εκτελέσει αυτό το βήμα αναζητώντας «cmd» Και στη συνέχεια πατήστε Enter.

7. Πληκτρολογήστε την ακόλουθη εντολή στο cmd και πατήστε Enter:
msdt.exe / id ΑπόδοσηDiagnostic
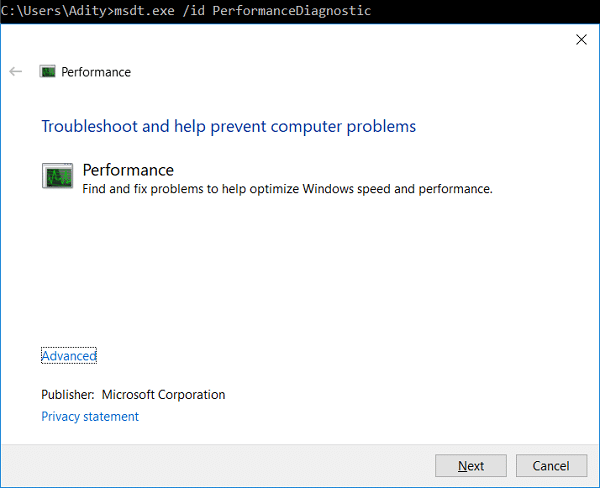
8. Follow the on-screen instruction to run the troubleshooter and fix any issues find the System.
9. Finally, exit the cmd and reboot your PC.
Method 5: Disable Automatic Maintenance
Sometimes Automatic Maintenance can conflict with the Windows Modules Installer Worker service, so try to disable Automatic Maintenance using this guide and see if this fixes your issue.
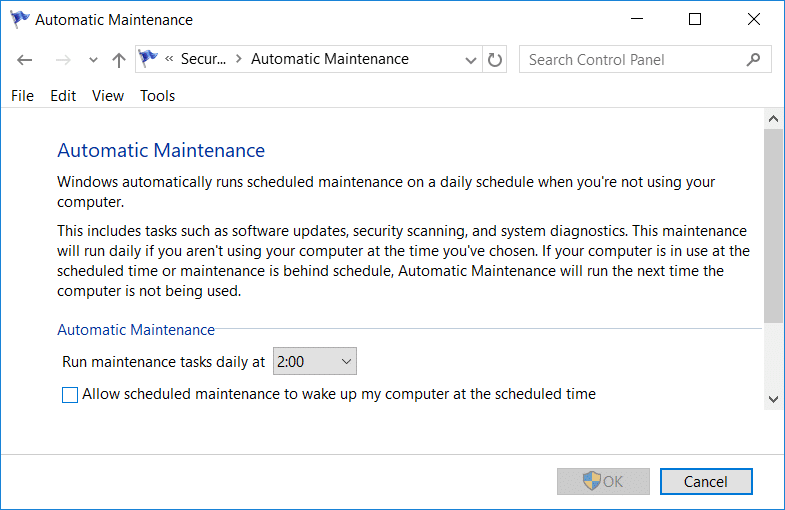
Although disabling Automatic Maintenance is not a good idea, but there might be some case where you need to actually disable it, for example, if your PC freezes during automatic maintenance or Windows Modules Installer Worker High CPU Usage issue then you should disable maintenance to troubleshoot the issue.
Μέθοδος 6: Εκτελέστε τον Έλεγχο αρχείων συστήματος και DISM
1. Ανοίξτε τη γραμμή εντολών. Ο χρήστης μπορεί να εκτελέσει αυτό το βήμα αναζητώντας «cmd» Και στη συνέχεια πατήστε Enter.
2. Τώρα πληκτρολογήστε τα παρακάτω στο cmd και πατήστε enter:
Sfc /scannow sfc /scannow /offbootdir=c: /offwindir=c:windows (Εάν τα παραπάνω αποτύχουν, δοκιμάστε αυτό)

3. Περιμένετε να ολοκληρωθεί η παραπάνω διαδικασία και μόλις ολοκληρωθεί, επανεκκινήστε τον υπολογιστή σας.
4. Ανοίξτε ξανά το cmd και πληκτρολογήστε την παρακάτω εντολή και πατήστε enter μετά από κάθε μία:
Dism /Online /Cleanup-Image /CheckHealth Dism /Online /Cleanup-Image /ScanHealth Dism /Διαδικτυακός /Cleanup-Image /RestoreHealth

5. Αφήστε την εντολή DISM να εκτελεστεί και περιμένετε να τελειώσει.
6. Εάν η παραπάνω εντολή δεν λειτουργεί, δοκιμάστε τα παρακάτω:
Dism /Image:C:offline /Cleanup-Image /RestoreHealth /Source:c:testmountwindows Dism /Online /Cleanup-Image /RestoreHealth /Πηγή:c:testmountwindows /LimitAccess
Σημείωση: Αντικαταστήστε το C:RepairSourceWindows με την πηγή επισκευής σας (Windows Installation ή Recovery Disc).
7. Επανεκκινήστε τον υπολογιστή σας για να αποθηκεύσετε τις αλλαγές και να δείτε αν μπορείτε Fix Windows Modules Installer Worker High CPU Usage.
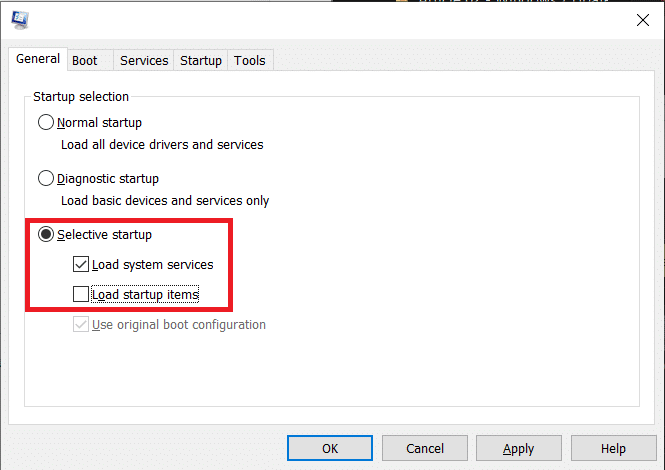
Μέθοδος 7: Εκτελέστε μια καθαρή μπότα
Sometimes 3rd party software can conflict with Windows and can cause the issue. To Fix Windows Modules Installer Worker High CPU Usage issue, πρέπει να εκτελέσετε μια καθαρή εκκίνηση στον υπολογιστή σας και να διαγνώσετε το πρόβλημα βήμα προς βήμα.
Method 8: Set your WiFi as Metered Connection
Σημείωση: This will stop Windows Automatic Update, and you will need to manually check for Updates.
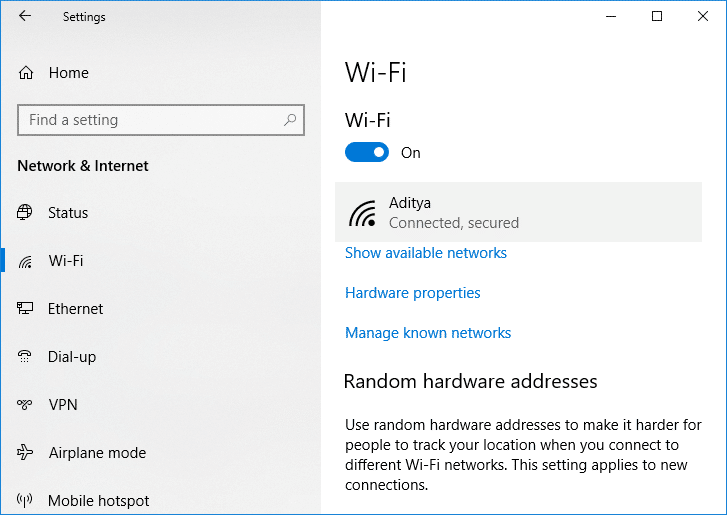
1. Πατήστε Windows Key + I για να ανοίξετε ρυθμίσεις στη συνέχεια, κάντε κλικ στο Δίκτυο & Διαδίκτυο.

2. Από το αριστερό μενού, επιλέξτε Wi-Fi.
3. Under Wi-Fi, κλικ on your currently connected network (WiFi).
4. Scroll down to Metered connection and ενεργοποιήστε την εναλλαγή υπό "Ορίστε ως μετρημένη σύνδεση".
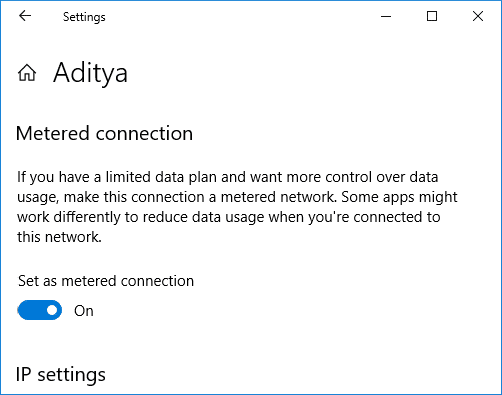
5. Close Settings and reboot your PC to save changes.
Συνιστάται:
Αυτό είναι όλο, το έχετε με επιτυχία Fix Windows Modules Installer Worker High CPU Usage αλλά αν εξακολουθείτε να έχετε απορίες σχετικά με αυτό το σεμινάριο, μπορείτε να τις ρωτήσετε στην ενότητα των σχολίων.
