Ripari VirtualBox-Interfaco Havas Eraran Mesaĝon pri Aktivaj Konektoj

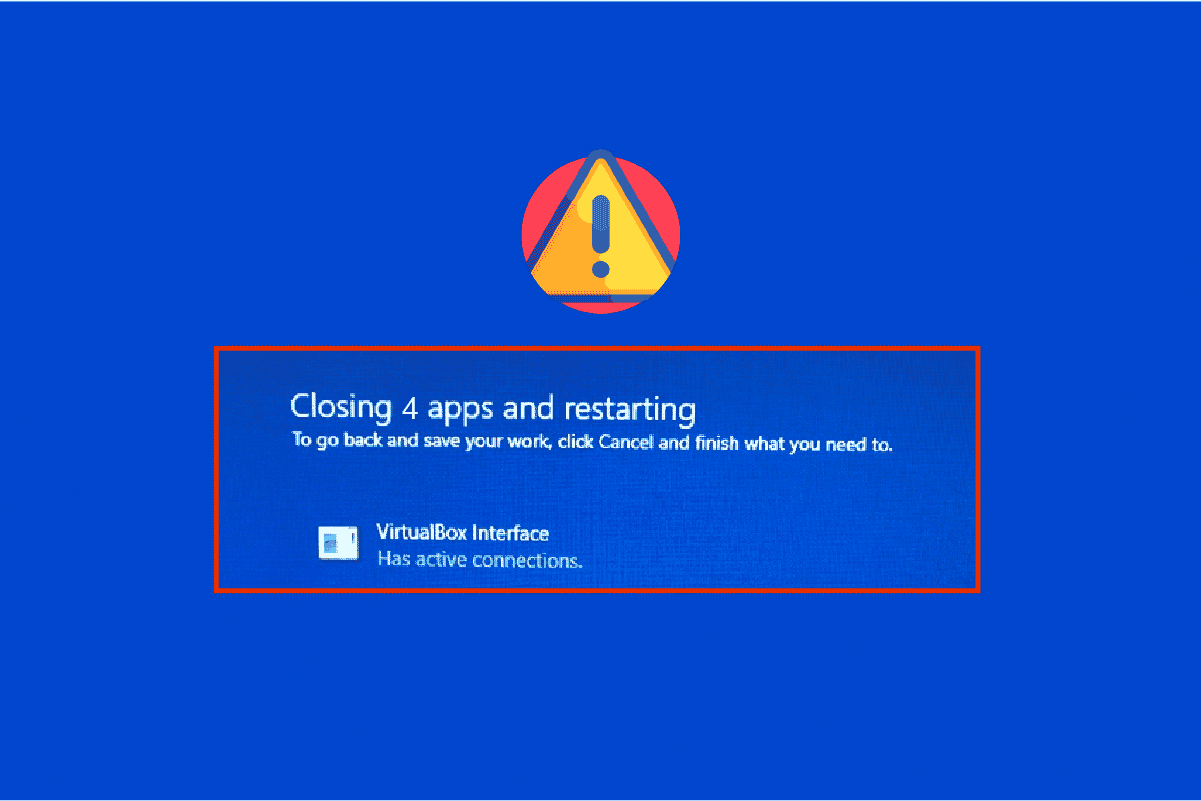
You might face VirtualBox interface has active connections error message when you are shutting down your PC especially when you use the old version of the BlueStacks emulator. This is an issue encountered by the users when they try to shut down their computer but can’t. In addition, configuring the Task Manager priorities of the BlueStacks can also cause the error VirtualBox interface BlueStacks. If you are also the one who is facing the same error, this guide will help you fix the same with effective troubleshooting steps.
How to Fix VirtualBox Interface Has Active Connections Error Message
There are so many factors that contribute to VirtualBox interface unable to insert Virtual optical disk or Windows 10 shut down issue. A few of them are listed below.
- Conflicting background processes running on your PC.
- Startup tasks are interfering with BlueStacks.
- Inappropriate priorities are set to BlueStacks.
- Outdated emulator, Operating system, .NET framework, drivers on PC.
- Few apps are conflicting with BlueStacks.
- Conflicting user account and Windows version.
We have compiled a list of effective troubleshooting methods that will help you fix VirtualBox interface BlueStacks shutdown issue on your Windows 10 computer.
Noto: Before getting into the solution, make sure that you have not enabled the Notifications Mode in the BlueStacks.
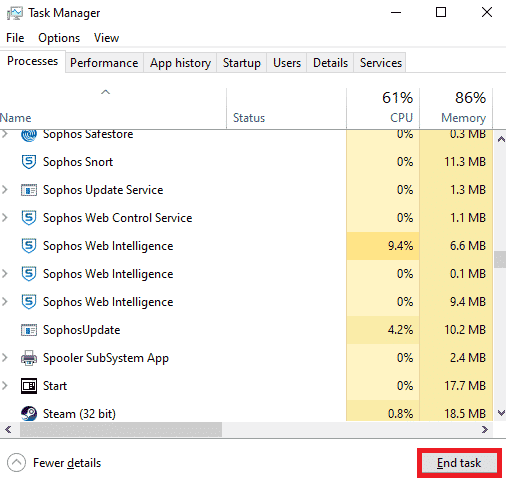
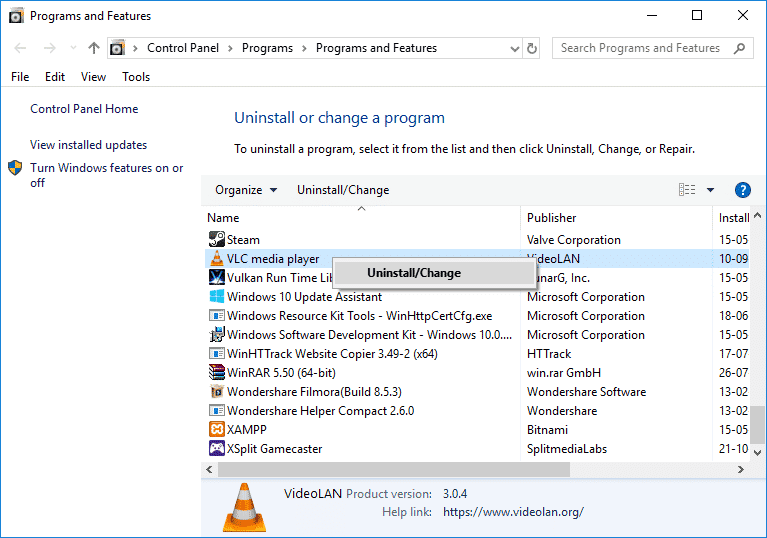
Method 1: Close BlueStack Processes
If BlueStacks is operating on your PC (even in the background), it makes your PC difficult in shutting down. In this case, exit the BlueStacks emulator completely with the use of Task Manager by closing all the processes which are related to BlueStacks forcefully by following our guide How to End Task in Windows 10. This will help you solve this issue. You can also create a batch file in achieving the functionality, follow the steps below to do it.
Now, shut down your PC and check if the error VirtualBox interface Windows 10 shut down issue is fixed. If the error is fixed, you could make a batch file and then click the batch file before shutting down your PC.
Noto: This function can also be done by creating a shutdown task either in a Group Policy Editor or in the Task Scheduler.
Now follow the given steps;
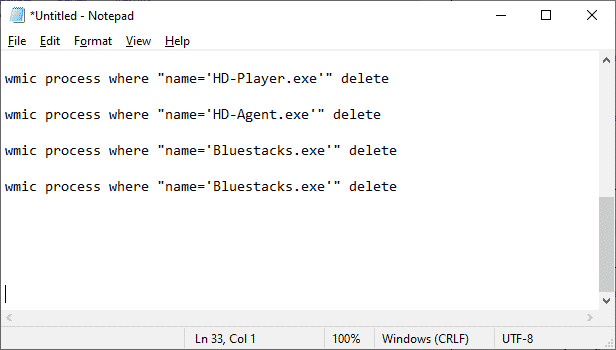
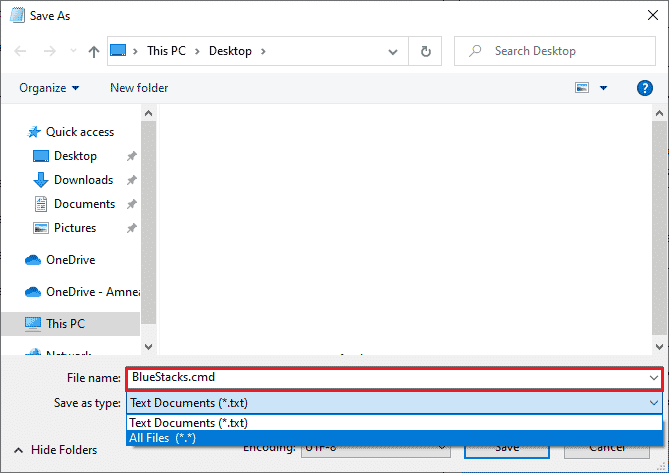
1. Copy the following text in a text editor for instance Notepad.
wmic process where "name="HD-Player.exe"" delete
wmic process where "name="HD-Agent.exe"" delete
wmic process where "name="Bluestacks.exe"" delete
wmic process where "name="Bluestacks.exe"" delete
2. Tiam, alklaku dosiero kaj tiam elektu Konservi kiel.
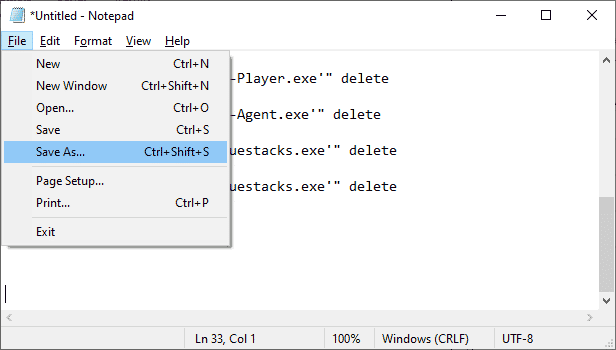
3. Now, change the dropdown menu of Konservi kiel Tipo al Ĉiuj dosieroj, then save the file with the name having a CMD extension (example, Click it Before Shutting Down the Computer.cmd )
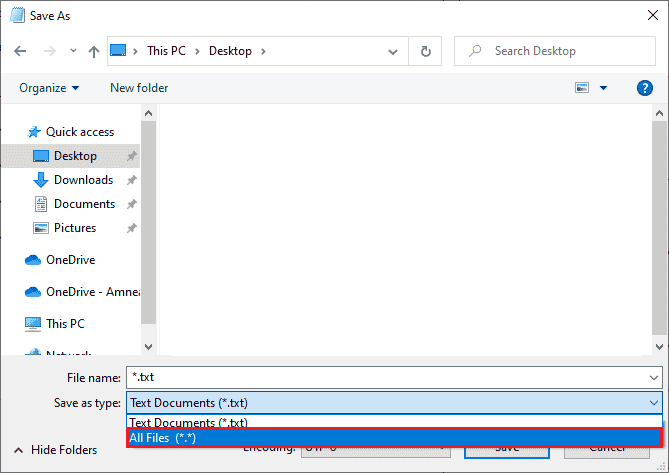
4. Alklaku la dosiero now and then shut down the computer and check if the VirtualBox interface has active connections error message is fixed.
Method 2: Disable Startup Processes
If the first method did not fix VirtualBox interface has active connections error message, you can try disabling all the startup processes with the Task Manager, and several users have suggested that this task has helped them a lot. To implement the method, follow our guide on 4 Ways to Disable Startup Programs in Windows 10.
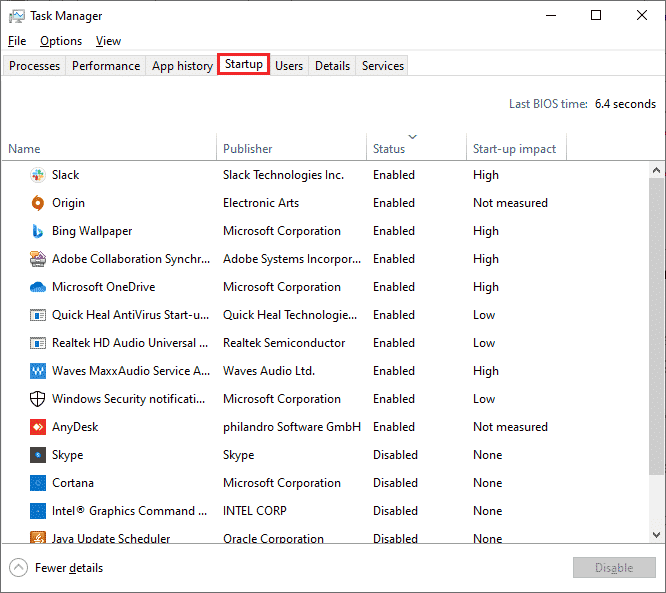
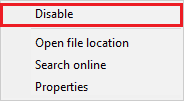
Click the start-up processes one by one and select Malebligu.
When you are done disabling the tasks, restart your computer and check if the error VirtualBox interface error Windows 10 estas fiksita.
Ankaŭ Legu: 5 Manieroj Ripari Bluestacks Motoro Ne Komencos
Method 3: Modify Compatibility Setting
It is also possible that BlueStacks may not have enough security clearance to run on your PC. The security settings may be changed in the latest application update or Windows update. Follow the steps below to grant full control to BlueStacks.
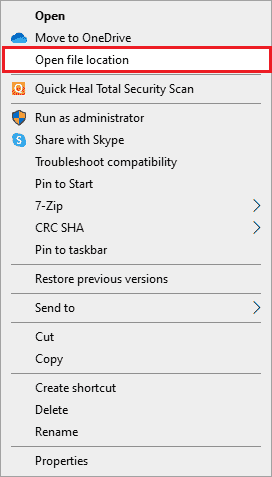
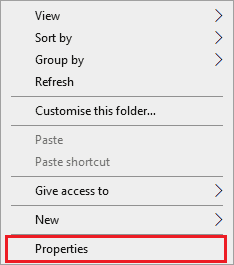
1. Right-click on the Desktop shortcut of BlueStacks kaj elektu Malfermu dosierlokon in the option.
2. Trovu la Bluestacks.exe file and right-click on it.
3. Elektu Propraĵoj.
4. Movu al la Sekureco tab of the Properties window and then click on the redakti button which is next to To change permissions, click Edit.
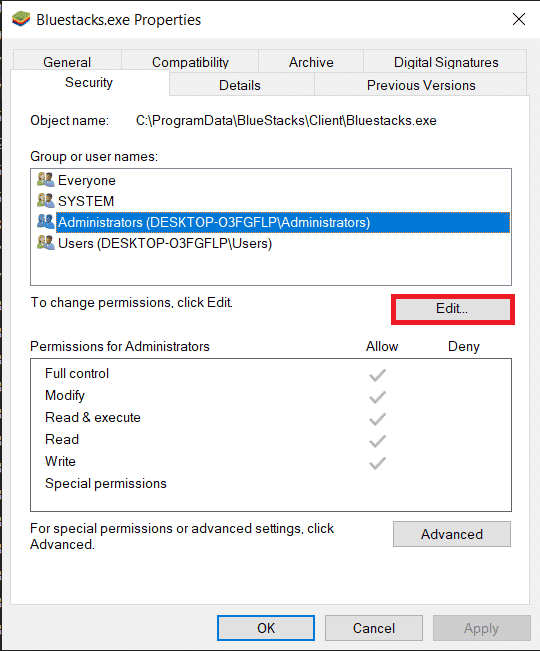
5. At first, select your username from the list of users which are displayed under Group or user names, and under Permissions for everyone, check the box in the Allow column for Full control.
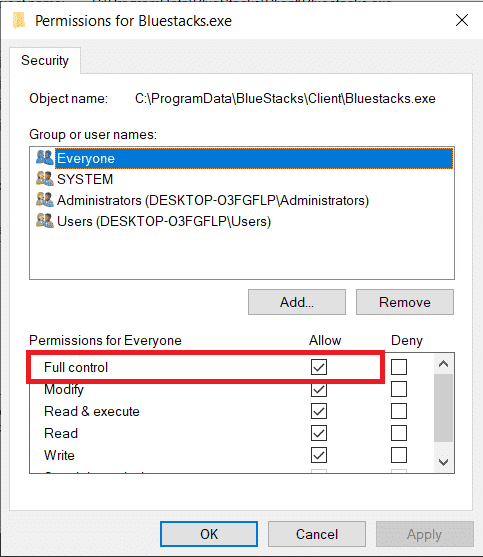
6. Alklaku apliki kaj OK por savi la ŝanĝojn.
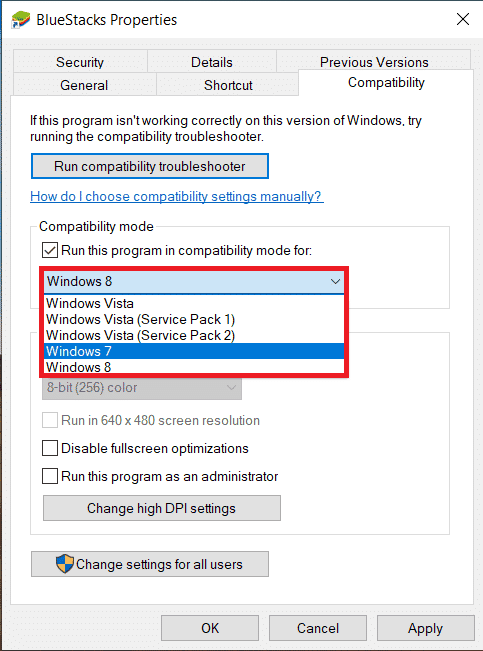
Check if the issue VirtualBox interface BlueStacks shutdown is fixed. If the issue is not fixed yet, you can try running BlueStacks in compatibility mode in another Windows version if you are facing this issue after updating to a specific Windows version. Follow the steps below to do it.
1. Right-click on the shortcut of BlueStacks mallonga vojo ikono kaj tiam elektu Propraĵoj.
2. Ŝanĝu al la kongruo langeto kaj alklaku Kuru ĉi tiu programo en kongrureĝimo por: skatolo.
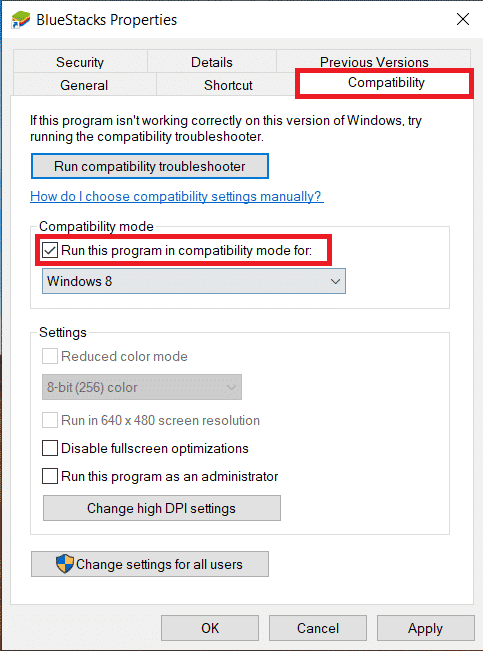
3. Select a Windows version that is appropriate to run Bluestacks in compatibility for and then click on apliki which is followed by Bone.
Method 4: Change Priorities of BlueStacks Processes
If the priorities of the BlueStacks processes are not set properly, you may face VirtualBox interface has active connections error message. If so, you can change the priorities of the BlueStacks processes in the Task Manager as instructed below.
Noto: Continue with great caution as changing the priorities of the processes carelessly may make your system unstable or extremely slow.
1. Premu la Ctrl + Maj + Esk klavoj kune malfermi Taskministro.
2. Nun, ŝanĝu al la detaloj tab and then right-click on HD-Player,exe.
3. Tiam, iru al la Agordu Prioritaton opcion kaj poste elektu Reala tempo.
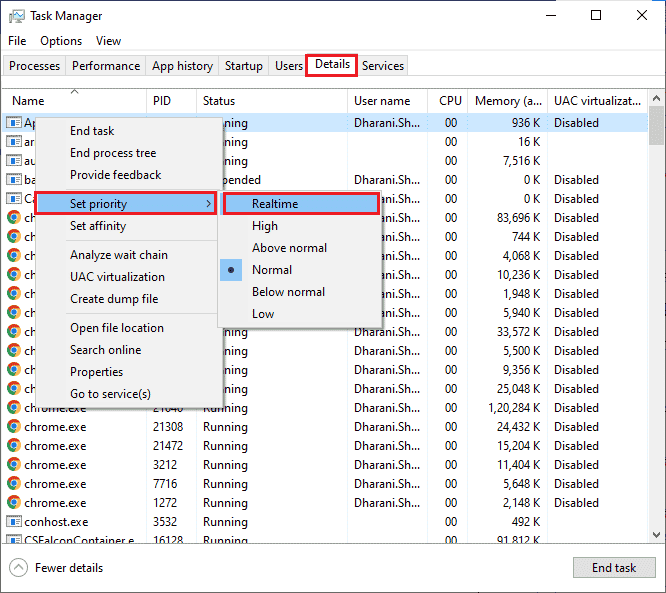
4. Now, set the priorities given below to the corresponding processes.
HD-Agent.exe        >> above normal
Bluestacks.exe      >> realtime
BstkSVC.exe          >> realtime
5. Rekomencu la komputilon post fermo de la Taskministro and check if VirtualBox interface Windows 10 issue is solved.
6. If the issue is fixed, close all the open processes.
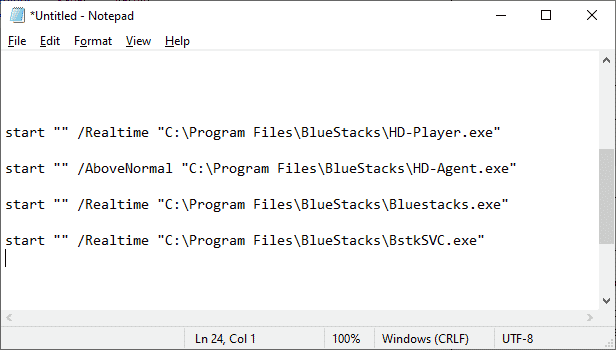
7. Now, open a text editor for instance Notepad, and then copy the following into it.
start "" /Realtime "C:Program FilesBlueStacksHD-Player.exe"
start "" /AboveNormal "C:Program FilesBlueStacksHD-Agent.exe"
start "" /Realtime "C:Program FilesBlueStacksBluestacks.exe"
start "" /Realtime "C:Program FilesBlueStacksBstkSVC.exe"
8. Nun elektu Konservi kiel el la dosiero menuobreto.
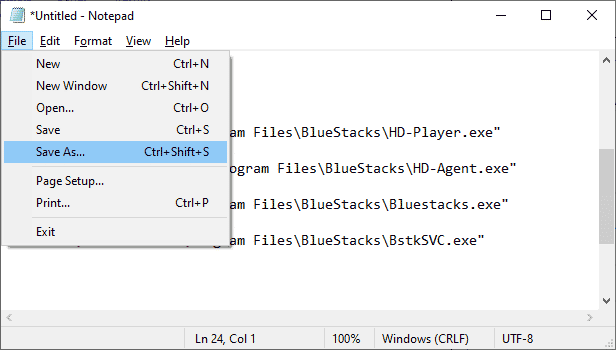
9. Now, change the dropdown menu of Konservi kiel Tipo al Ĉiuj dosieroj, then save the file with the name having a CMD extension ( example, BlueStacks.cmd )
10. Launch the BlueStacks with the newly created command file and the issue will be fixed.
Ankaŭ Legu: 15 Best Virtual Mailbox Free Service Providers
Method 5: Turn On Virtualization (If Applicable)
Bluestacks is a virtualizing application. Some chipsets of AMD and Intel include a virtualization technology that boosts the performance while virtualization software like Bluestacks is being used at the time. Such software runs more smoothly without any strain with the use of technology like this. Many users reported that turning on Virtualization is resolving VirtualBox interface BlueStacks shutdown issue. You have to check if this is available on your system as all computers are not equipped with this technology.
Follow the steps below to check if your computer (Intel system) supports Virtualization technology.
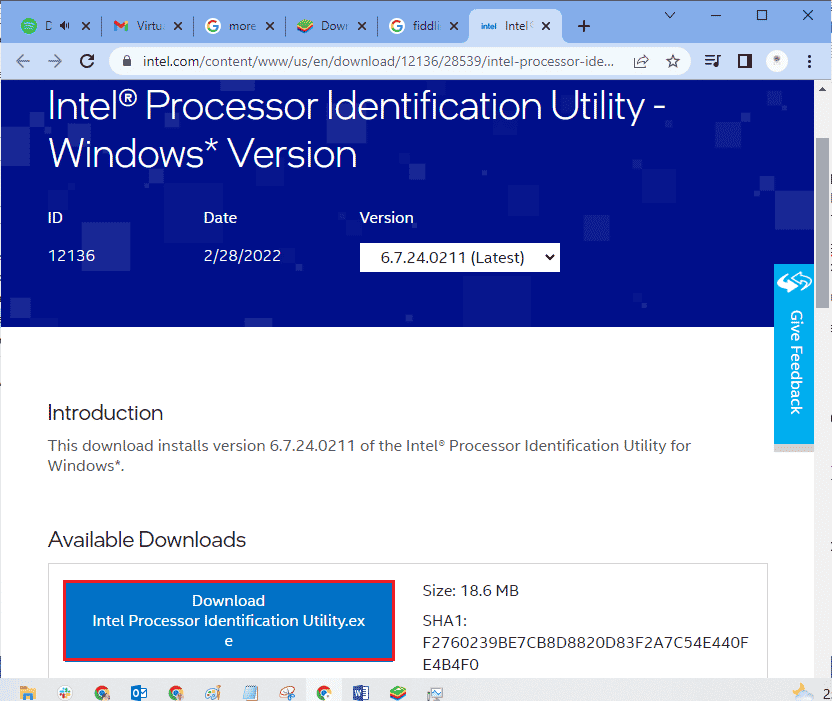
1. Elŝutu la Processor Identification Utility of Intel by navigating to the oficiala retejo and by clicking on the Elŝuti button which is on the left side.
2. Once downloaded the file, click the installation file from Miaj elŝutoj and follow the instructions to install Processor Identification Utility en via komputilo.
3. Lanĉu la apliko after installing it.
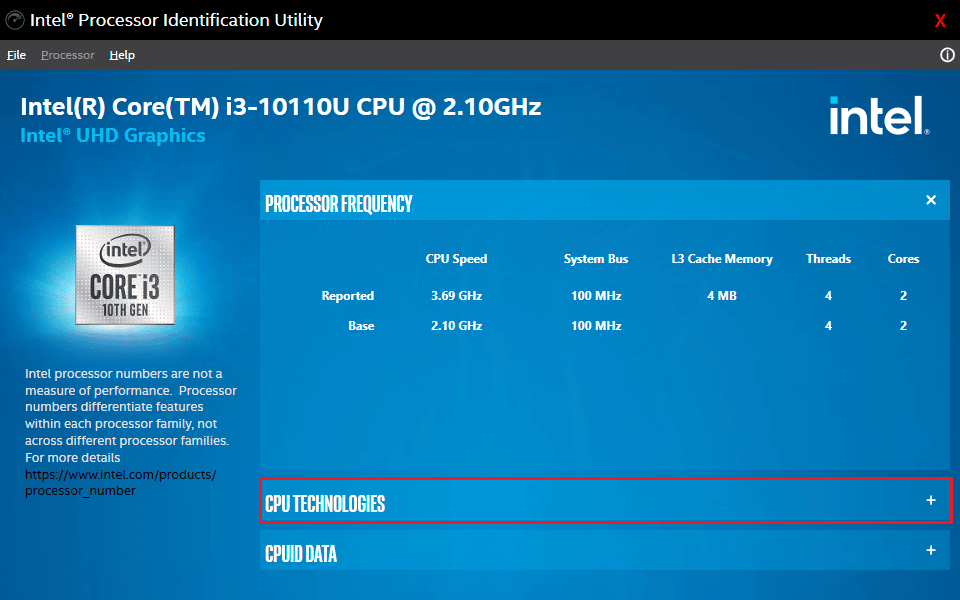
4. Pligrandigi la CPU TECHNOLOGIES alklakante la + ikono.
5. Scan the CPU technologies list for Intel® Virtualization Technology, usually Intel® Virtualization Technology will be the very first item on the list.
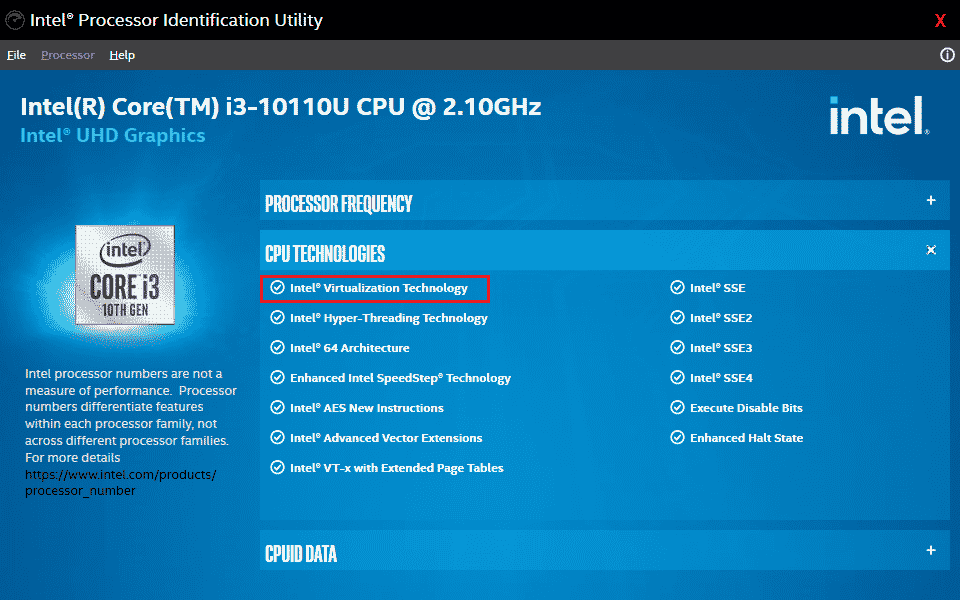
6. If the technology is supported on your computer, there will be a Jes next to it or a markobutono to its left.
Follow the steps below to check your PC (AMD) supports Virtualization.
1. Elŝutu la AMD Virtualization Technology and Hyper V files required for your PC.
2. Alklaku la .exe-dosiero which is downloaded and follow the surekranaj instrukcioj instali ĝin.
3. Check if it supports Virtualization by opening the application. If it is supported you will receive a message The system is compatible with Hyper-V

If your PC supports Virtualization technology in Intel or AMD, follow the following steps to enable it. If not, move on to the next method.
1. You can enable the Virtualization from the BIOS menu, for that you have to restart your computer.
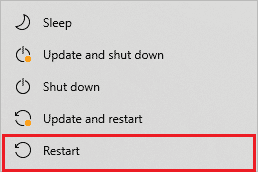
2. Alklaku la komenco button, now click on the Potenca elekto kaj tiam elektu Rekomenci.
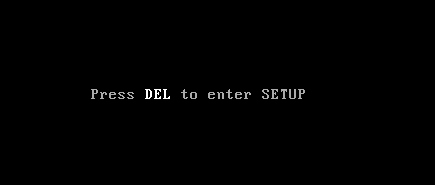
3. Press one of the following keys Esc, Del, F12, F10, or F8 repeatedly to enter the BIOS-menuo. The BIOS key is not similar to all manufacturers so check the BIOS key papers which came along with your computer. Or you can simply Goggle search for your BIOS key
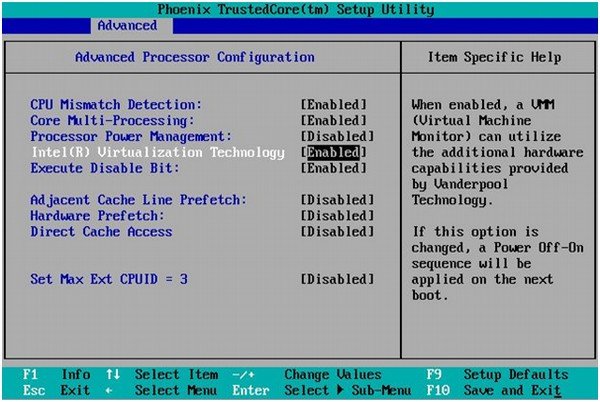
4. In the BIOS menu, go to Virtualization Technology or Intel Virtualization Technology or Intel VT for Direct I/O or any similar option with the arrow keys and hit Enigu por ebligi ĝin.
5. Exit BIOS after saving your changed settings. Now, your computer reboots automatically, after it is done check if the issue VirtualBox interface BlueStacks shutdown issue is fixed.
Ankaŭ Legu: Kiel Ebligi Virtualigon en Vindozo 10?
Method 6: Update BlueStacks Emulator
BlueStacks are being updated regularly to satisfy the technology advancements that are being made these days and fix the reported bugs like this one. So, updating the BlueStacks to the latest version may fix this issue. Follow the steps to update BlueStacks.
1. Lanĉu la BlueStacks emulator which is near the bottom right of the screen, open Agordoj alklakante la Ilaro de ilaro.
![]()
2. Alklaku Pri which is in the left pane of the window.
3. Nun, alklaku la Kontrolu ĝisdatigojn butonon.
4. apliki the updates and then relanĉi the emulator.
5. Now close the emulator, from the system tray also, and then check if the issue VirtualBox interface has active connections error message estas fiksita.
Metodo 7: Ĝisdatigu Vindozon
If there are any bugs in your PC, they can only be fixed after a Windows update. Microsoft releases regular updates to fix all these bugs thereby VirtualBox interface Windows 10 shut down issue will also be fixed. Hence, ensure if you have updated your Windows Operating System and if any updates are pending in action, use our guide How to Download and Install Windows 10 Latest Update
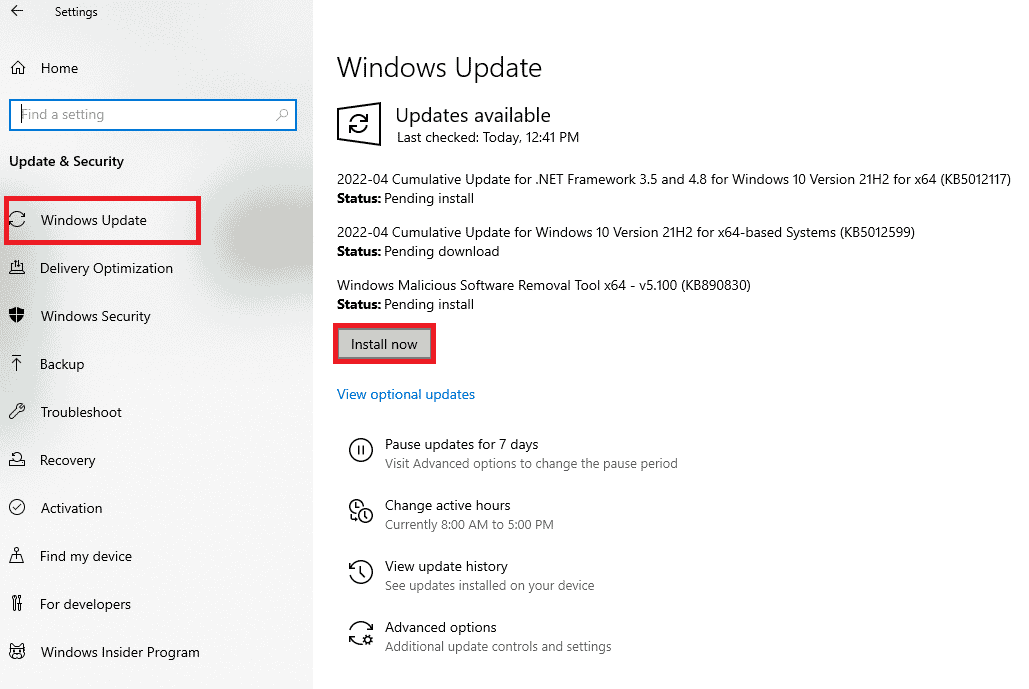
After updating your Windows Operating System, check whether VirtualBox interface BlueStacks shutdown issue is fixed.
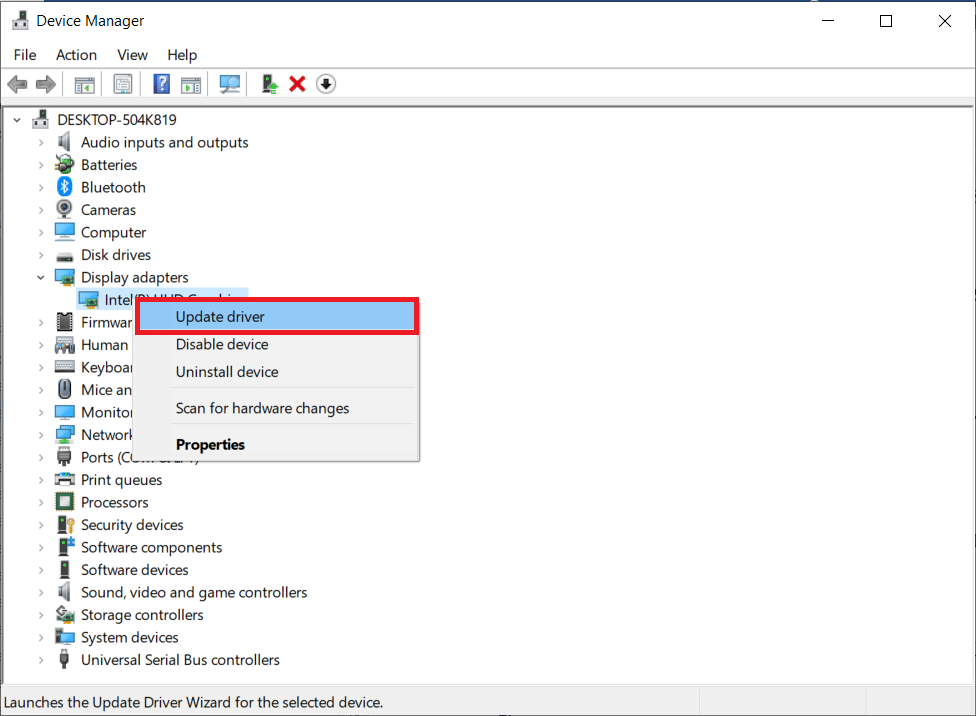
Metodo 8: Ĝisdatigu Grafikajn Pilotojn
If your PC makes use of outdated graphics drivers, you must update all of them to fix any gaming issues. You can do this task either manually or by using third-party software. Check our guide 4 Ways to Update Graphics Drivers in Windows 10 to update all the drivers manually and check if VirtualBox interface has active connections error message issue is fixed.
Ankaŭ Legu: Fix Printer Driver ne disponeblas en Vindozo 10
Metodo 9: Reinstalu Grafikajn Ŝoforojn
When you still face the error after updating the Graphical drivers, then reinstall device drivers to fix any incompatibility problems. There are so many methods to reinstall drivers on Windows. Yet, if you are confused about how to implement the same, check our guide How to Uninstall and Reinstall Drivers on Windows 10 and implement the same.
After reinstalling GPU drivers, check if you can enjoy games without VirtualBox interface BlueStacks shutdown issue.
Metodo 10: Reiru Grafikaj Ŝoforoj
Se la nuna versio de la grafikaj peliloj ne kongruas kun via ludo, tiam ne utilas ĝisdatigi aŭ reinstali ilin. Ĉio, kion vi devas fari, estas restarigi la ŝoforojn al la antaŭa versio sekvante nian gvidilon Kiel Refari ŝoforojn en Windows 10.
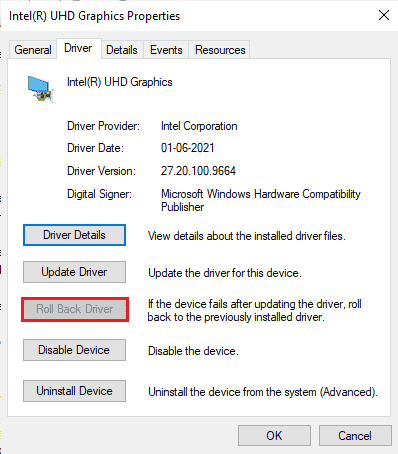
Check if you have fixed VirtualBox interface has active connections error message.
Metodo 11: Ĝisdatigu .NET Framework
.NET framework in Windows 10 computer is essential for uninterrupted service of modern apps and games. Many games have an auto-update feature for the .NET framework, and thus it will be updated automatically whenever an update is available. In another case, if an update prompts in your PC, you can manually install the latest version of the .NET framework, as discussed below, to fix VirtualBox interface Windows 10 issue.
1. Kontrolu pri novaj ĝisdatigoj por .NET-kadro el la oficiala retejo de Mikrosofto.
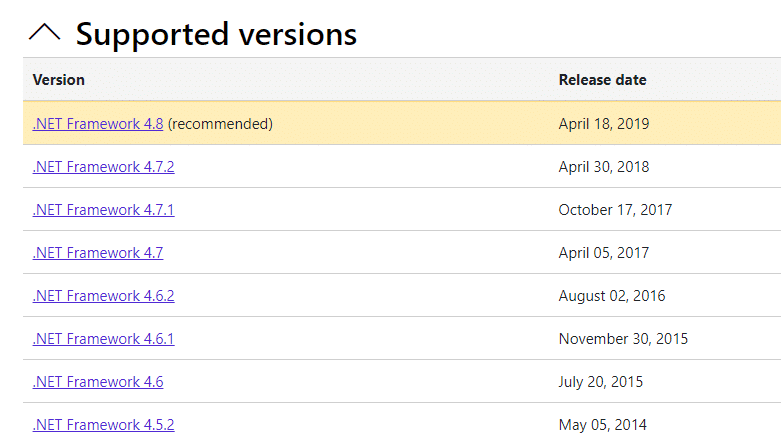
2. If there are any updates, click on the corresponding/rekomendita ligi kaj alklaki Download .NET Framework 4.8 Runtime elekto.
Noto: Do not click on Download .NET Framework 4.8 Developer Pack as it is used by software developers.

3. Iru al Miaj elŝutoj, double-click on the setup file to run the downloaded file, and follow the surekranaj instrukcioj to install the .NET framework successfully on your Windows PC.
4. Once done, check if you have fixed VirtualBox interface Windows 10 issue or not.
Method 12: Create New Administrator User
If none of the methods have helped you fix VirtualBox interface has active connections error message, there are some circumstances where your user account is corrupt or some of its configurations are inappropriate. In this case, you have to create a new administrator account as instructed below to fix the issue.
1. Premu la Vindozo + I klavoj kune malfermi la Agordoj.
2. Alklaku la kontoj fikso.
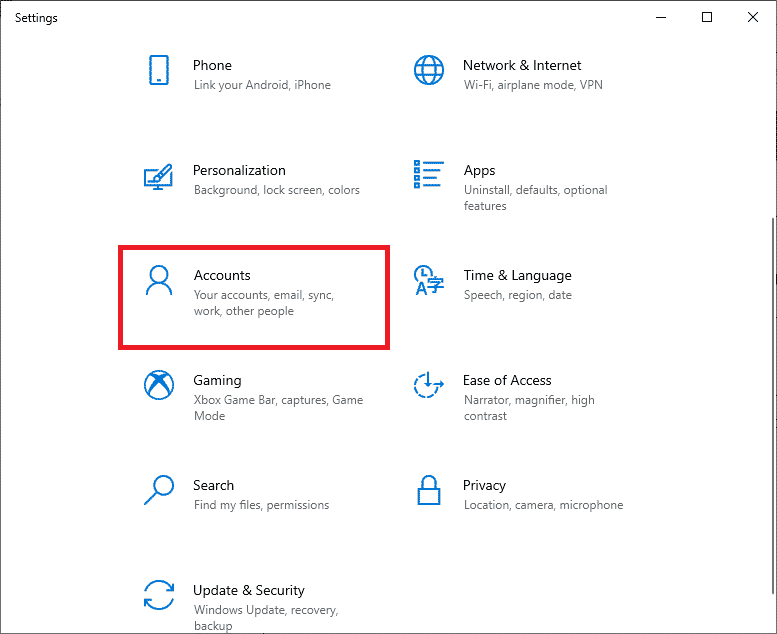
3. Tiam elektu la Familio kaj aliaj uzantoj menu from the left menu.
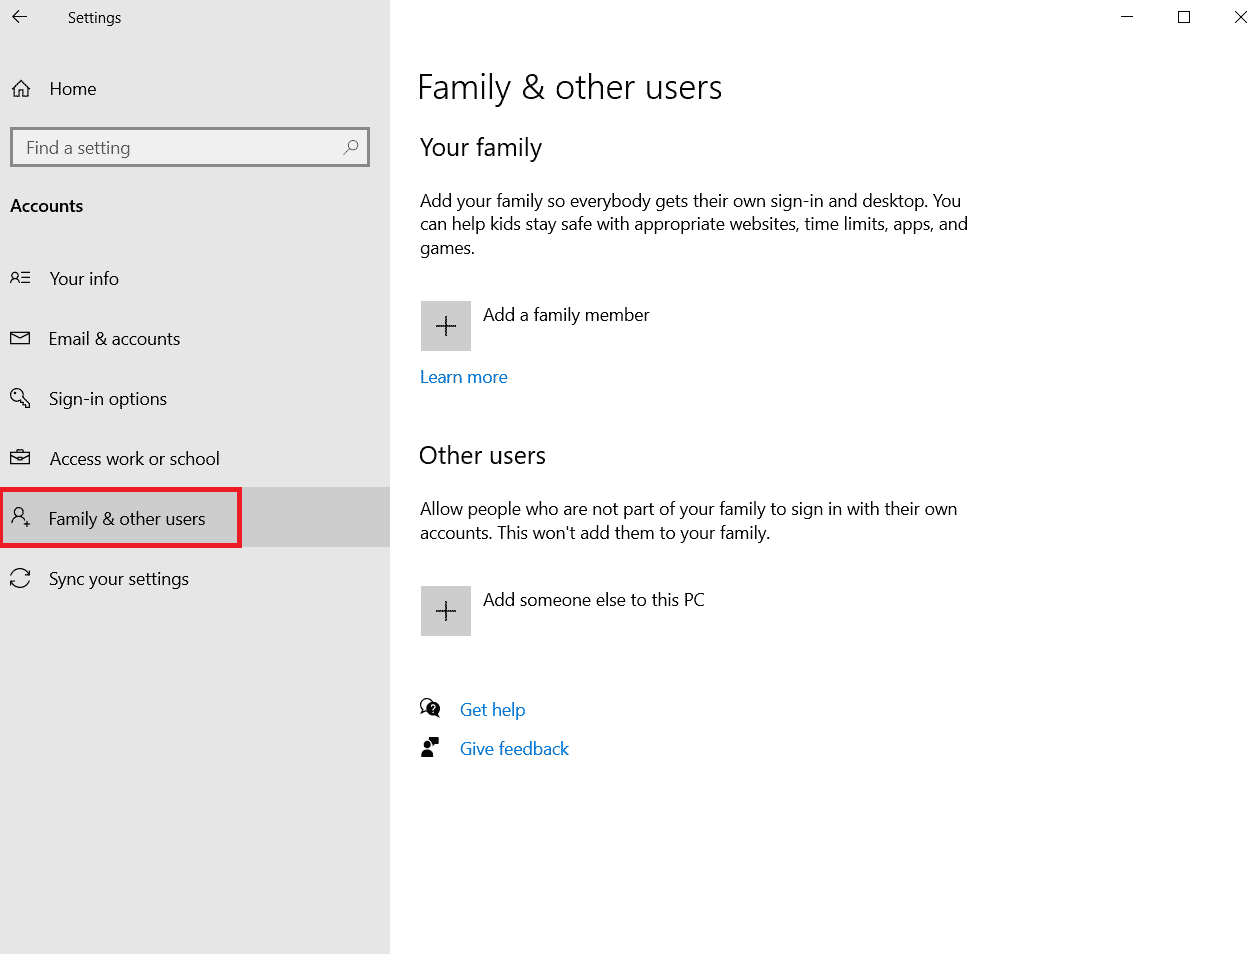
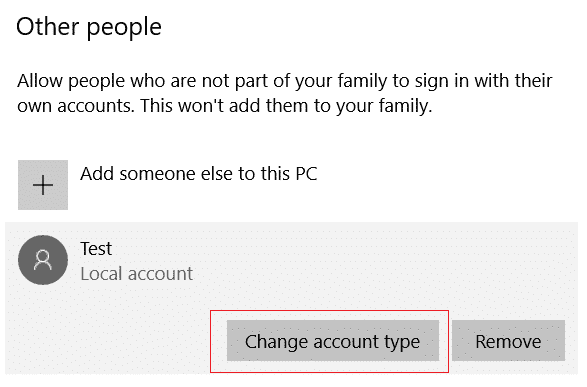
4. Under the Aliaj homoj sekcio, elektu la konton, tiam alklaku Ŝanĝi konto-tipo.
Noto: If you do not find any account, then you can follow our guide to create a local account on Windows 10.
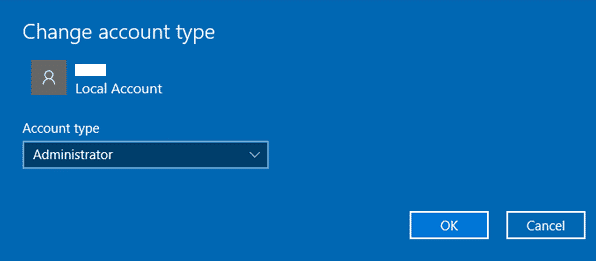
5. Fine elektu Administrator sub la Konto-tipo kaj klaku OK.
Noto: Ĉi tio ne aplikeblas por uzantoj de Norma konto.
6. Finally, check if you have fixed VirtualBox interface BlueStacks problem or not.
Ankaŭ Legu: Ripari Malĝustan PSK Provizitan por Reto SSID en Vindozo 10
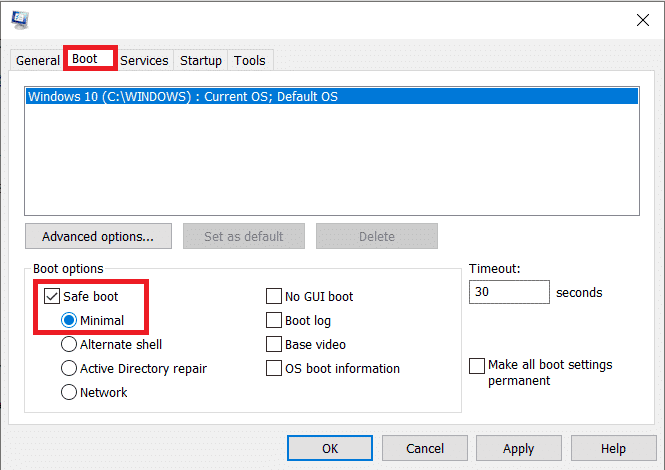
Method 13: Uninstall Conflicted Apps in Safe Mode
Some applications and programs might interfere with BlueStacks during its operation. To confirm and to fix this, you have to boot to Safe Mode in Windows 10. The safe mode of Windows PC will shut all the non-essential tasks and runs with the most stable drivers. In safe mode, Windows PC will be in the most stable environment and hence you can find which app is conflicting with BlueStacks. You can boot your computer by following our guide How to Boot to Safe Mode in Windows 10 and once all the third-party software is disabled, check if you face the VirtualBox interface BlueStacks shutdown issue again.
If you do not face the problem, uninstall any recent program or application you have added to your computer.
Method 14: Uninstall Bluestacks and Reinstall in Safe Mode
If none of the above methods fixed VirtualBox interface has active connections error message, the fault may be with the inherent bug in the application itself. In this case, you have to uninstall the current version of the application and replace it with the latest version of BlueStacks.
1. First of all, end all BlueStacks processes which may be running in the background.
2. If you have your BlueStacks open, close it by clicking on the X-butono which will be at the top right of your screen.
3. Now, remove the BlueStacks icon from your system tray by right-clicking on the BlueStacks icon and then clicking Lasu.
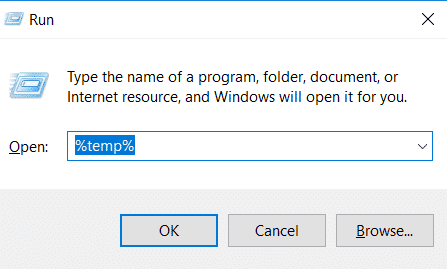
4. Delete all the temporary files on your computer as a precautionary measure. Follow the steps below to do it.
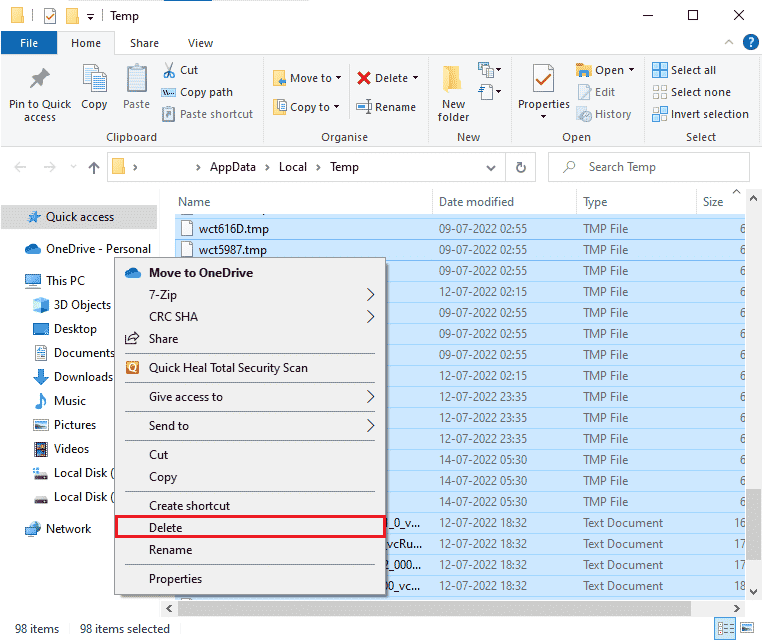
5. Premu Vindozo + R klavoj simultaneously to access the Kuri dialog box and type % temp% in it and hit Enigu ŝlosilon.
6. Select all the files, right-click on them and click on Forigi.
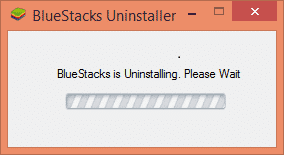
7. Use BlueStacks uninstaller to remove all the traces of it from your computer instead of following an unusual route to uninstall an application.
8. Vizitu ĉi tiu retejo elŝuti la BlueStacks uninstaller tool.
9. After installing it, run it to remove all of its files. Grant for permissions if it asks for many. Click on the OK button on the final screen.
Now, reinstall BlueStacks by following these steps.
10. Iru al la Bluestokoj download paĝo kaj elŝutu la lastan version.

11. We will be installing the application after booting into Safe Mode.
12. Once Window starts in Safe Mode, head over to the folder (Downloads) where you downloaded the Bluestacks installation file and run it. Follow the on-screen instructions to finish the installation.
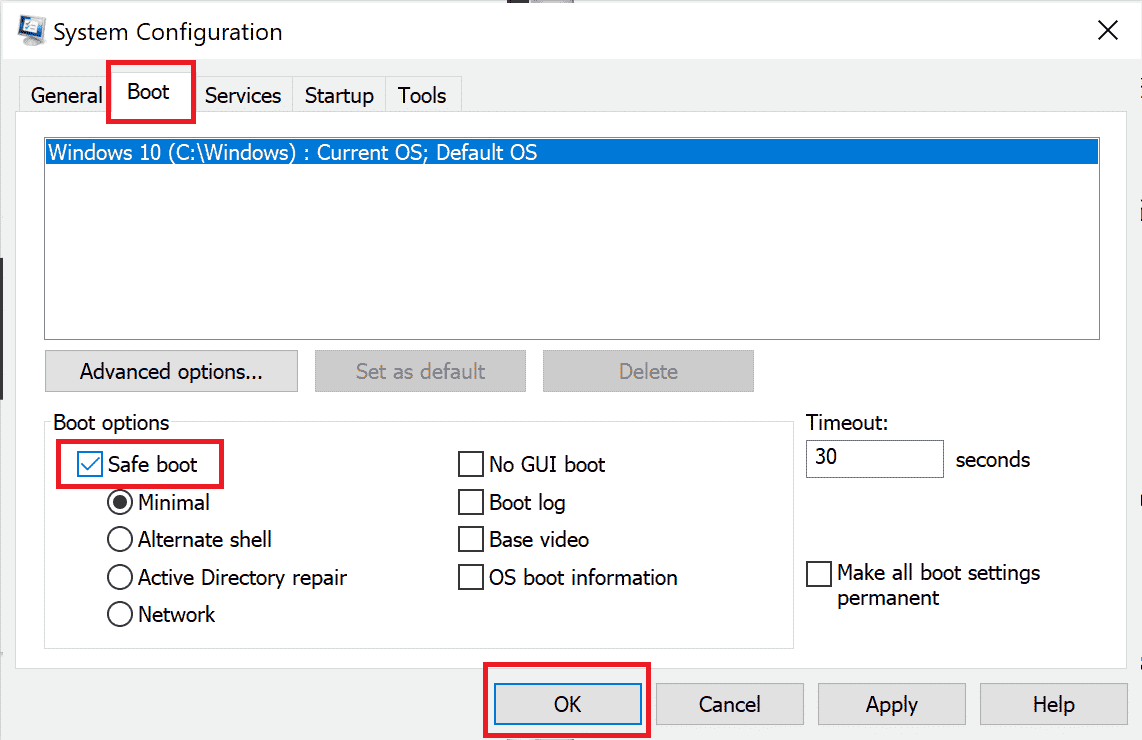
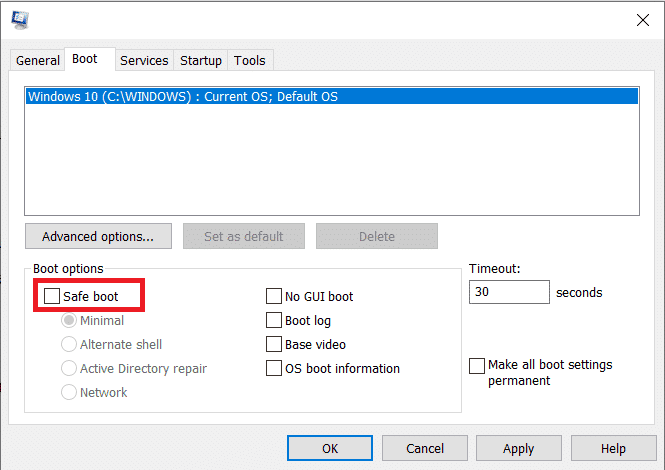
13. Now that we have reinstalled Bluestacks, we can turn off Safe Mode and boot back normally.
14. Open Run, type msconfig, and press enter. In the Boot tab, untick the box next to Safe mode kaj alklaku OK.
15. Fine, rekomencu la komputilon and run Bluestacks to check if VirtualBox interface Windows 10 problem has been resolved.
Ankaŭ Legu: Kiel ripari eraran kodon 0x80004005
Method 15: Restore Windows
The latest Windows update may not be compatible with BlueStacks which leads to the VirtualBox interface Windows 10 issue. Try recalling if this error started after updating your Windows, if so you can either wait for a new update or revert to the previous version which did not cause this error.
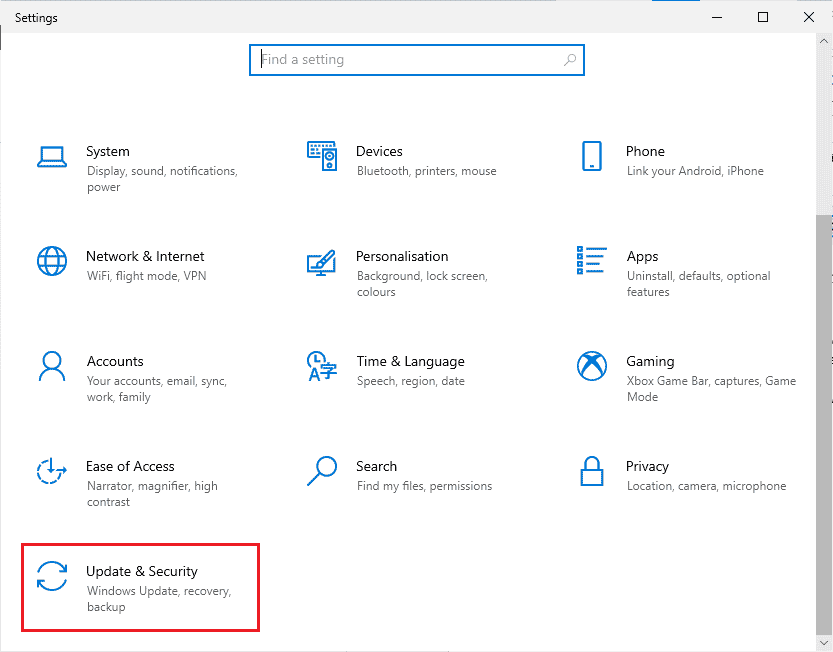
1. Iru al Agordoj premante la Vindozo + I klavoj Samtempe.
2. Alklaku Ĝisdatigoj kaj Sekureco agordojn.
3. Now, look for retrovo settings and click on it.
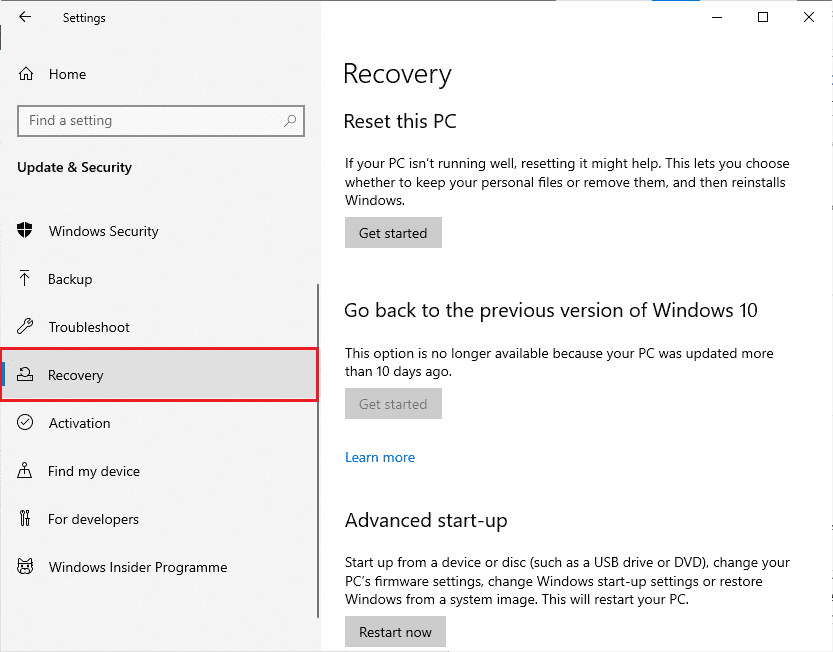
4. Nun, alklaku la komenci button which will be under Go back to the previous version of Windows 10.
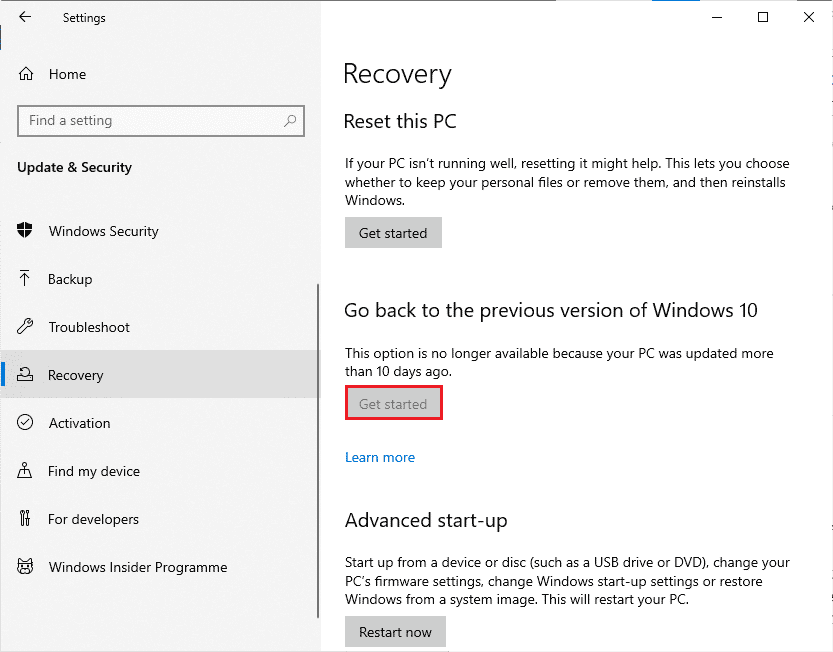
5. Sekvu la surekranaj instrukcioj to revert to the previous version of Windows.
6. If it has been 10 days since you last updated, the komenci option will be greyed out, in that case, you have to wait until you get the next update.
Ankaŭ Legu: Ripari eraron pri Java Virtuala Maŝino aŭ JVM ne trovita
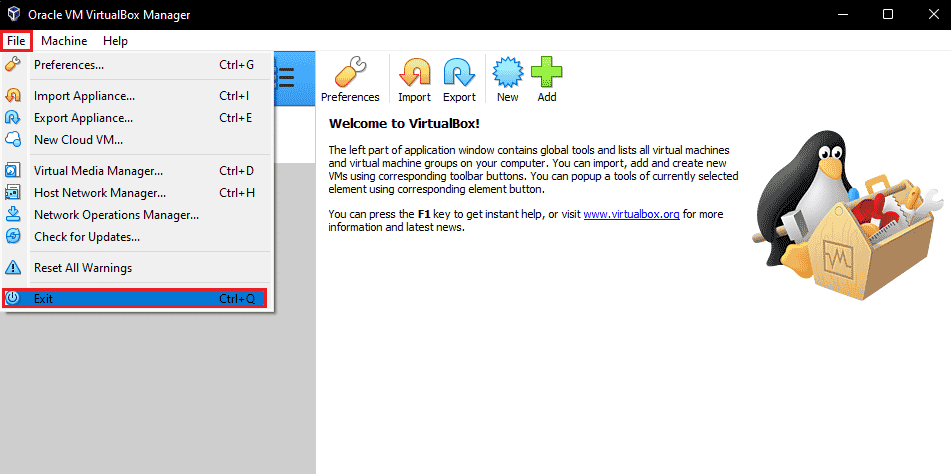
Pro Tip: How to Shut Down VirtualBox
VirtualBox is an open-source application that allows users to run an additional operating system environment from the desktop of PCs or Macs. For example, a Windows user could use VirtualBox to run Windows XP, Mac OS X, and Windows 7. But you have to close a VirtualBox with the Fermi command after using the VirtualBox virtual machine.
1. Alklaku la Fermi button which will be in the upper right corner of the screen.
2. Choose the radio button labeled as Malŝaltu la maŝinon
3. Check the box which is next to Restore current snapshot if you want to load the recent snapshot.
4. Begin the shutdown process by Clicking the OK butonon.
5. malfermu dosiero menuo aŭ VirtualBox and elektu eliro when the shutdown is completed.
rekomendita:
Ni esperas, ke ĉi tiu gvidilo estis helpema kaj vi estus lerninta kiel ripari VirtualBox interface has active connections error message on Windows 10. Let us know how this article has helped you the best. Also, if you have any queries/suggestions regarding this article, then feel free to drop them in the comments section.