- in ventanas by Administración
Solucionar el problema de uso elevado de CPU y disco de Windows 10
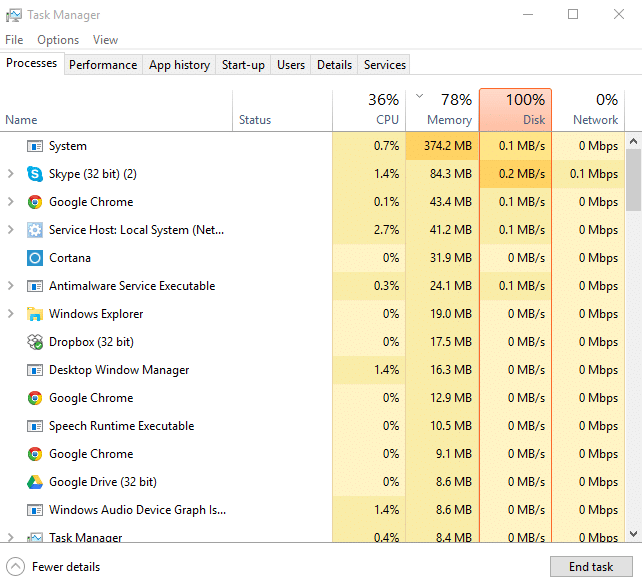
Users are currently reporting that their system shows 100% disk usage and very high Memory usage even though they are not doing any memory-intensive task. While many users believe that this problem is only related to users who have low configuration PC (low system specification), but this is not the case here, even the system with the specs such as an i7 processor and 16GB RAM is also facing a similar issue. So the question that everyone is asking is How to Fix the High CPU and Disk usage problem of Windows 10? Well, below are the listed steps on how to tackle this issue exactly.
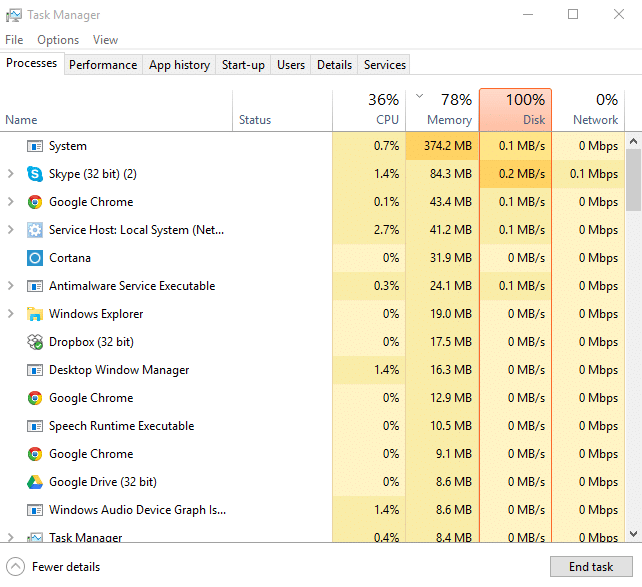
This is a rather annoying problem where you are not using any apps on your Windows 10, but when you check Task Manager (Press Ctrl+Shift+Esc Keys), you see that your memory and disk usage is almost 100%. The problem is not limited to this as your computer will be running very slow or even freeze sometimes, in short, you won’t be able to use your PC.
What are the causes of high CPU & Memory usage in Windows 10?
- Pérdida de memoria de Windows 10
- Notificaciones de aplicaciones de Windows
- Servicio Superfetch
- Aplicaciones y servicios de inicio
- Compartir actualizaciones de Windows P2P
- Servicios de predicción de Google Chrome
- Skype permission issue
- Windows Personalization services
- Actualización de Windows y controladores
- Problemas de malware
Entonces, sin perder tiempo, veamos cómo Fix High CPU and Disk usage in Windows 10 due to SoftThinks Agent Service in Dell PCs with the help of the below-listed tutorial.
Solucionar el problema de uso elevado de CPU y disco de Windows 10
Method 1: Edit Registry to disable RuntimeBroker
1. Presione la tecla Windows + R y luego escriba regedit y presiona enter para abrir Editor del registro.

2. En el Editor del Registro navegue hasta lo siguiente:
HKEY_LOCALMACHINESYSTEMCurrentControlSetServicesTimeBrokerSvc
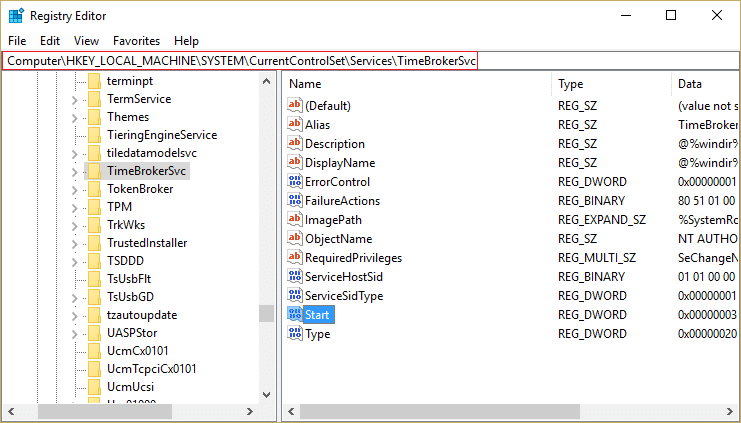
3. In the right pane, double click on Inicio y cámbialo Valor hexadecimal de 3 a 4. (El valor 2 significa Automático, 3 significa manual y 4 significa deshabilitado)
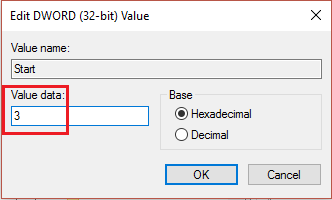
4. Cierre el Editor del Registro y reinicie su PC para aplicar los cambios.
Método 2: deshabilitar Superfetch
1. Presione la tecla Windows + R y luego escriba "services.msc” (without quotes) and hit enter.

2. Scroll down the list and find Superfetch.
3. Haga clic derecho en SuperFetch y seleccionar Propiedades.
4. Luego haga clic en Detener y establecer el startup type to Disabled.

5. Reboot your PC to save changes, and this must have Fix High CPU and Disk usage problem of Windows 10.
Method 3: Disable Clear Pagefile at Shutdown
1. Presione la tecla Windows + R y luego escriba regedit y presiona enter para abrir el Editor del Registro.

2. Navigate to the following key inside Registry Editor:
Gestión HKEY_LOCAL_MACHINESYSTEMCurrentControlSetControlSession ManagerMemory
3. Encontrar ClearPageFileAtShutDown and change its value to 1.
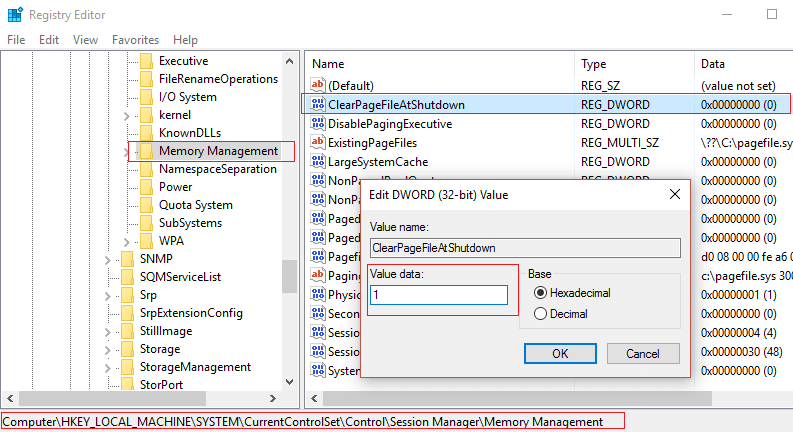
4. Reinicie su PC para guardar los cambios.
Método 4: deshabilite las aplicaciones y servicios de inicio
1. Prensa Ctrl + Mayús + tecla Esc simultáneamente para abrir Administrador de tareas.
2. Luego seleccione el Pestaña de inicio y Desactiva todos los servicios que tengan un alto impacto.
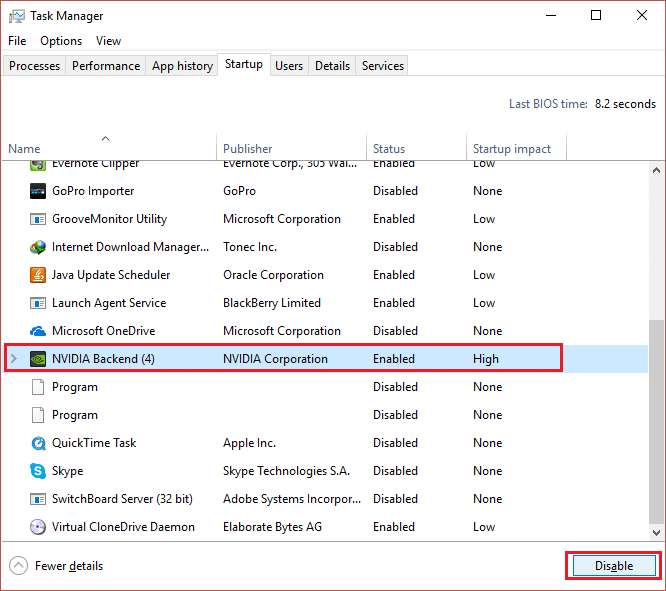
3. Asegúrate de solo Deshabilite los servicios de terceros.
4. Reinicie su PC para guardar los cambios.
Método 5: deshabilitar el uso compartido P2P
1. Click the Windows button and select Ajustes.
2. From Settings windows, click on Actualización y seguridad.
![]()
3. Next, under Update settings, click Opciones avanzadas.
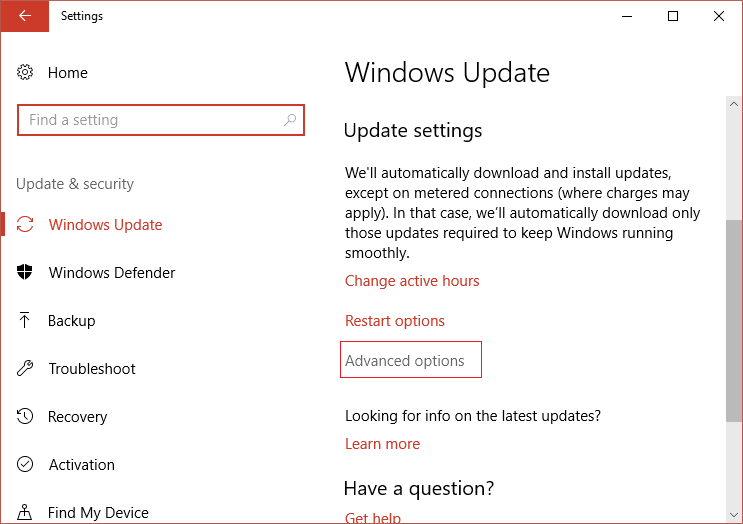
4. Ahora haga clic en Elija cómo se envían las actualizaciones.
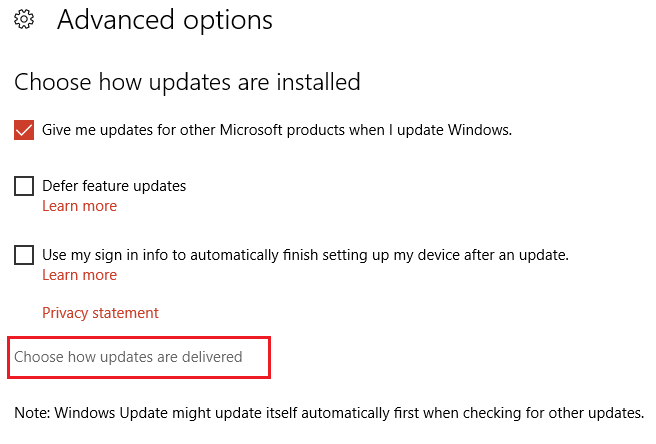
5. Make sure to turn off “Actualizaciones de más de un lugar."
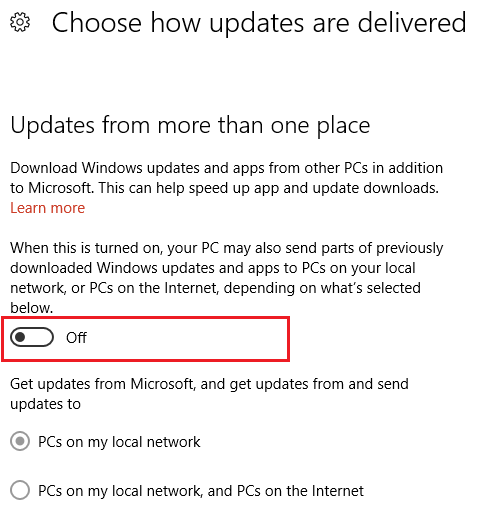
6. Restart your PC and again check if this method has Fix High CPU and Disk usage problem of Windows 10 due to WaasMedicSVC.exe..
Método 6: deshabilite la tarea ConfigNotification
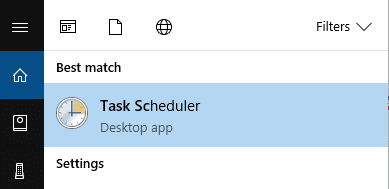
1. Type Task Scheduler in the Windows search bar and click on Programador de tareas.
2. From Task Scheduler go to Microsoft than Windows and finally select WindowsBackup.
3. Siguiente, Deshabilitar la notificación de configuración y aplicar cambios.
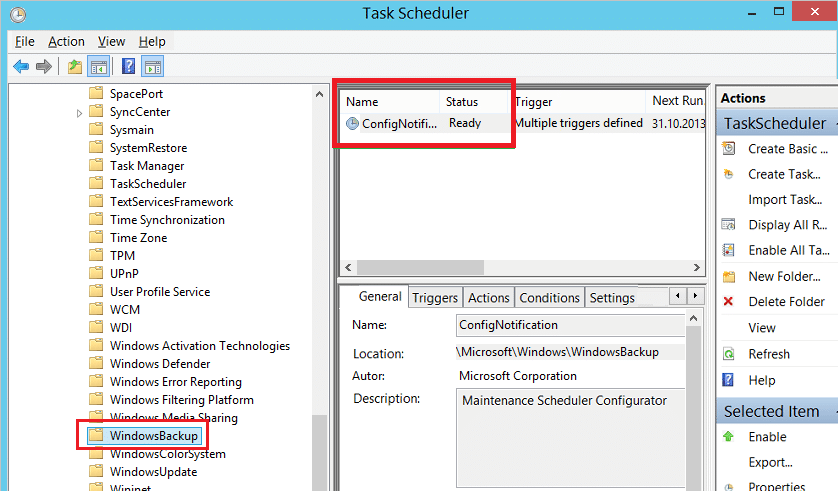
4. Close Event Viewer and restart your PC, and this may Fix High CPU and Disk usage problem of Windows 10, if not then continue.
Method 7: Disable Prediction service to load pages more quickly
1. Abierto Google Chrome e ir a Ajustes.
2. Desplácese hacia abajo y haga clic en el opción avanzada.
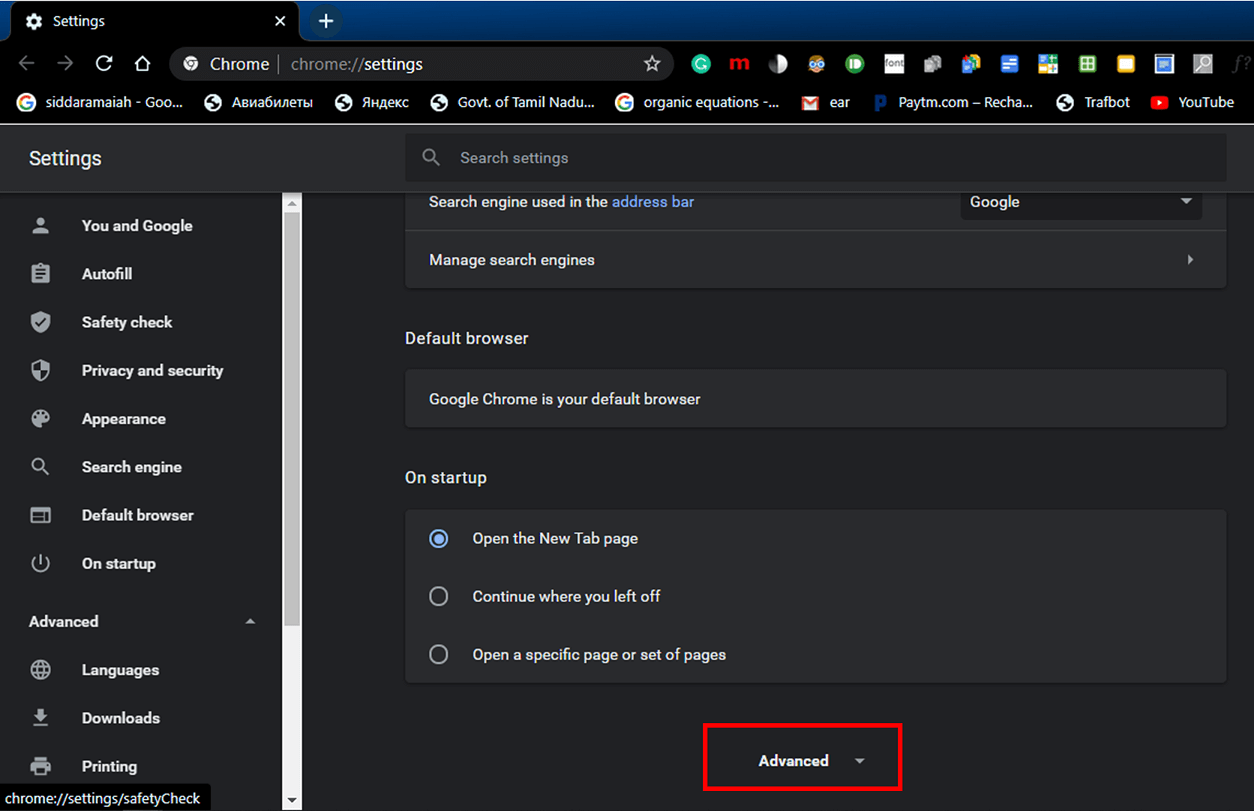
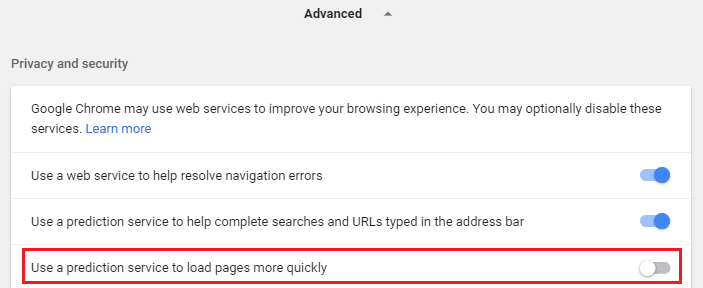
3. Then find Privacy and make sure to inhabilitar la palanca para Utilice un servicio de predicción para cargar páginas más rápidamente.
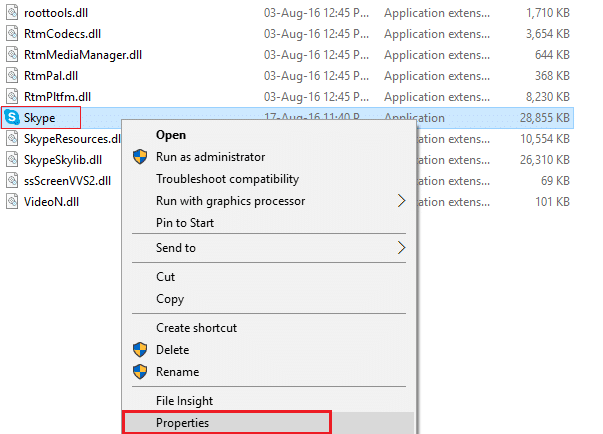
4. Presione la tecla Windows + R y luego escriba "C: Archivos de programa (x86) SkypePhone”Y presione enter.
5. Ahora haga clic derecho en Skype.exe y seleccionar Propiedades.
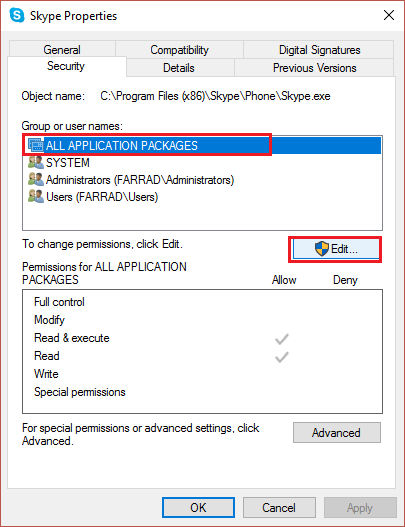
6. Select the Security tab and make sure to highlight “TODOS LOS PAQUETES DE APLICACIÓN” then click Edit.
7. Again make sure “ALL APPLICATION PACKAGES” is highlighted then tick mark Write permission.
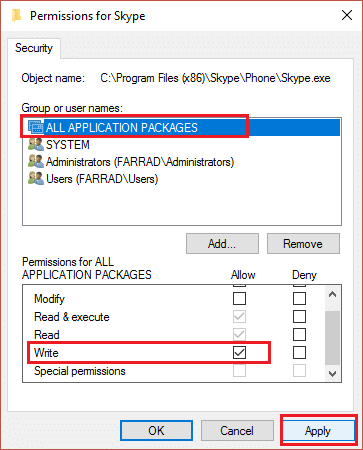
8. Click Apply, followed by Ok, and then restart your PC to save changes.
Método 8: Ejecute el Solucionador de problemas de mantenimiento del sistema
1. Escriba control en la Búsqueda de Windows y luego haga clic en Panel de Control del resultado de la búsqueda.

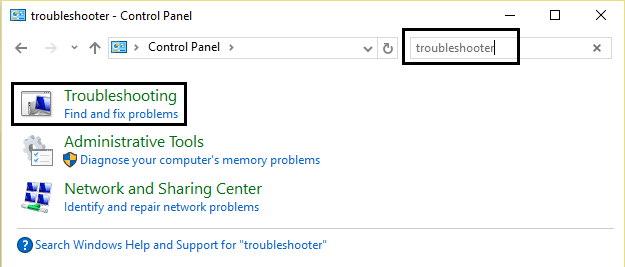
2. Ahora, escriba solucionar problemas en el cuadro de búsqueda y seleccione Solución de problemas.
3. Hacer clic en Ver todo desde el panel de la ventana de la izquierda.
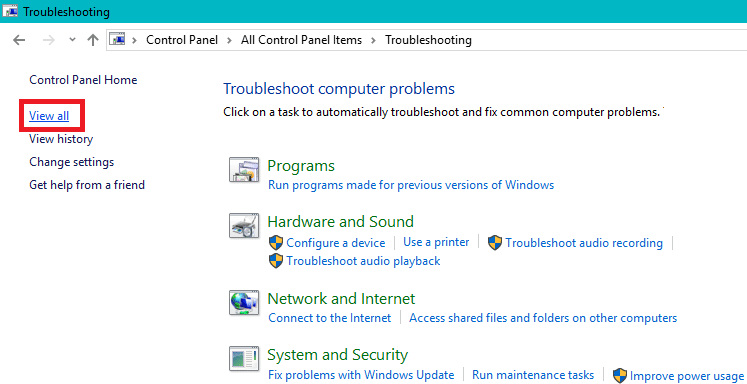
4. A continuación, haga clic en el Mantenimiento del sistema para ejecutar el solucionador de problemas y siga las instrucciones en pantalla.

5. El solucionador de problemas puede ser capaz de Fix High CPU and Disk usage problem of Windows 10.
Method 9: Disable Automatically Pick An Accent Color From My Background
1. Presione la tecla Windows + I para abrir Configuración de Windows.
2. A continuación, haga clic en Personalización.
![]()
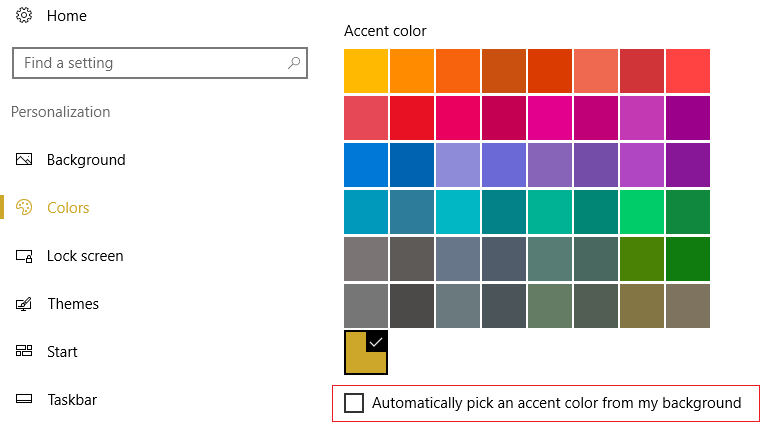
3. From the left pane, select Colores.
4. Then, from the right side, Disable Automatically pick an accent color from my background.
5. Reinicie su PC para guardar los cambios.
Method 10: Disable Apps Running In Background
1. Presione la tecla Windows + I para abrir el Ventana de ajustes.
2. Luego, selecciona Intimidad, and then from the left pane click on Aplicaciones en segundo plano.
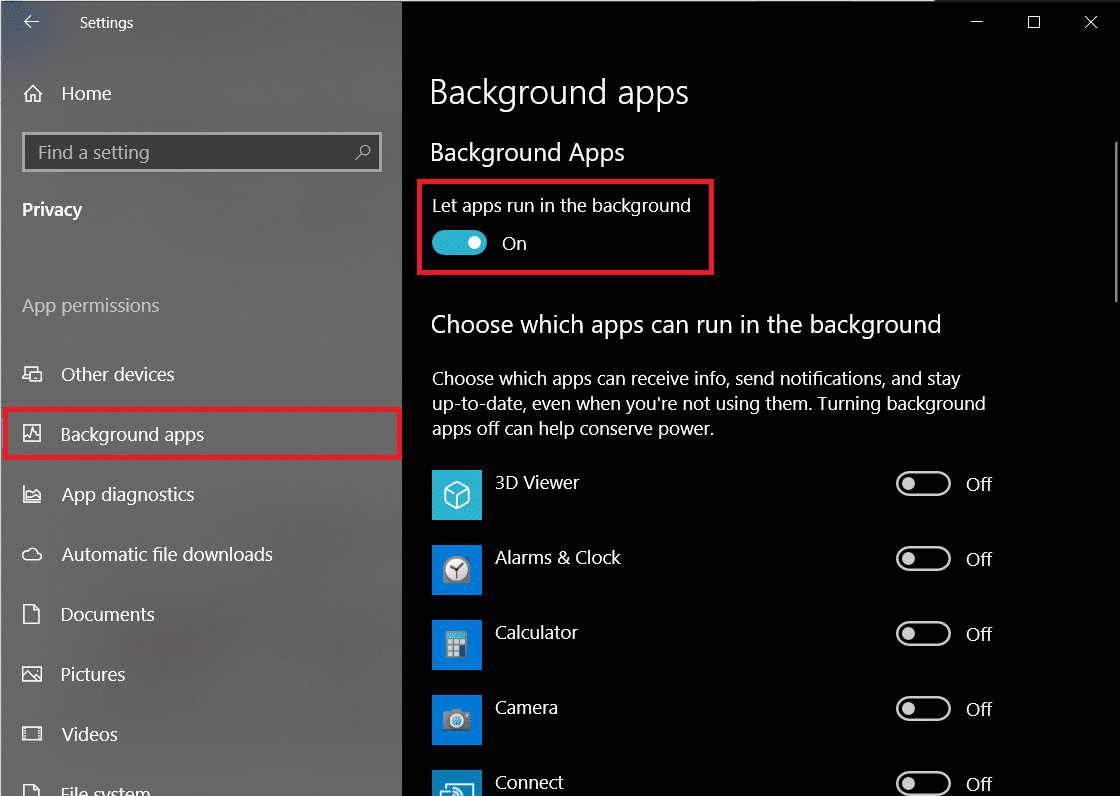
3. Disable all of them and close the window, then Reboot your system.
Method 11: Adjust settings in Windows 10 for Best Performance
1. Haga clic derecho en “este PC"Y seleccione Propiedades.
2. Then, from the left pane, click on Configuración avanzada del sistema.
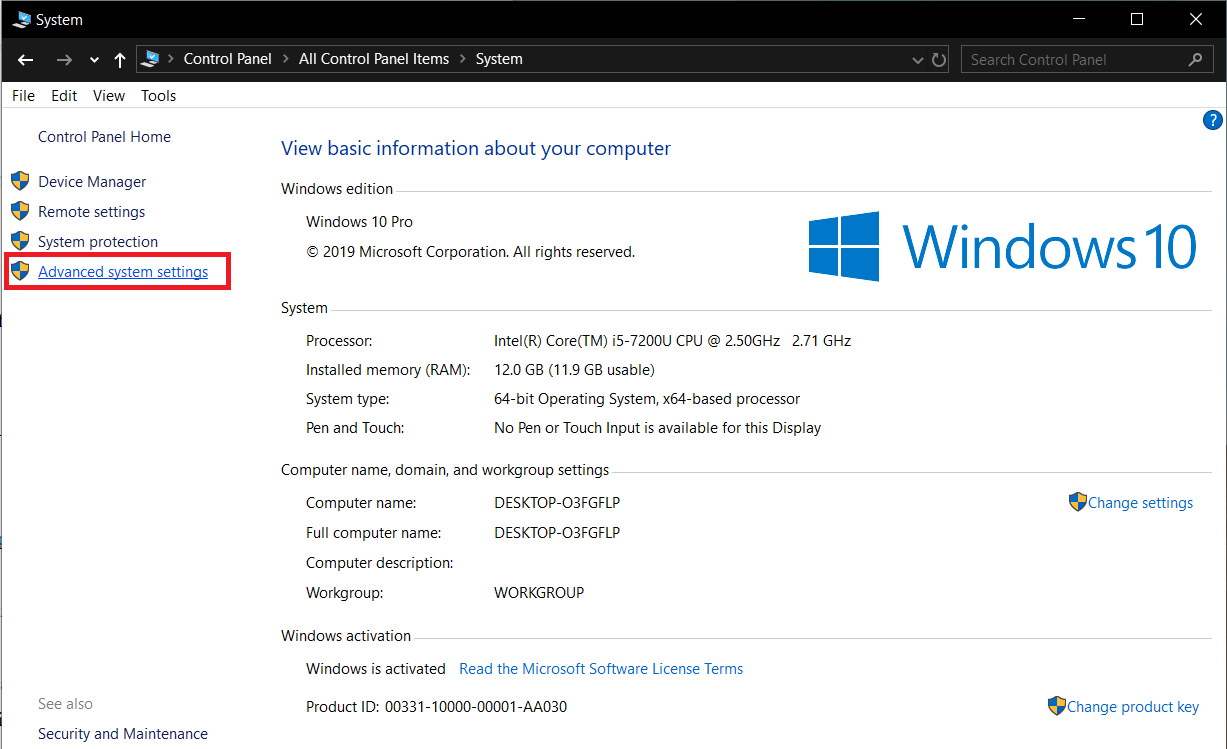
3. Now from the Advanced tab in System Properties, hacer clic en Ajustes.

4. Next, choose to Ajustar para obtener el mejor rendimiento. Luego haga clic en Aplicar seguido de Aceptar.
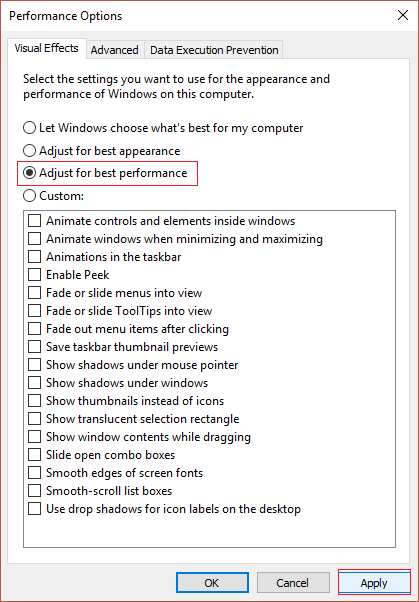
5. Restart your PC and check if you’re able to Fix High CPU and Disk usage in Windows 10.
Method 12: Turn off Windows Spotlight
1. Presione la tecla Windows + I para abrir Ajustes Y luego seleccione Personalización.
![]()
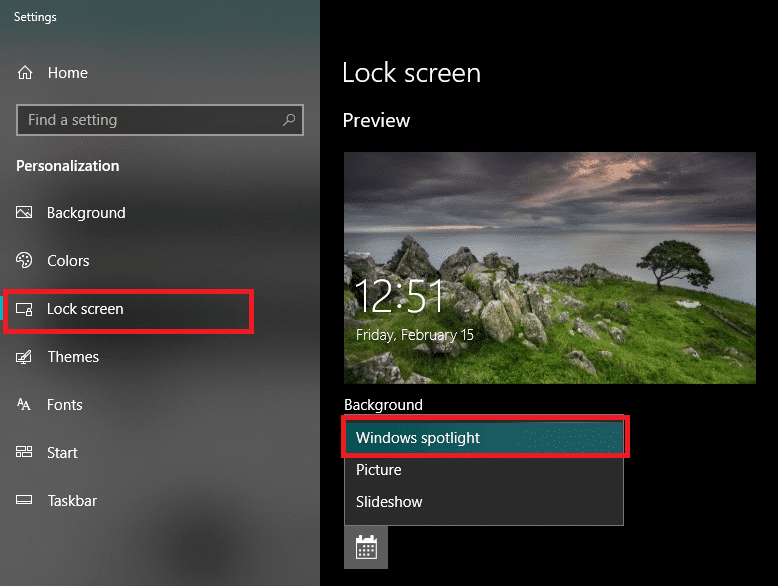
2. Then from the left pane select the Bloquear pantalla.
3. Under the background from the dropdown, select Picture en lugar de Proyector de Windows.
Método 13: actualice Windows y los controladores
1. Prensa Tecla de Windows + Para abrir Configuración y luego hacer clic en Actualización y seguridad.
![]()
2. Desde el lado izquierdo, el menú hace clic en Windows Update.
3. Ahora haga clic en "Buscar actualizaciones”Para comprobar si hay actualizaciones disponibles.

4. Si hay alguna actualización pendiente, haga clic en Descargue e instale actualizaciones.

5. Una vez descargadas las actualizaciones, instálelas y su Windows estará actualizado.
6. Presione la tecla Windows + R y escriba "devmgmt.msc” in the Run dialogue box to open the administrador de dispositivos.

7. Expandir Los adaptadores de red, luego haga clic derecho en su controlador wifi(por ejemplo Broadcom o Intel) y seleccione Actualizar los controladores.
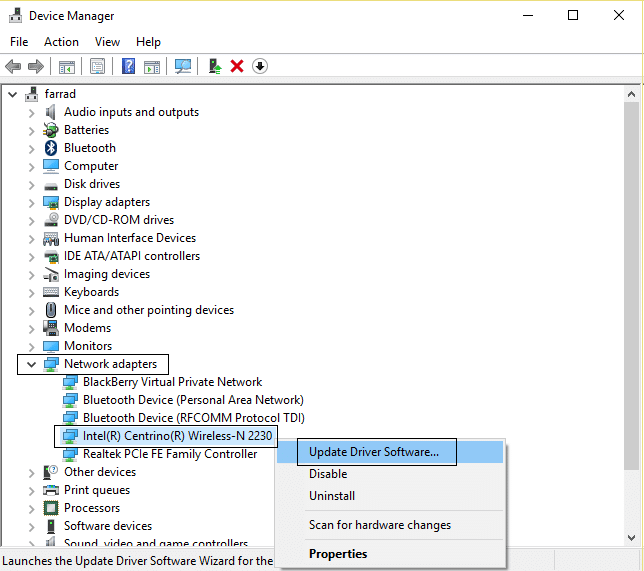
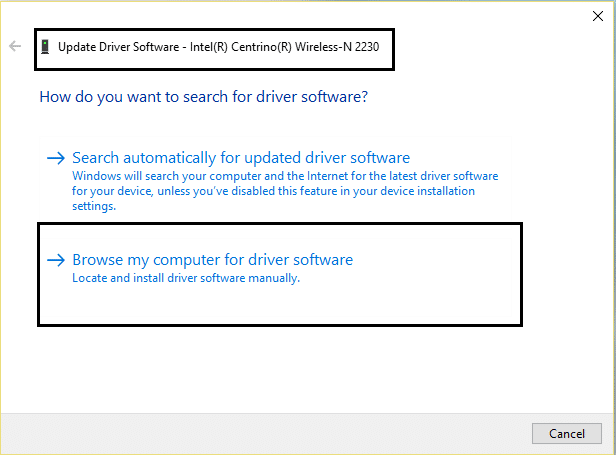
8. En Actualizar software del controlador de Windows, seleccione "Buscar mi computadora para el software del controlador."
9. Ahora selecciona “Permítame elegir de una lista de controladores de dispositivo en mi computadora."
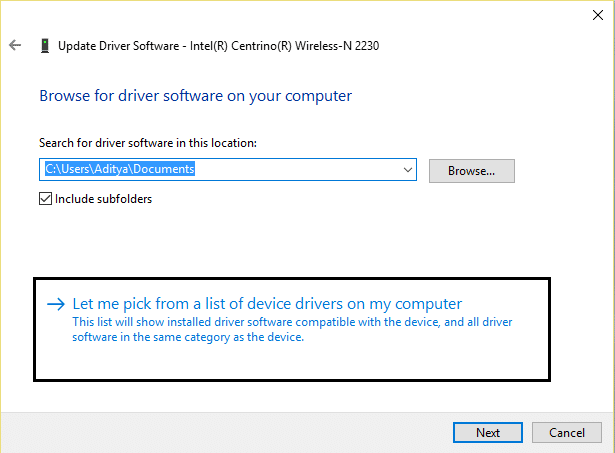
10. Intenta actualice los controladores de las versiones enumeradas.
11. Si lo anterior no funcionó, vaya a la sitio web del fabricante para actualizar los controladores: https://downloadcenter.intel.com/
12. reiniciar para aplicar cambios
Método 14: desfragmentar el disco duro
1. In the Windows Search bar type desfragmentar y luego haga clic en Desfragmentar y optimizar unidades.
2. Next, select all the drives one by one and click on Analizar.
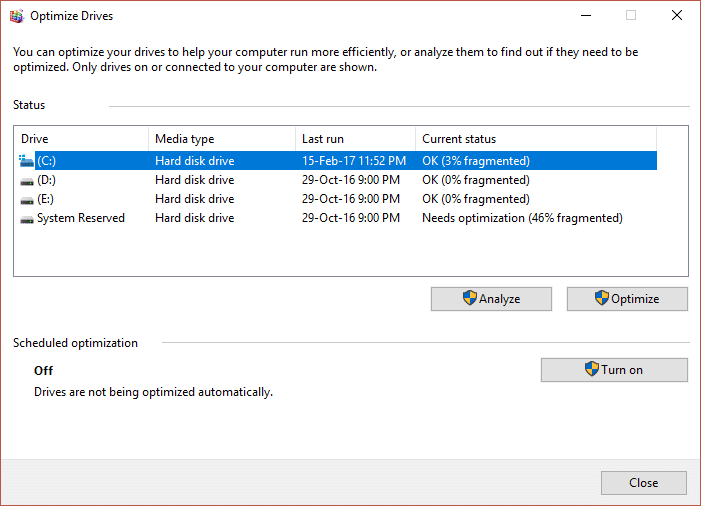
3. If the percentage of fragmentation is above 10%, select the drive and click on Optimize (This process can take some time so be patient).
4. Once fragmentation is done restart your PC and see if you’re able to fix High CPU and Disk usage problem of Windows 10.
Método 15: ejecutar CCleaner y Malwarebytes
1. Descargar e instalar Ccleaner Y Malwarebytes.
2. Ejecute Malwarebytes y deje que escanee su sistema en busca de archivos dañinos. Si se encuentra malware, lo eliminará automáticamente.

3. Ahora ejecute CCleaner y seleccione Limpieza personalizada.
4. En Limpieza personalizada, seleccione el Pestaña de Windows y marque los valores predeterminados y haga clic Analizar.

5. Una vez que se complete el Análisis, asegúrese de eliminar los archivos que desea eliminar.

6. Finalmente, haga clic en el Run Cleaner y deje que CCleaner siga su curso.
7. Para limpiar aún más su sistema, seleccione la pestaña Registroy asegúrese de que se compruebe lo siguiente:

8. Haga clic en el Escanear en busca de problemas y permita que CCleaner escanee, luego haga clic en el Arregla los problemas seleccionados del botón.

9. Cuando CCleaner pregunta "¿Quieres hacer una copia de seguridad de los cambios en el registro?" seleccione Sí.
10. Una vez que se haya completado la copia de seguridad, haga clic en el Solucionar todos los problemas seleccionados del botón.
11. Reinicie su PC para guardar los cambios.
Eso es todo lo que has logrado Solucionar el problema de uso elevado de CPU y disco de Windows 10 but if you still have any queries regarding this post feel free to ask them in the comment section.