- in ventanas by Administración
Fix Windows 10 install Fails With Error C1900101-4000D

Fix Windows 10 install Fails With Error C1900101-4000D: If you’re trying to upgrade to Windows 10 but the install fails with error code C1900101-4000D then don’t worry as it occurs because the Windows installer cannot access important files required for installation. Sometimes this error is also caused because of a conflict during installation but you can’t be sure as there is no error message accompanying this error.
0xC1900101-0x4000D
The installation failed in the SECOND_BOOT phase with an error during MIGRATE_DATA operation
While there is no definite fix for this issue but users seem to be recommending a clean installation of Windows 10 which should only be used as a last resort. So without wasting any time let’s see How to Fix Windows 10 install Fails With Error C1900101-4000D with the help of below-listed troubleshooting guide.
Fix Windows 10 install Fails With Error C1900101-4000D
Requisitos previos
a)Make sure to Update all drivers, including graphic, sound, BIOS, USB devices, printers, etc before the installing Windows 10.
b)Remove all external USB devices such as pen drive, external hard disk, USB keyboard & mouse, USB printer and all peripherals.
c)Use an ethernet cable instead of WiFi and disable WiFi until the update is complete.
Method 1: Temporarily Disable Antivirus and Firewall before attempting Upgrade
1.Haga clic derecho en el Icono del programa antivirus desde la bandeja del sistema y seleccione Inhabilitar.

2.A continuación, seleccione el período de tiempo durante el cual El antivirus permanecerá desactivado.

Nota: Elija la menor cantidad de tiempo posible, por ejemplo 15 minutos o 30 minutos.
3.Once done, again try to upgrade your PC and check if the error resolves or not.
4.Type control in the Windows Search then click on Panel de Control del resultado de la búsqueda.

5.A continuación, haga clic en Sistema y seguridad.
6.Luego haga clic en Firewall de Windows.

7.Ahora, desde el panel izquierdo de la ventana, haga clic en Activa o desactiva el Firewall de Windows.

8.Seleccione Desactivar Firewall de Windows y reinicie su PC. Again try to upgrade your PC and see if you’re able to Fix Windows 10 install Fails With Error C1900101-4000D.
Si el método anterior no funciona, asegúrese de seguir exactamente los mismos pasos para encender su Firewall nuevamente.
Method 2: Remove any hyphens from your computer or machine name
1.Presione la tecla Windows + R y luego escriba sysdm.cpl y presione Enter para abrir Propiedades del sistema.

2.Make sure you’re under Ficha Nombre del equipo a continuación, haga clic en Cambios Botón en la parte inferior.
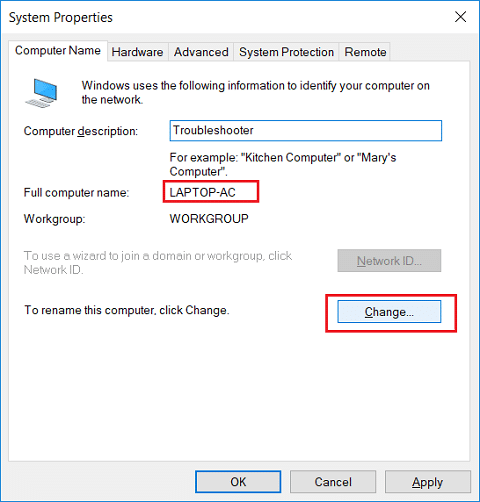
3.Make sure your machine name is simple no periods or hyphens or dashes.
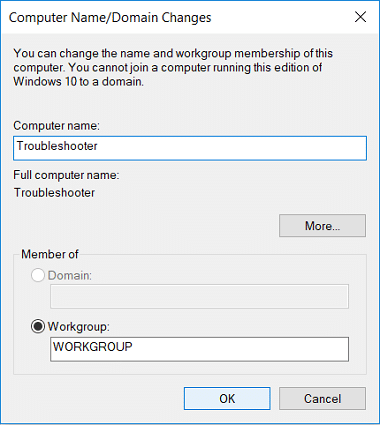
4.Click OK then Apply followed by OK.
5.Reinicie su PC para guardar los cambios.
Método 3: asegúrese de que Windows esté actualizado
1.Presione la tecla Windows + I y luego seleccione Actualización y seguridad.

2.A continuación, haga clic nuevamente Buscar actualizaciones y asegúrese de instalar las actualizaciones pendientes.

3.Después de instalar las actualizaciones, reinicie su PC y vea si puede Fix Windows 10 install Fails With Error C1900101-4000D.
Método 4: realizar un inicio limpio
This would make sure that if any 3rd party application is conflicting with Windows update then you will be able to successfully install Windows Updates inside Clean Boot. Sometimes 3rd party software can conflict with Windows Update and therefore cause Windows Update to be Stuck. In order, Fix Windows 10 install Fails With Error C1900101-4000D, debe realizar un inicio limpio en su PC y diagnosticar el problema paso a paso.

Método 5: Actualizar con la herramienta de creación de medios de Windows 10
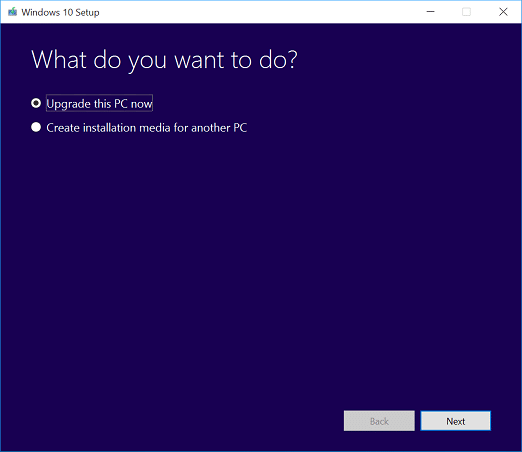
1.Download Media Creation Tool here.
2.Backup your data from system partition and save your license key.
3.Start the tool and choose to Actualice esta PC ahora.
4.Accept the license terms.
5.After the installer is ready, choose to Mantenga archivos y aplicaciones personales.
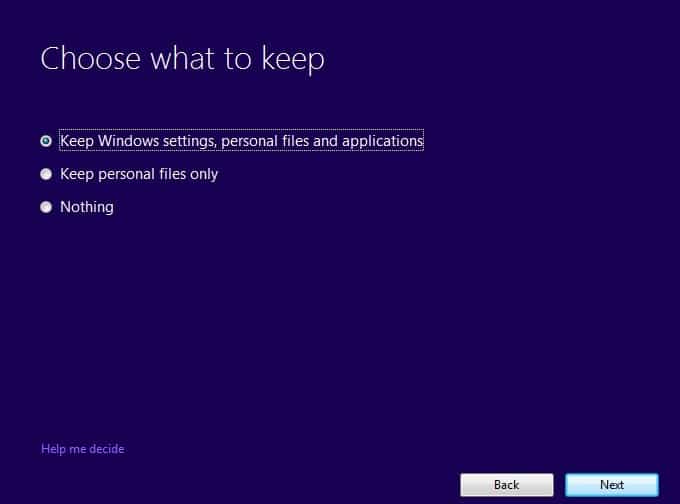
6.The PC will restart few times and your PC would be successfully upgraded.
Método 6: ejecutar SFC y DISM
1.Presione la tecla Windows + X y luego haga clic en Símbolo del sistema (Administrador).

2.Ahora escribe lo siguiente en el cmd y presiona enter:
Sfc /scannow sfc /scannow /offbootdir=c: /offwindir=c:windows (Si lo anterior falla, intente con este)

3.Espere a que finalice el proceso anterior y, una vez terminado, reinicie su PC.
4.Vuelva a abrir cmd, escriba el siguiente comando y presione Intro después de cada uno:
a) Dism /Online /Cleanup-Image /CheckHealth b) Dism /Online /Cleanup-Image /ScanHealth c) Dism /Online /Cleanup-Image /RestoreHealth

5.Deje que se ejecute el comando DISM y espere a que finalice.
6. Si el comando anterior no funciona, intente con lo siguiente:
Dism /Image:C:offline /Cleanup-Image /RestoreHealth /Source:c:testmountwindows Dism /Online /Cleanup-Image /RestoreHealth /Source:c:testmountwindows /LimitAccess
Nota: Reemplace C:RepairSourceWindows con la ubicación de su fuente de reparación (Disco de instalación o recuperación de Windows).
7.Reinicie su PC para guardar los cambios y ver si puede Fix Windows 10 install Fails With Error C1900101-4000D.
Method 7: Reset Windows Updates Components
1.Presione la tecla Windows + X y luego seleccione Símbolo del sistema (Admin).
2.Ahora escriba los siguientes comandos para detener Windows Update Services y luego presione Enter después de cada uno:
net stop wuauserv
net stop cryptSvc
bits de parada netos
net stop msiserver

3.A continuación, escriba el siguiente comando para cambiar el nombre de la carpeta de distribución de software y luego presione Enter:
ren C: WindowsSoftwareDistribution SoftwareDistribution.old
ren C: WindowsSystem32catroot2 catroot2.old

4.Finalmente, escriba el siguiente comando para iniciar Windows Update Services y presione Enter después de cada uno:
net start wuauserv
net start cryptSvc
bits de inicio de red
net start msiserver

5.Reinicie su PC para guardar los cambios y verifique si puede Fix Windows 10 install Fails With Error C1900101-4000D.
Method 8: Delete Registry for Mounted Images
1.Presione la tecla Windows + R y luego escriba regedit y presione Enter para abrir el Editor del Registro.

2. Navegue hasta la siguiente clave de registro:
HKEY_LOCAL_MACHINESOFTWAREMicrosoftWIMMountMounted Images
3.Select Mounted Images then in the right window pane right-click on (Default) and select Delete.
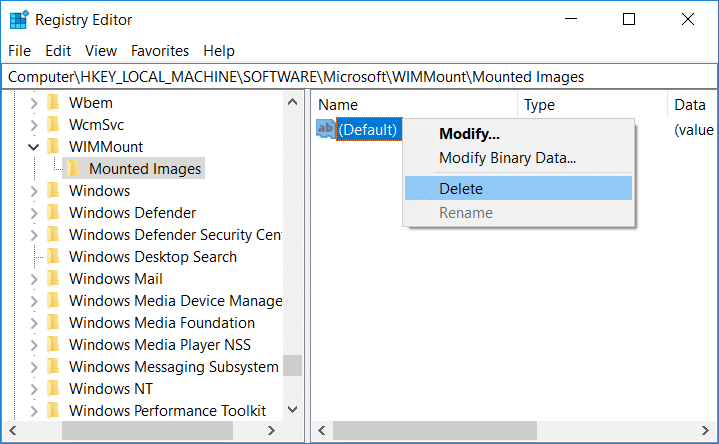
4.Salga del Editor del Registro y reinicie su PC para guardar los cambios.
Method 9: Disable Wi-Fi Adapter and CD/DVD Drive
1.Presione la tecla Windows + R y luego escriba devmgmt.msc y presione Enter para abrir el Administrador de dispositivos.

2.Expand DVD/CD-ROM drives, luego haga clic derecho en su CD / DVD y seleccionar Desactivar dispositivo.

3.Similarly, expand Network adapters then right-click on your WiFi adaptador y seleccione Desactivar dispositivo.
4.Again try to run Windows 10 setup and see if you’re able to Fix Windows 10 install Fails With Error C1900101-4000D.
Method 10: Run Malwarebytes and AdwCleaner
Malwarebytes es un potente escáner bajo demanda que debería eliminar secuestradores de navegador, adware y otros tipos de malware de su PC. Es importante tener en cuenta que Malwarebytes se ejecutará junto con el software antivirus sin conflictos. Para instalar y ejecutar Malwarebytes Anti-Malware, vaya a este artículo y siga todos y cada uno de los pasos.
1.Download AdwCleaner from this link.
2.Once the download is complete, double-click on the adwcleaner.exe file para ejecutar el programa.
3.Haga clic en "Estoy de acuerdo"Botón para aceptar el acuerdo de licencia.
4.On the next screen, click the Botón Escanear bajo acciones.
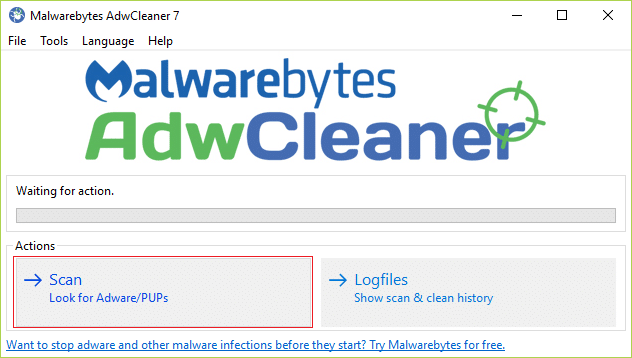
5.Now, wait for the AdwCleaner to search for PUPs and other malicious programs.
6. Una vez completado el escaneo, haga clic en Fácil in order to clean your system of such files.
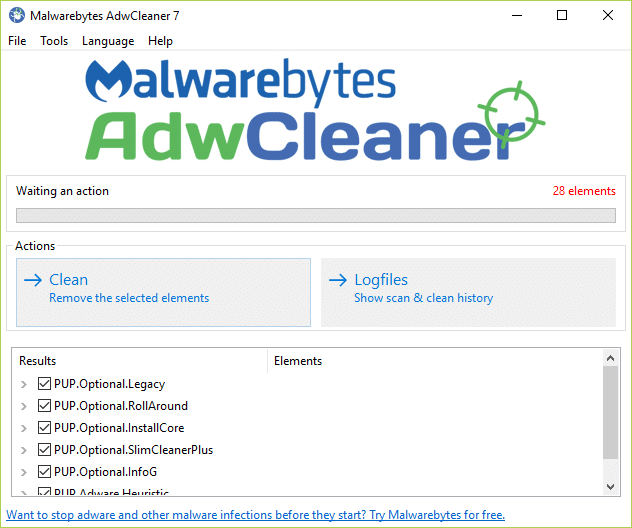
7.Save any work you might be doing as your PC will need to reboot, click OK to reboot your PC.
8.Once the computer reboots, a log file will open which will list all of the files, folders, registry keys, etc that were removed in the previous step.
Recomendado:
Eso es todo lo que has logrado Fix Windows 10 install Fails With Error C1900101-4000D pero si todavía tiene alguna pregunta sobre esta guía, no dude en hacerla en la sección de comentarios.