Parandage menüü Start, mis ei tööta operatsioonisüsteemis Windows 10

If you have recently updated or upgraded to Windows 10, then chances are your Start Menu may not work properly, making it impossible for users to navigate around Windows 10. Users are experiencing various issues with Start Menu such as Start Menu does not open, Start Button is not working, or Start Menu freezes etc. If your Start Menu isn’t working then don’t worry as today we will see a way to fix this issue.
This exact cause is different for different users because each user has a different system configuration and environment. But the problem can be related to anything like corrupted user account or drivers, damaged system files, etc. So without wasting any time, let’s see How to Fix Start Menu Not Working in Windows 10 with the help of the below-listed tutorial.
Looge kindlasti taastepunkt juhuks, kui midagi läheb valesti.
To run Command Prompt as an administrator, press Ctrl + Shift + Esc to open Task Manager. Then click on fail siis vali Käivitage uus ülesanne. Tüüp cmd.exe ja linnuke "Looge see ülesanne administraatoriõigustega” then click OK. Similarly, to open PowerShell, type powershell.exe and again checkmark the above field then hit Enter.

1. meetod: taaskäivitage Windows Explorer
1. press Ctrl + Shift + Esc klahvid kokku, et käivitada Task Manager.
2. Leidke explorer.exe loendis, seejärel paremklõpsake sellel ja valige Lõpeta ülesanne.

3. Nüüd suletakse Explorer ja selle uuesti käivitamiseks klõpsake nuppu Fail > Käivita uus ülesanne.
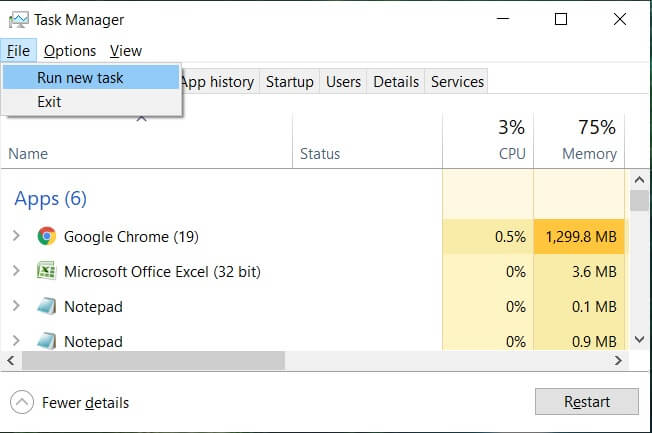
4. Tüüp explorer.exe ja klõpsake Exploreri taaskäivitamiseks nuppu OK.

5. Exit Task Manager and see if you’re able to Fix Start Menu Not Working in Windows 10.
6. If you’re still facing the issue, then log out from your account and re-login.
7. press Ctrl + Tõst + Del key at the same time and click on Signout.
8. Type in your password to login to Windows and see if you’re able to fix the issue.
Method 2: Create a new local administrator account
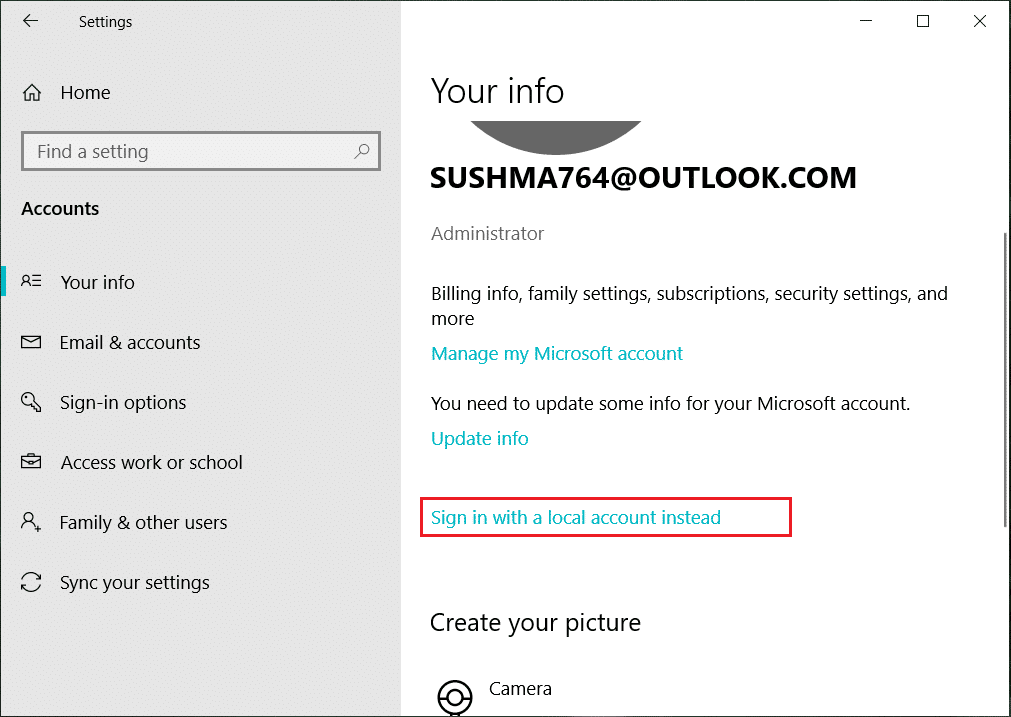
Kui olete oma Microsofti kontoga sisse logitud, eemaldage esmalt selle konto link järgmiselt.
1. Vajutage Windowsi klahve + R, seejärel tippige "ms-seaded:” (ilma jutumärkideta) ja vajuta Enter.
2. Vali Konto > Logige sisse hoopis kohaliku kontoga.
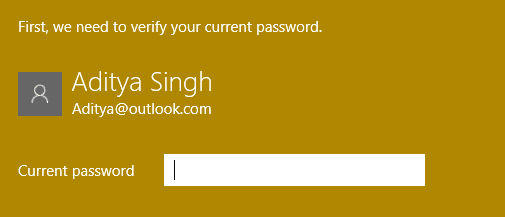
3. Sisestage oma Microsofti konto parool ja kliki Järgmine.
4. Valige a uus konto nimi ja paroolja seejärel valige Lõpeta ja logige välja.
#1. Create the new administrator account:
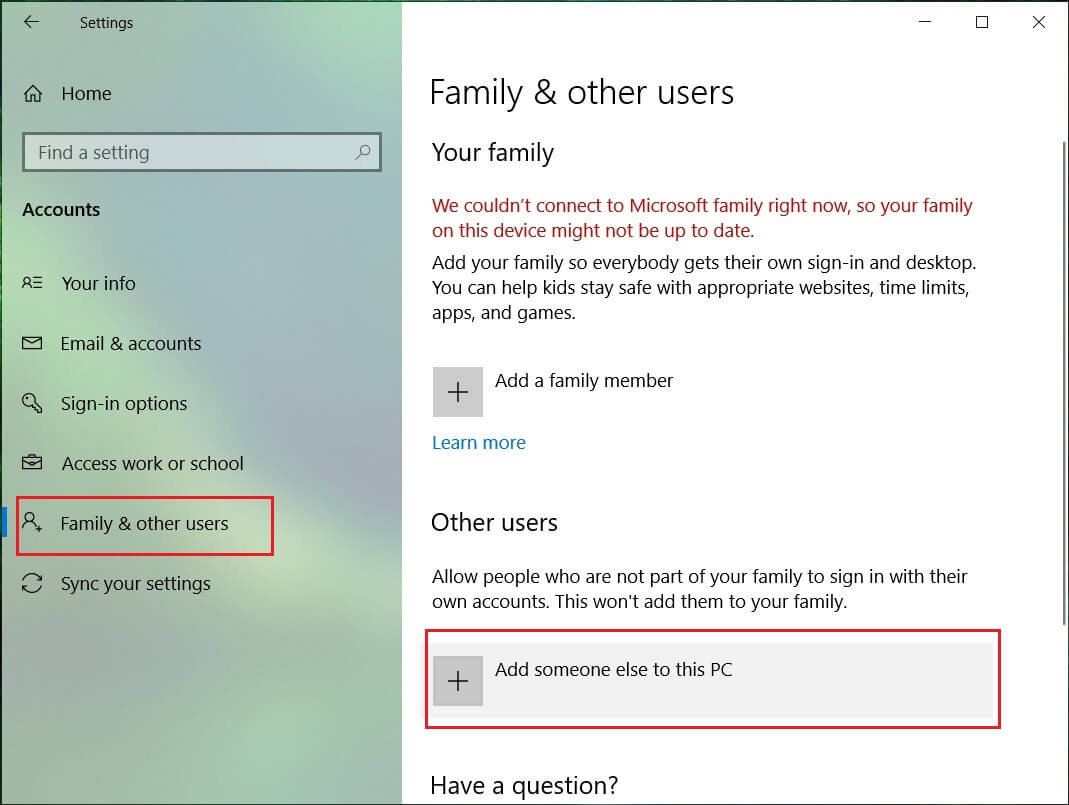
1. Vajutage Windows Key + I, et avada Sätted ja seejärel klõpsake Kontod.
2. Seejärel navigeerige saidile Perekond ja teised inimesed.
3. Klõpsake jaotises Muud inimesed valikul „Lisage sellesse arvutisse keegi teine."
4. Järgmisena sisestage nimi user and a password then select Next.
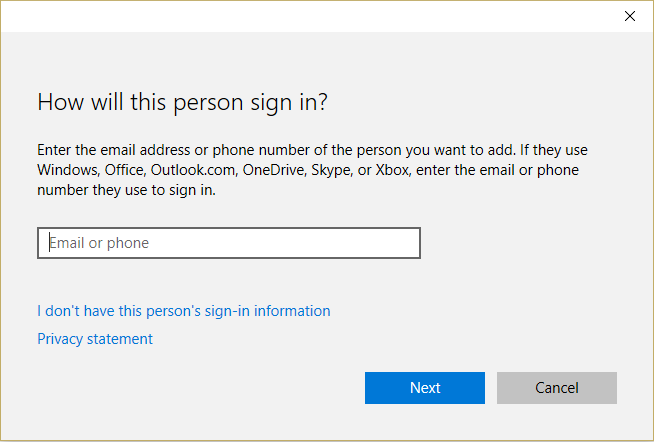
5. Määra a kasutajanimi ja parool, Seejärel valige Järgmine> Lõpeta.
#2. Next, make the new account an administrator account:
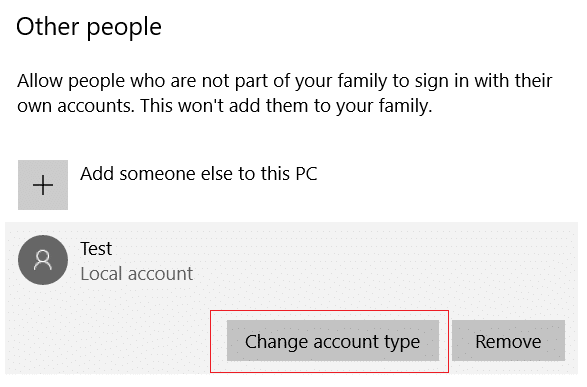
1. Jälle avatud Windows Settings ja kliki Konto.

2. Mine Vahekaart Perekond ja teised inimesed.
3. Teised inimesed valivad teie äsja loodud konto ja seejärel a Muutke konto tüüpi.
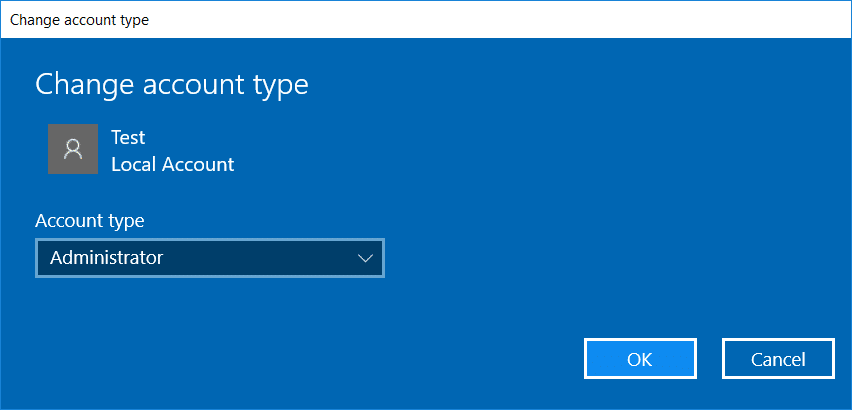
4. Valige jaotises Konto tüüp administraator siis kliki OK.
#3. If the issue persists try deleting the old administrator account:
1. Seejärel avage uuesti Windowsi sätted Konto > Perekond ja teised inimesed.
2. Jaotises Muud kasutajad valige vana administraatori konto ja klõpsake nuppu Eemalda, ja valige Kustutage konto ja andmed.

3. If you were using a Microsoft account to sign in before, you can associate it with the new administrator by following the next step.
4. sisse Windowsi sätted > Kontod, valige selle asemel Logi sisse Microsofti kontoga ja sisestage oma konto teave.
Lõpuks peaksite suutma Parandage menüü Start, mis ei tööta operatsioonisüsteemis Windows 10 as this step seems to fix the issue in most cases.
If you continue to experience Start Menu’s issue, it’s recommended to download and run Start Menu Troubleshooter.
1. Download and run Start Menu Troubleshooter.
2. Topeltklõpsake ikooni allalaaditud fail ja seejärel klõpsake Järgmine.
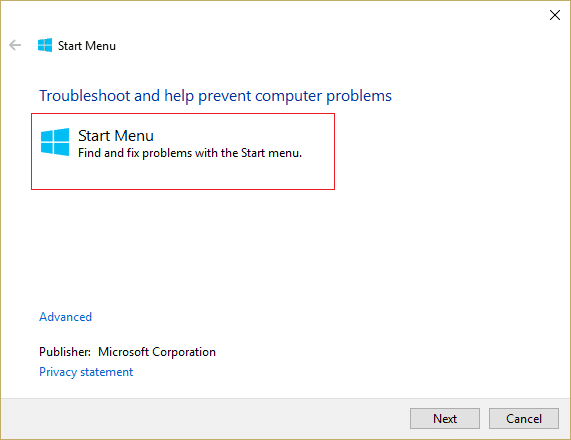
3. Let it finds and automatically Fixes Start Menu Not Working in Windows 10.
Method 4: Run System File Checker (SFC) and Check Disk
1. Avage käsuviip. Kasutaja saab selle toimingu sooritada otsides 'cmd' Ja seejärel vajutage sisestusklahvi.

2. Nüüd tippige cmd-sse järgmine tekst ja vajutage sisestusklahvi:
Sfc /scannow sfc /scannow /offbootdir=c: /offwindir=c:windows

3. Oodake, kuni ülaltoodud protsess on lõppenud, ja kui see on tehtud, taaskäivitage arvuti.
4. Next, run CHKDSK from Parandage failisüsteemi vead Check Disk Utility (CHKDSK) abil.
5. Laske ülaltoodud protsess lõpule viia ja muudatuste salvestamiseks taaskäivitage arvuti.
Method 5: Force Cortana to Rebuild Settings
Open Command Prompt with administrative rights then type the following one by one and hit Enter after each command:
CD /d "%LOCALAPPDATA%PackagesMicrosoft.Windows.Cortana_cw5n1h2txyewy"
Taskkill /F /IM SearchUI.exe
RD /S /Q Settings
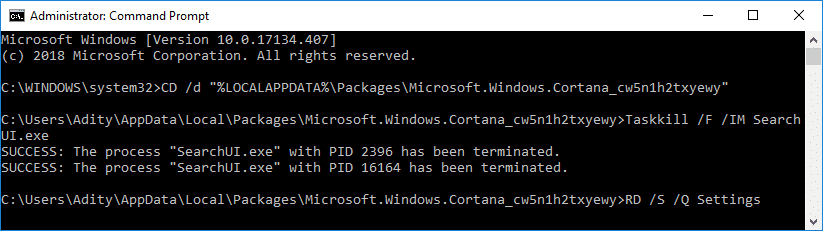
This will force Cortana to rebuild the settings and will Fix Start Menu and Cortana Not Working in Windows 10.
If the issue is still not resolved, follow this guide to fix any issues related to Cortana.
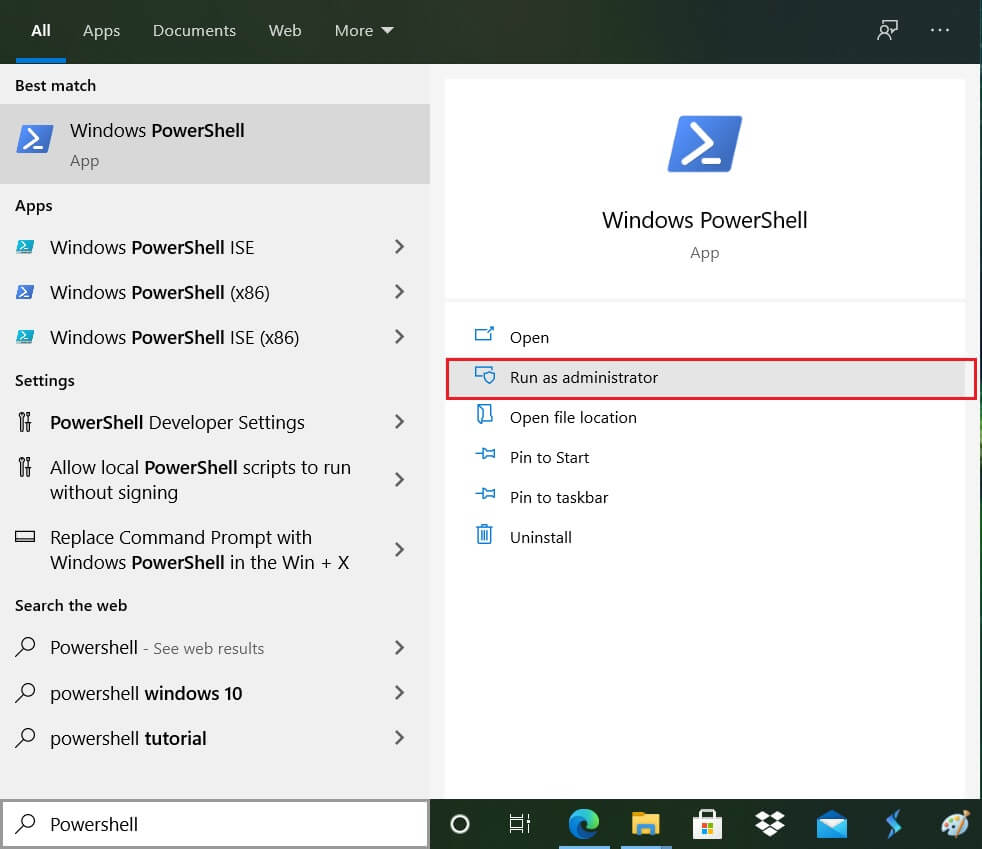
Method 6: Re-Register Windows App
1. Tüüp PowerShell Windows Searchis paremklõpsake PowerShelli ja valige Käivita administraatorina.
2. Nüüd tippige PowerShelli aknasse järgmine käsk:
Get-AppXPackage -AllUsers | Foreach {Add-AppxPackage -DisableDevelopmentMode -Register "$ ($ _. InstallLocation) AppXManifest.xml"}

3. Oodake, kuni Powershell täidab ülaltoodud käsu, ja ignoreerige mõningaid vigu, mis võivad ette tulla.
4. Muudatuste salvestamiseks taaskäivitage arvuti.
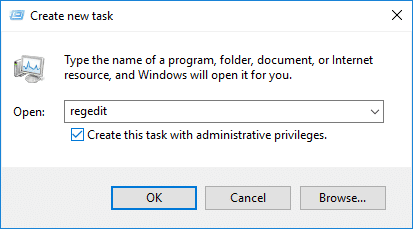
7. meetod: registriparandus
1. Press Ctrl + Shift + Esc to open Task Manager then click on fail ja valige Käivitage uus ülesanne.
2. Tüüp regedit ja linnuke "Looge see ülesanne administraatoriõigustega” then click OK.
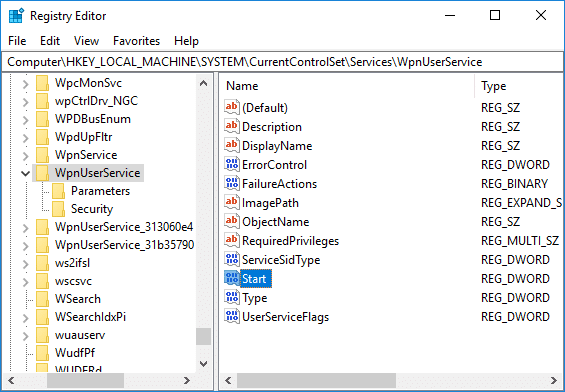
3. Now navigate to the following registry key in the Registry Editor:
ComputerHKEY_LOCAL_MACHINESYSTEMCurrentControlSetServicesWpnUserService
4. Valige kindlasti WpnUserService then in the right window double-click on the Käivitage DWORD.
5. Change its value to 4 then click OK.
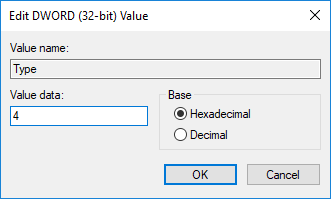
6. Muudatuste salvestamiseks taaskäivitage arvuti.
8. meetod: värskendage või lähtestage Windows 10
Märge: If you can’t access your PC, restart your PC a few times until you start Automaatne remont. Seejärel navigeerige aadressile Tõrkeotsing > Lähtesta see arvuti > Eemalda kõik.
1. Vajutage Windows Key + I, et avada Sätted, seejärel klõpsake nuppu Värskendus- ja turvaikoon.
![]()
2. Valige vasakpoolsest menüüst Recovery.
3. All Nulli see arvuti klõpsake nuppu "Alustamine"Nuppu.

4. Valige suvand Hoidke oma failid.

5. For the next step, you might be asked to insert Windows 10 installation media, so ensure you have it ready.
6. Now, select your Windows version and click ainult sellel draivil, kuhu Windows on installitud > remove my files.

5. Klõpsake nupul Reset-nupp.
6. Lähtestamise lõpetamiseks järgige ekraanil kuvatavaid juhiseid.
Soovitan:
See on teil edukalt Parandage menüü Start, mis ei tööta operatsioonisüsteemis Windows 10 kuid kui teil on selle õpetuse kohta veel küsimusi, küsige neid kommentaaride jaotises.