Fix Windows 10 install Fails With Error C1900101-4000D

Fix Windows 10 install Fails With Error C1900101-4000D: If you’re trying to upgrade to Windows 10 but the install fails with error code C1900101-4000D then don’t worry as it occurs because the Windows installer cannot access important files required for installation. Sometimes this error is also caused because of a conflict during installation but you can’t be sure as there is no error message accompanying this error.
0xC1900101-0x4000D
The installation failed in the SECOND_BOOT phase with an error during MIGRATE_DATA operation
While there is no definite fix for this issue but users seem to be recommending a clean installation of Windows 10 which should only be used as a last resort. So without wasting any time let’s see How to Fix Windows 10 install Fails With Error C1900101-4000D with the help of below-listed troubleshooting guide.
Fix Windows 10 install Fails With Error C1900101-4000D
Eeldused
a)Make sure to Update all drivers, including graphic, sound, BIOS, USB devices, printers, etc before the installing Windows 10.
b)Remove all external USB devices such as pen drive, external hard disk, USB keyboard & mouse, USB printer and all peripherals.
c)Use an ethernet cable instead of WiFi and disable WiFi until the update is complete.
Method 1: Temporarily Disable Antivirus and Firewall before attempting Upgrade
1. Paremklõpsake ikooni Viirusetõrjeprogrammi ikoon süsteemses salves ja valige Keela.

2. Järgmisena valige ajavahemik, mille jaoks Viirusetõrje jääb keelatuks.

Märge: Valige väikseim võimalik aeg, näiteks 15 minutit või 30 minutit.
3.Once done, again try to upgrade your PC and check if the error resolves or not.
4.Type control in the Windows Search then click on juhtpaneel otsingutulemitest.

5. Järgmisena klõpsake nuppu Süsteem ja turvalisus.
6. Seejärel klõpsake nuppu Windowsi tulemüür.

7. Nüüd klõpsake vasakpoolsel aknapaanil nuppu Lülitage Windowsi tulemüür sisse või välja.

8.Valige Lülita Windowsi tulemüür välja ja taaskäivitage arvuti. Again try to upgrade your PC and see if you’re able to Fix Windows 10 install Fails With Error C1900101-4000D.
Kui ülaltoodud meetod ei tööta, järgige tulemüüri uuesti sisselülitamiseks täpselt samu samme.
Method 2: Remove any hyphens from your computer or machine name
1. Vajutage Windows Key + R ja seejärel tippige sysdm.cpl ja vajutage avamiseks Enter System Properties.

2.Make sure you’re under Arvuti nime vahekaart siis klõpsake nuppu Muutma nupp allosas.
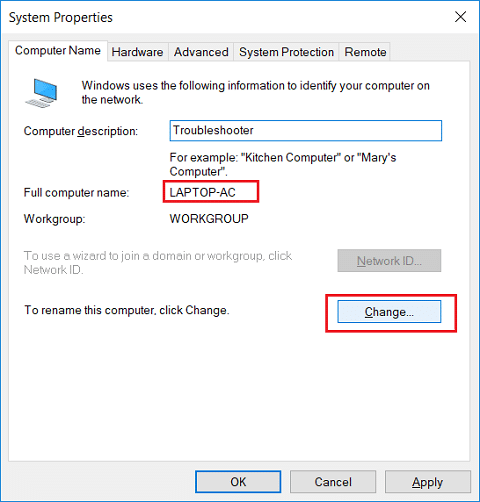
3.Make sure your machine name is simple no periods or hyphens or dashes.
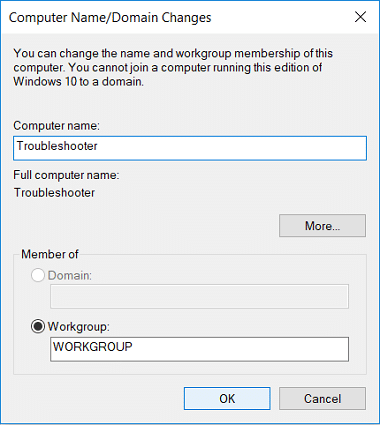
4.Click OK then Apply followed by OK.
5. Muudatuste salvestamiseks taaskäivitage arvuti.
3. meetod: veenduge, et Windows on ajakohane
1. Vajutage Windows Key + I ja seejärel valige Värskendamine ja turvalisus.

2. Järgmiseks klõpsake uuesti Kontrolli uuendusi ja installige kindlasti kõik ootel olevad värskendused.

3. Pärast värskenduste installimist taaskäivitage arvuti ja vaadake, kas saate seda teha Fix Windows 10 install Fails With Error C1900101-4000D.
4. meetod: tehke puhas alglaadimine
This would make sure that if any 3rd party application is conflicting with Windows update then you will be able to successfully install Windows Updates inside Clean Boot. Sometimes 3rd party software can conflict with Windows Update and therefore cause Windows Update to be Stuck. In order, Fix Windows 10 install Fails With Error C1900101-4000D, peate oma arvutis puhta alglaadimise ja probleemi samm-sammult diagnoosima.

Method 5: Upgrade using Windows 10 Media Creation Tool
1.Download Media Creation Tool here.
2.Backup your data from system partition and save your license key.
3.Start the tool and choose to Upgrade this PC now.
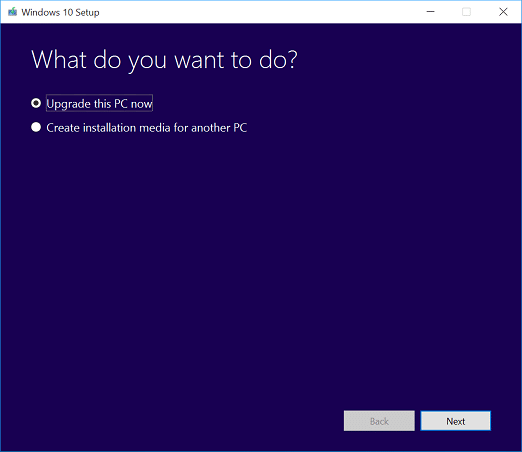
4.Accept the license terms.
5.After the installer is ready, choose to Keep personal files and apps.
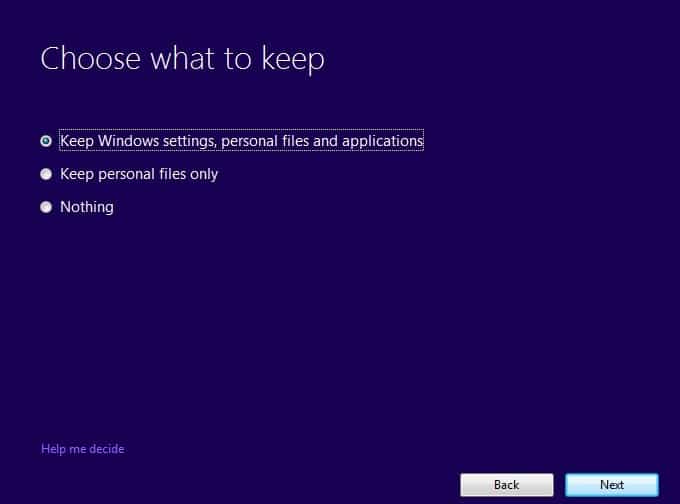
6.The PC will restart few times and your PC would be successfully upgraded.
6. meetod: käivitage SFC ja DISM
1. Vajutage Windows Key + X ja seejärel klõpsake nuppu Käsuviip (administraator).

2. Nüüd tippige cmd-sse järgmine tekst ja vajutage sisestusklahvi:
Sfc /scannow sfc /scannow /offbootdir=c: /offwindir=c:windows (Kui ülaltoodud ei õnnestu, proovige seda)

3. Oodake, kuni ülaltoodud protsess lõpeb, ja pärast seda taaskäivitage arvuti.
4. Avage uuesti cmd ja tippige järgmine käsk ja vajutage iga käsu järel sisestusklahvi:
a) Dism /Online /Cleanup-Image /CheckHealth b) Dism /Online /Cleanup-Image /ScanHealth c) Dism /Online /Cleanup-Image /RestoreHealth

5. Laske käsul DISM käivituda ja oodake, kuni see lõpeb.
6. Kui ülaltoodud käsk ei tööta, proovige allolevat:
Dism /Image:C:offline /Cleanup-Image /RestoreHealth /Source:c:testmountwindows Dism /Online /Cleanup-Image /RestoreHealth /Allikas:c:testmountwindows /LimitAccess
Märge: Asendage C:RepairSourceWindows oma parandusallika asukohaga (Windowsi installi- või taasteketas).
7. Taaskäivitage arvuti, et muudatused salvestada ja kontrollida, kas saate seda teha Fix Windows 10 install Fails With Error C1900101-4000D.
Method 7: Reset Windows Updates Components
1. Vajutage Windows Key + X ja seejärel valige Käsuviip (admin).
2. Nüüd tippige Windowsi värskendusteenuste peatamiseks järgmised käsud ja seejärel vajutage iga käsu järel sisestusklahvi.
net stop wuauserv
net stop cryptSvc
net stop bitid
net stop msiserver

3. Järgmisena tippige SoftwareDistribution Folder ümbernimetamiseks järgmine käsk ja vajutage sisestusklahvi:
ren C: WindowsSoftwareDistribution SoftwareDistribution.old
ren C: WindowsSystem32catroot2 catroot2.old

4. Lõpuks tippige Windows Update Services käivitamiseks järgmine käsk ja vajutage iga käsu järel sisestusklahvi:
net start wuauserv
net start cryptSvc
net start bits
net start msiserver

5. Taaskäivitage arvuti, et muudatused salvestada ja kontrollida, kas see on võimalik Fix Windows 10 install Fails With Error C1900101-4000D.
Method 8: Delete Registry for Mounted Images
1. Vajutage Windows Key + R ja seejärel tippige regedit ja vajutage registriredaktori avamiseks sisestusklahvi.

2. Liikuge järgmisele registrivõtmele:
HKEY_LOCAL_MACHINESOFTWAREMicrosoftWIMMountMounted Images
3.Valige Mounted Images then in the right window pane right-click on (Default) and select Delete.
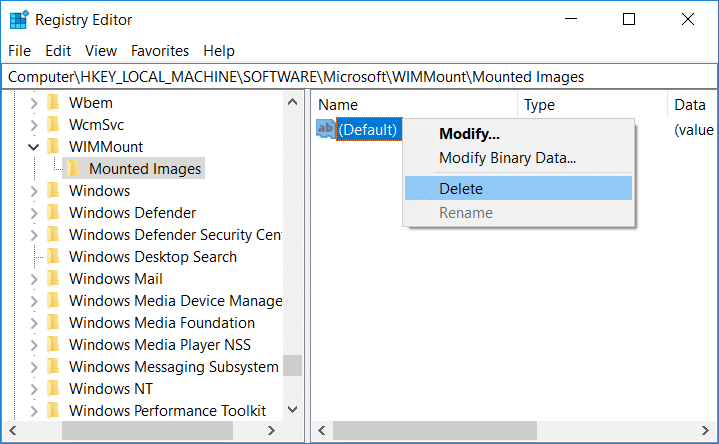
4. Väljuge registriredaktorist ja taaskäivitage arvuti muudatuste salvestamiseks.
Method 9: Disable Wi-Fi Adapter and CD/DVD Drive
1. Vajutage Windows Key + R ja seejärel tippige käsk devmgmt.msc ja vajutage seadmehalduri avamiseks sisestusklahvi.

2.Expand DVD/CD-ROM drives, seejärel paremklõpsake oma CD / DVD-draiv ja valige Keela seade.

3.Similarly, expand Network adapters then right-click on your WiFi adapter ja valige Keela seade.
4.Again try to run Windows 10 setup and see if you’re able to Fix Windows 10 install Fails With Error C1900101-4000D.
Method 10: Run Malwarebytes and AdwCleaner
Malwarebytes on võimas tellitav skanner, mis peaks eemaldama teie arvutist brauseri kaaperdajad, reklaamvara ja muud tüüpi pahavara. Oluline on märkida, et Malwarebytes töötab koos viirusetõrjetarkvaraga ilma konfliktideta. Malwarebytes Anti-Malware installimiseks ja käitamiseks lugege seda artiklit ja järgige iga sammu.
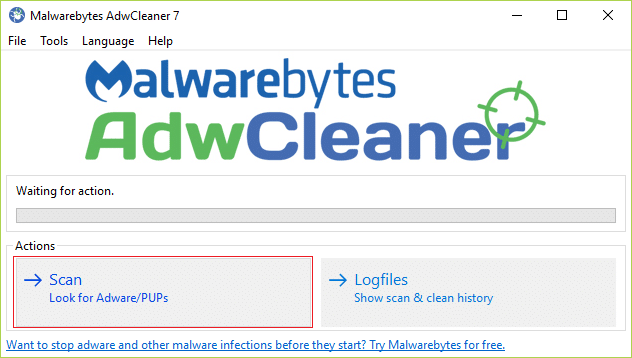
1.Download AdwCleaner from this link.
2.Once the download is complete, double-click on the adwcleaner.exe file programmi käivitamiseks.
3. Klõpsake "Nõustun”Nuppu accept the license agreement.
4.On the next screen, click the Skannimisnupp under Actions.
5.Now, wait for the AdwCleaner to search for PUPs and other malicious programs.
6.Kui skannimine on lõppenud, klõpsake nuppu puhastada in order to clean your system of such files.
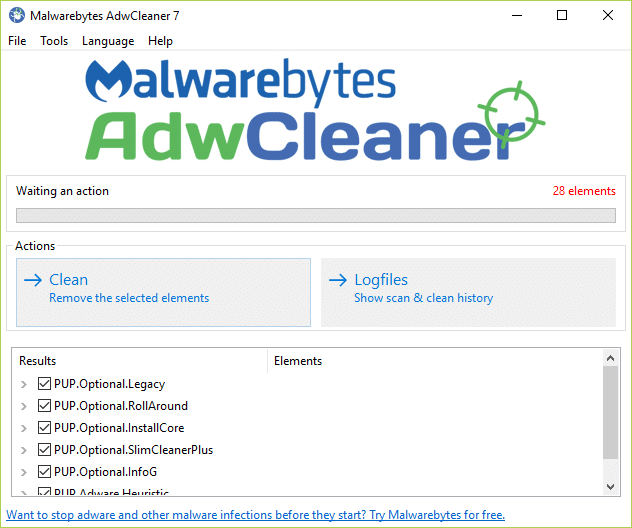
7.Save any work you might be doing as your PC will need to reboot, click OK to reboot your PC.
8.Once the computer reboots, a log file will open which will list all of the files, folders, registry keys, etc that were removed in the previous step.
Soovitan:
See on teil edukalt Fix Windows 10 install Fails With Error C1900101-4000D kuid kui teil on selle juhendi kohta endiselt küsimusi, küsige neid kommentaaride jaotises.