Fix MultiVersus Not Launching in Windows 10

MultiVersus is a famous online multiplayer fighting game that is rocking today’s gaming world. Yet, few users complain about the MultiVersus not launching issue when the game is launched on their Windows 10 PC. If you are in the same boat, the troubleshooting hacks discussed in this article will help you sail the problem.
How to Fix MultiVersus Not Launching in Windows 10
If you are vexed by MultiVersus won’t launch issue in your Windows 10 computer, here are a few possible reasons why you must analyze them carefully to sort out the problem.
- PC ei täytä pelin perusvaatimuksia.
- Joku muu taustaohjelma häiritsee peliä.
- Käytät ajurien vahvistamatonta versiota.
- Pelin grafiikkaasetukset on määritetty väärin.
- Haittaohjelmien ja virusten esiintyminen.
- .NET-kehystä ja käyttöjärjestelmää ei ole päivitetty uusimpaan versioon.
- DirectX-versio ei ole ajan tasalla.
- Ylikellotus.
- Myös pelin väärin määritetyt tai vioittuneet asennustiedostot aiheuttavat ongelman.
- Microsoft C++ -uudelleenjakelutiedostot eivät ole yhteensopivia pelin ja tietokoneen kanssa.
Here are a few possible troubleshooting methods that will help you fix the discussed issue.
Tapa 1: Perusvianetsintämenetelmät
Korjaa mainittu ongelma noudattamalla näitä perusvianetsintämenetelmiä.
1A. Tarkista järjestelmävaatimukset
Multi Versus Järjestelmän vähimmäisvaatimukset
- prosessori: Intel Core i5-2300 tai AMD FX-8350
- RAM: 4 Gt
- NÄYTÖNOHJAIN: Nvidia GeForce GTX 550 Ti or AMD Radeon HD 5850 | Intel UHD 750
- PIKSELIVARJ: 5.0
- VERTEX Shader: 5.0
- ILMAINEN LEVYTILA: 6 Gt
- Omistettu videomuisti: 1024 MB
Multi Versus Suositeltu kokoonpano
- prosessori: Intel Core i5-3470 tai AMD Ryzen 3 1200
- RAM: 8 Gt
- NÄYTÖNOHJAIN: Nvidia GeForce GTX 660 or AMD Radeon R9 270
- PIKSELIVARJ: 5.0
- VERTEX Shader: 5.0
- ILMAINEN LEVYTILA: 6 Gt
- Omistettu videomuisti: 2048 MB
1B. Check your internet connection
Unstable internet connection leads to MultiVersus is not working issue, also if there are any obstacles between your router and your computer, they may interfere with the wireless signal and will cause intermittent connection problems.
Voit ajaa a nopeuskoe tietääksesi oikean yhteyden edellyttämän optimaalisen verkon nopeuden.
Varmista, että laitteesi täyttää alla olevat kriteerit.
- Selvitä verkkosi signaalinvoimakkuus ja jos se on hyvin alhainen, poista kaikki väliltä olevat esteet.
- Vältä liian montaa samaan verkkoon kytkettyä laitetta.
- Osta aina Internet-palveluntarjoajasi (ISP) vahvistama modeemi/reititin, ja niissä ei ole ristiriitoja.
- Älä käytä vanhoja, rikkinäisiä tai vaurioituneita kaapeleita. Vaihda kaapelit tarvittaessa.
- Varmista, että johdot modeemista reitittimeen ja modeemista seinään ovat vakaat ja häiriöttömät.
Jos Internet-yhteysongelmia ilmenee, katso oppaamme Verkkoyhteysongelmien vianmääritys Windows 10:ssä saman vianmäärityksen suorittamiseksi.
1C. Stop Overclocking
- Every high-end computer is built with the option of Overclocking which helps in outputting more juice than your specifications that you already have. Running the graphics card or processor faster than the default speed refers to overclocking.
- Kun näin tapahtuu, tietokoneesi saavuttaa maksimilämpötilan tietyn ajan kuluttua. Tietokone havaitsee tämän ja säätää kellonopeuden normaalille nopeudelle, kunnes se jäähtyy. Kellonopeutta nostetaan uudelleen niiden jäähtymisen jälkeen.
- Tämä lisää tietokoneesi suorituskykyä ja on suureksi avuksi, jos sinulla ei ole tehokasta tietokonetta.
- It must be noted that all the games do not support overclocking. The same applies to MultiVersus. So, you must try disabling all overclocking on your computer and try launching the game. If it launches well, the issue is fixed.
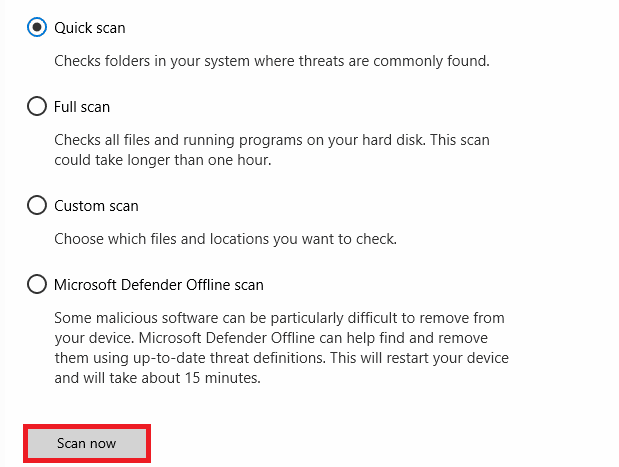
1D. Suorita haittaohjelmien tarkistus
The presence of a virus or malware attack will result in gaming problems on your computer. If in case, the virus attack is very severe, you cannot connect to any online game continuously at all. To resolve the problem, you have to remove the virus or malware completely from your Windows 10 computer.
Sinun on suositeltavaa tarkistaa tietokoneesi oppaassamme olevien ohjeiden mukaisesti. Kuinka suoritan virustarkistuksen tietokoneellani?
Lisäksi, jos haluat poistaa haittaohjelmia tietokoneeltasi, tutustu oppaaseemme Haittaohjelmien poistaminen tietokoneesta Windows 10:ssä.
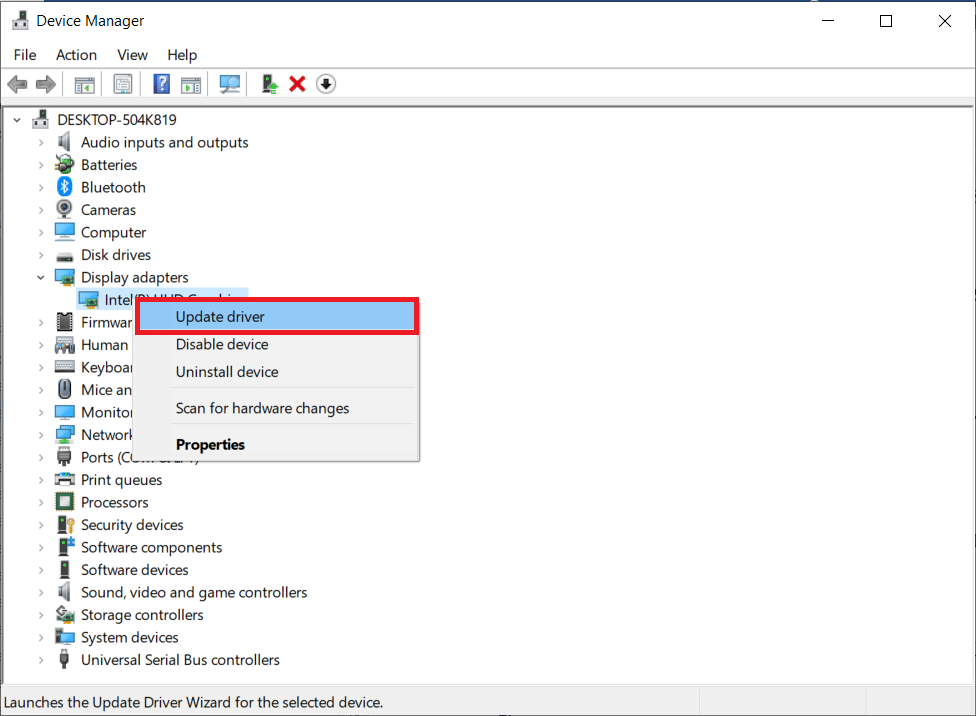
1E. Update GPU Drivers
Graphical drivers are responsible for heavy graphical images and video processing games. If you face any launching conflicts in the MultiVersus game, make sure you use an updated version of device drivers, as they serve as a link between the hardware and Operating System of your PC. Many users have suggested that updating drivers have fixed MultiVersus not working issue. Read and implement the steps instructed in our guide 4 Ways to Update Graphics Drivers in Windows 10 to do so.
Lue myös: Korjaa Windowsin löytämät ohjaimet laitteellesi, mutta havaittiin virhe
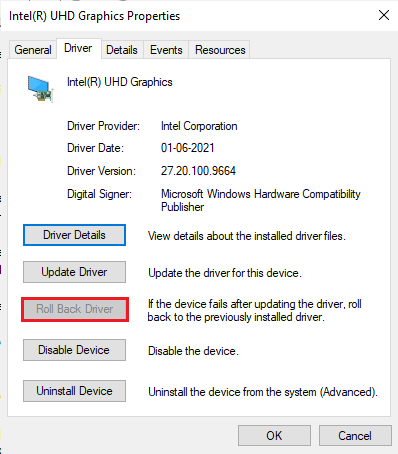
1F. Roll Back GPU Drivers
Sometimes, the current version of GPU drivers may cause the discussed launching issue in MultiVersus, and in this case, you have to restore previous versions of installed drivers. This process is called kuljettajien palautus ja voit helposti palauttaa tietokoneesi ohjaimet aiempaan tilaan seuraamalla ohjaimien palauttamista Windows 10:ssä.
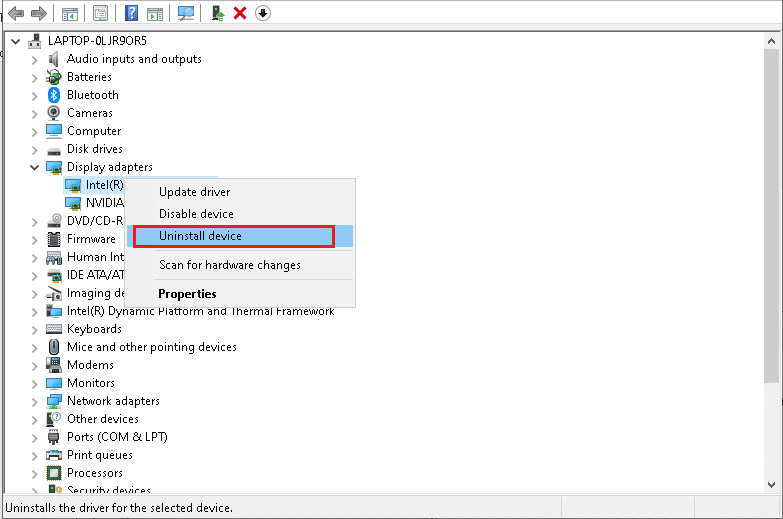
1G. Reinstall GPU Driver
If you still face MultiVersus not starting issue after updating your GPU drivers, then reinstall device drivers to fix any incompatibility issues. There are several ways to reinstall drivers on your computer. Yet, you can easily reinstall Graphical drivers as instructed in our guide How to Uninstall and Reinstall Drivers on Windows 10.
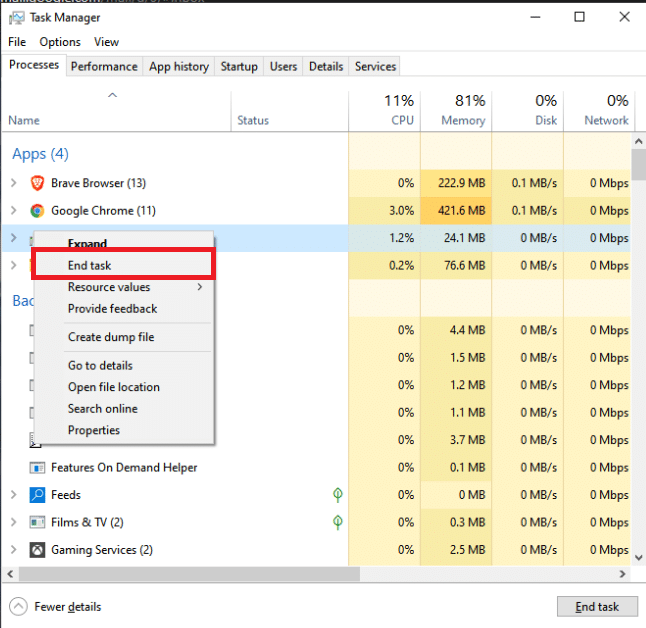
1H. End Background Processes
Several users have confirmed that MultiVersus not starting on PC can be resolved by closing all the background tasks running on your PC. To implement the task, follow our guide How to End Task in Windows 10, and proceed as instructed.
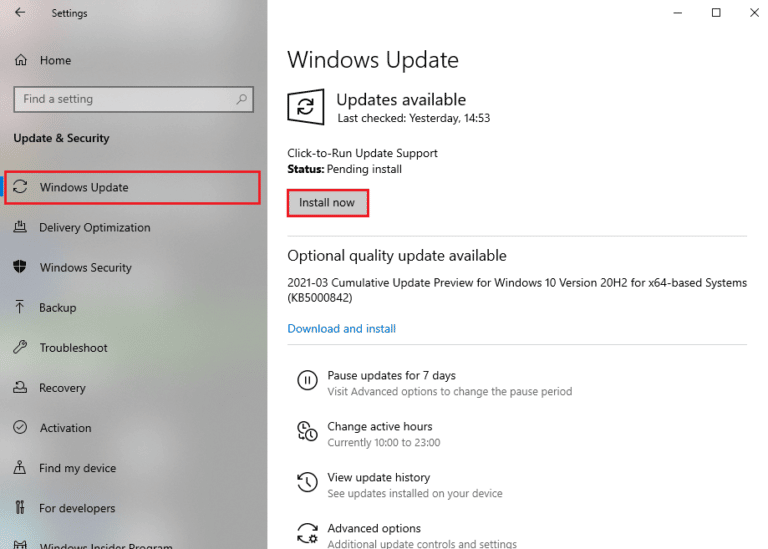
1I. Update Windows
You can also eradicate bugs in your computer and game by updating your Operating System. Always ensure if you have updated your Windows Operating System and if any updates are pending in action, use our guide How to Download and Install Windows 10 Latest Update
1J. Disable Antivirus Temporarily (If Applicable)
Some incompatible antivirus programs installed on your computer will cause MultiVersus launching problem. To avoid conflicts, you must ensure the security settings of your Windows 10 computer and check if they are stable or not. To find whether the antivirus suite is the reason for the discussed issue, disable it once and try connecting to a network.
Lue opas virustentorjunnan poistamisesta väliaikaisesti käytöstä Windows 10:ssä ja seuraa ohjeita poistaaksesi virustentorjuntaohjelman väliaikaisesti käytöstä tietokoneellasi.
Jos saat korjauksen ongelmaasi sen jälkeen, kun olet poistanut virustentorjuntaohjelman käytöstä tietokoneeltasi, sinun kannattaa poistaa ohjelma kokonaan tietokoneeltasi.
Read our guide Force Uninstall Programs which won’t Uninstall in Windows 10 to uninstall your antivirus program on your computer.
Lue myös: Kuinka poistaa McAfee LiveSafe Windows 10:ssä
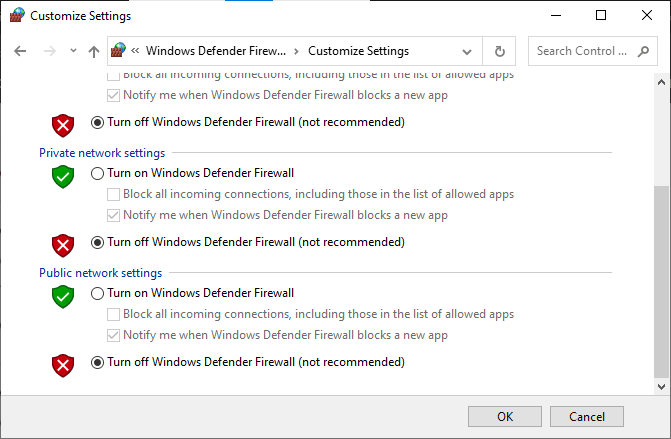
1K. Turn Off Windows Defender Firewall (Not Recommended)
Your computer will face MultiVersus is not working issue, due to an over-protective firewall suite in the Windows 10 PC. To resolve the problem, you can either add a new rule for your game, whitelist the game or as the last fix, disable the firewall temporarily.
Our guide on How to Disable Windows 10 Firewall will help you.
1L. Korjaa järjestelmätiedostot
If there are any missing or damaged files on your Windows 10 PC, you will face MultiVersus takes forever to launch issue. Yet, you are repairing these corrupt files by using inbuilt utilities namely, Järjestelmätiedostojen tarkistuksen ja Käyttöönotto ja ylläpito.
Lue opas järjestelmätiedostojen korjaamisesta Windows 10:ssä ja korjaa kaikki vioittuneet tiedostot ohjeiden mukaisesti.
Method 2: Run MultiVersus Game as Administrator
If MultiVersus does not have required administrative privileges, a few essential features of the game will be limited causing you MultiVersus not launching issue whenever you open the game or install any updates. Follow the below-mentioned instructions to run the game as an administrator.
1. Napsauta hiiren kakkospainikkeella MultiVersus shortcut työpöydällä.
Huomautus: Voit myös siirtyä asennushakemisto ja napsauta sitä hiiren kakkospainikkeella.
2. Valitse sitten Kiinteistöt vaihtoehto.
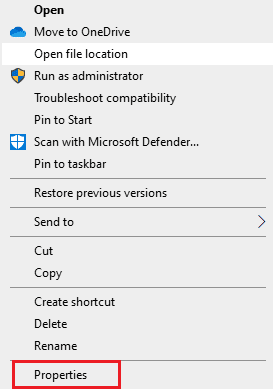
3. Siirry nyt kohtaan Yhteensopivuus välilehti ja napsauta Suorita tämä ohjelma järjestelmänvalvojana.
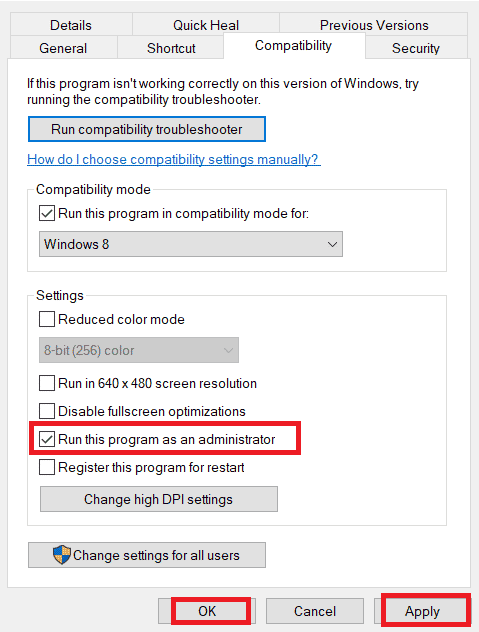
4. Napsauta lopuksi Käytä> OK Tallentaa muutokset.
Check if you have fixed MultiVersus launching issues.
Lue myös: Fix WoW Takes Forever to Launch in Windows 10
Tapa 3: Muuta peliprosessin prioriteettia
The preference of an application or process tells the computer the importance and if it should be given preference over the others while allocating the resources. The priority of every application is normal except the system processes, by default. MultiVersus might crash if it didn’t get enough resources.
1. paina Ctrl + Shift + Esc näppäimet yhdessä avataksesi tehtäväpalkki.
2. Etsi nyt MultiVersus process.
3. Muuta sitten prioriteetiksi Korkea prioriteetti ja tarkista toimiiko tämä.
Huomautus: Muuta prioriteettia erittäin varoen, sillä prosessin prioriteetin huolimaton muuttaminen voi tehdä järjestelmästäsi erittäin hitaan tai epävakaan.
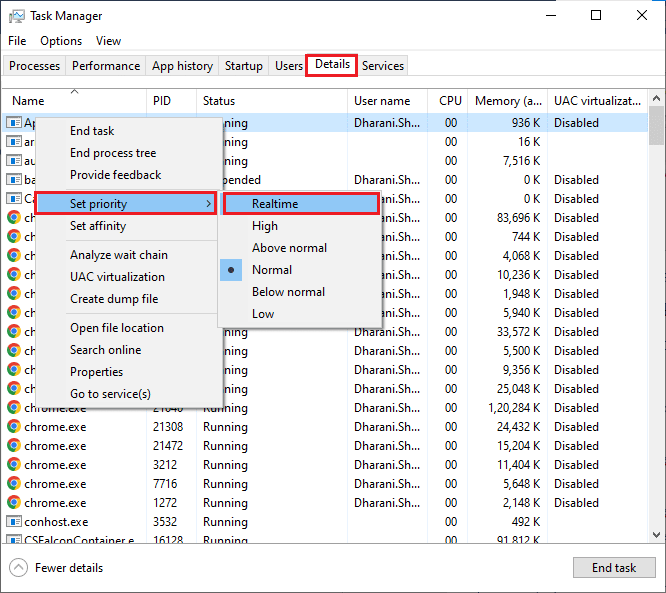
4. Sulje Task Manager ja uudelleenkäynnistys Sinun tietokoneesi.
Tapa 4: Aseta korkea suorituskyky
You can also optimize your game when setting your high-performance power plan settings. These power plans are developed to manage the power settings on portable settings. Follow the below-mentioned instructions to use high-performance power plan settings in your system.
1. paina Windows + I -näppäimet avautua samanaikaisesti Windowsin asetukset.
2. Napsauta nyt järjestelmä asettaminen.
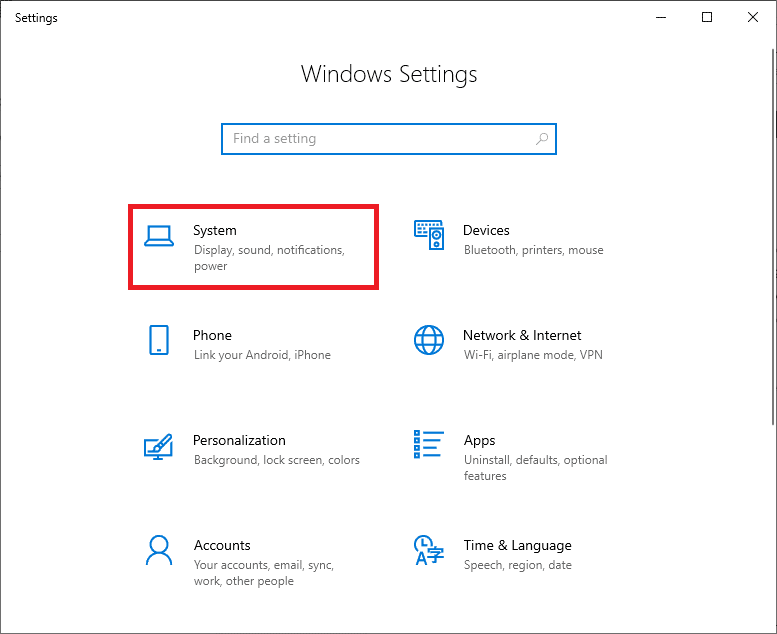
3. Valitse nyt Virta ja nukkuminen ja napsauta Lisävirtaa asetukset varten Liittyvät asetukset.
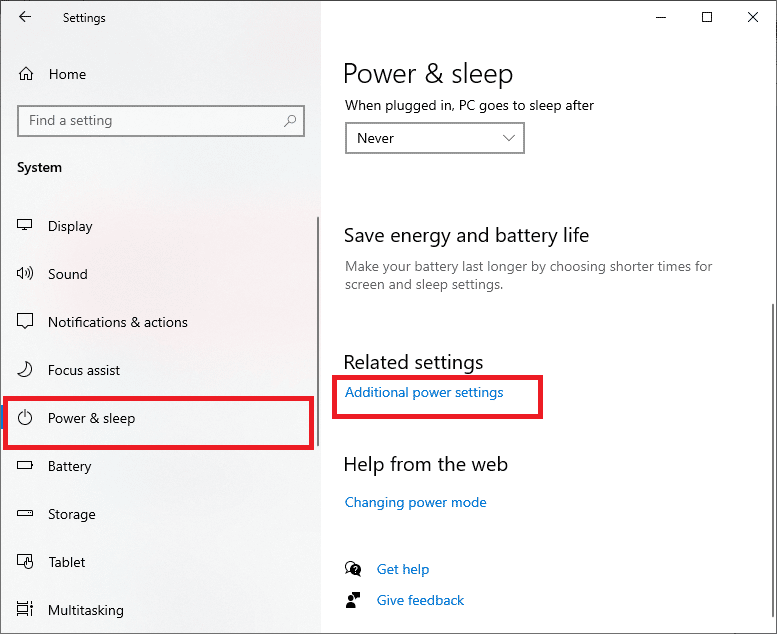
4. Valitse nyt Korkea suorituskyky vaihtoehto kohdassa Korkeat lisäsuunnitelmat kuten alla olevassa kuvassa näkyy.
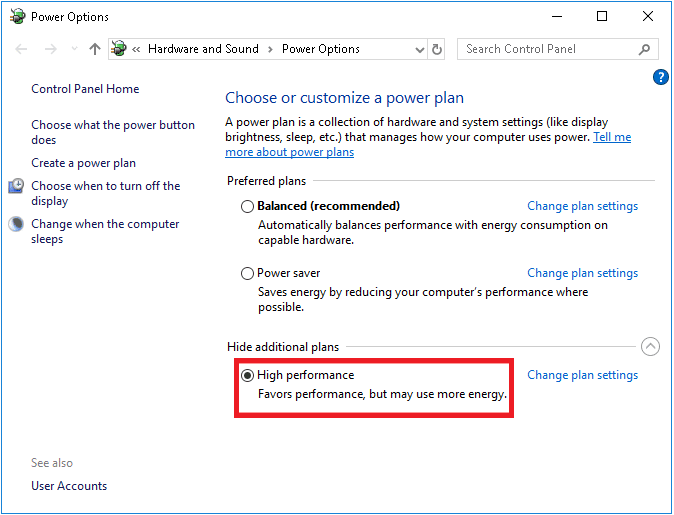
Now you have optimized your system, check if you have fixed MultiVersus won’t launch on startup issue.
Lue myös: Korjaa puuttuvien ladattujen tiedostojen virhe Steamissä
Method 5: Update Steam App & MultiVersus Game
If you use an outdated Steam application, you cannot access any games smoothly. Hence always make sure you use an updated version of Steam and MultiVersus game before launching it.
1. Osuma Windows-näppäin ja tyyppi Höyry, napsauta sitten Avata.
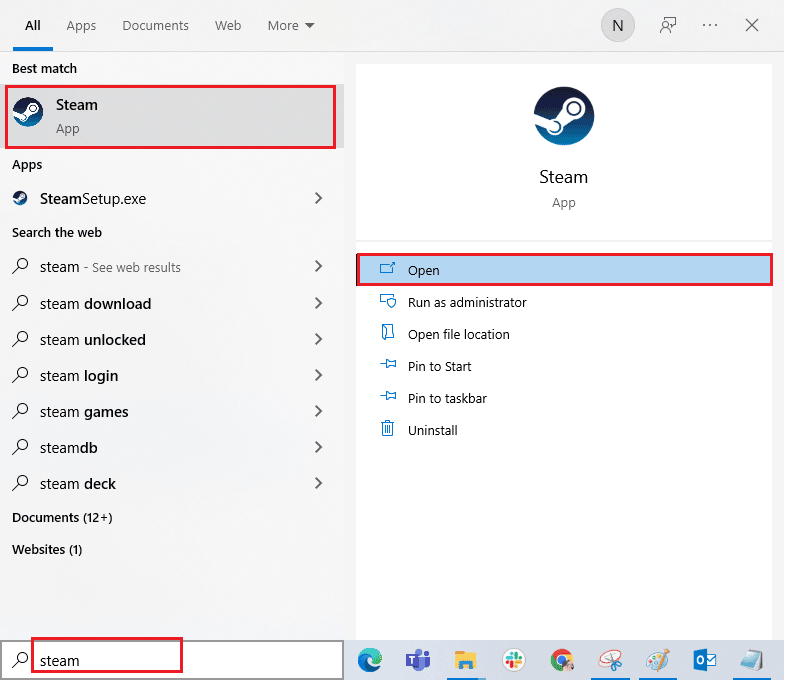
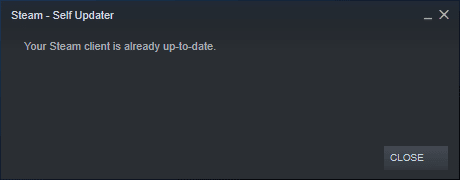
2. Napsauta nyt Höyry näytön vasemmassa yläkulmassa ja sen jälkeen Tarkista Steam-asiakaspäivitykset… kuten alla on korostettu.
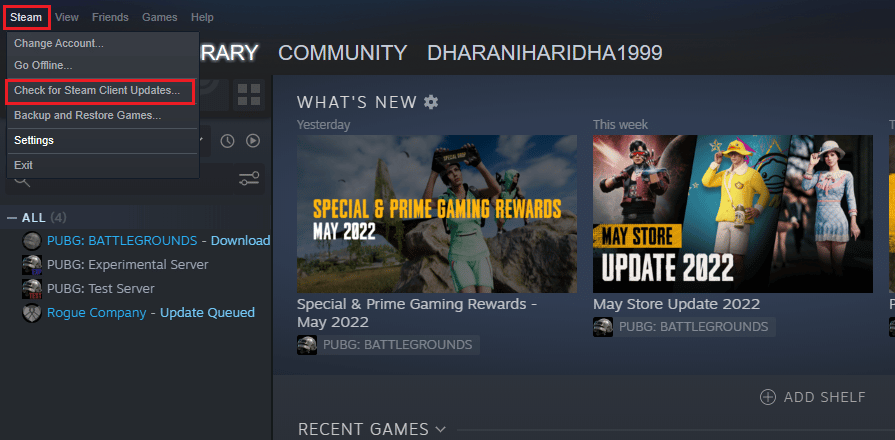
3. Jos sinulla on ladattavana uusia päivityksiä, asenna ne ja varmista Steam-asiakasohjelmasi on ajan tasalla.
4. Nyt käynnistä Steam uudelleen ja tarkista onko ongelma nyt ratkaistu.
Likewise, it is always essential that your game run at its latest version to avoid any conflicts. Until your game is updated, you cannot log in to MultiVersus servers successfully.
jotta päivitä pelisi, noudata alla olevia ohjeita.
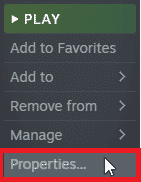
1. Tuoda markkinoille Höyry ja navigoida KIRJASTO.
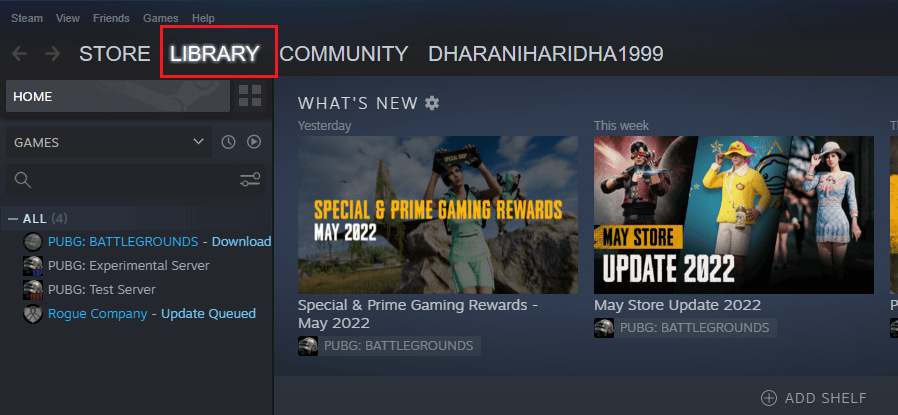
2. Napsauta nyt KOTI and search for MultiVersus.
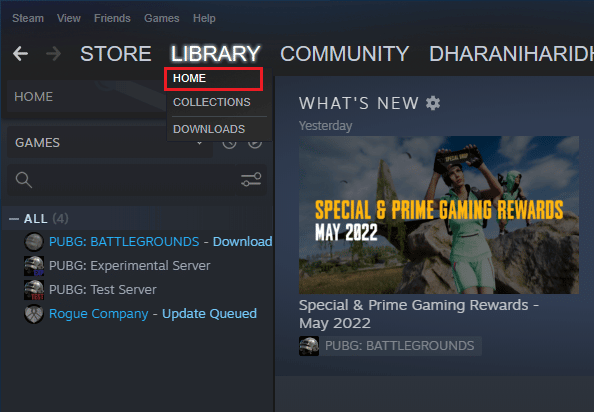
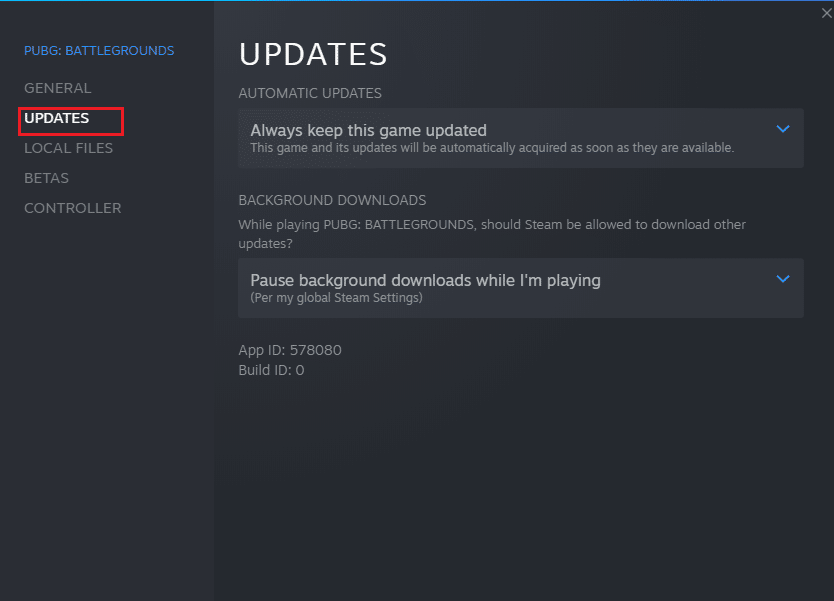
3. Napsauta sitten hiiren kakkospainikkeella peliä ja valitse Ominaisuudet… vaihtoehto.

4. Vaihda nyt kohtaan PÄIVITYKSET -välilehti ja tarkista, onko päivityksiä käynnissä. Jos näin on, lataa uusimmat päivitykset noudattamalla näytön ohjeita.
After an update, check if MultiVersus not launching issue is fixed.
Tapa 6: Poista koko näytön optimoinnit käytöstä
Few users have suggested that disabling full-screen optimizations on PC has helped them fix MultiVersus is not launching issue. Follow as instructed.
1. Navigate to the Steam KIRJASTO valikosta.
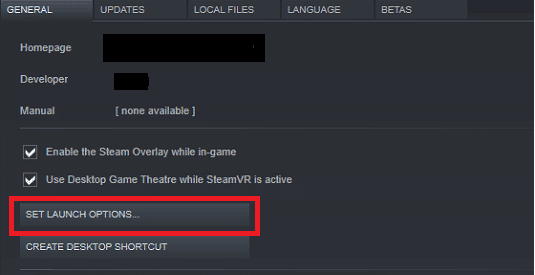
2. Now, right-click on the MultiVersus game and click on Ominaisuudet…
3. Vaihda nyt kohtaan YLEINEN välilehti ja napsauta ASETTAA KÄYNNISTYSVAIHTOEHDOT… kuten kuvattu.
4. Nyt avautuu uusi ikkuna, jossa on edistyneen käyttäjän varoitus. Avaa peli ikkunatilassa kirjoittamalla -ikkunallinen parametri.
5. Tallenna nyt muutokset napsauttamalla OK ja poistu Ominaisuudet-ikkunasta.
6. Nyt elvyttämisen peli and ensure that it runs in windowed mode.
Huomautus: Voit myös navigoida kohteeseen ASETTAA KÄYNNISTYSVAIHTOEHDOT… uudelleen ja kirjoita seuraavat parametrit viimeisen parametrin sijaan.
-ikkunallinen -w 1024
7. Now, save the changes by clicking on OK.
Tämä parametri asettaa pelin käynnistymään ikkunatilassa.
Lue myös: Korjaa Steam-sovelluksen määritys, joka ei ole käytettävissä Windows 10:ssä
Tapa 7: Poista pelin sisäinen peittokuva käytöstä
The Steam Overlay is a piece of Steam that allows the users to access friends list, and web browser and allows in-game purchasing. It is a significant tool, yet it sometimes triggers MultiVersus not launching on startup issue. If you want to solve this problem, then turn off the Steam game overlay.
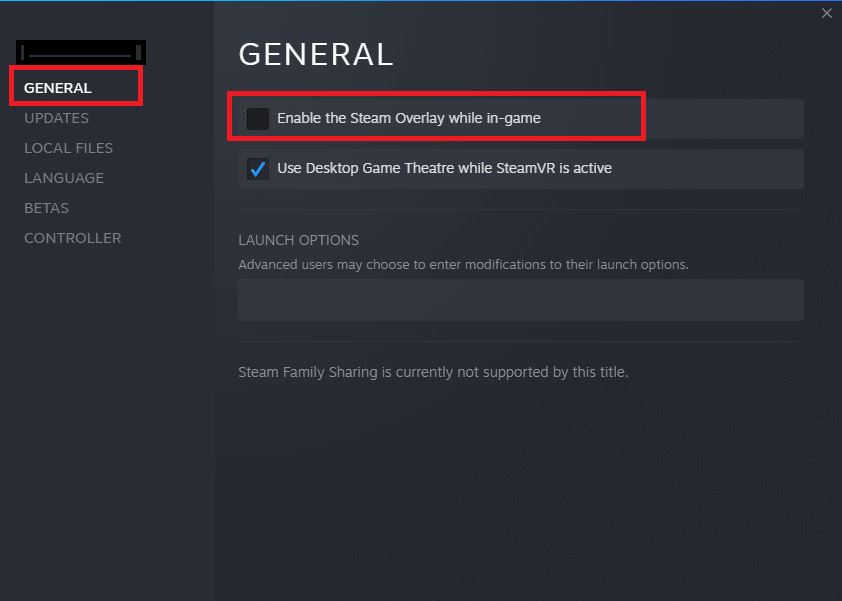
1. Avaa Höyry sovellus ja napsauta KIRJASTO.
2. Napsauta nyt hiiren kakkospainikkeella Multi Versus ja klikkaa Ominaisuudet…

3. Vaihda nyt kohtaan YLEINEN -välilehti ja poista valinta ruudusta, joka sisältää Ota Steam Overlay käyttöön pelin aikana.
4. Lopuksi käynnistä peli uudelleen and check if the MultiVersus launching issue is solved.
Tapa 8: Tarkista pelitiedostojen eheys
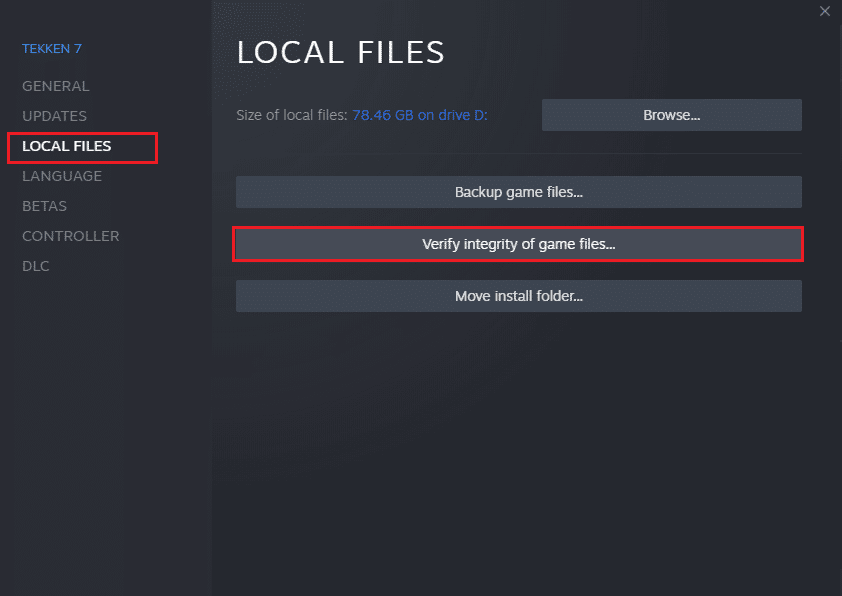
We have seen many cases in which the game files are either missing or corrupt or it had incomplete installations. Users could also experience MultiVersus not starting on PC issue if they are interrupted by the update process or if the game files are being moved. In this method, you will be opening Steam and using the built-in function for verifying the integrity of the game. It will be replaced if the application finds something. Read our guide on how to verify integrity of game files on Steam.
Lue myös: Fix Steam Client Bootstrapper Not Responding in Windows 10
Tapa 9: Päivitä .NET Framework
.NET framework in Windows 10 computer is essential for uninterrupted service of modern apps and games. Many games have an auto-update feature for the .NET framework, and thus it will be updated automatically whenever an update is available. In another case, if an update prompts in your PC, you can manually install the latest version of the .NET framework, as discussed below, to fix MultiVersus not launching issue.
1. Tarkista uudet päivitykset varten . NET mistä virallinen Microsoftin verkkosivusto.
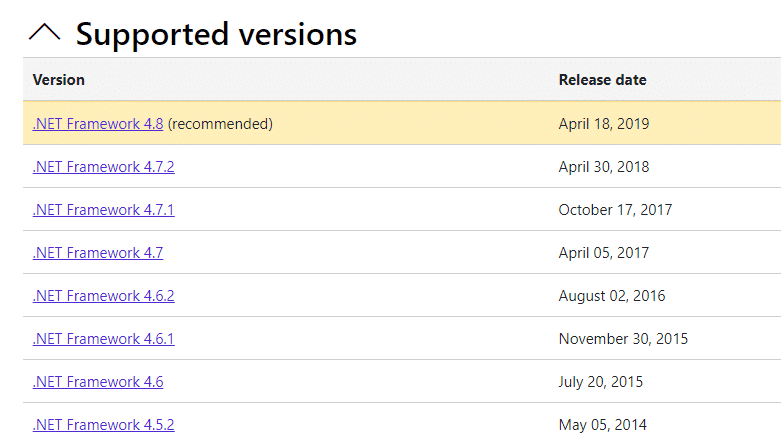
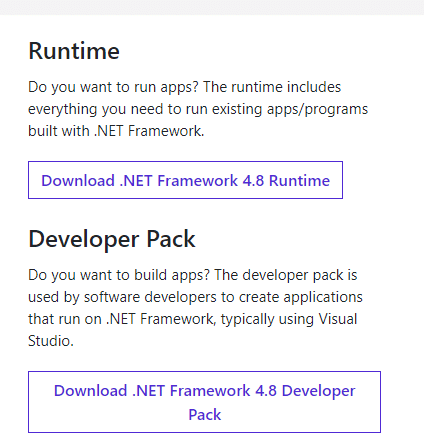
2. Jos päivityksiä on, napsauta vastaavaa/suositeltu linkki ja napsauta Lataa .NET Framework 4.8 Runtime vaihtoehto.
Huomautus: Älä napsauta Lataa .NET Framework 4.8 Developer Pack kuten ohjelmistokehittäjät käyttävät sitä.
3. Mene Lataukseni, kaksoisnapsauta asennustiedostoa käynnistääksesi ladatun tiedoston ja seuraa ohjeita näytön ohjeet to install the .NET framework successfully on your Windows PC. Once done, check if you have fixed the discussed issue or not.
Tapa 10: Päivitä DirectX
To enjoy a seamless multimedia experience on MultiVersus, you have to make sure whether DirectX is installed, and it is updated to its latest version. DirectX helps you improve the visual media experience for graphical games and applications especially. It is worth updating DirectX needed for this game.
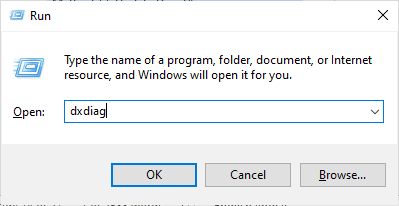
1. Paina Windows + R-näppäimet samanaikaisesti käynnistääksesi ajaa valintaikkuna.
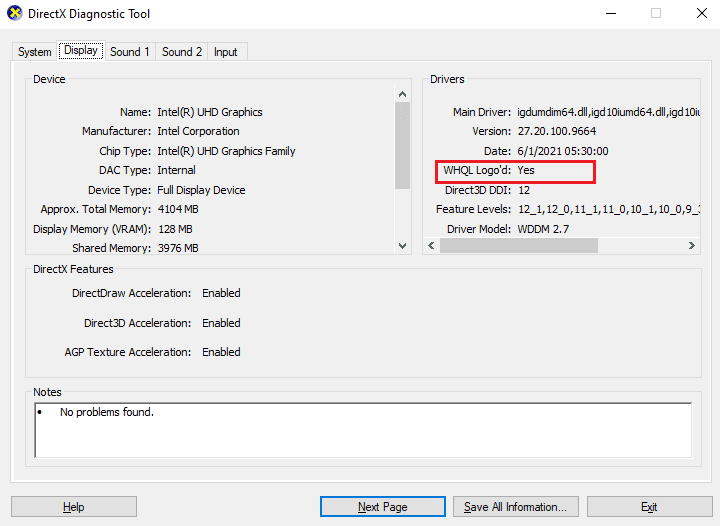
2. Tyyppi dxdiag ja paina Enter-näppäin avata DirectX Diagnostic Tool.
3. Tarkista DirectX-versio, if it contains DirectX 12 vai ei.
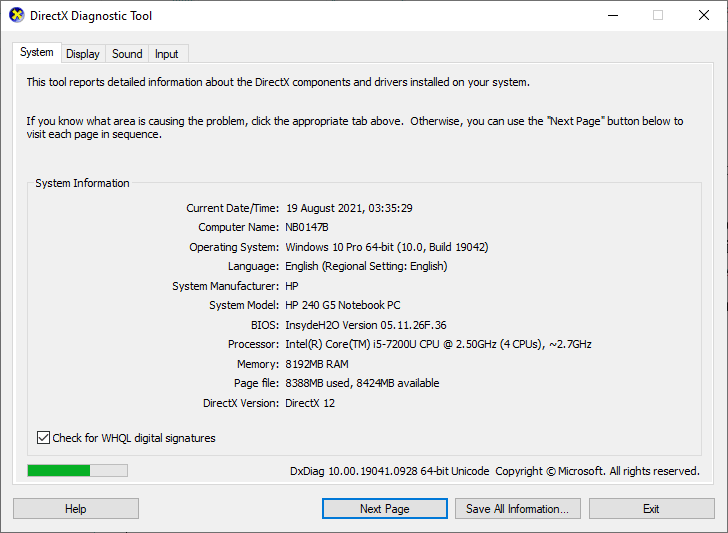
4. If you do not have DirectX 12 in your system, download and install it from the DirectX lataussivu noudattamalla näytön ohjeita.
After installing DirectX, check if the issue occurs again.
Huomautus: Varmistaa Tarkista digitaaliset WHQL-allekirjoitukset laatikko on kirjattu sisään järjestelmä -välilehti ja kaikissa välilehdissä, tarkista onko WHQL-logo olla asetettu kohtaan Kyllä.
Tapa 11: Korjaa Microsoft Visual C++ Redistributable
Alternately, you can try to repair the Microsoft Visual C++ Redistributable packages to fix MultiVersus not launching issue as follows:
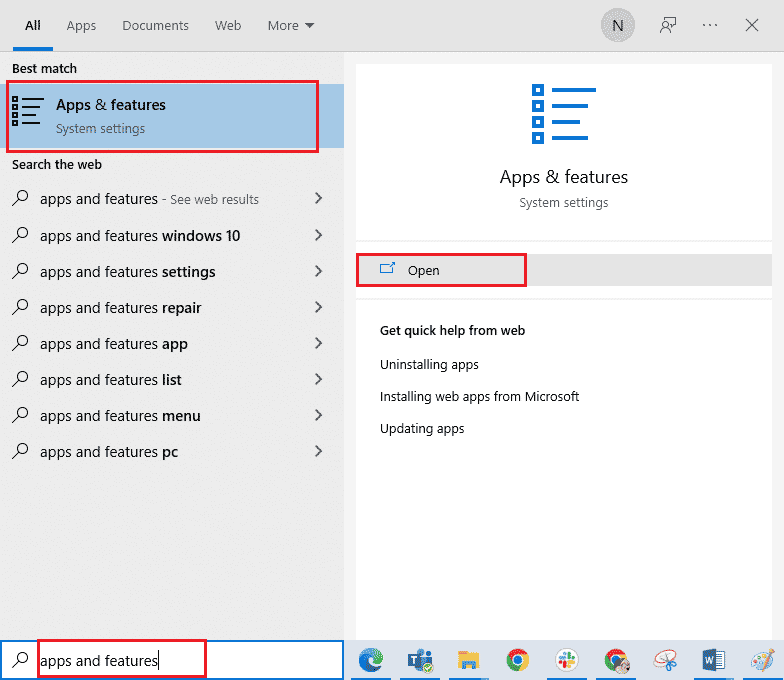
1. Paina Windows-näppäin, tyyppi Sovellukset ja ominaisuudet, napsauta sitten avoin.
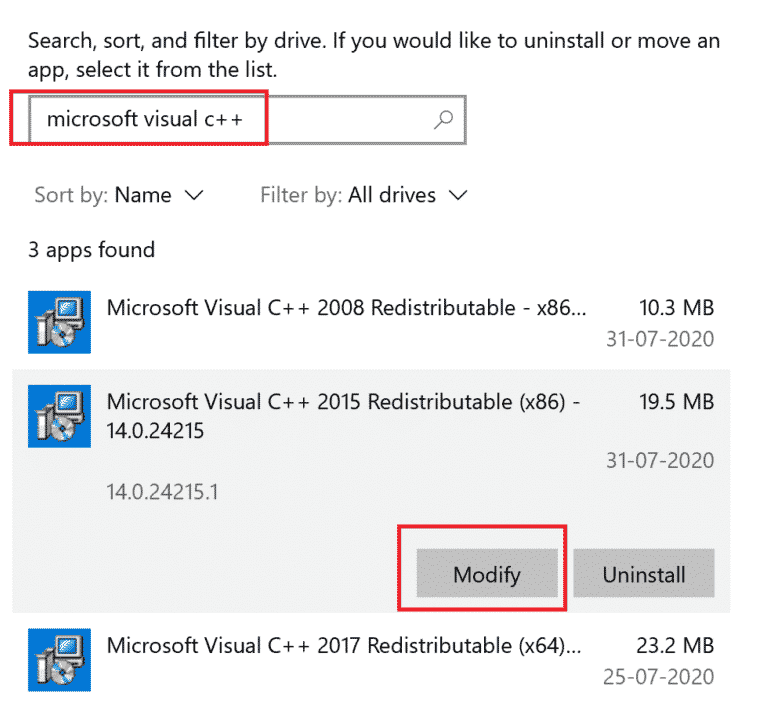
2. Etsi Microsoft Visual C ++ -ohjelmistopaketti paketti.
3. Then, select the package, and click on Muuttaa vaihtoehto.
4. Napsauta sitten Kyllä på den User Account Control valintaikkuna.
5. In the pop-up window that appears, click on korjaus. Odota, että prosessi loppuu.
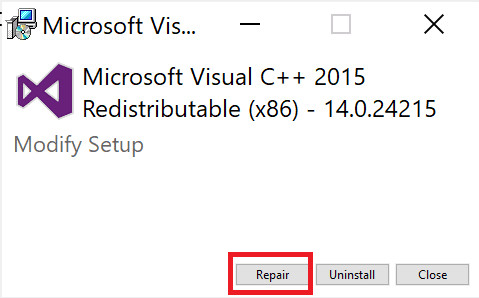
6. Repeat the above steps to modify all the Microsoft Visual C++ Redistributable packages.
7. Lopuksi käynnistä tietokone uudelleen.
Open the application that you were unable to open previously. If this did not work, try reinstalling the C++ redistributable instead.
Lue myös: Korjaa Microsoft Visual C++ 2015 Redistributable Setup Fails Error 0x80240017
Tapa 12: Asenna Microsoft Visual C++ Redistributable uudelleen
If the previous method of repairing the Microsoft C++ Visual Redistributable did not fix MultiVersus won’t launch issue, then you will have to reinstall the redistributable. Follow the given steps to uninstall & then install these again.
1. Avaa Sovellukset ja ominaisuudet Järjestelmäasetukset.
2. Valitse Microsoft Visual C ++ -ohjelmistopaketti package, then click on Uninstall vaihtoehto.
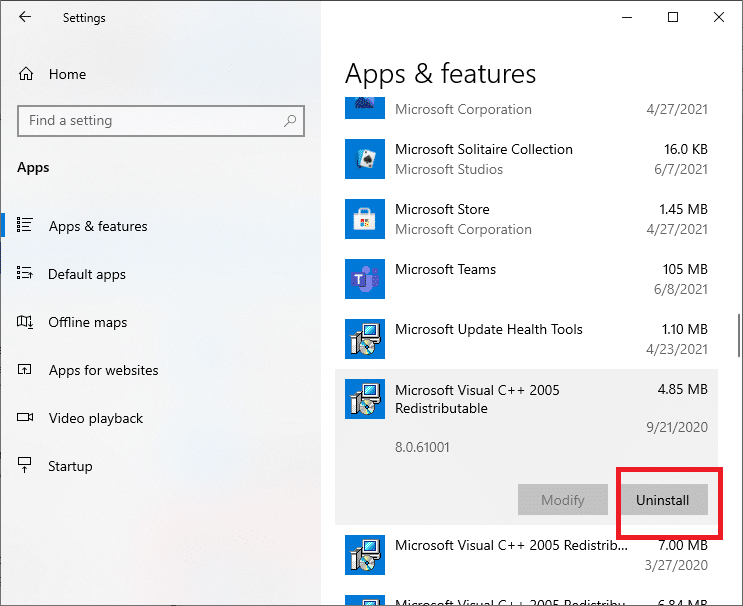
3. Valitse Uninstall option again to confirm and remove the package.
Huomautus: Make sure to uninstall all the Microsoft Visual C++ Redistributable packages.
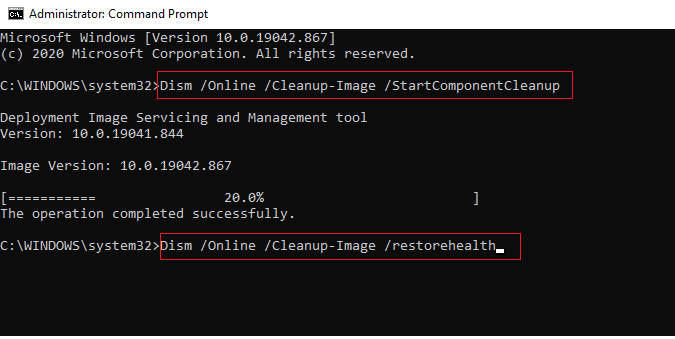
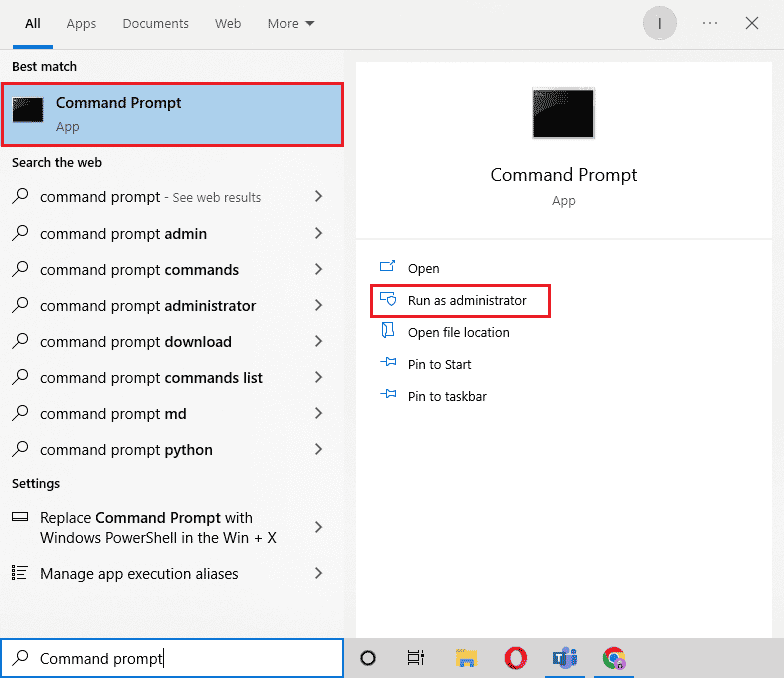
4. Paina Windows-näppäin, tyyppi Komentorivi, napsauta sitten Suorita järjestelmänvalvojana.
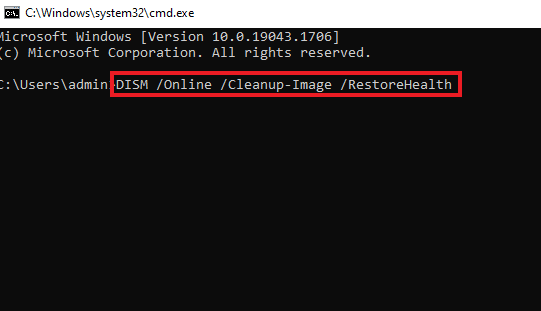
5. Kirjoita seuraava komennot ja paina enter avain jokaisen jälkeen:
DISM /online /Cleanup-Image /StartComponentCleanup
DISM /online /Cleanup-Image /RestoreHealth
6. Kun prosessi on valmis, käynnistä PC uudelleen.
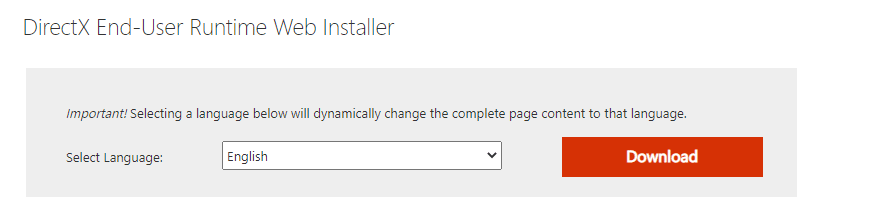
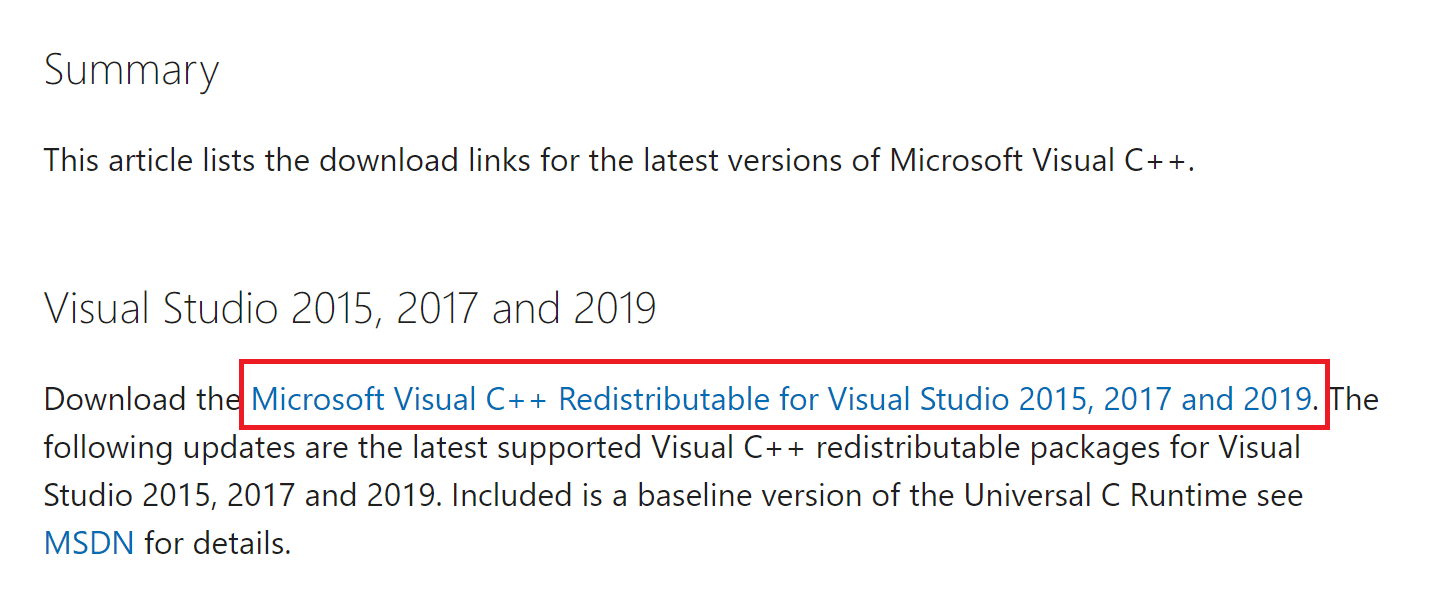
7. Vieraile seuraavaksi osoitteessa Microsoft Visual C++ Redistributable webpage to download the latest C++ package as shown here.
8. Once downloaded, open the ladattu tiedosto by double-clicking on it in Omat lataukset. install the package by following the on-screen instructions.
9. Once the installation is complete, finally käynnistä tietokone uudelleen.
Suositus:
Toivomme, että tästä oppaasta oli apua ja voit korjata sen MultiVersus not launching issue on your Windows 10 PC. Let us know which method worked for you the best. Feel free to reach out to us with your queries and suggestions via the comments section below.