Korjaa Käynnistä-valikko, joka ei toimi Windows 10:ssä

If you have recently updated or upgraded to Windows 10, then chances are your Start Menu may not work properly, making it impossible for users to navigate around Windows 10. Users are experiencing various issues with Start Menu such as Start Menu does not open, Start Button is not working, or Start Menu freezes etc. If your Start Menu isn’t working then don’t worry as today we will see a way to fix this issue.
This exact cause is different for different users because each user has a different system configuration and environment. But the problem can be related to anything like corrupted user account or drivers, damaged system files, etc. So without wasting any time, let’s see How to Fix Start Menu Not Working in Windows 10 with the help of the below-listed tutorial.
Muista luoda palautuspiste siltä varalta, että jokin menee pieleen.
To run Command Prompt as an administrator, press Ctrl + Shift + Esc to open Task Manager. Then click on filee Valitse sitten Suorita uusi tehtävä. Tyyppi cmd.exe ja rastita "Luo tämä tehtävä hallinnollisilla oikeuksilla” then click OK. Similarly, to open PowerShell, type powershell.exe and again checkmark the above field then hit Enter.

Tapa 1: Käynnistä Windows Explorer uudelleen
1. Lehdistö Ctrl + Shift + Esc avaimet yhdessä käynnistääksesi Task Manager.
2. löytö explorer.exe luettelossa, napsauta sitä hiiren kakkospainikkeella ja valitse Lopeta tehtävä.

3. Now, this will close the Explorer and to rerun it, napsauta Tiedosto > Suorita uusi tehtävä.
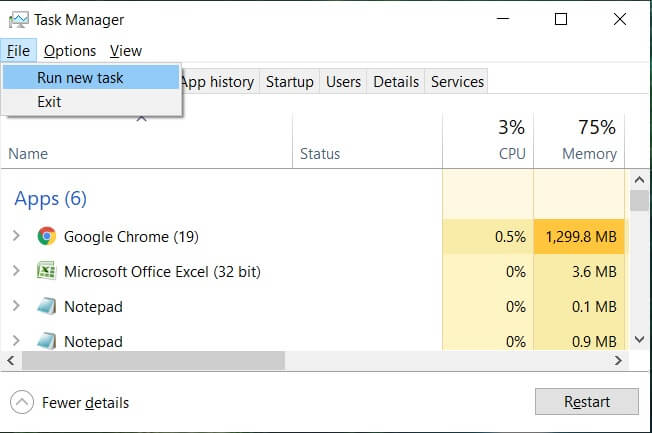
4. Tyyppi explorer.exe ja käynnistä Explorer uudelleen painamalla OK.

5. Exit Task Manager and see if you’re able to Fix Start Menu Not Working in Windows 10.
6. If you’re still facing the issue, then log out from your account and re-login.
7. Lehdistö Ctrl + Vaihto + Del key at the same time and click on Signout.
8. Type in your password to login to Windows and see if you’re able to fix the issue.
Method 2: Create a new local administrator account
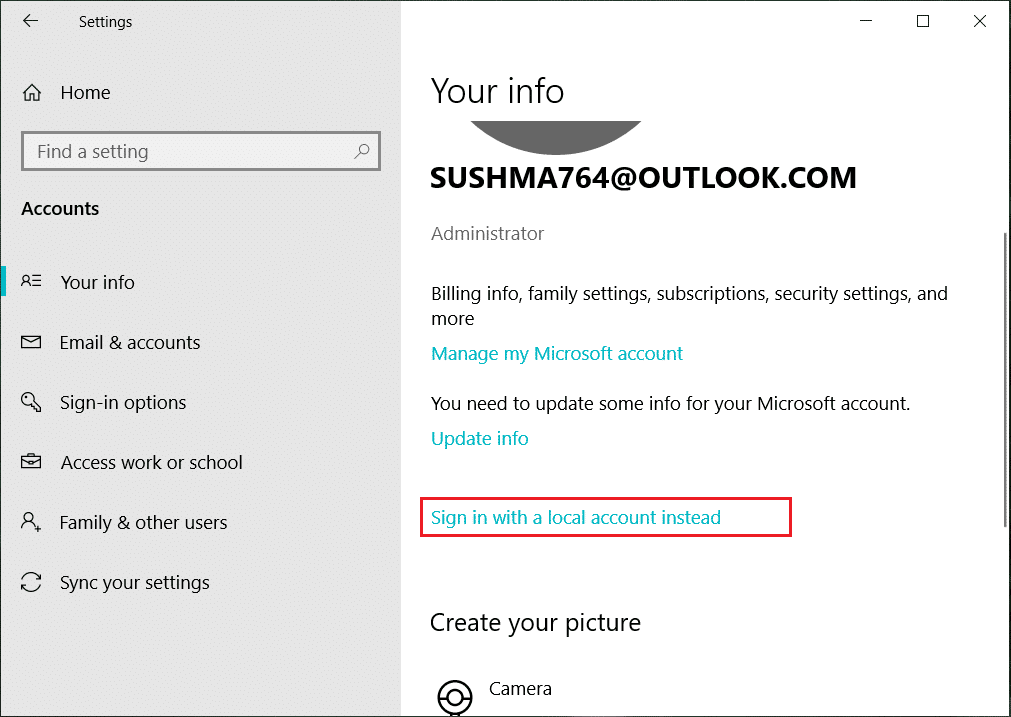
Jos olet kirjautunut Microsoft-tilillesi, poista ensin linkki kyseiseen tiliin seuraavasti:
1. Paina Windows Key + R ja kirjoita "MS-asetukset:” (ilman lainausmerkkejä) ja paina Enter.
2. valita Tili > Kirjaudu sen sijaan sisään paikallisella tilillä.
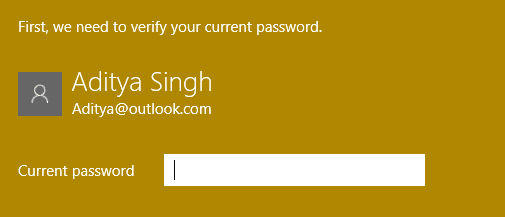
3. Kirjoita Microsoft-tilin salasana ja valitse Seuraava.
4. Valitse a uusi tilin nimi ja salasanaja valitse sitten Valmis ja kirjaudu ulos.
#1. Create the new administrator account:
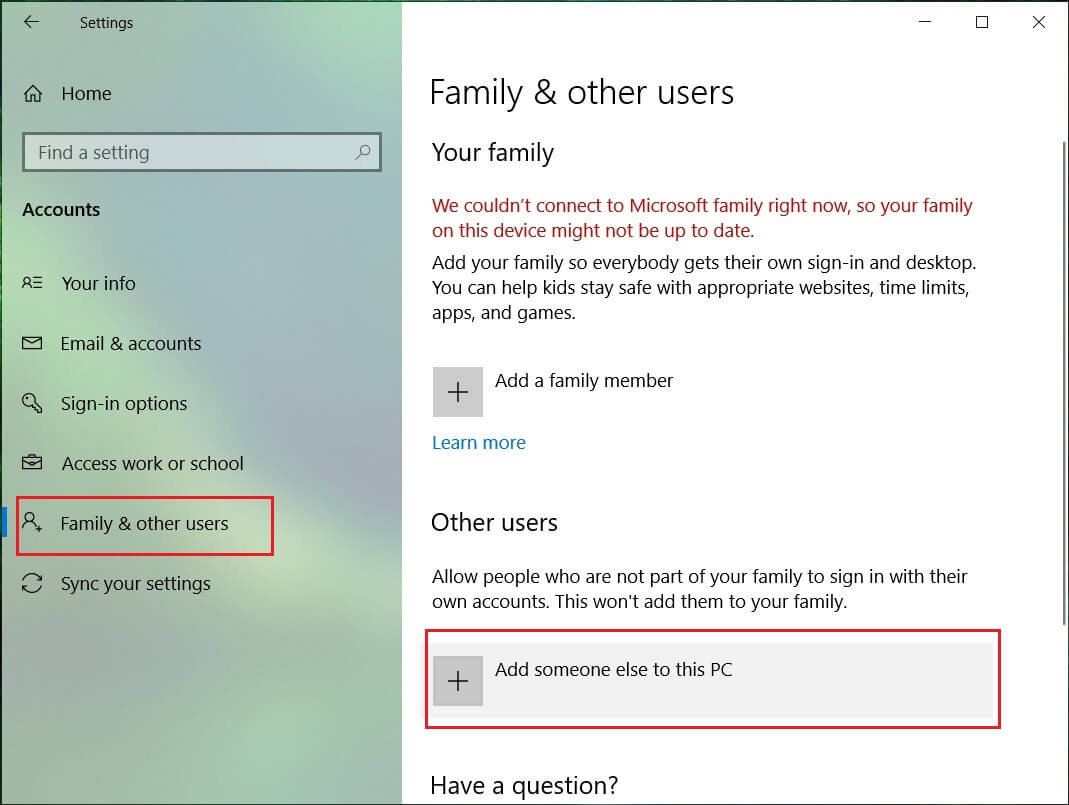
1. Avaa Asetukset painamalla Windows Key + I ja napsauta sitten Tilit.
2. Siirry sitten kohtaan Perhe ja muut ihmiset.
3. Napsauta Muut ihmiset -kohdassa "Lisää joku muu tähän tietokoneeseen."
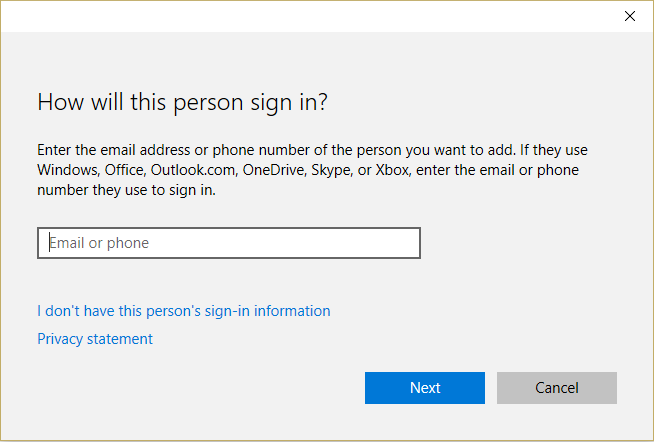
4. Anna seuraavaksi nimi user and a password then select Next.
5. Aseta a Käyttäjänimi ja salasanaValitse Seuraava> Valmis.
#2. Next, make the new account an administrator account:
1. Avaa jälleen Windows-asetukset ja klikkaa Tili.

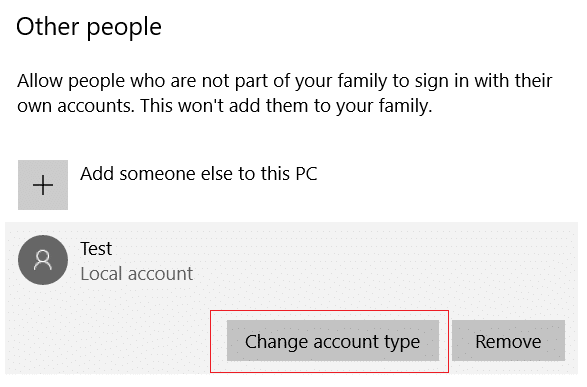
2. Siirry Perhe ja muut ihmiset -välilehti.
3. Muut ihmiset valitsevat juuri luomasi tilin ja valitsivat sitten a Vaihda tilin tyyppi.
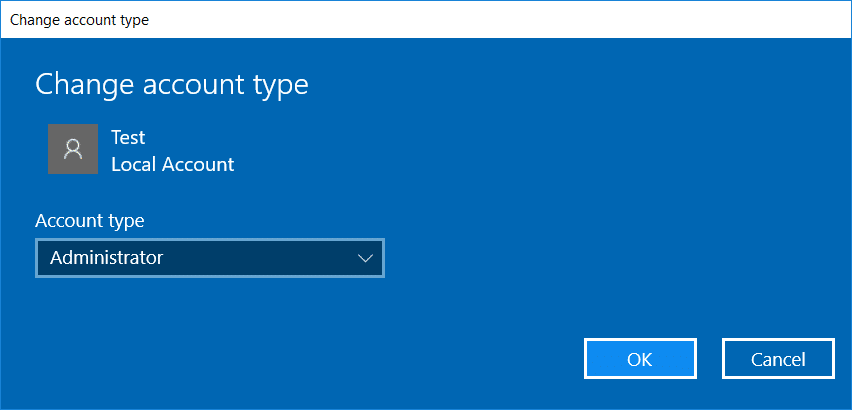
4. Valitse Tilin tyyppi -kohdasta ylläpitäjä napsauta sitten OK.
#3. If the issue persists try deleting the old administrator account:
1. Siirry sitten uudelleen Windows-asetuksiin Tili > Perhe ja muut ihmiset.
2. Valitse Muut käyttäjät -kohdasta vanha järjestelmänvalvojan tili ja napsauta Poista, ja valitse Poista tili ja tiedot.

3. If you were using a Microsoft account to sign in before, you can associate it with the new administrator by following the next step.
4. sisään Windowsin asetukset > Tilit, valitse sen sijaan Kirjaudu sisään Microsoft-tilillä ja anna tilitietosi.
Lopulta sinun pitäisi pystyä Korjaa Käynnistä-valikko, joka ei toimi Windows 10:ssä as this step seems to fix the issue in most cases.
If you continue to experience Start Menu’s issue, it’s recommended to download and run Start Menu Troubleshooter.
1. Download and run Start Menu Troubleshooter.
2. Kaksoisnapsauta -kuvaketta ladattu tiedosto Ja napsauta sitten Seuraava.
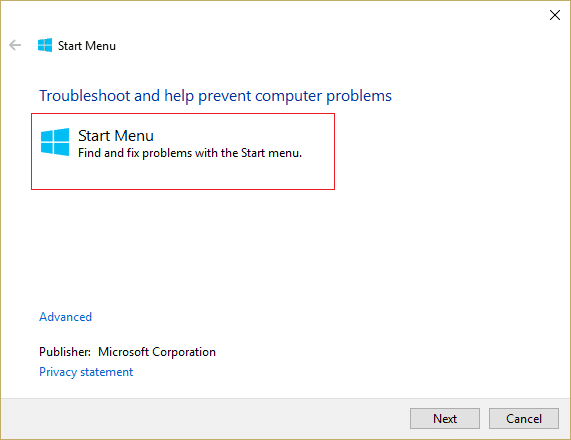
3. Let it finds and automatically Fixes Start Menu Not Working in Windows 10.
Method 4: Run System File Checker (SFC) and Check Disk
1. Avaa komentokehote. Käyttäjä voi suorittaa tämän vaiheen etsimällä 'cmd' Ja paina sitten Enter.

2. Kirjoita nyt seuraava cmd:hen ja paina enter:
sfc /scannow sfc /scannow /offbootdir=c: /offwindir=c:windows

3. Odota, että yllä oleva prosessi on valmis, ja kun olet valmis, käynnistä tietokone uudelleen.
4. Suorita seuraavaksi CHKDSK osoitteesta Korjaa tiedostojärjestelmävirheet Check Disk Utilitylla (CHKDSK).
5. Anna yllä olevan prosessin loppuun ja käynnistä tietokone uudelleen tallentaaksesi muutokset.
Method 5: Force Cortana to Rebuild Settings
Open Command Prompt with administrative rights then type the following one by one and hit Enter after each command:
CD /d "%LOCALAPPDATA%PackagesMicrosoft.Windows.Cortana_cw5n1h2txyewy"
Taskkill /F /IM SearchUI.exe
RD /S /Q Settings
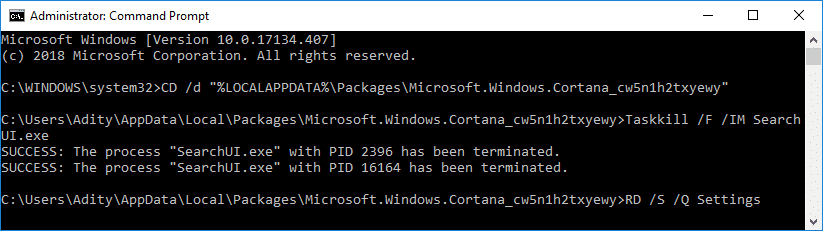
This will force Cortana to rebuild the settings and will Fix Start Menu and Cortana Not Working in Windows 10.
If the issue is still not resolved, follow this guide to fix any issues related to Cortana.
Method 6: Re-Register Windows App
1. Tyyppi PowerShell in Windows Search then right-click on PowerShell and select Suorita järjestelmänvalvojana.
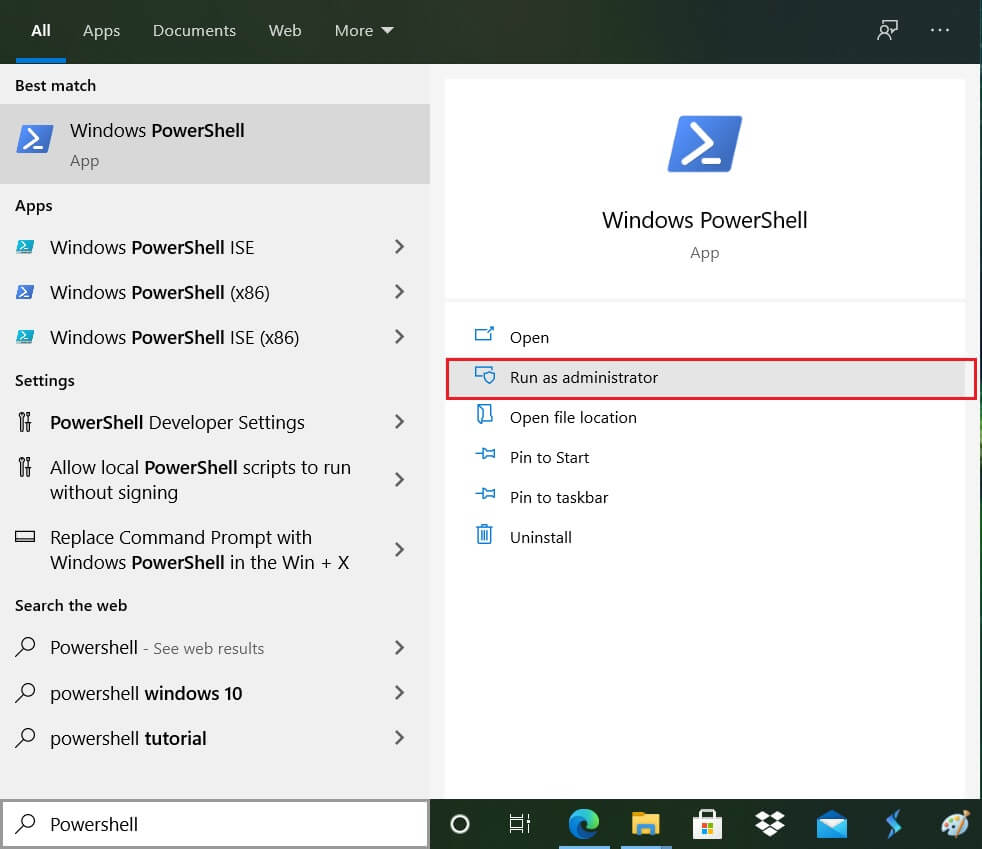
2. Now type the following command into PowerShell window:
Get-AppXPackage -AllUserit | Foreach {Lisää-AppxPackage -DisableDevelopmentMode -Register "$ ($ _. InstallLocation) AppXManifest.xml"}

3. Wait for the Powershell to execute the above command and ignore the few errors which may come along.
4. Tallenna muutokset käynnistämällä tietokoneesi uudelleen.
Tapa 7: Rekisterin korjaus
1. Press Ctrl + Shift + Esc to open Task Manager then click on filee ja valitse Suorita uusi tehtävä.
2. Tyyppi regedit ja rastita "Luo tämä tehtävä hallinnollisilla oikeuksilla” then click OK.
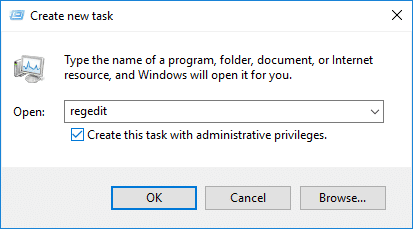
3. Now navigate to the following registry key in the Registry Editor:
TietokoneHKEY_LOCAL_MACHINESYSTEMCurrentControlSetServicesWpnUserService
4. Varmista, että valitset WpnUserService then in the right window double-click on the Käynnistä DWORD.
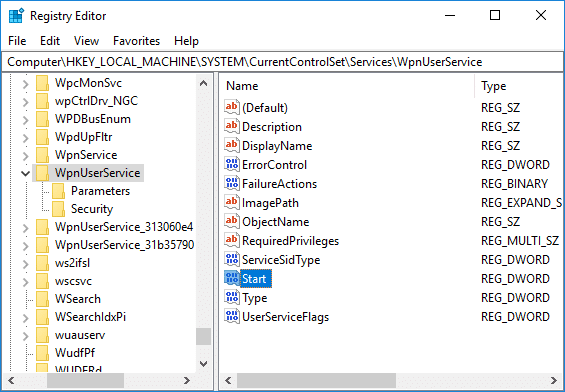
5. Change its value to 4 then click OK.
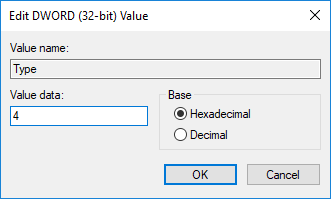
6. Tallenna muutokset käynnistämällä tietokoneesi uudelleen.
Tapa 8: Päivitä tai nollaa Windows 10
Huomautus: If you can’t access your PC, restart your PC a few times until you start Automaattinen korjaus. Siirry sitten kohtaan Vianmääritys > Palauta tämä tietokone > Poista kaikki.
1. Paina Windows Key + I avataksesi Asetukset ja napsauta sitten Päivitys ja suojaus -kuvake.
![]()
2. Valitse vasemmasta valikosta Elpymistä.
3. Alla Nollaa tämä tietokone, Klikkaa "Aloita"-Painiketta.

4. Valitse vaihtoehto Pidä tiedostoni.

5. For the next step, you might be asked to insert Windows 10 installation media, so ensure you have it ready.
6. Now, select your Windows version and click vain siinä asemassa, johon Windows on asennettu > remove my files.

5. Klikkaa Nollaus painike.
6. Suorita palautus loppuun noudattamalla näytön ohjeita.
Suositus:
Siinä se onnistuu Korjaa Käynnistä-valikko, joka ei toimi Windows 10:ssä mutta jos sinulla on vielä kysyttävää tästä opetusohjelmasta, kysy heiltä kommenttiosiossa.