- in fenêtres by Administrateur
Fix Computer does not start until restarted multiple times

Fix Computer does not start until restarted multiple times: There seems to be a new issue with PC users, which is when they first turn ON their PC the power comes ON, fans start to spin but everything suddenly stops and PC never gets a display, in short, PC automatically turned OFF without any warning. Now if the user, powers off the PC and then turned it back ON, the computer boots normally without any additional issues. Basically, Computer does not start until restarted multiple times which is very annoying for basic Windows users.
Sometimes you need to boot up to 4-5 time before you could see the display or even boot your PC, but there is no guarantee that it will boot. Now living in this uncertainty, that you may or may not be able to use your PC next day is not such a good thing, so you need to address this problem immediately.
Now there are only a few issues which can cause this problem, so you can definitely troubleshoot this issue easily. The problem sometimes can be related to software like the main culprit seems to be Fast Startup in many cases and disabling it seems to fix the issue. But if this doesn’t fix the issue then you can be sure that the issue is related to hardware. In hardware, this can be a memory issue, faulty power supply, BIOS Settings or CMOS battery dried up, etc. So without wasting any time let’s see how to Fix Computer does not start until restarted multiple times with the help of the below-listed guide.
Fix Computer does not start until restarted multiple times
Assurez-vous de créer un point de restauration, juste au cas où quelque chose se passerait mal.
Remarque: Some of the methods require expert supervision as you can seriously damage your PC while performing the steps, so if you don’t know what you’re doing then take your laptop/PC to a service repair center. If your PC is under warranty then opening the case can temper/void the warranty.
Méthode 1 : désactiver le démarrage rapide
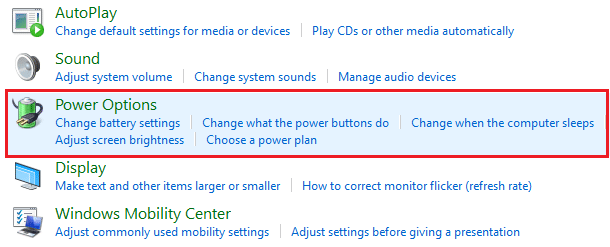
1.Appuyez sur la touche Windows + R, puis tapez contrôle et appuyez sur Entrée pour ouvrir. Panneau de configuration.

2.Cliquez sur Matériel et audio puis cliquez sur Options d'alimentation.
3.Puis dans le volet de gauche de la fenêtre, sélectionnez «Choisissez ce que font les boutons d'alimentation."
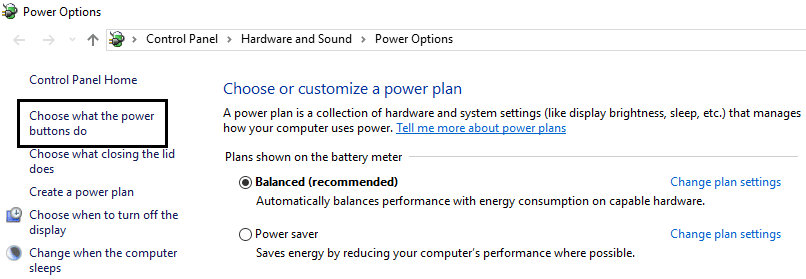
4. Cliquez maintenant sur «Modifier les paramètres actuellement indisponibles"

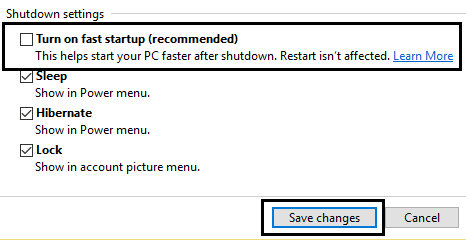
5.Décochez «Activer le démarrage rapide» et cliquez sur Enregistrer les modifications.
Méthode 2 : exécuter la réparation automatique
1.Insérez le DVD d'installation amorçable de Windows 10 et redémarrez votre PC.
2.Lorsque vous êtes invité à appuyez sur une touche pour démarrer à partir d'un CD ou d'un DVD, appuyez sur n'importe quelle touche pour continuer.

3.Sélectionnez vos préférences linguistiques et cliquez sur Suivant. Cliquez sur Réparer votre ordinateur en bas à gauche.

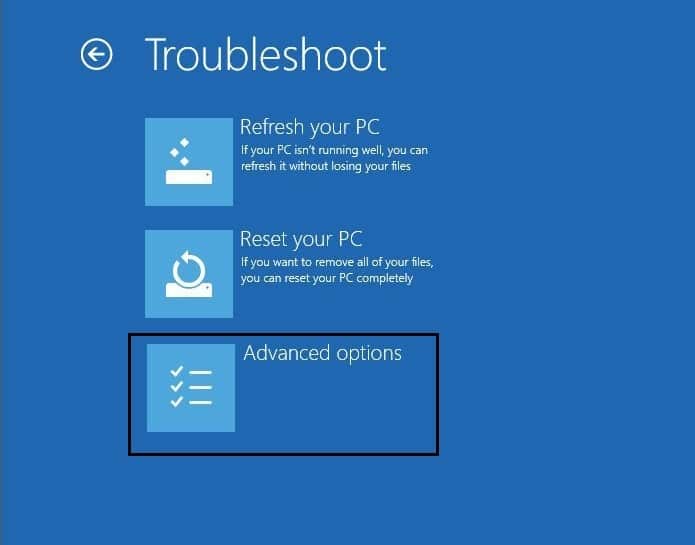
4. Sur l'écran de choix d'une option, cliquez sur Résolution des problèmes.

5.Sur l'écran de dépannage, cliquez sur Option avancée.
6.Sur l'écran Options avancées, cliquez sur Réparation automatique ou réparation au démarrage.
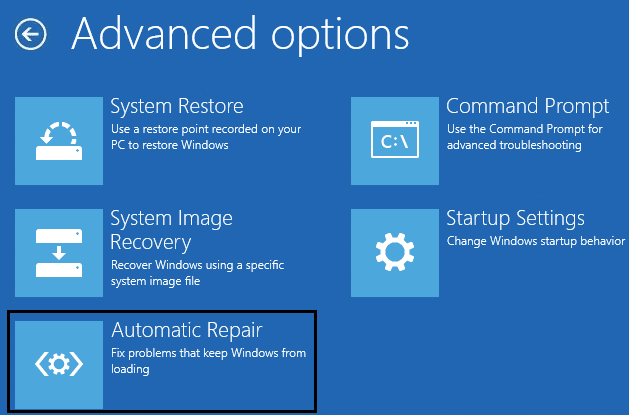
7. Attendez que le Réparations automatiques/au démarrage de Windows complète.
8. Redémarrez et vous avez réussi Fix Computer does not start until restarted multiple times issue, sinon, continuez.
Aussi, lisez Comment réparer la réparation automatique n'a pas pu réparer votre PC.
Méthode 3 : réinitialiser le BIOS aux paramètres par défaut
1. Éteignez votre ordinateur portable, puis allumez-le et simultanément appuyez sur F2, DEL ou F12 (selon votre fabricant) pour conclure Configuration du BIOS.

2.Now you’ll need to find the reset option to charger la configuration par défaut et il peut être nommé Réinitialiser par défaut, Charger les paramètres d'usine par défaut, Effacer les paramètres du BIOS, Charger les paramètres de configuration par défaut ou quelque chose de similaire.

3.Select it with your arrow keys, press Enter, and confirm the operation. Your BIOS va maintenant utiliser son paramètres par défaut.
4.Once you’re logged into Windows see if you’re able to Fix Computer does not start until restarted multiple times issue.
Method 4: Check if hard disk is failing
In many cases, the issue occurs because of the failing hard disk and to check if this is the problem here you need to disconnect the hard disk from your PC and connect it to another PC and try to boot from it. If you can boot from the hard disk without any issue on the other PC then you can be sure that the issue is not related to it.
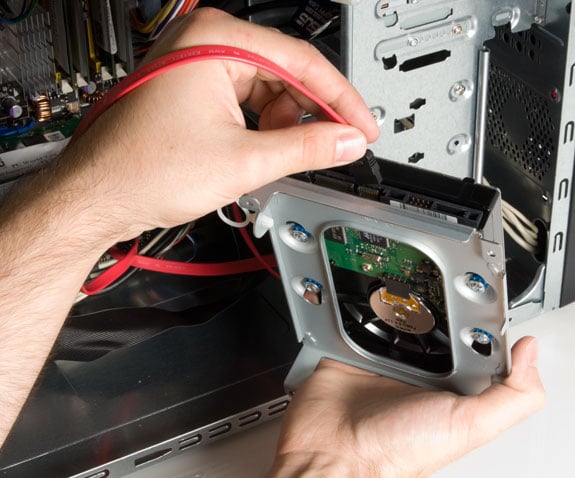
Another way to test your hard disk is download and burn the SeaTools for DOS on a CD then run the test to check if your hard disk is failing or not. You will need to set the first boot to CD/DVD from BIOS in order for this to work.
Méthode 5 : vérifier l'alimentation
A faulty or failing Power Supply is generally the cause for PC not starting at the first boot. Because if the power consumption of hard disk is not met, it won’t get enough power to run and subsequently you may need to restart the PC several times before it can take the adequate power from PSU. In this case, you may need to replace the power supply with a new one or you could borrow a spare power supply to test if this is the case here.
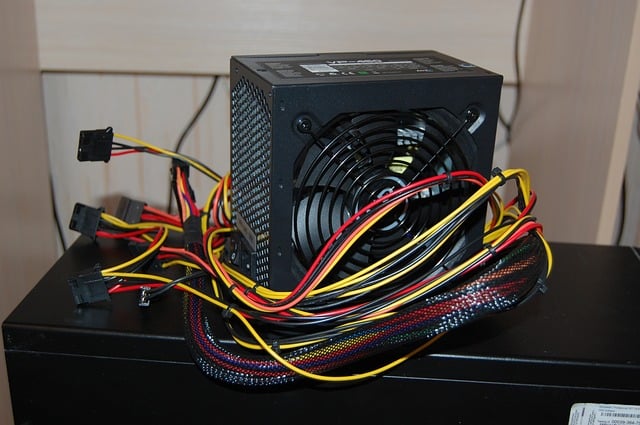
If you have recently installed a new hardware such as video card then chances are the PSU is not able to deliver the necessary power needed by the graphic card. Just temporary remove the hardware and see if this fixes the issue. If the issue is resolved then in order to use the graphic card you may need to purchase a higher voltage Power Supply Unit.
Method 6: Replace CMOS battery
If CMOS battery has dried up or no longer deliver powers then your PC won’t start and after few days it will eventually start hanging up. In order to fix the issue, it’s advised to replace your CMOS battery.
Méthode 7 : réinitialisation ATX
Remarque: Ce processus s'applique généralement aux ordinateurs portables, donc si vous possédez un ordinateur, abandonnez cette méthode.
1.Power off your laptop then remove the power cord, leave it for few minutes.
2. maintenant retirez la batterie par derrière et maintenez enfoncé le bouton d'alimentation pendant 15 à 20 secondes.
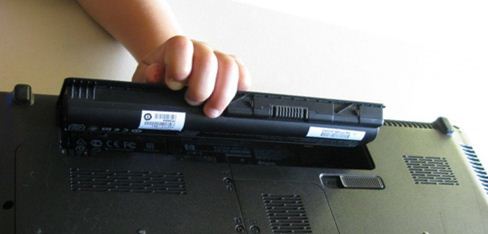
Remarque: Ne branchez pas encore le cordon d’alimentation, nous vous dirons quand le faire.
3.Now plug in votre cordon d'alimentation (la batterie ne doit pas être insérée) et essayez de démarrer votre ordinateur portable.
4.If it’s boot properly then again turn off your laptop. Put in the battery and again start your laptop.
If the problem is still there again turn off your laptop, remove power cord & battery. Press & hold the power button for 15-20 seconds and then insert the battery. Power on the laptop and this should fix the issue.
Now if any of the above methods weren’t helpful then it means the problem is with your motherboard and unfortunately, you need to replace it in order to fix the issue.
Recommandée:
Voilà, vous avez réussi Fix Computer does not start until restarted multiple times issue mais si vous avez encore des questions concernant ce guide, n'hésitez pas à les poser dans la section commentaires.