Fix Windows Modules Installer Worker High CPU Usage
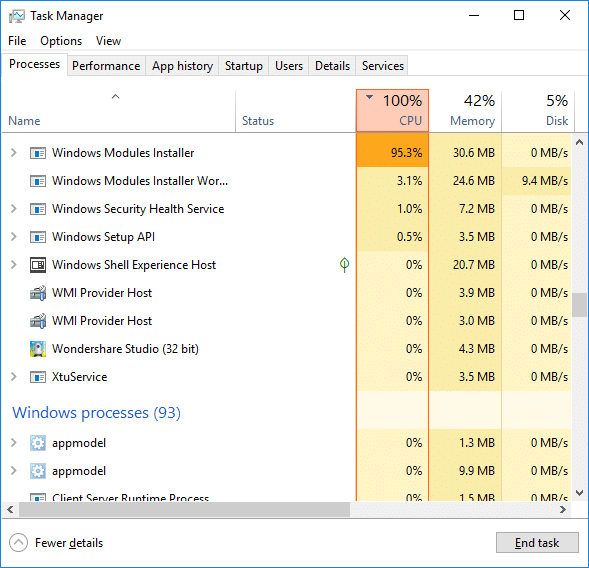
If you are facing the High CPU Usage by Windows Modules Installer Worker, then don’t worry as thousands of other users are also facing the similar problem and therefore, there are many working fixes which we will be discussing today in this article. To verify if you are facing this issue open Task Manager (Ctrl + Shift + Esc) and you will find that the Windows Modules Installer Worker is consuming High CPU or Disk Usage.

Pro Tip: You may leave your PC overnight or for a few hours to see the issue rectify itself once the Windows is finished downloading and installing updates.
What is Windows Modules Installer worker (WMIW)?
Windows Modules Installer worker (WMIW) is a service which takes cares of automatically installing Windows Update. According to its service description, WMIW is a system process that enables automatic installation, modification, and removal of Windows updates and optional components.
This process is responsible for finding new Windows Update automatically and installing them. As you might be aware that Windows 10 automatically install newer builds (i.e. 1803 etc.) via Windows Updates, so this process is responsible for installing these updates in the background.
Although this process is called Windows Modules Installer worker (WMIW) and you will see the same name in the Processes tab in the Task Manager, but if you switch to Details tab, then you will find the name of the file as TiWorker.exe.
Why Is Windows Modules Installer worker Using So Much CPU?
As Windows Modules Installer worker (TiWorker.exe) runs continuously in the background, sometimes it might utilize high CPU or disk usage when installing or uninstalling Windows Updates. But if its constantly using high CPU then the Windows Modules Installer worker may have become unresponsive while checking new updates. As a result, you may be experiencing lags, or your system might hang or freeze completely.
The first thing users do when they experience freezing, or lagging issues on their system is to restart their PC, but I assure you that this strategy won’t work in this case. This is because the issue will not resolve by itself until and unless you fix the underlying cause.
Fix Windows Modules Installer Worker High CPU Usage
Soargje derfoar dat jo in herstelpunt meitsje foar it gefal dat der wat mis giet.
Windows Modules Installer Worker (WMIW) is an important service, and it should not be disabled. WMIW or TiWorker.exe is not a virus or malware, and you cannot just delete this service from your PC. So without wasting any time let’s see How to Fix Windows Modules Installer Worker High CPU Usage mei help fan de hjirûnder neamde gids foar probleemoplossing.
Metoade 1: Run Windows Update Troubleshooter
1. Druk op Windows Key + I om te iepenjen ynstellings klik dan op Update & Feiligens byldkaike.
![]()
2. Selektearje út it linker menu Troubleshoot ûnder “Kom op en rinne” klikje op Windows Update.
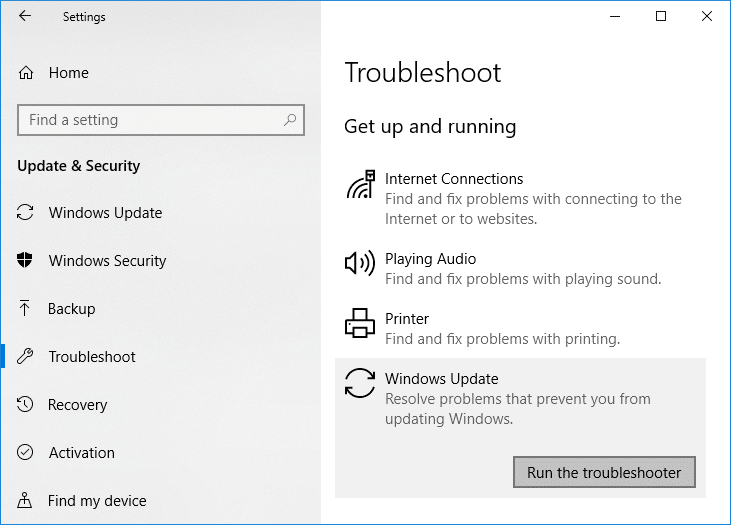
3. Klikje no op “Laad de troubleshooter" ûnder Windows Update.
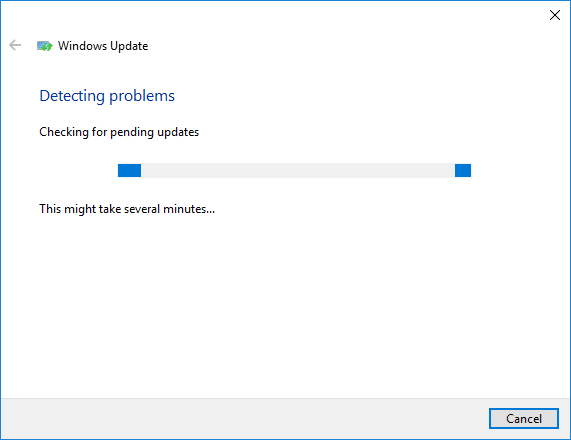
4. Let the troubleshooter run, and it will automatically fix any issues found with Windows Update taking forever.
Method 2: Manually Check for Windows Updates
1. Druk op Windows Key + I dan selektearje Update & befeiliging.
2. Fan de lofterkant, menu klikke op Windows Update.
3. Klikje no op de "Kontrolearje op fernijings” knop om te kontrolearjen op alle beskikbere updates.

4. As der updates wachtsje, klik dan op Download en ynstallearje updates.

5. Sadree't de fernijings binne ynladen, ynstallearje se, en jo Windows sil wurde up-to-date.
Method 3: Configure Windows Update to Manual
Foarsichtigens: This method will switch Windows Update from automatically installing the new updates to the manual. This means you have to manually check for Windows Update (weekly or monthly) to keep your PC secure. But follow this method, and you can again set the Updates to Automatic once the issue is resolved.
1.Druk op Windows Key + R en typ dan services.msc en klik op Enter.

2. Scroll down and find Windows-module-ynstallaasjeprogramma service in the list.
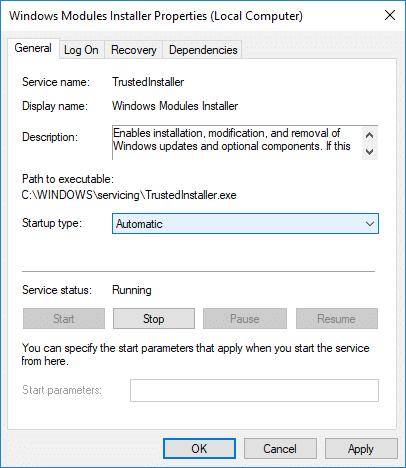
3. Rjochts-klikke op Windows Modules Installer service en selektearje Eigenskippen.
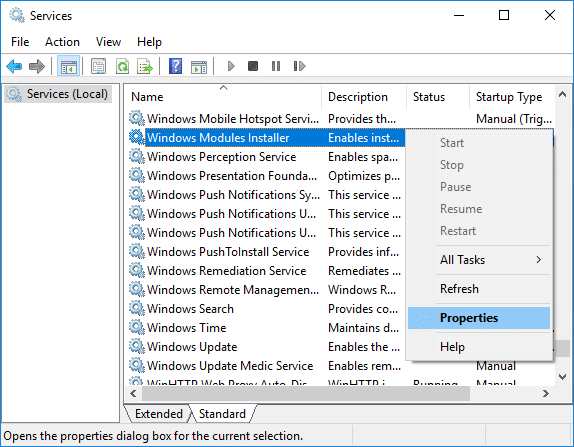
4. Klikje no op Ophâlde then from the Opstarttype drop-down select Hantlieding.
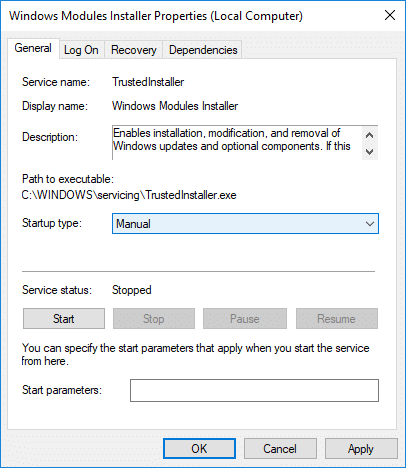
5. Klik Tapasse, folge troch OK.
6. Similarly, follow the same step for the Windows Update service.
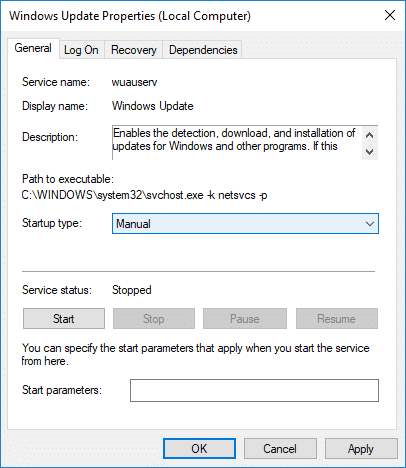
7. Reboot jo PC te bewarjen feroarings.
8. Wer kontrolearje foar Windows Updates Manually en ynstallearje alle wachtsjende updates.
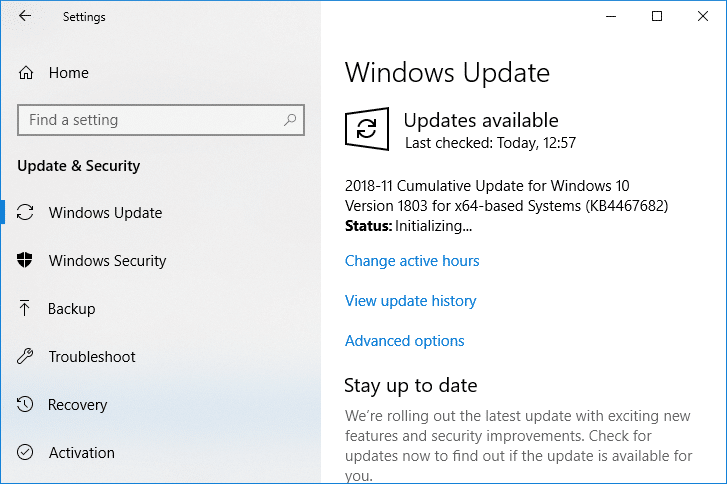
9. Once is done, again go back to services.msc window and open the Windows Modules Installer & Windows Update Properties finster.
10. Stel de Opstarttype nei Automatysk en klikke Start. Then click Apply followed by OK.
11. Reboot jo PC te bewarjen feroarings.
Metoade 4: Run Systeemûnderhâld Troubleshooter
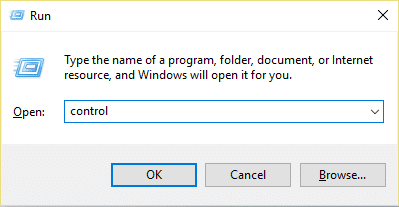
1. Druk op Windows Key + R en typ dan kontrôle en druk op Enter om te iepenjen Control Panel.
2. Sykje Troubleshoot en klikje op Problemen oplosse.

3. Klikje dan op Alles besjen yn it linkspan.
4. Klik op “System Maintenance” te rinne de System Maintenance Troubleshooter.

5. De Troubleshooter kin wêze kinne Fix Windows Modules Installer Worker High CPU Usage, but if it didn’t, then you need to run System Performance Troubleshooter.
6. Iepenje Kommando-prompt. De brûker kin dizze stap útfiere troch te sykjen nei 'cmd' en druk op Enter.

7. Typ it folgjende kommando yn cmd en druk op Enter:
msdt.exe / id PerformanceDiagnostic
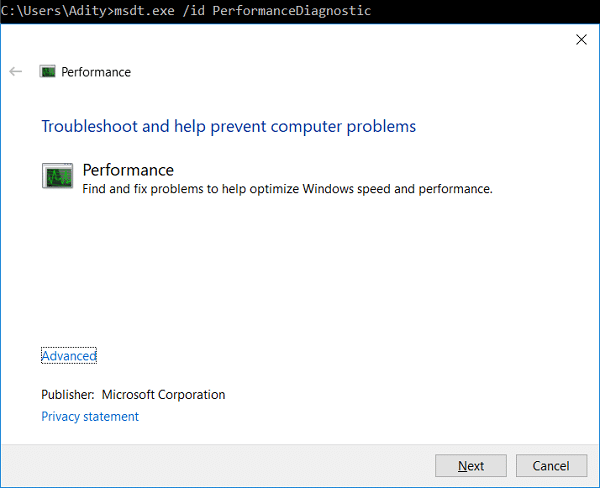
8. Follow the on-screen instruction to run the troubleshooter and fix any issues find the System.
9. Finally, exit the cmd and reboot your PC.
Method 5: Disable Automatic Maintenance
Sometimes Automatic Maintenance can conflict with the Windows Modules Installer Worker service, so try to disable Automatic Maintenance using this guide and see if this fixes your issue.
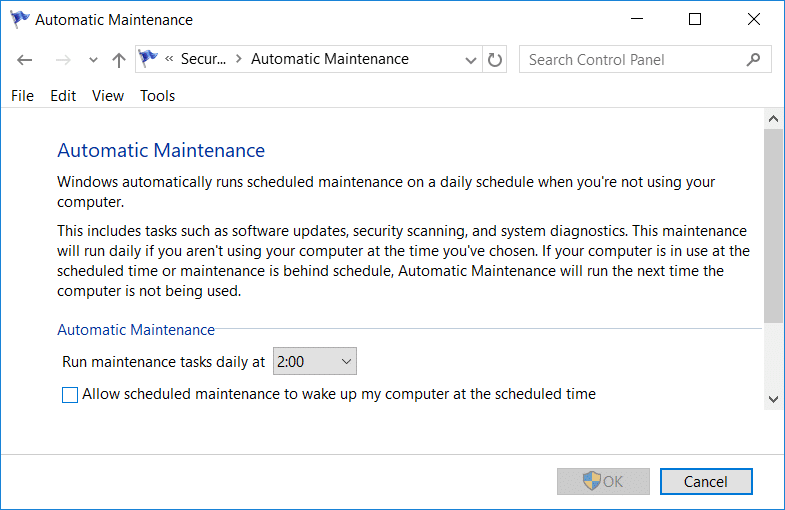
Although disabling Automatic Maintenance is not a good idea, but there might be some case where you need to actually disable it, for example, if your PC freezes during automatic maintenance or Windows Modules Installer Worker High CPU Usage issue then you should disable maintenance to troubleshoot the issue.
Method 6: Run System File Checker and DISM
1. Iepenje Kommando-prompt. De brûker kin dizze stap útfiere troch te sykjen nei 'cmd' en druk op Enter.
2.Typ no it folgjende yn 'e cmd en druk op enter:
Sfc / scannow sfc / scannow / offbootdir = c: / offwindir = c: finsters (As boppesteande mislearret, besykje dan dizze)

3. Wachtsje foar it boppesteande proses om te foltôgjen en ienris dien, start jo PC opnij.
4. Iepenje wer cmd en typ it folgjende kommando en druk op enter nei elk ien:
Dism /Online / Cleanup-Image / CheckHealth Dism / Online / Cleanup-Image / ScanHealth Dism / Online / Cleanup-Image / RestoreHealth

5. Lit it kommando DISM rinne en wachtsje oant it klear is.
6. As it boppesteande kommando net wurket, besykje dan it hjirûnder:
Dism /Image:C:offline /Cleanup-Image /RestoreHealth /Source:c:testmountwindows Dism /Online /Cleanup-Image /RestoreHealth /Boarne:c:testmountwindows /LimitAccess
Noat: Ferfange de C: RepairSourceWindows mei jo reparaasjeboarne (Windows-ynstallaasje of herstelskiif).
7. Reboot jo PC te bewarjen feroarings en sjen oft do bist by steat Fix Windows Modules Installer Worker High CPU Usage.
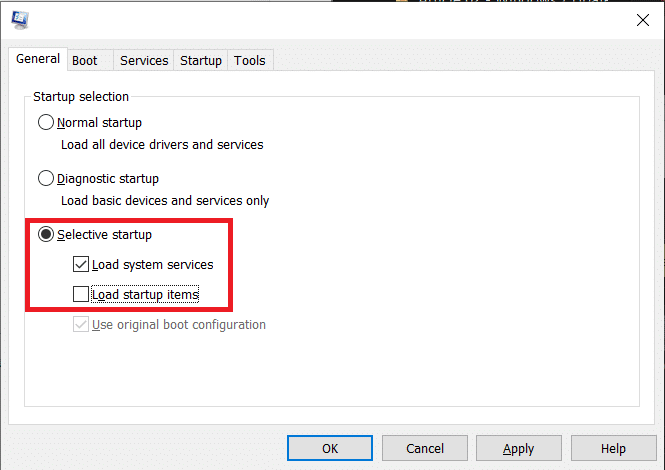
Metoade 7: In skjinne boot útfiere
Sometimes 3rd party software can conflict with Windows and can cause the issue. To Fix Windows Modules Installer Worker High CPU Usage issue, you need to perform a clean boot on your PC and diagnose the issue step by step.
Method 8: Set your WiFi as Metered Connection
Noat: This will stop Windows Automatic Update, and you will need to manually check for Updates.
1. Druk op Windows Key + I om te iepenjen ynstellings klik dan op Netwurk en ynternet.

2. Selektearje út it linker menu Wi-Fi.
3. Under Wi-Fi, click on your currently connected network (WiFi).
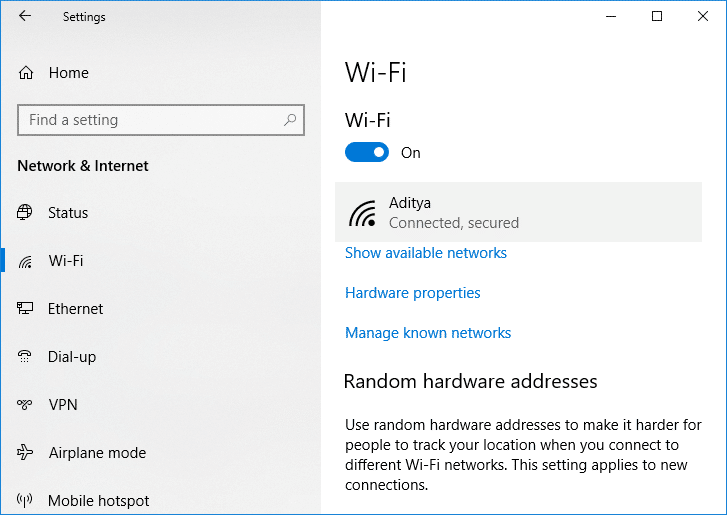
4. Scroll down to Metered connection and ynskeakelje de skeakel ûnder “Set as meterdere ferbining".
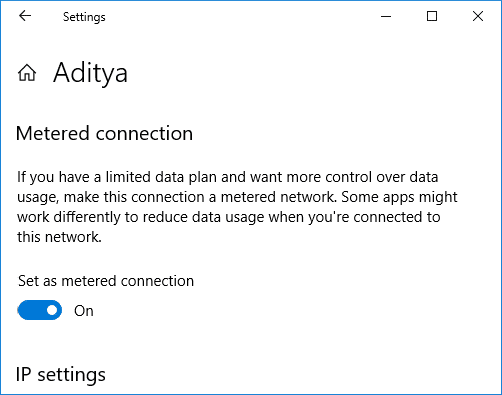
5. Close Settings and reboot your PC to save changes.
recommended:
Dat is it, jo hawwe mei sukses Fix Windows Modules Installer Worker High CPU Usage mar as jo noch fragen hawwe oangeande dizze tutorial, fiel jo dan frij om se te freegjen yn 'e kommentaardiel.
