Bypass ADB Device
Android Debug Bridge (ADB) is a handy tool that lets a user control their android device from a computer or laptop. It provides features such as installing apps through the computer and also lets us debug apps. By default, ADB functionality is disabled on Android phones.
They need to be turned on manually from the Android phone by the User. Android Users report errors in ADB and face issues like ADB device unauthorized messages. If you are searching the internet for an article to explain how to solve this particular problem and/or if you are wondering if is there a way for ADB device unauthorized bypass, then keep reading, Here I will show you the methods and fixes to bypass ADB unauthorized errors and ADBlink device unauthorized. Let’s get started!
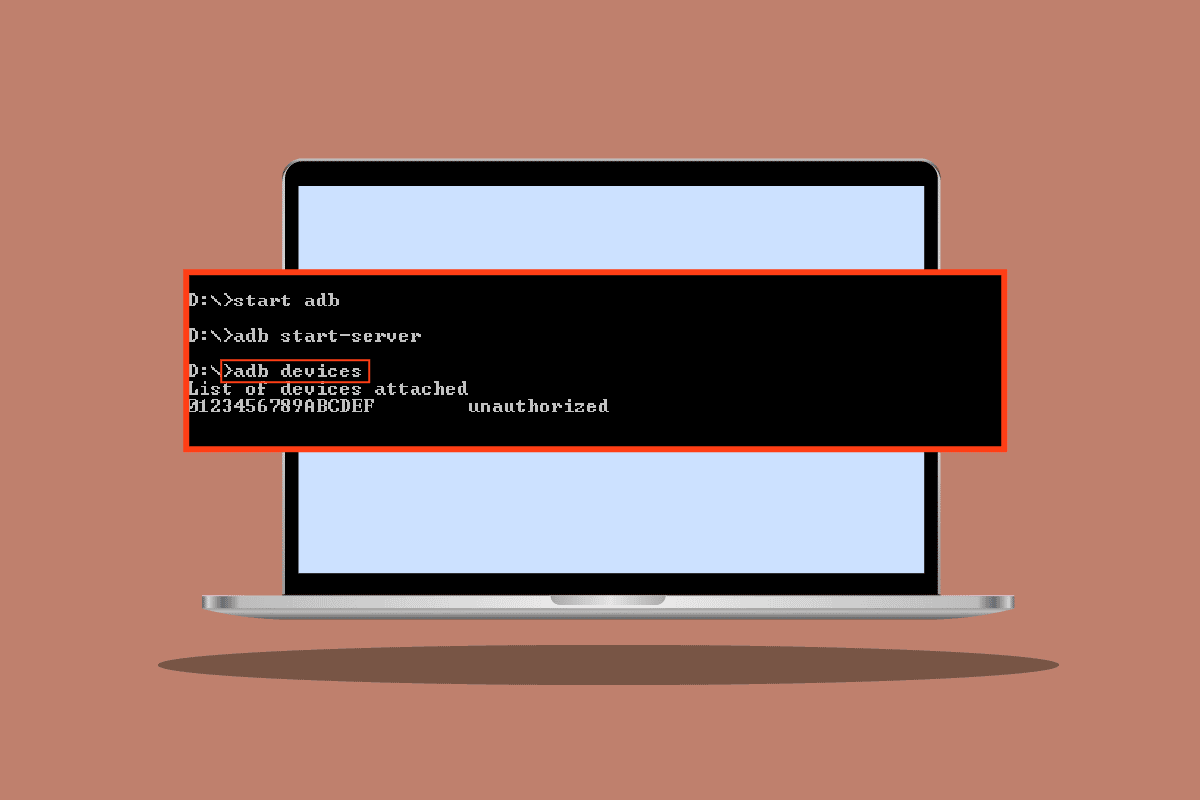
Let us see some of the causes of this issue before we move on to the methods to fix the issue
- Faulty USB connection
- RSA fingerprint prompt not appearing
- Incorrect ADB Connection
- USB drivers issue
- ADB drivers issue
Note: Since smartphones do not have the same settings and may vary from device to device hence, ensure the correct settings before changing any. The following methods were tried on Moto g(8) Power lite Android 10 (Stoc)
Faic cuideachd:
Mar a chuireas tu casg air Samsung Pass
12 dòighean air càradh nach urrainn a luchdachadh sìos an-dràsta air inneal Android
8 dòighean air teachdaireachdan teacsa Android a chàradh Mearachd luchdaich sìos
How to Install Apple Mobile Device Support on Windows 10
Mar a stàlaicheas tu APK a’ cleachdadh òrdughan ADB
Method 1: Change USB Connection
Android Users reported they could not receive proper prompts when performing ADB activities, if the USB is interrupted in middle then there is a chance for an ADB device unauthorized message to occur, this could be due to a possible fault in the USB connection (in USB hub or USB cable). Try changing the USB cable and the USB hub to see if that solves your issue.
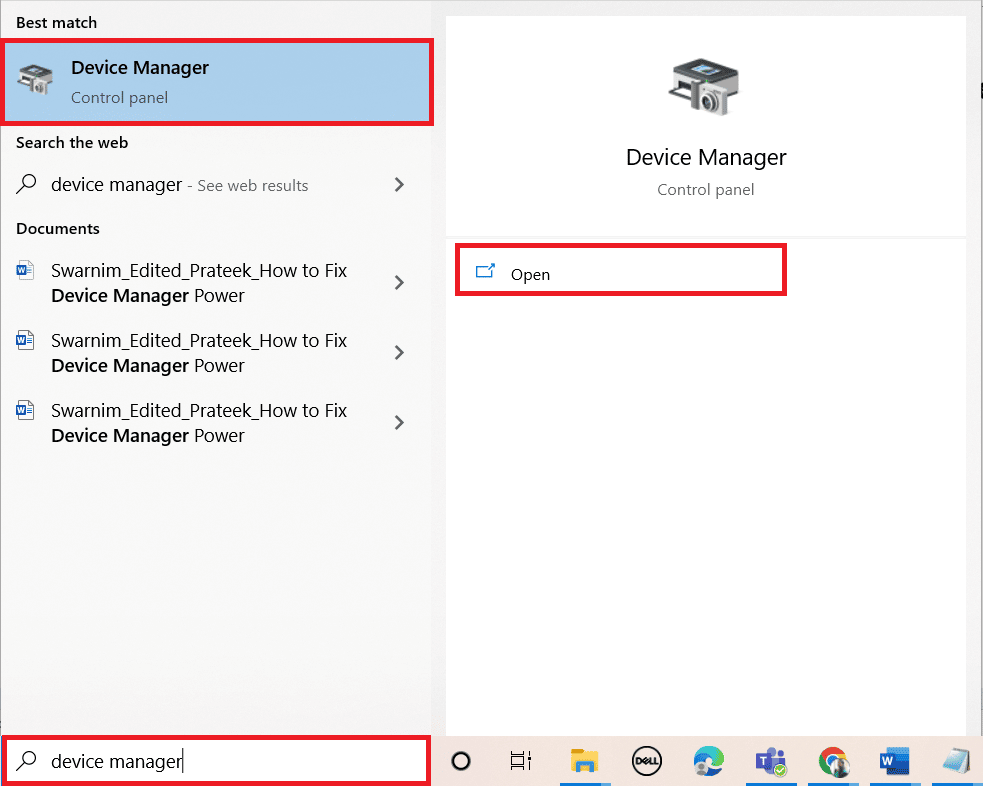
Method 2: Update USB drivers
When you have connected your mobile with the PC, chances are that it wasn’t recognized by the PC due to faulty USB drivers. Thus, updating USB drivers might be helpful in this scenario.
1. Buail an Iuchair Windows, seòrsa Neach-stiùiridh, an uairsin cliog air Open.
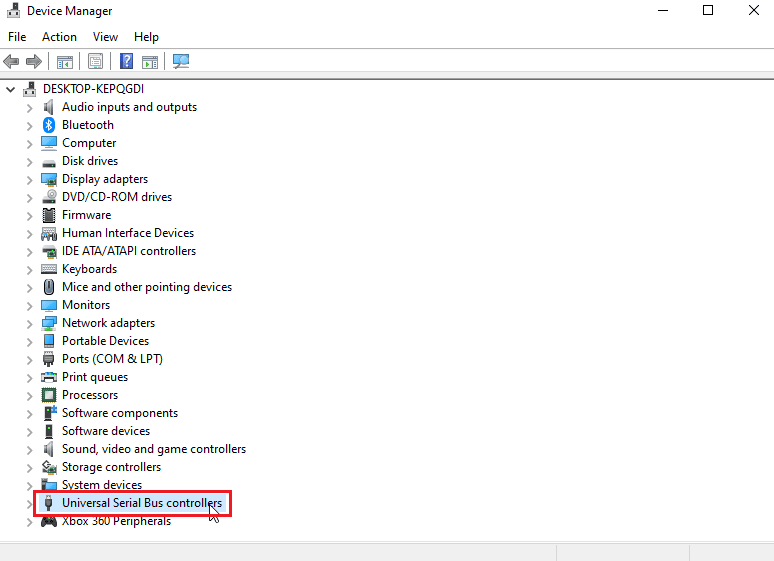
2. Dèan briogadh dùbailte air Riaghladairean Bus Serialil Uile-choitcheann.
3. Right-click on your USB driver and select the Ùraich an dràibhear roghainn.
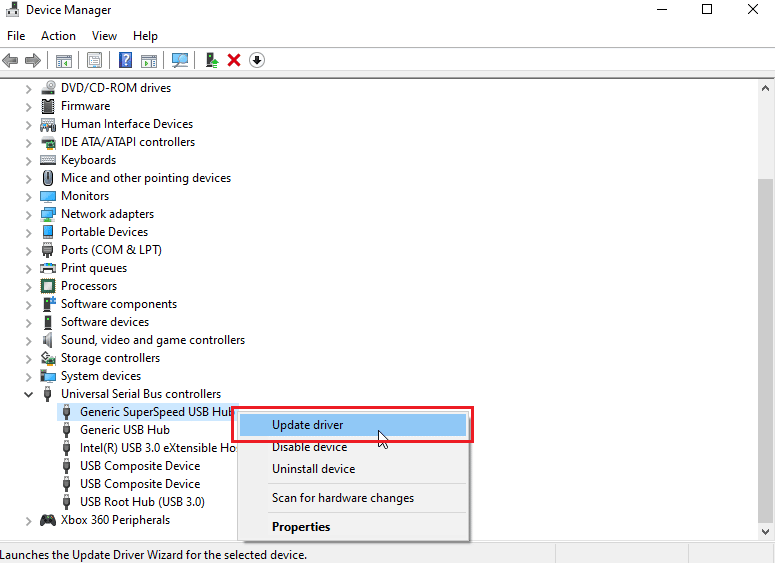
4. A-nis, brùth air Search automatically for Updated driver software to let Windows install the drivers automatically.
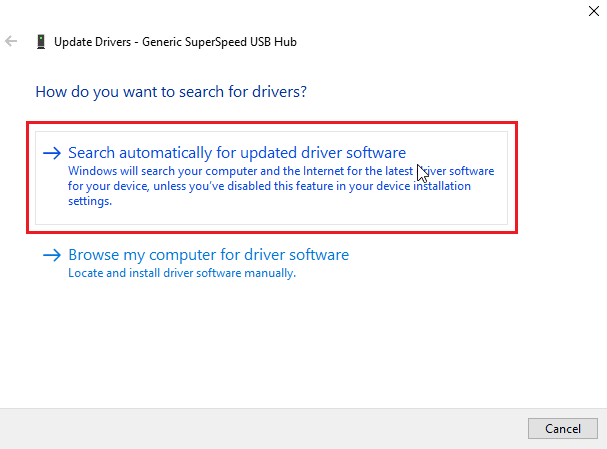
5. Repeat the above steps for all Draibhearan USB fo na Stiùirichean bus sreathach uile-choitcheann earrann
Cuideachd Leugh: How to Install ADB (Android Debug Bridge) on Windows 10
Method 3: Android SDK
Make sure you have downloaded and extracted the Android SDK to avoid an ADB device unauthorized message. Following are the steps to download Android SDK to bypass ADB device unauthorized message.
1. Rach gu SDK Android download duilleag.
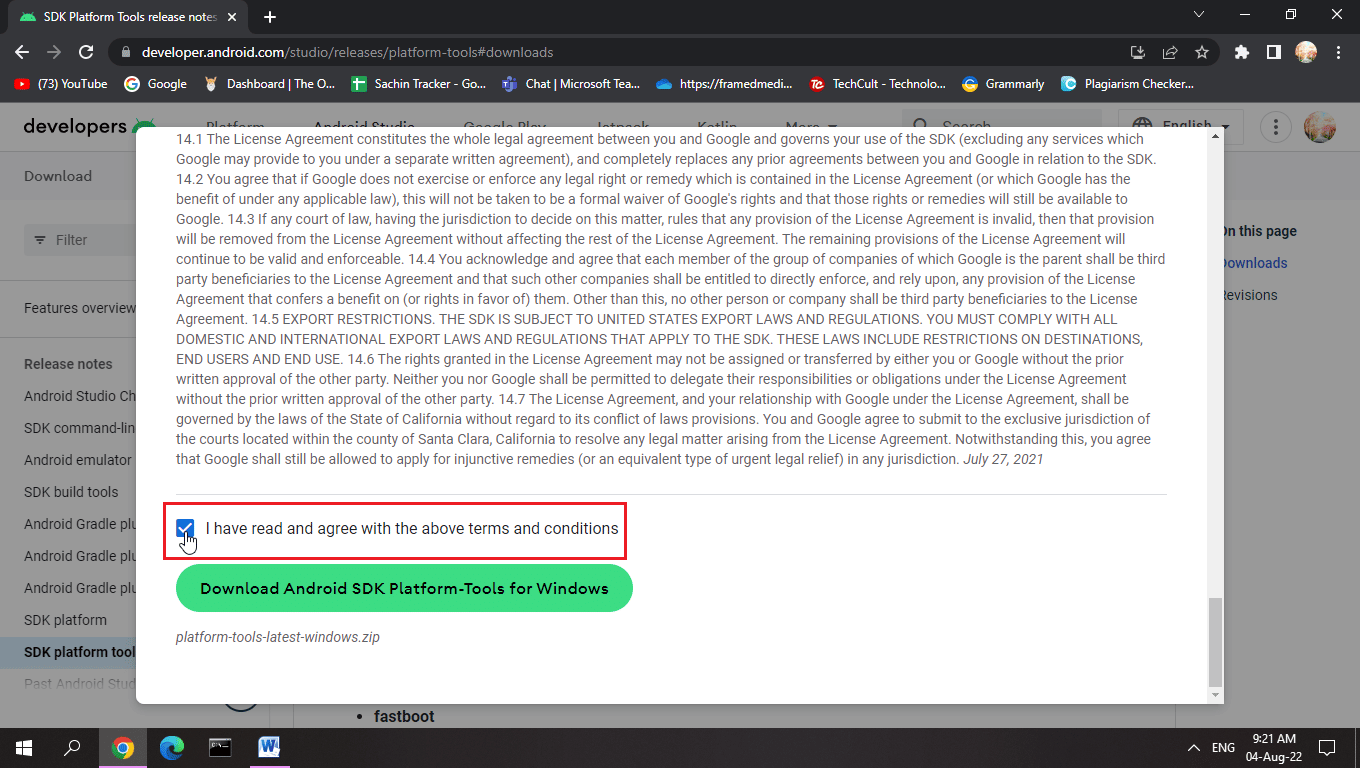
2. Scrollaich sìos agus cliog SDK platform tools for Windows

3. Leugh an Cumhachan is Cùmhnantan, scroll down and check Tha mi air na teirmichean is cumhaichean gu h-àrd a leughadh agus aontachadh roghainn.
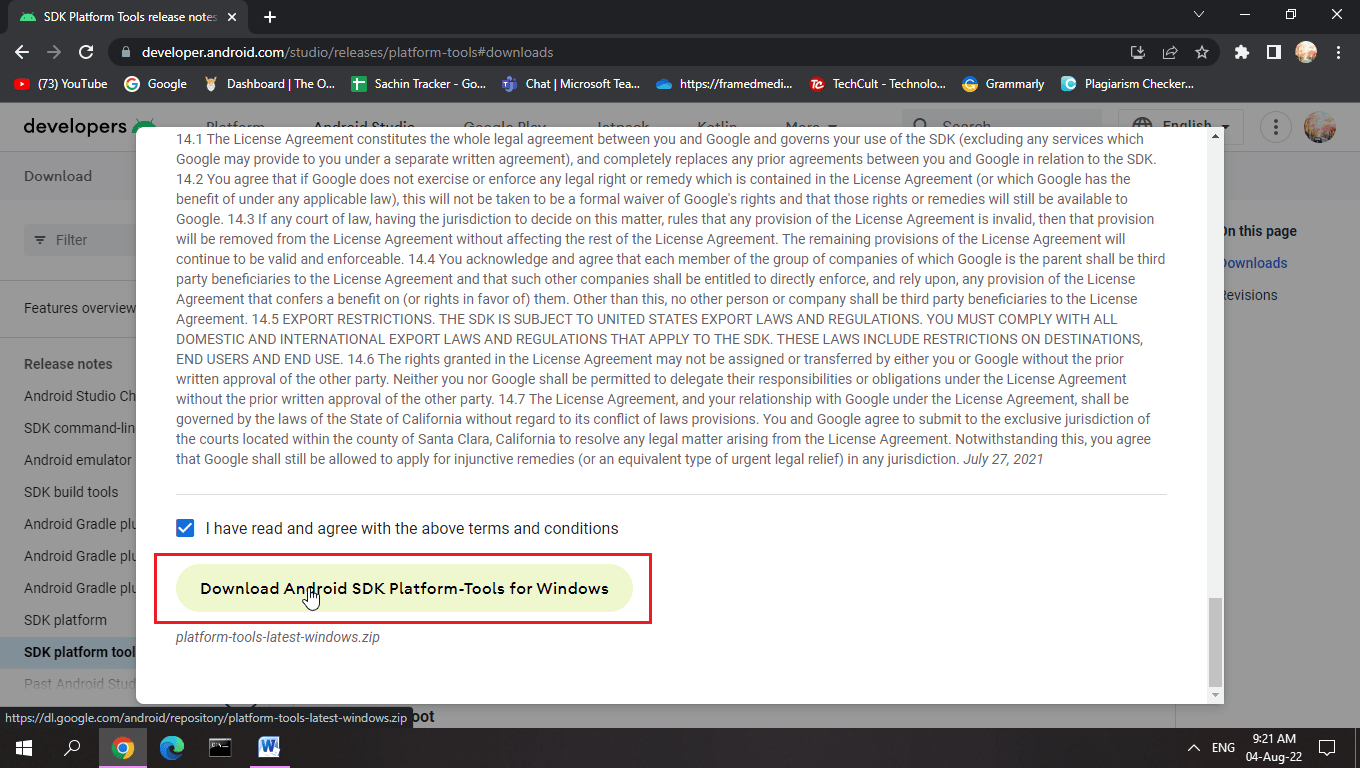
4. Cliog air Luchdaich a-nuas Android SDK Plaform-Tools airson Windows. The Android SDK will be downloaded.
5. Navigate to the download folder and extract the Android SDK files.
With this SDK, you will have all the required ADB files.
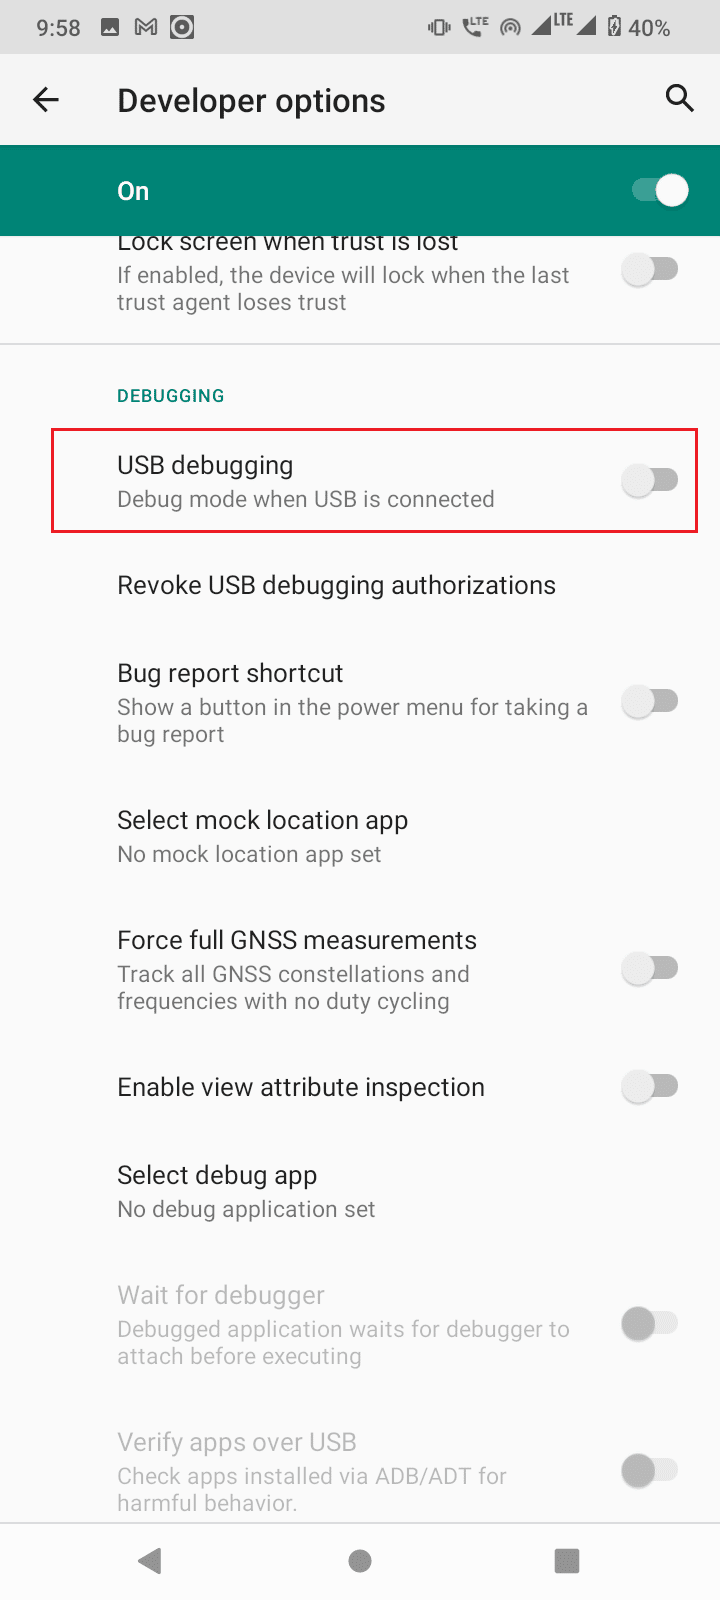
Method 4: Enable USB Debugging
USB Debugging allows an Android device to be controlled by a computer through a USB connection, this function allows applications to be installed from a computer and a couple of other functions too. To make sure if you have enabled USB debugging. Here are the steps to enable USB debugging to bypass ADB device unauthorized message.
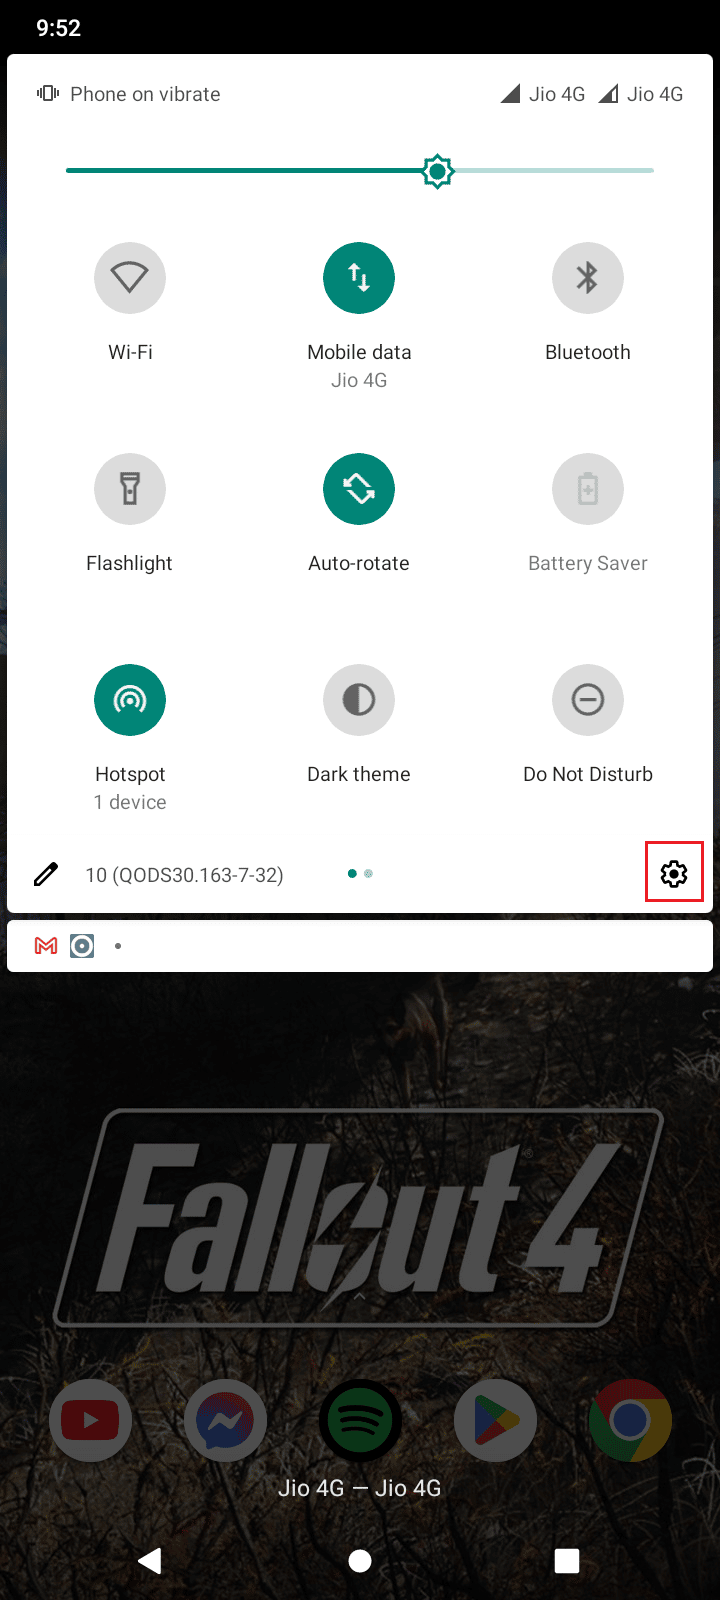
1. Swipe down the Bàr fios annad Home Screen.
2. Tap air ìomhaigh cog a dh 'fhosgladh roghainnean.
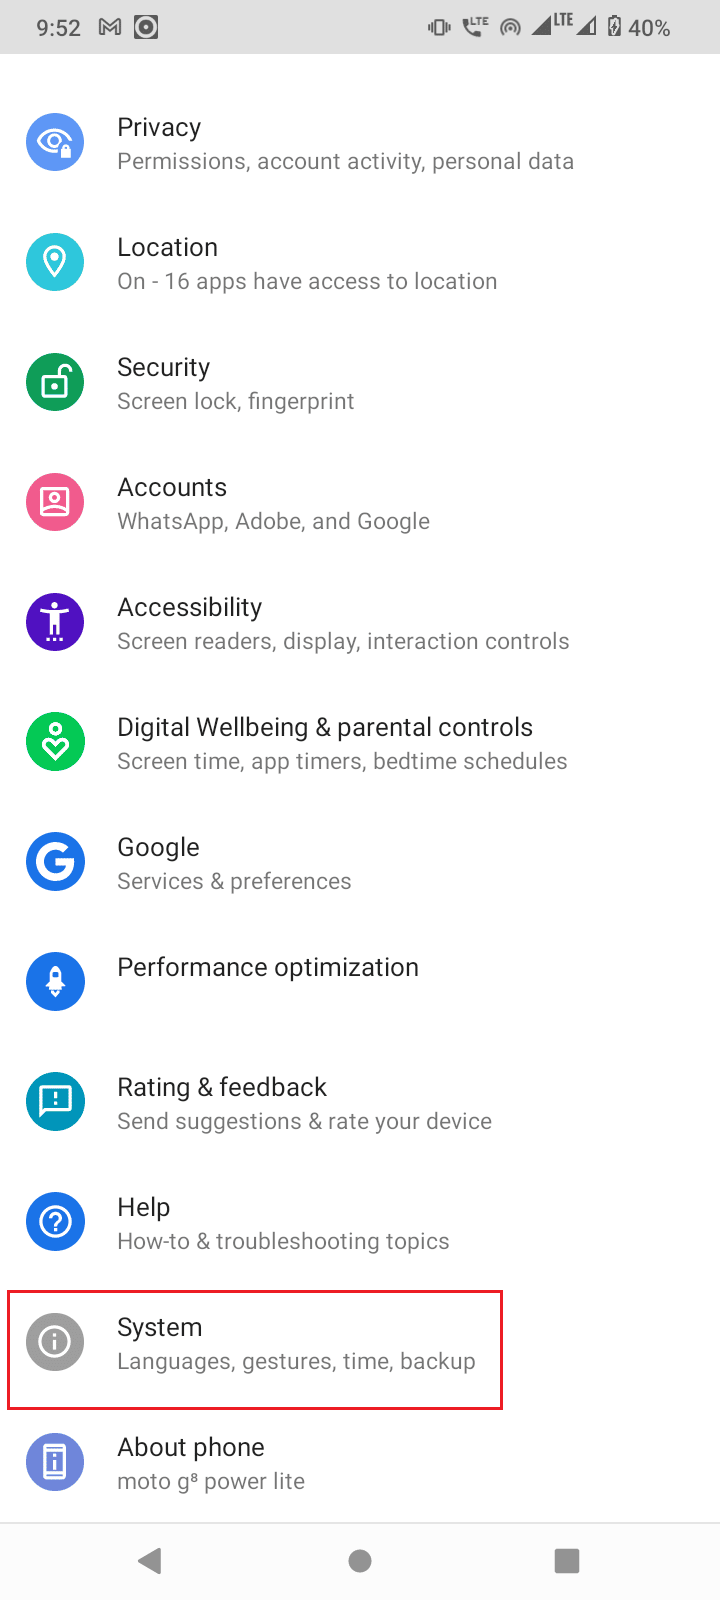
3. An uairsin, tap air System suidheachadh.

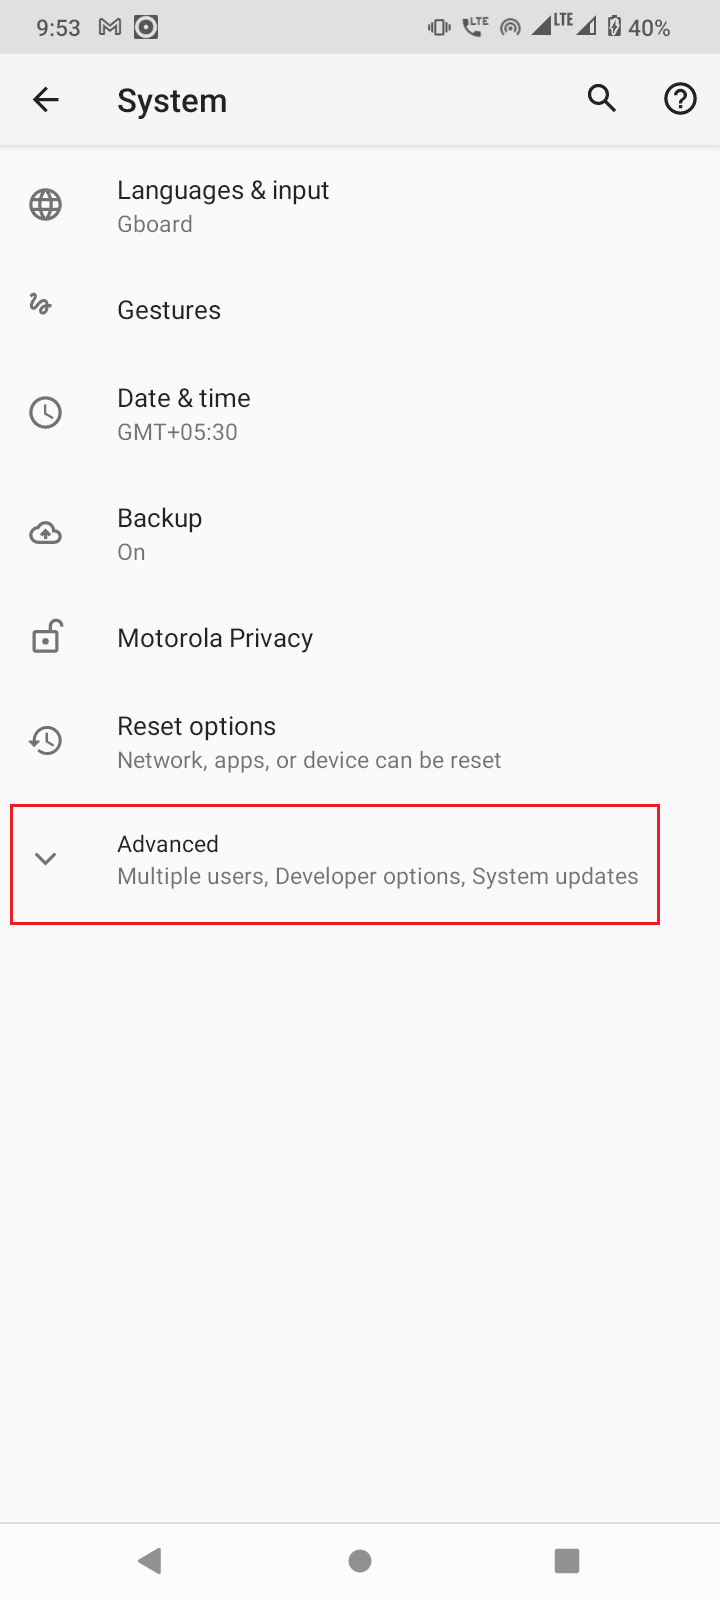
4. Tagh an adhartach roghainn.

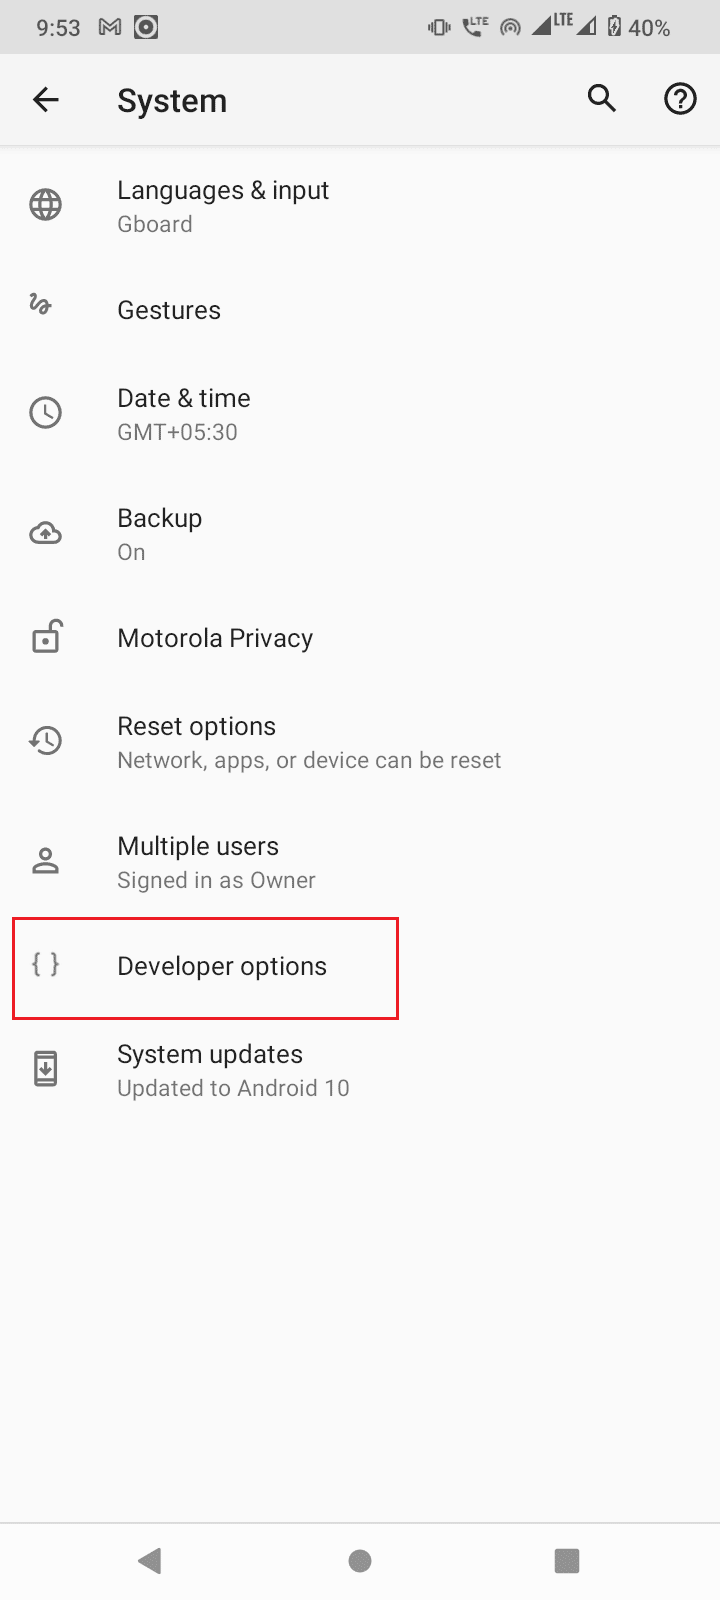
5. A-nis, tap air Roghainnean luchd-leasachaidh.

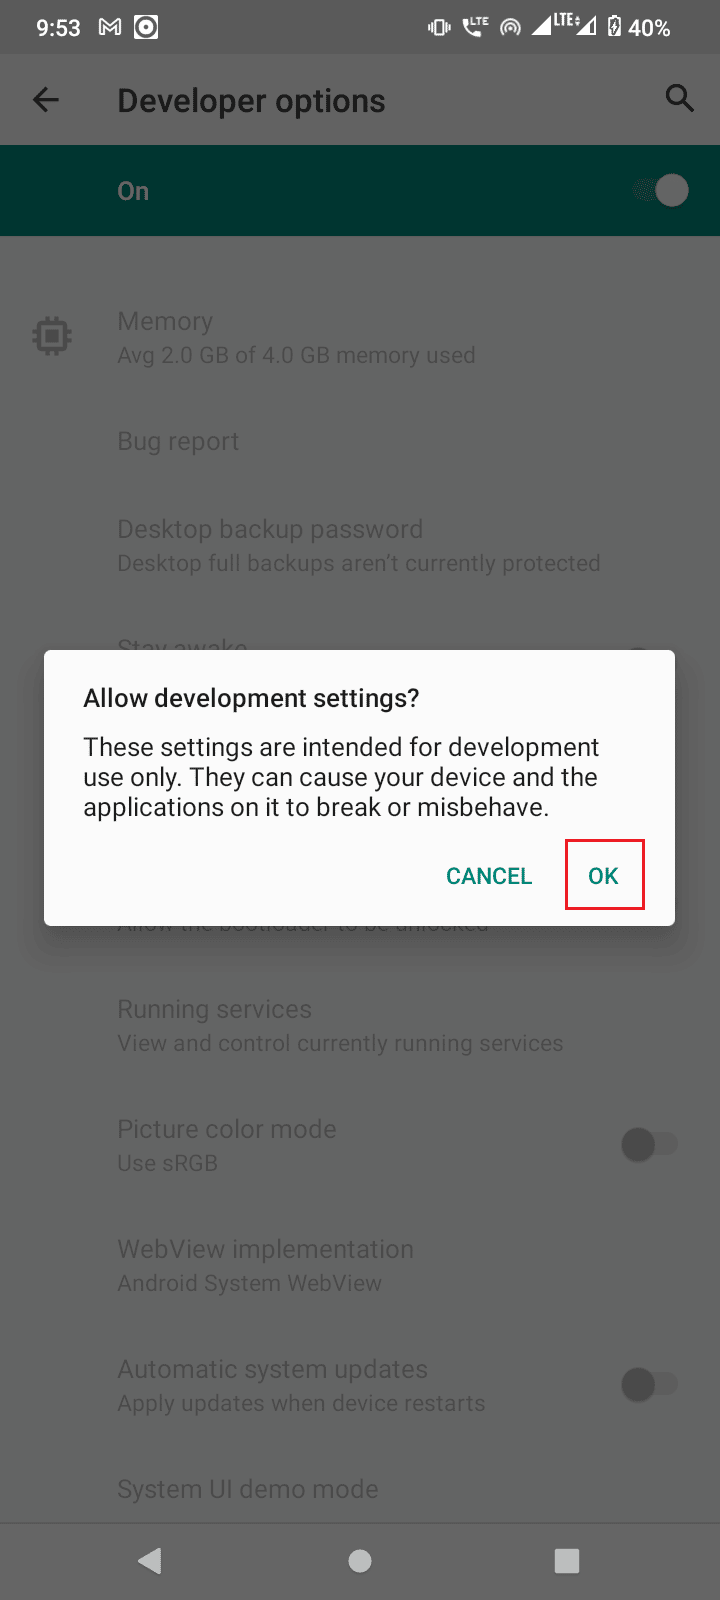
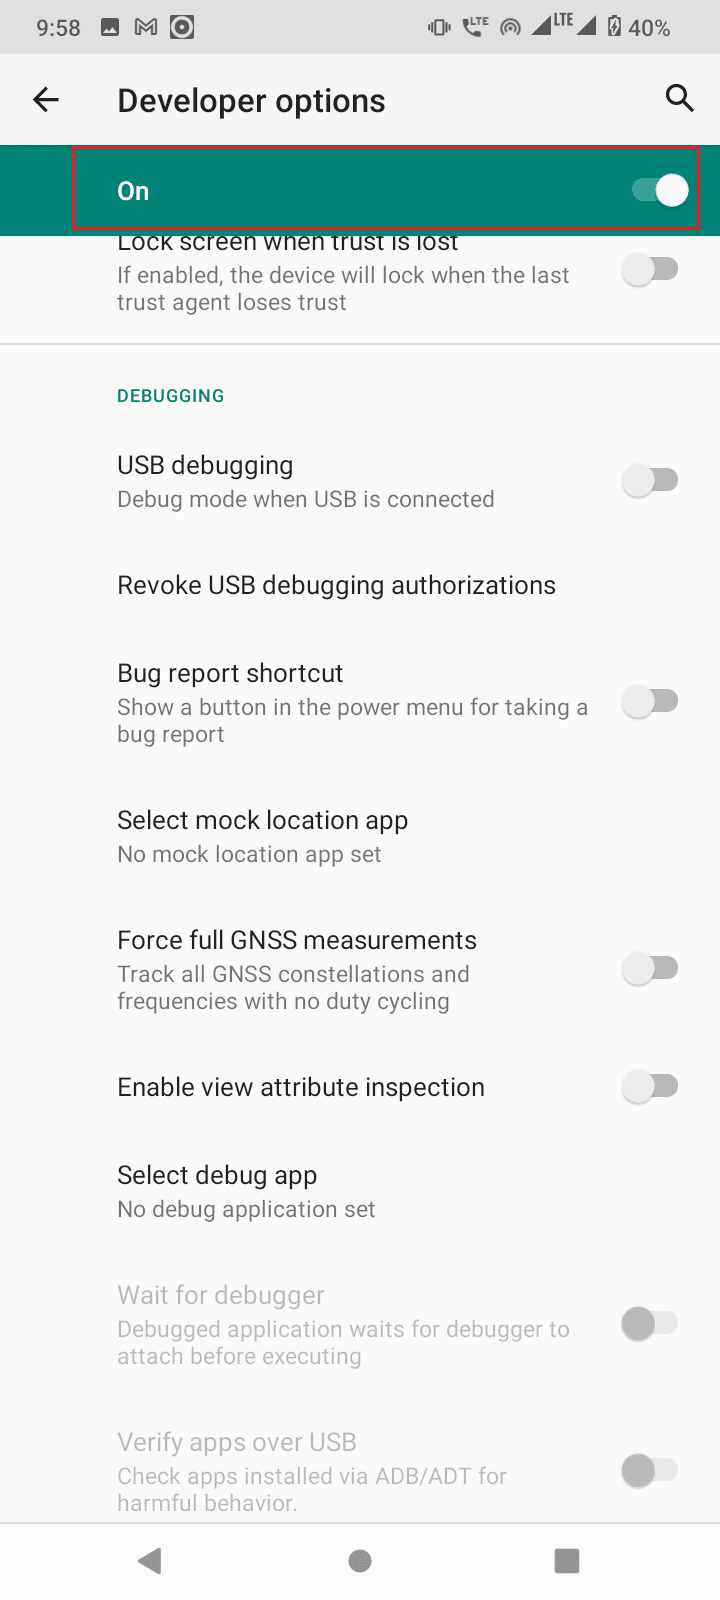
6.Switch On an togl airson Roghainnean luchd-leasachaidh.
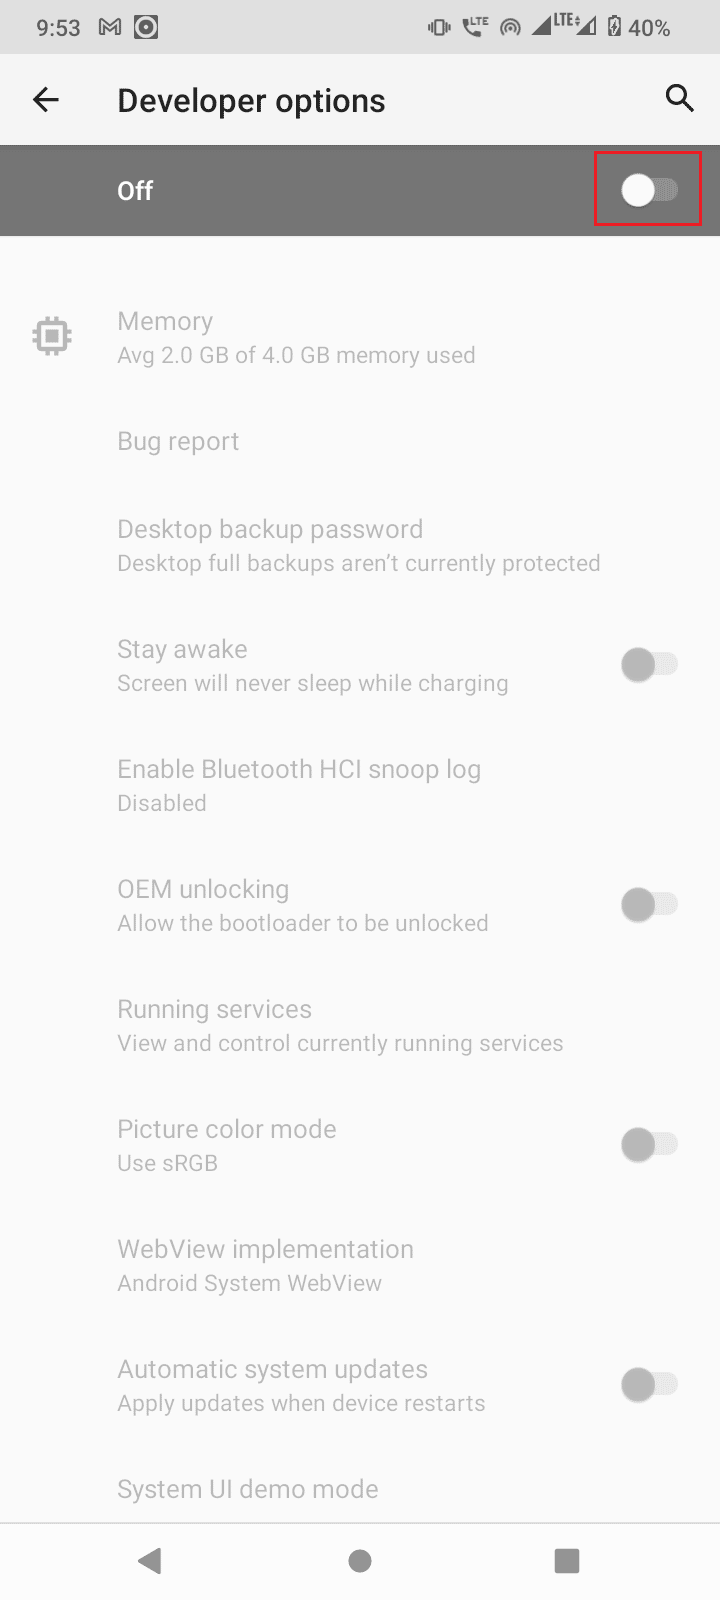
7. Tap air OK gu Allow development settings?
Cuideachd Leugh: Mar a dh’ atharraicheas tu roghainnean USB air Android 6.0
In case you cannot see the Roghainnean luchd-leasachaidh then you might not have enabled it, to enable developer options,
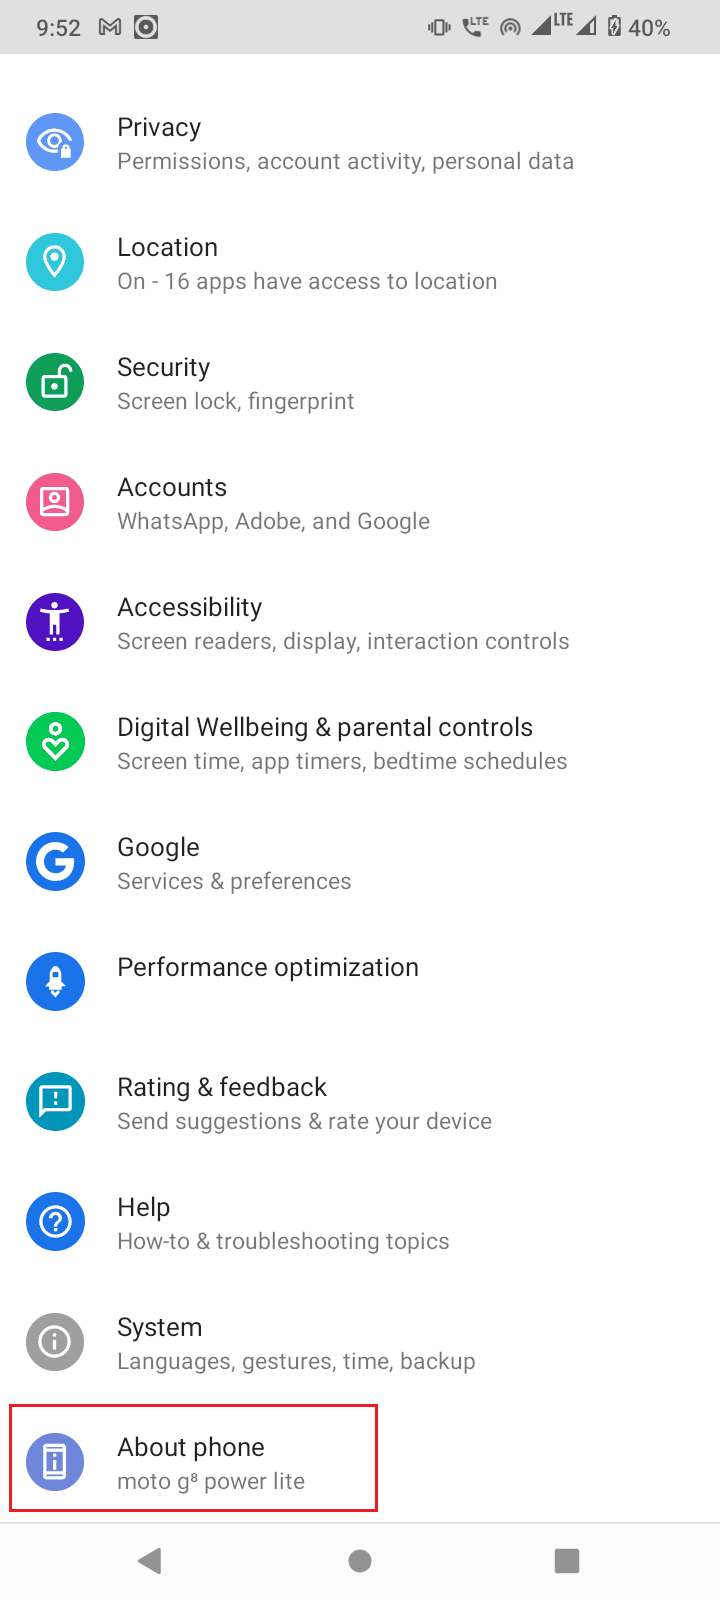
1. Launch your device roghainnean.

2. An uairsin, tap air Mu dheidhinn fòn roghainn.
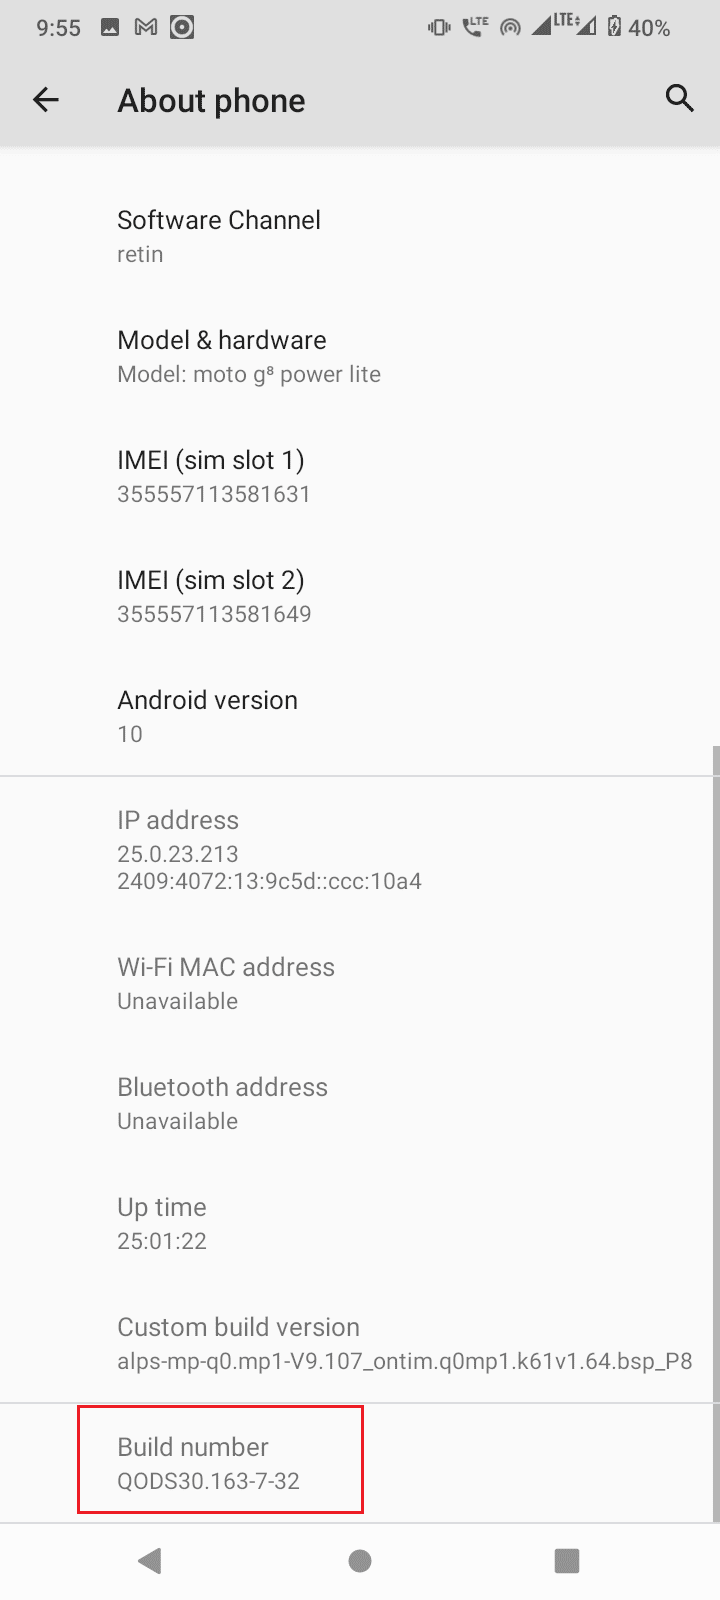
3. Tap air Tog àireamh 5-7 times to activate Modh leasaiche.
4. A prompt mentioning you are now a developer thèid an teachdaireachd a thaisbeanadh.
If your developer mode is visible then no need to follow the above step.
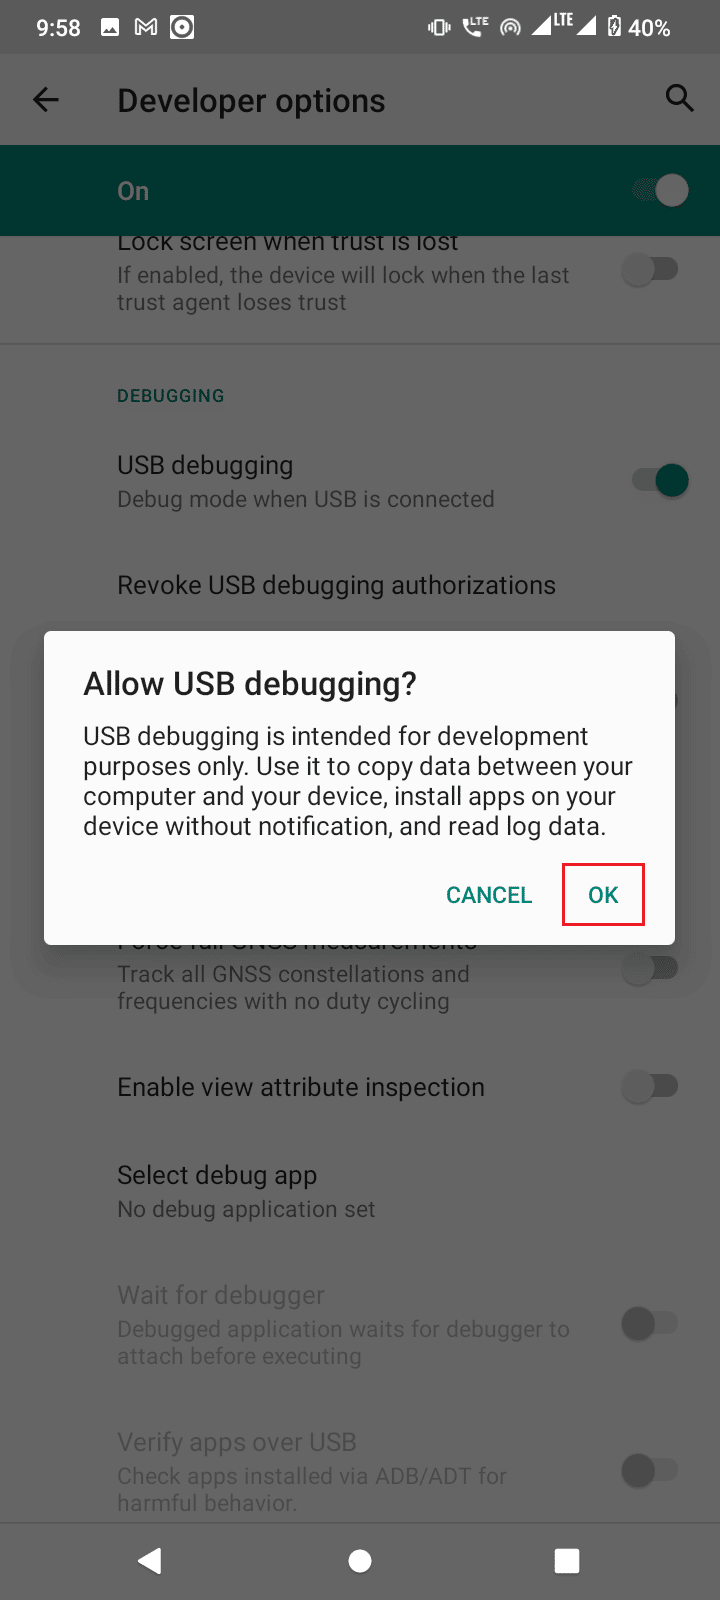
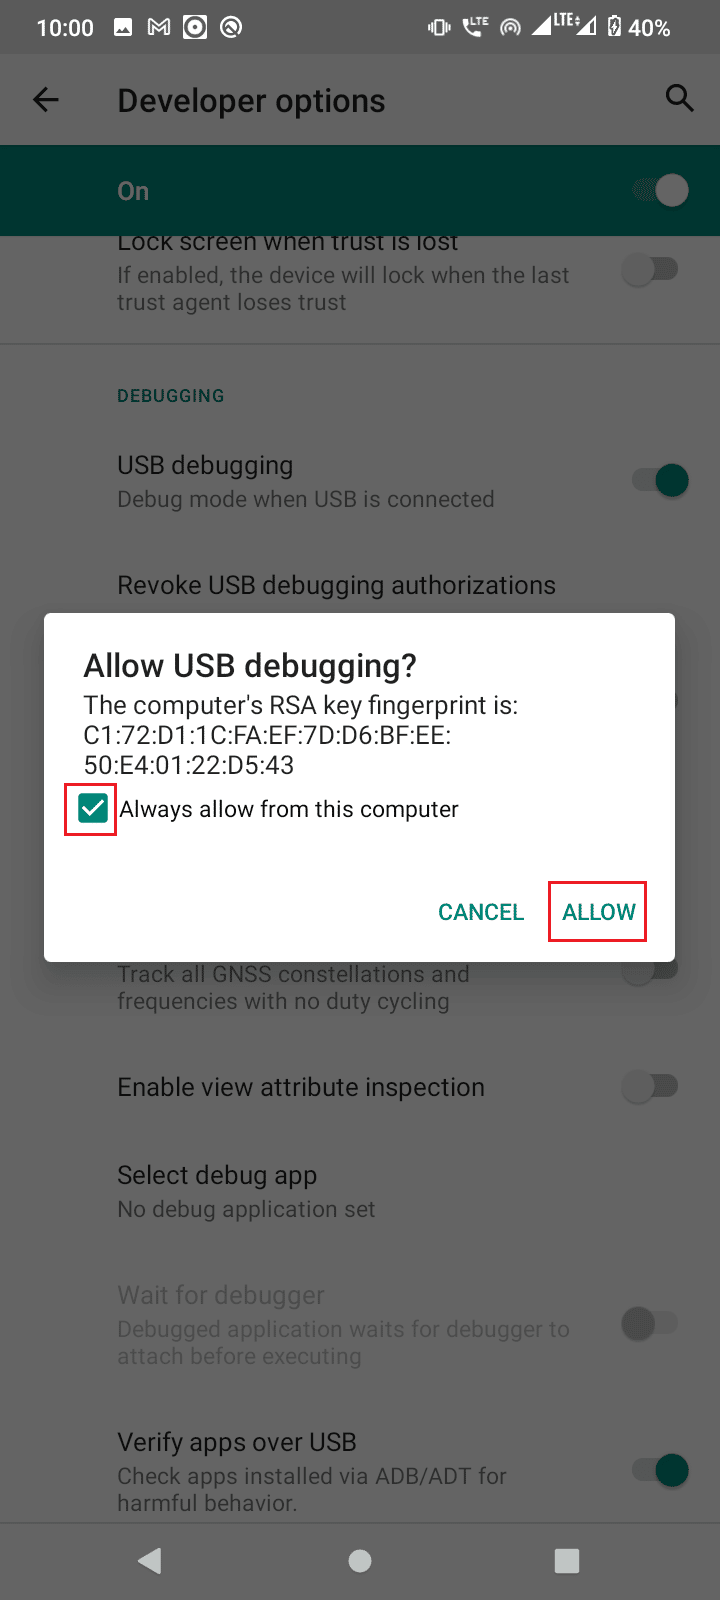
1. Ann Roghainnean luchd-leasachaidh, scroll down and switch On the toggle for A ’deasbad USB.
2. Tap air OK in the prompt asking to Ceadaich USB debugging?
Cuideachd Leugh: Ceartaich USB OTG nach eil ag obair air innealan Android
Method 5: Request Access from CMD
If you connected your device and enabled USB debugging but did not receive the request from the PC, then follow the below steps.
1. Seòl chun an platform-tools folder far a bheilSDK Android air a thoirt a-mach.
2. Seòrsa CMD on the address bar and hit Cuir a-steach iuchair.
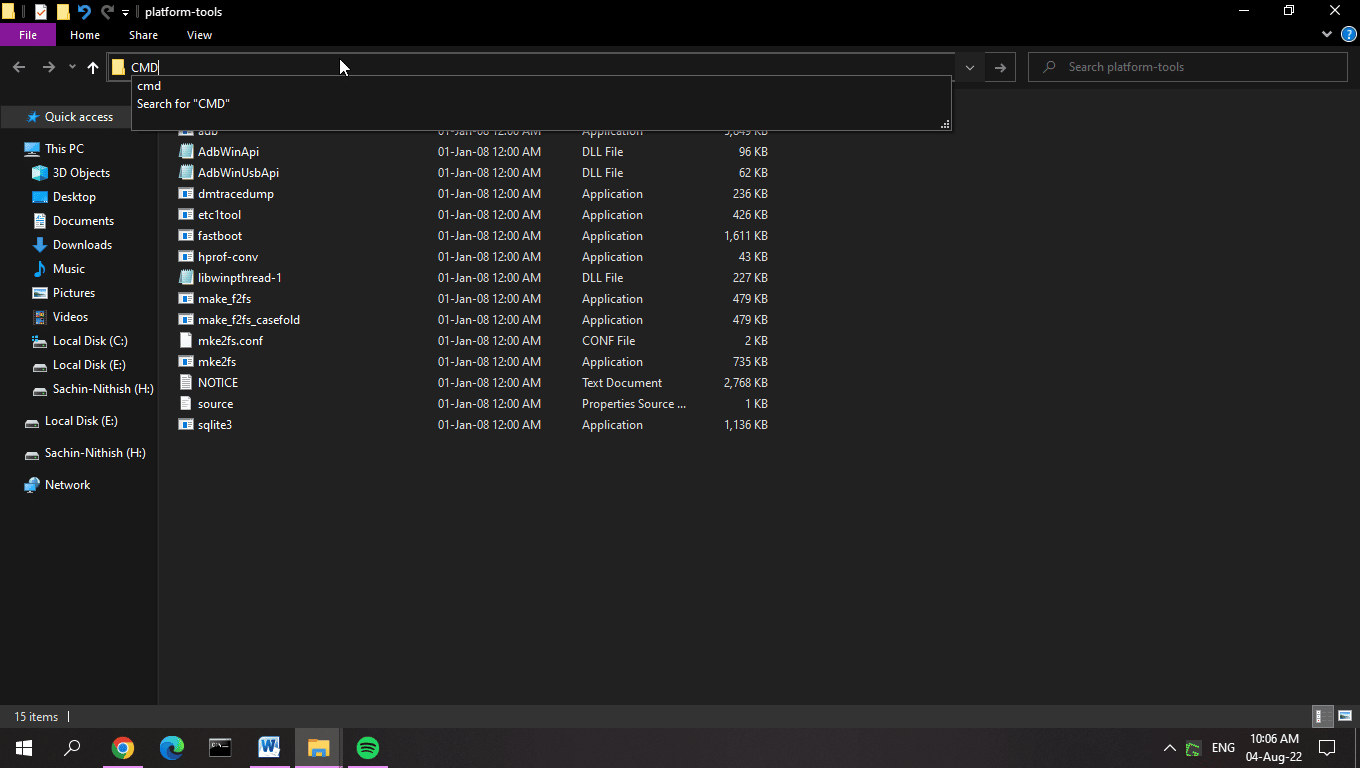
3. Seòrsa innealan adb àithne agus buail an Cuir a-steach iuchair.
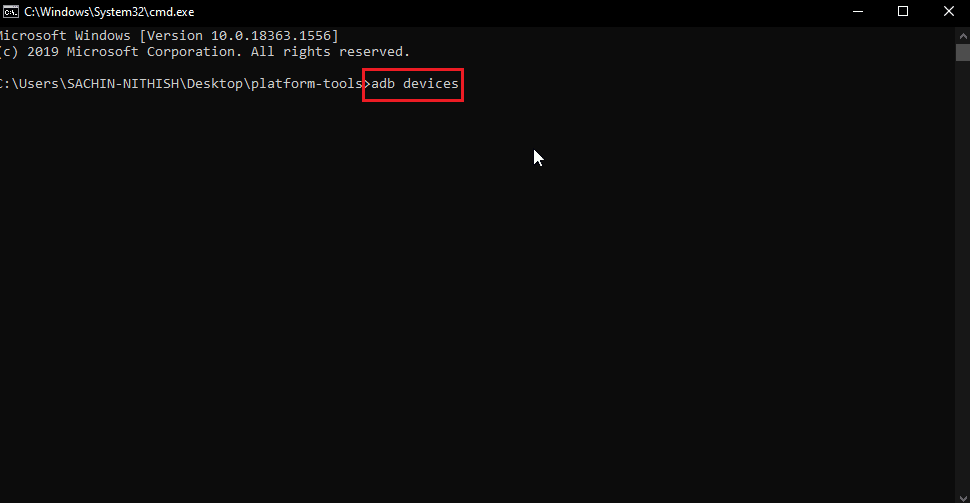
4. If you didn’t get the request now after entering the command you will receive the prompt on your Android Phone.
5. Thoir sùil air an Ceadaich an-còmhnaidh bhon choimpiutair seo roghainn.
6. Tap air ALLOW anns an t-seisean.
Method 6: Restart ADB Connection
Sometimes ADB device unauthorized message occurs due to a faulty connection with the Android device. This can be fixed by re-connecting the ADB connection by revoking the USB connection.
In the previous solution if you still did not get the prompt or still getting ADB device unauthorized message, follow these steps to ADB device unauthorized bypass.
1. Rach gun notifications pannal.
2. Tap air ìomhaigh cog a dh 'fhosgladh roghainnean

3. An uairsin, tap air System suidheachadh.
4. An ath-, tap air adhartach suidheachadh.

5. A-nis, fosgail an Roghainnean luchd-leasachaidh.

6. Ann Roghainnean luchd-leasachaidh toggle dheth a ' A ’deasbad USB roghainn.
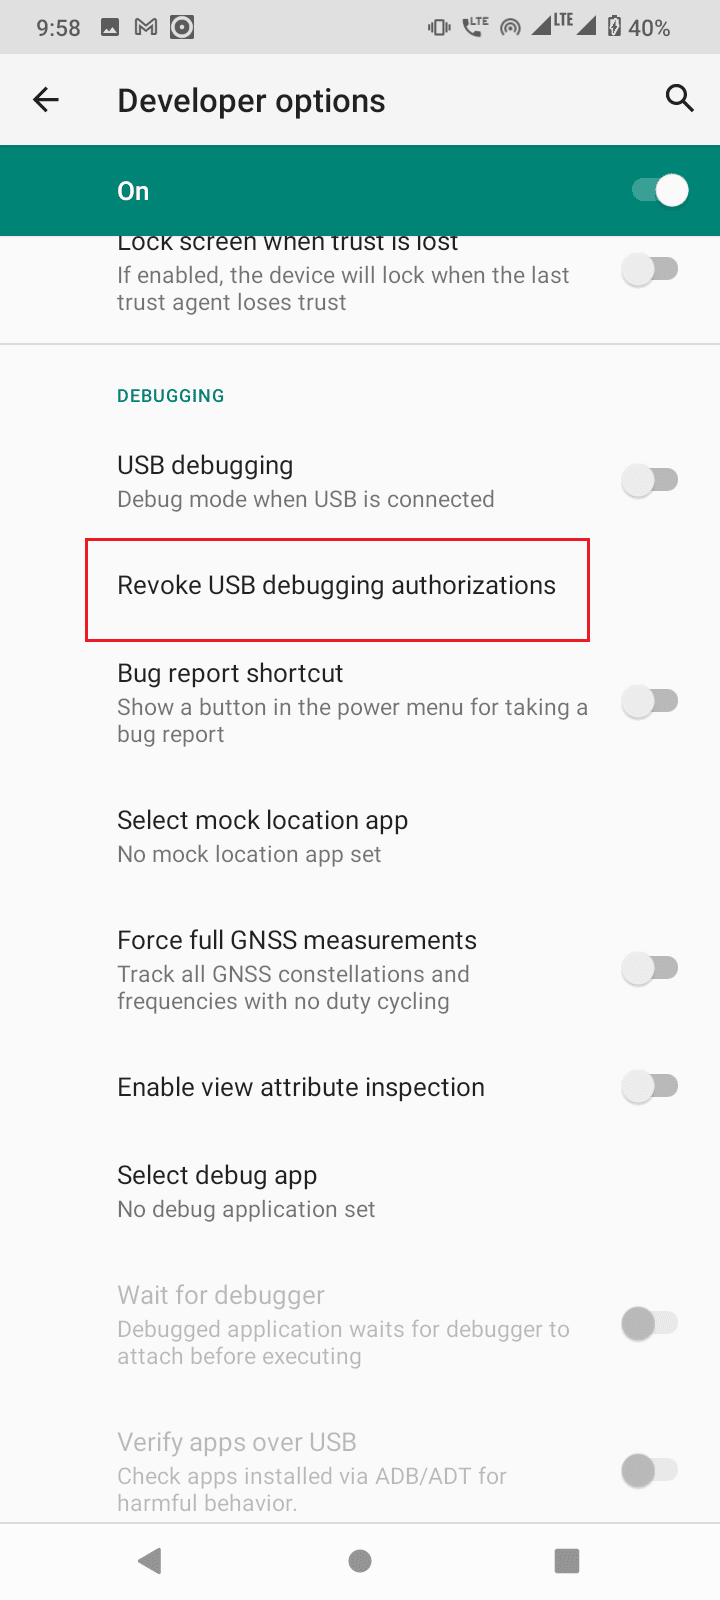
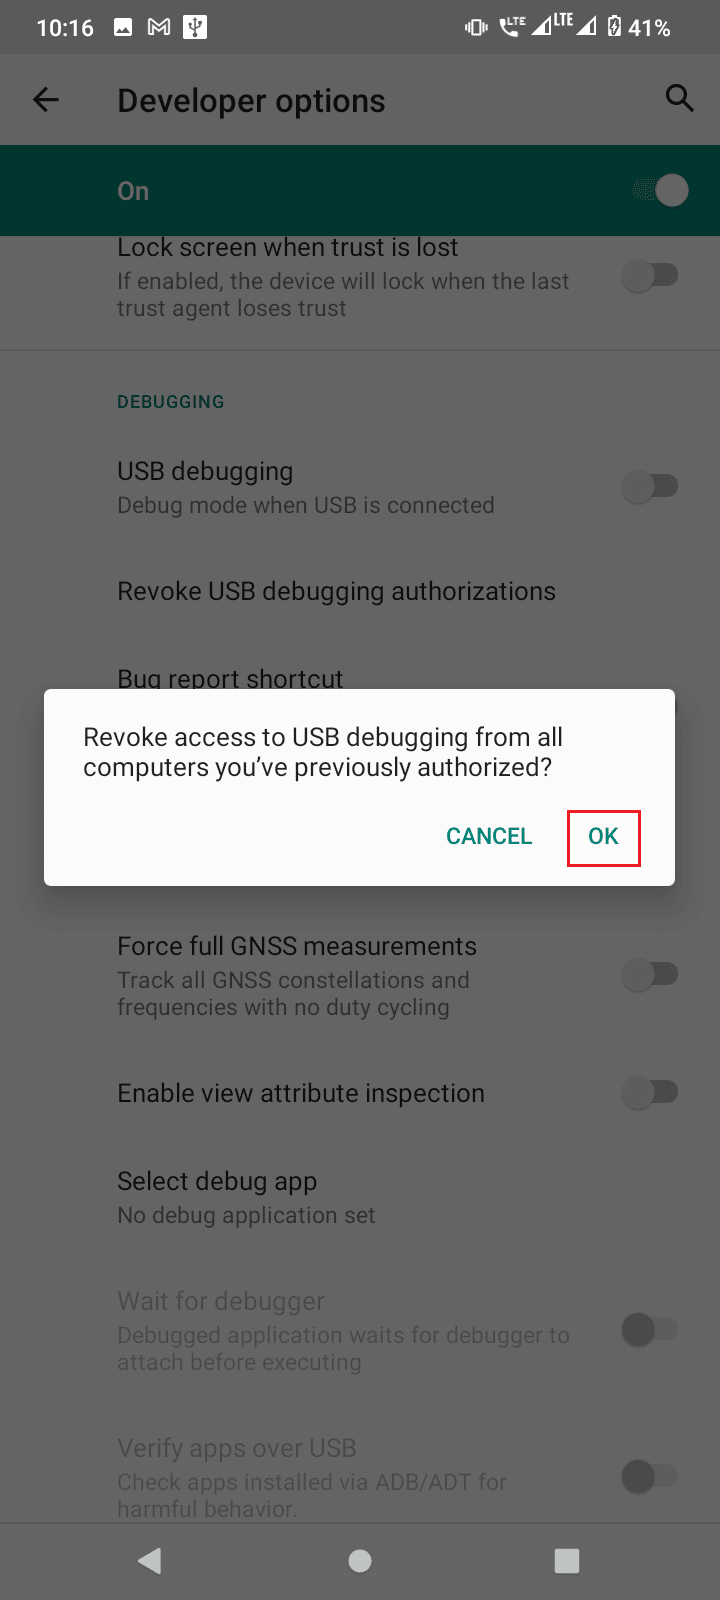
7. Fo A ’deasbad USB, tap air Revoke USB debugging authorizations.
8. Tap air OK gus dearbhadh
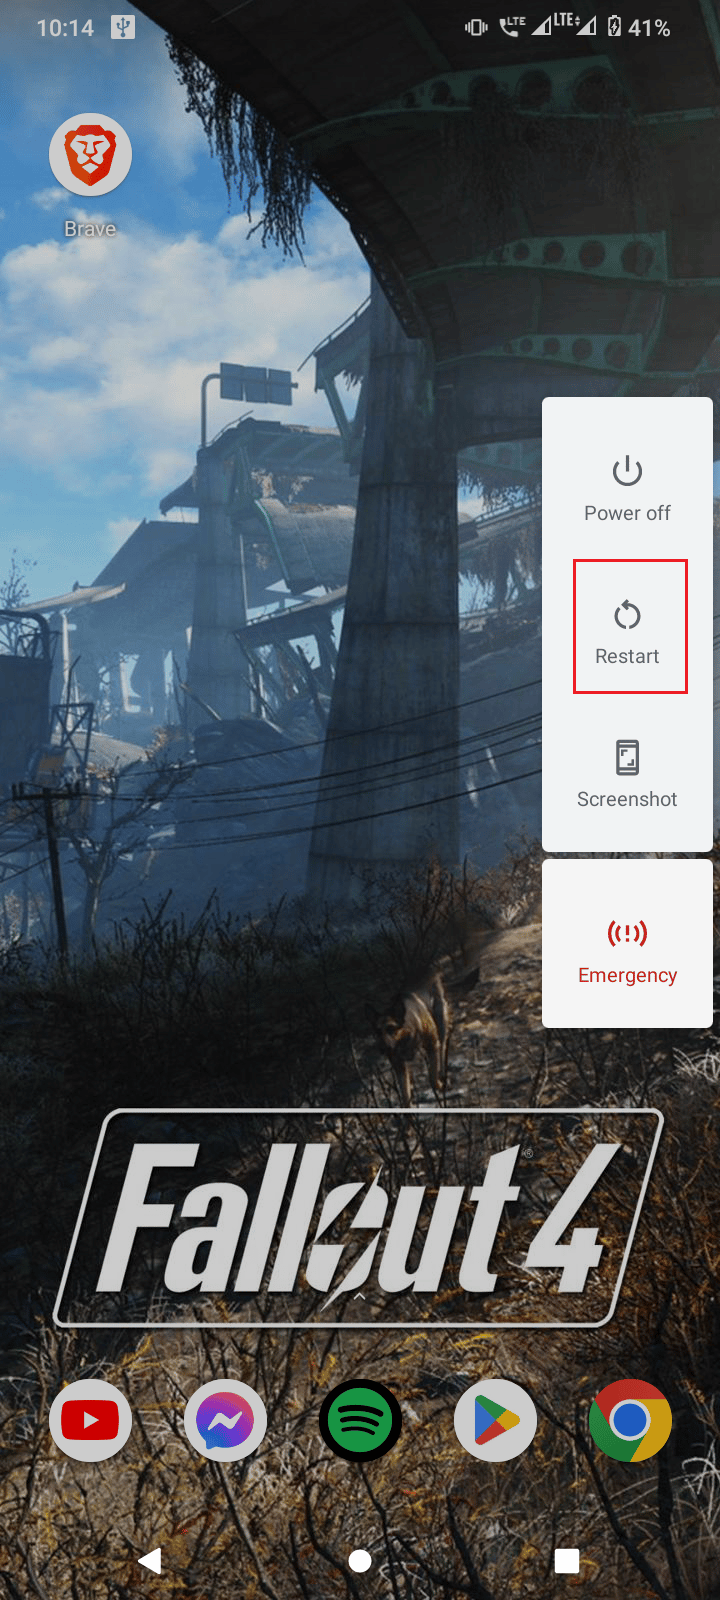
9. Restart your phone by holding the cumhachd putan agus tap air Ath-thòisich.
10. Finally, remove your phone from the Ceangal USB.
Cuideachd Leugh: How to Unlock Bootloader Via Fastboot on Android
After the above procedure, follow these steps.
1. Now connect your Android mobile to your computer again.
2. Launch your Android device roghainnean.

3. An uairsin, tap air System suidheachadh.

4. An ath-, tap air adhartach suidheachadh.
5. A-nis, tap Roghainnean luchd-leasachaidh.
6. Then, turn on A ’deasbad USB.

7. Swipe down the bàr fiosan where it shows charging mode, tap on it.
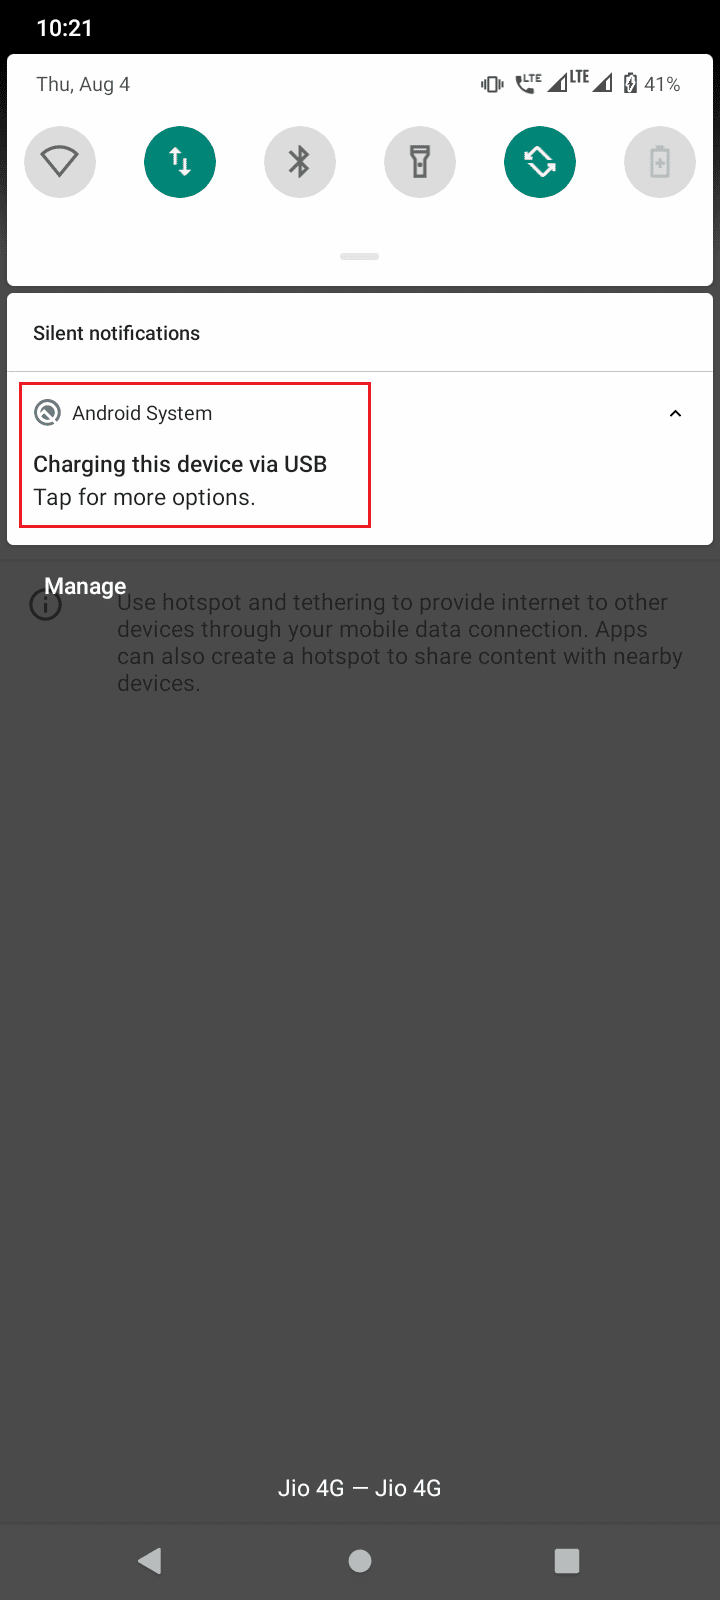
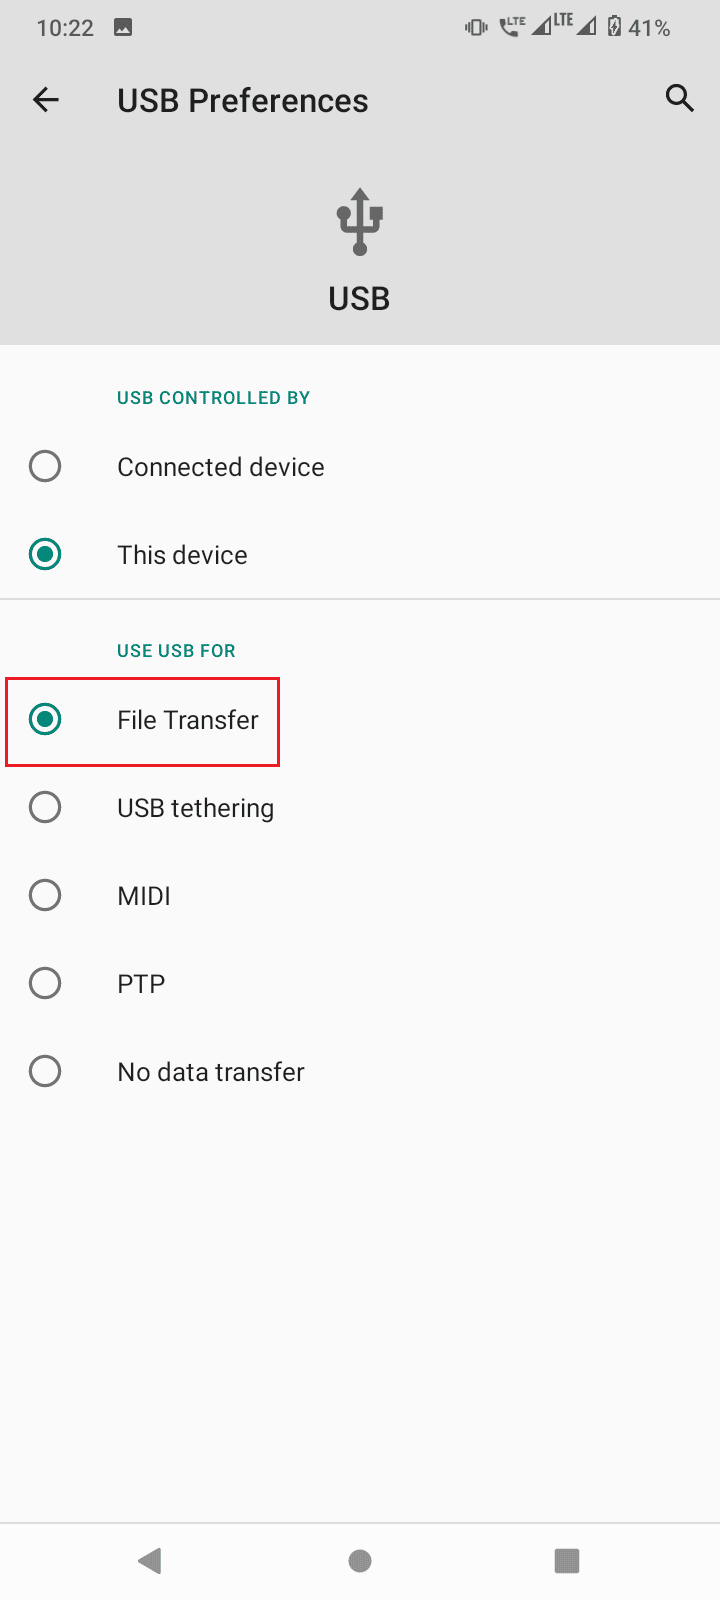
8. Tagh an Gluasad faidhle roghainn.
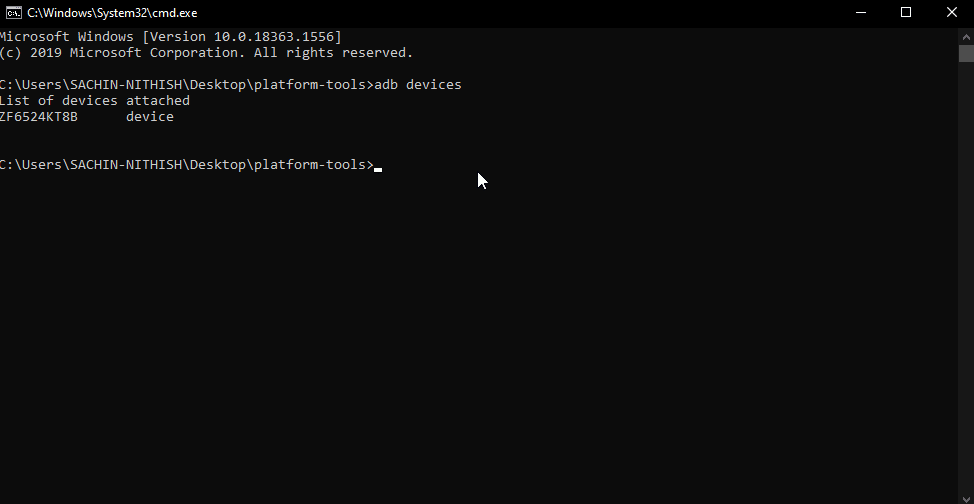
9. Then, run innealan adb command in CMD at the platform-tools folder.

10. This will fix the ADB device unauthorized message
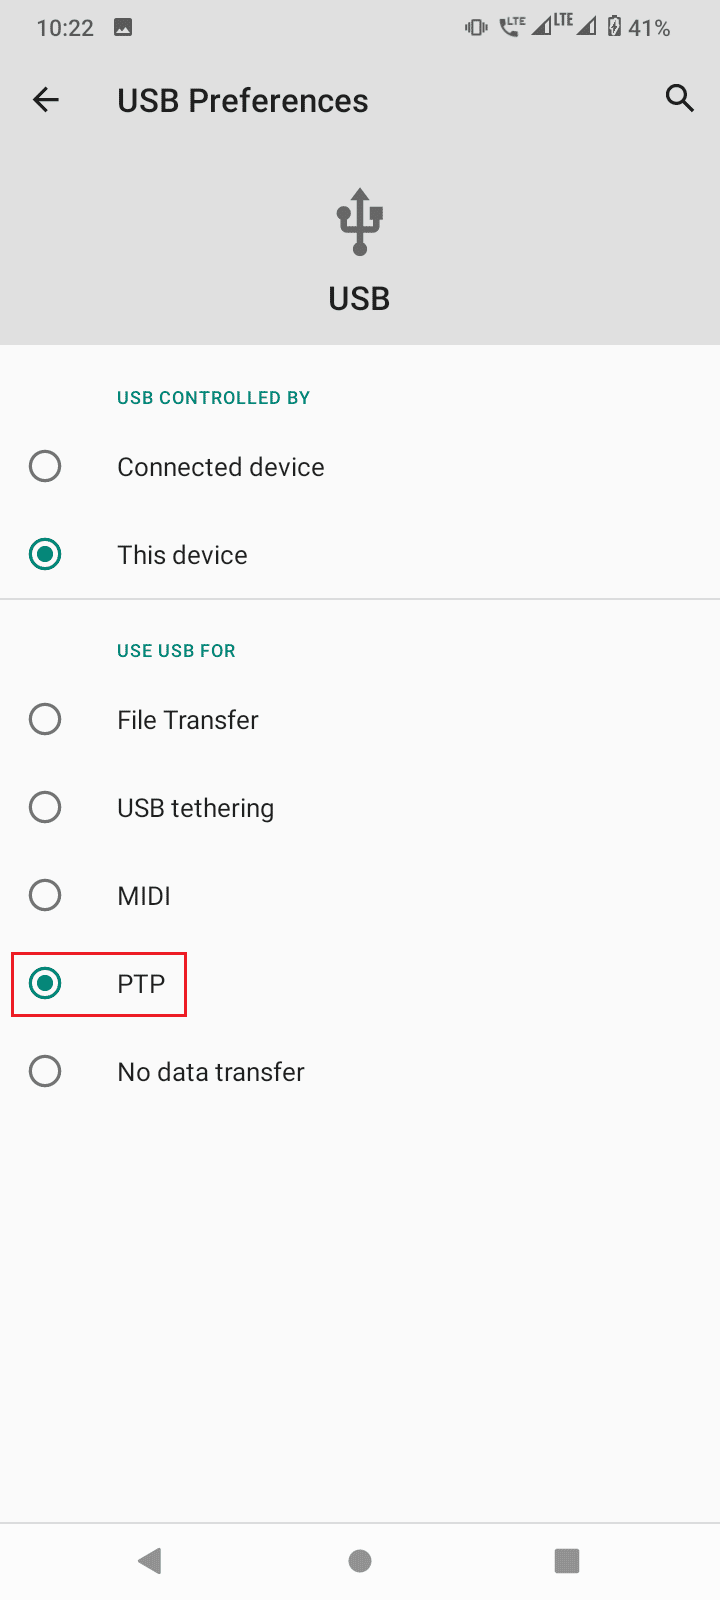
11. Alternatively, choose PTP an àite Gluasad faidhle in ceum 7 and continue the above steps.
Cuideachd Leugh: 13 teachdaichean protocol tar-chuir faidhle as fheàrr airson Android
Ceistean Bitheanta (Ceistean Àbhaisteach)
Q1. Why do I get an Unauthorized device error?
Ans. It simply means that the user did not give a permit to access the Android device through ADB for use with a computer, follow the guide to fix this issue.
Q2. Can ADB run without enabling USB debugging?
Ans. Chan eil, ADB requires USB debugging to be turned on by the user to get authorization from and an Android device and further communicate with it. Also with this USB debugging and RSA fingerprint of the computer only will the connection between the computer and android will be successfully be established.
Q3. Can I remove ADB devices without disconnecting my devices?
Ans. Tha, you can do so by just turning off USB debugging.
Q4. I don’t have developer options, Why?
Ans. Android developer options are disabled by default, to enable it you need to tap build number 6-7 times. Refer to your manufacturer’s website to know your particular model setting.
Air a mholadh:
We hope that the above article on how to bypass ADB device unauthorized message was helpful to you and you were able successfully to fix your issue, don’t forget to mention which one of the methods worked for you. If you have queries and/or suggestions about the article feel free to drop them down in the comment section below.

