11 Ways to Fix Memory Management Error (GUIDE)

Fix Memory Management Error: You may have faced various Blue Screen of Death errors with Windows PC and one such error is Memory Management. Memory_Management is a Windows Stop error which indicates that there is something wrong with your system memory. As the name itself suggest, memory management is the function which typically manages your system memory.
Causes of the Memory Management Blue Screen of Death Error in Windows 10?
Memory Management BSOD Error generally means that there is something critical going on with your system memory and here are some well-known causes for the Memory_Management error:
- Faulty or damaged RAM
- Incompatible or outdated drivers
- A virus of Malware infection
- Disk yuam kev
- Issues with new Hardware or Software
- Corrupt System files or Operating System
- Error 0x1A may be caused by a damaged hard disk.
There can a number of reasons for Windows Stop Memory Management error because it all depends on users system configuration and environment. Therefore, we are going to list all the possible solutions for this issue. So without wasting any time let’s see How to Fix Memory Management Error in Windows 10 with the help of the below-listed guide.
11 Ways to Fix Memory Management Error in Windows 10
Nco ntsoov tsim qhov taw tes rov qab tsuas yog thaum muaj qee yam yuam kev.
Txoj Kev 1: Khiav System File Checker thiab Check Disk
1.Nias Windows Key + X ces nyem rau Command Prompt (Admin).

2.Tam sim no ntaus cov hauv qab no hauv cmd thiab ntaus enter:
Sfc / scannow sfc / scannow / offbootdir = c: / offwindir = c: windows (Yog hais tias saum toj no tsis ua haujlwm ces sim qhov no)

3.Tos rau cov txheej txheem saum toj no kom tiav thiab ib zaug ua tiav rov pib koj lub PC.
4.Tom ntej no, khiav CHKDSK ntawm no Txhim kho cov ntaub ntawv yuam kev nrog Check Disk Utility (CHKDSK).
5.Cia cov txheej txheem saum toj no ua tiav thiab rov pib dua koj lub PC kom txuag tau cov kev hloov pauv.
Method 2: Run Windows Memory Diagnostic Tool
If you have a faulty RAM then the best way to determine this is to run Windows Memory Diagnostic Tool and if the test results indicate that RAM has some issues then you can easily replace it with a new one and can easily fix Memory Management Error in Windows 10.
1.Type memory in the Windows search bar and select “Windows Memory Diagnostic."
2.In the set of options displayed select “Pib dua tam sim no thiab tshawb xyuas cov teeb meem."
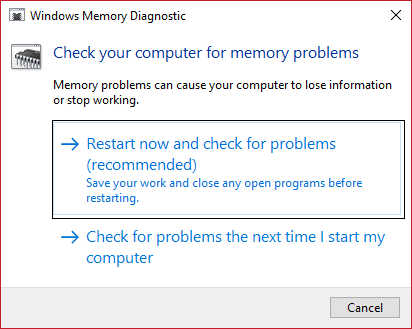
3.After which Windows will restart to check for possible RAM errors and will hopefully Fix Memory Management Error in Windows 10.
4.Reboot koj lub PC kom txuag tau cov kev hloov pauv.
Method 3: Run MemTest86
1. Txuas lub USB flash drive rau koj lub cev.
2.Download thiab nruab lub qhov rais Kev 86 Auto-installer rau USB Key.
3.Right-click rau ntawm daim duab cov ntaub ntawv uas koj nyuam qhuav downloaded thiab xaiv "Extract ntawm no"Kev xaiv.
4.Thaum muab rho tawm, qhib lub nplaub tshev thiab khiav lub Memtest86+ USB Installer.
5.Xaiv koj lub ntsaws rau hauv USB tsav, thiaj li yuav hlawv lub MemTest86 software (Qhov no yuav format koj USB tsav).

6.Once the above process is finished, insert the USB to the PC in which you’re getting the “Memory Management Error".
7.Restart koj lub PC thiab xyuas kom meej tias khau raj ntawm USB flash drive raug xaiv.
8.Memtest86 yuav pib kuaj kev nco kev noj nyiaj txiag hauv koj lub cev.
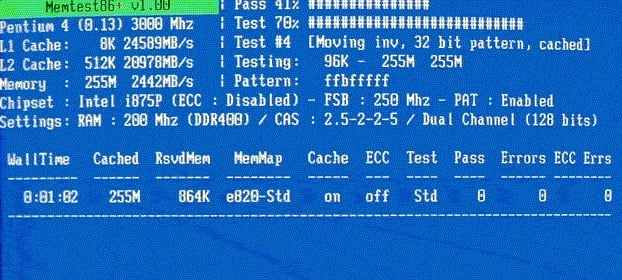
9.Yog tias koj tau xeem dhau tag nrho cov kev xeem ces koj tuaj yeem paub tseeb tias koj lub cim xeeb ua haujlwm raug.
10.Yog qee cov kauj ruam ua tsis tiav ces Kev 86 will find memory corruption which means “Memory Management Error” is because of bad/corrupt memory.
11.In order to Fix Memory Management Error in Windows 10, koj yuav tsum tau hloov koj RAM yog tias pom cov chaw nco tsis zoo.
Txoj Kev 4: Nco ntsoov tias Windows hloov tshiab
1.Nias Windows Key + I ces xaiv Hloov Kho & Ruaj Ntseg.

2.Tom ntej no, rov nias Kos rau cov tshiab thiab nco ntsoov nruab ib qho kev hloov tshiab tseem tos.

3.Tom qab cov kev hloov tshiab yog ntsia reboot koj lub PC.
Method 5: Update your graphics card drivers
1.Nias Windows Key + R ces ntaus "devmgmt.msc” (tsis muaj quotes) thiab ntaus nkag mus rau qhib Device Manager.

2.Tom ntej no, nthuav Zaub adapters thiab right-click rau koj Nvidia Graphic Card thiab xaiv Pab Kom.

3.Thaum koj tau ua qhov no dua right-click ntawm koj daim card graphics thiab xaiv "Hloov kho Software Software."

4.Xaiv “Nrhiav tau rau cov software tsav kho tshiab”thiab cia nws ua tiav cov txheej txheem.

5.Yog cov kauj ruam saum toj no tuaj yeem kho koj qhov teeb meem ces zoo heev, yog tias tsis yog ces txuas ntxiv mus.
6.Dua ntxiv xaiv “Hloov tshiab Software"tab sis lub sijhawm no ntawm qhov screen tom ntej xaiv "Tshawb xyuas kuv lub computer kom tsav tsheb."

7.Tam sim no xaiv "Cia kuv xaiv ntawm cov npe tsav ntawm kuv lub computer. "

8.Thaum kawg, xaiv tus tsav tsheb sib xws los ntawm cov npe rau koj Nvidia Graphic Card thiab nias Next.
9.Let the above process finish and restart your PC to save changes. After updating the Graphics card driver you may be able to Fix Memory Management Error in Windows 10.
Txoj Kev 6: Khiav CCleaner thiab Malwarebytes
1.Download thiab nruab CCleaner & Malwarebytes.
2.Khiav Malwarebytes thiab cia nws luam theej duab koj lub cev rau cov ntaub ntawv tsis zoo.
3.Yog tias malware pom nws yuav tshem tawm lawv.
4.Tam sim no khiav CCleaner thiab hauv ntu "Cleaner", nyob rau hauv Windows tab, peb xav kom kuaj xyuas cov kev xaiv hauv qab no kom huv:

5.Thaum koj tau kuaj xyuas cov ntsiab lus kom raug, tsuas yog nyem Khiav Cleaner, thiab cia CCleaner khiav nws txoj kev kawm.
6. Txhawm rau ntxuav koj lub kaw lus ntxiv xaiv qhov Registry tab thiab xyuas kom meej cov hauv qab no raug kuaj:

7.Xaiv Scan rau Qhov Teeb Meem thiab tso cai rau CCleaner luam theej duab, tom qab ntawd nyem Txhim kho cov teeb meem xaiv.
8.Thaum CCleaner nug "Koj puas xav tau kev hloov pauv hloov pauv rau lub npe?” xaiv Yes.
9.Thaum koj thaub qab tau ua tiav, xaiv Kho Txhua Qhov Teeb Meem Xaiv.
10.Restart koj lub PC kom txuag tau cov kev hloov pauv.
Txoj Kev 7: Ua Qhov System Restore
1.Nias Windows Key + R thiab ntaus "sysdm.cpl” ces ntaus enter.

2.Select Kev Tiv Thaiv Zog tab thiab xaiv Qhov System Restore.
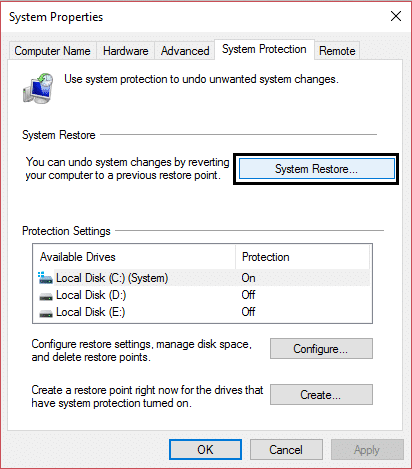
3.Click Next thiab xaiv qhov xav tau System Restore point.
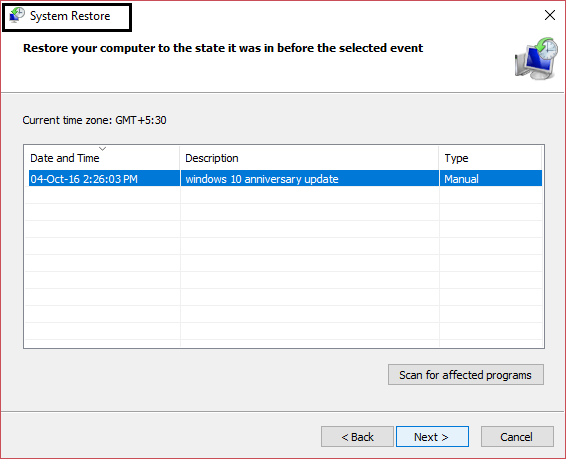
4. Ua raws li cov lus qhia ntawm lub vijtsam kom ua tiav cov txheej txheem rov qab.
5.Tom qab reboot, koj tuaj yeem ua tau Fix Memory Management Error in Windows 10.
Method 8: Manually increase Virtual Memory
1.Press Windows Key + R and type sysdm.cpl in the Run dialog box and click OK to open Cov Khoom Siv.
2.U hauv Cov Khoom Siv qhov rai, hloov mus rau Advanced tab thiab nyob rau hauv Performance, nyem rau chaw kev xaiv.

3.Next, in the Kev Xaiv Kev Ua Tau Zoo qhov rai, hloov mus rau Advanced tab thiab nias rau hloov hauv qab Virtual memory.

4.Finally, in the Virtual nco window shown below, uncheck the “Automatically manage paging file size for all drive” option. Then highlight your system drive under Paging file size for each type heading and for the Custom size option, set the suitable values for fields: Initial size (MB) and Maximum size (MB). It is highly recommended to avoid selecting Tsis muaj paging ntaub ntawv option here.
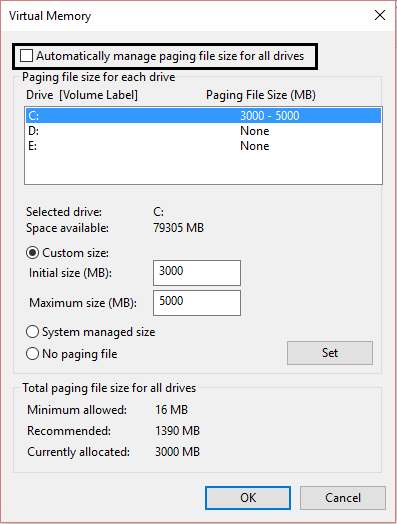
5.Select the radio button which says Kev cai loj and set the initial size to 1500 rau 3000 and maximum to at least 5000 (Both of these depends on the size of your hard disk).
Nco ntsoov: You can always set the Recommended values for fields: Initial size (MB) and Maximum size (MB).
6.Now if you’ve increased the size, a reboot is not mandatory. But if you’ve decreased the size of the paging file, you must have to reboot to make changes effective.
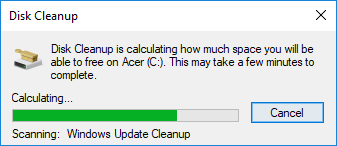
Txoj Kev 9: Khiav Disk Cleanup
Disk Cleanup generally deletes temporary files, system files, empties Recycle Bin, remove a variety of other items that you might no longer need. Disk Cleanup also comes up with a new System compression which will compress Windows binaries and program files to save disk space on your system. Anyway, without wasting any time let’s see How to Run Disk Cleanup to Fix Memory Management Error in Windows 10.
Txoj Kev 10: Clean Memory Slot
Nco ntsoov: Don’t open your PC as it may void your warranty, if you don’t know what to do please take your laptop to the service center. If you don’t know what you are doing then expert supervision is recommended.
Try to switch RAM in another memory slot then try using only one memory and see if you can use the PC normally. Also, clean memory slot vents just to be sure and again check if this fixes the issue. If you have two RAM slots then remove both RAM’s, clean the slot and then insert RAM in only one slot and see if the issue is resolved. If it didn’t, then again do the same thing with another slot and see if this helps in fixing the issue.
Now if you are still facing the MEMORY_MANAGEMENT error then you need to replace your RAM with a new one which will definitely fix the issue.
Method 11: Reset Windows 10 (Last Resort)
Nco ntsoov: Yog tias koj nkag tsis tau koj lub PC ces rov pib koj lub PC ob peb zaug kom txog thaum koj pib Tsis Siv Neeg Kho. Ces navigate rau Troubleshoot> Reset this PC> Tshem tawm txhua yam.
1.Nias Windows Key + I kom qhib Chaw ces nyem rau Hloov tshiab & Kev ruaj ntseg icon.
![]()
2.Los ntawm cov ntawv qhia zaub mov sab laug xaiv Rov qab.
3. Hauv qab Pib dua lub PC nyem rau ntawm "tau pib"Khawm.

4.Xaiv qhov kev xaiv rau Khaws kuv cov ntaub ntawv.

5.Rau cov kauj ruam tom ntej koj yuav raug nug kom ntxig Windows 10 kev teeb tsa xov xwm, yog li xyuas kom koj muaj nws npaj.
6.Tam sim no, xaiv koj version ntawm Windows thiab nyem tsuas yog tus tsav uas Windows tau nruab > Tsuas yog tshem kuv cov ntaub ntawv.

5.Click rau ntawm Rov qab pib dua khawm.
6.Ua raws li cov lus qhia ntawm lub vijtsam kom ua tiav qhov rov pib dua.
pom zoo:
Qhov ntawd yog nws, koj tau ua tiav Fix Memory Management Error in Windows 10 tab sis yog tias koj tseem muaj lus nug txog qhov kev qhia no ces xav nug lawv hauv cov lus ntu.