7 Ways to Fix Critical Process Died in Windows 10

7 Ways to Fix Critical Process Died in Windows 10: Critical Process Died is a Blue Screen of Death Error (BSOD) with an error message Critical_Process_Died and a stop error 0x000000EF. The main cause of this error is that the process which was supposed to run the Windows Operating System ended abruptly and thus the BSOD error. There is no information available on this error on Microsoft website apart from this:
“The CRITICAL_PROCESS_DIED bug check has a value of 0x000000EF. This indicates that a critical system process died.”
The other reason why you could see this BSOD error is that when an unauthorized program tries to modify a data related to the critical component of Windows then the Operating System immediately steps in, causing the Critical Process Died error to stop this unauthorized change.
Now you know all about the Critical Process Died error but what causes this error on your PC? Well, the main culprit seems to be outdated, incompatible or a buggy driver. This error can also be caused because of the bad memory sector. So without wasting any time let’s see How to Fix Critical Process Died in Windows 10 with the help of the below-listed tutorial.
Fix Critical Process Died in Windows 10
Nco ntsoov tsim qhov taw tes rov qab tsuas yog thaum muaj qee yam yuam kev.
If you can’t access your PC then start Windows in Safe Mode using this guide and then try the following fixes.
Txoj Kev 1: Khiav CCleaner thiab Antimalware
1.Download thiab nruab CCleaner & Malwarebytes.
2.Khiav Malwarebytes thiab cia nws luam theej duab koj lub cev rau cov ntaub ntawv tsis zoo.
3.Yog tias malware pom nws yuav tshem tawm lawv.
4.Now run CCleaner and in the “Nqus Tsev Vacuum"section, nyob rau hauv Windows tab, peb xav kom kuaj xyuas cov kev xaiv hauv qab no kom huv:

5.Thaum koj tau kuaj xyuas cov ntsiab lus kom raug, tsuas yog nyem Khiav Cleaner, thiab cia CCleaner khiav nws txoj kev kawm.
6. Txhawm rau ntxuav koj lub kaw lus ntxiv xaiv qhov Registry tab thiab xyuas kom meej cov hauv qab no raug kuaj:

7.Select Tshawb nrhiav qhov teeb meem and allow CCleaner to scan, then click Fix Selected Issues.
8.Thaum CCleaner nug "Do you want backup changes to the registry?” select Yog.
9.Thaum koj thaub qab tau ua tiav, xaiv Kho Txhua Qhov Teeb Meem Xaiv.
10.Restart koj lub PC thiab saib seb koj puas tuaj yeem ua tau Fix Critical Process Died in Windows 10.
Txoj Kev 2: Khiav SFC thiab DISM Tool
1.Nias Windows Key + X ces nyem rau Command Prompt (Admin).

2.Tam sim no ntaus cov hauv qab no hauv cmd thiab ntaus enter:
Sfc / scannow sfc / scannow / offbootdir = c: / offwindir = c: windows (Yog hais tias saum toj no tsis ua haujlwm ces sim qhov no)

3.Tos rau cov txheej txheem saum toj no kom tiav thiab ib zaug ua tiav rov pib koj lub PC.
4. Rov qhib cmd thiab ntaus cov lus txib hauv qab no thiab ntaus nkag tom qab txhua tus:
a) Dism / Online / Cleanup-Image / CheckHealth b) Dism / Online / Cleanup-Image / ScanHealth c) Dism / Online / Cleanup-Image / RestoreHealth

5.Cia cov lus txib DISM khiav thiab tos kom tiav.
6. Yog hais tias cov lus txib saum toj no tsis ua haujlwm, sim ua cov hauv qab no:
Dism / Duab: C: offline / Cleanup-Image / RestoreHealth / Source: c:testmountwindows Dism / Online / Cleanup-Duab / RestoreHealth / Source: c: testmountwindows / LimitAccess
Nco ntsoov: Hloov lub C: RepairSourceWindows nrog qhov chaw ntawm koj qhov chaw kho (Windows Installation lossis Recovery Disc).
7.Reboot koj lub PC kom txuag tau cov kev hloov pauv thiab saib seb koj puas tuaj yeem ua tau Fix Critical Process Died in Windows 10 Issue.
Txoj Kev 3: Ua kom huv huv khau raj
Qee zaum 3rd tog software tuaj yeem cuam tshuam nrog Windows thiab tuaj yeem ua rau qhov teeb meem. Nyob rau hauv thiaj li yuav Fix Critical Process Died issue, koj yuav tsum ua kom huv si khau raj ntawm koj lub PC thiab kuaj xyuas qhov teeb meem ib kauj ruam.

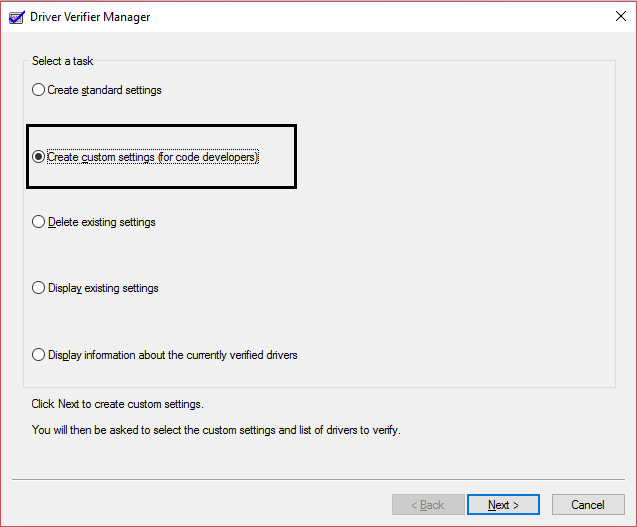
Txoj Kev 4: Khiav Tsav Tsheb Tsav Tsheb
Txoj kev no tsuas yog siv tau yog tias koj tuaj yeem nkag mus rau hauv koj lub Windows ib txwm tsis nyob hauv hom kev nyab xeeb. Tom ntej no, nco ntsoov tsim qhov System Restore point.
Txoj Kev 5: Hloov kho cov tsav tsheb tsis dhau
1.Nias Windows Key + R ces ntaus devmgmt.msc thiab ntaus Enter los qhib Ntaus Tus Thawj Coj.

2.Click the arrow on the left side of each category to expand it and see the list of devices in it.
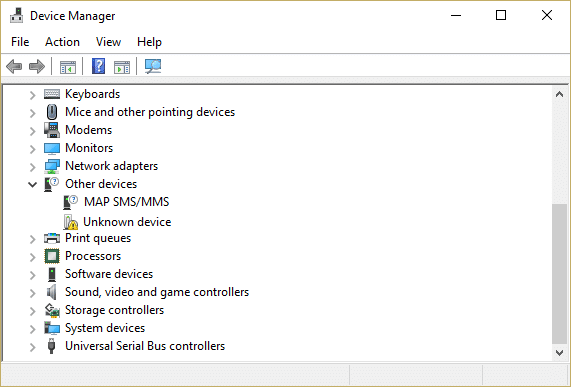
3.Now check if any of the devices have a yellow exclamation mark next to it.
4.If any device has a yellow exclamation mark then this means they have outdated drivers.
5.To fix this, right-click on such ntaus ntawv thiab xaiv Uninstall.
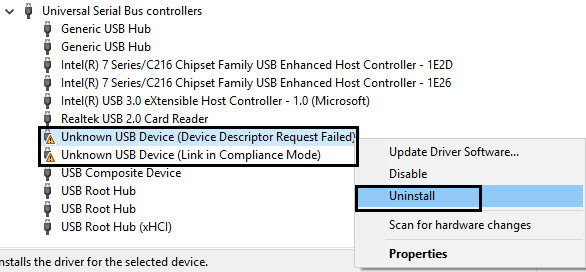
5.Restart your PC to apply changes and Windows will automatically install the default drivers for the above device.
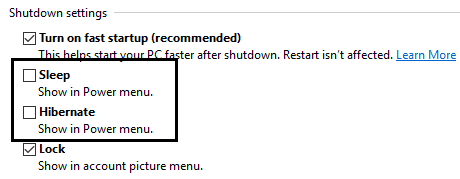
Method 6: Disable Sleep and Hibernate
1. Hom tswj hauv Windows Search ces nyem rau Control Vaj Huam Sib Luag los ntawm kev tshawb nrhiav.

2.In Control Panel then type Fais fab xaiv in the search.
2.In Power Options, click change what the power button do.
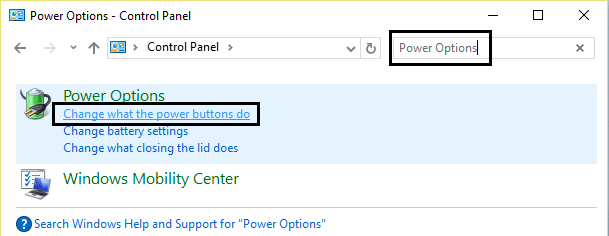
3.Tom ntej no, nyem Hloov cov chaw uas tsis tam sim no link.

4.Nco ntsoov Tshem tawm Sleep and Hibernate.
5.Click save changes and restart your PC.
Txoj Kev 7: Hloov tshiab lossis rov pib dua Windows 10
Nco ntsoov: Yog tias koj nkag tsis tau koj lub PC ces rov pib koj lub PC ob peb zaug kom txog thaum koj pib Tsis Siv Neeg Kho. Ces navigate rau Troubleshoot> Reset this PC> Tshem tawm txhua yam.
1.Nias Windows Key + I kom qhib Chaw ces nyem rau Hloov tshiab & Kev ruaj ntseg icon.
![]()
2.Los ntawm cov ntawv qhia zaub mov sab laug xaiv Rov qab.
3. Hauv qab Pib dua lub PC nyem rau ntawm "tau pib"Khawm.

4.Xaiv qhov kev xaiv rau Khaws kuv cov ntaub ntawv.

5.Rau cov kauj ruam tom ntej koj yuav raug nug kom ntxig Windows 10 kev teeb tsa xov xwm, yog li xyuas kom koj muaj nws npaj.
6.Tam sim no, xaiv koj version ntawm Windows thiab nyem tsuas yog tus tsav uas Windows tau nruab > Tsuas yog tshem kuv cov ntaub ntawv.

5.Click rau ntawm Rov qab pib dua khawm.
6.Follow the instructions on the screen to complete the reset or refresh.
pom zoo:
Qhov ntawd yog nws koj tau ua tiav Fix Critical Process Died in Windows 10 but if you still have any queries regarding this post then feel free to ask them in the comments section.