Windows Updates Error 0x8024401c Fix

If you are facing error code 0x8024401c while trying to update Windows 10, then you are at the right place as today we are going to discuss how to resolve this issue. Basically, you won’t be able to download or install any updates because of this error 0x8024401c. Windows updates are an essential part of your system to easily prevent your PC from vulnerabilities, leading to malware or virus, spyware, or adware installed on your system. Depending upon user’s system configuration, you could face the following error:
There were some problems installing updates, but we’ll try again later. If you keep seeing this and want to search the web or contact support for information, this may help: (0x8024401c)
Now you could face this error message because of a number of reasons such as corrupt registry entries, corrupted system files, outdated or incompatible drivers, incomplete installation or uninstallation of a program etc. So without wasting any time let’s see how to actually Fix Windows Updates Error 0x8024401c with the help of below-listed steps.
Windows Updates Error 0x8024401c Fix
Nco ntsoov tsim qhov taw tes rov qab tsuas yog thaum muaj qee yam yuam kev.
Txoj Kev 1: Khiav Windows Update Troubleshooter
1. Open control panel and search Troubleshooting in the Search Bar on the top right side and click on Troubleshooting.

2. Tom ntej no, los ntawm sab laug lub qhov rais, pane xaiv Saib tag nrho.
3. Tom qab ntawd los ntawm Troubleshoot computer teeb meem daim ntawv xaiv Qhov Hloov Piav Qhia qhov rais
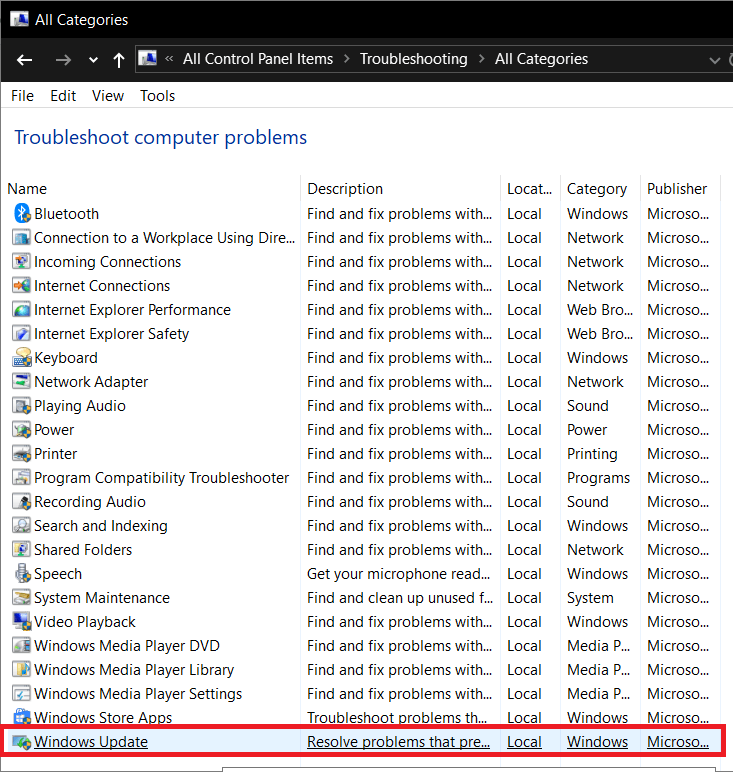
4. Ua raws li cov lus qhia ntawm lub vijtsam thiab cia Windows Update Troubleshoot khiav.
5. Rov pib koj lub PC, thiab koj tuaj yeem ua tau Fix Windows Updates Error 0x8024401c.
Txoj Kev 2: Khiav SFC thiab CHKDSK
1. Qhib Hais kom sai. Tus neeg siv tuaj yeem ua cov kauj ruam no los ntawm kev tshawb nrhiav 'cmd' Thiab tom qab ntawd nias sau.

2. Tam sim no ntaus cov hauv qab no hauv cmd thiab ntaus enter:
Sfc /scannow sfc /scannow /offbootdir=c: /offwindir=c:Windows

3. Tos rau cov txheej txheem saum toj no kom tiav thiab ib zaug ua tiav, rov pib koj lub PC.
4. Tom ntej no, khiav CHKDSK los kho cov ntaub ntawv yuam kev.
5. Cia cov txheej txheem saum toj no ua tiav thiab rov pib dua koj lub PC kom txuag tau cov kev hloov pauv.
Txoj Kev 3: Khiav DISM
1. Qhib Hais kom sai. Tus neeg siv tuaj yeem ua cov kauj ruam no los ntawm kev tshawb nrhiav 'cmd' Thiab tom qab ntawd nias sau.
2. Now type the following in the cmd and hit enter after each one:
Dism / Online / Cleanup-Image / CheckHealth Dism / Online / Cleanup-Image / ScanHealth Dism / Online / Cleanup-Duab / RestoreHealth

3. Cia cov lus txib DISM khiav thiab tos kom tiav.
4. Yog hais tias cov lus txib saum toj no tsis ua hauj lwm, ces sim rau hauv qab no:
Dism / Duab: C: offline / Cleanup-Image / RestoreHealth / Source: c:testmountwindows Dism / Online / Cleanup-Duab / RestoreHealth / Source: c: testmountwindows / LimitAccess
Nco ntsoov: Hloov lub C: RepairSourceWindows nrog koj qhov chaw kho (Windows Installation lossis Recovery Disc).
5. Reboot koj lub PC kom txuag tau cov kev hloov pauv thiab saib seb koj puas tuaj yeem ua tau Fix Windows Updates Error 0x8024401c.
Txoj Kev 4: Disable IPv6
1. Txoj cai-nias rau ntawm WiFi icon ntawm lub system tais thiab tom qab ntawd nyem rau ntawm "Qhib Network thiab Sib Tw Qhov Chaw."
![]()
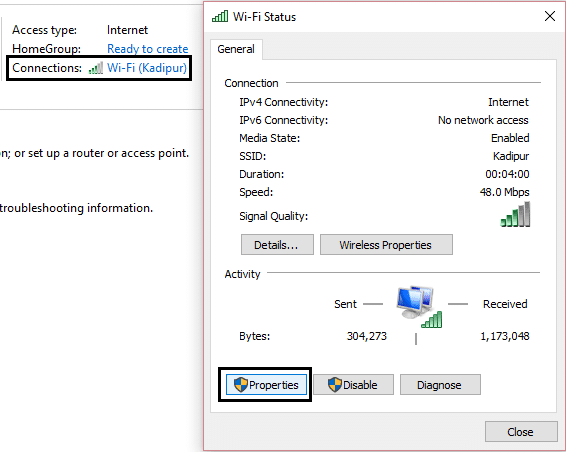
2. Zaum no nyem rau ntawm koj qhov kev sib txuas tam sim no qhib Chaw.
Nco ntsoov: If you can’t connect to your network, then use an Ethernet cable to connect and then follow this step.
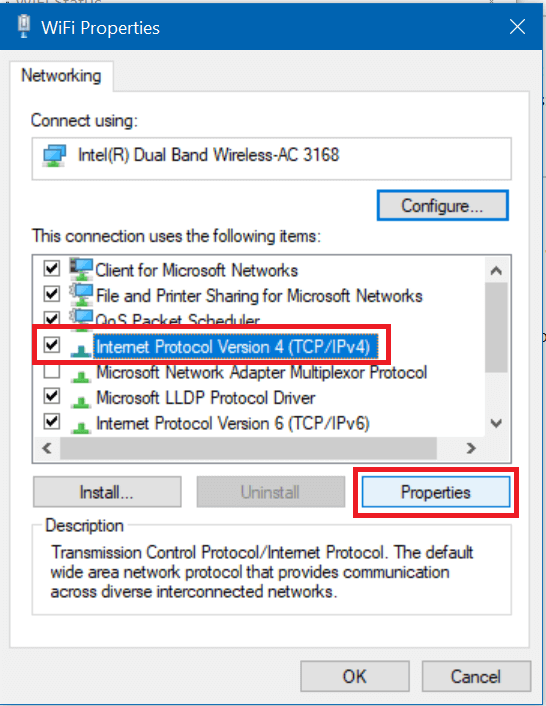
3. Nyem qhov Cov khoom khawm in the window that just open.
4. Nco ntsoov tias uncheck Internet Protocol Version 6 (TCP/IP).
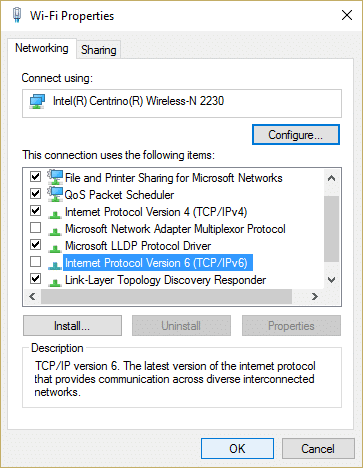
5. Click OK, then click Close. Reboot your PC to save changes.
Txoj Kev 5: Khiav System Restore
1. Nias Windows Key + R thiab ntaus system.cpl ces ntaus enter.

2. Xaiv qhov Kev Tiv Thaiv Zog tab thiab xaiv Qhov System Restore.
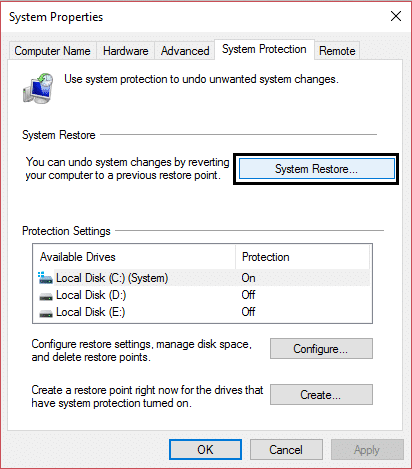
3. Nyem Tom ntej thiab xaiv qhov xav tau System Restore point.
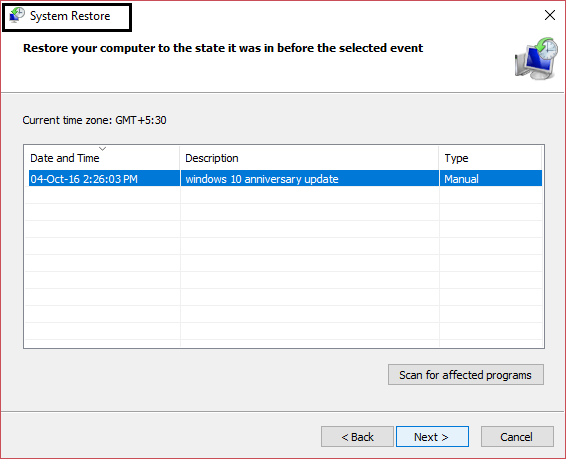
4. Ua raws li cov lus qhia ntawm lub vijtsam kom ua tiav cov txheej txheem rov qab.
5. Tom qab reboot, koj tuaj yeem ua tau Fix Windows Updates Error 0x8024401c.
Method 6: Registry Fix
1. Nias Windows Key + R ces ntaus regedit thiab ntaus Enter kom qhib Registry Editor.

2. Nkag mus rau tus yuam sij npe hauv qab no:
ComputerHKEY_LOCAL_MACHINESOFTWAREPoliciesMicrosoftWindowsWindowsUpdateAU
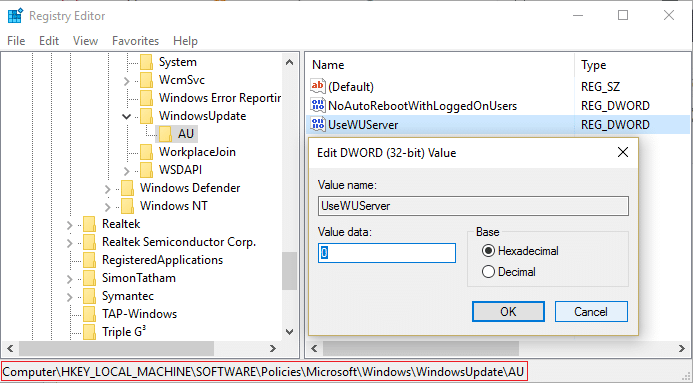
3. Make sure to select AU than in the right window pane double click on UseWUServer DWORD.
Nco ntsoov: If you can’t find the above DWORD then you need to create it manually. Right-click on AU then select Tshiab> DWORD (32-ntsis) tus nqi. Name this key as SivWUServer thiab ntaus nkag.
4. Now, in the Value data field, enter 0 thiab nias rau OK.
5. Reboot koj lub PC kom txuag tau cov kev hloov pauv.
Txoj Kev 7: Siv Google DNS
You can use Google’s DNS instead of the default DNS set by your Internet Service Provider or the network adapter manufacturer. This will ensure that the DNS your browser is using has nothing to do with the YouTube video not loading. To do so,
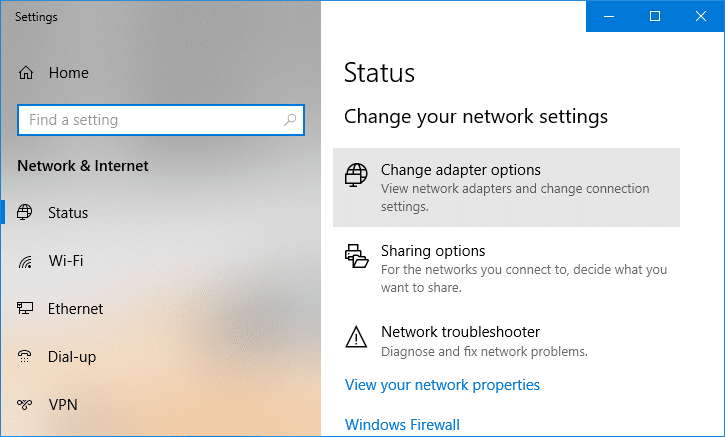
1. Txoj cai-nias nyob rau hauv cov network (LAN) icon hauv qhov kawg ntawm tus taskbar, thiab nias rau Open Network & Internet Settings.
![]()
2. Hauv chaw app that opens, click on Hloov cov adapter xaiv nyob rau hauv txoj cai pane.
3. Txoj cai-nias on the network you want to configure, and click on Zog.

4. Nias rau Internet Protocol Version 4 (IPv4) in the list and then click on Zog.
Kuj nyeem: Fix Your DNS Server might be unavailable error
5. Under the General tab, choose ‘Siv cov npe DNS servers nram qab no’ and put the following DNS addresses.
Nyiam DNS Server: 8.8.8.8
Hloov DNS Server: 8.8.4.4
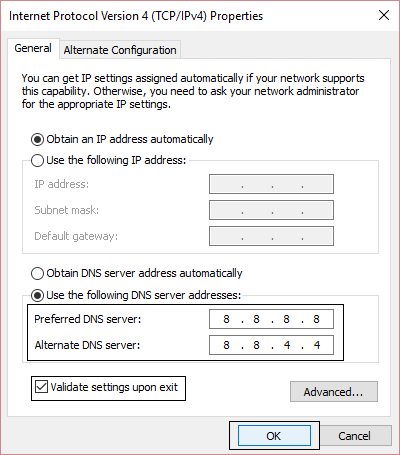
6. Thaum kawg, nyem OK at the bottom of the window to save changes.
7. Reboot your PC and once the system restart, see if you’re able to Fix Windows Updates Error 0x8024401c.
Txoj Kev 8: Ua kom huv huv khau raj
Sometimes 3rd party software can conflict with Windows and can cause Windows Update error. To Fix Windows Updates Error 0x8024401c, you need to perform a clean boot on your PC and diagnose the issue step by step.

pom zoo:
Qhov ntawd yog nws koj tau ua tiav Fix Windows Updates Error 0x8024401c tab sis yog tias koj tseem muaj lus nug txog phau ntawv qhia no ces xav nug lawv hauv cov lus qhia.