Popravite to što izbornik Start ne radi u sustavu Windows 10

If you have recently updated or upgraded to Windows 10, then chances are your Start Menu may not work properly, making it impossible for users to navigate around Windows 10. Users are experiencing various issues with Start Menu such as Start Menu does not open, Start Button is not working, or Start Menu freezes etc. If your Start Menu isn’t working then don’t worry as today we will see a way to fix this issue.
This exact cause is different for different users because each user has a different system configuration and environment. But the problem can be related to anything like corrupted user account or drivers, damaged system files, etc. So without wasting any time, let’s see How to Fix Start Menu Not Working in Windows 10 with the help of the below-listed tutorial.
Obavezno stvorite točku vraćanja za slučaj da nešto pođe po zlu.
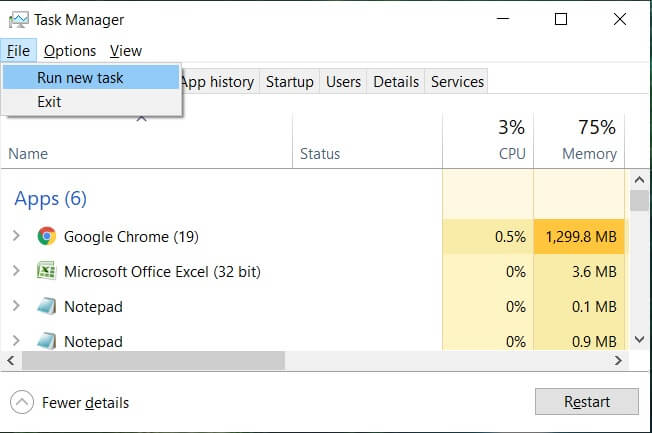
To run Command Prompt as an administrator, press Ctrl + Shift + Esc to open Task Manager. Then click on file zatim odaberite Pokrenite novi zadatak, Tip cmd.exe i kvačica "Stvorite ovaj zadatak s administrativnim privilegijama” then click OK. Similarly, to open PowerShell, type powershell.exe and again checkmark the above field then hit Enter.

1. metoda: Ponovo pokrenite Windows Explorer
1. tisak Ctrl + Shift + Esc tipke zajedno za pokretanje Voditelj zadataka
2. Pronađi explorer.exe na popisu zatim desnom tipkom miša kliknite na njega i odaberite Završi zadatak.

3. Ovo će zatvoriti Explorer i ponovno ga pokrenuti, kliknite Datoteka > Pokreni novi zadatak.
4. Tip explorer.exe i pritisnite OK za ponovno pokretanje Explorera.

5. Exit Task Manager and see if you’re able to Fix Start Menu Not Working in Windows 10.
6. If you’re still facing the issue, then log out from your account and re-login.
7. tisak Ctrl+Shift+Del key at the same time and click on Signout.
8. Type in your password to login to Windows and see if you’re able to fix the issue.
Method 2: Create a new local administrator account
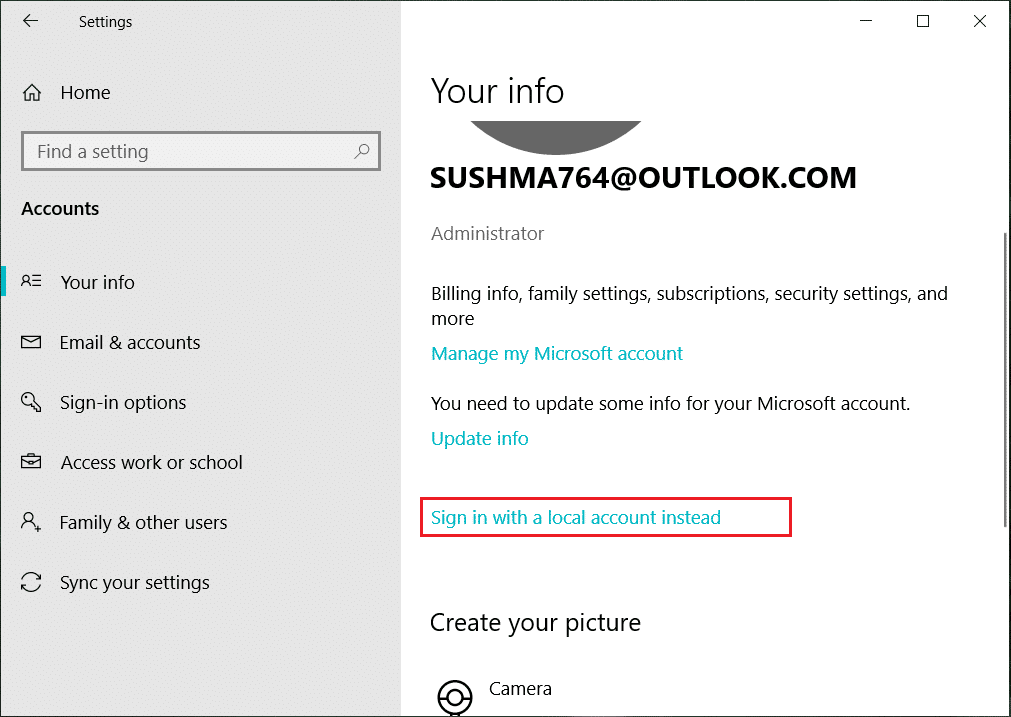
Ako ste prijavljeni svojim Microsoftovim računom, prvo uklonite vezu na taj račun na sljedeći način:
1. Pritisnite tipku Windows + R, a zatim upišite “MS-postavke:” (bez navodnika) i pritisnite Enter.
2. odabrati Račun > Prijavite se s lokalnim računom.
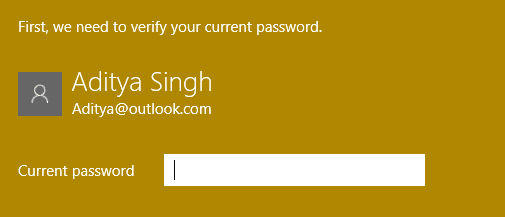
3. Upišite svoj Zaporka za Microsoft račun i kliknite Dalje.
4. Odaberite a novo ime računa i lozinku, a zatim odaberite Završi i odjavite se.
#1. Create the new administrator account:
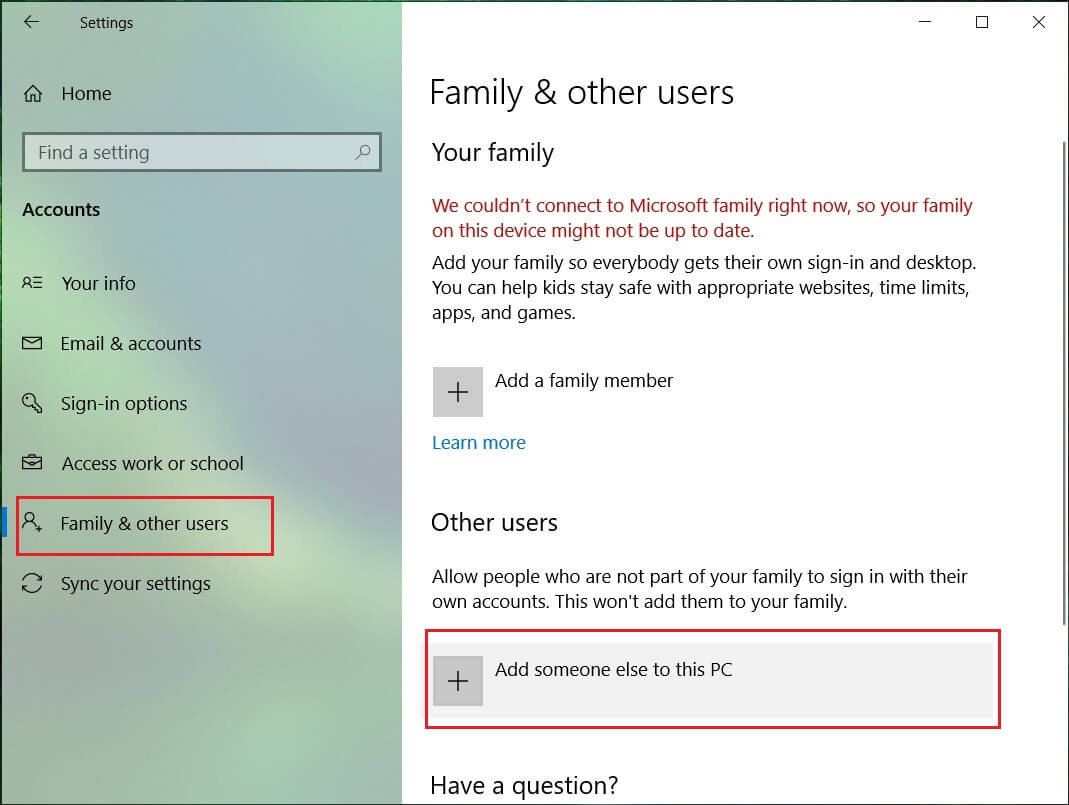
1. Pritisnite tipku Windows + I za otvaranje postavki, a zatim kliknite Računi.
2. Zatim idite na Obitelj i drugi ljudi.
3. Pod Ostali ljudi kliknite na "Dodajte još nekoga ovom računalu."
4. Zatim unesite naziv za user and a password then select Next.
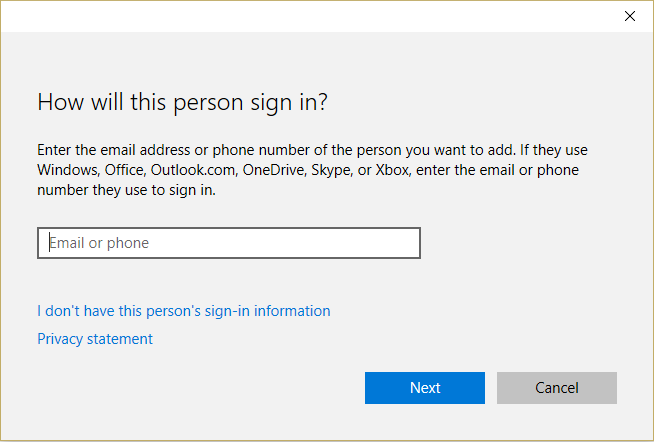
5. Postavite a korisničko ime i zaporka, A zatim odaberite Dalje> Završi.
#2. Next, make the new account an administrator account:
1. Ponovno otvoriti Windows Settings i kliknite na Račun.

2. Idi na Kartica Obitelj i drugi ljudi.
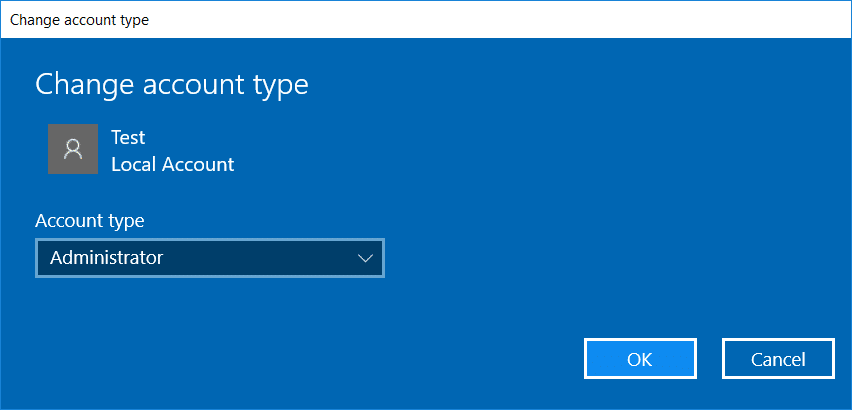
3. Drugi ljudi odabiru račun koji ste upravo stvorili i zatim odabrali a Promjena vrste računa.
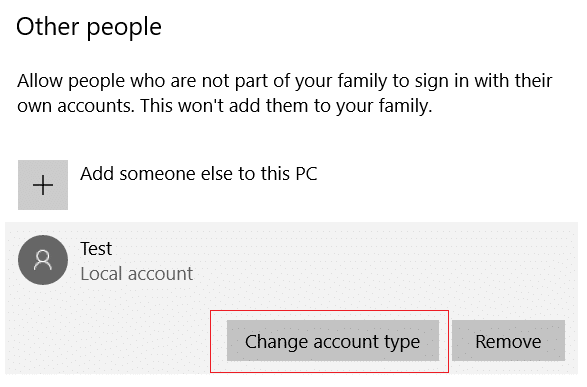
4. Pod vrstom računa odaberite administrator zatim kliknite OK.
#3. If the issue persists try deleting the old administrator account:
1. Zatim ponovno idite na postavke sustava Windows Račun > Obitelj i drugi ljudi.
2. Pod Ostali korisnici odaberite stari administratorski račun, kliknite Ukloniti, i odaberite Brisanje računa i podataka.

3. If you were using a Microsoft account to sign in before, you can associate it with the new administrator by following the next step.
4. u Postavke sustava Windows > Računi, umjesto toga odaberite Prijavite se Microsoftovim računom i unesite podatke o svom računu.
Konačno, trebali biste moći Popravite to što izbornik Start ne radi u sustavu Windows 10 as this step seems to fix the issue in most cases.
If you continue to experience Start Menu’s issue, it’s recommended to download and run Start Menu Troubleshooter.
1. Download and run Start Menu Troubleshooter.
2. Dvaput kliknite na preuzetu datoteku I zatim kliknite Dalje.
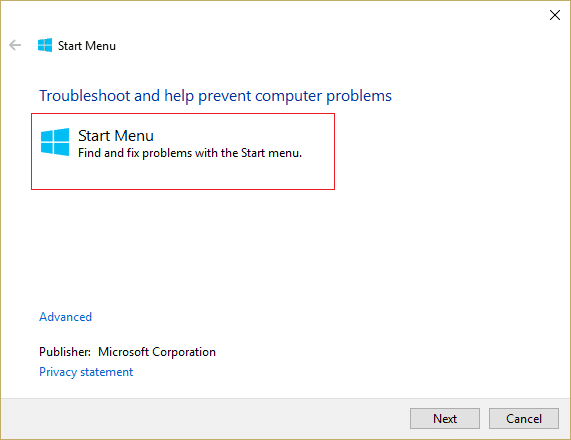
3. Let it finds and automatically Fixes Start Menu Not Working in Windows 10.
Method 4: Run System File Checker (SFC) and Check Disk
1. Otvorite naredbeni redak. Korisnik može izvesti ovaj korak traženjem "cmd" I zatim pritisnite Enter.

2. Sada upišite sljedeće u cmd i pritisnite enter:
Sfc /scannow sfc /scannow /offbootdir=c: /offwindir=c:windows

3. Pričekajte da gore navedeni proces završi i kada završite, ponovno pokrenite računalo.
4. Zatim pokrenite CHKDSK iz Popravite pogreške datotečnog sustava pomoću uslužnog programa za provjeru diska (CHKDSK).
5. Pustite da gornji postupak završi i ponovo pokrenite računalo da biste spremili promjene.
Method 5: Force Cortana to Rebuild Settings
Open Command Prompt with administrative rights then type the following one by one and hit Enter after each command:
CD /d "%LOCALAPPDATA%PackagesMicrosoft.Windows.Cortana_cw5n1h2txyewy"
Taskkill /F /IM SearchUI.exe
RD /S /Q Settings
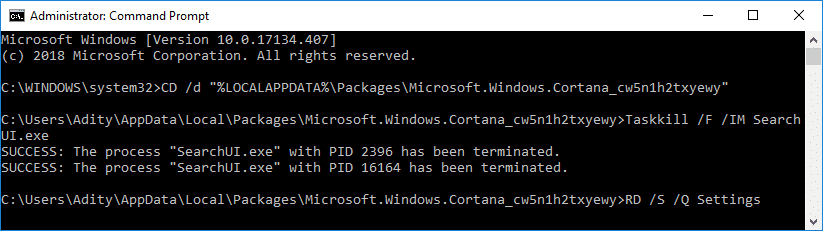
This will force Cortana to rebuild the settings and will Fix Start Menu and Cortana Not Working in Windows 10.
If the issue is still not resolved, follow this guide to fix any issues related to Cortana.
Method 6: Re-Register Windows App
1. Tip PowerShell u Windows Searchu zatim desnom tipkom miša kliknite PowerShell i odaberite Pokreni kao administrator.
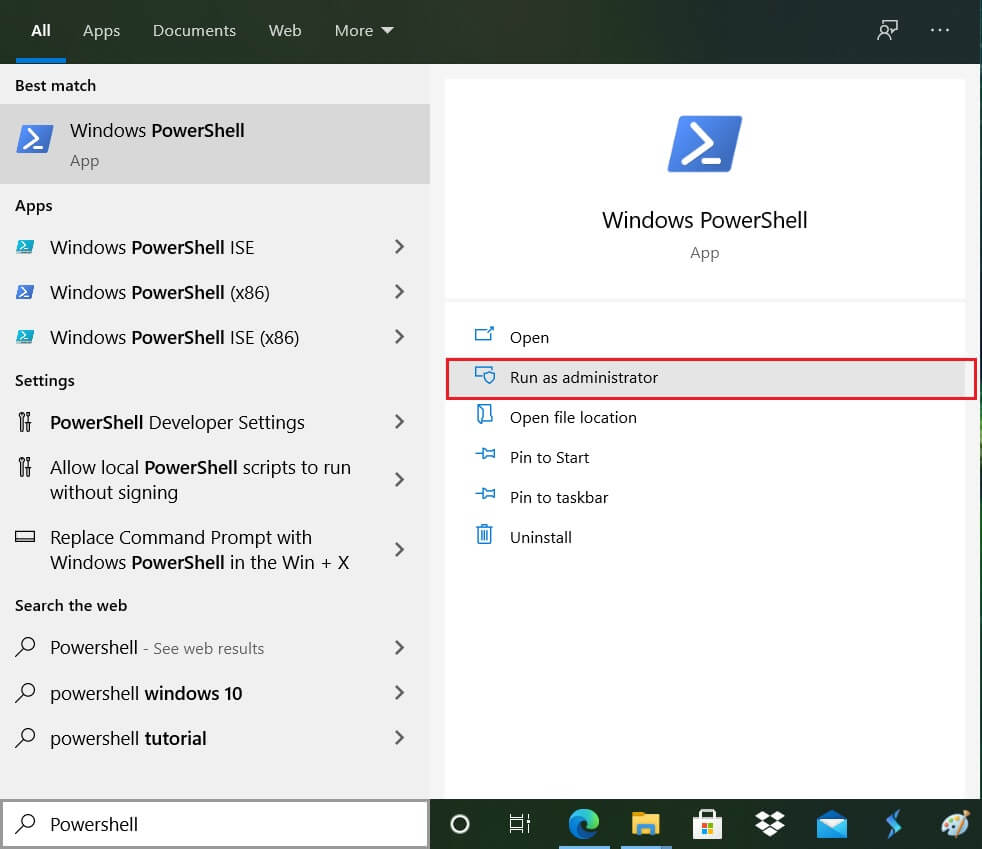
2. Sada upišite sljedeću naredbu u PowerShell prozor:
Get-AppXPackage -AllUsers | Foreach {Add-AppxPackage -DisableDevelopmentMode -Registracija "$ ($ _. InstallLocation) AppXManifest.xml"}

3. Pričekajte da Powershell izvrši gornju naredbu i zanemarite nekoliko pogrešaka koje se mogu pojaviti.
4. Ponovno pokrenite računalo da biste spremili promjene.
Metoda 7: Popravak registra
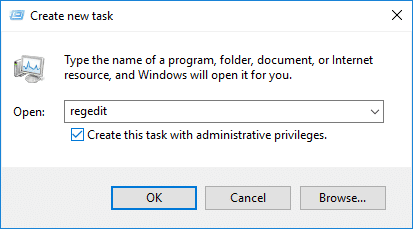
1. Press Ctrl + Shift + Esc to open Task Manager then click on file i odaberite Pokrenite novi zadatak.
2. Tip regedit i kvačica "Stvorite ovaj zadatak s administrativnim privilegijama” then click OK.
3. Now navigate to the following registry key in the Registry Editor:
ComputerHKEY_LOCAL_MACHINESYSTEMCurrentControlSetServicesWpnUserService
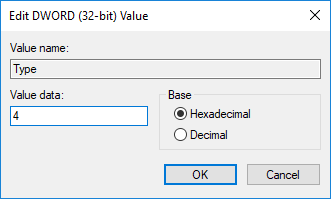
4. Provjerite jeste li odabrali WpnUserService then in the right window double-click on the Pokrenite DWORD.
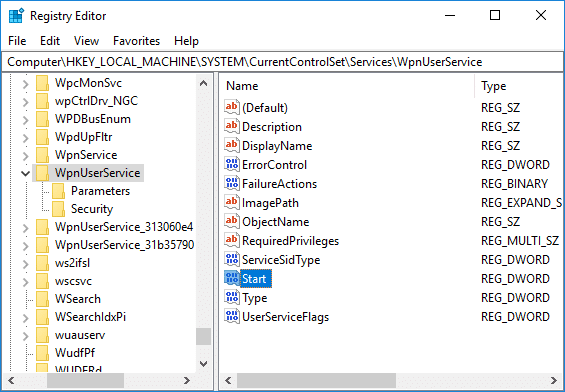
5. Change its value to 4 then click OK.
6. Ponovno pokrenite računalo da biste spremili promjene.
Metoda 8: Osvježite ili poništite Windows 10
Bilješka: If you can’t access your PC, restart your PC a few times until you start Automatski popravak. Zatim idite na Rješavanje problema > Resetiraj ovo računalo > Ukloni sve.
1. Pritisnite tipku Windows + I za otvaranje postavki, a zatim kliknite na Ikona ažuriranja i sigurnosti.
![]()
2. S lijevog izbornika odaberite Oporavak.
3. Pod, ispod Poništi ovo računalo, Klikni na "Početak"Tipku.

4. Odaberite opciju za Zadrži moje datoteke.

5. For the next step, you might be asked to insert Windows 10 installation media, so ensure you have it ready.
6. Now, select your Windows version and click samo na pogonu na kojem je instaliran Windows > remove my files.

5. Kliknite na Gumb za poništavanje.
6. Slijedite upute na zaslonu za dovršetak resetiranja.
Preporučena:
To je to što uspješno imate Popravite to što izbornik Start ne radi u sustavu Windows 10 ali ako još uvijek imate bilo kakvih pitanja u vezi s ovim vodičem, slobodno ih postavite u odjeljku za komentare.