Popravak Nema internetske veze, nešto nije u redu s proxy poslužiteljem

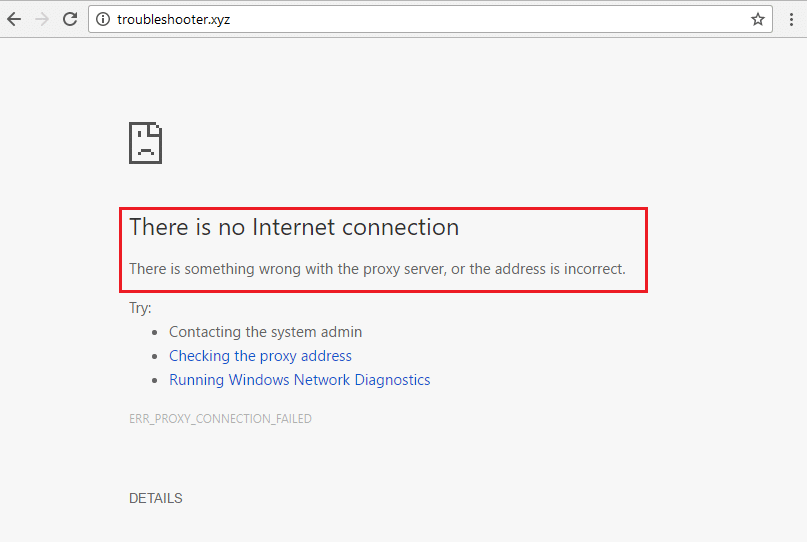
Internet connectivity issues in Google Chrome and other browsers too are becoming common these days. Even when the users have not set up any proxy or have not configured manual proxy settings, the internet will suddenly break down and chrome will show that there is no internet connection with the error message “There is something wrong with your proxy server or the address is incorrect“. Unless you are addicted to the Dinosaur Dash game, which you can play when the Google Chrome Browser is offline, this is not a pleasing sign at all!
What to do then? We can start by looking at what might have caused the problem. It might be your new antivirus software or internet firewall, or badly behaving web browser extensions or plugins. Or, your device might be affected by one of the malware or virus infected programs you just installed.
Once you pinpoint the problem, then it becomes easier to fix. So, let’s check some of the most common and known issues that can cause this issue and what you can try and do to fix it quickly as well as with minimum prior knowledge required.
Popravak Nema internetske veze, nešto nije u redu s proxy poslužiteljem
In this article, we have listed the cause & fixes to the “There is no internet connection” error as well as web browser-related settings that you can use to fix the issue yourselves. Depending on the signs like which applications are affected by this error and if the effect is system-wide, you can rule down some of these methods to save time.
1. način: Onemogućite proxy
If the user does not explicitly configure these settings, proxy settings are set by default to be automatically detected and configured and should not give any issues. But some applications or VPN programs can cause incorrect configurations and change these settings. Here’s what you need to do to restore the automatic proxy settings:
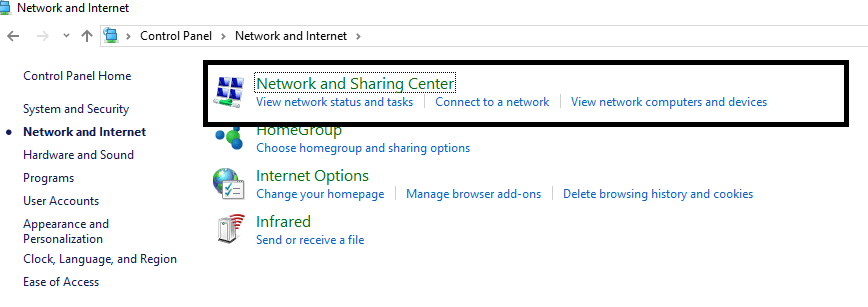
1. Open the control panel. Type Control Panel u Windows Search which can be accessed pressing Windows Key + S combination. Click and open the Control Panel app from the search results.

2. In the control panel, go to Network & Sharing center.
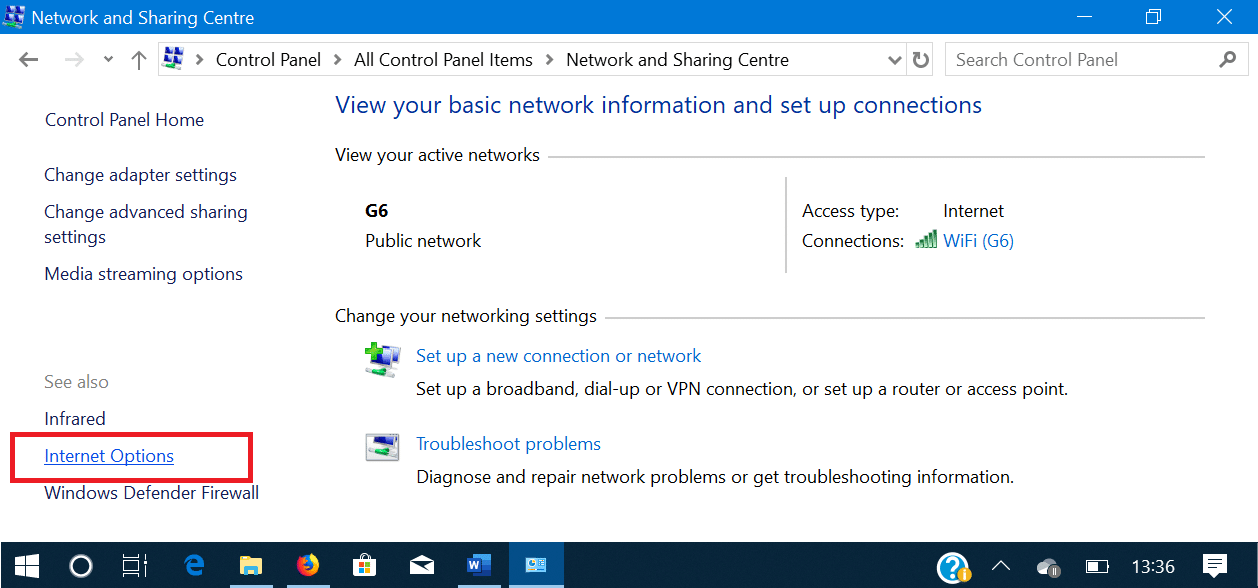
3. Kliknite na Internet Options from the bottom left corner of the Control Panel Window.
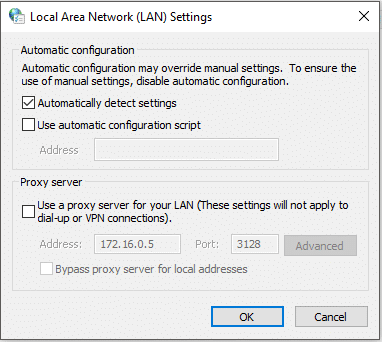
4. Go to the tab labeled veze, then click on the button labeled LAN postavke.
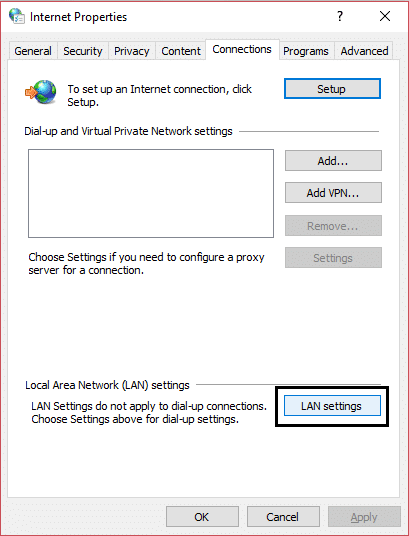
5. Označite okvir pored Automatski otkrij postavke i uncheck other boxes, Kliknite na OK button and then close all the open windows.
6. Ponovno pokrenite računalo i provjerite možete li fix There is no internet connection error.
If you still experience problems, follow steps 1 through 7 to see if the settings have changed back to what they were before. If they switch back on their own, you may have an application installed or running that changes them. In this case, here are some options.
If after the restart the proxy settings change automatically or they switch back on their own then a third-party applica
tion might be interfering with the proxy settings. In this case, you need to start your PC into safe mode then navigate to Control Panel > Programs > Programs and Features. Now uninstall any third-party app which you found suspicious or you have recently installed. Next, again change the proxy settings by following the above method and restart your PC normally.
Također pročitajte: 5 Ispravak pogreške otkrivenog Netflix proxyja
Method 2: Disable Proxy Settings via Registry
If you’re unable to disable proxy using the above method then you can uncheck proxy via Registry Editor using the below steps:
1. Pritisnite tipku Windows + R, a zatim upišite regedit i pritisnite Enter da otvorite uređivač registra.

2. Dođite do sljedećeg ključa registra:
ComputerHKEY_CURRENT_USERSoftwareMicrosoftWindowsCurrentVersionInternet Settings
3. Now in the right window pane right-click on ProxyEnable DWORD i odaberite Izbriši.
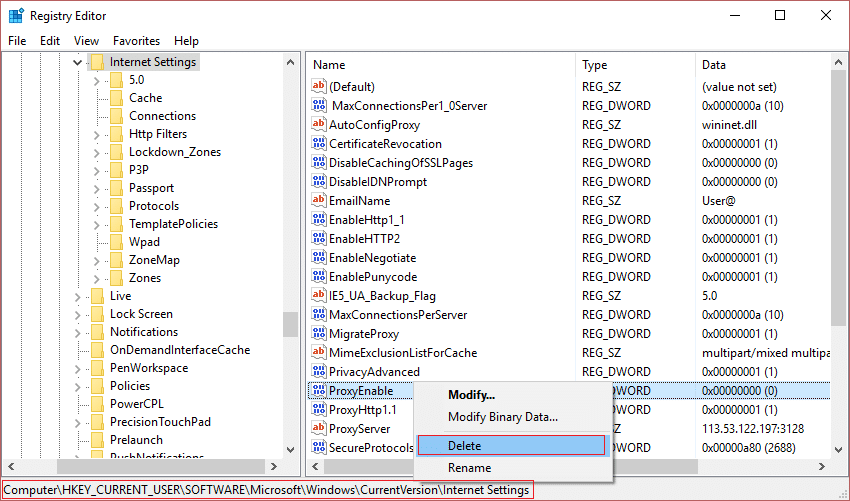
4. Similarly also delete the following keys ProxyServer, Migrate Proxy, and Proxy Override.
5. Reboot your PC normally to save changes and see if you are able to fix something went wrong with the proxy server error.
Method 3: Disable VPN/Antivirus Program
You can easily disable your VPN or Antivirus program, but sometimes it also depends on which type of VPN you are currently using. Some VPNs are installed on their PC using an installer whereas others are browser-based plugins.
The basic principle is to either turn off the firewall/proxy settings from the Antivirus program or disable the VPN. Open the antivirus program, go to its Settings, and disable the Antivirus & turn off the firewall. You may also uninstall the antivirus program altogether if you find it tricky to configure. Being on Windows 10, Windows Defender Security measures are always there even though there is no antivirus program installed.
1. Desnom tipkom miša kliknite Ikona antivirusnog programa iz programske trake i odaberite Onemogućiti.

2. Next, select the time frame for which the Antivirus će ostati onemogućen.

Napomena: Odaberite najmanje moguće vrijeme, na primjer 15 minuta ili 30 minuta.
3. Once done, again try to connect to the WiFi network and check if you’re able to fix there is no internet connection, something went wrong with the proxy server error.
Most of the VPN programs have an icon in the system tray (while they are running), just click on its icon and turn off the VPN. If there is a browser plugin for VPN active, you can go to the browser’s addon page and uninstall it.
Također pročitajte: Kako popraviti Proxy poslužitelj ne reagira
If this does not solve your problem of not being able to access the internet because of some proxy misconfiguration, then continue with the next method.
Method 4: Reset Google Chrome to Default
If the problem exists only in the Google Chrome Browser and on another browser such as Mozilla Firefox you’re able to access the internet, then the issue is with Chrome. Firefox may still be able to connect to the internet even in case of system-wide wrong proxy settings because it can override the proxy settings. So make sure Microsft Edge/Internet Explorer or any other web browsers work fine, and then only reset Google Chrome to fix the issue.
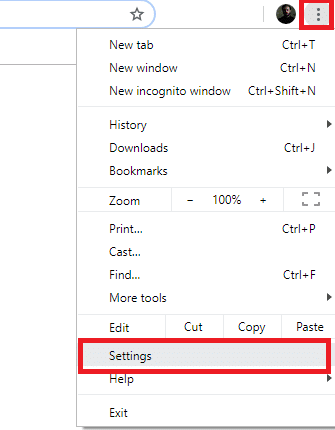
1. Otvoreno Google Chrome i kliknite na tri okomite točke in the top right corner, then select the Postavke opcija.
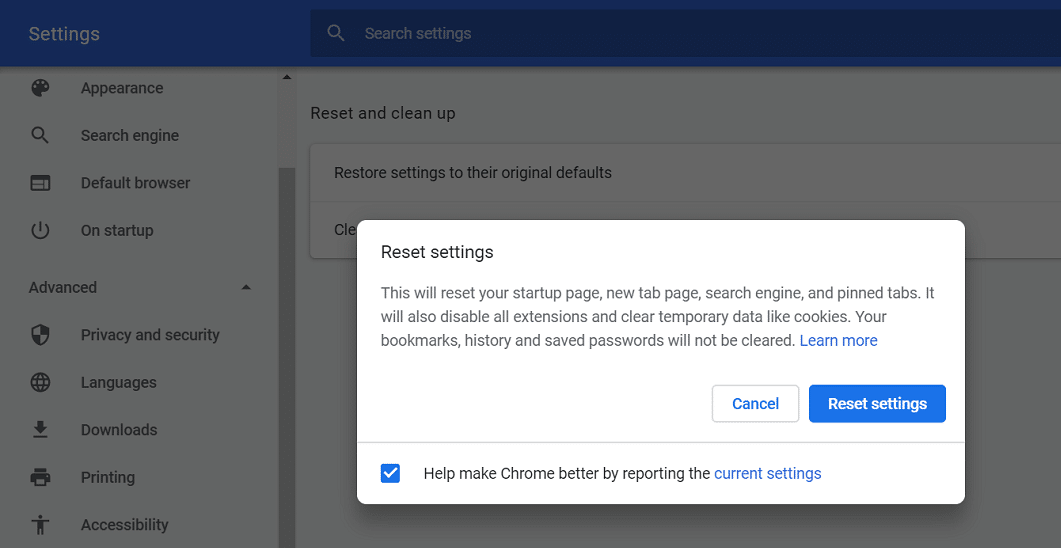
2. Kliknite na Napredne postavke option in the left navigation pane. In the list that collapses, choose the option labeled Reset & Clean-Up. Zatim odaberite opciju Vratite postavke na izvorne zadane vrijednosti.
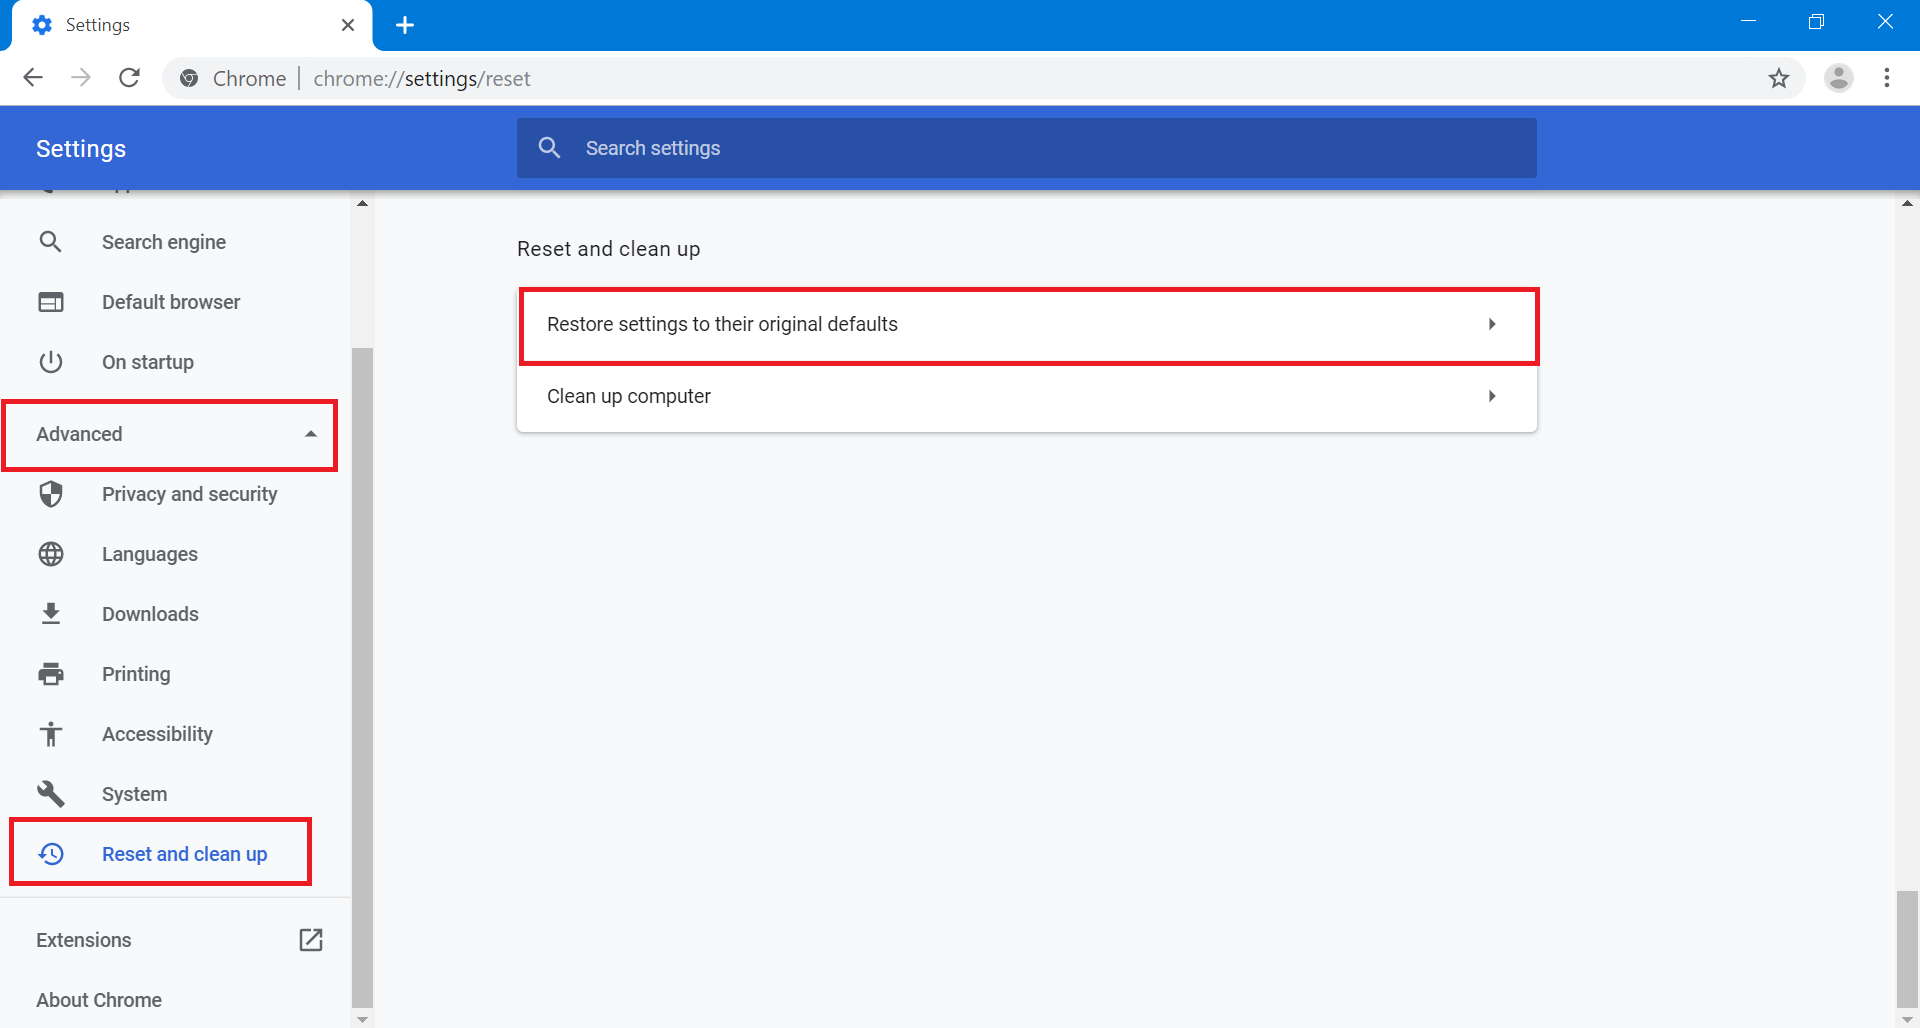
3. U pop-up box that appears, select Poništi postavke to clear all the saved cookies, cache data, and other temporary files.
Method 5: Re-install Google Chrome
If the above method doesn’t work for you and the issue still persists on the Chrome Browser, then there is only one thing left to try. You have to uninstall Google Chrome and reinstall it again.
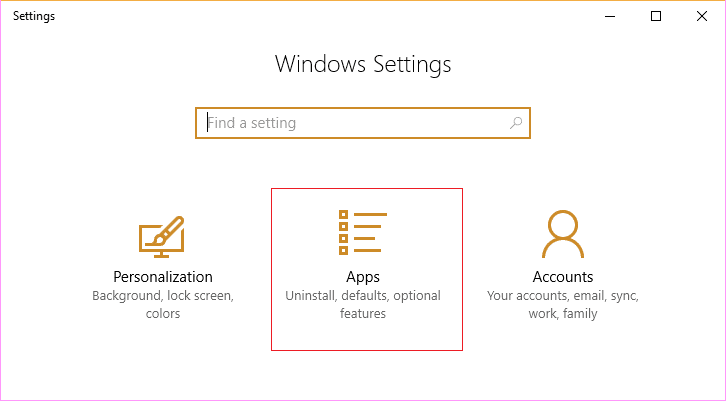
1. Otvorite Postavke app in Windows 10. Use the Windows Key+S key combination shortcut to do so quickly. Go to Aplikacije.
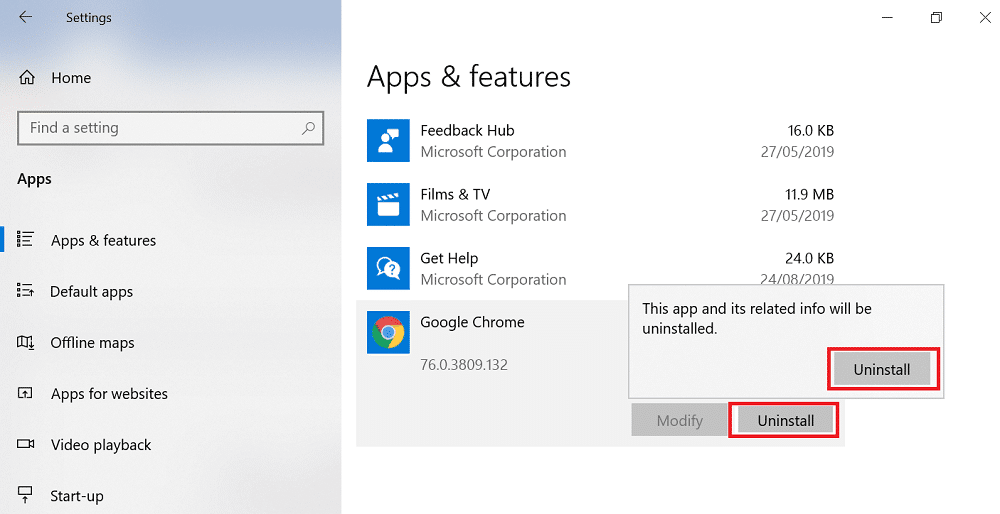
2. Scroll down the list of applications and features to find Google Chrome, Kliknite na Uninstall button at the right-hand side of the application name then again click on the Deinstaliraj gumb in the popup box when prompted.
3. Posjetiti google.com/chrome i kliknite na Preuzmite Chrome button to download the latest version of Chrome Installer.

4. Pokrenite preuzeti instalacijski program. It will download the necessary files and install chrome on your machine.
Također pročitajte: 10 načina da popravite sporo učitavanje stranica u pregledniku Google Chrome
6. metoda: Izvršite obnavljanje sustava
If you’re still facing the “There is no internet connection” error then the final recommendation would be restoring your PC to an earlier working configuration. Using System Restore you can revert all your current configuration of the system to an earlier time when the system was working correctly. However, you need to make sure that you have at least one system restore point otherwise you cannot restore your device. Now if you have a restore point then it will bring your system to the previous working condition without affecting your stored data.
1. Tip kontrola in Windows Search then click on the “Control Panel” shortcut from the search result.

2. Switch the ‘Prikaz po’ mode to ‘Male ikone'.
![]()
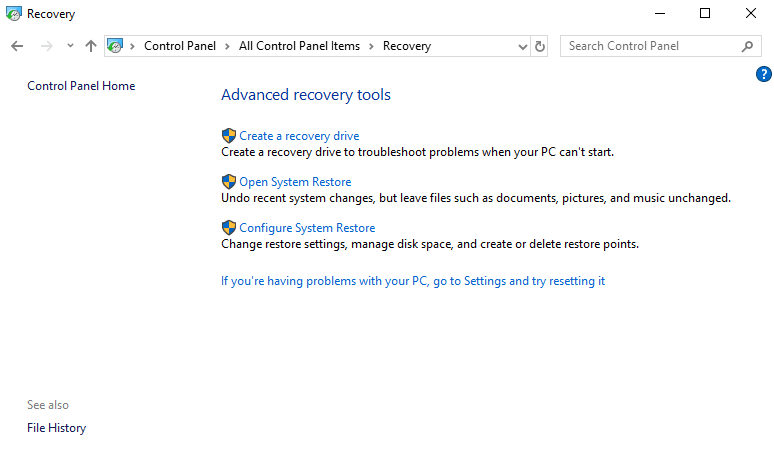
3. Kliknite na 'Oporavak'.
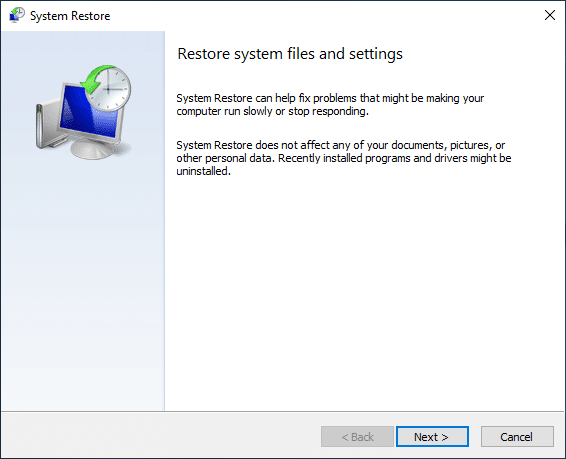
4. Kliknite na 'Otvorite System Restore’ to undo recent system changes. Follow all the steps needed.
5. Now from the Vratite sistemske datoteke i postavke kliknite na prozor Dalje.
6. Odaberite točku vraćanja and make sure this restore point is created before you were facing “There is no internet connection, something went wrong with the proxy server” issue.
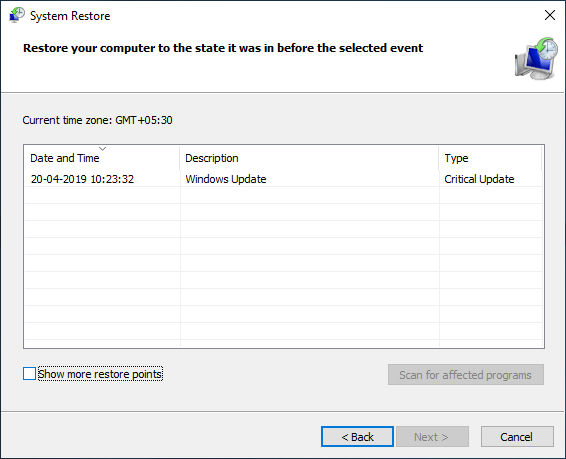
7. If you can’t find old restore points then Kvačica "Pokažite više točaka vraćanja” and then select the restore point.
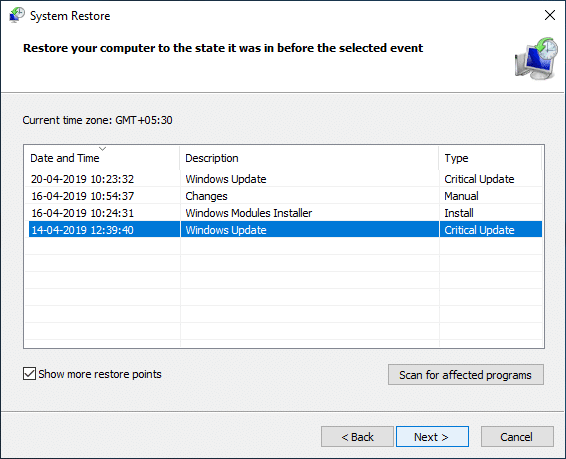
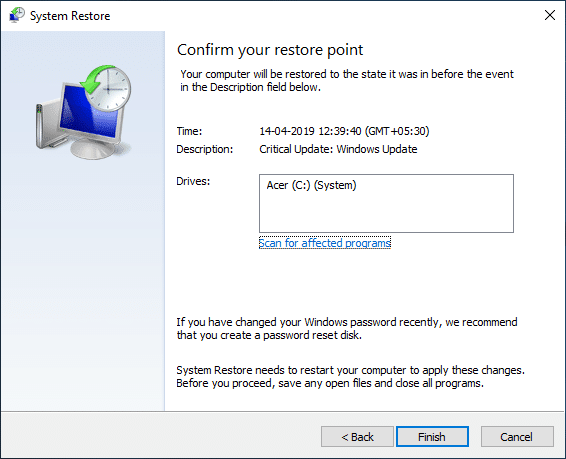
8. klik Sljedeći and then review all the settings you configured.
9. Na kraju kliknite završiti za početak procesa vraćanja.
Method 7: Reset Network Configuration
1. Open elevated Command Prompt using any one of the methods listed here.

2. Sada upišite sljedeću naredbu i pritisnite Enter nakon svake:
ipconfig / release
ipconfig / flushdns
ipconfig / renew
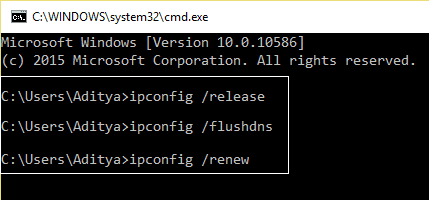
3. Again open Admin Command Prompt and type the following and hit enter after each one:
ipconfig / flushdns
nbtstat –r
Netscape int ip reset
reset netsh winsock
4. Ponovno pokrenite sustav za primjenu promjena. Čini se da ispiranje DNS-a fix There is no internet connection error.
Method 8: Reset Windows 10
If any of these fixes did not work for you, or if the problem is not limited to Google Chrome and you can’t fix it, you can try resetting your PC.
Resetting your PC might also help in the cases where a suspicious application or malware has been automatically resetting your proxy settings to some invalid configuration to prevent you from accessing the internet. All your files on the drives other than the Windows drive itself will not be deleted. However, data on the Windows Drive as well as installed applications along with their settings will be lost. So make sure you create a backup of everything before resetting your PC.
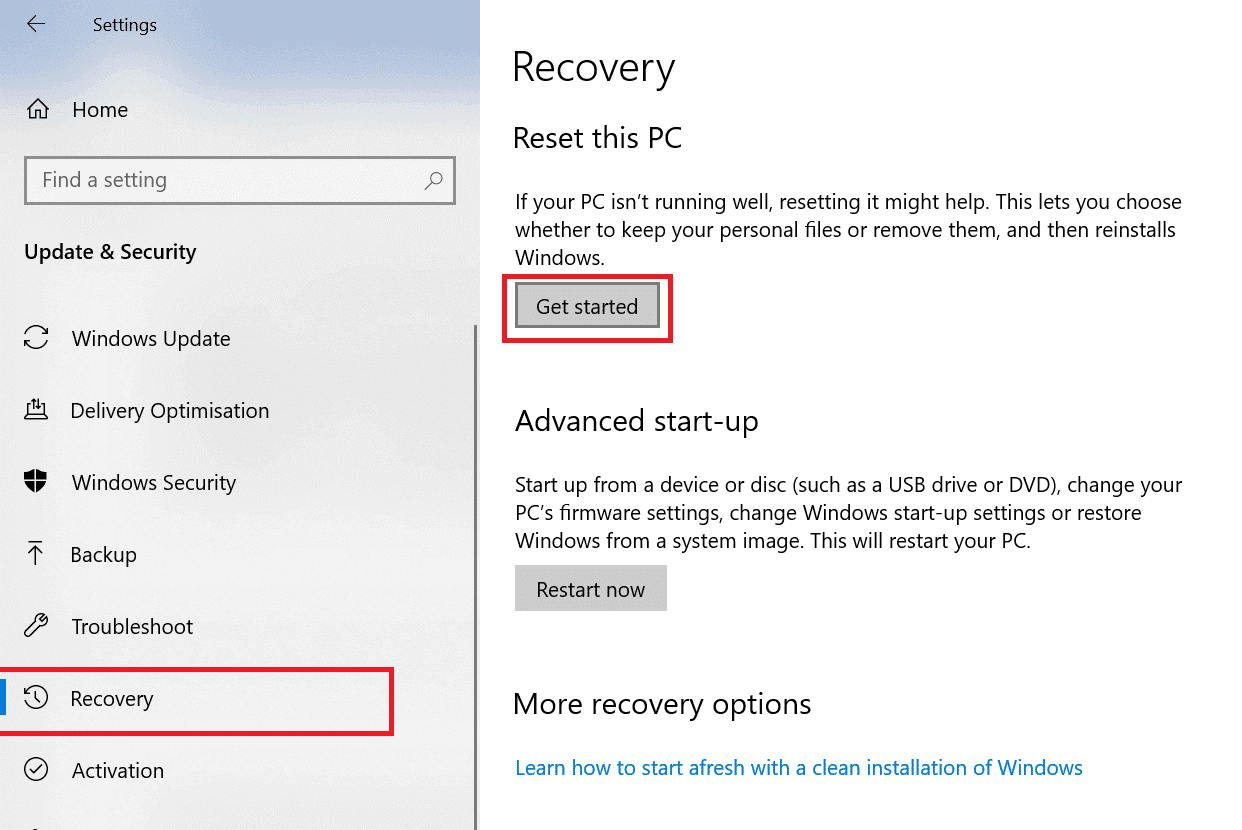
1. Pritisnite tipku Windows + I za otvaranje postavki, a zatim kliknite na Ažuriranje i sigurnost.
![]()
2. In the left navigation pane, choose Oporavak a zatim kliknite na Početak gumb ispod Reset this PC section.
3. Odaberite opciju za Zadrži moje datoteke.

4. Za sljedeći korak od vas će se možda tražiti da umetnete instalacijski medij za Windows 10, stoga provjerite jeste li ga pripremili.
5. Sada odaberite svoju verziju sustava Windows i kliknite samo na pogonu na kojem je instaliran Windows > Samo uklonite moje datoteke.

6. Kliknite na Gumb za poništavanje.
7. Slijedite upute na zaslonu za dovršetak resetiranja.
8. Once you complete the resetting process, try connecting to the internet again.
Također pročitajte: Kako resetirati lozinku u sustavu Windows 10
“There is no internet connection” error because of some wrong configuration of proxy is not suitable for anyone. It kills the purpose of having a device with everything but no internet connection. As we have discussed, the error shown on Google Chrome about being unable to connect to the internet because of some incorrect proxy settings is just the Google Chrome internal settings error, or it may be system-wide.
Even though it is not rare to find oneself in such a situation without tampering with any settings before this issue, it is more probable that a virus or some form of malware has caused this issue. The virus can penetrate a system through a downloaded installation file which did not come from a reliable source or an infected email. Even a secure looking pdf can be the source of the virus. In such cases, it is advised to first remove malware from Windows 10 and if that didn’t work then try to reset the system itself.
Plugins that contain malware or too many advertisements can be a sign of such a threat. So make sure you install plugins that were developed by some renowned developer and always check the user ratings before installing any application or a browser plugin.