Kako popraviti Twitter obavijesti koje ne rade (na Androidu i iOS-u)

Twitter is one of the biggest social networking platforms that you should sign up for, if you wish to get regular updates about everything that is happening all around the world. However, if you already hold a Twitter account, then you must get notification alerts. These notifications provide you updates about new Followers, ReTweets, Direct Messages, Replies, Highlights, new Tweets, etc. so that you don’t miss out on the latest trends and news updates. Unfortunately, some users complained that they do not receive Twitter notifications for their accounts. Therefore, we have compiled this guide for you to learn how to fix Twitter notifications not working on Android and iOS devices.

12 Ways to Fix Twitter Notifications Not Working
There are several reasons why you may not receive notifications from Twitter on your device, such as:
- Poor Internet Connectivity
- Outdated Version of Twitter
- Incorrect Notification Settings on your device
- Improper Notification Settings on Twitter
In accordance with the primary reasons listed above, we have explained a few methods that should help fix Twitter notifications not working on your Android and/or iOS devices.
So, continue reading!
Vidi također:
Kako popraviti Instagram glazbu koja ne radi
Popravite USB OTG koji ne radi na Android uređajima
Kako izbrisati naučene riječi s tipkovnice na Androidu
Kako popraviti pogrešku Aplikacija nije instalirana na Androidu
Popravite slučajno ponovno pokretanje Android telefona
Bilješka: Budući da pametni telefoni nemaju iste opcije postavki i razlikuju se od proizvođača do proizvođača, provjerite točne postavke prije nego što ih promijenite.
Metoda 1: Provjerite svoju internetsku vezu
An unstable internet connection could be the reason for you not receiving notifications from Twitter. Therefore, restart your Wi-Fi router and your device to ensure proper internet connectivity. If this basic fix doesn’t solve the Twitter notifications not working issue, try any of the below-mentioned methods.
Method 2: Enable Push Notifications on Twitter
Sometimes, users mistakenly disable push notifications on Twitter. Therefore, the first thing that you should do is check whether the push notifications are enabled on Twitter or not.
On Android and iOS devices: Follow these steps to fix Twitter notifications not working by enabling Push notifications:
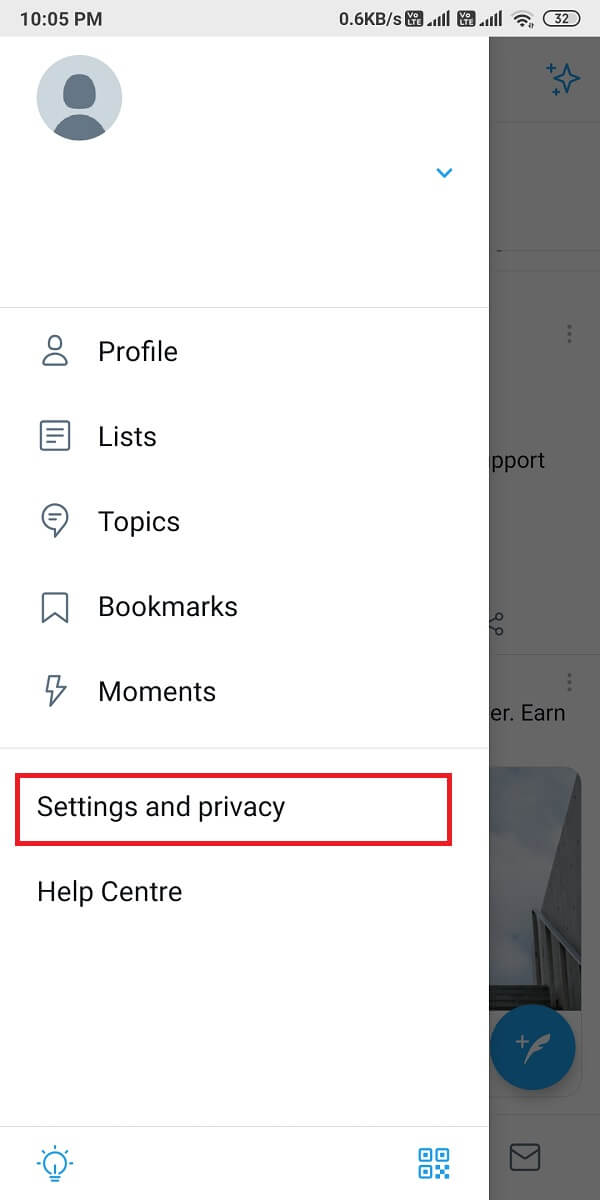
1. Otvorite Twitter app.
2. Dodirnite ikona s tri crtice from the top-left corner of the screen to access the menu.
![]()
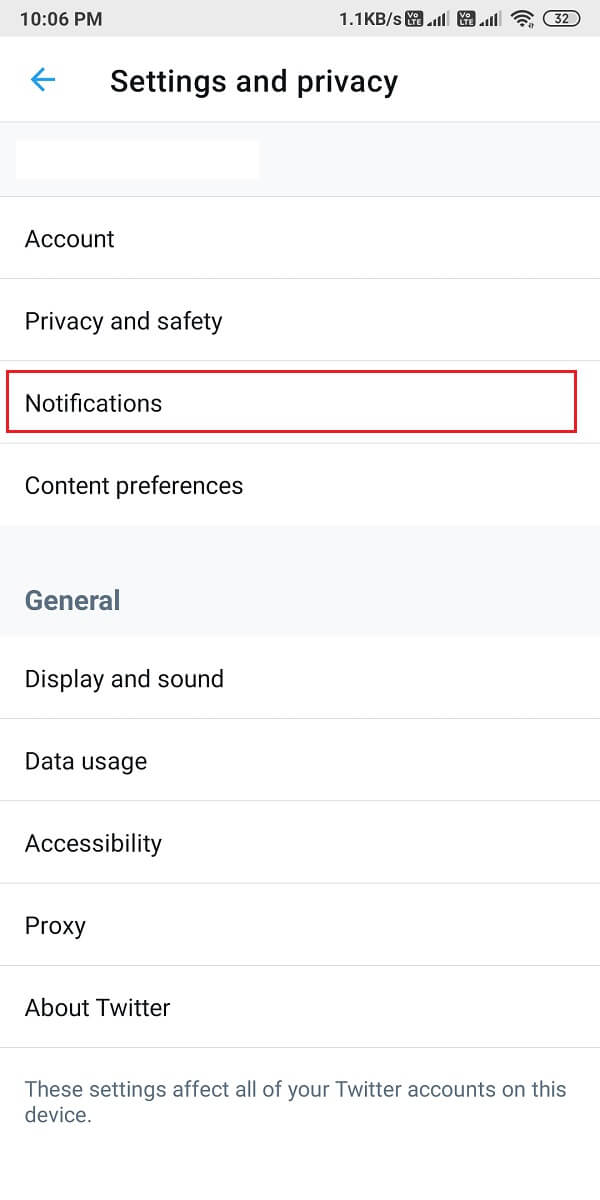
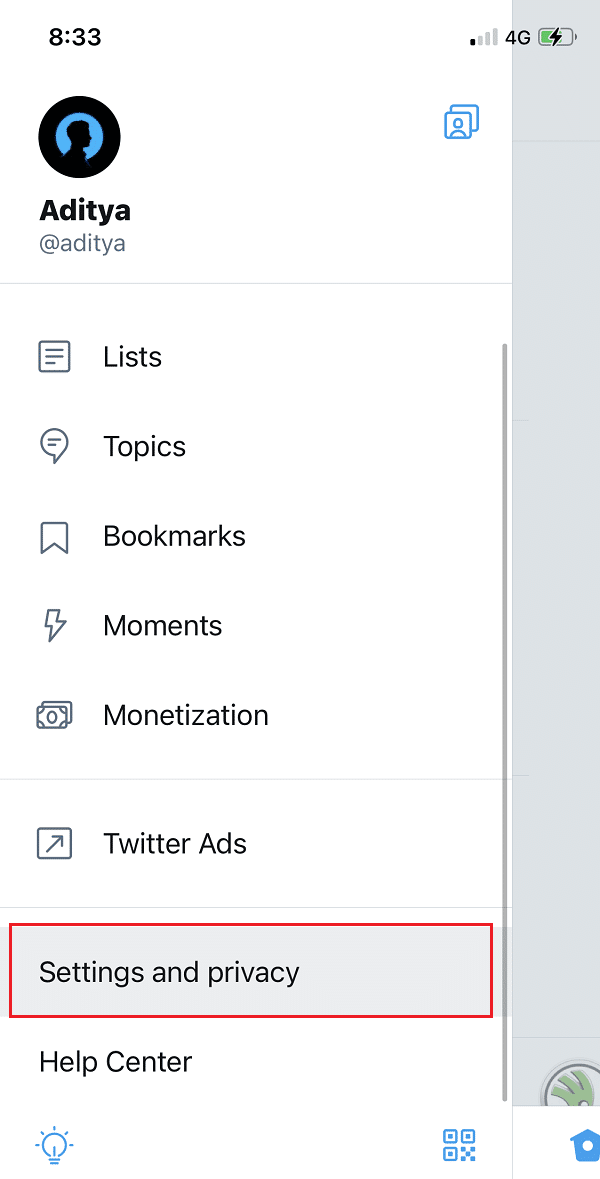
3. From the given menu, tap Postavke i privatnost.
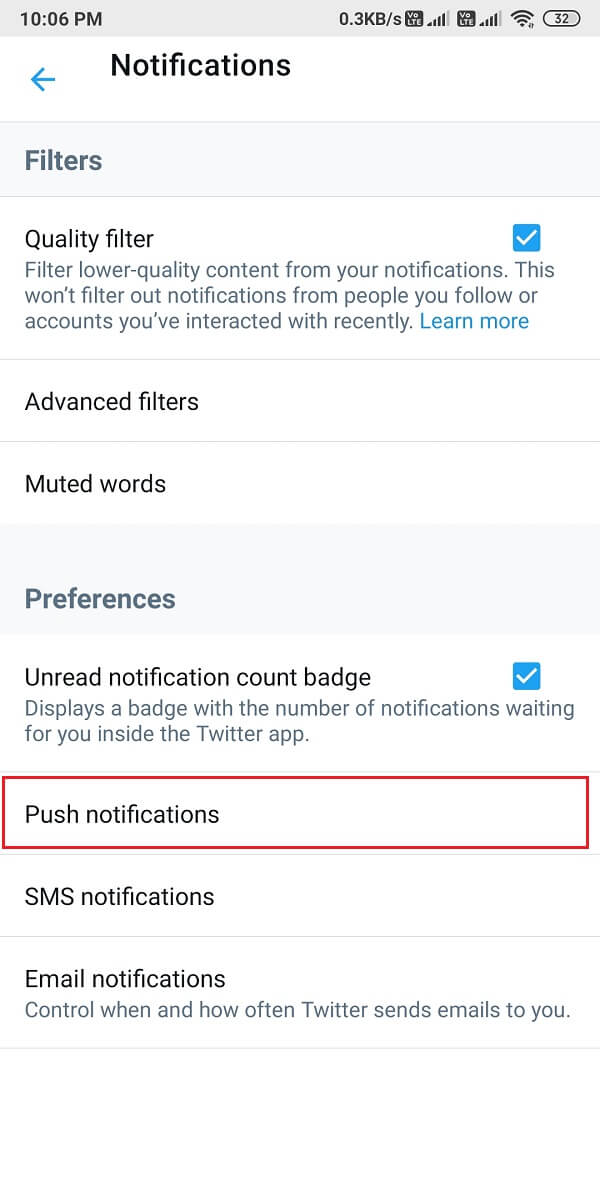
4. Zatim dodirnite Obavijesti, kao što je prikazano.
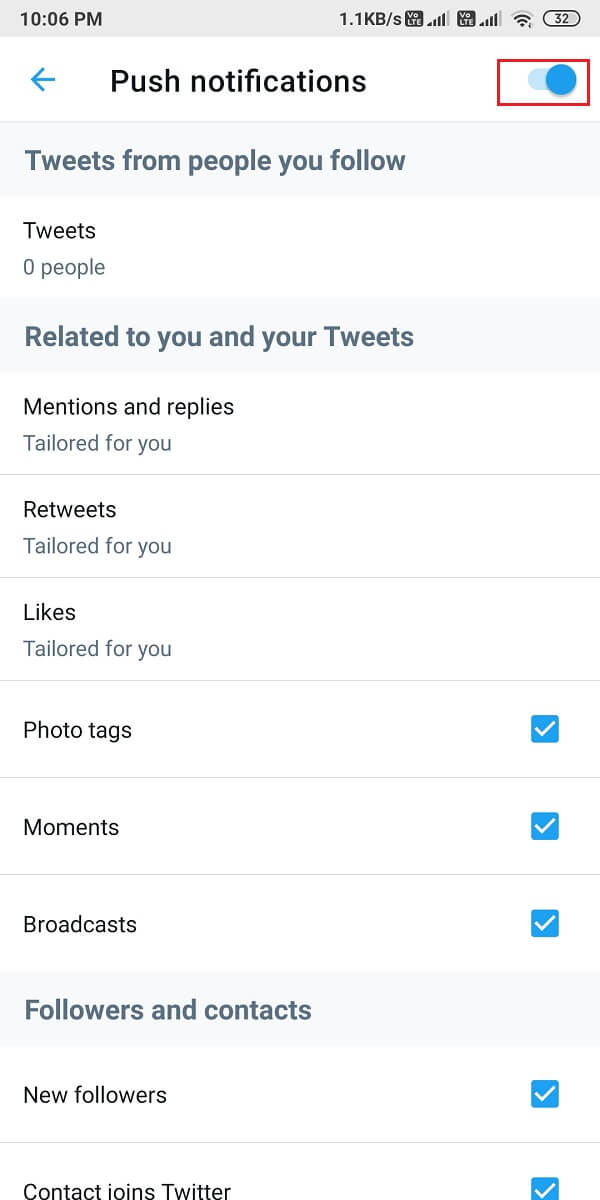
5. Sada dodirnite Push obavijesti.
6. Okrenite toggle ON pored Obavijesti preko push notifikacijama, kao što je prikazano u nastavku.
Method 3: Disable DND or Silent Mode
When you turn on Do Not Disturb or Silent Mode on your device, you will not receive any notifications at all. The DND feature comes in handy for not getting distracted when you are in an important meeting or in class. It is possible that you put your phone on DND mode earlier but, forgot to disable it afterward.
Na Android uređajima
You can turn off DND and Silent mode on your Android device by following these steps:
1. Prijeđite prstom prema dolje Ploča obavijesti za pristup Brzi izbornik.
2. Pronađite i dodirnite DND način rada to disable it. Refer given pic for clarity.
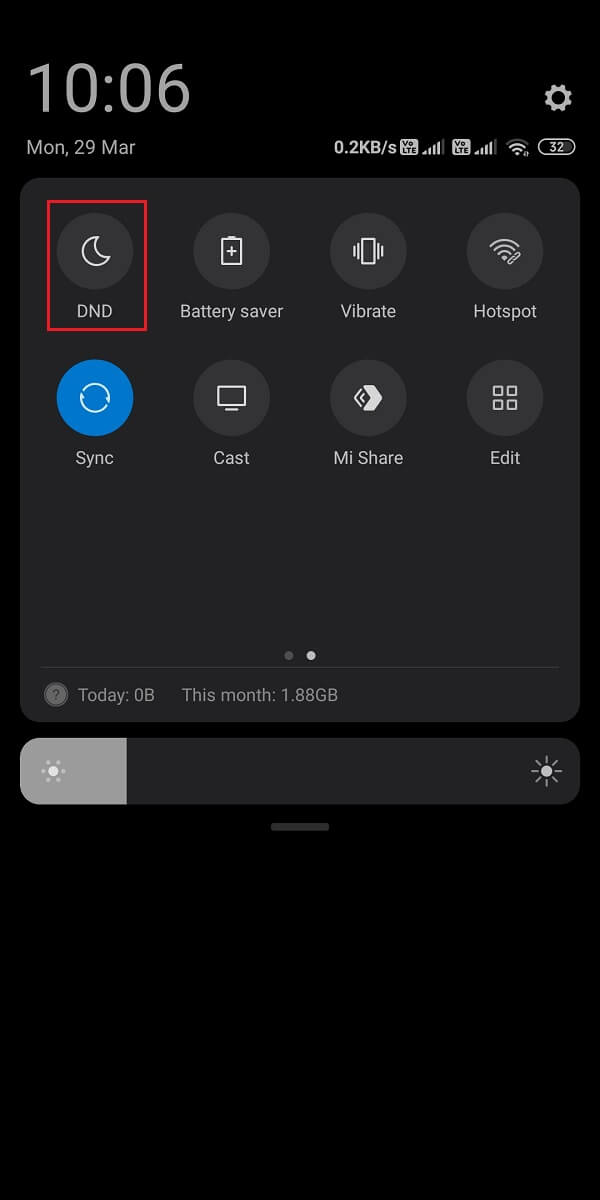
3. Pritisnite i držite Pojačati button to make sure that your phone is not on Tihi način rada.
Na iOS uređajima
Here’s how you can disable DND mode on your iPhone:
1. Pokrenite iPhone Postavke.
2. Ovdje dodirnite Ne smetaj, kao što je istaknuto u nastavku.
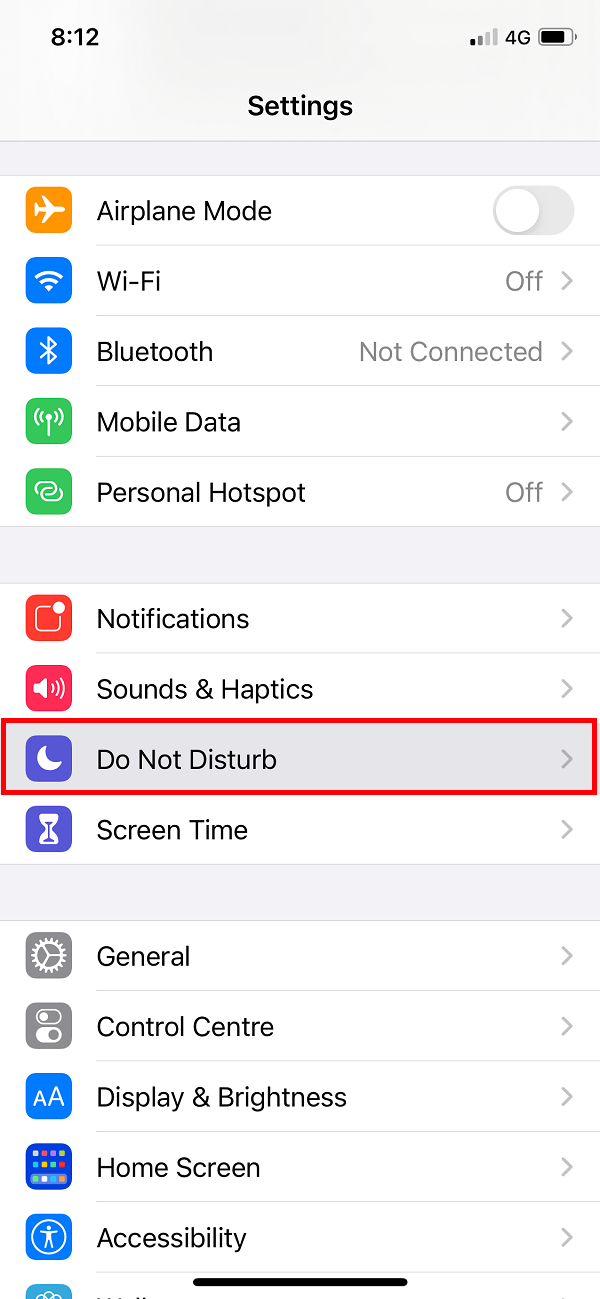
3. Okrenite isključiti on the next screen to disable DND.
4. In order to disable Nijem pritisnite tipku Ringer /Volume up button sa strane.
Također pročitajte: 9 načina za ispravljanje pogreške Snapchat veze
Method 4: Check Notification Settings of your device
If you haven’t granted permissions to the Twitter app to send push notifications, then this might be the reason for Twitter notifications not working on your smartphone. You need to enable push notifications for Twitter from your device notification settings, as discussed below.
Na Android uređajima
Follow the given steps to enable Push Notifications for Twitter on your Android phone:
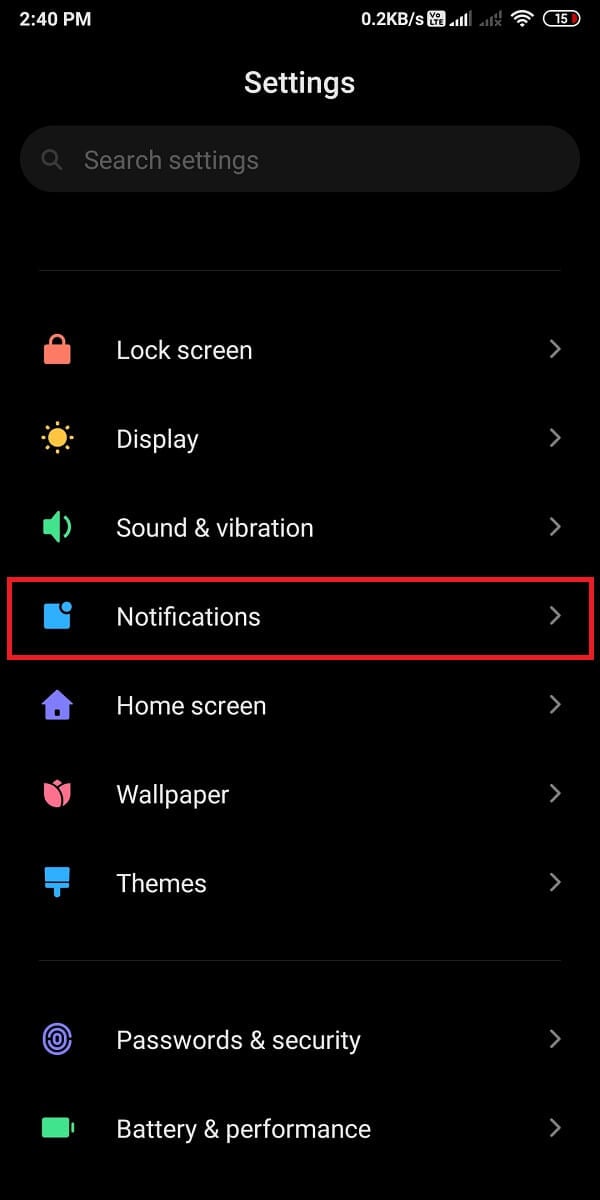
1. Krenite prema Postavke aplikaciju i dodirnite Obavijesti, kao što je prikazano.
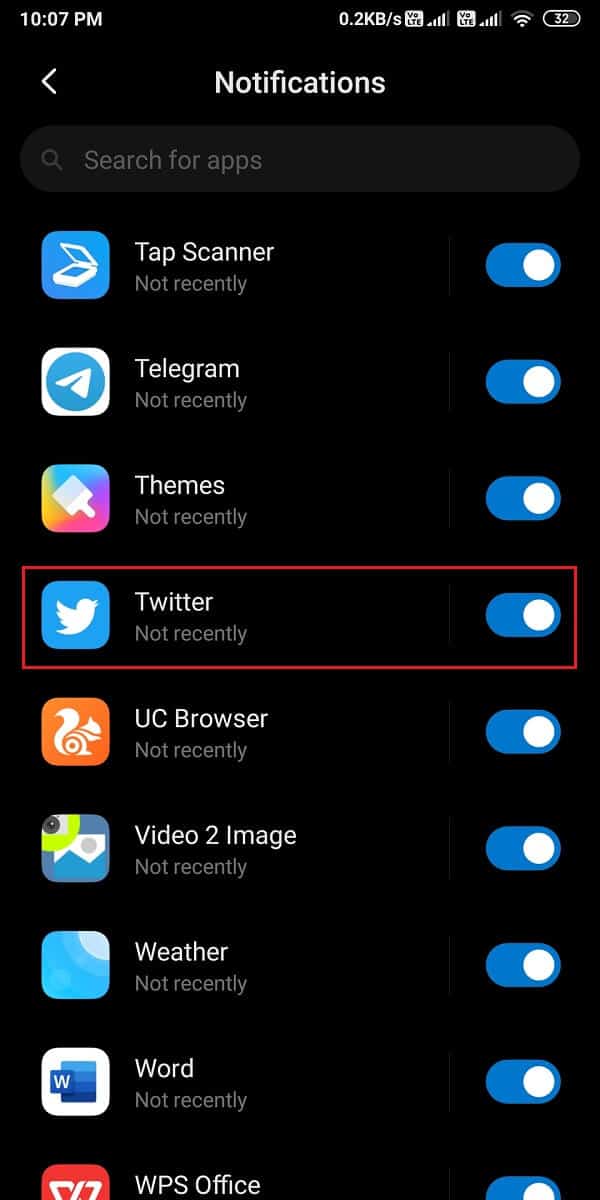
2. Pronađite X / Twitter from the list of applications and turn the toggle ON za Twitter.
Na iOS uređajima
The process to check for and enable Twitter notifications is quite similar to that of Android phones:
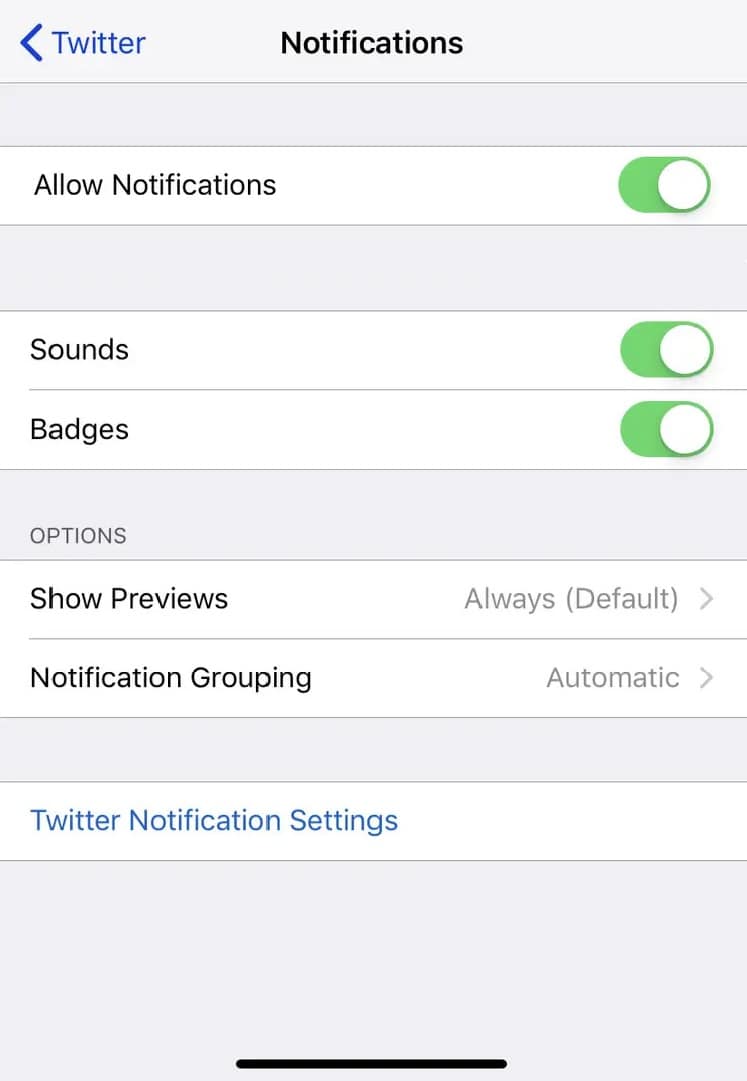
1. On your iPhone, navigate to Settings > Twitter > Notifications.
2. Turn the toggle ON for Allow Notifications, kao što je prikazano.
Method 5: Update Twitter app
To fix Twitter notifications not working, make sure that you are using the latest version of the Twitter app since you may not receive notifications on an outdated version of the app. Follow the below steps to update Twitter on your smartphone.
Na Android uređajima
1. Otvorite Google Play Store na uređaju.
2. Dodirnite svoj Profilna slika i zatim dodirnite Upravljajte aplikacijama i uređajem.
3. Ispod Pregled , vidjet ćete Dostupna su ažuriranja opcija.
4. Kliknite na Vidi detalje to view all available updates.
5. On the next screen, locate X / Twitter i kliknite na Nadopune, kako je prikazano istaknuto.

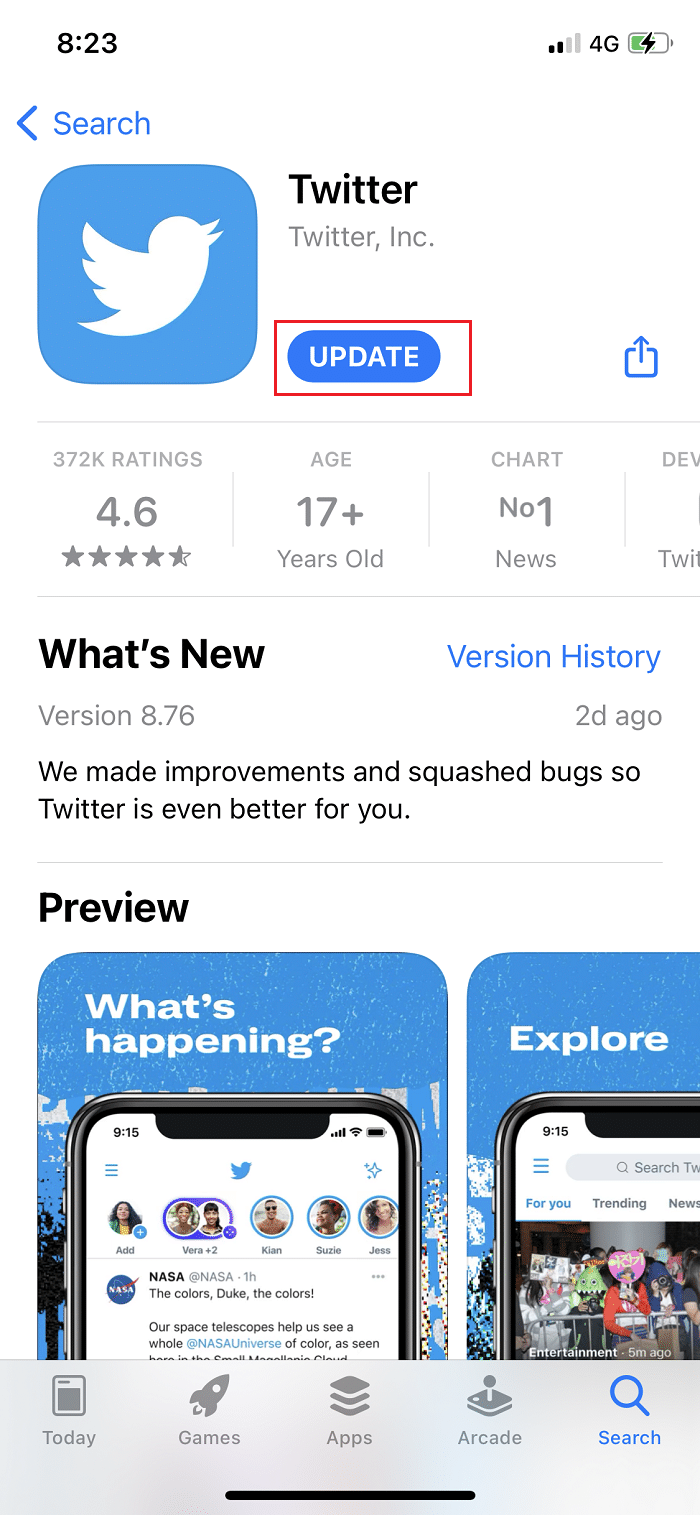
Na iOS uređajima
You can easily follow these steps to fix Twitter notifications not working on iPhone:
1. Otvorite Trgovina aplikacijama na uređaju.
2. Sada dodirnite Ažuriranja tab from the bottom panel of the screen.
3. Finally, locate X / Twitter i dodirnite Update.
After updating the Twitter app, ask your friends to send you a DM or Mention you in a Tweet to check if you are getting notifications or not.
Method 6: Re-log-in to your Twitter account
Many users reported that this helped resolve the said issue. The procedure for logging out of your Twitter account and logging into it remains the same for both Android and iOS devices, kao što je objašnjeno u nastavku:
1. Pokrenite Twitter app and open the menu by tapping the ikona s tri crtice, kao što je prikazano.
![]()
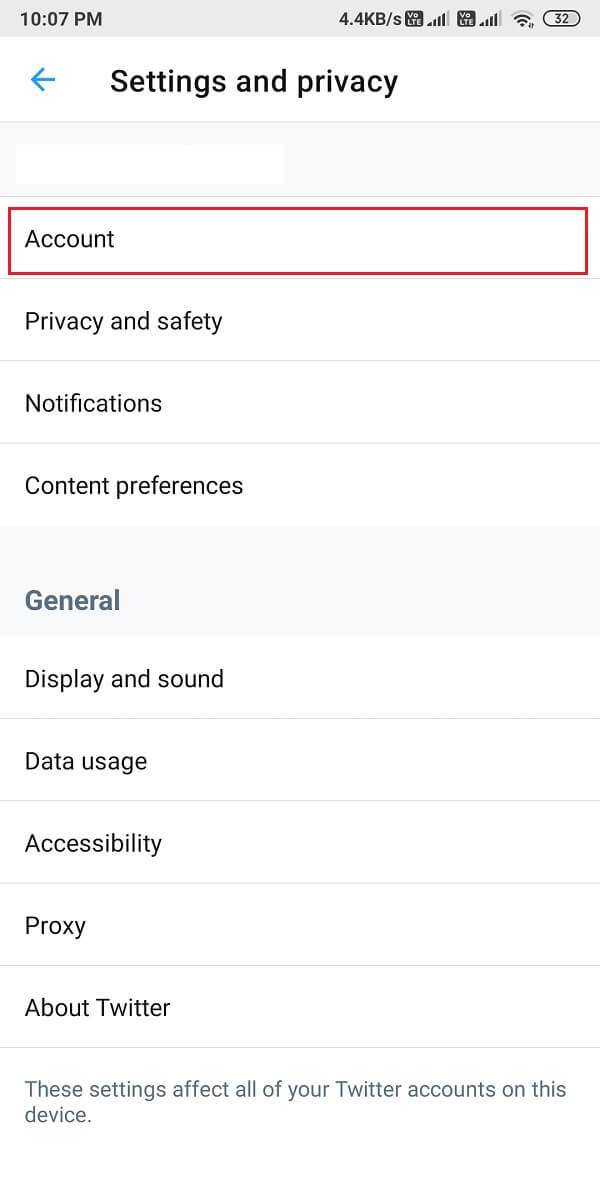
2. Dodirnite Postavke i privatnost.
3. Zatim dodirnite Korisnički račun, kao što je prikazano.
4. Finally, scroll down and tap on Odjava.
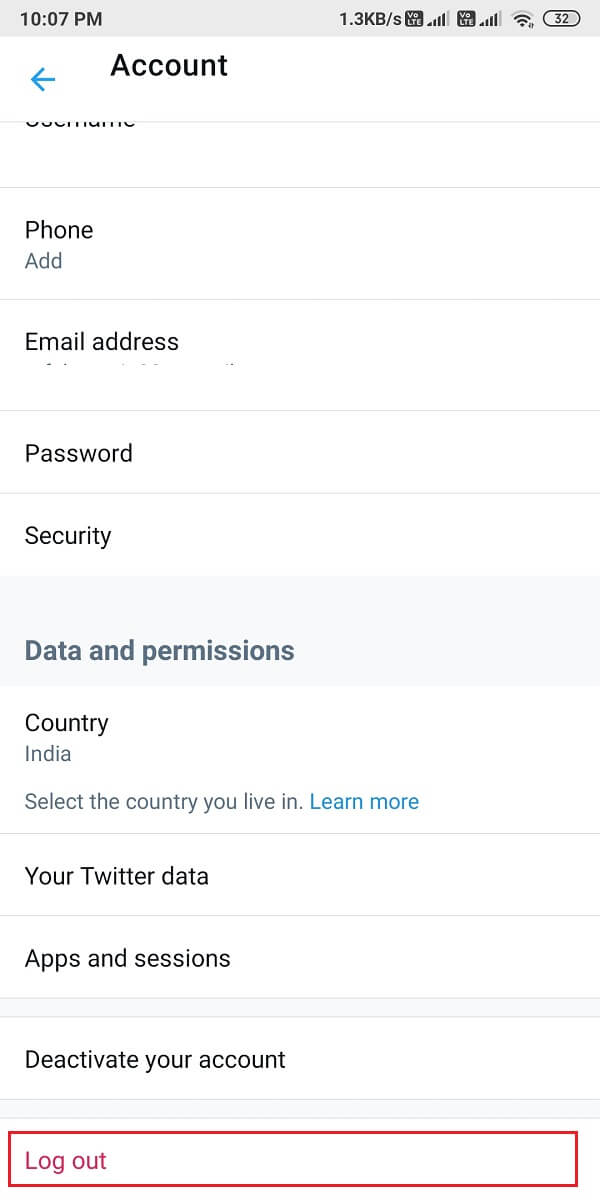
5. Restart your phone after logging out of Twitter. Then, re-log-in into your account by entering your user ID and password.
Twitter notifications not working issue should be rectified by now. If not, try the next fix.
Također pročitajte: 5 načina da popravite Gmail račun koji ne prima e-poštu
Method 7: Clear App Cache and Data
You can clear the cache and data for the Twitter app to get rid of corrupt files and potentially fix the notification error on your device.
Na Android uređajima
Listed below are the steps to clear the cache and data files for the Twitter app on your Android phone:
1. Otvoreno Postavke i otići Aplikacije.
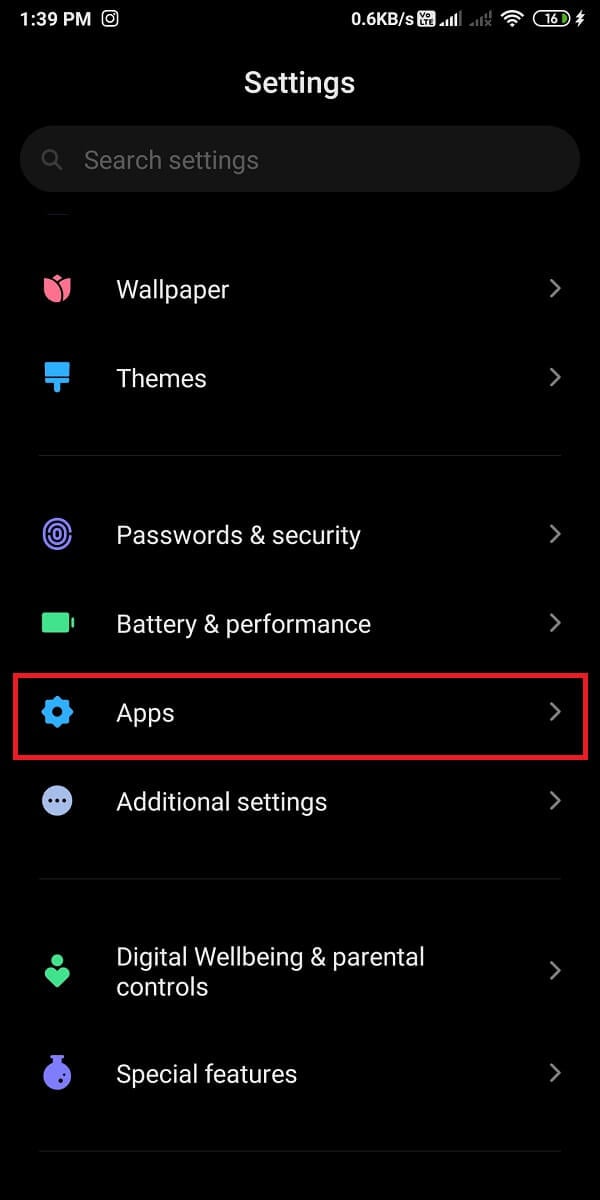
2. Zatim dodirnite Upravljanje aplikacijama, kao što je prikazano.
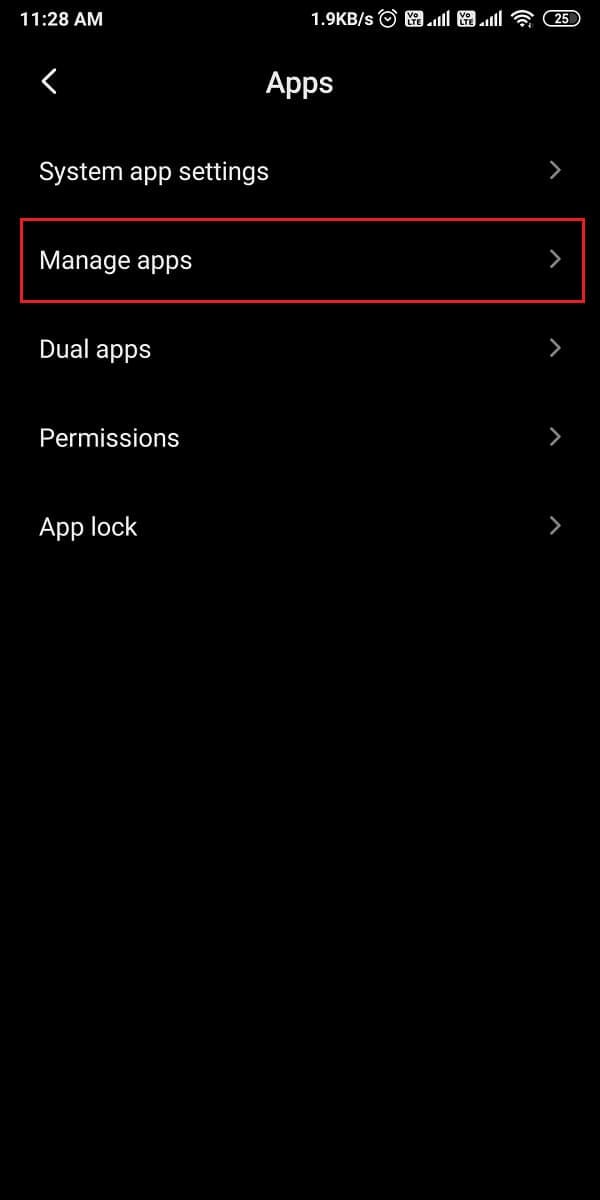
3. Pronađite i otvorite X / Twitter from the given list. Tap on Vedro datum s dna zaslona.
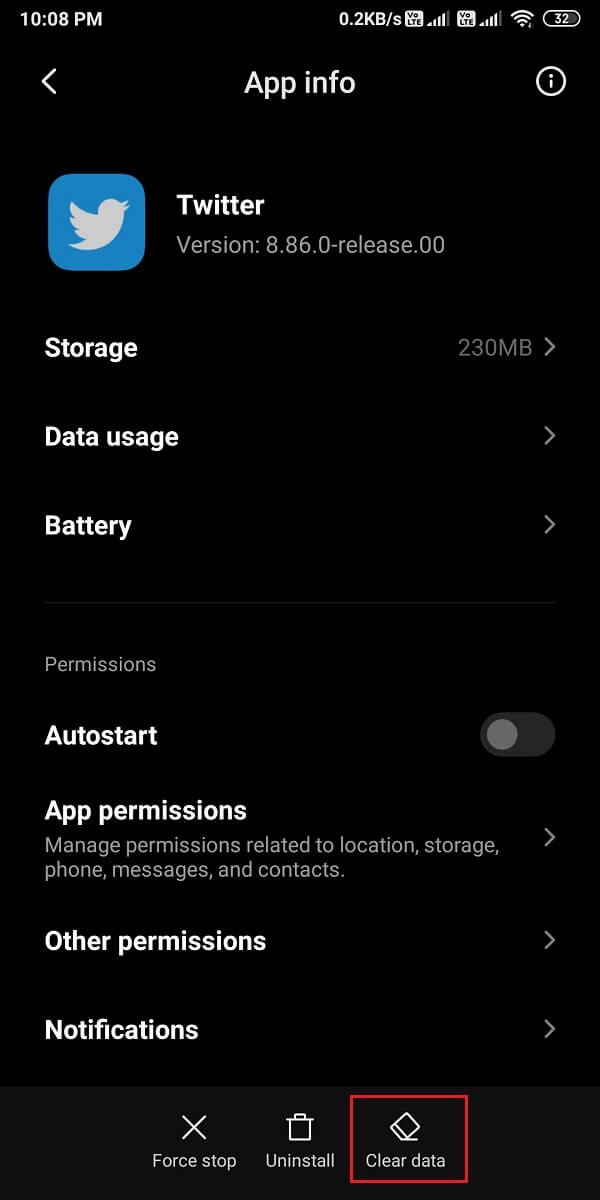
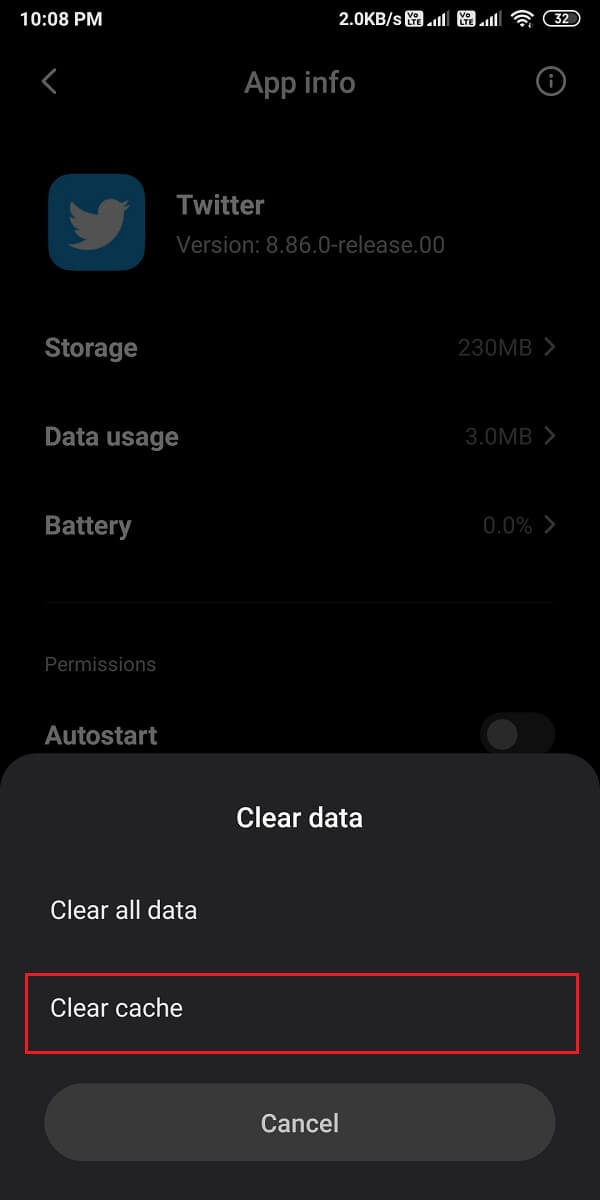
4. Na kraju dodirnite Očisti predmemoriju, kao što je istaknuto u nastavku.
Na iOS uređajima
However, in case you use an iPhone, you need to clear the Media and web storage instead. Follow these steps to do so:
1. U X / Twitter app, tap on your ikona profila iz gornjeg lijevog kuta zaslona.
2. Sada dodirnite Postavke i privatnost iz izbornika.
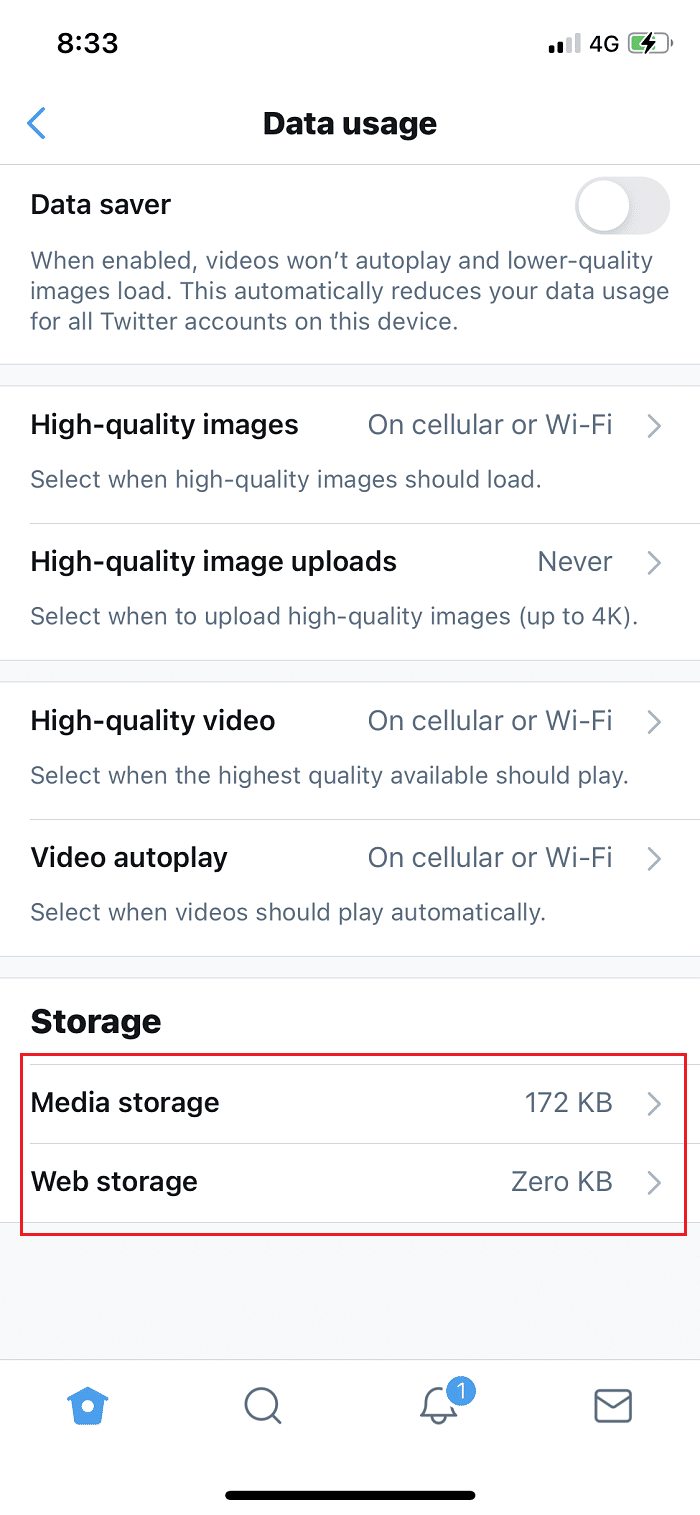
3. Dodirnite Upotreba podataka.
4. Sada dodirnite Web pohrana pod skladištenje odjeljak.
5. Under Web storage, tap on Clear web page storage and Clear all web storage.
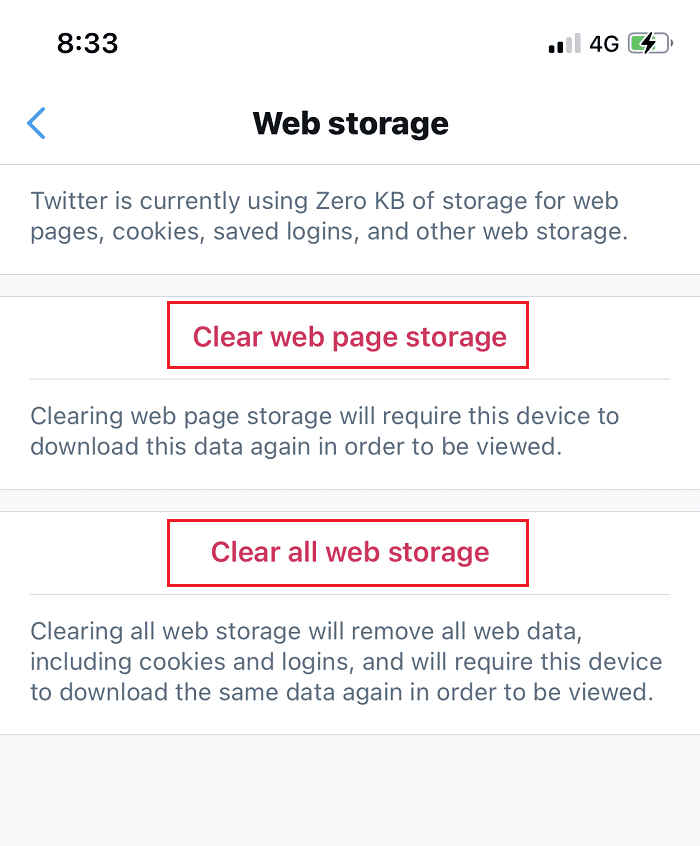
6. Similarly, clear the storage for Medij skladištenje kao dobro.
Method 8: Turn off Battery Saver Mode
When you turn on the battery saver mode on your device, you may not receive notifications from any app on your device. Therefore, to fix Twitter notifications not working, you need to disable battery saver mode, if enabled.
Na Android uređajima
You can easily turn off Battery Saver mode on your Android device as:
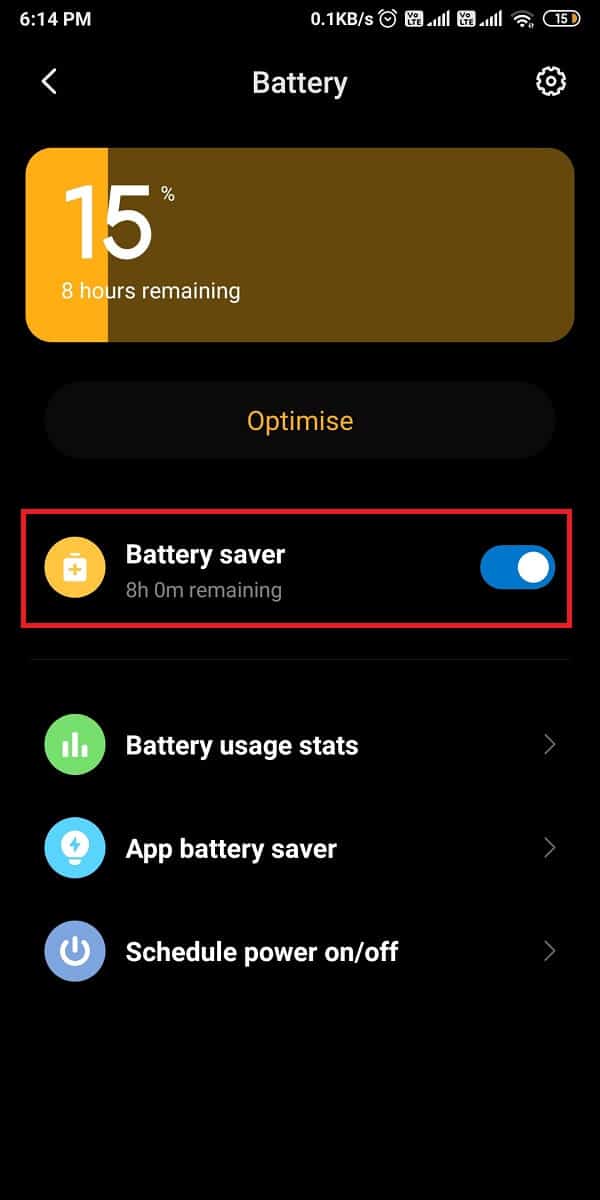
1. Otvoreno Postavke i dodirnite Baterija i performanse, kao što je prikazano.

2. Turn the toggle OFF next to the Ušteda baterije to disable it. Refer given pic for clarity.
Na iOS uređajima
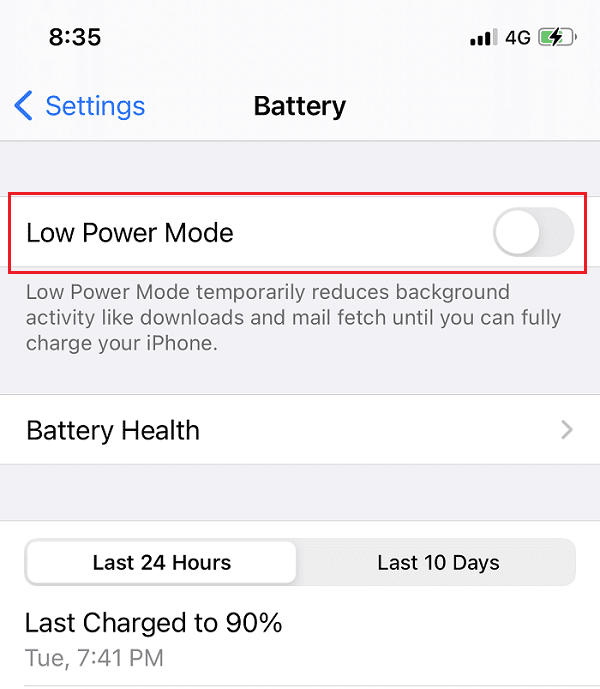
Similarly, turn off Low power mode to fix Twitter notifications not working on iPhone issue:
1. Idi na Postavke of your iPhone and tap on baterija.
2. Ovdje dodirnite Način niske potrošnje energije.
3. Finally, turn off the toggle for Način niske potrošnje energije, kao što je prikazano.
Također pročitajte: How To Fix Facebook Dating Is Not Working
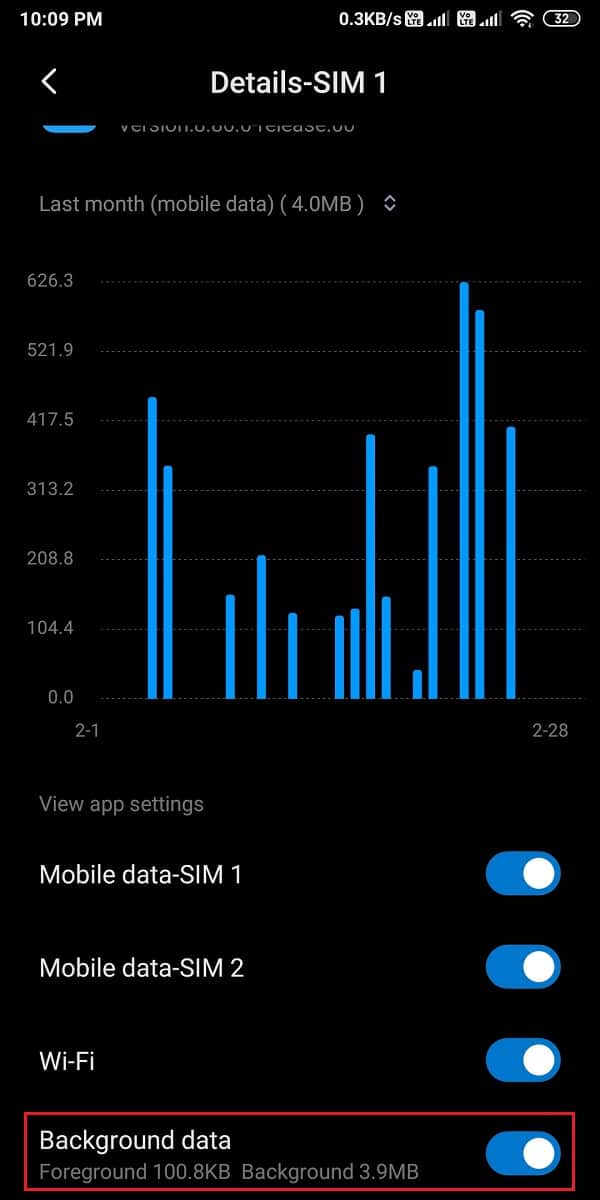
Method 9: Enable Background Data Usage for Twitter
When you enable Background data usage, the Twitter app will have access to the internet even when the app is not being used. In this way, Twitter will be able to constantly refresh and send you notifications, if any.
Na Android uređajima
1. Ići Postavke > Aplikacije > Upravljanje aplikacijama kao prije.
2. Otvoreno X / Twitter s popisa dostupnih aplikacija.
3. Sada dodirnite Upotreba podataka, kao što je prikazano u nastavku.
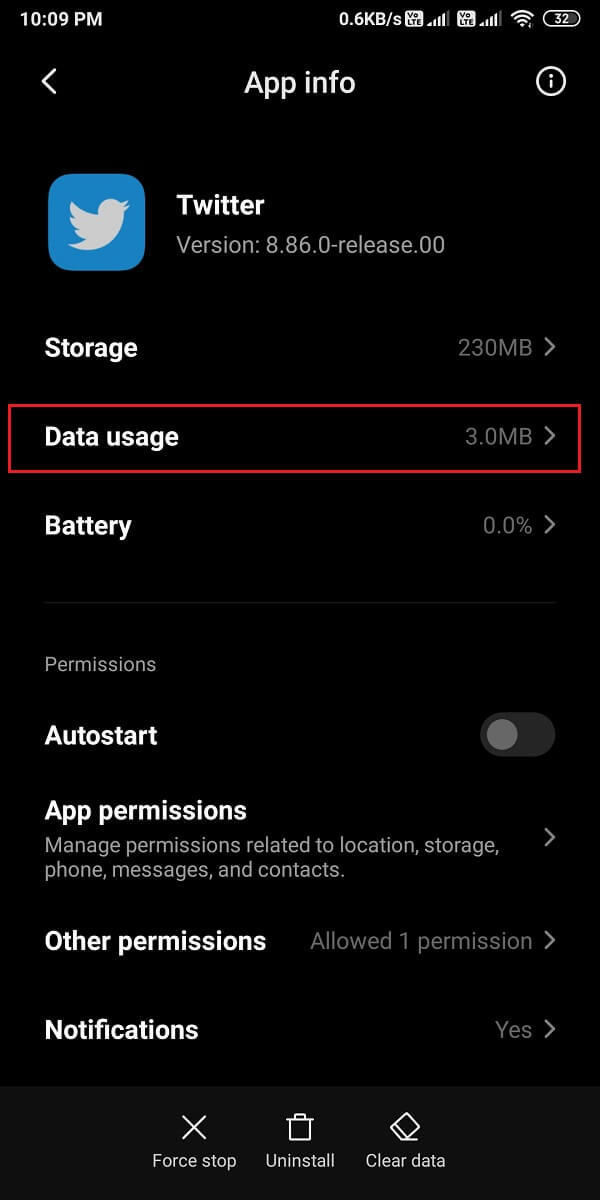
4. Napokon, uključite prekidač pored Pozadinski podaci opcija.
Na iOS uređajima
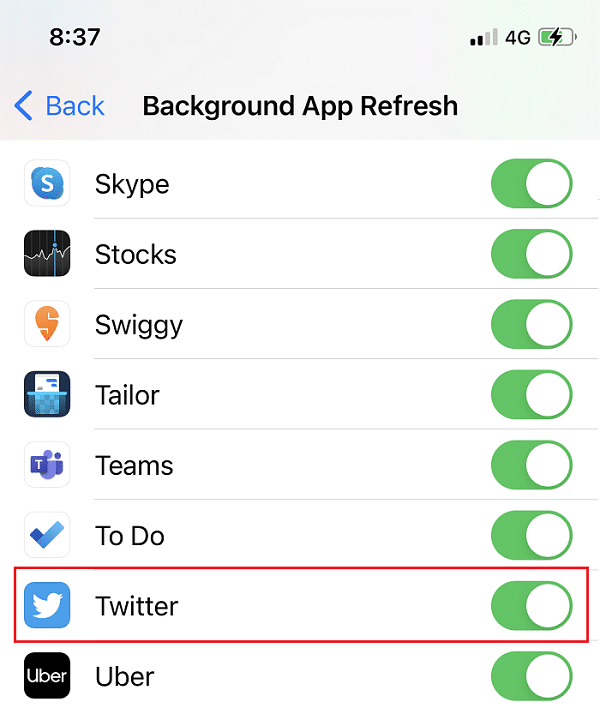
You can easily enable the Background App Refresh feature for Twitter on your iPhone by following these simple steps:
1. Otvoreno Postavke i dodirnite General.
2. Zatim dodirnite Osvježavanje aplikacije u pozadini, kao što je prikazano.
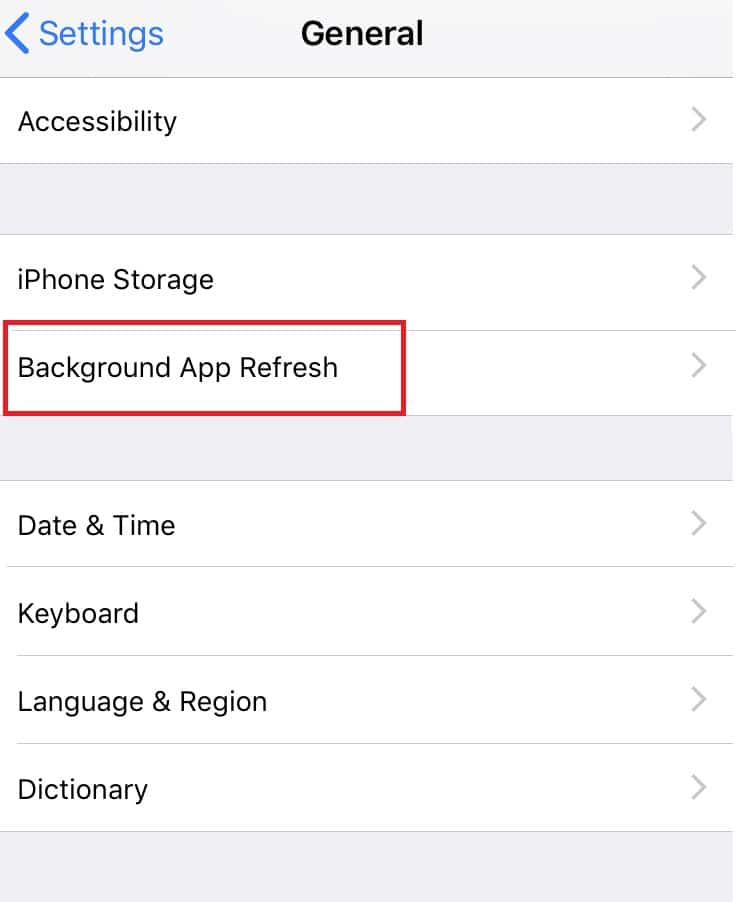
3. Finally, turn on the toggle on the next screen to enable background data usage for Twitter.
Method 10: Re-install Twitter
If none of the above methods have worked, then you should try uninstalling the Twitter app from your device and then, installing it again.
Na Android uređajima
Android users can uninstall the Twitter app and then, install it from Google Play Store.
1. Pronađite X / Twitter app in your App ladica.
2. Press-Hold the app until you get some pop-up options on the screen.
3. Tap on Uninstall to remove Twitter from your device.
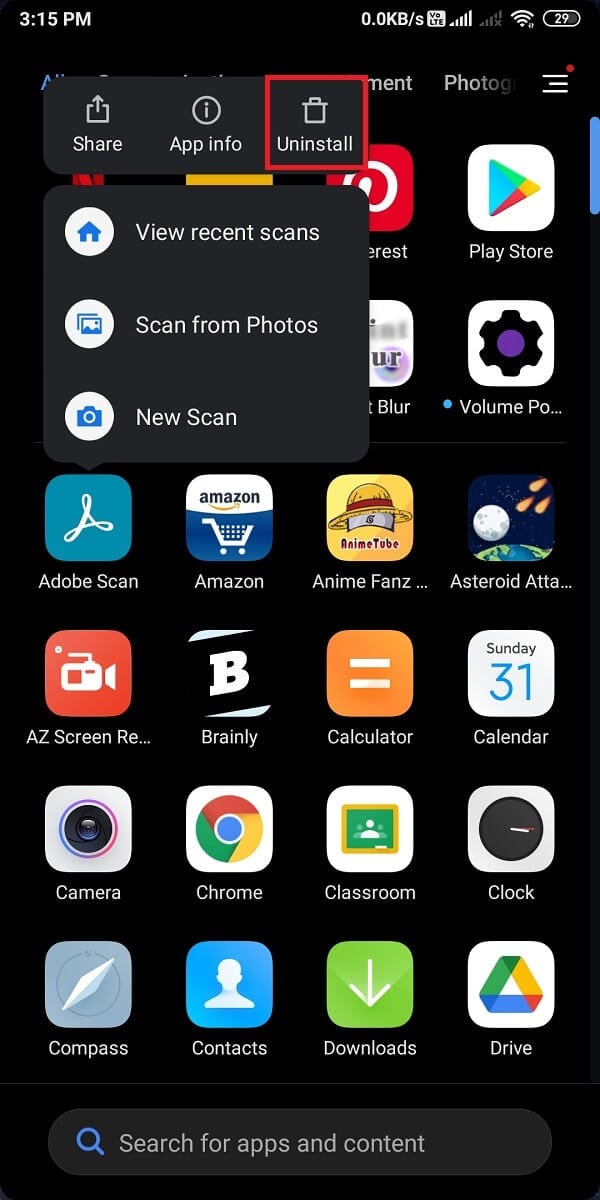
4. Next, head to Google Play Store and re-install X / Twitter na uređaju.
5. Prijava with your account credentials and Twitter should now function error-free.
Na iOS uređajima
Follow these steps to remove Twitter from your iPhone and then, to re-install it from the App Store:
1. Pronađite X / Twitter i press-hold to.
2. Dodirnite Uklonite aplikaciju to uninstall it from your device.
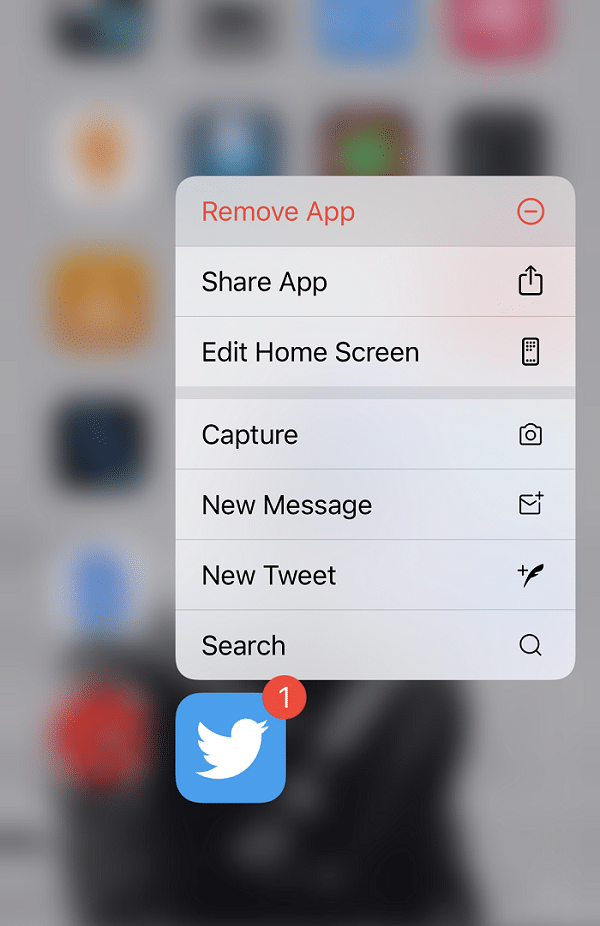
3. Sada idite na App Store and re-install Twitter on your iPhone.
Method 11: Report Notification Error to Twitter Help Center
You can get in touch with the Twitter Help Center if you are unable to receive any kind of notifications for your Twitter account. The procedure to access the Help Center is the same for both Android and iOS users, as detailed below:
1. Otvorite X / Twitter na uređaju.
2. Expand the menu by clicking on the ikona s tri crtice iz gornjeg lijevog kuta zaslona.
3. Dodirnite Centar za pomoć, kako je prikazano dolje.
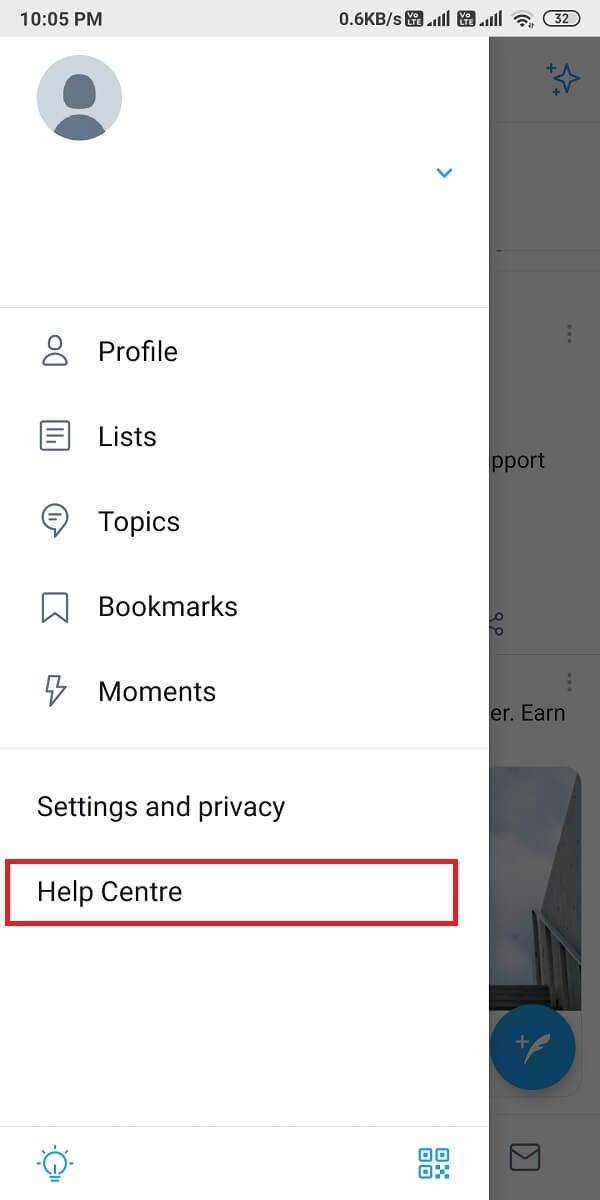
4. Potražite Obavijesti in the Search box provided.
5. Alternately, Contact Twitter Support by clicking ovdje.
Method 12: Factory Reset your device (Not Recommended)
We do not recommend this method as it will delete all data saved on your phone and you need to create a backup for all your data before you proceed with this method. However, if continue facing this issue with Twitter and none of the methods mentioned above are working for you, then you can factory reset your device to return to default settings.
Na Android uređajima
Let’s see how to Factory Reset your phone to fix Twitter notifications not working issue.
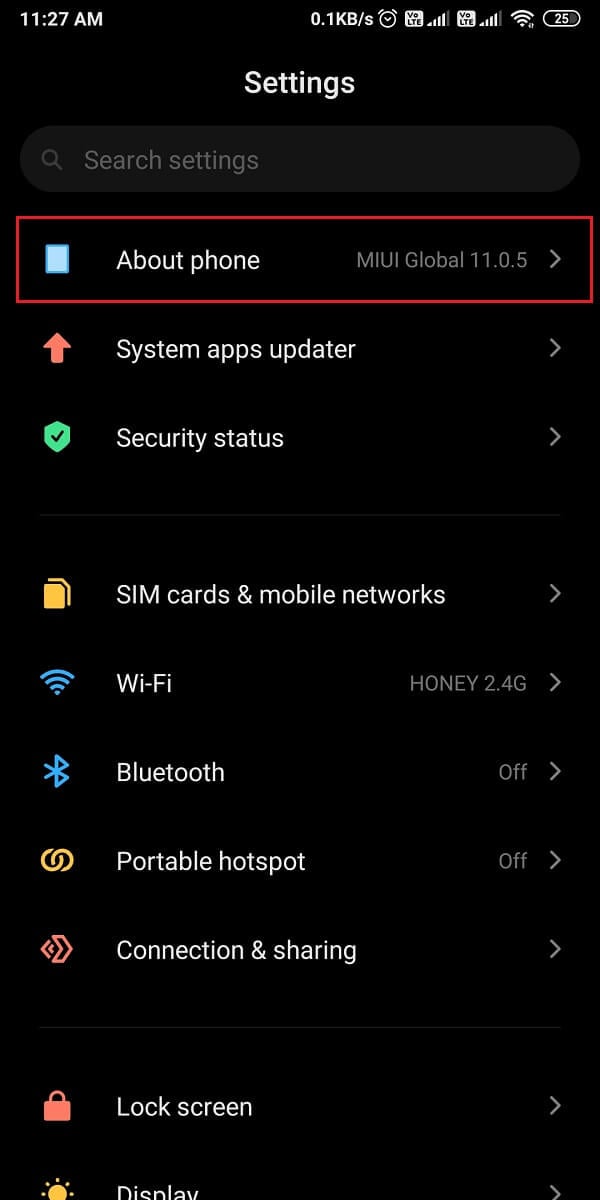
1. Otvoreno Postavke of your device and go to the O telefonu odjeljak, kao što je prikazano.
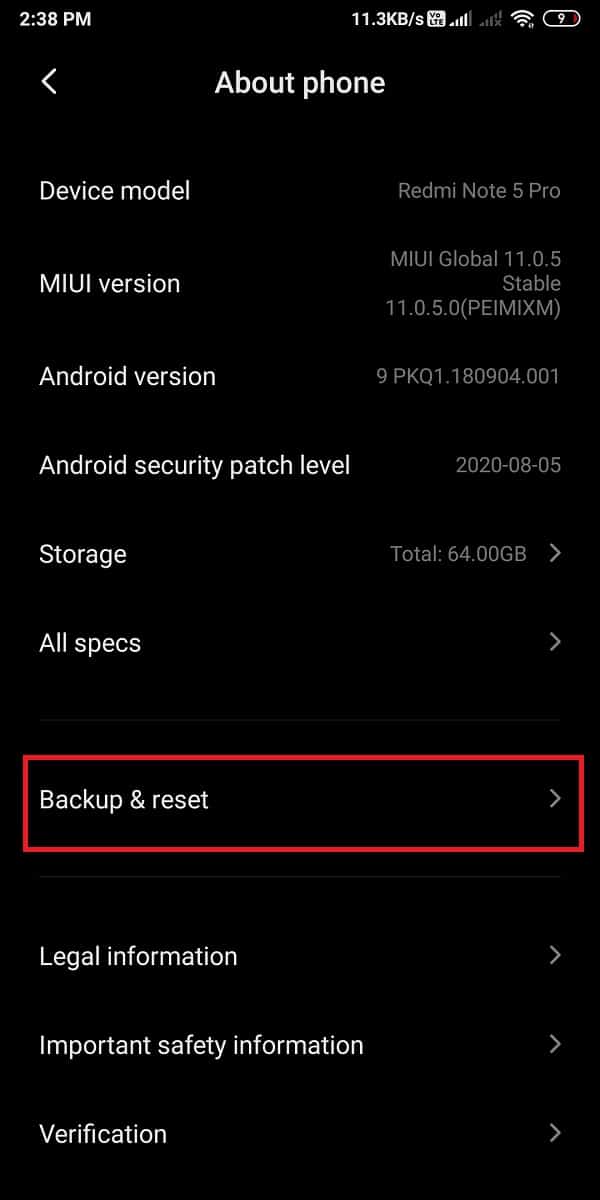
2. Dodirnite Backup and reset, kako je prikazano.
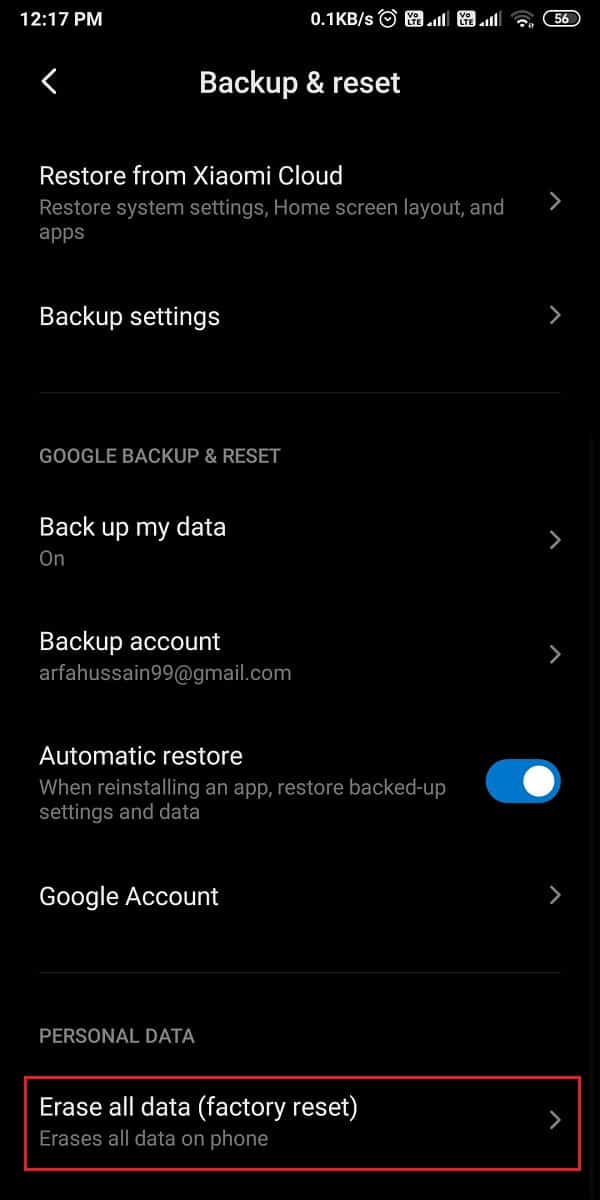
3. Pomaknite se prema dolje i dodirnite Izbriši sve podatke (vraćanje na tvorničke postavke) opcija.
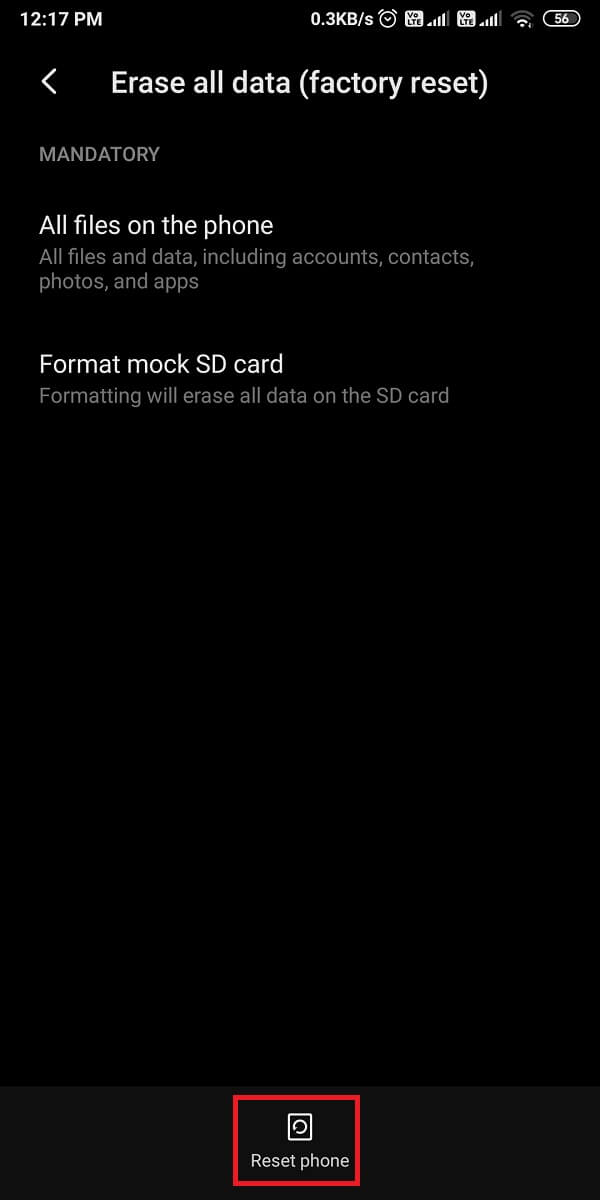
4. Zatim dodirnite Poništi telefon s dna zaslona.
5. Upišite svoje PIN or Lozinka on the next screen to confirm and initiate the factory reset.
Na iOS uređajima
If you are an iOS user, follow the given steps to Factory Reset your device and fix all issues or glitches with your iPhone.
1. Otvoreno Postavke i otići Osnovne informacije postavke.
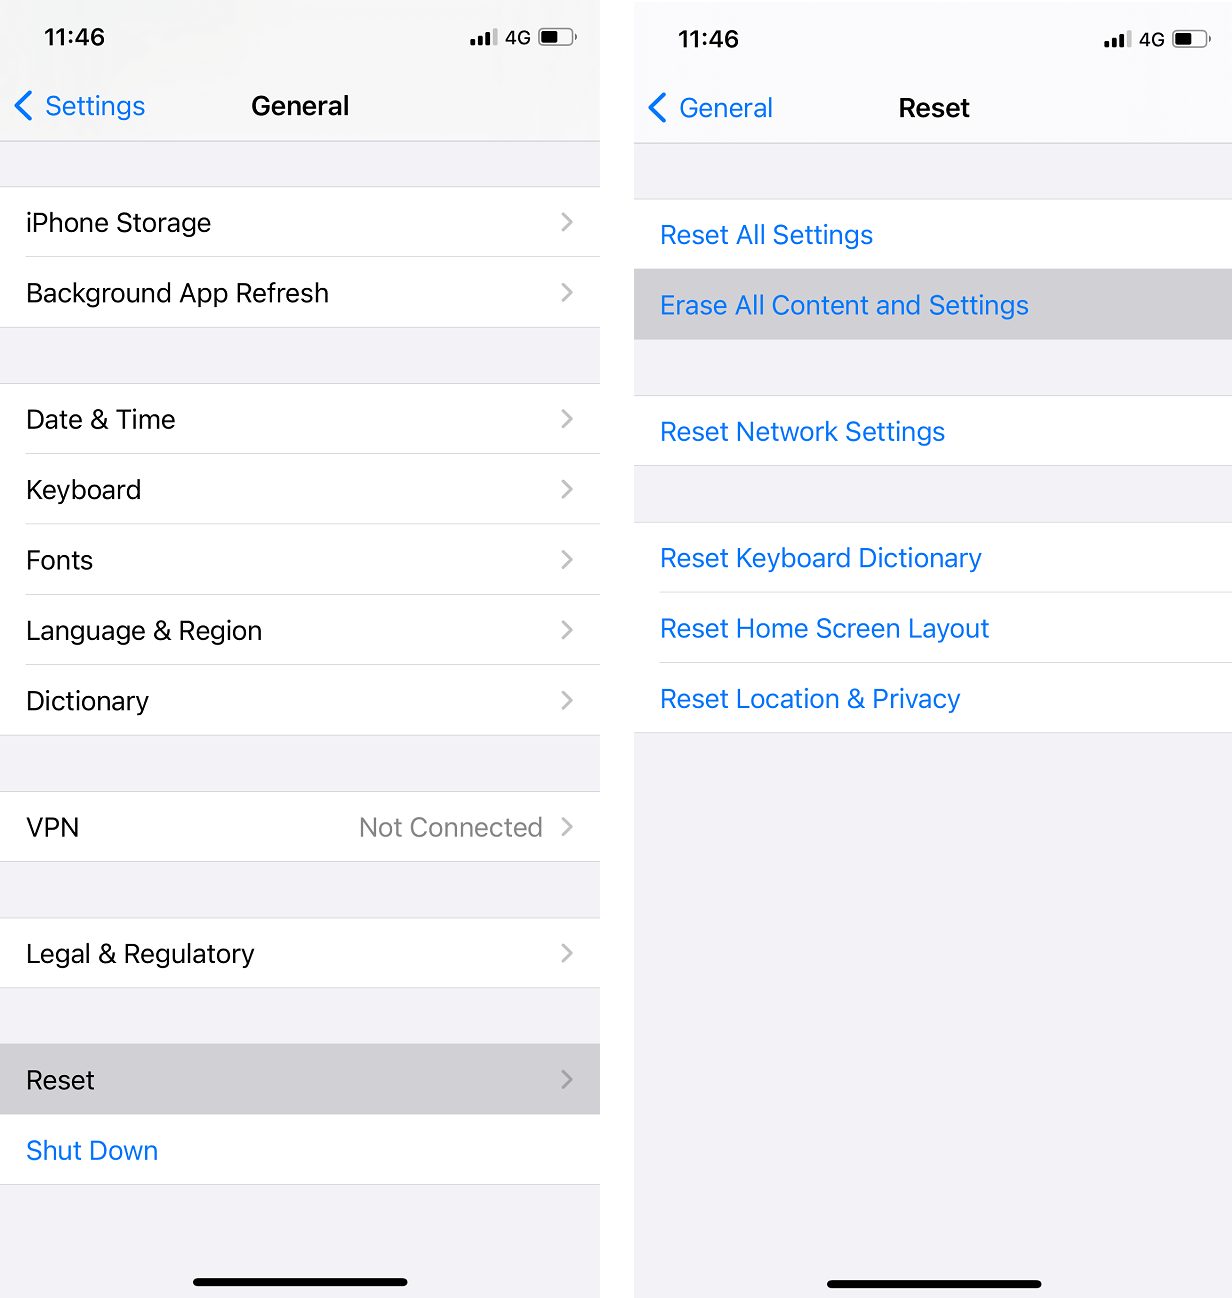
2. Pomaknite se prema dolje i dodirnite Reset.
3. Na kraju dodirnite Izbriši sav sadržaj i postavke. Refer to pic below for clarity.
4. Unesite svoj PIN to confirm and proceed further.
Često postavljana pitanja (FAQ)
Q1. Why are my notifications not showing up on Twitter?
The Twitter notifications do not show up on your device if you disable the push notifications on the Twitter app or in your device settings. Therefore, to fix notifications not showing up on Twitter, you need to enable the push notifications by heading to your Twitter account > Settings and privacy > Notifications > Push notifications. Finally, turn on the push notifications to start receiving the notifications on your Twitter account.
Q2. Why am I not getting any of my notifications?
If you are not getting any notifications on your device, then you may have to enable push notifications from your device settings. Here is how to do it:
- Idite na Postavke vašeg uređaja.
- Idi na Obavijesti.
- Finally, turn the toggle ON pored aplikacije for which you wish to enable all notifications.
Q3. How do you fix Twitter notifications on Android?
To fix Twitter notifications not working on Android, you can enable Push Notifications both from Twitter and your device settings. Moreover, you can Turn off battery saver & DND mode as it may be preventing the notifications on your device. You can also try to ponovno se prijaviti to your Twitter account to fix the issue. You can follow the methods mentioned in our guide to fix the Twitter notifications issue.
Preporučena:
We hope our guide was helpful and you were able to fix Twitter notifications not working on your device. If you have any queries/suggestions, let us know in the comments below.