How to Soft and Hard Reset Kindle Fire

When an electronic device collapses due to conditions like malfunctioning, slow charging, or screen freeze, you are recommended to reset your device to solve such abnormal functions. Like any other device, Kindle Fire issues can also be restored by resetting them. You can either opt for a soft reset or a hard reset, or a factory reset.
Soft reset je u osnovi sličan ponovnom pokretanju sustava. Ovo će zatvoriti sve pokrenute aplikacije i osvježiti uređaj.
Factory reset is usually done to remove the entire data associated with the device. Hence, the device would need re-installation of all of the software afterward. It makes the device function fresh like that of a new one. It is usually carried out when a device’s software gets updated.
A hard reset is usually carried out when device settings need to be altered due to improper functionality. It deletes all the memory stored in the hardware and updates it with the latest version.
Bilješka: After any reset, all the data associated with the device gets deleted. Therefore, it is recommended to back up all the files before you undergo a reset.
How to Soft and Hard Reset Kindle Fire
How to Soft Reset Kindle Fire?
Kada Zapaliti požara freezes, the best way to sort this issue is to soft reset it. Follow the instructions given below to do so:
1. The first step is to turn Kindle Fire to OFF state by simultaneously holding the Vlast i Glasnoća se smanjuje tipke.
2. Once Kindle Fire is turned OFF, take your hand away from the buttons and čekati neko vrijeme.
3. Finally, hold the tipka za uključivanje for a while to restart it.
Now, Kindle Fire is turned NA, and the soft reset of Kindle Fire is complete.
This is similar to restarting the device to fix minor glitches.
How to Soft Reset Kindle Fire HD and HDX (First to Fourth Generation)
1. Okreni se OFF Kindle Fire HD and HDX by pressing the Vlast tipku oko 20 sekundi. Note: Ignore the prompts popping up on the screen while doing so.
2. Once Kindle Fire is turned OFF, objaviti the button and wait for some time.
3. Finally, turn Kindle Fire ON držeći Gumb za napajanje.
It is advised to opt for a hard reset only when the soft reset does not resolve it. Continue reading to learn how to hard reset Kindle fire.
How to Hard Reset Kindle Fire?
Before beginning the process for hard reset, it is highly recommended to:
a. make sure that all the data and media files are backed up. This will prevent the loss of data.
b. ensure that the device has at least 30% of battery charge left.
Također pročitajte: 6 stvari koje biste trebali znati prije nego što kupite Amazon Fire TV Stick
How to Hard Reset Kindle Fire (1st i 2nd Generation Models)
Za 1st i 2nd Generation Models, a hard reset can be done in 5 simple clicks. Follow the steps mentioned below:
1. The first step is to click the zupčanik icon and enter it into Postavke.
2. Click the option called Više…
3. Zatim kliknite na Uređaj.
4. Here, click on the option titled Reset to Factory Defaults.
5. By clicking this, the following screen will display an option to Izbriši sve, Kliknite na njega.
Kindle Fire will enter the hard reset mode. Wait until the reset is complete. Check if Kindle Fire works fine now.
How to Hard Reset Kindle Fire (3rd na 7th Generation Models)
Method 1: Hard Reset using Settings & Password
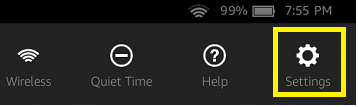
1. The first step is to enter the Settings menu. It is made visible when you swipe down the screen from the top. Click on Postavke kao što je prikazano u nastavku.
2. Under the Settings tab, click to see Opcije uređaja.
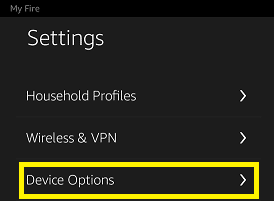
3. Ovdje kliknite na Reset to Factory Defaults. This will remove all personal data and downloaded content from your file.

4. When you click on it, a prompt will appear on the screen. It will ask you for confirmation to proceed with “Reset to Factory Defaults.” Confirm the prompt by clicking on the Reset gumb, kao što je prikazano u nastavku.
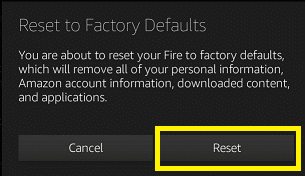
5. Kada kliknete na Reset, the screen will turn OFF, and Kindle Fire will enter reset mode.
Wait for the process to finish and check if Kindle Fire works properly.
Također pročitajte: Kako resetirati svoj Android telefon
Method 2: Hard Reset Without Password
If you have lost or forgotten the lock screen password, you will not be able to access Kindle Fire and hard reset it through the settings option. However, you can hard reset Kindle Fire without a password by using the following steps:
1. The first step is to turn OFF Kindle Fire. This can be done by holding the Vlast button until you see a power OFF brz on the screen. Confirm the prompt by clicking OK.
2. Držite tipku Vlast + Glasnoća se smanjuje buttons simultaneously after the device is turned OFF. After 10 to 15 seconds, the Amazon logotip pojavit će se na zaslonu.
Ako Napajanje + smanjivanje glasnoće button does not work, try Napajanje + pojačavanje glasnoće buttons. The Amazon logo will be displayed now.
3. After some time, the logo disappears, and the Amazon System Recovery Screen će se prikazati.
4. On this screen, you will see an option titled wipe data and factory reset. Navigate to this option by using the Volume down button.
5. Kliknite na wipe data and factory reset option by using the Power button.
6. On the next page, you will see an option marked Yes — delete all user data. Navigate to this option by using the Volume down button.
7. Kliknite na Vlast button to start a hard reset of Kindle Fire.
The screen will turn OFF after some time as Kindle Fire enters into reset mode. Wait for the process to get completed and check if Kindle Fire issues are solved. This method will be extremely helpful if you can’t remember your password.
Preporučena:
Nadamo se da je ovaj članak bio od pomoći i da ste uspjeli Soft and Hard Reset Kindle Fire. If you have any queries, reach out to us through the comments section below.