Fix Desktop Icons keep getting rearranged after Windows 10 Creators Update: After installing the latest Windows 10 Creators Update users are complaining about a new strange issue where the desktop icons keep getting rearranged automatically. Every time the user hits refresh the desktop icons arrangement is changed or messed up. In short whatever you do from saving a new file on the desktop, to rearranging icons on the desktop, to renaming files or shortcuts on the desktop affects the icon arrangement in some way or other.
![]()
In some cases, in addition to above issues, users are also complaining about the icon spacing issue as before the update the space between icons was different and after the Creators Update, the icon spacing is also messed up. Below is the official Windows announcement of a new feature being introduced in Creators Update called Desktop Icon Placement Improvements:
Windows now more intelligently rearranges and scales desktop icons when you switch between different monitors and scaling settings, seeking to preserve your custom icon layout rather than scrambling them.
Now the main issue about this feature is you can’t disable it and this time Microsoft has really messed up by introducing this feature which is causing more harm than good. Anyway without wasting any more time let’s see how to actually Fix Desktop Icons keep getting rearranged after Windows 10 Creators Update with the below-listed troubleshooting guide.
Fix Desktop Icons keep getting rearranged after Windows 10 Creators Update
Győződjön meg arról, hogy hozzon létre egy helyreállítási pontot ha valami rosszul megy.
1. módszer: Változtassa meg az ikonnézetet
1. Kattintson a jobb gombbal az asztalra, majd válassza a lehetőséget Megnézem és módosítsa a nézetet az aktuálisan kiválasztott nézetről bármely másikra. Például, ha jelenleg a „Közepes” van kiválasztva, kattintson a „Kicsi” gombra.

2. Most ismét válassza ki ugyanazt a nézetet, amelyet korábban, például mi választunk Ismét közepes.
3. Ezután válassza a „Small” a Nézet opcióban, és azonnal látni fogja a változásokat az asztalon lévő ikonban.
![]()
4. Ezt követően az ikonok nem rendeződnek át automatikusan.
Method 2: Enable Align icons to grid
1.Right-click on an empty space on the desktop then select View és törölje a jelölést Align icons to grid.
![]()
2.Now again from the view option enable Align icons to grid and see if you are able to fix the issue.
3.Ha nem, akkor a Nézet opcióból törölje a pipát az Ikonok automatikus elrendezése jelölőnégyzetből és minden sikerülni fog.
3. módszer: Törölje a jelölést az Asztali ikonok megváltoztatásának engedélyezése a témáknak jelölőnégyzetből
1.Press Windows Key + I to open Settings then click Testreszabás.
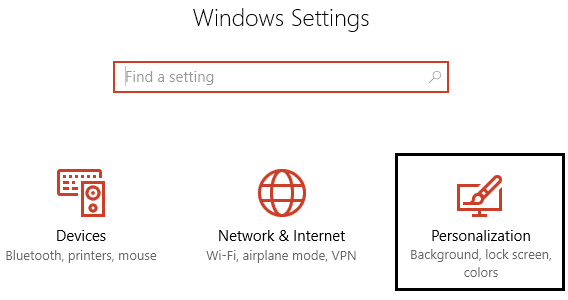
2.A bal oldali menüből válassza ki a lehetőséget témák majd kattintson az OK gombra Asztali ikon beállításai.
![]()
3. Az Asztali ikon beállításai ablakban törölje a jelet a „A témák megváltoztathatják az asztali ikonokat" az alján.
![]()
4. Kattintson az Alkalmaz, majd az OK gombra.
5. Indítsa újra a számítógépet a módosítások mentéséhez, és ellenőrizze, hogy képes-e rá Fix Desktop Icons keep getting rearranged automatically issue.
4. módszer: Törölje az ikon-gyorsítótárat
1.Make sure to save all the work which you are currently doing on your PC and close all the present applications or folder windows.
2. Nyomja meg a Ctrl + Shift + Esc billentyűkombinációt a megnyitáshoz Feladatkezelő.
3. Kattintson a jobb gombbal A windows Explorer és válassza ki a Utolsó feladat.

4.Click filé majd kattintson a gombra Új feladat futtatása.

5.Típus cmd.exe az érték mezőben, és kattintson az OK gombra.

6. Most írja be a következő parancsot a cmd-be, és mindegyik után nyomja meg az Enter billentyűt:
CD /d %userprofile%AppDataLocal
DEL IconCache.db / a
EXIT
![]()
7. Ha az összes parancsot sikeresen végrehajtotta, zárja be a parancssort.
8. Most ismét nyissa meg a Feladatkezelőt, ha bezárta, majd kattintson a gombra Fájl > Új feladat futtatása.
9. Írja be az explorer.exe fájlt, és kattintson az OK gombra. Ez újraindítja a Windows Intézőt és Fix Desktop Icons keep getting rearranged issue.

Method 5: Roll back to the previous Windows 10 build
1.First, go to the Login screen then click on Bekapcsoló gomb akkor tartsa lenyomva a Shift billentyűt majd kattintson rá Újraindul.
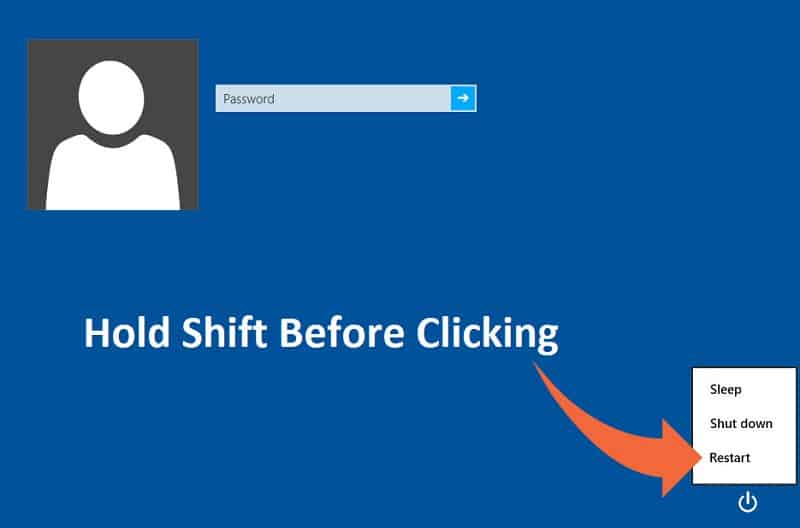
2. Ügyeljen arra, hogy ne engedje el a Shift gombot, amíg meg nem látja a Speciális helyreállítási beállítások menü.

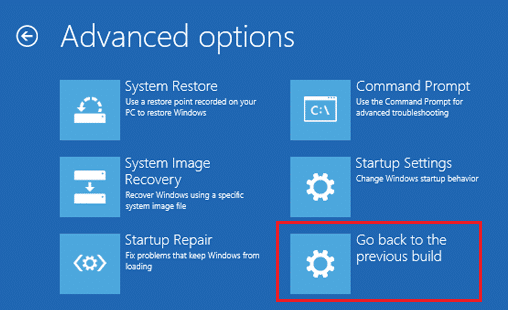
3. Most lépjen a következőhöz a Speciális helyreállítási beállítások menüben:
Hibaelhárítás > Speciális beállítások > Visszatérés az előző buildhez.
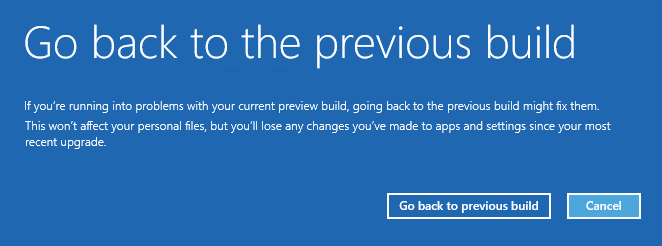
3.After a few seconds, you will be asked to choose your User Account. Click on the User Account, type in your password and click Continue. Once done, choose the option Go Back to the Previous Build again.
Neked ajánlott:
Ez az, ami sikeresen megvan Fix Desktop Icons keep getting rearranged after Windows 10 Creators Update de ha továbbra is kérdései vannak ezzel az útmutatóval kapcsolatban, nyugodtan kérdezze meg őket a megjegyzés részben.
![Fix WMI Provider Host High CPU Usage [Windows 10]](https://lbsite.org/wp-content/uploads/2023/02/Fix-WMI-Provider-Host-High-CPU-Usage-on-Windows-10.png "Fix WMI Provider Host High CPU Usage [Windows 10]")
