Fix High CPU Usage by svchost.exe (netsvcs)
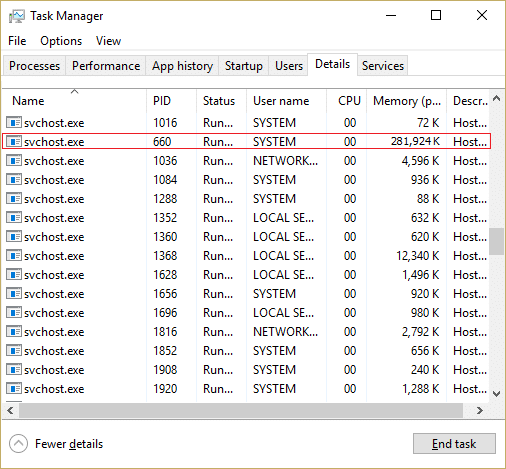
Svchost.exe (Service Host, or SvcHost) is a generic host process name for services that run from dynamic-link libraries. All the Windows internal services were moved into one .dll file instead of the .exe file, but you need an executable (.exe) file in order to load these .dll files; hence the svchost.exe process was created. Now you may notice that there were several instances of svchost.exe processes which are there because if one service fails it won’t bring down the Windows and all these services are organized into groups, and each svchost.exe instance is created for each such group.

Now the problem begins when svchost.exe (netsvcs) start taking almost all of the Windows resources and causes a High CPU usage. If you looked into Task Manager, you would find that a particular svchost.exe is taking up almost all the memory and creating a problem for other programs or applications. The computer becomes unstable as it becomes very sluggish and it starts freezing Windows randomly, then the user either has to reboot their system or force shutdown.
Svchost.exe High CPU Usage problem occurs mostly because of virus or malware infection on users PC. But the problem is not limited to only this as it generally depends on users system configuration and the environment. So without wasting any time let’ see how to actually Fix High CPU Usage by svchost.exe (netsvcs) with the below-listed troubleshooting guide.
Fix High CPU Usage by svchost.exe (netsvcs)
Győződjön meg róla, hogy hozzon létre egy visszaállítási pontot arra az esetre, ha valami baj lenne.
1. módszer: Futtassa a CCleanert és a Malwarebytes programot
1. letöltés és telepítés CCleaner & Malwarebytes.
2. Futtassa a Malwarebytes-t és hagyja, hogy átvizsgálja a rendszert káros fájlok után kutatva. Ha rosszindulatú programot talál, automatikusan eltávolítja azokat.

3. Most futtassa a CCleanert, és válassza ki Egyedi tisztítás.
4. Az Egyéni tisztítás alatt válassza ki a Windows fül és jelölje be az alapértelmezett értékeket, majd kattintson Elemez.

5. Az elemzés befejezése után győződjön meg arról, hogy eltávolítja a törölni kívánt fájlokat.

6. Végül kattintson a gombra Run Cleaner gombot, és hagyja, hogy a CCleaner futtasson.
7. A rendszer további tisztításához válassza a Registry fület, és győződjön meg arról, hogy a következőket ellenőrizték:

8. Kattintson a Hibákat keres gombot, és engedélyezze a CCleaner beolvasását, majd kattintson a Kiválasztott hibák javítása gombot.

9. Amikor a CCleaner megkérdezi,Biztonsági másolatot szeretne készíteni a rendszerleíró adatbázis módosításairól?" válassza az Igen lehetőséget.
10. A biztonsági mentés befejezése után kattintson a gombra Javítsa ki az összes kiválasztott hibát gombot.
11. Indítsa újra a számítógépet a módosítások mentéséhez.
Method 2: Disable the particular service that is causing High CPU
1. nyomja meg Ctrl + Shift + Esc together to launch Task Manager.
2. Váltás Részletek lap and right-click on the high CPU usage svchost.exe process and choose Go to Service(s).
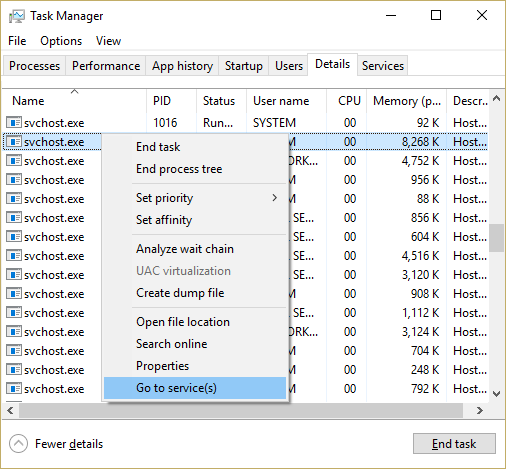
3. This would automatically take you to the Services tab, and you will notice that there are several highlighted services that run under the svchost.exe process.
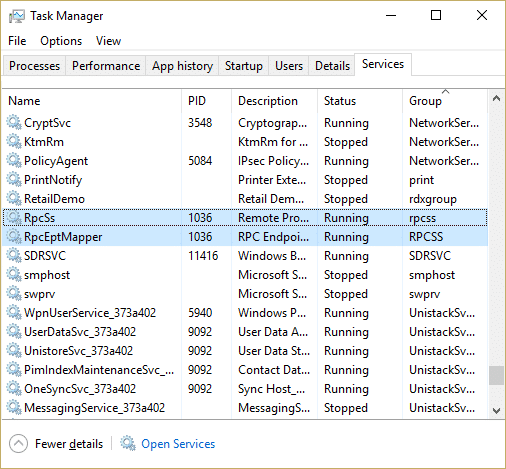
4. Most kattintson a jobb gombbal a highlighted service one by one and select Stop.
5. Do this until the high CPU usage by that particular svchost.exe process is fixed.
6. Once you have verified the services because of which this problem has occurred, it’s time to disable that service.
Jegyzet: Az idő nagy részében, Windows Update szolgáltatás is the culprit service, but we will deal with it later on.
7. Nyomja meg a Windows Key + R billentyűket, majd írja be services.msc és nyomja meg az Enter billentyűt.

8. Now find that particular service in this list then kattintson jobb gombbal rajta és válassza ki Tulajdonságok.
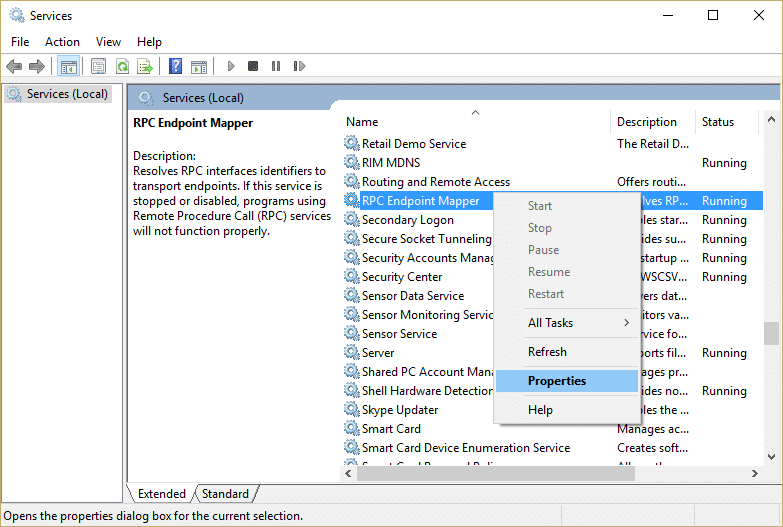
9. Click Stop if the service is running and then make sure Startup type is set to Kikapcsolja and click Apply followed by OK.
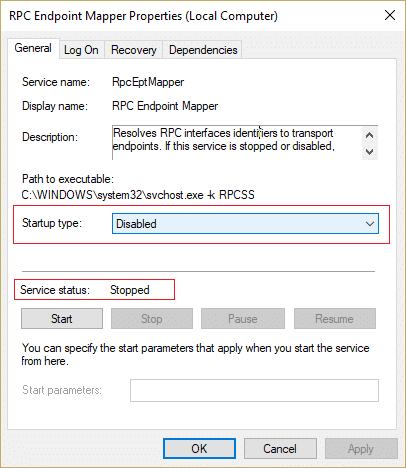
10. Reboot your PC to save changes and see if the issue is resolved or not
This would definitely Resolve High CPU Usage by svchost.exe (netsvcs). If you find it difficult to zero in on the particular svchost.exe file causing the issue, you could use a Microsoft program called Process Explorer, which would help you find the cause of the problem.
Method 3: Clear Event Viewer Logs
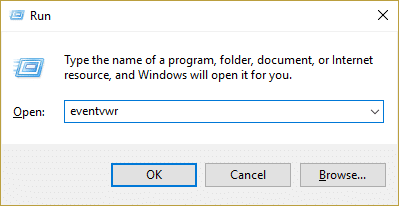
1. Nyomja meg a Windows Key + R billentyűket, majd írja be eventvwr.msc és nyomja meg az Enter billentyűt a megnyitáshoz Eseménynéző.
2. From the left-hand side menu, expand Windows-naplók and then right-click on the subfolders one by one and choose Napló törlése.
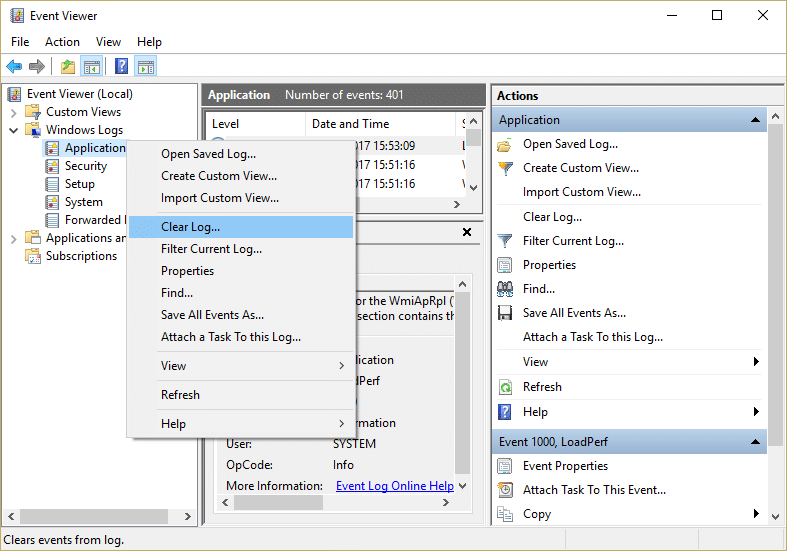
3. These subfolders will be Application, Security, Setup, System and Forwarded Events.
4. Make sure you clear the event logs for all the above folders.
5. A változtatások mentéséhez indítsa újra a számítógépet.
4. módszer: SoftwareDistribution Folder átnevezése
1. Nyomja meg a Windows Key + X billentyűkombinációt, majd válassza ki Parancssor (Admin).
2. Most írja be a következő parancsokat a Windows Update Services leállításához, majd mindegyik után nyomja meg az Enter billentyűt:
net stop wuauserv
net stop cryptSvc
net stop bitek
net stop msiserver
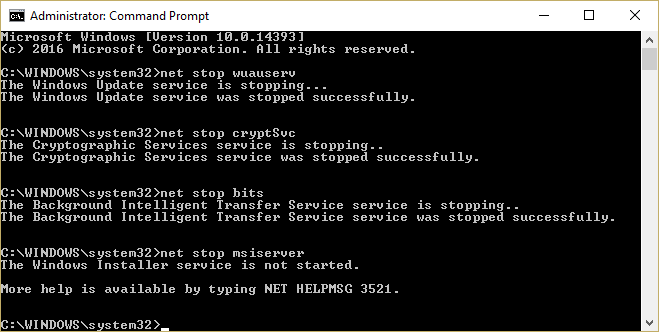
3. Ezután írja be a következő parancsot a SoftwareDistribution Folder átnevezéséhez, majd nyomja meg az Enter billentyűt:
ren C: WindowsSoftwareDistribution SoftwareDistribution.old
ren C: WindowsSystem32catroot2 catroot2.old

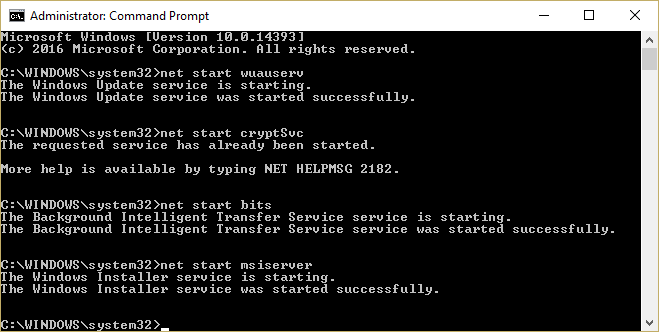
4. Végül írja be a következő parancsot a Windows Update Services elindításához, és mindegyik után nyomja meg az Enter billentyűt:
net start wuauserv
net start cryptSvc
net start bitek
net start msiserver
5. A változtatások mentéséhez indítsa újra a számítógépet.
5. módszer: Futtassa a Windows Update hibaelhárítót
1. Type “troubleshooting” in the Windows Search bar and click on Hibaelhárítás.

2. Ezután a bal oldali ablakban válassza ki a panelt Összes megtekintése.
3. Ezután a Számítógépes problémák elhárítása listából válassza ki a lehetőséget Windows Update.

4. Kövesse a képernyőn megjelenő utasításokat, és hagyja, hogy a A Windows Update hibaelhárítása fut.

5. Indítsa újra a számítógépet a módosítások mentéséhez.
This should help you fix High CPU Usage by svchost.exe (netsvcs) but if not then continue with the next method.
Method 6: Make sure to Update Windows
1. Nyomja meg a Windows Key + I billentyűket, majd válassza ki Frissítés és biztonság.
![]()
2. Ezután kattintson a gombra Frissítések ellenőrzése és mindenképpen telepítse a függőben lévő frissítéseket.

3. A frissítések telepítése után indítsa újra a számítógépet Fix High CPU Usage by svchost.exe (netsvcs).
Method 7: Disable the BITS and Windows Update service
1. Nyomja meg a Windows Key + R billentyűket, majd írja be services.msc és nyomja meg az Enter billentyűt.

2. Now find BITS és a windows Update in the list then right-click on them and select Tulajdonságok.
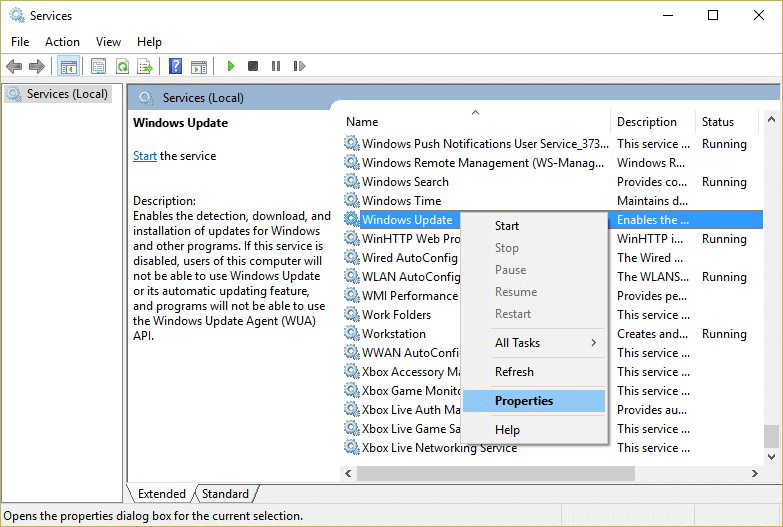
3. Győződjön meg róla, hogy kattintson a Leállítás gombra and then set up their Startup type to Tiltva.
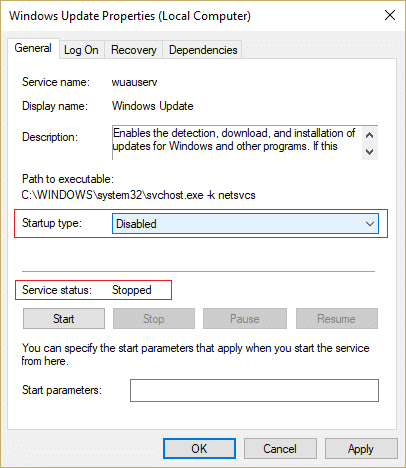
4. Kattintson az Alkalmaz, majd az OK gombra.
5. A változtatások mentéséhez indítsa újra a számítógépet.
This should help you fix High CPU Usage by svchost.exe (netsvcs) but if not then continue with the next method.
Method 8: Download & Run RKill
Rkill is a program that was developed at BleepingComputer.com that attempts to terminate known malware processes so that your normal security software can then run and clean your computer of infections. When Rkill runs, it will kill malware processes and then remove incorrect executable associations and fixes policies that stop us from using certain tools when finished. It will display a log file that shows the processes that were terminated while the program was running. This should resolve High CPU Usage by svchost.exe issue.
Töltse le az Rkill-t innen, telepítse és futtassa.
9 módszer: Run System File Checker (SFC) and Check Disk (CHKDSK)
1. Nyomja meg a Windows Key + X billentyűket, majd kattintson a gombra Parancssor (Adminisztrátor).

2. Most írja be a következőket a cmd-be, és nyomja meg az Enter billentyűt:
Sfc /scannow sfc /scannow /offbootdir=c: /offwindir=c:windows (Ha a fenti sikertelen, próbálja meg ezt)

3. Várja meg, amíg a fenti folyamat befejeződik, és miután végzett, indítsa újra a számítógépet.
4. Next, run CHKDSK from Javítsa ki a fájlrendszer-hibákat a Check Disk Utility (CHKDSK) segítségével.
5. Hagyja befejezni a fenti folyamatot, majd indítsa újra a számítógépet a módosítások mentéséhez.
10. módszer: Futtassa a Rendszer és karbantartás hibaelhárítót
1. Nyomja meg a Windows Key + X billentyűket, és kattintson a gombra Kezelőpanel.

2. Keressen a Hibaelhárítás elemre, és kattintson a gombra Hibaelhárítás.

3. Ezután kattintson az összes megtekintése elemre a bal oldali ablaktáblában.
4. Kattintson és futtassa a Hibaelhárító a rendszer karbantartásához.

5. A Hibaelhárító képes lehet Fix High CPU Usage by svchost.exe (netsvcs).
Ajánlott:
That’s it you have successfully Fix High CPU Usage by svchost.exe (netsvcs) but if you still have any questions regarding this post then feel free to ask them in the comment’s section.