Windows 7-ում մահացած կրիտիկական գործընթացը շտկելու 10 եղանակ

7 Ways to Fix Critical Process Died in Windows 10: Critical Process Died is a Blue Screen of Death Error (BSOD) with an error message Critical_Process_Died and a stop error 0x000000EF. The main cause of this error is that the process which was supposed to run the Windows Operating System ended abruptly and thus the BSOD error. There is no information available on this error on Microsoft website apart from this:
“The CRITICAL_PROCESS_DIED bug check has a value of 0x000000EF. This indicates that a critical system process died.”
The other reason why you could see this BSOD error is that when an unauthorized program tries to modify a data related to the critical component of Windows then the Operating System immediately steps in, causing the Critical Process Died error to stop this unauthorized change.
Now you know all about the Critical Process Died error but what causes this error on your PC? Well, the main culprit seems to be outdated, incompatible or a buggy driver. This error can also be caused because of the bad memory sector. So without wasting any time let’s see How to Fix Critical Process Died in Windows 10 with the help of the below-listed tutorial.
Fix Critical Process Died in Windows 10
Համոզվեք, որ ստեղծեք վերականգնման կետ, եթե ինչ-որ բան սխալ լինի:
If you can’t access your PC then start Windows in Safe Mode using this guide and then try the following fixes.
Մեթոդ 1. Գործարկել CCleaner-ը և Antimalware-ը
1. Ներբեռնեք և տեղադրեք CCleaner & Վնասակար ծրագրեր:
2. Գործարկեք Malwarebytes-ը և թույլ տվեք, որ այն ստուգի ձեր համակարգը վնասակար ֆայլերի համար:
3. Եթե չարամիտ հայտնաբերվի, այն ինքնաբերաբար կհեռացնի դրանք:
4.Now run CCleaner and in the “Cleaner” բաժինը, Windows ներդիրի տակ, առաջարկում ենք ստուգել մաքրման ենթակա հետևյալ ընտրանքները.

5. Երբ համոզվեք, որ ճիշտ կետերը ստուգված են, պարզապես սեղմեք Գործարկել Cleaner-ը, և թող CCleaner-ը գործի իր ընթացքը:
6. Ձեր համակարգը հետագայում մաքրելու համար ընտրեք Ռեեստրի ներդիրը և համոզվեք, որ ստուգված են հետևյալը.

7. Ընտրեք Սկանավորեք խնդիրը and allow CCleaner to scan, then click Fix Selected Issues.
8. Երբ CCleaner-ը հարցնում է.Do you want backup changes to the registry?” select Այո:
9. Երբ ձեր պահուստավորումն ավարտվի, ընտրեք «Fix All Selected Issues»:
10.Վերագործարկեք ձեր համակարգիչը և տեսեք, թե արդյոք կարող եք դա անել Fix Critical Process Died in Windows 10.
Մեթոդ 2. Գործարկել SFC և DISM գործիքը
1. Սեղմեք Windows Key + X, ապա սեղմեք Հրամանի տող (ադմինիստրատոր):

2. Այժմ մուտքագրեք հետևյալը cmd-ում և սեղմեք enter.
Sfc /scannow sfc /scannow /offbootdir=c: /offwindir=c:windows (Եթե վերը նշվածը ձախողվի, ապա փորձեք սա)

3. Սպասեք վերը նշված գործընթացի ավարտին և ավարտից հետո վերագործարկեք ձեր համակարգիչը:
4. Կրկին բացեք cmd և մուտքագրեք հետևյալ հրամանը և յուրաքանչյուրից հետո սեղմեք enter.
ա) Dism /Online /Cleanup-Image /CheckHealth բ) Dism /Online /Cleanup-Image /ScanHealth գ) Dism /Online /Cleanup-Image /RestoreHealth

5. Թողեք DISM հրամանը գործարկվի և սպասեք, որ այն ավարտվի:
6. Եթե վերը նշված հրամանը չի աշխատում, ապա փորձեք ստորև.
Dism /Image:C:offline /Cleanup-Image /RestoreHealth /Source:c:testmountwindows Dism /Առցանց /Cleanup-Image /RestoreHealth /Աղբյուր:c:testmountwindows /LimitAccess
Նշում: Փոխարինեք C:RepairSourceWindows-ը ձեր վերանորոգման աղբյուրի գտնվելու վայրով (Windows-ի տեղադրում կամ վերականգնման սկավառակ):
7. Վերագործարկեք ձեր համակարգիչը, որպեսզի պահպանեք փոփոխությունները և տեսնեք, թե արդյոք կարող եք դա անել Fix Critical Process Died in Windows 10 Issue.
Մեթոդ 3. Կատարել մաքուր կոշիկներ
Sometimes 3rd party software can conflict with Windows and can cause the issue. In order to Fix Critical Process Died issue, դուք պետք է կատարեք մաքուր բեռնում ձեր համակարգչի վրա և քայլ առ քայլ ախտորոշեք խնդիրը:

Մեթոդ 4. Գործարկել վարորդի ստուգիչը
Այս մեթոդը օգտակար է միայն այն դեպքում, եթե դուք կարող եք մուտք գործել ձեր Windows սովորաբար ոչ անվտանգ ռեժիմում: Հաջորդը, համոզվեք, որ ստեղծեք համակարգի վերականգնման կետ:
Method 5: Update Outdated Drivers
1. Սեղմեք Windows Key + R, ապա մուտքագրեք devmgmt.msc և սեղմեք Enter ՝ բացելու համար Device Manager.

2.Click the arrow on the left side of each category to expand it and see the list of devices in it.
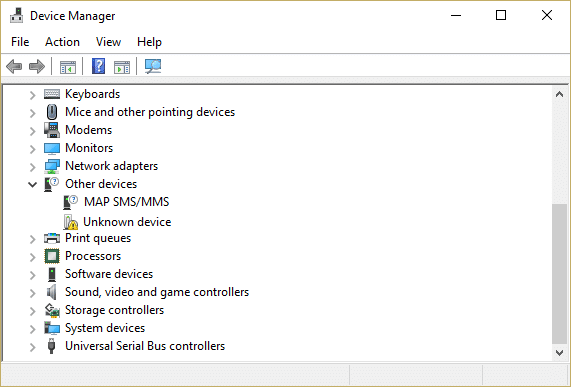
3.Now check if any of the devices have a yellow exclamation mark next to it.
4.If any device has a yellow exclamation mark then this means they have outdated drivers.
5.To fix this, right-click on such սարք(ներ) եւ ընտրել Տեղահանեք:
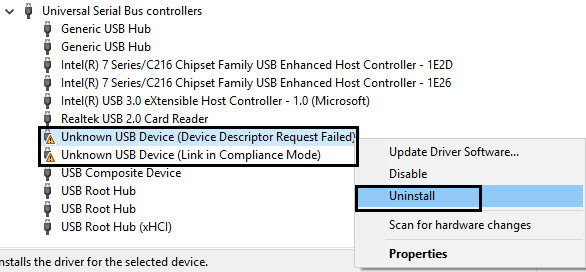
5.Restart your PC to apply changes and Windows will automatically install the default drivers for the above device.
Method 6: Disable Sleep and Hibernate
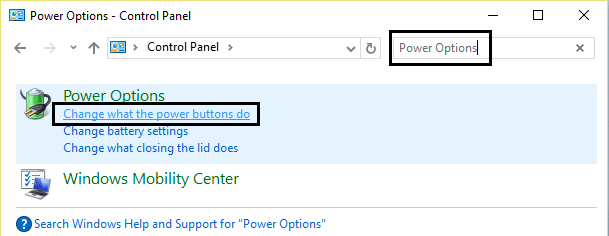
1.Տեսակ վերահսկել Windows Search-ում, ապա սեղմեք Control Panel որոնման արդյունքից։

2.In Control Panel then type Power ընտրանքներ in the search.
2.In Power Options, click change what the power button do.
3. Հաջորդը, սեղմեք Փոխեք կարգավորումները, որոնք ներկայումս անհասանելի են ՈՒղեցույց.

4. Համոզվեք, որ Բացեք Sleep and Hibernate.
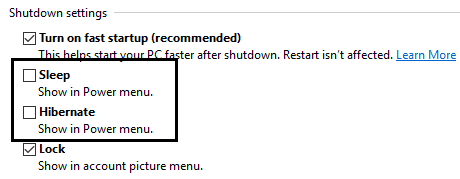
5.Click save changes and restart your PC.
Մեթոդ 7. Թարմացրեք կամ վերակայեք Windows 10-ը
Նշում: Եթե չեք կարող մուտք գործել ձեր համակարգիչ, ապա մի քանի անգամ վերագործարկեք ձեր համակարգիչը, մինչև սկսեք Ավտոմատ վերանորոգում. Այնուհետև անցեք դեպի Անսարքությունների վերացում > Վերականգնել այս համակարգիչը > Հեռացնել ամեն ինչ:
1. Սեղմեք Windows Key + I՝ Settings-ը բացելու համար, այնուհետև սեղմեք Թարմացում և անվտանգության պատկերակ:
![]()
2. Ձախ ընտրացանկից ընտրեք Վերականգնում:
3. Տակ Ստեղծեք այս համակարգիչը սեղմեք «Սկսել"Կոճակը:

4. Ընտրեք տարբերակը Պահեք իմ ֆայլերը.

5. Հաջորդ քայլի համար ձեզ կարող է պահանջվել տեղադրել Windows 10 տեղադրման մեդիա, այնպես որ համոզվեք, որ այն պատրաստ եք:
6. Այժմ ընտրեք Windows-ի ձեր տարբերակը և սեղմեք միայն սկավառակի վրա, որտեղ տեղադրված է Windows-ը > Պարզապես հեռացրեք իմ ֆայլերը:

5 սեղմեք Վերականգնել կոճակը:
6.Follow the instructions on the screen to complete the reset or refresh.
Խորհուրդ է տրվում:
Դա այն է, ինչ դուք հաջողությամբ ունեք Fix Critical Process Died in Windows 10 but if you still have any queries regarding this post then feel free to ask them in the comments section.