Windows Updates Error 0x8024401c Fix

If you are facing error code 0x8024401c while trying to update Windows 10, then you are at the right place as today we are going to discuss how to resolve this issue. Basically, you won’t be able to download or install any updates because of this error 0x8024401c. Windows updates are an essential part of your system to easily prevent your PC from vulnerabilities, leading to malware or virus, spyware, or adware installed on your system. Depending upon user’s system configuration, you could face the following error:
There were some problems installing updates, but we’ll try again later. If you keep seeing this and want to search the web or contact support for information, this may help: (0x8024401c)
Now you could face this error message because of a number of reasons such as corrupt registry entries, corrupted system files, outdated or incompatible drivers, incomplete installation or uninstallation of a program etc. So without wasting any time let’s see how to actually Fix Windows Updates Error 0x8024401c with the help of below-listed steps.
Windows Updates Error 0x8024401c Fix
Համոզվեք, որ ստեղծեք վերականգնման կետ, եթե ինչ-որ բան սխալ լինի:
Մեթոդ 1. Գործարկել Windows Update Troubleshooter-ը
1. Open control panel and search Troubleshooting in the Search Bar on the top right side and click on Troubleshooting.

2. Հաջորդը, ձախ պատուհանից ընտրեք պատուհանը Դիտել բոլորը
3. Այնուհետև Համակարգչի խնդիրների վերացման ցանկից ընտրեք Windows Update- ը:
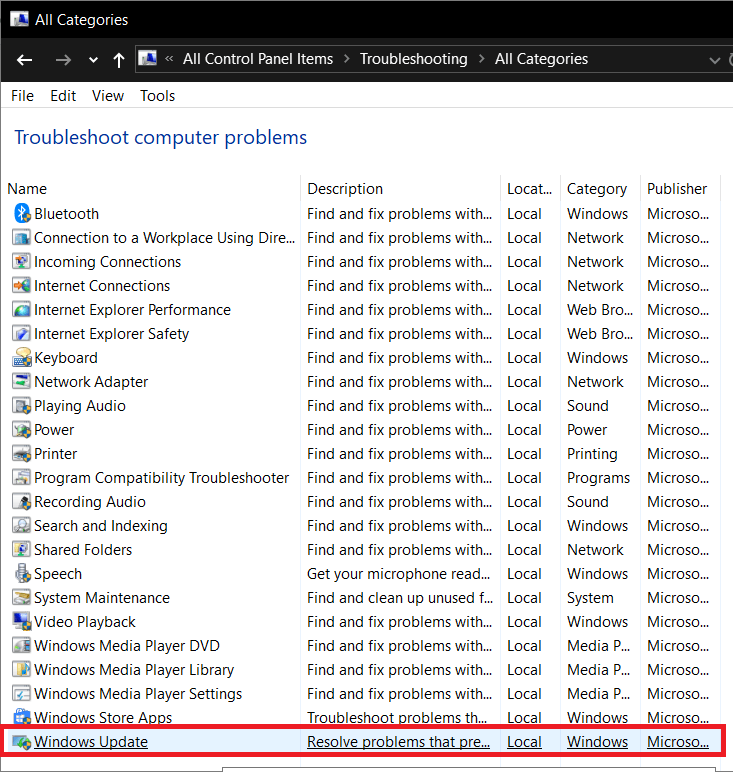
4. Հետևեք էկրանի հրահանգներին և թողեք Windows Update Troubleshoot-ը գործարկվի:
5. Վերագործարկեք ձեր համակարգիչը, և դուք կարող եք դա անել Fix Windows Updates Error 0x8024401c.
Մեթոդ 2. Գործարկել SFC և CHKDSK
1. Բաց Հրահանգ արագ. Օգտագործողը կարող է կատարել այս քայլը՝ որոնելով «cmd» եւ ապա սեղմեք Enter:

2. Այժմ cmd-ում մուտքագրեք հետևյալը և սեղմեք enter.
sfc /scannow sfc /scannow /offbootdir=c: /offwindir=c:windows

3. Սպասեք, մինչև վերը նշված գործընթացը ավարտվի, և երբ ավարտվի, վերագործարկեք ձեր համակարգիչը:
4. Հաջորդը գործարկեք CHKDSK ֆայլային համակարգի սխալները շտկելու համար:
5. Թող վերը նշված գործընթացը ավարտվի և նորից վերագործարկեք ձեր համակարգիչը՝ փոփոխությունները պահպանելու համար:
Մեթոդ 3. Գործարկել DISM-ը
1. Բաց Հրահանգ արագ. Օգտագործողը կարող է կատարել այս քայլը՝ որոնելով «cmd» եւ ապա սեղմեք Enter:
2. Now type the following in the cmd and hit enter after each one:
Dism /Առցանց /Cleanup-Image /CheckHealth Dism /Առցանց /Cleanup-Image /ScanHealth Dis /Առցանց /Cleanup-Image /RestoreHealth

3. Թողեք DISM հրամանը գործարկվի և սպասեք, որ այն ավարտվի:
4. Եթե վերը նշված հրամանը չի աշխատում, ապա փորձեք ստորև.
Dism /Image:C:offline /Cleanup-Image /RestoreHealth /Source:c:testmountwindows Dism /Առցանց /Cleanup-Image /RestoreHealth /Աղբյուր:c:testmountwindows /LimitAccess
Նշում: Փոխարինեք C:RepairSourceWindows-ը ձեր վերանորոգման աղբյուրով (Windows-ի տեղադրում կամ վերականգնման սկավառակ):
5. Վերագործարկեք ձեր համակարգիչը, որպեսզի պահպանեք փոփոխությունները և տեսնեք, թե արդյոք կարող եք դա անել Fix Windows Updates Error 0x8024401c.
Մեթոդ 4. անջատել IPv6-ը
1. Աջ սեղմեք համակարգային սկուտեղի WiFi պատկերակի վրա և սեղմեք «Բաց ցանց եւ փոխանակման կենտրոն:"
![]()
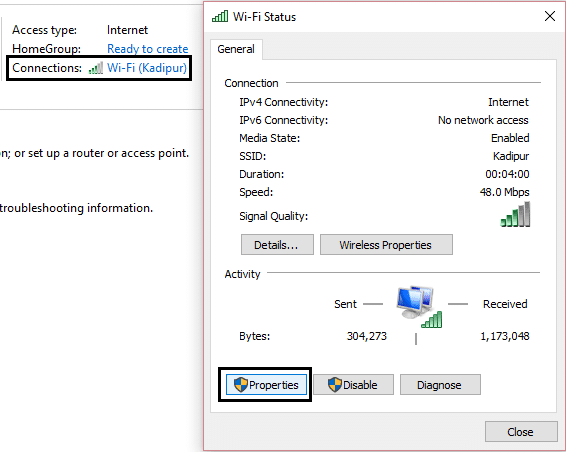
2. Այժմ սեղմեք ձեր ընթացիկ կապի վրա բացել Պարամետրեր.
Նշում: Եթե չեք կարողանում միանալ ձեր ցանցին, ապա միանալու համար օգտագործեք Ethernet մալուխ, այնուհետև հետևեք այս քայլին:
3. Սեղմեք Հատկություններ կոճակ հենց նոր բացվող պատուհանում:
4. Համոզված եղեք հեռացնել Ինտերնետային արձանագրության տարբերակ 6 (TCP/IP):
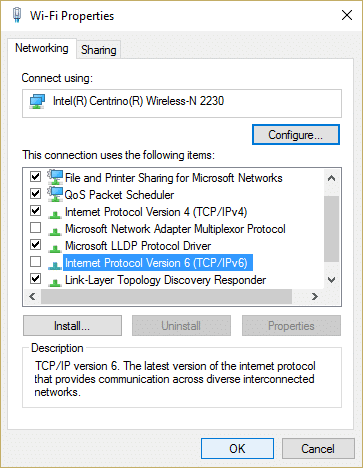
5. Սեղմեք OK, ապա սեղմեք Փակել: Փոփոխությունները պահպանելու համար վերագործարկեք ձեր համակարգիչը:
Մեթոդ 5. Գործարկել համակարգի վերականգնումը
1. Սեղմեք Windows Key + R և մուտքագրեք system.cpl ապա սեղմեք enter:

2. Ընտրել Համակարգի պաշտպանություն ներդիր և ընտրել Համակարգը վերականգնելու.
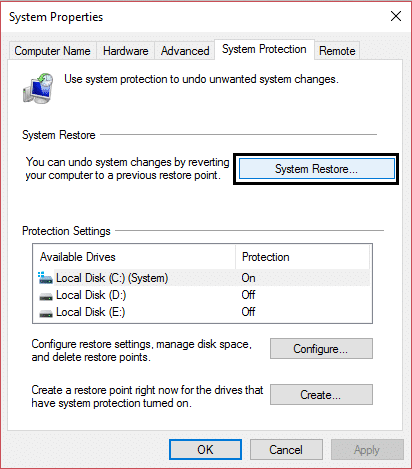
3. Սեղմեք Հաջորդը և ընտրեք ցանկալիը Համակարգի վերականգնման կետ.
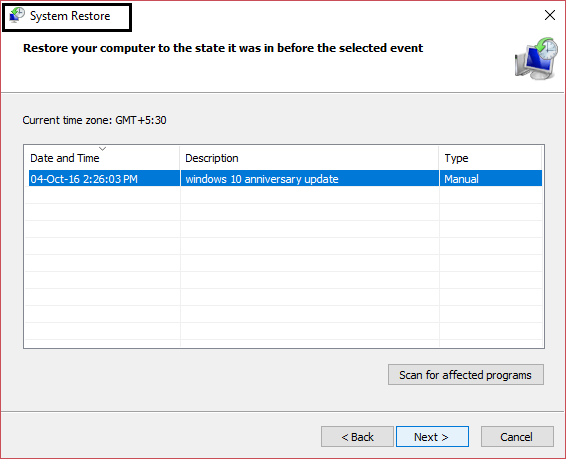
4. Համակարգի վերականգնումն ավարտելու համար հետևեք էկրանի հրահանգներին:
5. Վերագործարկելուց հետո դուք կարող եք դա անել Fix Windows Updates Error 0x8024401c.
Մեթոդ 6. ռեեստրի ուղղում
1. Սեղմեք Windows Key + R, ապա մուտքագրեք regedit և սեղմեք Enter՝ ռեեստրի խմբագրիչը բացելու համար:

2. Նավարկեք հետևյալ ռեեստրի բանալի.
ComputerHKEY_LOCAL_MACHINESOFTWAREPoliciesMicrosoftWindowsWindowsUpdateAU
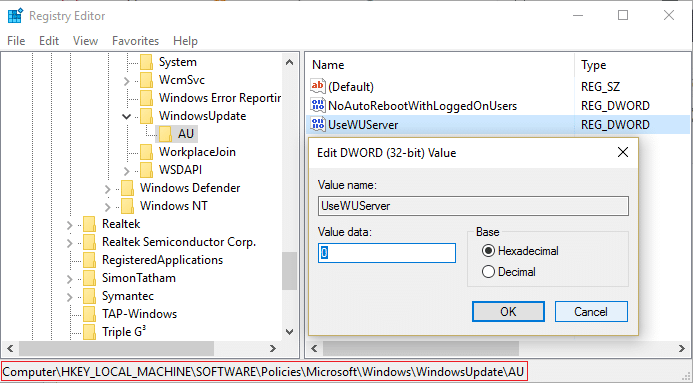
3. Make sure to select AU than in the right window pane double click on UseWUServer DWORD.
Նշում: If you can’t find the above DWORD then you need to create it manually. Right-click on AU then select Նոր > DWORD (32-բիթ) արժեք. Name this key as UseWUServer- ը եւ հարվածել Enter:
4. Now, in the Value data field, enter 0 և կտտացրեք OK- ին:
5. Վերագործարկեք ձեր համակարգիչը՝ փոփոխությունները պահպանելու համար:
Մեթոդ 7. Օգտագործեք Google DNS
You can use Google’s DNS instead of the default DNS set by your Internet Service Provider or the network adapter manufacturer. This will ensure that the DNS your browser is using has nothing to do with the YouTube video not loading. To do so,
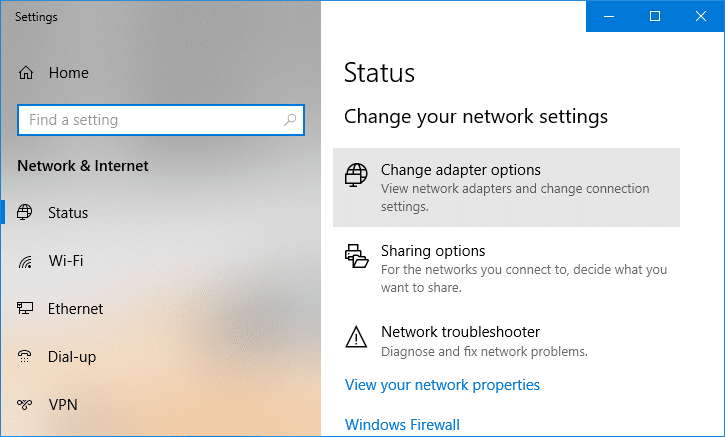
1. Աջ - կտտացրեք մասին network (LAN) icon աջի վերջում taskbar- ըեւ սեղմեք Բացեք Ցանցի և ինտերնետի կարգավորումները:
![]()
2. Մեջ Կառավարում app that opens, click on Փոփոխության ադապտեր ընտրանքներ ճիշտ պատուհանում:
3. Աջ - կտտացրեք on the network you want to configure, and click on Հատկություններ:

4. Սեղմիր Internet Protocol Version 4 (IPv4) in the list and then click on Հատկություններ:
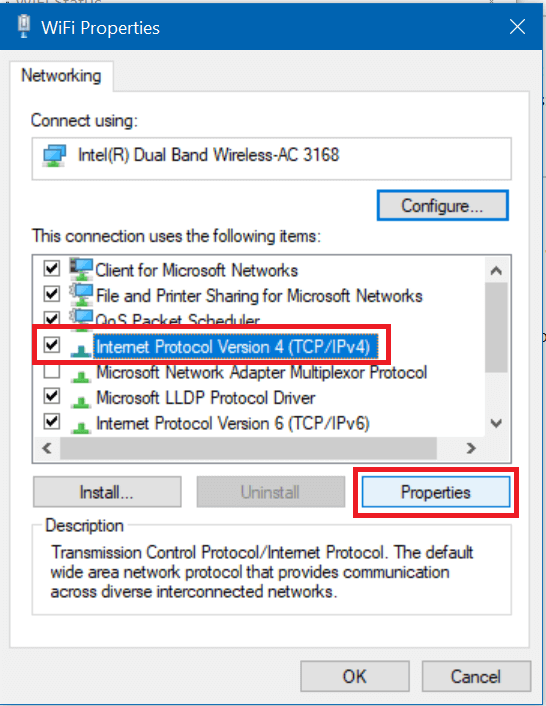
Նաեւ Կարդալ: Fix Your DNS Server might be unavailable error
5. Under the General tab, choose ‘Օգտագործեք հետեւյալ DNS սերվերի հասցեները’ and put the following DNS addresses.
Նախընտրելի DNS սերվեր՝ 8.8.8.8
Այլընտրանքային DNS սերվեր՝ 8.8.4.4
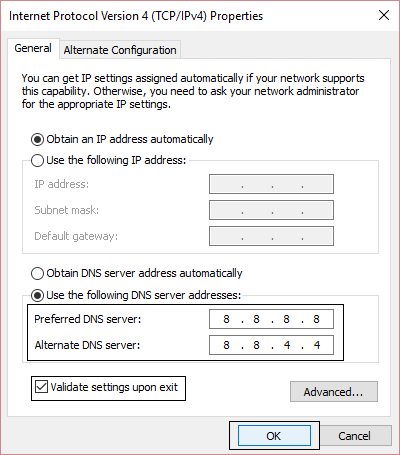
6. Վերջապես սեղմեք OK at the bottom of the window to save changes.
7. Reboot your PC and once the system restart, see if you’re able to Fix Windows Updates Error 0x8024401c.
Մեթոդ 8. Կատարել մաքուր կոշիկներ
Sometimes 3rd party software can conflict with Windows and can cause Windows Update error. To Fix Windows Updates Error 0x8024401c, you need to perform a clean boot on your PC and diagnose the issue step by step.

Խորհուրդ է տրվում:
Դա այն է, ինչ դուք հաջողությամբ ունեք Fix Windows Updates Error 0x8024401c բայց եթե դեռ հարցեր ունեք այս ուղեցույցի հետ կապված, ապա ազատ զգալ հարցրեք դրանք մեկնաբանությունների բաժնում: