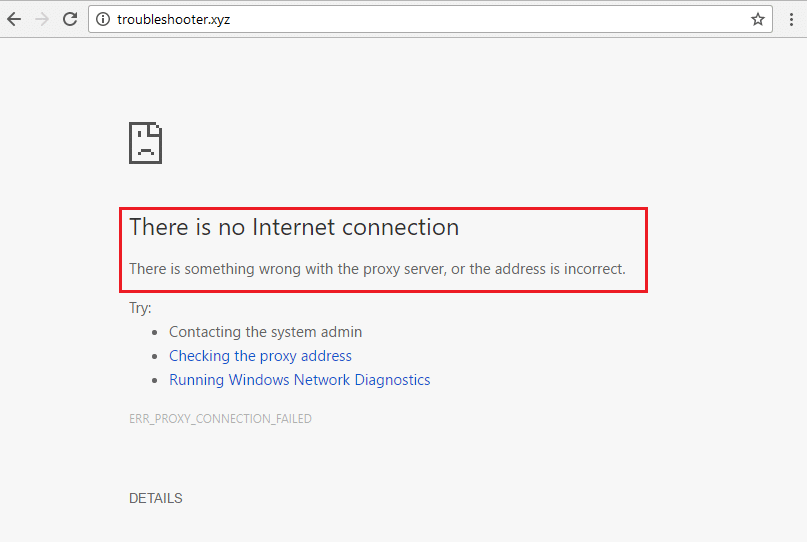
Lagfæring Það er engin nettenging, eitthvað fór úrskeiðis með proxy-þjóninum

Internet connectivity issues in Google Chrome and other browsers too are becoming common these days. Even when the users have not set up any proxy or have not configured manual proxy settings, the internet will suddenly break down and chrome will show that there is no internet connection with the error message “There is something wrong with your proxy server or the address is incorrect“. Unless you are addicted to the Dinosaur Dash game, which you can play when the Google Chrome Browser is offline, this is not a pleasing sign at all!
What to do then? We can start by looking at what might have caused the problem. It might be your new antivirus software or internet firewall, or badly behaving web browser extensions or plugins. Or, your device might be affected by one of the malware or virus infected programs you just installed.
Once you pinpoint the problem, then it becomes easier to fix. So, let’s check some of the most common and known issues that can cause this issue and what you can try and do to fix it quickly as well as with minimum prior knowledge required.
Lagfæring Það er engin nettenging, eitthvað fór úrskeiðis með proxy-þjóninum
In this article, we have listed the cause & fixes to the “There is no internet connection” error as well as web browser-related settings that you can use to fix the issue yourselves. Depending on the signs like which applications are affected by this error and if the effect is system-wide, you can rule down some of these methods to save time.
Aðferð 1: Slökktu á proxy
If the user does not explicitly configure these settings, proxy settings are set by default to be automatically detected and configured and should not give any issues. But some applications or VPN programs can cause incorrect configurations and change these settings. Here’s what you need to do to restore the automatic proxy settings:
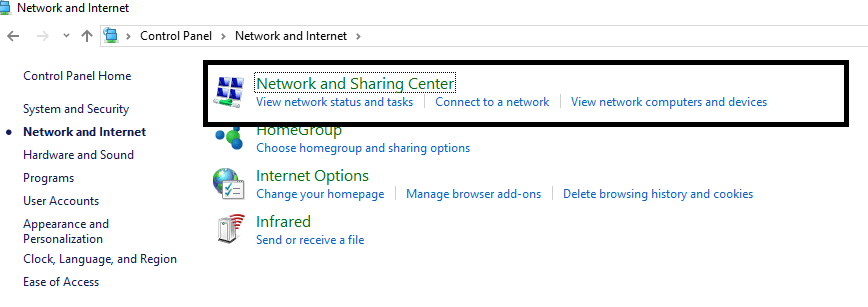
1. Open the control panel. Type Stjórnborð í Windows Search which can be accessed pressing Windows Key + S combination. Click and open the Control Panel app from the search results.

2. In the control panel, go to Network & Sharing center.
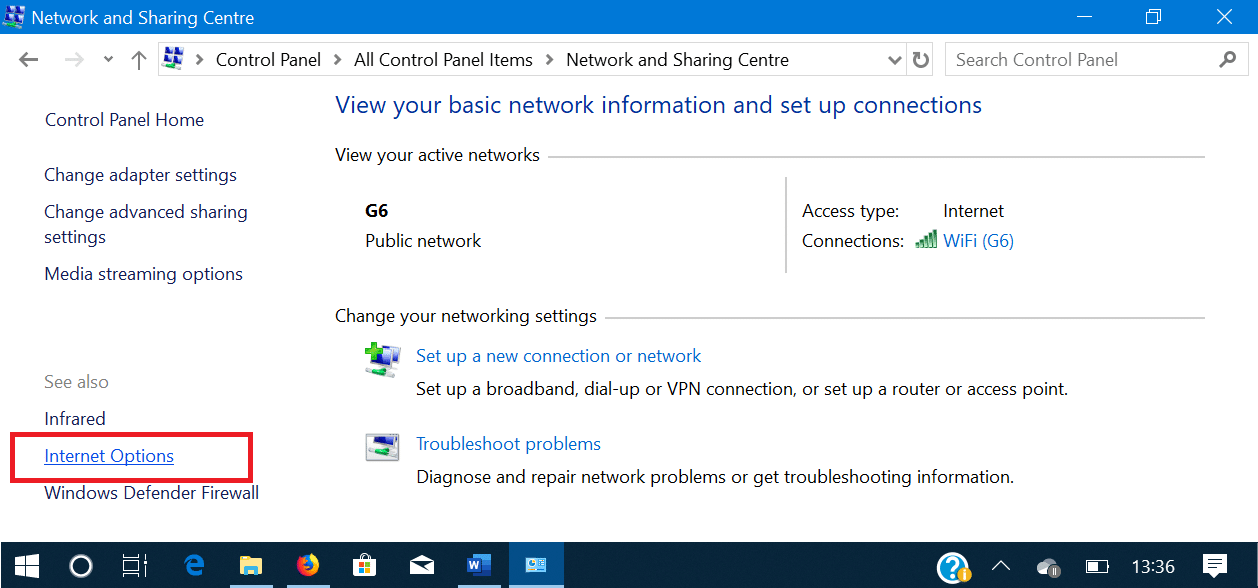
3. Smelltu á Internet Options from the bottom left corner of the Control Panel Window.
4. Go to the tab labeled Tengingar, then click on the button labeled LAN stillingar.
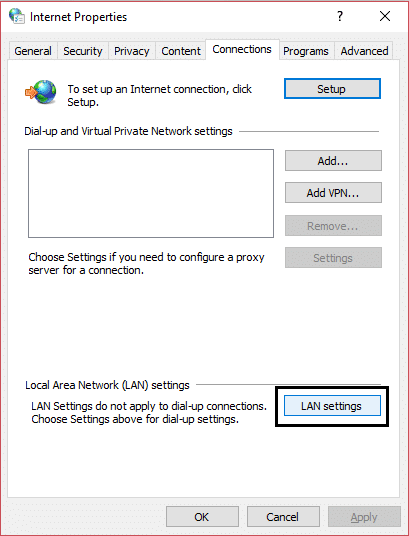
5. Merktu við reitinn við hliðina á Greina stillingar sjálfkrafa og uncheck other boxes. Smelltu á OK button and then close all the open windows.
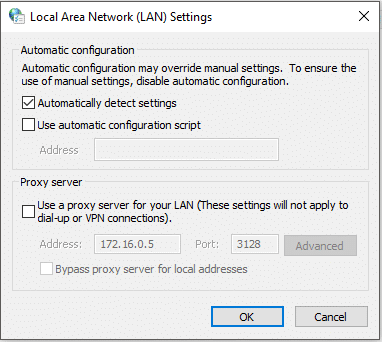
6. Endurræstu tölvuna þína og athugaðu hvort þú getir það fix There is no internet connection error.
If you still experience problems, follow steps 1 through 7 to see if the settings have changed back to what they were before. If they switch back on their own, you may have an application installed or running that changes them. In this case, here are some options.
If after the restart the proxy settings change automatically or they switch back on their own then a third-party applica
tion might be interfering with the proxy settings. In this case, you need to start your PC into safe mode then navigate to Control Panel > Programs > Programs and Features. Now uninstall any third-party app which you found suspicious or you have recently installed. Next, again change the proxy settings by following the above method and restart your PC normally.
Einnig lesið: 5 Netflix proxy uppgötvaði villuleiðréttingu
Method 2: Disable Proxy Settings via Registry
If you’re unable to disable proxy using the above method then you can uncheck proxy via Registry Editor using the below steps:
1. Ýttu á Windows Key + R og sláðu síðan inn ríkisstjóratíð og ýttu á Enter til að opna Registry Editor.

2. Farðu í eftirfarandi skrásetningarlykil:
ComputerHKEY_CURRENT_USERSoftwareMicrosoftWindowsCurrentVersionInternet Settings
3. Now in the right window pane right-click on ProxyEnable DWORD og velja Eyða.
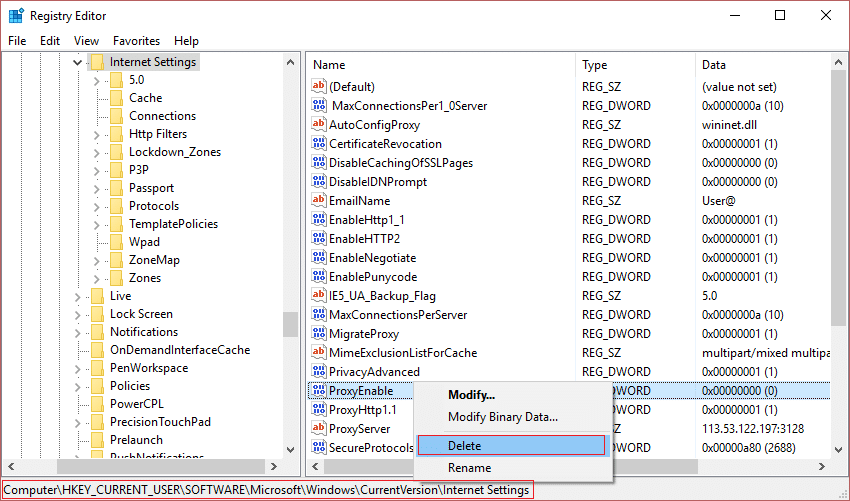
4. Similarly also delete the following keys ProxyServer, Migrate Proxy, and Proxy Override.
5. Reboot your PC normally to save changes and see if you are able to fix something went wrong with the proxy server error.
Method 3: Disable VPN/Antivirus Program
You can easily disable your VPN or Antivirus program, but sometimes it also depends on which type of VPN you are currently using. Some VPNs are installed on their PC using an installer whereas others are browser-based plugins.
The basic principle is to either turn off the firewall/proxy settings from the Antivirus program or disable the VPN. Open the antivirus program, go to its Settings, and disable the Antivirus & turn off the firewall. You may also uninstall the antivirus program altogether if you find it tricky to configure. Being on Windows 10, Windows Defender Security measures are always there even though there is no antivirus program installed.
1. Hægri smelltu á Tákn fyrir vírusvarnarforrit úr kerfisbakkanum og veldu Slökkva.

2. Next, select the time frame for which the Vírusvörn verður áfram óvirk.

Athugið: Veldu minnsta tíma sem hægt er, til dæmis 15 mínútur eða 30 mínútur.
3. Once done, again try to connect to the WiFi network and check if you’re able to fix there is no internet connection, something went wrong with the proxy server error.
Most of the VPN programs have an icon in the system tray (while they are running), just click on its icon and turn off the VPN. If there is a browser plugin for VPN active, you can go to the browser’s addon page and uninstall it.
Einnig lesið: Hvernig á að laga proxy-þjónninn svarar ekki
If this does not solve your problem of not being able to access the internet because of some proxy misconfiguration, then continue with the next method.
Method 4: Reset Google Chrome to Default
If the problem exists only in the Google Chrome Browser and on another browser such as Mozilla Firefox you’re able to access the internet, then the issue is with Chrome. Firefox may still be able to connect to the internet even in case of system-wide wrong proxy settings because it can override the proxy settings. So make sure Microsft Edge/Internet Explorer or any other web browsers work fine, and then only reset Google Chrome to fix the issue.
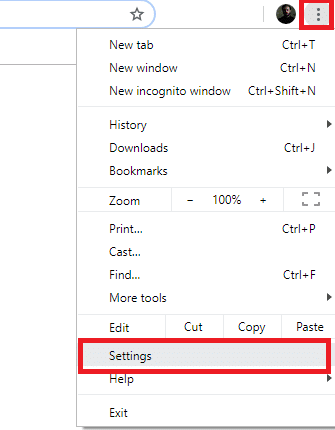
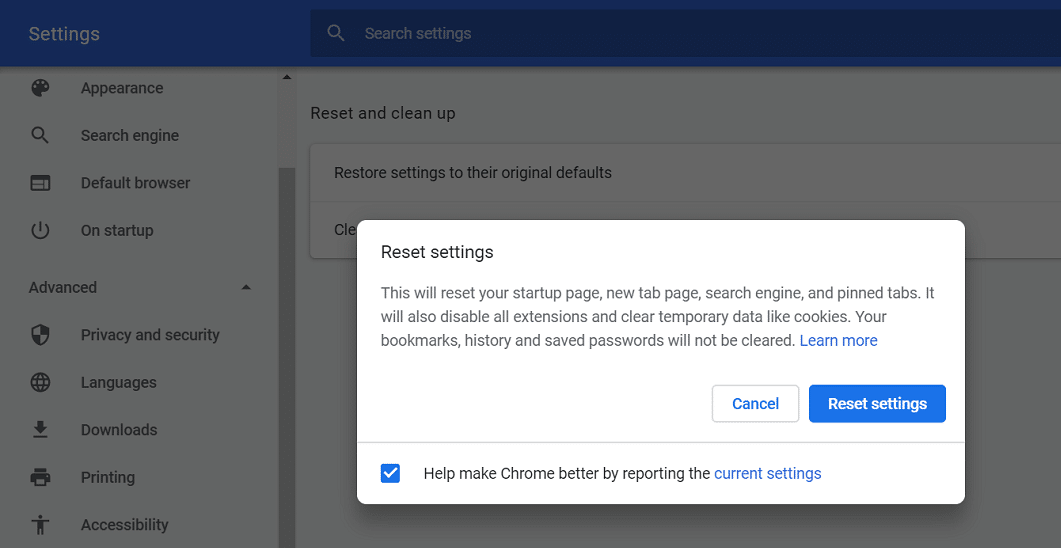
1. Opna Google Króm og smelltu á þrír lóðréttir punktar in the top right corner, then select the Stillingar valkostur.
2. Smelltu á Ítarlegar stillingar option in the left navigation pane. In the list that collapses, choose the option labeled Reset & Clean-Up. Then select the option Restore settings to their original defaults.
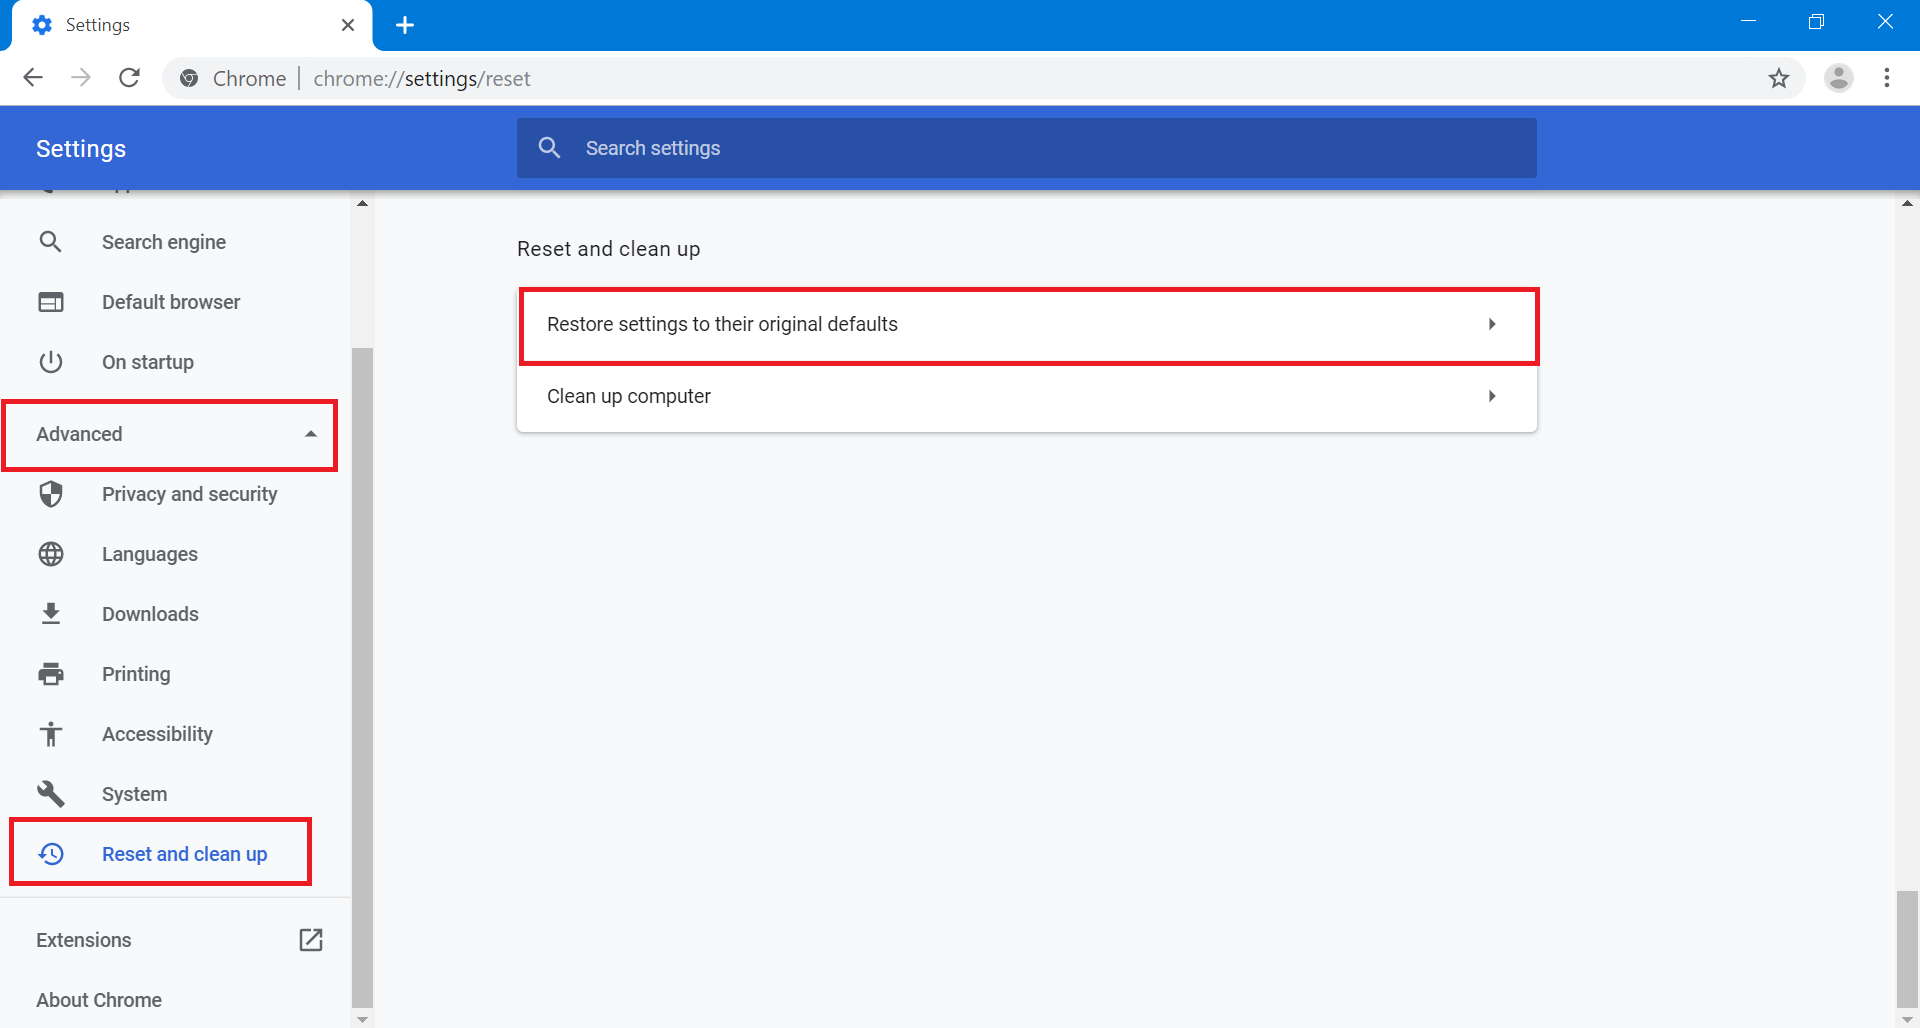
3. Í pop-up box that appears, select Núllstilla stillingar to clear all the saved cookies, cache data, and other temporary files.
Method 5: Re-install Google Chrome
If the above method doesn’t work for you and the issue still persists on the Chrome Browser, then there is only one thing left to try. You have to uninstall Google Chrome and reinstall it again.
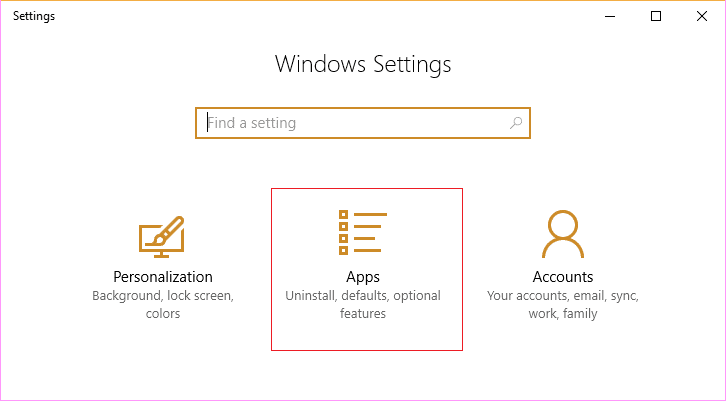
1. opna Stillingar app in Windows 10. Use the Windows Key+S key combination shortcut to do so quickly. Go to Forrit.
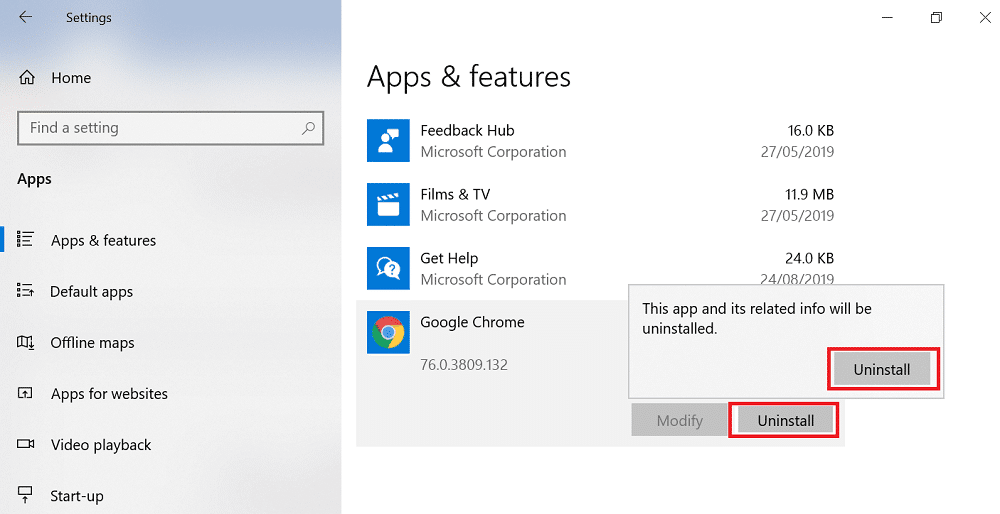
2. Scroll down the list of applications and features to find Google Chrome. Smelltu á Uninstall button at the right-hand side of the application name then again click on the Fjarlægja hnappinn in the popup box when prompted.
3. Heimsókn google.com/chrome og smelltu á Sæktu Chrome button to download the latest version of Chrome Installer.

4. Keyrðu niðurhalaða uppsetningarforritið. It will download the necessary files and install chrome on your machine.
Einnig lesið: 10 Ways To Fix Slow Page Loading In Google Chrome
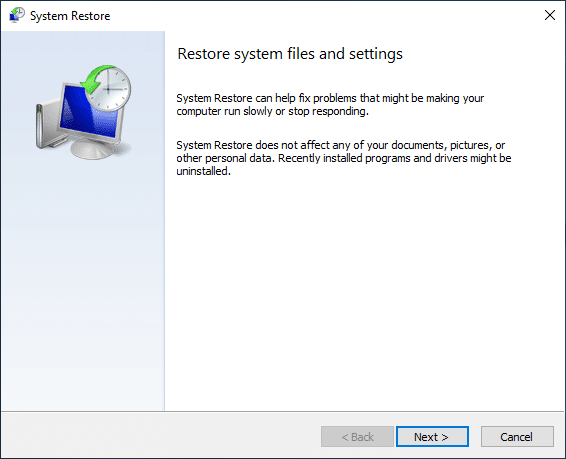
Aðferð 6: Framkvæmdu System Restore
If you’re still facing the “There is no internet connection” error then the final recommendation would be restoring your PC to an earlier working configuration. Using System Restore you can revert all your current configuration of the system to an earlier time when the system was working correctly. However, you need to make sure that you have at least one system restore point otherwise you cannot restore your device. Now if you have a restore point then it will bring your system to the previous working condition without affecting your stored data.
1. Gerð stjórn in Windows Search then click on the “Stjórnborð” shortcut from the search result.

2. Switch the ‘Skoða eftir’ mode to ‘Lítil tákn'.
![]()
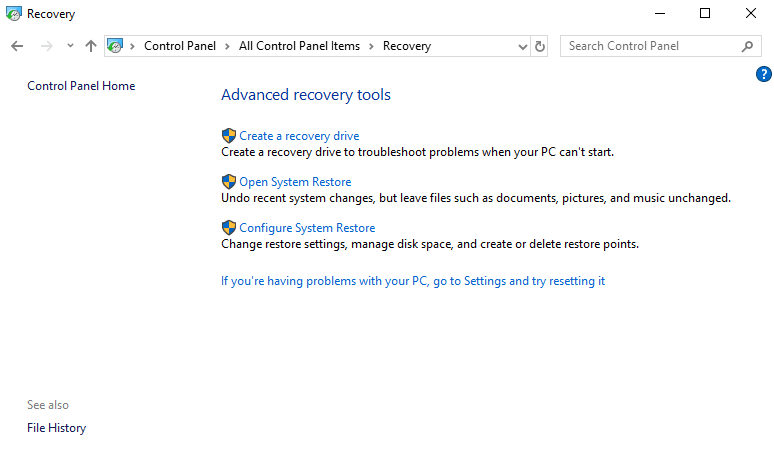
3. Smelltu á 'Recovery'.
4. Smelltu á 'Opnaðu System Restore’ to undo recent system changes. Follow all the steps needed.
5. Now from the Endurheimtu kerfisskrár og stillingar window click on Next.
6. Veldu endurheimtapunktur and make sure this restore point is created before you were facing “There is no internet connection, something went wrong with the proxy server” issue.
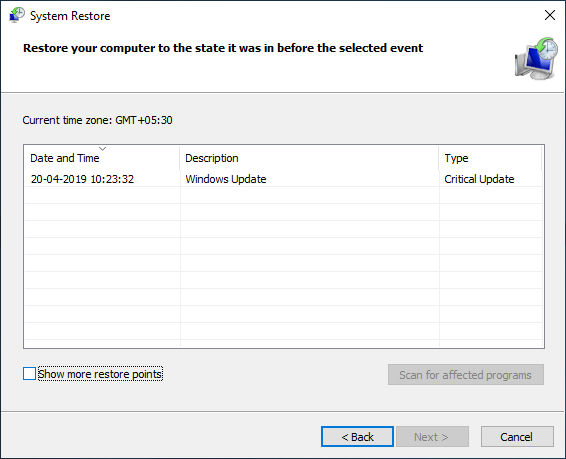
7. If you can’t find old restore points then gátmerki "Sýna fleiri endurheimta stig” and then select the restore point.
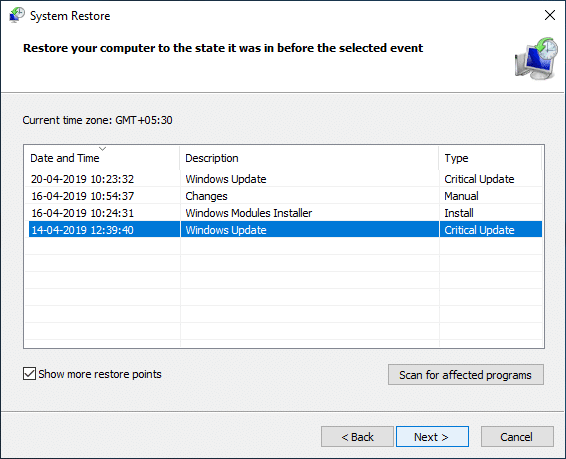
8. smellur Næstu and then review all the settings you configured.
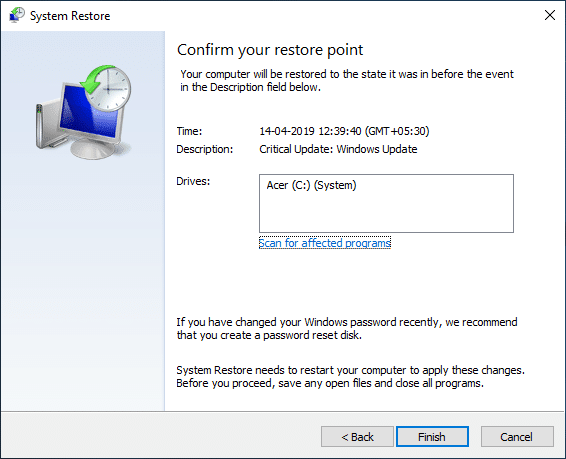
9. Smelltu að lokum Ljúka til að hefja endurheimtunarferlið.
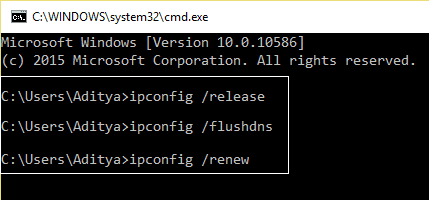
Method 7: Reset Network Configuration
1. Open elevated Command Prompt using any one of the methods listed here.

2. Sláðu nú inn eftirfarandi skipun og ýttu á Enter eftir hverja:
ipconfig / release
ipconfig / flushdns
ipconfig / endurnýja
3. Again open Admin Command Prompt and type the following and hit enter after each one:
ipconfig / flushdns
nbtstat –r
netsh INT IP endurstilla
netsh WinSock endurstilla
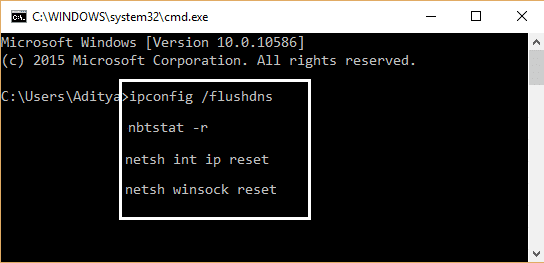
4. Endurræstu til að beita breytingum. Það virðist vera að skola DNS fix There is no internet connection error.
Method 8: Reset Windows 10
If any of these fixes did not work for you, or if the problem is not limited to Google Chrome and you can’t fix it, you can try resetting your PC.
Resetting your PC might also help in the cases where a suspicious application or malware has been automatically resetting your proxy settings to some invalid configuration to prevent you from accessing the internet. All your files on the drives other than the Windows drive itself will not be deleted. However, data on the Windows Drive as well as installed applications along with their settings will be lost. So make sure you create a backup of everything before resetting your PC.
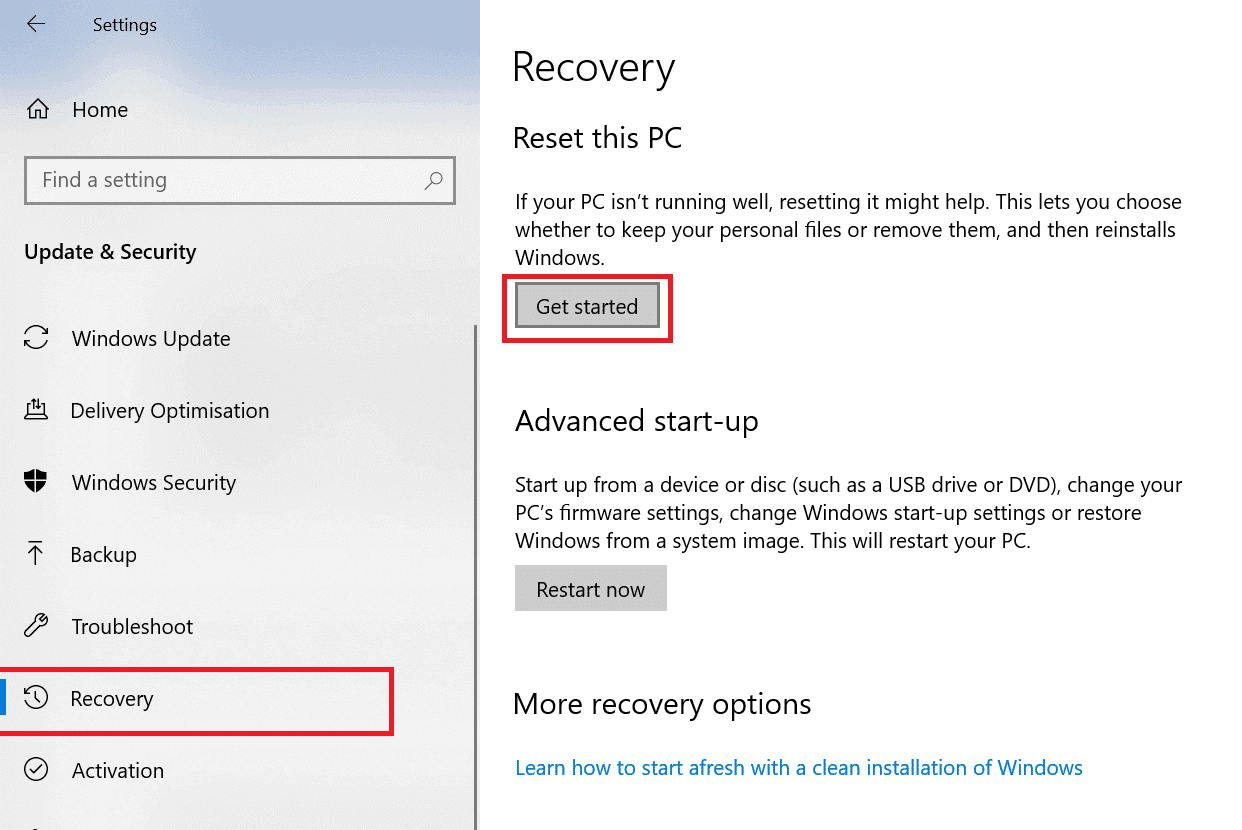
1. Ýttu á Windows takkann + I til að opna Stillingar og smelltu síðan á Uppfærsla og öryggi.
![]()
2. In the left navigation pane, choose Recovery og smelltu síðan á Byrjaðu hnappur undir Reset this PC section.
3. Veldu valkostinn til að Halda skrám mínum.

4. Fyrir næsta skref gætirðu verið beðinn um að setja inn Windows 10 uppsetningarmiðil, svo vertu viss um að þú hafir hann tilbúinn.
5. Veldu nú þína útgáfu af Windows og smelltu aðeins á drifinu þar sem Windows er uppsett > Fjarlægðu bara skrárnar mínar.

6. Smelltu á Endurstilla hnappinn.
7. Fylgdu leiðbeiningunum á skjánum til að ljúka endurstillingunni.
8. Once you complete the resetting process, try connecting to the internet again.
Einnig lesið: Hvernig á að endurstilla lykilorðið þitt í Windows 10
“There is no internet connection” error because of some wrong configuration of proxy is not suitable for anyone. It kills the purpose of having a device with everything but no internet connection. As we have discussed, the error shown on Google Chrome about being unable to connect to the internet because of some incorrect proxy settings is just the Google Chrome internal settings error, or it may be system-wide.
Even though it is not rare to find oneself in such a situation without tampering with any settings before this issue, it is more probable that a virus or some form of malware has caused this issue. The virus can penetrate a system through a downloaded installation file which did not come from a reliable source or an infected email. Even a secure looking pdf can be the source of the virus. In such cases, it is advised to first remove malware from Windows 10 and if that didn’t work then try to reset the system itself.
Plugins that contain malware or too many advertisements can be a sign of such a threat. So make sure you install plugins that were developed by some renowned developer and always check the user ratings before installing any application or a browser plugin.