Fix Windows 10 install Fails With Error C1900101-4000D

Fix Windows 10 install Fails With Error C1900101-4000D: If you’re trying to upgrade to Windows 10 but the install fails with error code C1900101-4000D then don’t worry as it occurs because the Windows installer cannot access important files required for installation. Sometimes this error is also caused because of a conflict during installation but you can’t be sure as there is no error message accompanying this error.
0xC1900101-0x4000D
The installation failed in the SECOND_BOOT phase with an error during MIGRATE_DATA operation
While there is no definite fix for this issue but users seem to be recommending a clean installation of Windows 10 which should only be used as a last resort. So without wasting any time let’s see How to Fix Windows 10 install Fails With Error C1900101-4000D with the help of below-listed troubleshooting guide.
Fix Windows 10 install Fails With Error C1900101-4000D
Forkröfur
a)Make sure to Update all drivers, including graphic, sound, BIOS, USB devices, printers, etc before the installing Windows 10.
b)Remove all external USB devices such as pen drive, external hard disk, USB keyboard & mouse, USB printer and all peripherals.
c)Use an ethernet cable instead of WiFi and disable WiFi until the update is complete.
Method 1: Temporarily Disable Antivirus and Firewall before attempting Upgrade
1.Hægri-smelltu á Tákn fyrir vírusvarnarforrit úr kerfisbakkanum og veldu Slökkva.

2.Næst, veldu þann tímaramma sem Vírusvörn verður áfram óvirk.

Athugaðu: Veldu minnsta tíma sem hægt er, til dæmis 15 mínútur eða 30 mínútur.
3.Once done, again try to upgrade your PC and check if the error resolves or not.
4.Type control in the Windows Search then click on Stjórnborð úr leitarniðurstöðunni.

5.Næst, smelltu á Kerfi og öryggi.
6.Smelltu síðan á Windows eldveggur.

7.Nú smelltu á vinstri gluggarúðuna Kveiktu eða slökktu á Windows Firewall.

8.Veldu Slökkva á Windows eldvegg og endurræstu tölvuna þína. Again try to upgrade your PC and see if you’re able to Fix Windows 10 install Fails With Error C1900101-4000D.
Ef ofangreind aðferð virkar ekki vertu viss um að fylgja nákvæmlega sömu skrefum til að kveikja aftur á eldveggnum þínum.
Method 2: Remove any hyphens from your computer or machine name
1. Ýttu á Windows takkann + R og sláðu síðan inn sysdm.cpl og ýttu á Enter til að opna Kerfiseiginleikar.

2.Make sure you’re under Tölvuheiti flipinn smelltu síðan á Breyta hnappur neðst.
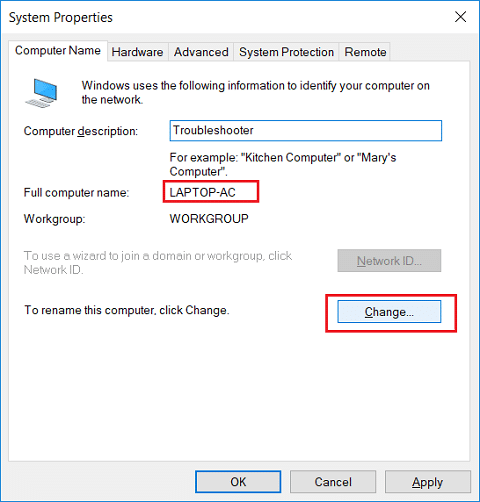
3.Make sure your machine name is simple no periods or hyphens or dashes.
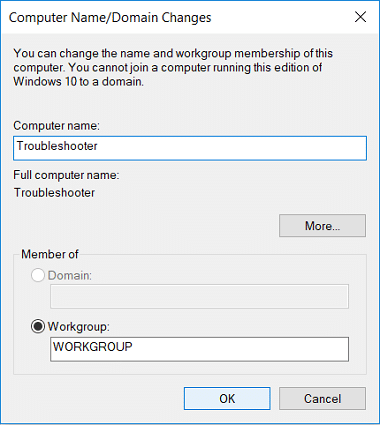
4.Click OK then Apply followed by OK.
5.Endurræstu tölvuna þína til að vista breytingar.
Aðferð 3: Gakktu úr skugga um að Windows sé uppfært
1. Ýttu á Windows Key + I og veldu síðan Uppfærsla og öryggi.

2.Næst, smelltu aftur Athugaðu með uppfærslur og vertu viss um að setja upp allar uppfærslur sem bíða.

3.Eftir að uppfærslurnar hafa verið settar upp endurræstu tölvuna þína og athugaðu hvort þú getir það Fix Windows 10 install Fails With Error C1900101-4000D.
Aðferð 4: Framkvæmdu hreint ræsi
This would make sure that if any 3rd party application is conflicting with Windows update then you will be able to successfully install Windows Updates inside Clean Boot. Sometimes 3rd party software can conflict with Windows Update and therefore cause Windows Update to be Stuck. In order, Fix Windows 10 install Fails With Error C1900101-4000D, þú þarft að framkvæma hreina ræsingu á tölvunni þinni og greina vandamálið skref fyrir skref.

Method 5: Upgrade using Windows 10 Media Creation Tool
1.Download Media Creation Tool here.
2.Backup your data from system partition and save your license key.
3.Start the tool and choose to Upgrade this PC now.
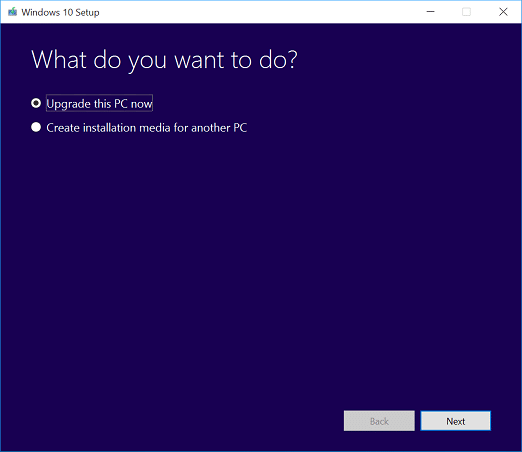
4.Accept the license terms.
5.After the installer is ready, choose to Keep personal files and apps.
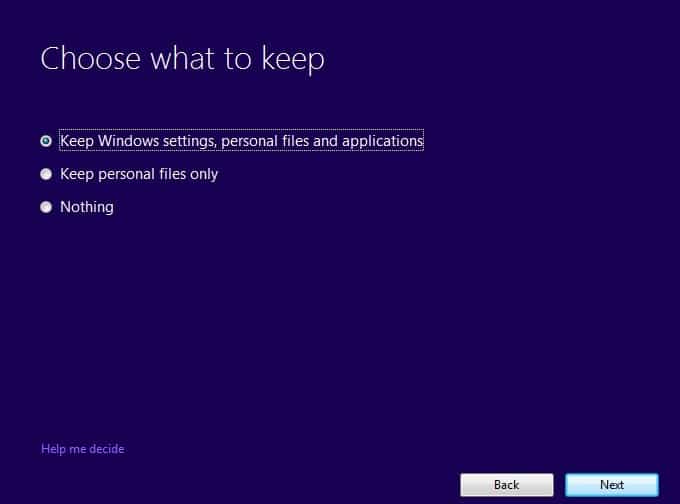
6.The PC will restart few times and your PC would be successfully upgraded.
Aðferð 6: Keyra SFC og DISM
1.Ýttu á Windows Key + X og smelltu síðan á Skipunarlína (Admin).

2.Sláðu nú inn eftirfarandi í cmd og ýttu á enter:
Sfc /scannow sfc /scannow /offbootdir=c: /offwindir=c:windows (Ef að ofan mistekst þá skaltu prófa þetta)

3.Bíddu eftir að ferlinu hér að ofan lýkur og endurræstu tölvuna þegar því er lokið.
4. Aftur opnaðu cmd og sláðu inn eftirfarandi skipun og ýttu á enter eftir hverja og eina:
a) Dism /Online /Cleanup-Image /CheckHealth b) Dism /Online /Cleanup-Image /ScanHealth c) Dism /Online /Cleanup-Image /RestoreHealth

5.Láttu DISM skipunina keyra og bíddu eftir að henni ljúki.
6. Ef ofangreind skipun virkar ekki, reyndu þá eftirfarandi:
Dism /Mynd:C:offline /Cleanup-Image /RestoreHealth /Source:c:testmountwindows Dism /Online /Cleanup-Image /RestoreHealth /Source:c:testmountwindows /LimitAccess
Athugaðu: Skiptu um C:RepairSourceWindows fyrir staðsetningu viðgerðaruppsprettunnar (Windows uppsetningar- eða endurheimtardiskur).
7.Endurræstu tölvuna þína til að vista breytingar og athugaðu hvort þú getir það Fix Windows 10 install Fails With Error C1900101-4000D.
Method 7: Reset Windows Updates Components
1. Ýttu á Windows takkann + X og veldu síðan Stjórn hvetja (Admin).
2.Sláðu nú inn eftirfarandi skipanir til að stöðva Windows Update Services og ýttu síðan á Enter eftir hverja eina:
net stop wuauserv
net stop cryptSvc
net stopp bitar
net stop msiserver

3. Næst skaltu slá inn eftirfarandi skipun til að endurnefna SoftwareDistribution Folder og ýta síðan á Enter:
renna C: WindowsSoftwareDistribution SoftwareDistribution.old
ren C: WindowsSystem32catroot2 catroot2.old

4. Að lokum skaltu slá inn eftirfarandi skipun til að ræsa Windows Update Services og ýta á Enter eftir hverja eina:
nettó byrjun wuauserv
nettó byrjun cryptSvc
nettó byrjun bits
nettó byrja msiserver

5.Endurræstu tölvuna þína til að vista breytingar og athuga hvort þú getir það Fix Windows 10 install Fails With Error C1900101-4000D.
Method 8: Delete Registry for Mounted Images
1. Ýttu á Windows takkann + R og sláðu síðan inn ríkisstjóratíð og ýttu á Enter til að opna Registry Editor.

2. Farðu í eftirfarandi skrásetningarlykil:
HKEY_LOCAL_MACHINESOFTWAREMicrosoftWIMMountMounted Images
3. Veldu Mounted Images then in the right window pane right-click on (Default) and select Delete.
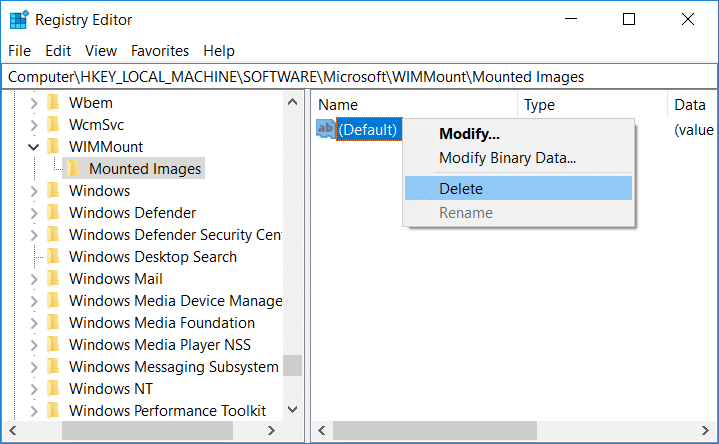
4.Hættu Registry Editor og endurræstu tölvuna þína til að vista breytingar.
Method 9: Disable Wi-Fi Adapter and CD/DVD Drive
1. Ýttu á Windows takkann + R og sláðu síðan inn devmgmt.msc og ýttu á Enter til að opna Device Manager.

2.Expand DVD/CD-ROM drives, hægrismelltu síðan á þinn CD/DVD drif og velja Slökkva á tæki.

3.Similarly, expand Network adapters then right-click on your WiFi millistykki og veldu Slökkva á tæki.
4.Again try to run Windows 10 setup and see if you’re able to Fix Windows 10 install Fails With Error C1900101-4000D.
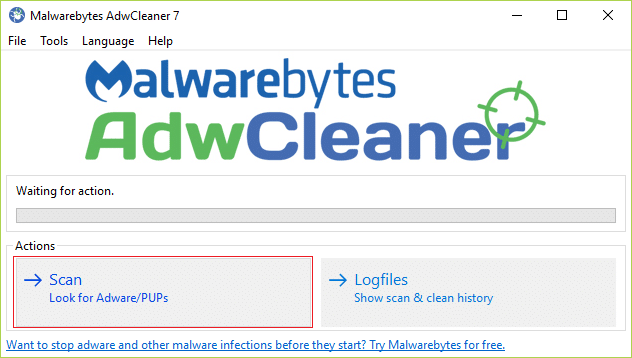
Method 10: Run Malwarebytes and AdwCleaner
Malwarebytes is a powerful on-demand scanner which should remove browser hijackers, adware and other types of malware from your PC. It is important to note that Malwarebytes will run alongside antivirus software without conflicts. To install and run Malwarebytes Anti-Malware, go to this article and follow each and every step.
1.Download AdwCleaner from this link.
2.Once the download is complete, double-click on the adwcleaner.exe file til að keyra forritið.
3. Smelltu á “ég er sammála”Hnappinn til accept the license agreement.
4.On the next screen, click the Skannahnappur under Actions.
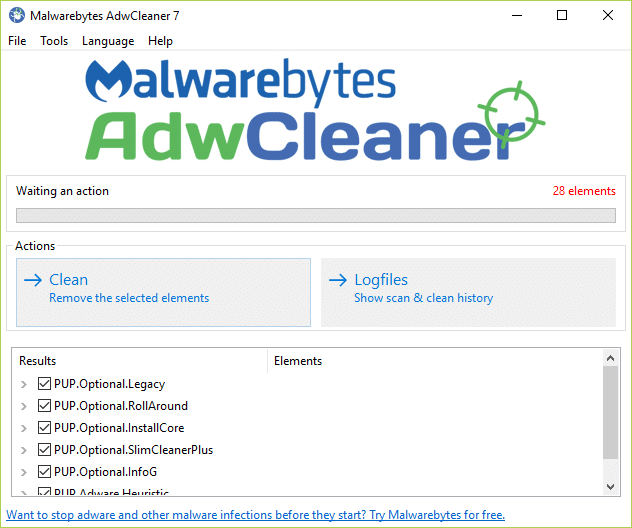
5.Now, wait for the AdwCleaner to search for PUPs and other malicious programs.
6.Once the scan is complete, click Hreint in order to clean your system of such files.
7.Save any work you might be doing as your PC will need to reboot, click OK to reboot your PC.
8.Once the computer reboots, a log file will open which will list all of the files, folders, registry keys, etc that were removed in the previous step.
Mælt með:
Það er það sem þú hefur með góðum árangri Fix Windows 10 install Fails With Error C1900101-4000D en ef þú hefur enn einhverjar spurningar varðandi þessa handbók skaltu ekki hika við að spyrja þær í athugasemdahlutanum.